

Hi Joel,
I'm having difficulty finding pipe cleaners to use to scrub out my airbrush, I'm only coming across cheap, brightly-colored arts and crafts ones. Am I actually looking for legitimate, tobacco store quality pipe cleaners, or are arts and crafts style ones ok?
Start Here (for Beginners)
This forum is for younger modelers or people just starting out in the hobby.
This forum is for younger modelers or people just starting out in the hobby.
Hosted by Jim Starkweather
Airbrush Woes

FinneganBojangles

Joined: May 01, 2013
KitMaker: 60 posts
AeroScale: 56 posts
Posted: Tuesday, November 05, 2013 - 02:47 AM UTC
Joel_W
Joined: December 04, 2010
KitMaker: 11,666 posts
AeroScale: 7,410 posts
Posted: Tuesday, November 05, 2013 - 05:03 AM UTC
Quoted Text
Hi Joel,
I'm having difficulty finding pipe cleaners to use to scrub out my airbrush, I'm only coming across cheap, brightly-colored arts and crafts ones. Am I actually looking for legitimate, tobacco store quality pipe cleaners, or are arts and crafts style ones ok?
Kevin,
You live in NJ, so you must have some Tobacco shops locally. Also try Walmart, K-Mart, and even Michaels. I use the ones that come in a Yellow cardboard package. Been using them for literally the last 40 years. They're the thinnest ones I've found.
Don't use the one colored ones, or the stiff bristle ones. I'm not sure if the color will bleed from the lacquer thinner or not.
Also, cut them in half, and you double the qty per package.
Joel


Emeritus

Joined: March 30, 2004
KitMaker: 2,845 posts
AeroScale: 1,564 posts

Posted: Tuesday, November 05, 2013 - 06:46 AM UTC
Interdental brushes work too, although I'd guess they probably cost more than pipe cleaners. I got a pack of 12 and they seem to last quite a long time, though. I think just about any pharmacy should have them.
Robbd01

#323
Joined: February 13, 2013
KitMaker: 791 posts
AeroScale: 213 posts

Posted: Tuesday, November 05, 2013 - 07:13 AM UTC
My solution to cleaning dirty AB's. Get a sonic cleaner for jewelery and fill it with water. Get a glass jar and fill it with lacquer thinner. Put the AB parts in the jar (in this case I have the parts and the business end of one of my AB's). Set the timer (mine maxes out just under 4min). Voila a clean AB. 

Cheers


Cheers

Joel_W
Joined: December 04, 2010
KitMaker: 11,666 posts
AeroScale: 7,410 posts
Posted: Tuesday, November 05, 2013 - 08:59 AM UTC
Robbie, A Sonic jewelry cleaner certainly would do the job. Cost, time to setup, clean/dry, and put away, are all issues that each of us would have to come to terms with if one decided to go that route. I'm just basically lazy, kind of cheap, and definitely set in my ways.
I can remove the paint cup, needle & cone, clean, dry, and reinstall in less then 5 min.
Using the Sonic jewelry cleaner, I would gather that you still have to dry the parts with a pipe cleaner and a Qtip. It would also cause me to have 2nd thoughts to air brush a few small parts.
Joel
I can remove the paint cup, needle & cone, clean, dry, and reinstall in less then 5 min.
Using the Sonic jewelry cleaner, I would gather that you still have to dry the parts with a pipe cleaner and a Qtip. It would also cause me to have 2nd thoughts to air brush a few small parts.
Joel
Robbd01
#323
Joined: February 13, 2013
KitMaker: 791 posts
AeroScale: 213 posts
Posted: Tuesday, November 05, 2013 - 11:21 AM UTC
Quoted Text
Robbie, A Sonic jewelry cleaner certainly would do the job. Cost, time to setup, clean/dry, and put away, are all issues that each of us would have to come to terms with if one decided to go that route. I'm just basically lazy, kind of cheap, and definitely set in my ways.
I can remove the paint cup, needle & cone, clean, dry, and reinstall in less then 5 min.
Using the Sonic jewelry cleaner, I would gather that you still have to dry the parts with a pipe cleaner and a Qtip. It would also cause me to have 2nd thoughts to air brush a few small parts.
Joel
After decades of cleaning AB's, count me in on the lazy part.
 It is one of the reasons I got it. A paper towel and the cleaner is all I really need. Pull the parts wipe dry. Maybe blast some air to dry out the innards - done. Sometimes I will have up to 3 AB's going during them long painting sessions. Even if I need to do a quick session with one/two parts it is not bad for me. At least with it, I have stopped putting off painting which is one of the major causes of my projects languishing on the bench, shelf. I have even used it to fix neglected gunked up ones that sat for years/decades with dried up paint clogging up every orifice. For the 30 bucks I spent on this one 6 years ago, it has paid for itself (it was it or another kit). So I have one less kit in my stash... I will survive
 I have heard stories of some co-modelers 'borrowing' their wives/girl friend/significant other's jewelry cleaner - shhh

The one thing I must say I have done is cut down on the fumes/vapors especially using lacquer thinner. I am really no longer spraying thinner through the AB as much anymore. The only fumes I do get are when the cleaner is being used but it is not as bad. Yes I have a AB cleaning station to blast thinner into but still there is fumes. Of course with acrylics that is really not an issue so instead of tossing parts into the cup of thinner they just go into the water.
So the only AB woes I currently have is using Humbrol Acrylics.
Cheers
Joel_W
Joined: December 04, 2010
KitMaker: 11,666 posts
AeroScale: 7,410 posts
Posted: Tuesday, November 05, 2013 - 01:37 PM UTC
Robbie,
Just might have to rethink my position.
Joel
Just might have to rethink my position.
Joel

cinzano
Joined: January 13, 2009
KitMaker: 419 posts
AeroScale: 378 posts
Posted: Wednesday, November 06, 2013 - 07:14 AM UTC
Robbie,
That's brilliant! I just ordered a sonic cleaner last night. Thanks for the tip.
Oh as an aside: I found that Pinesol in a small jar is great for cleaning airbrush tips that are really fouled with acrylic enamels.
Cheers,
Fred
That's brilliant! I just ordered a sonic cleaner last night. Thanks for the tip.
Oh as an aside: I found that Pinesol in a small jar is great for cleaning airbrush tips that are really fouled with acrylic enamels.
Cheers,
Fred
Robbd01
#323
Joined: February 13, 2013
KitMaker: 791 posts
AeroScale: 213 posts
Posted: Wednesday, November 06, 2013 - 09:52 AM UTC
Quoted Text
Robbie,
That's brilliant! I just ordered a sonic cleaner last night. Thanks for the tip.
Oh as an aside: I found that Pinesol in a small jar is great for cleaning airbrush tips that are really fouled with acrylic enamels.
Cheers,
Fred
Here is the initial link that got me interested in ultrasonic cleaners.
http://www.cybermodeler.com/tips/tools_03.shtml
I want to make sure it was not just my idea. I slightly modified my cleaning procedures buy using a small jar to hold thinner/solvent instead of using ultrasonic cleaner and or other cleaning ideas mentioned in the article.
Let me know how your experience is when you try yours out Cinzano
Cheers
cinzano
Joined: January 13, 2009
KitMaker: 419 posts
AeroScale: 378 posts
Posted: Wednesday, November 13, 2013 - 03:01 AM UTC
Quoted Text
Let me know how your experience is when you try yours out Cinzano
Cheers
Works like a champ. Spent the morning cleaning, brushes, tips, jars etc...
I used to think my ABs were clean. I got so much gunk out of them its amazing!
Cheers,
Fred
FinneganBojangles
Joined: May 01, 2013
KitMaker: 60 posts
AeroScale: 56 posts
Posted: Tuesday, November 26, 2013 - 12:51 PM UTC
All right, yet another setback... the airbrush is CLEAN, I've soaked everything repeatedly in lacquer thinner, I bought a new #3 needle, went along with pretty much everything that was suggested in this thread. Finally gave it another go tonight, aaaaaaaand... this happened.
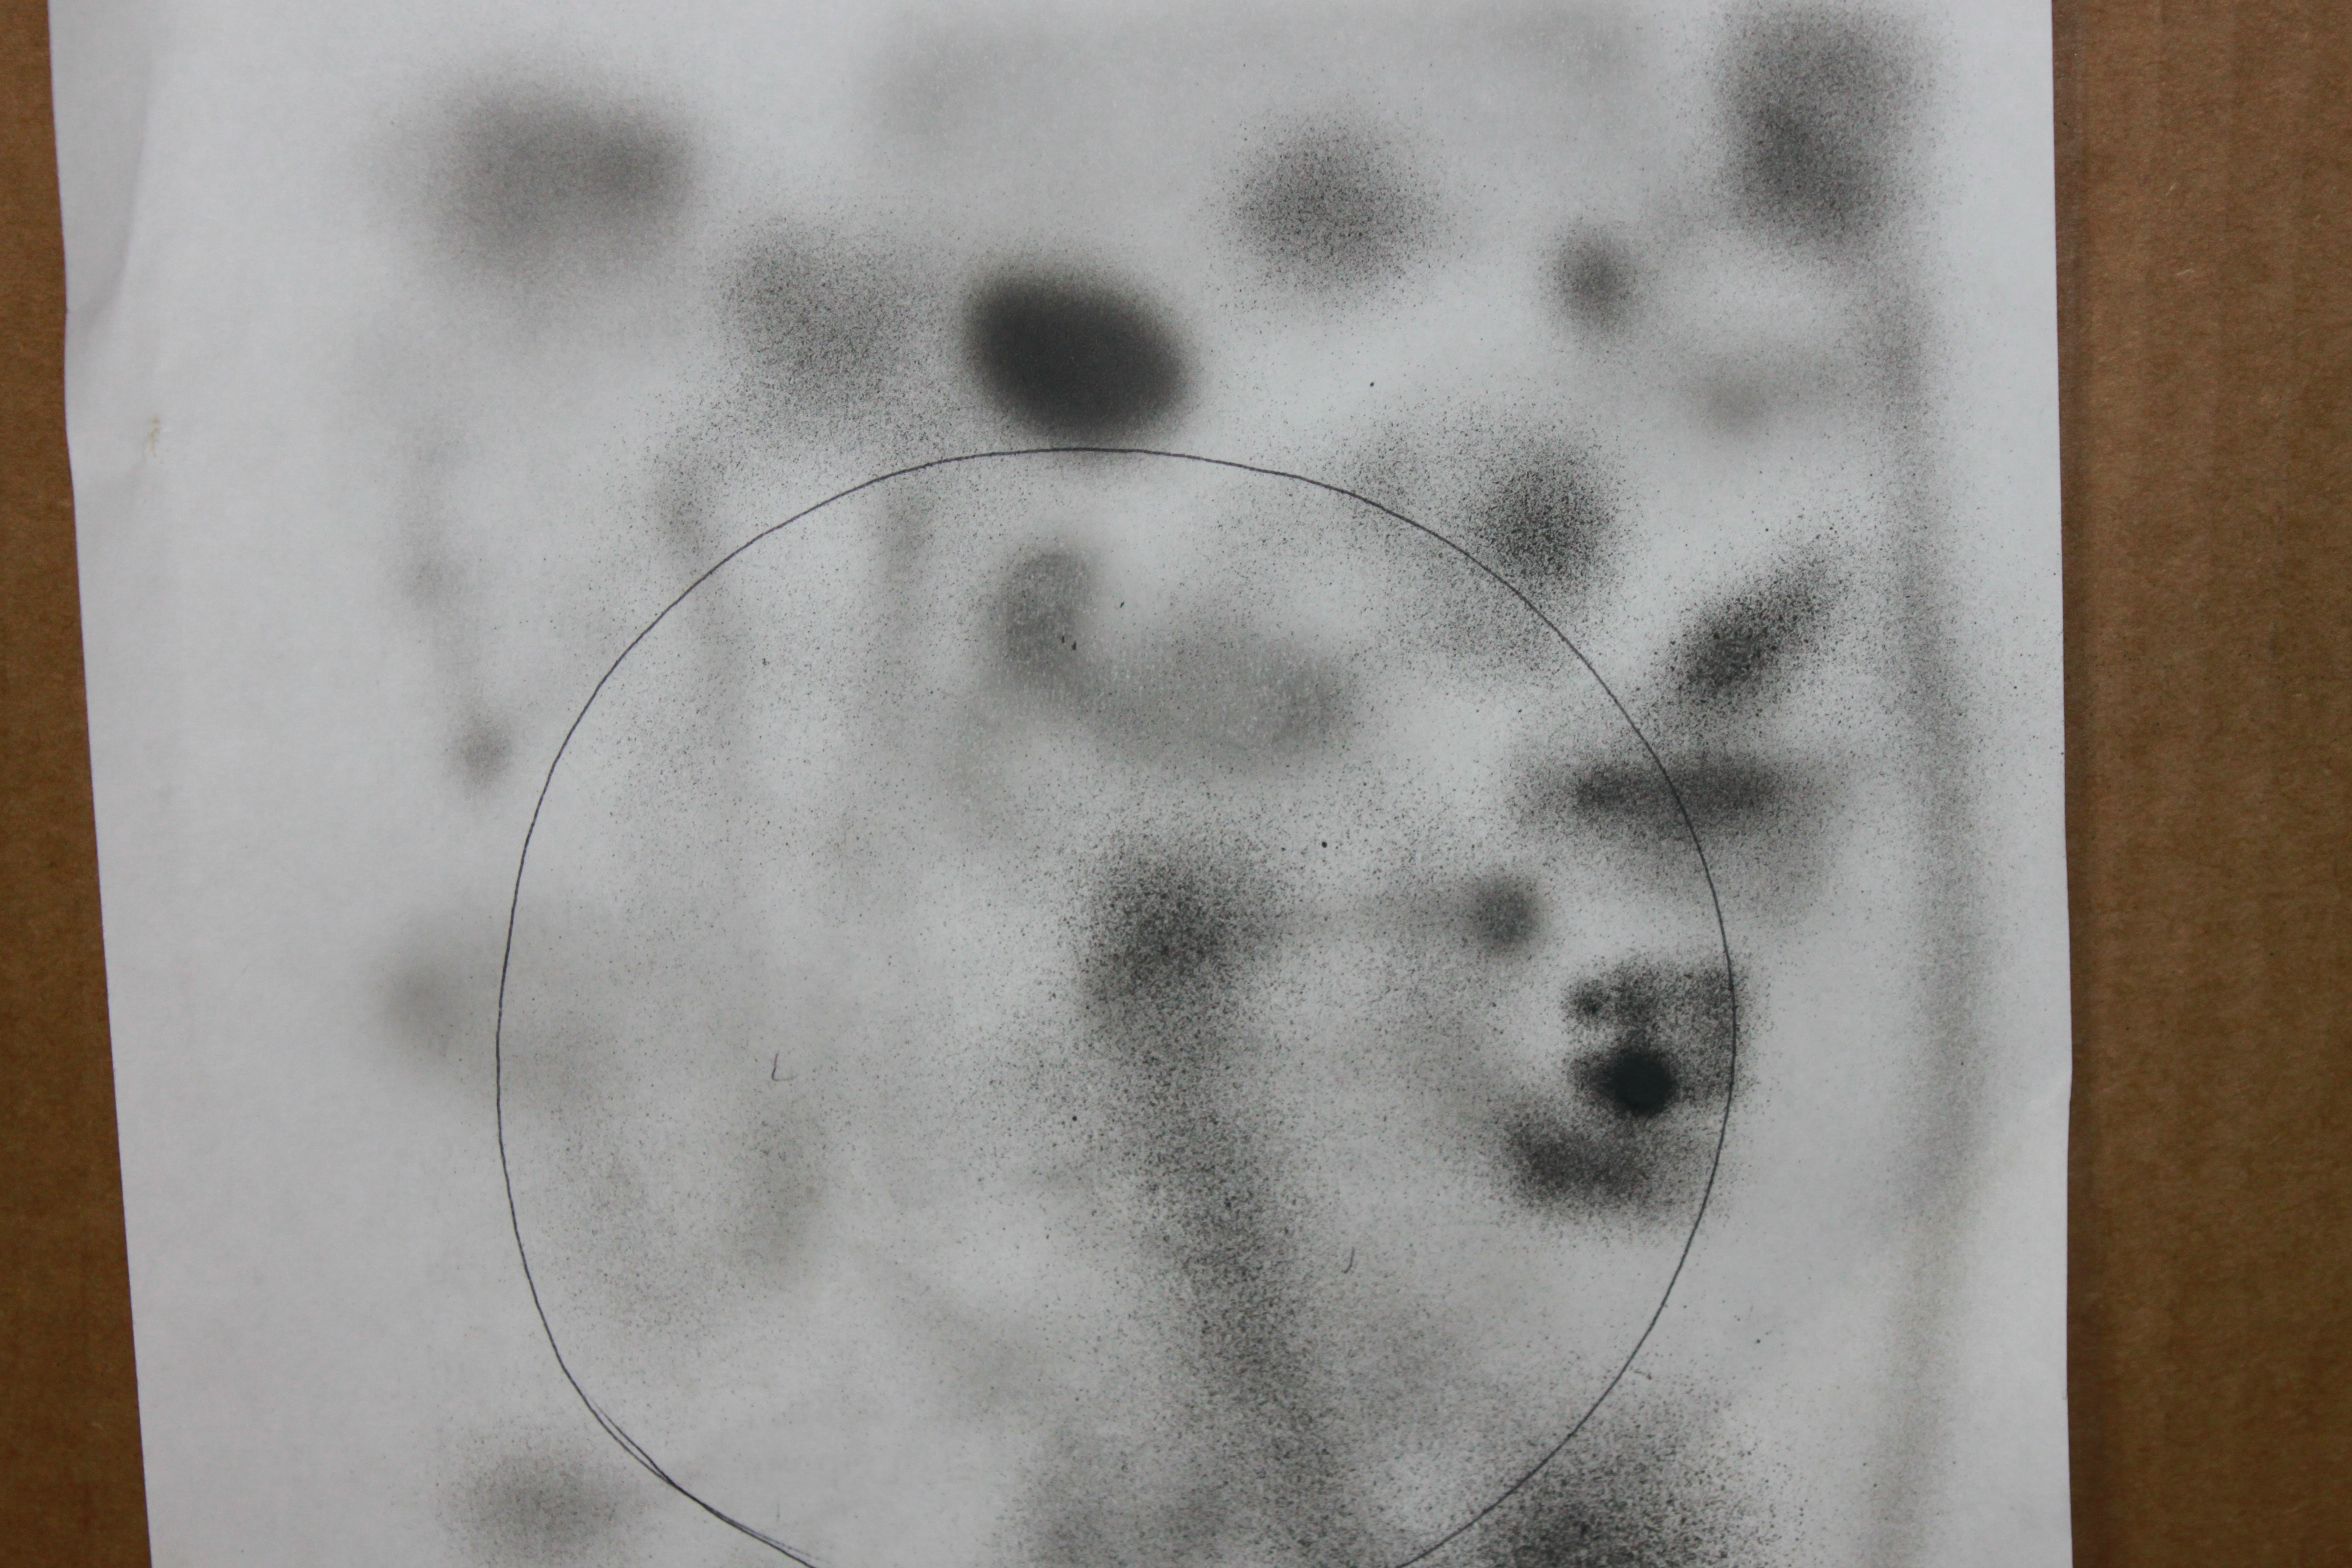
I was testing it out a bit. The large gray patch right above the circle drawn on the paper was how it was coming out at first. Confident with that, I painted most of what I needed to get done. However, within a few minutes, the paint started splattering no matter what I tried, opening the cone more, thinning it, etc. Pretty much everything else on the paper is there to illustrate the splattering.
I'm hoping this is something silly I did with that paint, and not an airbrush issue. Can anyone tell me what's wrong?
Grauwolf

#084

Joined: September 14, 2005
KitMaker: 2,485 posts
AeroScale: 95 posts

Posted: Tuesday, November 26, 2013 - 01:42 PM UTC
Well if all was cleaned and your still getting this.....then
Check that you are not getting crusty dried bits of paint from
the mouth of the bottle falling into your spray bottle that
make their way into the paint passage and clog the nozzle.
Also recommended for this type of AB is an in bottle filter
to trap chucks of dried paint or a small blob of unmixed paint that may have fallen in.
How old is the paint?
Cheers,
Joe
FinneganBojangles
Joined: May 01, 2013
KitMaker: 60 posts
AeroScale: 56 posts
Posted: Tuesday, November 26, 2013 - 02:50 PM UTC
Hi Joe,
The paint does appear to be rather old, I'm not entirely sure when I bought it. As for a filter, if you're referring to a water-trap I already have one hooked up.
The paint does appear to be rather old, I'm not entirely sure when I bought it. As for a filter, if you're referring to a water-trap I already have one hooked up.
Grauwolf
#084
Joined: September 14, 2005
KitMaker: 2,485 posts
AeroScale: 95 posts
Posted: Tuesday, November 26, 2013 - 05:29 PM UTC
The filter I am referring to is a tubular mess filter which
fits over the the siphon tube so as to prevent any goop or
dried chunks of paint that may have fallen it the paint
bottle on the airbrush, from being sucked up into the nozzle.
Like this if you are using a paint bottle:
http://www.hobbylinc.com/htm/bad/bad50-2016.htm
or use a piece of panty hose over your paint cup, when
pouring in paint, this will filter and trap any debris
that might be in the paint mix.
Cheers,
Joe
Joel_W
Joined: December 04, 2010
KitMaker: 11,666 posts
AeroScale: 7,410 posts
Posted: Wednesday, November 27, 2013 - 05:18 AM UTC
Don't think that the paint splatter issue was caused by chunks of old, hard paint. They would just clog the needle or cone and no paint would come out, or very little. You're getting way too much paint for that to be the case.
Lets start with exactly what you're doing.
Brand of paint
Type and brand of thinner
what psi are you air brushing at?
What paint/thinner ratio are you using?
Have you just used straight Thinner through the gun and was able to air brush it consistently, for lets say half a bowl?
For now, don't use the jar as you could be sucking up air if there isn't enough paint in it. Use the cup that came with the gun. I use it 95% of the time.
Joel

jakes357
Joined: May 16, 2002
KitMaker: 254 posts
AeroScale: 3 posts

Posted: Wednesday, November 27, 2013 - 05:39 PM UTC
In my humble opinion, 25psi is twice what you need for air pressure with enamels.
I use enamels a lot and never go over 10-15 psi. Try it ,you have nothing to lose....
Jake
I use enamels a lot and never go over 10-15 psi. Try it ,you have nothing to lose....
Jake
FinneganBojangles
Joined: May 01, 2013
KitMaker: 60 posts
AeroScale: 56 posts
Posted: Thursday, December 05, 2013 - 12:13 PM UTC
Quoted Text
Don't think that the paint splatter issue was caused by chunks of old, hard paint. They would just clog the needle or cone and no paint would come out, or very little. You're getting way too much paint for that to be the case.
Lets start with exactly what you're doing.
Brand of paint
Type and brand of thinner
what psi are you air brushing at?
What paint/thinner ratio are you using?
Have you just used straight Thinner through the gun and was able to air brush it consistently, for lets say half a bowl?
For now, don't use the jar as you could be sucking up air if there isn't enough paint in it. Use the cup that came with the gun. I use it 95% of the time.
Joel
Hi Joel, sorry for the delayed reply. Thanksgiving, holiday shopping, etc.

I am using Testors Modelmaster enamels, with Testors' brand thinner. I only use the paint cup that came with the brush, I've never tried to use the jars. Thinner/paint ratios is about 50/50.
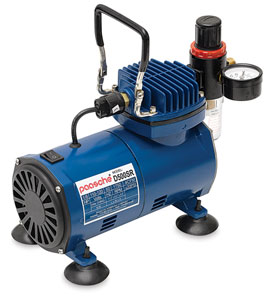
Now, as for PSI, here's where I'm a bit confused. I have a PSI indicator. When I initially turn my compressor on, it sits at about 60 or so PSI. When I start to spray the airbrush, it drops down to about 25 PSI. Which level is the brush actually spraying at?
This photo is the assembly I use, it's a Paasche compressor and although I don't remember the exact brand of the PSI meter and moisture trap, it's the exact one pictured.
Quoted Text
In my humble opinion, 25psi is twice what you need for air pressure with enamels.
I use enamels a lot and never go over 10-15 psi. Try it ,you have nothing to lose....
Jake
Aaand this is where I bring up that I'm not exactly sure how to adjust the PSI on my compressor.
Robbd01
#323
Joined: February 13, 2013
KitMaker: 791 posts
AeroScale: 213 posts
Posted: Thursday, December 05, 2013 - 02:36 PM UTC
60 PSI is way too high. Drop it to 15 or 10. When you see your gauge drop when you are spraying is because whatever your setting is, is what is going out your airbrush. The meter will drop because there is no pressure to measure as you spray. That setting is what is going out your airbrush.
Cheers
Cheers

Jessie_C

Joined: September 03, 2009
KitMaker: 6,965 posts
AeroScale: 6,247 posts

Posted: Thursday, December 05, 2013 - 03:03 PM UTC
Quoted Text
Aaand this is where I bring up that I'm not exactly sure how to adjust the PSI on my compressor.
It appears that the pressure adjustment is made using the black knob just beside the pressure gauge. Compressors like that are the reason I like using one with a tank. It's much simpler to get a consistent pressure out of it.
Joel_W
Joined: December 04, 2010
KitMaker: 11,666 posts
AeroScale: 7,410 posts
Posted: Friday, December 06, 2013 - 02:45 AM UTC
Kevin,
It's been a long time since I used a compressor without a holding tank. Your compressor motor is always running in order to pump air, the psi is usually regulated by a knob on your moisture trap, as your compressor doesn't come with any valves to adjust the out psi. The longer your compressor runs, the hotter it gets, and that changes the psi, but the out valve should still keep it within it's acceptable range. With a tank system there are two gauges, one for the internal psi, and one for the out psi. As Jessica said, with a tank the pressure is regulated and consistent, & the air is at room temp.
The other issue, and it's a major one, is that with a tank the flow is smooth and constant. With a continuous running diaphragm compressor, the flow is not smooth, but rather pulsates as the piston forces air out of the top of the chamber at the top of each compression stroke. You can actually feel it if you shoot air at your hand from up close. That pulsation does effect the smoothness of the flow of paint. But not to the point of your examples. Like I said, I used one for more then 10 years, and could do free hand camo paint schemes without any issues.
Your 1:1 ratio of thinner to MM enamel paints shouldn't be that much unless you're shooting blacks or very dark colors. Mid colors and lighter should be 2 parts paint to 1 part thinner, as the MM enamel paints are on the thin side compared to acrylics.
I mostly paint these days with either Arcylics or lacquers, and each has their own psi ranges for my painting system. Enamels are right in the middle. Start with no more then 15 psi and test with it. Your compressor isn't very powerful, so that's why I suggested 15 rather then 12 psi max. If you find that opening up the cone doesn't help the flow rate, then increase the psi a little at a time till you're able to shoot a smooth line.
Joel
FinneganBojangles
Joined: May 01, 2013
KitMaker: 60 posts
AeroScale: 56 posts
Posted: Monday, December 09, 2013 - 08:18 AM UTC
Thanks for the info, Joel. I've tried looking around for a compressed air tank and I've found I have no idea what to look for. The compressor I have is a 1/8HP Paasche D500. I'm seeing a lot of compressor/tank combos online for ~$150-200, but considering I spent about $110 on this compressor just last year, I'm not interested in buying a whole new one just to get the tank. The thing is, I can't seem to find any smaller tanks online. The smallest I can find is a 5 gallon, 135psi Craftsman holding tank (which seems like a real steal at only $30), but I'm not sure if 5 gallons is overkill, or if my 1/8HP compressor can even fill up 5 gallons in a reasonable amount of time. 

hudson2302
Joined: January 28, 2013
KitMaker: 11 posts
AeroScale: 1 posts
Posted: Monday, December 09, 2013 - 09:07 AM UTC
Quoted Text
Quoted TextAaand this is where I bring up that I'm not exactly sure how to adjust the PSI on my compressor.
It appears that the pressure adjustment is made using the black knob just beside the pressure gauge. Compressors like that are the reason I like using one with a tank. It's much simpler to get a consistent pressure out of it.
Jessica is absolutely right about the adjustment knob. the black knob will turn lowering or increasing the pressure. On the pressure gauge you will have two scales, one red which is psi and one black which is BAR. Use the red gauge to adjust your psi to 15PSI
Joel_W
Joined: December 04, 2010
KitMaker: 11,666 posts
AeroScale: 7,410 posts
Posted: Monday, December 09, 2013 - 09:40 AM UTC
Kevin, The holding tank/compressor is sold as a unit. If you ever decided to go with a separate tank, Buy a used tank and gauge from a dive shop, and use CO2 to fill it. The tank will last a long long time. Your compressor is fine. Just that the air is delivered in pulses. By the time it gets to the gun itself, there shouldn't be any issues to be concerned with.
The issue now is to get to the point where you can airbrush a consistent line.
Joel
The issue now is to get to the point where you can airbrush a consistent line.
Joel

chrism
Joined: January 05, 2012
KitMaker: 160 posts
AeroScale: 156 posts
Posted: Monday, December 09, 2013 - 12:03 PM UTC
Kevin, you might want to search Youtube to see if anyone made a video on how to disassemble your particular airbrush. Then as others have already said, clean it thoroughly especially the needle and nozzle.
Joel_W
Joined: December 04, 2010
KitMaker: 11,666 posts
AeroScale: 7,410 posts
Posted: Monday, December 09, 2013 - 01:22 PM UTC
Kevin, have you turned the top black knob so that it reads 12-15 psi, then tried to paint? I'm pretty sure that will solve your issues. Thin the enamel paint 1:1 to start with.
Joel
Joel
 |

WEB HOSTING BY


Copyright ©2021 AeroScale and Kitmaker Network, a subsidiary of Silver Star Enterprises
All Rights Reserved. Please read our Conditions of Use and Privacy Policy.
All Rights Reserved. Please read our Conditions of Use and Privacy Policy.