Eduard Spitfire Mk.IX early build log.
Moselle, France
Joined: May 15, 2005
KitMaker: 5,653 posts
AeroScale: 4,347 posts
Posted: Friday, March 29, 2013 - 11:04 PM UTC
Hi all,
Today I have received a nice Easter Egg from Eduard's little EBunnies. These are well know for their sense of humor and the egg was in fact squarish...
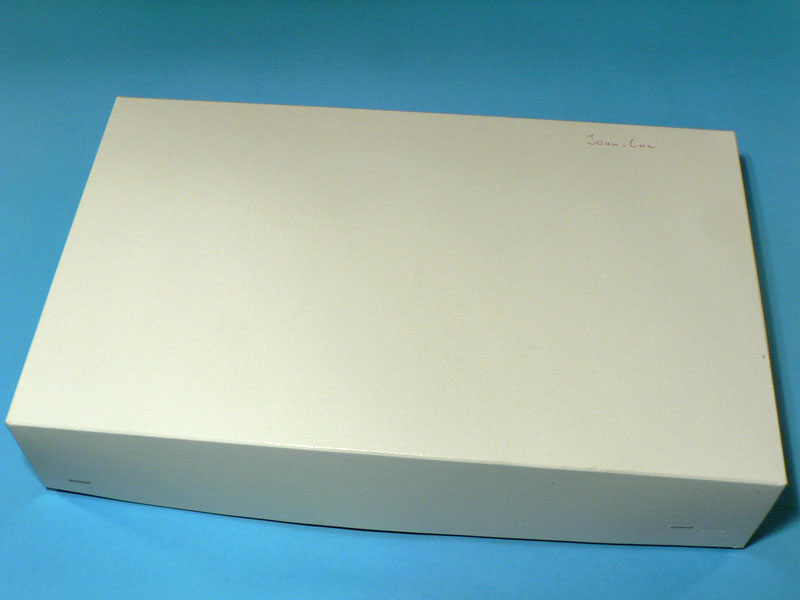
Surprise, surprise! Inside was the new 1/48 scale Spitfire Mk.IX kit with a full load of goodies... Wow!
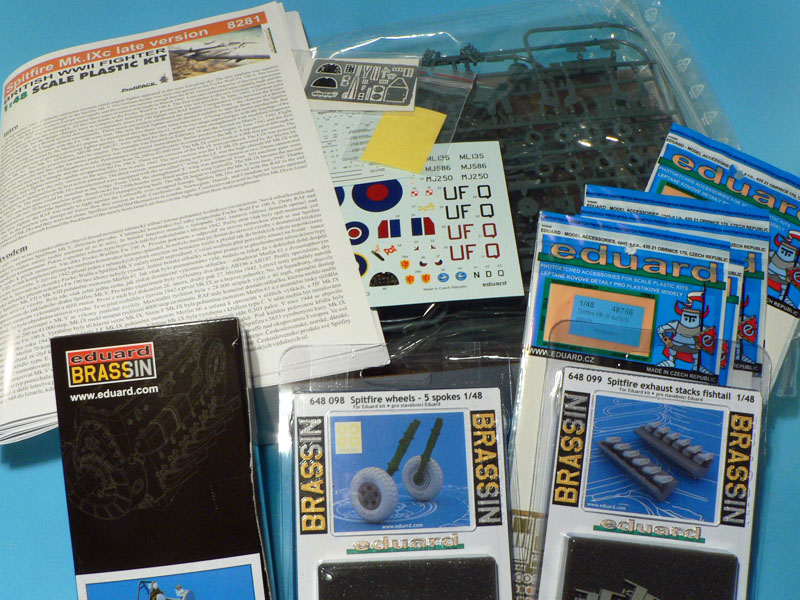
I won't do a review of the kit right now because I think Rowan will do one soon but instead I will start building it. Expect to see some updates in this thread soon...

Jean-Luc

Better think one hour and build five minutes...
Than think five minutes and build an hour!
Merlin
 Senior Editor
#017
United Kingdom
Joined: June 11, 2003
KitMaker: 17,582 posts
AeroScale: 12,795 posts
Posted: Friday, March 29, 2013 - 11:09 PM UTC
Hi Jean-Luc
You are a VERY lucky boy! I'm not jealous at all!

I'm really looking forward to following your build - it certainly couldn't be in better hands.

All the best
Rowan
BEWARE OF THE FEW...
As I grow older, I regret to say that a detestable habit of thinking seems to be getting a hold of me. - H. Rider Haggard
England - East Midlands, United Kingdom
Joined: June 03, 2006
KitMaker: 574 posts
AeroScale: 573 posts
Posted: Friday, March 29, 2013 - 11:36 PM UTC
The box looks at least 2mm too long than it should be.
Germany
Joined: September 07, 2005
KitMaker: 5,609 posts
AeroScale: 5,231 posts
Posted: Friday, March 29, 2013 - 11:36 PM UTC
Quoted Text
You are a VERY lucky boy! I'm not jealous at all!
I am
green in face and warts and all.... But you are right, could not be in better hands. 3 weeks to go J-L ... I expect to see it in Siegen!!
not to forget: have fun!
btw I have some fun too

cheers
Steffen
DULCE ET DECORUM EST PRO HOBBY MORI
Moselle, France
Joined: May 15, 2005
KitMaker: 5,653 posts
AeroScale: 4,347 posts
Posted: Saturday, March 30, 2013 - 08:15 AM UTC
Quoted Text
The box looks at least 2mm too long than it should be.
This is why I didn't wanted to write a review...
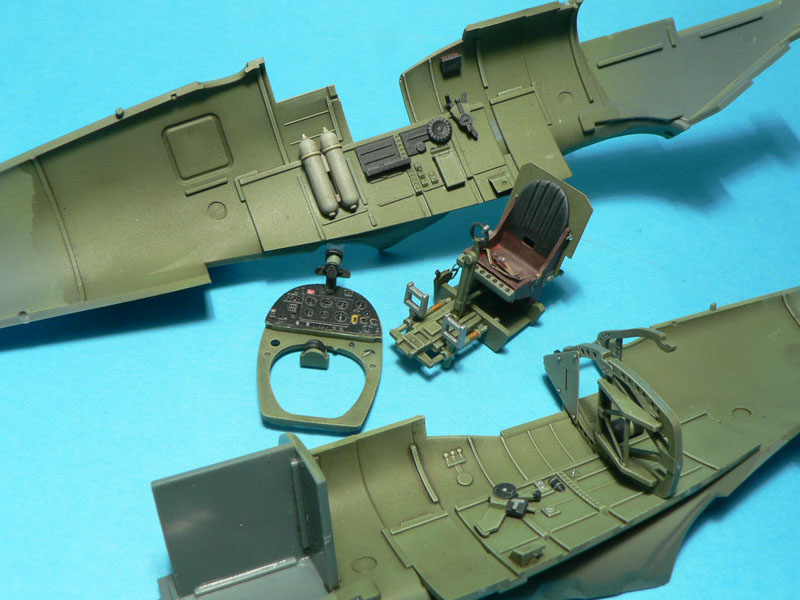
Here is update n°1...
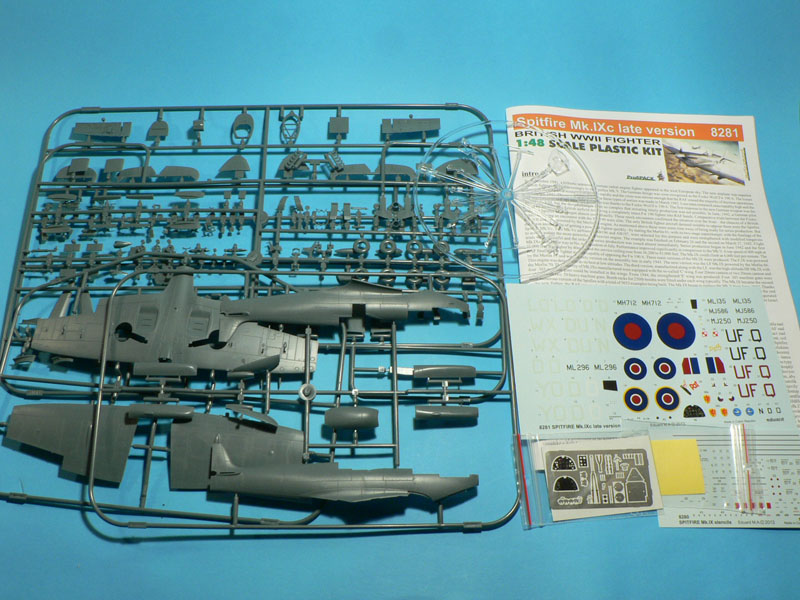
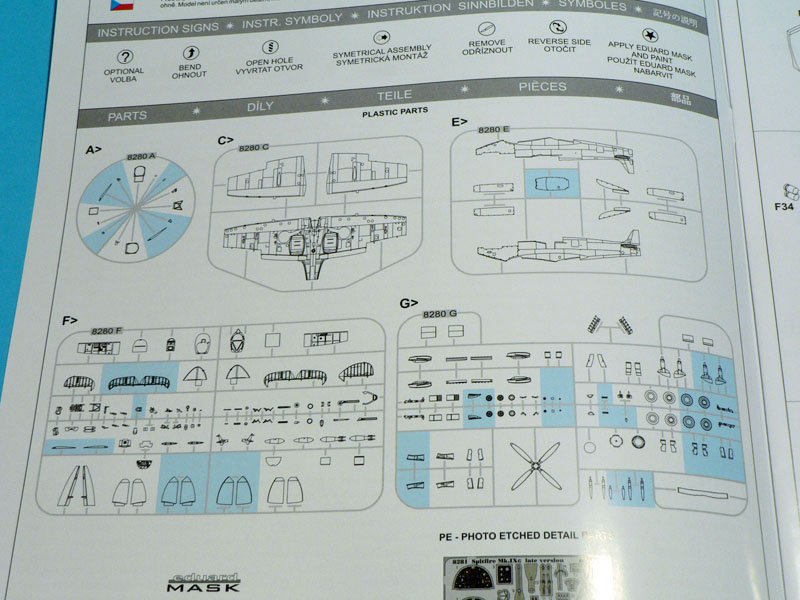
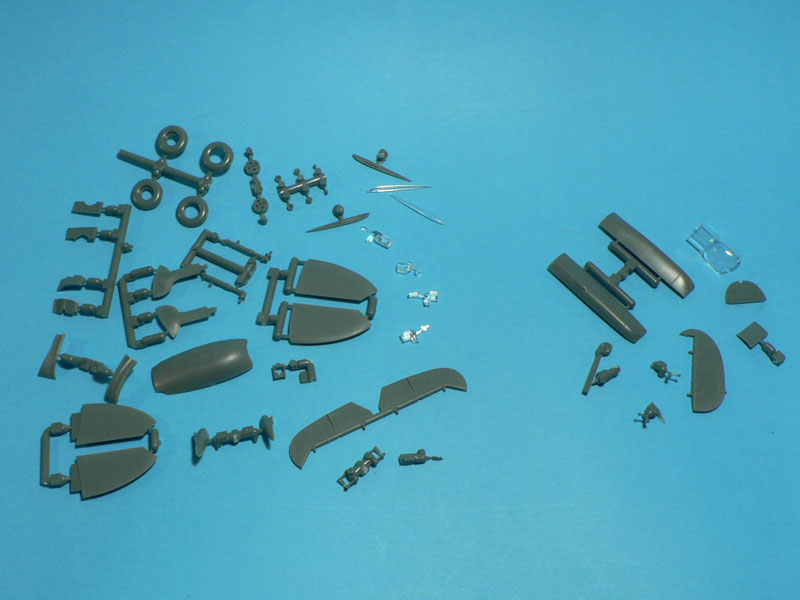
First I have eliminated all the parts that won't be used in the kit. They are marked in blue in the instructions...
On the following picture you can see the parts that will end in the spare box. On the left side what has been designed by Eduard for other variants and one the right side the parts that are optional in the kit, either because of the variant I chose (Option A in the kit with pointed rudder), because some parts are replaced with PE ones (instrument panel) or because one has the choice between open or closed positions (canopy, access door, wing radiator flaps, etc...)...
And finally this is how I managed to get the kit after some hours assembling parts...
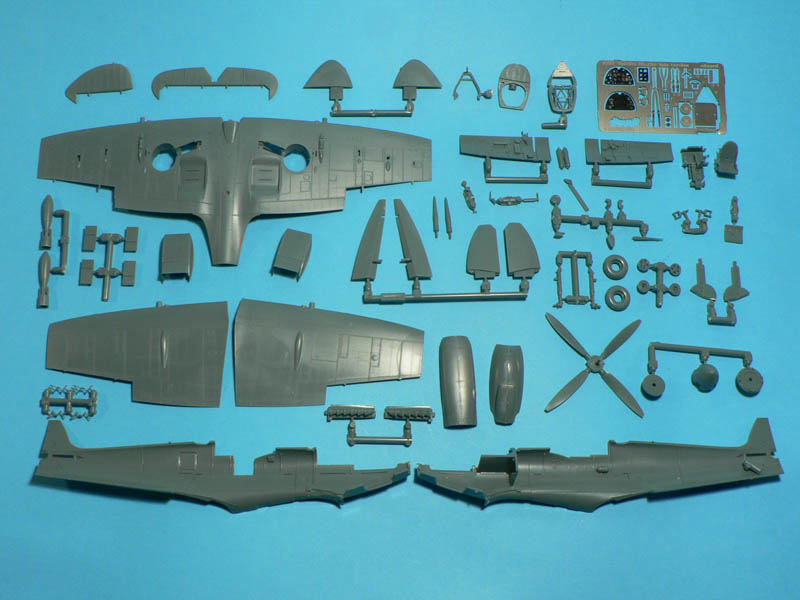
So far the fit of the sub-assemblies is excellent and while some parts are really small the kit is a joy to build. Now I will get the parts ready for the basic color painting.
Jean-Luc
P.S. Steffen, this is a nice collection of almost finished models! Especially the Udet 109 is one I'd like to see soon of course.
Better think one hour and build five minutes...
Than think five minutes and build an hour!
Merlin
Senior Editor #017
United Kingdom
Joined: June 11, 2003
KitMaker: 17,582 posts
AeroScale: 12,795 posts
Posted: Saturday, March 30, 2013 - 08:19 AM UTC
Quoted Text
I won't do a review of the kit right now because I think Rowan will do one soon
Hi Jean-Luc
I actually think you should do the review because who knows when/if I'll get a sample. If you go straight for it, it could be a real scoop.

All the best
Rowan
BEWARE OF THE FEW...
As I grow older, I regret to say that a detestable habit of thinking seems to be getting a hold of me. - H. Rider Haggard
Holdfast
President #056
England - South West, United Kingdom
Joined: September 30, 2002
KitMaker: 8,581 posts
AeroScale: 4,913 posts
Posted: Saturday, March 30, 2013 - 07:25 PM UTC
No, not jealous at all

Yep, couldn't be in better hands, but are you going to fix all the "flaws" in the kit?
MAL the MASK
BULLDOG # 6 (President)
BEWARE OF THE FEW
Sappers: First in, last out. (UBIQUE)
It's not the same, better, but not the same.
Moselle, France
Joined: May 15, 2005
KitMaker: 5,653 posts
AeroScale: 4,347 posts
Posted: Sunday, March 31, 2013 - 01:26 AM UTC
Quoted Text
but are you going to fix all the "flaws" in the kit?
I can fix the too long by 2mm box if you want

On the kit there is nothing to fix in my eyes...
Rowan, I'm currently working on the review. Basically it says: this kit is great!
Jean-Luc
Better think one hour and build five minutes...
Than think five minutes and build an hour!
MichaelSatin
Campaigns Administrator Colorado, United States
Joined: January 19, 2008
KitMaker: 3,909 posts
AeroScale: 2,904 posts
Posted: Sunday, March 31, 2013 - 03:29 AM UTC
Waiting for Gaston's inevitable blast. Better take some nice close up shots of the canopy and fuselage so he can better point out what makes the kit worthless. Nevertheless, it looks fantastic to me! Looking forward to the build Jean-Luc.
Michael
On the bench:
Sorta depends on your definition of "on the bench"...
Moselle, France
Joined: May 15, 2005
KitMaker: 5,653 posts
AeroScale: 4,347 posts
Posted: Sunday, March 31, 2013 - 03:54 AM UTC
Hi all,
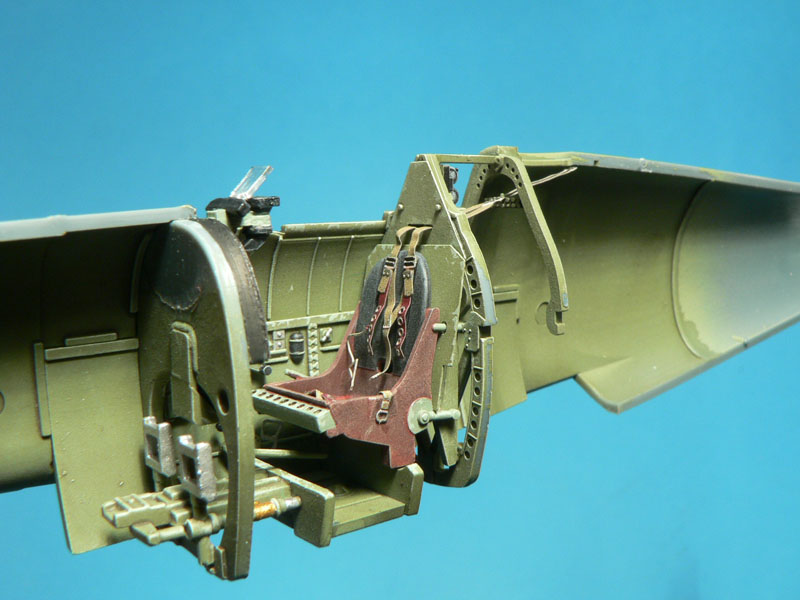
Update n°2...
The basic colors are on the parts. I made some pictures to show you the level of detail of the kit...
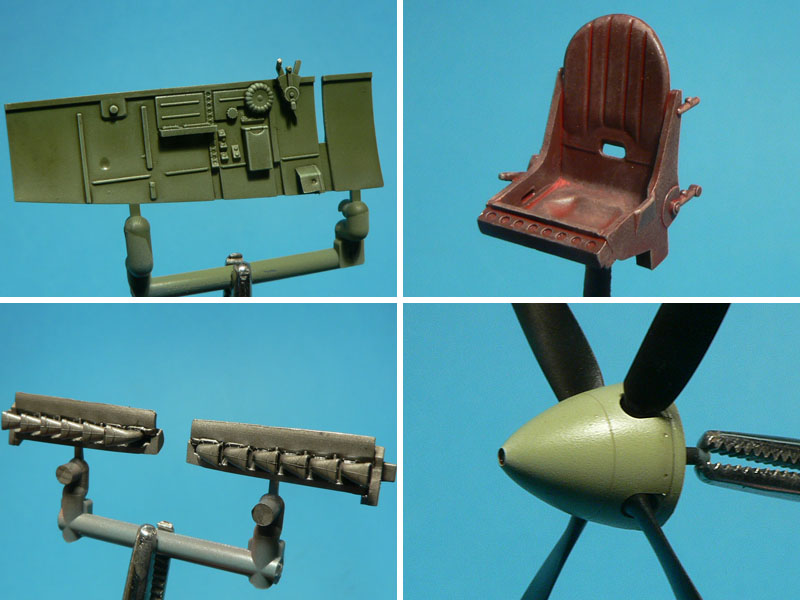
The parts have been painted with Tamiya Acrylics. They have received a light dry brush and a wash of Klir (Future)...
Now I will do the detail painting...
Jean-Luc
Better think one hour and build five minutes...
Than think five minutes and build an hour!
Stockholm, Sweden
Joined: May 02, 2006
KitMaker: 1,953 posts
AeroScale: 1,902 posts
Posted: Sunday, March 31, 2013 - 04:02 AM UTC
I haven't decided if I should convert to 1/48 or wait for Eduard to shrink it to 1/72 yet
!
Beautiful!
Magnus
Press banner to the right to follow my trail to the new forums!
Moselle, France
Joined: May 15, 2005
KitMaker: 5,653 posts
AeroScale: 4,347 posts
Posted: Sunday, March 31, 2013 - 09:07 PM UTC
Hi all,
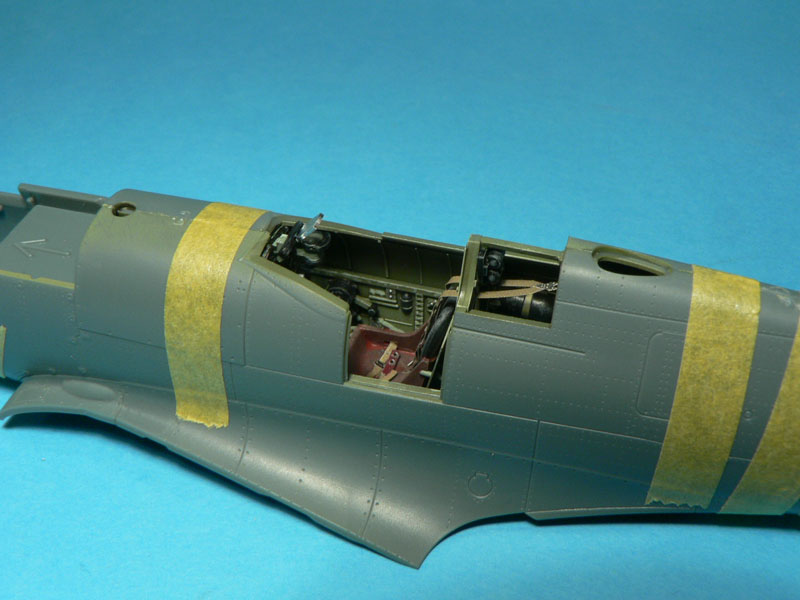
Just a small update to show the progress on the cockpit...
I must add some weathering and the seat belts but this gives you an idea of the overall level of detail.
Jean-Luc
Better think one hour and build five minutes...
Than think five minutes and build an hour!
Germany
Joined: September 07, 2005
KitMaker: 5,609 posts
AeroScale: 5,231 posts
Posted: Sunday, March 31, 2013 - 09:10 PM UTC
Looks great .. and please don't waste your time writing reviews...
. You can of course spend time with the family

cheers
Steffen
DULCE ET DECORUM EST PRO HOBBY MORI
Merlin
Senior Editor #017
United Kingdom
Joined: June 11, 2003
KitMaker: 17,582 posts
AeroScale: 12,795 posts
Posted: Sunday, March 31, 2013 - 10:39 PM UTC
Quoted Text
Looks great .. and please don't waste your time writing reviews... . You can of course spend time with the family
cheers
Steffen
Hi Steffen
You know what a busy bee Jean-Luc is - he's already written and submitted his review. Jessie's in the course of preparing it.
Great work so far, Jean-Luc.
The only point I'd question is the painted interior of the rear fuselage - my references show bare metal from the seat support frame backwards.
All the best
Rowan
BEWARE OF THE FEW...
As I grow older, I regret to say that a detestable habit of thinking seems to be getting a hold of me. - H. Rider Haggard
California, United States
Joined: November 28, 2007
KitMaker: 817 posts
AeroScale: 729 posts
Posted: Monday, April 01, 2013 - 02:43 AM UTC
I may not be a Spitfire fan but I am certainly enjoying this build! It's great to see you in the cockpit for this one, Jean-Luc- cheers!
[url]http://chukw.blogspot.com/[/url]
Moselle, France
Joined: May 15, 2005
KitMaker: 5,653 posts
AeroScale: 4,347 posts
Posted: Monday, April 01, 2013 - 10:06 AM UTC
Hi all,
Thanks for your kind words and for following this thread.
Quoted Text
The only point I'd question is the painted interior of the rear fuselage - my references show bare metal from the seat support frame backwards
Good catch Rowan. I will do it like you said on my second build.
I have completed the cockpit...
Rowan, does this mean that the area were the black bottle is located should be silver? This would mean that it would be visible from the rear cockpit opening...
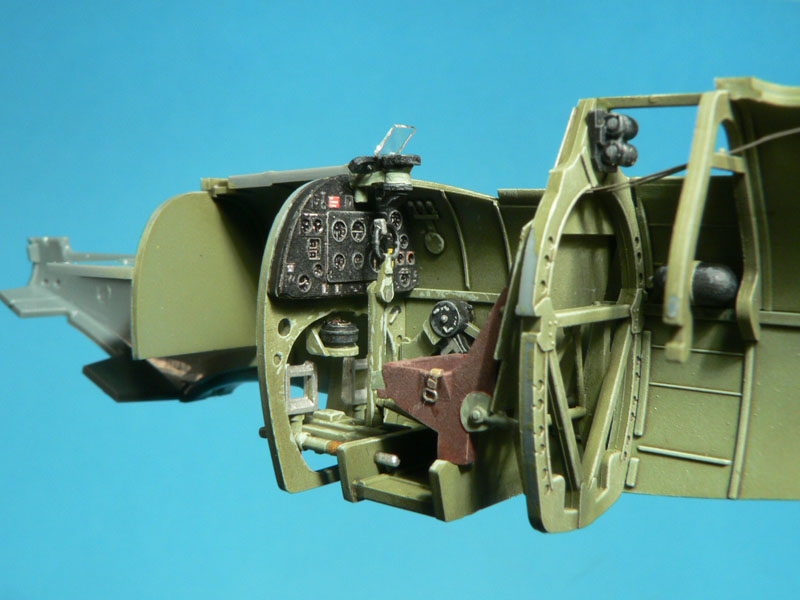
... and that the grey bottle would be over silver as well...
Anyway, once the fuselage is closed, not much will be visible unless one does a very close inspection...
Tomorrow I will do the famous Spitfire wing.
Jean-Luc
Better think one hour and build five minutes...
Than think five minutes and build an hour!
Merlin
Senior Editor #017
United Kingdom
Joined: June 11, 2003
KitMaker: 17,582 posts
AeroScale: 12,795 posts
Posted: Monday, April 01, 2013 - 06:44 PM UTC
Quoted Text
... Good catch Rowan. I will do it like you said on my second build... Jean-Luc
Hi Jean-Luc
Not such a good catch as it was too late!
Still, you do build quicker than most of us mere mortals can keep up with...
Edgar may have something to say about the flare rack on the seat too.
The finish and weathering you've done is simply superb! The paint chipping style you've developed is a work of art in itself.
All the best
Rowan
BEWARE OF THE FEW...
As I grow older, I regret to say that a detestable habit of thinking seems to be getting a hold of me. - H. Rider Haggard
AussieReg
Associate Editor #007
Victoria, Australia
Joined: June 09, 2009
KitMaker: 8,156 posts
AeroScale: 3,756 posts
Posted: Monday, April 01, 2013 - 09:14 PM UTC
Quoted Text
The finish and weathering you've done is simply superb! The paint chipping style you've developed is a work of art in itself.
That says it all Rowan!
As always your work is inspirational J-L, yet another thread for me to bookmark for future reference.
Cheers, D
ON the bench
Revell 1/24 '53 Corvette (building as '54)
Revell 1/24 BMW 507 Coupe and Cabrio
Italeri 1/48 Me262 B-1a/U1 Nightfighter
Monogram 1/24 '57 Chevy Nomad
Dragon 1/350 USS Frank Knox DD-742
Moselle, France
Joined: May 15, 2005
KitMaker: 5,653 posts
AeroScale: 4,347 posts
Posted: Monday, April 01, 2013 - 10:05 PM UTC
Hi all,
Quoted Text
Edgar may have something to say about the flare rack on the seat too.
No worries, the idea is to build the kit as per instructions and if there are errors to list them here...
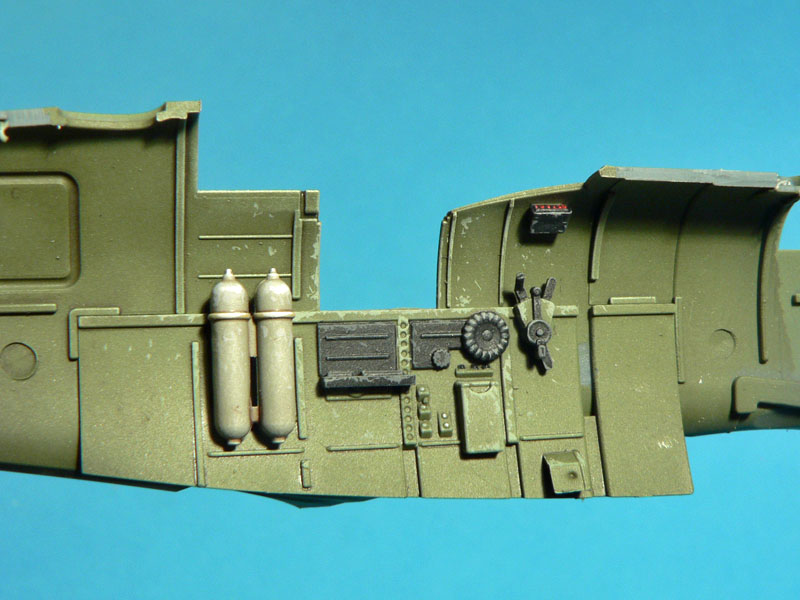
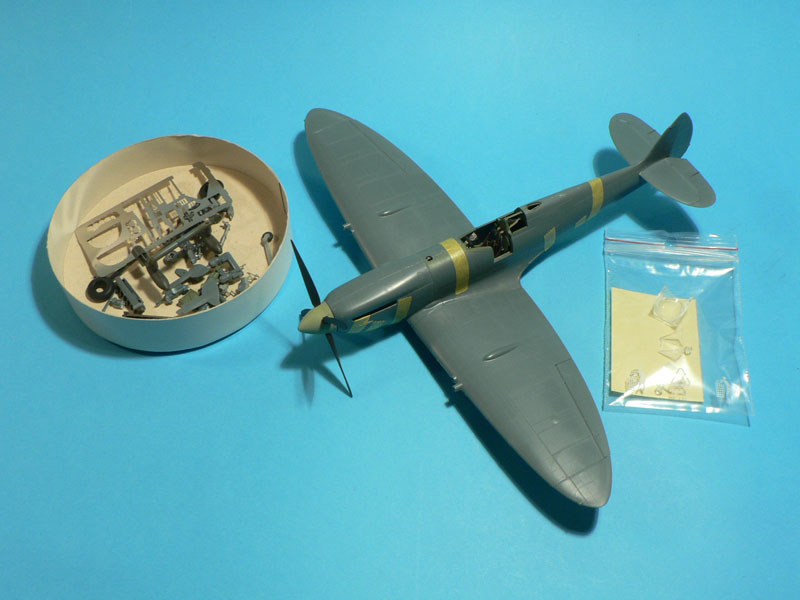
The wing parts have been assembled...
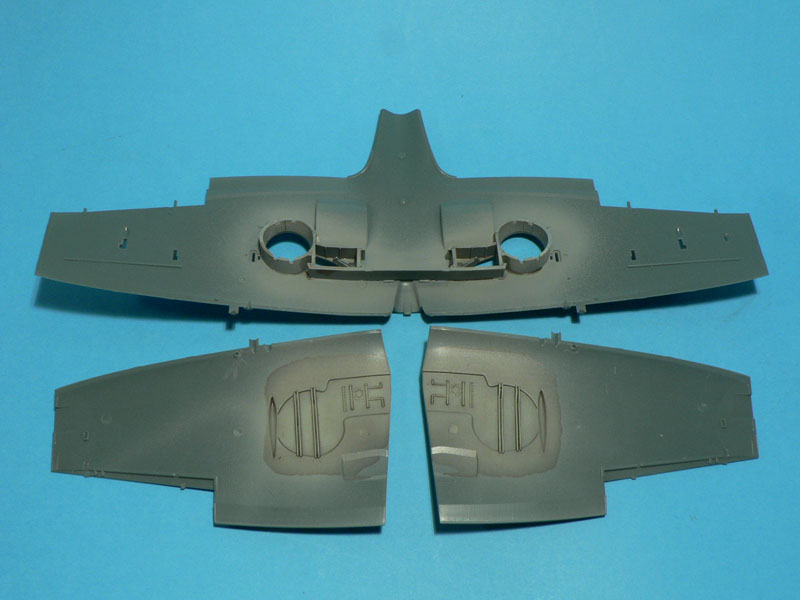
The wheel bays are made of 15 parts not counting the wing. This breakdown of the parts was necessary to reproduce the angled walls to accomodate the tire. I couldn't resist and glued the wings, rudders and elevator to the fuselage...
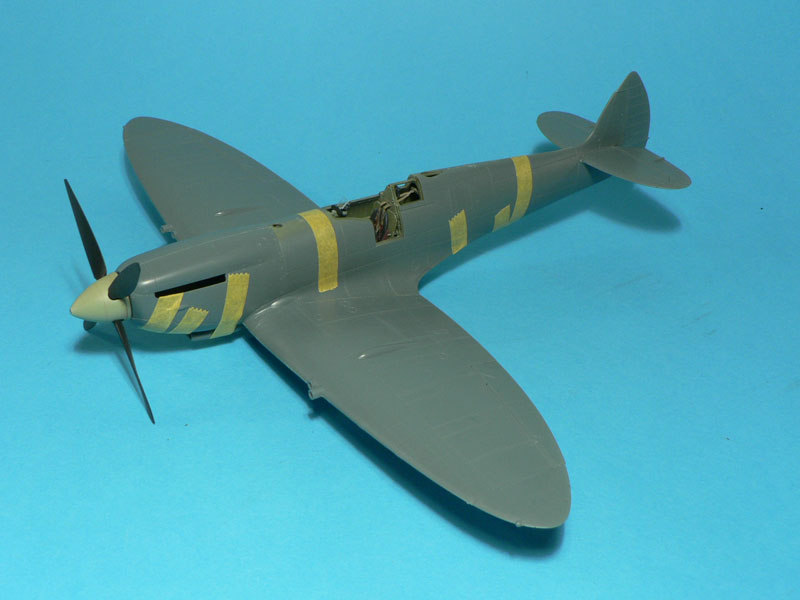
On the above picture, the top engine cowling part and the rudder aren't cemented yet. The fit is so good these can be glued after painting. So far so good, no filler was needed yet so precise is the kit. This is what remains of the content of the kit after 3 days of work...
I feel the smell of paint already...
Jean-Luc
Better think one hour and build five minutes...
Than think five minutes and build an hour!
England - South East, United Kingdom
Joined: June 03, 2006
KitMaker: 397 posts
AeroScale: 384 posts
Posted: Tuesday, April 02, 2013 - 02:58 AM UTC
An unrebuilt Mk.IX, which I photographed, at St. Athan, about 30 years ago, was painted green behind the pilot's seat, so it'd be brave man (which I'm not) who says you've got it wrong.
Also, the seat was replaceable, so, although it's probably unlikely that the rack would be fitted, since there was a recognition device fitted in the rear fuselage, it's impossible to state, unequivocally, that it was always the case.
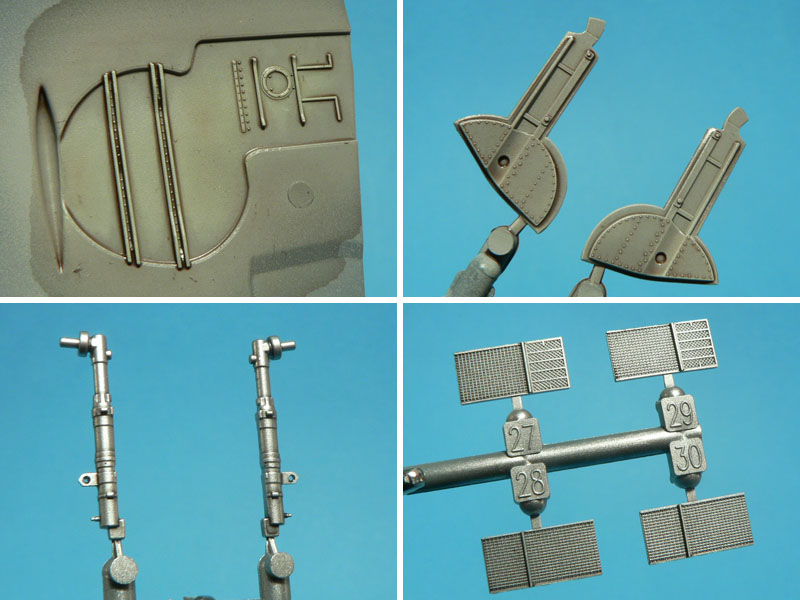
The model does look superb, and your construction compliments it, as well; Eduard have even included the deflection armour over the fuel tank, which is yet another plus point for them, I think.
Edgar
Merlin
Senior Editor #017
United Kingdom
Joined: June 11, 2003
KitMaker: 17,582 posts
AeroScale: 12,795 posts
Posted: Tuesday, April 02, 2013 - 06:21 AM UTC
Hi Edgar
That's interesting to know. Going slightly off-topic, I was actually intending to ask you if you had any idea about the finish inside the rear fuselage of the PR XIX. Airfix state Grey-Green for the camera bay, but I've never seen any vintage shots of the open hatch to form an opinion one way or the other.
All the best
Rowan
BEWARE OF THE FEW...
As I grow older, I regret to say that a detestable habit of thinking seems to be getting a hold of me. - H. Rider Haggard
England - South East, United Kingdom
Joined: June 03, 2006
KitMaker: 397 posts
AeroScale: 384 posts
Posted: Tuesday, April 02, 2013 - 07:34 AM UTC
At some stage (and my copy of the drawing is illegible regarding the dates) the interior painting went from silver (in the majority of areas) to interior green all through.
I've seen a Mark 22, with green interior, and the BBMF's XIXs have green wheel wells, which all lends weight to the idea.
I've no idea why there was a change, unless it was due to shortages, or something like the need for silver on the Pacific Mosquitos taking precedence, but I can only speculate.
Shortages were the reason for the post-war roundels remaining dull red & blue, instead of immediately reverting to the pre-war bright colours, so it might have had a bearing.
Edgar
Moselle, France
Joined: May 15, 2005
KitMaker: 5,653 posts
AeroScale: 4,347 posts
Posted: Tuesday, April 02, 2013 - 10:15 AM UTC
Hi all,
Nice to see you here Edgar.
The basic painting is done. First pre shading in black...
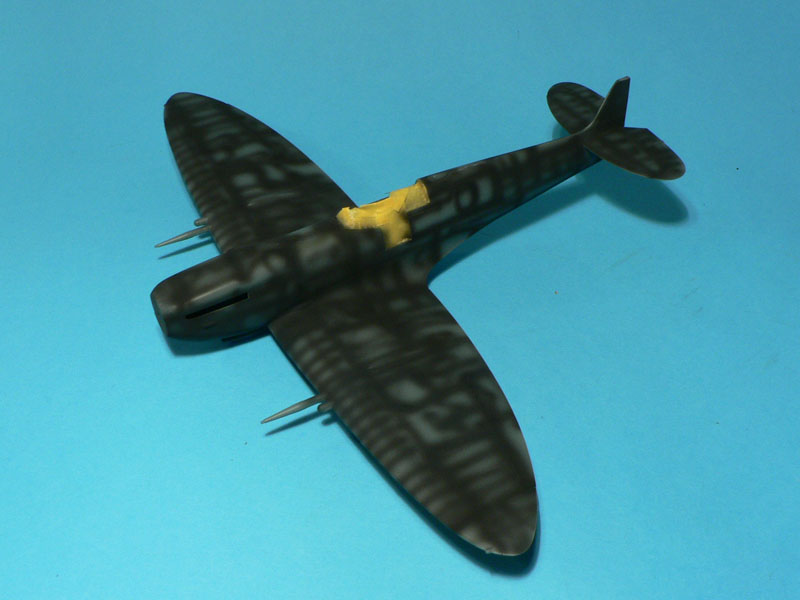
... then light grey underside...
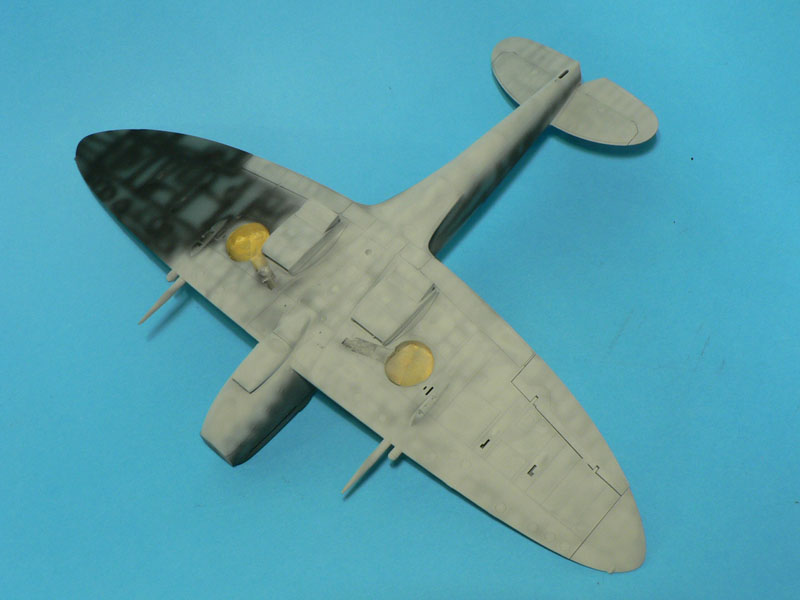
... and finally the upper two tone camouflage...
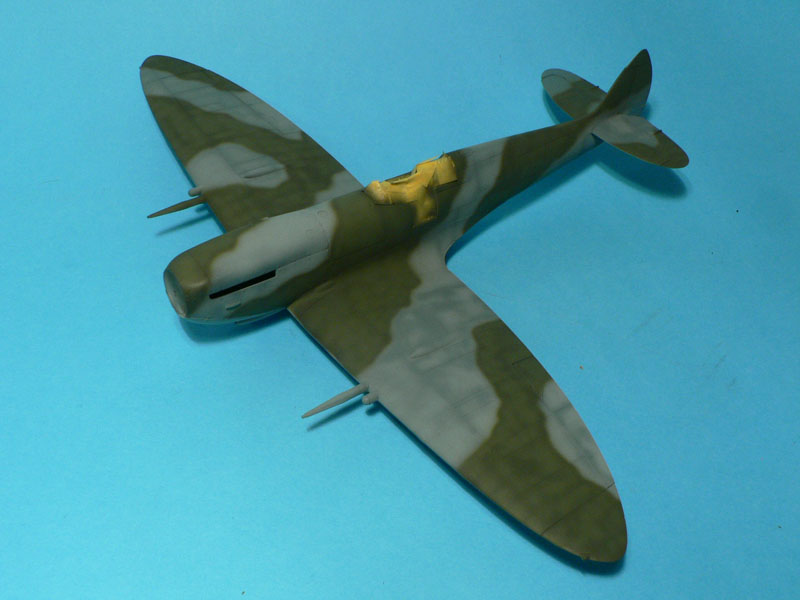
I will let the paint cure and then apply the Black and White D-Day stripes.
Jean-Luc
Better think one hour and build five minutes...
Than think five minutes and build an hour!
Uusimaa, Finland
Joined: March 30, 2004
KitMaker: 2,845 posts
AeroScale: 1,564 posts
Posted: Tuesday, April 02, 2013 - 10:27 AM UTC
Wov, you're certainly wasting no time getting it together! Looks awesome!
Moselle, France
Joined: May 15, 2005
KitMaker: 5,653 posts
AeroScale: 4,347 posts
Posted: Wednesday, April 03, 2013 - 09:13 AM UTC
Thanks Eetu,
I have applied the D-Day markings as well as the Sky fuselage band and the yellow wing stripes...
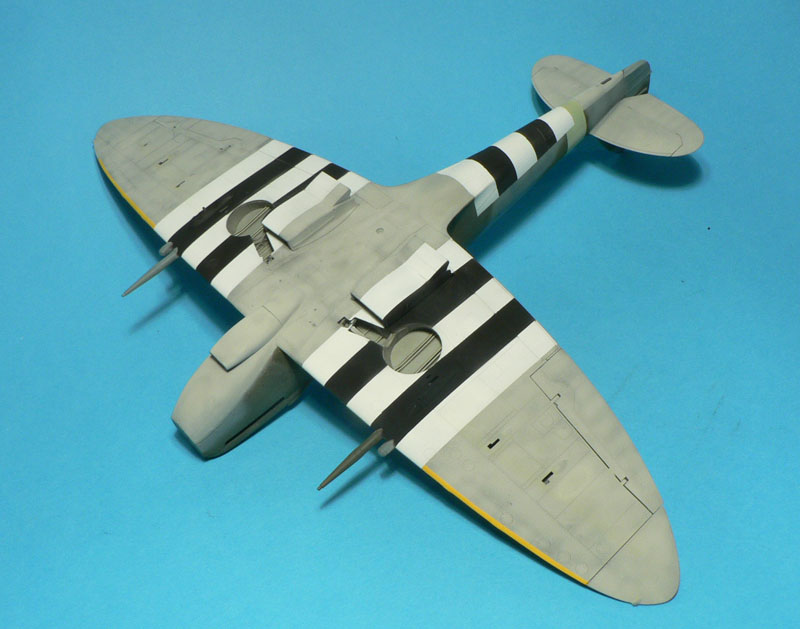
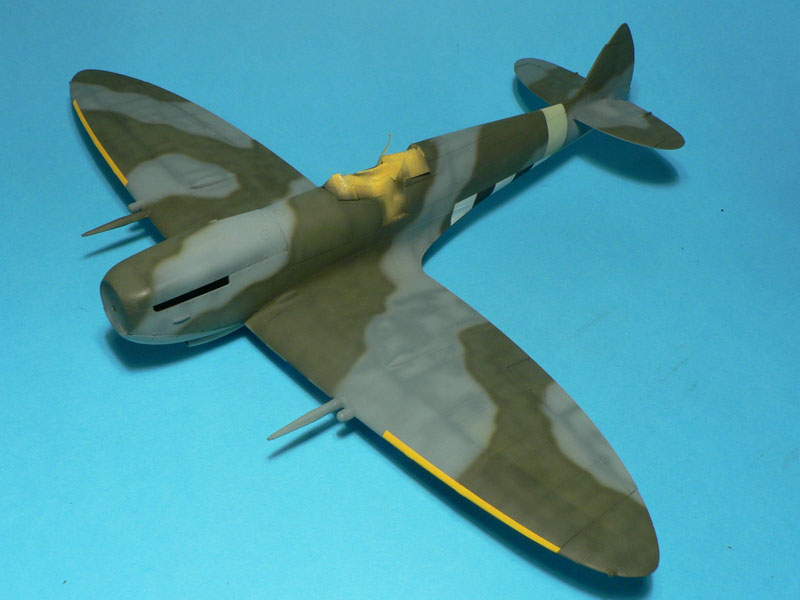
Next will be Klir (Future) coat and then decals...
Jean-Luc
Better think one hour and build five minutes...
Than think five minutes and build an hour!


