

The thickness of these veneers is about .003-.005 thou. I always start by giving the areas - closed up fuselage, a thorough sanding. I always remove surface details (like vents and access covers) that I intend to replace. The thickness stays pretty close to the original kit part. The key here is do not get impatient. As with any venues of our hobby. Careful work yields stunning results. By the way the cyano glue tends to leave you with a nice clear varnish as it soaks through the wood. Keep a paper towel nearby to soak up any problems. But even if you miss a spot that got too much glue it sands down nicely and does not destroy the wood grain effect. (Its always a good idea to lay masking tape down so you only get the extra glue and keep the surrounding area unaffected).
Early Aviation
Discuss World War I and the early years of aviation thru 1934.
Discuss World War I and the early years of aviation thru 1934.
Hosted by Jim Starkweather
Wood Grain Decals and Methods 101

JackFlash

Joined: January 25, 2004
KitMaker: 11,669 posts
AeroScale: 11,011 posts
Posted: Monday, September 05, 2011 - 03:53 PM UTC
JackFlash
Joined: January 25, 2004
KitMaker: 11,669 posts
AeroScale: 11,011 posts
Posted: Monday, September 05, 2011 - 04:01 PM UTC
Meikraft Models also sold a very brunette version of their product.


Using the same method of application I hope that I have enough for a 1:32 SSW D.III. If they appear muted its because they are in a clear plastic bag and I don't want to remove them until I am about to use them. They are sooooooo thin that I won't risk further damaging them by too much handling.
Using the same method of application I hope that I have enough for a 1:32 SSW D.III. If they appear muted its because they are in a clear plastic bag and I don't want to remove them until I am about to use them. They are sooooooo thin that I won't risk further damaging them by too much handling.

OEFFAG_153

Joined: February 19, 2010
KitMaker: 1,473 posts
AeroScale: 1,450 posts

Posted: Monday, September 05, 2011 - 08:38 PM UTC
Hello Stephen, Thank You for the clarification on the veneer This does look very good indeed, and I think I'll have to give this a go i a future project. I'm thinking this darker veneer would not only look good on a Siemens, but also on a dark stained fuselage, like some LVG Cs for instance...
Mikael
Mikael
JackFlash
Joined: January 25, 2004
KitMaker: 11,669 posts
AeroScale: 11,011 posts
Posted: Tuesday, September 06, 2011 - 07:21 PM UTC
By the way if you want to build an Alb. D.Va from scratch try this reference.
"Scratchbuilding Techniques" by Alan Clark, Scale Models Int. Pp174-5, 1990.
"Scratchbuilding Techniques" by Alan Clark, Scale Models Int. Pp174-5, 1990.

USCHIvdROSTEN

Joined: December 11, 2010
KitMaker: 64 posts
AeroScale: 57 posts
Posted: Wednesday, September 07, 2011 - 12:51 AM UTC
Thats a very educating thread. Thanks for doing this effort.
Veeeeery interesting.
Thanks for sharing, Stephen!
Veeeeery interesting.
Thanks for sharing, Stephen!
OEFFAG_153
Joined: February 19, 2010
KitMaker: 1,473 posts
AeroScale: 1,450 posts
Posted: Wednesday, September 07, 2011 - 01:45 AM UTC
Quoted Text
By the way if you want to build an Alb. D.Va from scratch try this reference.
"Scratchbuilding Techniques" by Alan Clark, Scale Models Int. Pp174-5, 1990.
Thank You Stephen slightly off topic do you know of a good thread/reference on how to scratch build wings? I'm thinking about doing an Albatros W.4 in 1:32...
Mikael
JackFlash
Joined: January 25, 2004
KitMaker: 11,669 posts
AeroScale: 11,011 posts
Posted: Wednesday, September 07, 2011 - 02:10 AM UTC
Here is Harry Woodman's book. Its free on my website. Several Aeroscale members have used the information there for scratchbuilding things such as wings, Specifically chapter 3. scratchbuild wings
JackFlash
Joined: January 25, 2004
KitMaker: 11,669 posts
AeroScale: 11,011 posts
Posted: Wednesday, September 07, 2011 - 02:31 AM UTC
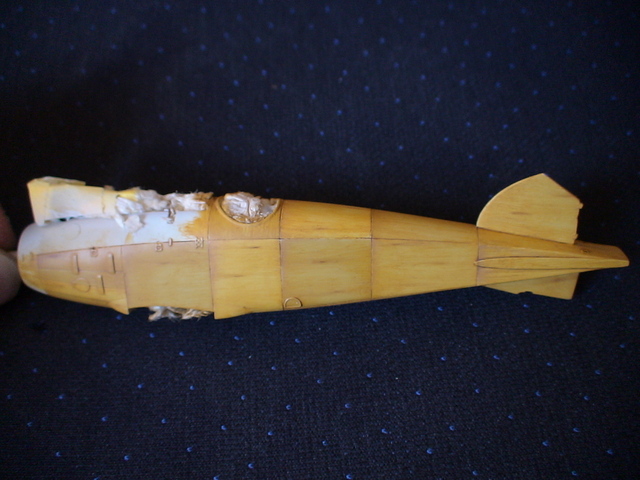
Now to continue We come to wood grain sheets used in Doll House projects. The lighter tinted sheet was used when I built the Eduard 1:48 Alb. C.III kit,

A little sanding with 600 grit, erase the fuselage details and then add the sheets cut into panels. Cyano is used here also for bonding to each adjacent panel. This build was completed in 1994. It still looks good.


The lighter colour darkened and added to the wood grain when I clear coated the fuselage.


A little sanding with 600 grit, erase the fuselage details and then add the sheets cut into panels. Cyano is used here also for bonding to each adjacent panel. This build was completed in 1994. It still looks good.
The lighter colour darkened and added to the wood grain when I clear coated the fuselage.
JackFlash
Joined: January 25, 2004
KitMaker: 11,669 posts
AeroScale: 11,011 posts
Posted: Wednesday, September 07, 2011 - 12:26 PM UTC
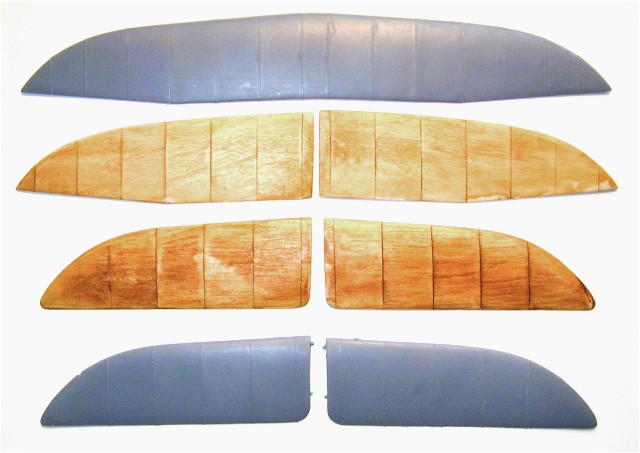
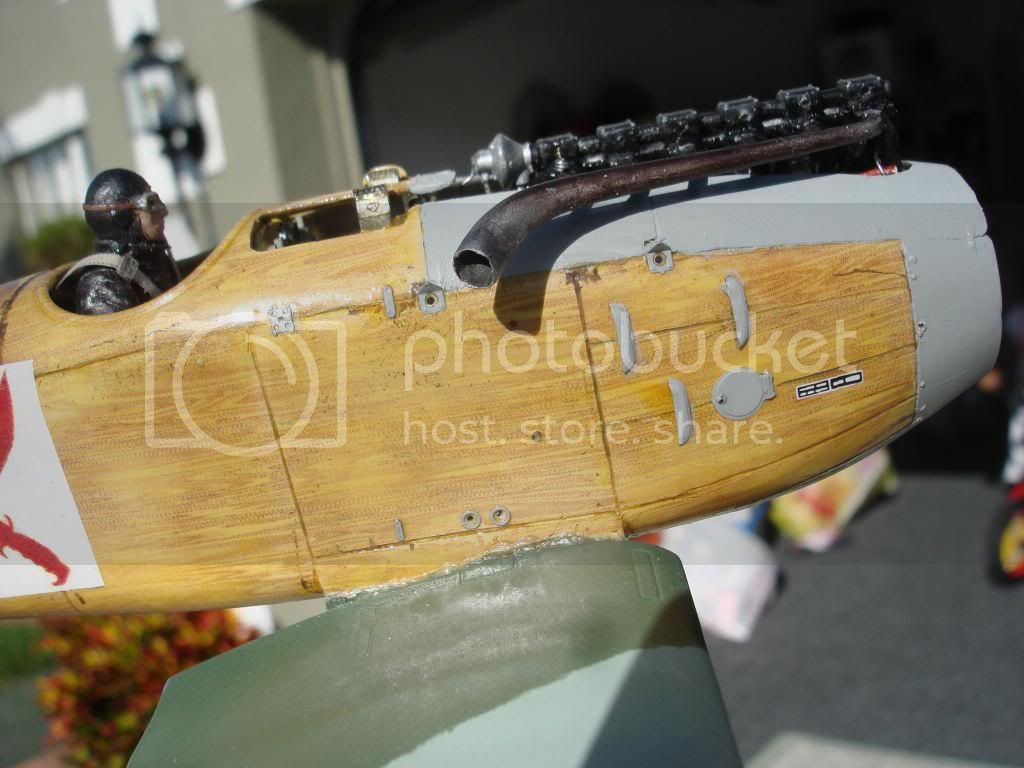
Here is a sheet that has a bit of a red cast to it. More like a mahogany stain over the ash or birch wood.

Exchanging a 180 hp Argus from Eduard or Koster for the 160 hp Mercedes kit item will be the basis for converting an Albatros C.III to an Alb. C.VI. The C.VI was used for training purposes when the Alb. C.V & V.II types were arriving for front line service. Known serials for the Alb. C.VI were 1800/16 - 1849/16.


This build depicts a post war Alb. C.VI in Polish livery. Strictly speaking the personal markings are hypothetical. Note the "replacement" wing and elevator with the earlier form of city marking. The was an identifier for the locality or airfield that the machine was assigned to before the national marking was officially standardized. The lozenge is a rare 5 colour variation that Aeromaster did before they standardized to the "very dark" 5 colour type. The armament has been altered by using a late model version 1918 and the rear cockpit has a medium sized German hand held camera (scratchbuilt) mounted on an allied Scarff ring.
Exchanging a 180 hp Argus from Eduard or Koster for the 160 hp Mercedes kit item will be the basis for converting an Albatros C.III to an Alb. C.VI. The C.VI was used for training purposes when the Alb. C.V & V.II types were arriving for front line service. Known serials for the Alb. C.VI were 1800/16 - 1849/16.
This build depicts a post war Alb. C.VI in Polish livery. Strictly speaking the personal markings are hypothetical. Note the "replacement" wing and elevator with the earlier form of city marking. The was an identifier for the locality or airfield that the machine was assigned to before the national marking was officially standardized. The lozenge is a rare 5 colour variation that Aeromaster did before they standardized to the "very dark" 5 colour type. The armament has been altered by using a late model version 1918 and the rear cockpit has a medium sized German hand held camera (scratchbuilt) mounted on an allied Scarff ring.
OEFFAG_153
Joined: February 19, 2010
KitMaker: 1,473 posts
AeroScale: 1,450 posts
Posted: Wednesday, September 07, 2011 - 08:28 PM UTC
Quoted Text
Here is Harry Woodman's book. Its free on my website. Several Aeroscale members have used the information there for scratchbuilding things such as wings, Specifically chapter 3. scratchbuild wings
Many Thanks Stephen, just what I was looking for Great looking Albatros C...
Mikael
JackFlash
Joined: January 25, 2004
KitMaker: 11,669 posts
AeroScale: 11,011 posts
Posted: Friday, September 09, 2011 - 03:25 PM UTC

Here is the last of the Doll House Veneers. You can get these with sticky backs that you simply cut to size then pull the waxpaper covering from the back and press down to any surface.
JackFlash
Joined: January 25, 2004
KitMaker: 11,669 posts
AeroScale: 11,011 posts
Posted: Tuesday, September 20, 2011 - 01:26 AM UTC
Note how subtle the grain is in the restored real deal. The following text is a general - thumbnail view of wood applications to airframes. Heavily edited by me it can be further detailed as we go along.

SPRUCE
Best strength to weight ratio of all woods & is generally the prefered wood for aircraft construction ( within specifics below). Alternatives used due to wartime or other unavailability was in Germany the pinewood called Kiefer .....other pine or fir was used. These woods are relatively "soft" woods and often require a hardwood facing where bolts pass through .
Used for wing spars, solid & box, fuselage longerons, rear sections rarely. In form of sheet material for wing ribs , particularly where they are compression members & require some baulk for stability. Solid shaped Interplane struts of streamlined section. It is also used on some British machines as floor boards ( BE's & FE's ) in the form of 1/2" thick planks. Spruce or pine / fir is used on landing gear (or interplane) struts in laminated sheaths, sometimes in conjunction with plywood layers. Sometimes wood is strengthened from splitting or to waterproof joints by covering in glued soaked fabric.
ASH
This wood is particularly good for bending work and therefore it can often be found used as wing tip bows & for bent edgings in panel-work. It is also fairly hard & being tough , it takes shock loads well , therefore is used also for engine bearers, fuselage longerons. Hard blocking & almost universally for tail skids and landing gear "struts" ( BE , Farman types etc). (but not fairings , which will be spruce or lighter ). Used in all countries that made airframes in WWI. Can be light creamy whitish to darkish brown in the grain .
PLYWOODS
Ash ply in UK ( light/ medium brownish )...Mahogany in France ( Redish Brown )....Birch (or Alder in Germany creamy grey , Off-white). Although other woods could be used as available. Birch is probably the prefered plywood .
Plywood is mainly used as a stiff form of sheet , having multi directional stiffness. Used mainly for wing ribs & sheet work, and in Germany for Albatros & other fuselages skins, Fokker E.V wing ribs & skin & variously for leading edge sheeting. Also used as floorboards and as face sheeting to stiffen fuselage frames & such.
Note!! Colours of any woods will change when varnish, laquer or oil is applied .
Basswood (US) or Lime (UK), Linden in Germany
Used due to its lightness , though not as good as spruce. Sopwith instrument panels (most others use Ash ply ). Used in Germany quite a bit on rib work in sheet & strip form/ Also used for light fairings etc.
Poplar ..Grey ( Grissard) & brown / Yellow White type
The former is used quite a lot in French machines for general , not very highly structural work such as spars onNieuport wing ribs , Ammo boxes & cabinetry & etc. Also sometimes used occasionally in German machines. White poplar is not so strong .
Walnut
Used for hard blocking, eg Spad, and for the motor mount bars, (in conjunction with Mahogany plywood )....(European medium brown or from US,it is very dark brown, known as black )
Tulip wood ( tulip poplar )
A type of Poplar used by Nieuport for multi strip layouts for the compound curves on Nieuport 17/23 side panels & for empenage skins of the 27/28. This formes are layed out over a mould & then strengthened by glued on layer of Fabric covering .
Mahogany
This was used at one early time in FE2a nacelle noses, in multy-layered strip form , similar to the above. Though by the later FE2b, this wood, along with Walnut , was then more kept for propeller use. Mahogany is mainly for plywood in French machines .
JackFlash
Joined: January 25, 2004
KitMaker: 11,669 posts
AeroScale: 11,011 posts
Posted: Tuesday, September 20, 2011 - 01:38 AM UTC
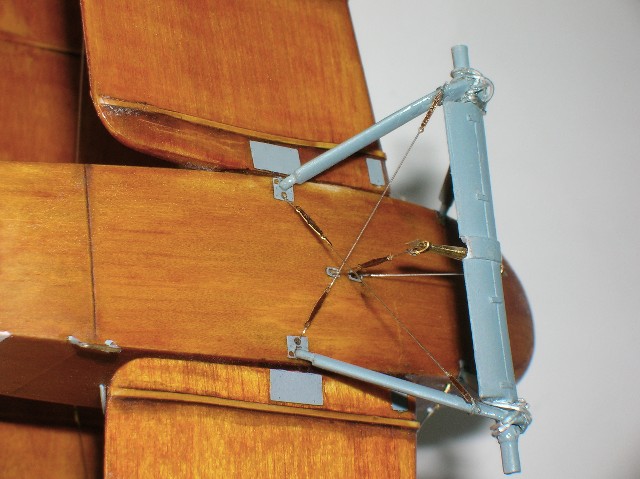
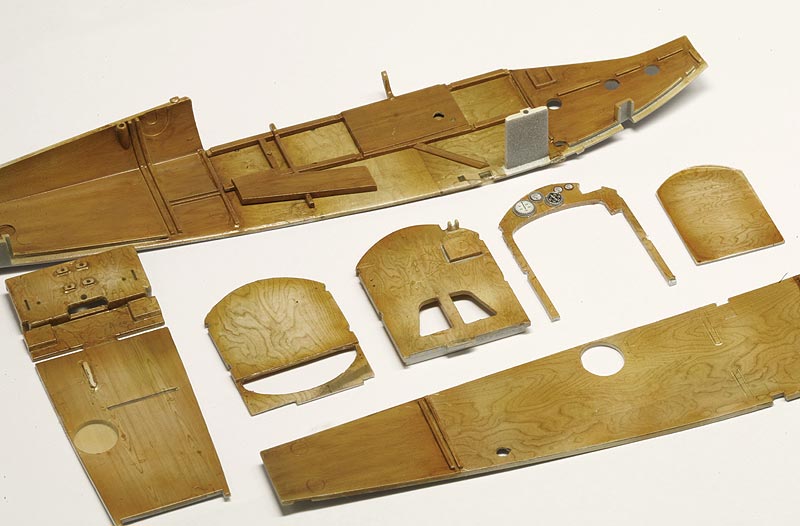
Here is a real treat. A fully scratchbuilt (1:20?) version of D.7161/17 by Master Builder Alan Clark. Note the grain on this "real" pywood. The wood was from a specialty shop that dealt with doll houses and model shipbuilding. This is a truely inspiring build.

JackFlash
Joined: January 25, 2004
KitMaker: 11,669 posts
AeroScale: 11,011 posts
Posted: Saturday, September 24, 2011 - 03:54 PM UTC
Now as a review to what has been presented
In the previous installments of this series we have discussed the existing kits of the SSW D.III & IV, Albatros C.III, D.III, D.V and D.Va in their basic forms. We discussed creating a real look to the plywood veneer fuselages that were typical of the WWI aircraft manufacturing works.
The process is very simple. To begin with it works better with the early Eduard kits as there is less detail to rid yourself of. Once you have closed up the fuselage and have erased the central union seam it is time to sand off all raised details. During this procedure, you will work down from using the heavy grit to about a fine 1200 grit sanding film. Do not try to polish the bare plastic as the small grooves helps in either process you are about to choose. When sanding seams or union gaps, protect the details you want to save with masking tape. Truing to Square is the process of checking and rechecking alignment planes. This just makes the build more life-like in the end. During this process you may find that you have to re-drill strut locator hole.
In doing either of the procedures that I am about to describe, there are a few rules that you should remember. First to repeat from page 1, the grain in the panels whether they be wild or straight always go from front to rear or in a word from nose to tail.
A. Decal film:
Start by cutting paper templates of the areas you want to work on first then transfer the pattern to the decal film and cut the piece out with a "sharp" blade. Now apply a clear film that has been streaked by you and is dry or use pre-printed decal film. This is applied in cut sections over the existing painted panels. Remember to be subtle. If your successful you can use these pieces for cockpit floors too. Note; The empty decal paper can serve as templates for any future projects in the same scale. When completely dry just mark them by number or location as to their position.
B. Painting:
Next, if you choose to paint your panels use several different colours of a basic cream or off white. Polly-S paints had a series of warm buff colours that I like and are just barely different enough, that when you place them side by side the effect is striking. Antique white, Dirty white, French Beige, Doped Linen and Sand. Apply them in pairs as I mentioned of earlier. They should oppose one another one on the left side and the match panel on the right side. Or the top panel then the matching panel on the bottom. Using this method and 5-6 different paints will cause the fuselage to look like a patch work quilt, but using subtle shades.
Next spray a (lacquer) gloss coat over the base colours you have just applied and let the piece dry thoroughly. This creates a barrier that will keep your base coat intact when applying the next step.
When ready apply a light dry brush application of brown to each individual panel. This can be a orange brown like Testors #1166. Work lightly one panel at a time and flip your brush over as you go to the next panel. This wash adds the grain so always work from nose to tail. The finish your trying to reach keeps the slight variation on the base colours but mutes them under the grain wash. This must be accomplished with a subtle approach. Practice on scrap plastic if you need to.
When dry apply a light clear coat and when it is dry take a rust or leather toned brown wash and apply over all with an airbrush or broad faced brush. This will accentuate the panel borders and give depth to the overall scheme. It really works great in smaller scales.
C. Real wood:
The other way to do a simulated wood grain is to simulate the wood veneer by using real wood panels that serve as the skin. You start by using .003-5 thou thick Marqueting wood used in doll houses or available in wood specialty stores. Cut with a very sharp - new #11 blade in your hobby knife. This was an included item in most of the old Meikraft kits. You will be sanding off most of the fuselage surface details. Do not primer. In this case you can just give the assembled fuselage a uniform coat of any one of the previously mentioned colours. It will not be necessary to seal the painted area with a dull coat here but prep the painted surface by light sanding after dry. Start by cutting paper templates of the areas you want to work on first then transfer the pattern to the Marqueting wood and cut the piece out with a sharp blade. Next, glue the piece in-place on the model with thin Cyanoacrylate. Soak up any excess with an old t-shirt. The saturation of the thin type "super glue" in the wood not only grabs the surface but when dry gives it a nice glossy surface that you can sand starting with 400 grit and work down to1200 grit and will look great. Remember to keep the grain on all panels going nose to tail. When it comes to the pieces that butt up against the metal cowling panels just sand that edge of the wood flush or near to it with a flex file. The main concern is that the panels need to butt up against each other uniformly. No raised or overlapping portions should be left. The grains will not match the one next to it. They did not match on the real aircraft either so do not worry about it.
JackFlash
Joined: January 25, 2004
KitMaker: 11,669 posts
AeroScale: 11,011 posts
Posted: Saturday, September 24, 2011 - 04:18 PM UTC

Since I already have an Eduard 1:48 Alb. D.II that I am using the Uschi decal film on, I'll choose a couple of closed up Eduard1:48 Alb. D.III kit fuselages (and maybe an old Eduard SSW D.III) and do a step by step on painting and wood veneer application. If I can snag up the HGW simulated wood decals for the Oëffag Alb. D.III version I'll review them and use the Eduard Weekend kit I reviewed earlier. (We will see how they look with the Mirage Sworl camouflage? I know Piotr Z. would like that.) Come to think of it I have a SH Lloyd C.V SH48013 on the shelf too. . .hhhmmmm.
By the way Peter Plattner did a fine example of that kit here.
JackFlash
Joined: January 25, 2004
KitMaker: 11,669 posts
AeroScale: 11,011 posts
Posted: Saturday, September 24, 2011 - 04:22 PM UTC
2008". . .For covering the seams between the veneer panels evergreen stripes (0,5 x 0,25 mm) have been used. The direction of woodgrain on the wing was a basic question. As there have been no drawings or other information available ( to me at the time), I consulted a lot of my friends associated to WWI aviation and even building replicas in 1:1 scale like Koloman Mayerhofer. In long discussions we came to the conclusion it must have been spanwise for static reasons. As I found out, much later in an article of a magazine of 1918 about building veneer wings we all have been wrong, it was chordwise! The reason was, the 3 layer ply was not included in static calculation. Modelers fate, I will not change it on my model. . ."
JackFlash
Joined: January 25, 2004
KitMaker: 11,669 posts
AeroScale: 11,011 posts
Posted: Monday, September 26, 2011 - 06:31 PM UTC
Here is the work of Brad cancian on the Eduard 81xx series kit. Landing gear lengthened.
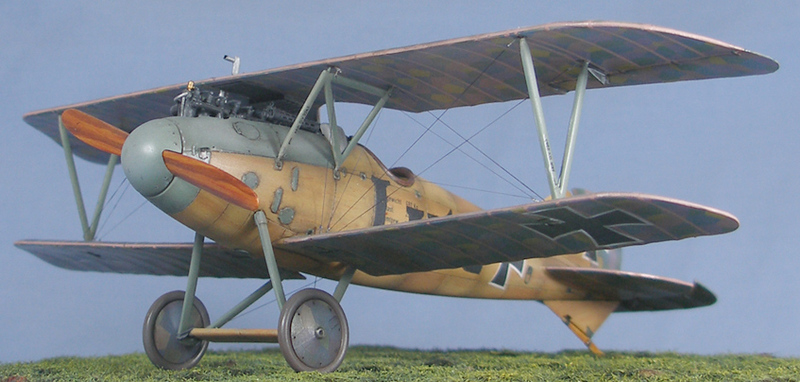
From the masterful work of Mark Miller (used with his kind permission.)
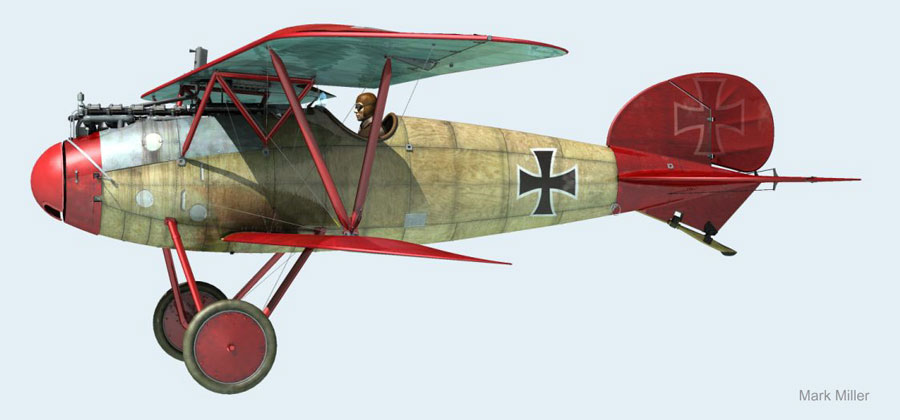

From the masterful work of Mark Miller (used with his kind permission.)
JackFlash
Joined: January 25, 2004
KitMaker: 11,669 posts
AeroScale: 11,011 posts
Posted: Saturday, October 01, 2011 - 05:53 PM UTC
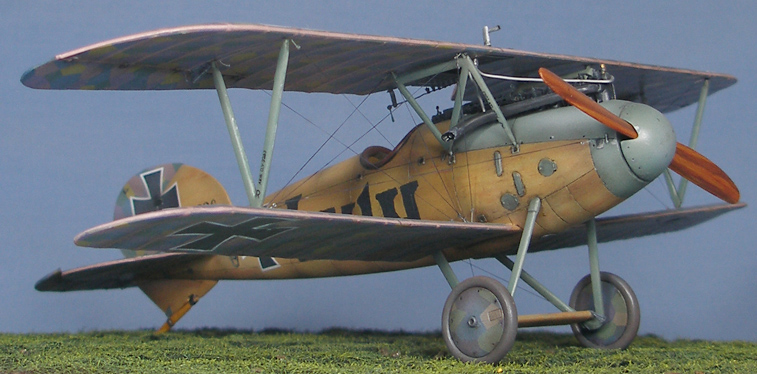
Now here is a bit of Wow! Care of that master modeler Wojtek Fajga.
Done with decals & painting.
http://www.modelarstworedukcyjne.pl/
Done with decals & painting.
http://www.modelarstworedukcyjne.pl/
JackFlash
Joined: January 25, 2004
KitMaker: 11,669 posts
AeroScale: 11,011 posts
Posted: Monday, October 03, 2011 - 02:18 PM UTC

Quoted Text
Now I haven't seen these and cannot tell you how they look but HGW has a set of wood grain decals for 1:48 & 1:32.
See here.
I am ordering some of these cookie cutter types later next week for use here and a review.
JackFlash
Joined: January 25, 2004
KitMaker: 11,669 posts
AeroScale: 11,011 posts
Posted: Monday, October 03, 2011 - 03:44 PM UTC
Here is the Alb. D.II kit #8082 fuselage with a painted wood grain technique applied. Build by Sastre Olivier
USCHIvdROSTEN
Joined: December 11, 2010
KitMaker: 64 posts
AeroScale: 57 posts
Posted: Friday, October 07, 2011 - 01:29 PM UTC
Hi gentlemen,
I have some news to share.
Uschi van der Rosten has teamed up with Ronny Bar, the man behind the masterful color profile arts in the WNW manuals.
I recommend to visit his website:

http://www.ronnybarprofiles.com/index/
The contact was made with the frinedly help of Martin Reid, editor of the
"AEROTORQUE" free online journal released by warbirds AMG, Melbourne, Australia.

http://www.warbirdsamg.com/journals
Ronny had the kindness to allow UvdR the use of his name AND:
The original artworks on which the color profiles are based on!
What came out is a pretty nice solution for your wood grain desires.
Lets have a few pictures:


These decals (WGSF-48 super fine) are supposed to be a finishing decal.
They come on a transparent carrier film.
This allows you to adjust your brightness via the color of the acrylic basecoat.
Some radome plus a little bit white is always a good idea.
However you set your preshading, i t will be vilsible nicely and subtile through the decals.
If you want to postshade them, give it a go with clear orange, yellow or smoke.
In case you dont want to see whatever kinda shading, of course no problem.
Just jump over this step.
Sealed with clear they will sport out more brilliance and a fine and crisp grain.
If you think you want them a lil darker, just give them a oil filter with some burnt sienna for instance.
I think this is our best wood grain decal for now.
Uschi is very excited and very proud to call Ronny her friend and partner.
Thanks for allowing me to jump in this thread and spread the word.
A review sample is already "in the pipe" to come to an independent point of view.
Thanks a lot!
Best wishes!
Alex
www.uschivdr.com
I have some news to share.
Uschi van der Rosten has teamed up with Ronny Bar, the man behind the masterful color profile arts in the WNW manuals.
I recommend to visit his website:
http://www.ronnybarprofiles.com/index/
The contact was made with the frinedly help of Martin Reid, editor of the
"AEROTORQUE" free online journal released by warbirds AMG, Melbourne, Australia.
http://www.warbirdsamg.com/journals
Ronny had the kindness to allow UvdR the use of his name AND:
The original artworks on which the color profiles are based on!
What came out is a pretty nice solution for your wood grain desires.
Lets have a few pictures:
These decals (WGSF-48 super fine) are supposed to be a finishing decal.
They come on a transparent carrier film.
This allows you to adjust your brightness via the color of the acrylic basecoat.
Some radome plus a little bit white is always a good idea.
However you set your preshading, i t will be vilsible nicely and subtile through the decals.
If you want to postshade them, give it a go with clear orange, yellow or smoke.
In case you dont want to see whatever kinda shading, of course no problem.
Just jump over this step.
Sealed with clear they will sport out more brilliance and a fine and crisp grain.
If you think you want them a lil darker, just give them a oil filter with some burnt sienna for instance.
I think this is our best wood grain decal for now.
Uschi is very excited and very proud to call Ronny her friend and partner.
Thanks for allowing me to jump in this thread and spread the word.
A review sample is already "in the pipe" to come to an independent point of view.
Thanks a lot!
Best wishes!
Alex
www.uschivdr.com
JackFlash
Joined: January 25, 2004
KitMaker: 11,669 posts
AeroScale: 11,011 posts
Posted: Saturday, October 08, 2011 - 04:33 PM UTC
Very cool Alex thanks for sharing!
From MisterkitUSA we get this and it looks like its on an Encore 1:32 Alb. D.II
http://www.misterkitusa.com/Page18.html
Cottage AfterMarket Industry, SPADA Laser Line Decals are finally back in re-production.
They make a free Solid sheet of a Clear Wood Pattern which is placed over a Painted Wood color base on the model.
It allows for an infinate number of varitions ot the final effect based on the color of the base coat chosen to be used and Pre and Post shading effects.
They also offer up to seven other different types of Wood grains for other applications for you to find.
I used a humbrol 61 Satin Oak thinned with white and post shaded with a Clear Future mix with Tamyia Clear yellow. And also applied each panel seperately which I measured and cut during the application.
JackFlash
Joined: January 25, 2004
KitMaker: 11,669 posts
AeroScale: 11,011 posts
Posted: Thursday, October 20, 2011 - 02:25 PM UTC
Quoted Text
Now I haven't seen these and cannot tell you how they look but HGW has a set of wood grain decals for 1:48 & 1:32.
See here.
I am ordering some of these cookie cutter types later next week for use here and a review.
I have been told that they are enroute to me now.
USCHIvdROSTEN
Joined: December 11, 2010
KitMaker: 64 posts
AeroScale: 57 posts
Posted: Sunday, October 30, 2011 - 03:43 AM UTC
JackFlash
Joined: January 25, 2004
KitMaker: 11,669 posts
AeroScale: 11,011 posts
Posted: Saturday, November 05, 2011 - 02:33 PM UTC
Quoted Text
Quoted TextNow I haven't seen these and cannot tell you how they look but HGW has a set of wood grain decals for 1:48 & 1:32.
See here.
I am ordering some of these cookie cutter types later next week for use here and a review.
I have been told that they are enroute to me now.
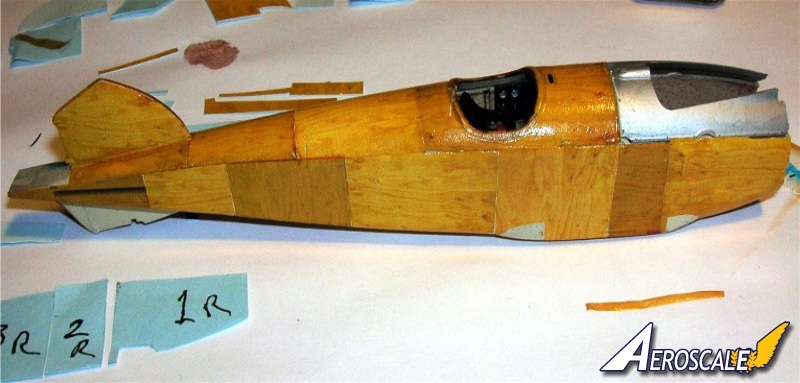
They have arrived and look good.
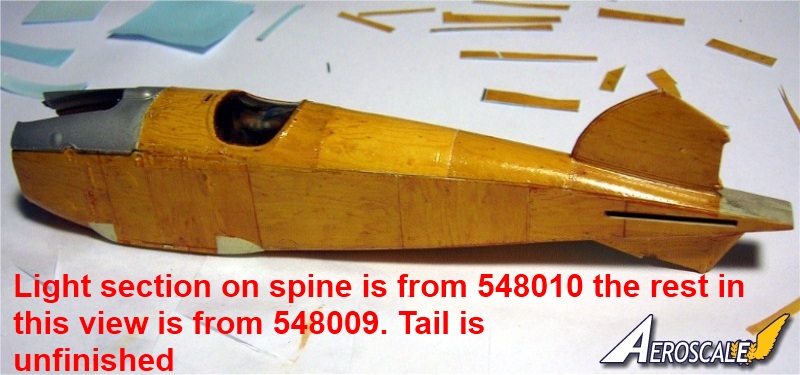
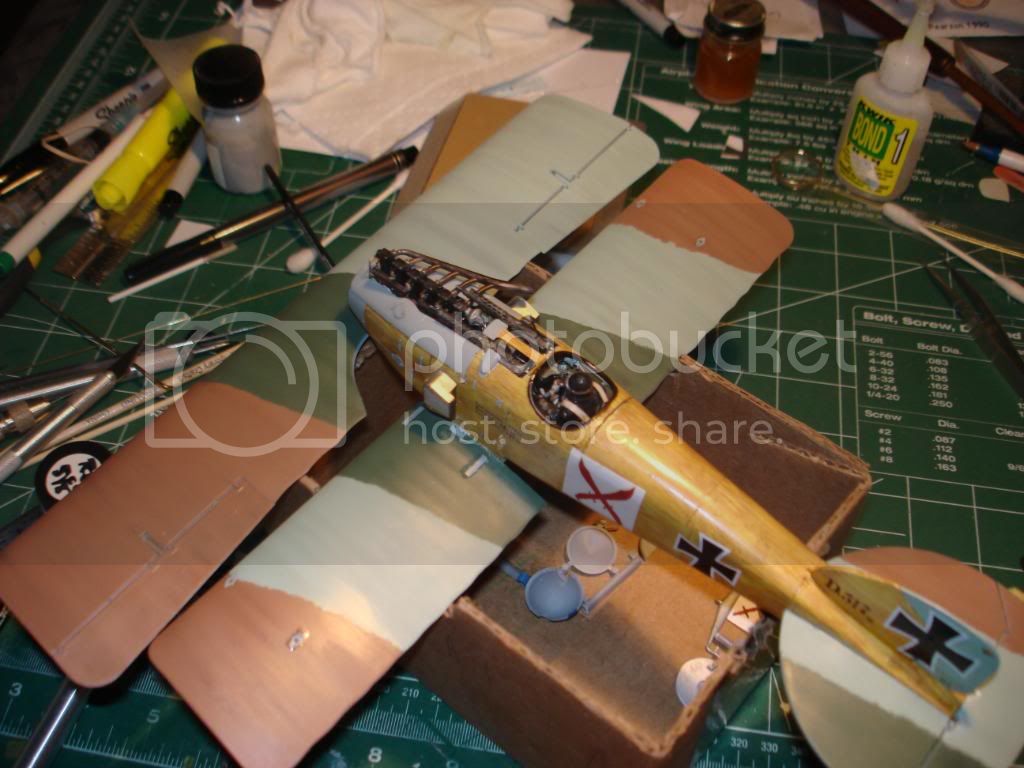
Here is the other side of the Eduard Alb. D.III Oeffag with the HGW woodgrain decals. Now on this side the darker panels are the transparent grain #548009 and the lighter ones are the white backed sets #548010.
 |

WEB HOSTING BY


Copyright ©2021 AeroScale and Kitmaker Network, a subsidiary of Silver Star Enterprises
All Rights Reserved. Please read our Conditions of Use and Privacy Policy.
All Rights Reserved. Please read our Conditions of Use and Privacy Policy.