Air Campaigns
Want to start or join a group build? This is where to start.
OFFICIAL: Big Beautiful Bombers Campaign
Dirkpitt289
_VISITCOMMUNITY
New Jersey, United States
Joined: May 24, 2008
KitMaker: 346 posts
AeroScale: 307 posts
Posted: Friday, January 08, 2010 - 08:44 AM UTC

Quoted Text

Hello everyone. I am still relatively new to this site and was curious how you join a campaign. I was just getting ready to start my b-1b 1/48 revell which I hope falls under the guidelines. I have never participated in a campaign on here, I would like to though.


Jason

Go to the very first page of the thread and the first post by chuck. There is a link called Big beautiful bombers. Click on it and it will take you to the campaign page. Then all you have to do is click on the "Enlist" button.

Welcome to the flight.
AiwaSoundSystem
_VISITCOMMUNITY
Idaho, United States
Joined: February 01, 2008
KitMaker: 52 posts
AeroScale: 49 posts
Posted: Friday, January 08, 2010 - 09:05 AM UTC

Quoted Text


Quoted Text

Hello everyone. I am still relatively new to this site and was curious how you join a campaign. I was just getting ready to start my b-1b 1/48 revell which I hope falls under the guidelines. I have never participated in a campaign on here, I would like to though.


Jason

Go to the very first page of the thread and the first post by chuck. There is a link called Big beautiful bombers. Click on it and it will take you to the campaign page. Then all you have to do is click on the "Enlist" button.

Welcome to the flight.


Thanks for the welcome I have looked at that page about 10 times today and don't know how I missed the "Enlist" button haha. Oldtimers I guess. I have to wait for some supplies to come in and then I will begin the build ... looking forward to my first campaign.
Red4
_VISITCOMMUNITY
California, United States
Joined: April 01, 2002
KitMaker: 4,287 posts
AeroScale: 1,164 posts
Posted: Friday, January 08, 2010 - 07:20 PM UTC
Hello all. Your bomber campaign lead checking into see how everybody is doing. I'm in Italy at the moment and thought I would say hi. Welcome to the group Jason. Looking forward to seeing the "B-one" take shape. Nice to see some folks have made some progress thus far. I'm off to Florence for the week end so I will check back in a little later. Have fun every body. Talk to you soon. "Q"
AiwaSoundSystem
_VISITCOMMUNITY
Idaho, United States
Joined: February 01, 2008
KitMaker: 52 posts
AeroScale: 49 posts
Posted: Saturday, January 09, 2010 - 03:16 AM UTC
Here is some of the aftermarket goodies I plan on sprucing this build up with:

Resin ALE-50 and Sniperpod
http://www.shull24.com/

White Metal Landing Gear
http://www.scaleaircraftconversions.com/moreinfo.cfm?KIT=149

Photo-Etch Parts and Burner Cans
Multiple Goodies http://www.eduard.cz/products/card.php?id_product=1619&name=b-1b&catalogue_nb=&type=&pgroup=&scale=&product_month=&product_year=&page_start=0

Burner Cans http://www.eduard.cz/products/card.php?id_product=3616&name=b-1b&catalogue_nb=&type=&pgroup=&scale=&product_month=&product_year=&page_start=0

I also know that TwoMikes is producing some other resin parts including a wheel set that I might be interested in. Waiting to see those parts before I decide though.
Red4
_VISITCOMMUNITY
California, United States
Joined: April 01, 2002
KitMaker: 4,287 posts
AeroScale: 1,164 posts
Posted: Sunday, January 10, 2010 - 06:36 AM UTC
Sounds good Jason. Mike Reeves of Two Mikes does some good stuff. I'm good friends with him. I don't think you'll be disappointed with any of their offerings. Looking forward to seeing the build. "Q"
Emeritus
_VISITCOMMUNITY
Uusimaa, Finland
Joined: March 30, 2004
KitMaker: 2,845 posts
AeroScale: 1,564 posts
Posted: Sunday, January 10, 2010 - 11:16 PM UTC
Some more progress:

Following the example of a fellow modeler, I spent several hours yesterday adding internal stucture to the cockpit sidewalls and the rear gunner's compartment with thin styrene strips. The two pieces of styrene sheet cover the depressions caused by the wing root area.

It's again one of these things that are not that visible on the finished model, but are nice knowing they're there.

With these assemblies properly dried, I'll be adding some more basic details.
AiwaSoundSystem
_VISITCOMMUNITY
Idaho, United States
Joined: February 01, 2008
KitMaker: 52 posts
AeroScale: 49 posts
Posted: Monday, January 11, 2010 - 01:54 AM UTC

Quoted Text

Sounds good Jason. Mike Reeves of Two Mikes does some good stuff. I'm good friends with him. I don't think you'll be disappointed with any of their offerings. Looking forward to seeing the build. "Q"


I know he's doing the wheels for the Bone, but do you know what else he has coming out for it? I don't want to start my build until I know how I'm going to build it. I've heard rumors of structures for the bays.
AiwaSoundSystem
_VISITCOMMUNITY
Idaho, United States
Joined: February 01, 2008
KitMaker: 52 posts
AeroScale: 49 posts
Posted: Monday, January 11, 2010 - 02:46 AM UTC
Oh what I would give to have this in time for this build.

1/48 B-52 Stratofortress
http://www.sangereng.fsnet.co.uk/boeing_52.htm

Drool.
Dirkpitt289
_VISITCOMMUNITY
New Jersey, United States
Joined: May 24, 2008
KitMaker: 346 posts
AeroScale: 307 posts
Posted: Monday, January 11, 2010 - 05:07 AM UTC
Welcome to the next instalment of B-17E "Lucy" or as it was called by its last crew "Old 666" referring to the last 3 numbers in the aircraft's serial number. Last time we saw the office of Pilot Captain Jay Zeamer and Co-Pilot 2nd LT John T Briton come together. Then the office of Bombardier Joe Sarnoski and Navigator LT Ruby Johnston.

Today we are going to focus on the temporary home of Sgt George Kendrick the waist gunner.

Starting with some styrene I had in my stash I set off.


I started by using some green Putty to fill in the optional staggered waste gunners position and started to lay out some frame work using .030 square stock styrene.


Next I used .080 H-Column to make the tracks for the waste gunners window.


More frame work.


Now before I could complete the frame work i had to install the gunners window but I had to paint it first. Using some fine grit sand paper i sanded the area around the window I wanted to paint olive green. This allowed the paint to stick to the clear plastic.


Once the frame work was completed I added some interior green, and dry brushed on some aluminum to add some wear. The window opens and closes.


Open


Closed


Next I turned back to the nose of the aircraft


Well that's it for now. Thanks for taking the time to look at my work.
Red4
_VISITCOMMUNITY
California, United States
Joined: April 01, 2002
KitMaker: 4,287 posts
AeroScale: 1,164 posts
Posted: Monday, January 11, 2010 - 06:10 PM UTC
I'll contact him and see if I can get a lead on what he has in store for the Bone. "Q"
Keeperofsouls2099
_VISITCOMMUNITY
Florida, United States
Joined: January 14, 2009
KitMaker: 2,798 posts
AeroScale: 2,443 posts
Posted: Wednesday, January 13, 2010 - 03:06 PM UTC
I bought my B-1b today at LHS should start as soon as im done with P-38 for ACES HIGH.Looking good guys


Build On,
Justin
Grenadier37
_VISITCOMMUNITY
Texas, United States
Joined: June 02, 2008
KitMaker: 232 posts
AeroScale: 155 posts
Posted: Thursday, January 14, 2010 - 08:24 AM UTC
I searched my stash and decided on Trumpeter's 1/72 Il-28 "Beagle". I've been looking camo and markings options but color images seem to be rare. Does anyone know of a good source?
Emeritus
_VISITCOMMUNITY
Uusimaa, Finland
Joined: March 30, 2004
KitMaker: 2,845 posts
AeroScale: 1,564 posts
Posted: Thursday, January 14, 2010 - 09:05 AM UTC
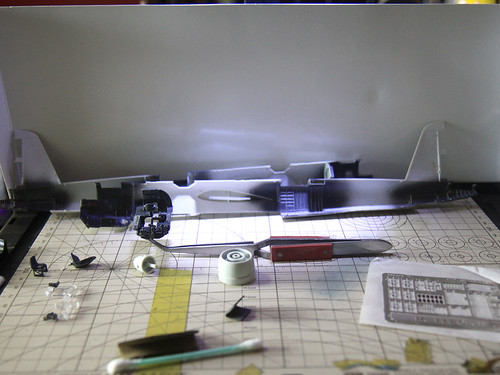
Some more progress on my Tupolev.

Even though I'm not sure whether I'll pose the bomb bay doors open, I added internal frame detail to the roof of the main bomb bay with styrene strips:


Oh, completely forgot this when posting, I also worked on the main U/C bay doors. The outsides have a pattern of very finely recessed rivets, but the insides are blank, so I added corresponding framing from styrene thin strip.


As I anticipated, the main landing gear support struts couldn't quite take the handling, one of the fixed broken struts breaking again when removing from the sprue.
Instead of fiddling with the flimsy bits anymore, I promptly cut off all of them, drilled a hole through each U/C gear leg and glued in copper wire. Simpler than the styrene they replaced, but certainly sturdier.

Now I just have to hope I don't break the parts while bending down the wire struts...

The outer wings were assembled from the usual upper and lower halves, nothing special worth mentioning. Fit was good, although the trailing edges will require some putty to make a cleaner uniform edge. The ailerons were a bit of a surprise, as they required quite a bit of cutting and filing to fit properly in the neutral position. Out of the box, both the left and right ailerons fit well in a "down" position, so to pose them fit uniform, a step had to be filed in the upper back edge.

When I got the ailerons glued on properly, I started with the landing light that was in the right wing on this particular aircraft. Pleasantly simple after the chore of fitting the ailerons:
1) measure, mark and cut a slot in the leading edge

2) clean up the slot and glue in styrene sheet to form a boxed-in space

3) trim off excess styrene sheet


Next I'll have to dig into to the spare parts box to see if I got something to make the lights. If not, I gotta make them from scratch.

That's it for this time. Hope you like it so far.
AIRGUNNER
_VISITCOMMUNITY
England - South East, United Kingdom
Joined: September 27, 2006
KitMaker: 246 posts
AeroScale: 234 posts
Posted: Friday, January 15, 2010 - 11:35 AM UTC
Hi all,

I originally wanted to do the Frog Renzen/Rita for this campaign, but Santa delivered this..


As it was a real blast from the past, I loved this kit as a kid, I am now going to try and get it done quick, and do the Rita as well. I made a start this evening..


I will add detail to the cockpit walls, and a quick dry-brush to bring out highlights. It needs more adding because it has a large glasshouse. I just need to let the wash dry throughly before proceeding. I also have the wings, tailplanes and rudder put together, and a base coat on the engines, but thats not very interesting yet so I will post pictures when they are finished.

More soon...
Frigate
_VISITCOMMUNITY
West Virginia, United States
Joined: April 22, 2006
KitMaker: 500 posts
AeroScale: 243 posts
Posted: Friday, January 15, 2010 - 12:59 PM UTC
OK Gang,
I originally was going with a 1/144 BAC Canberra. But after doing quite a bit more research,I have decided to go with the USA's first "bomber"- The DeHavilland DH-4. This will be Ye Olde Airfix kit in 1/72. I am going to try to convert it to the "Liberty" DH-4....so we'll see how that goes. At present,I haven't decided if this will be USAS colors, or a Marine Corps example from the Northern Bombing Group. Stay tuned...... Semper Fi.....Bruce
camogirl
_VISITCOMMUNITY
England - North East, United Kingdom
Joined: October 20, 2005
KitMaker: 1,045 posts
AeroScale: 622 posts
Posted: Saturday, January 16, 2010 - 10:52 AM UTC
Fingers crossed tomorrow will see the fuselage halves going together I will try and get some pics up of this before closing it all up
Tigerbait
_VISITCOMMUNITY
North Carolina, United States
Joined: September 28, 2005
KitMaker: 347 posts
AeroScale: 179 posts
Posted: Saturday, January 16, 2010 - 04:39 PM UTC
Here's some progress on my Mossie ... the Heyford will NOT be seeing the light of day YIKES!!!


She's all closed up ... just need to fix a couple gaps and the on to the wings ... so far so good!!! No major problems!


Dirkpitt289
_VISITCOMMUNITY
New Jersey, United States
Joined: May 24, 2008
KitMaker: 346 posts
AeroScale: 307 posts
Posted: Monday, January 18, 2010 - 08:44 AM UTC
Ok guys I'm finally back with some progress to share. After looking at several B-17 books and numerous photos online I found another detail I wanted to add. What I found was that the model came with center bomb racks flanking the catwalk. What it doesn't have were the bomb racks attached to the fuselage. These I had to scratch build. Its crude but except for these pictures who will ever see it.


Next I had to make some adjustments to the interior color of the aircraft. What I hadn't realized the first time around was that the bombay was not interior green. With a lot of poking around on the Internet and talking to people with infinitely more knowledge then me was that the fuselage was commonly left bare metal like the waist gunners area. The bulkheads and the inside of the bombay doors were green zinc chromite. Also you can see I finished the frame work in the waist and nose of the both fuselage halves.


Here is the rest of the bombay area. After a lot of trial and error I found what I feel is a somewhat believable plywood. I first painted what is suppose to be wood with tan and let it dry. Later I came back with some brown and left it streaky allowing the tan to show through in places. Not perfect but not bad IMHO.


here we have the right fuselage with the assemblies in place.


Well that's it for now. After looking at the photos I noticed something I had forgotten to do and that is wash the Bombay bulkheads. Its late so I will address that tomorrow. Thanks for looking.
Keeperofsouls2099
_VISITCOMMUNITY
Florida, United States
Joined: January 14, 2009
KitMaker: 2,798 posts
AeroScale: 2,443 posts
Posted: Monday, January 18, 2010 - 01:21 PM UTC
nice scratch work dirk when its all closed up you wont see any imperfections anyway not that I can see any anyway.


Build On,
Justin
iflytb20
#501
_VISITCOMMUNITY
Kerala, India / भारत
Joined: August 25, 2009
KitMaker: 292 posts
AeroScale: 194 posts
Posted: Tuesday, January 19, 2010 - 03:47 AM UTC
I finally started my build - Revell 1/72 He 177. A lot of firsts for me :
First time in a Group Build
First time using PE
First time doing research PRIOR to building

The Progress so far:

Started work on the cockpit. Most sub-assemblies completed. Most Fingers cut already.
Will upload some pics asap

Cheers
jhoog59
_VISITCOMMUNITY
Florida, United States
Joined: November 13, 2005
KitMaker: 189 posts
AeroScale: 129 posts
Posted: Tuesday, January 19, 2010 - 05:57 AM UTC
Sign me up. I have a 1/48 Lancaster and a MK2 conversion set waiting to go.
iflytb20
#501
_VISITCOMMUNITY
Kerala, India / भारत
Joined: August 25, 2009
KitMaker: 292 posts
AeroScale: 194 posts
Posted: Tuesday, January 19, 2010 - 07:58 PM UTC
Okies...here are the pics. As usual, all comments / suggestions / advice welcome

Like i said, a lot of firsts with this build. Also, my first time using an airbrush. Managed to get my hands on a Revell starter airbrush with a air can. And boy is it fun or what


Interiors. First primed with white and then Tamiya German Grey [it looks like RLM 66 to me]


Right cockpit sidewall - my first time using PE. And a looooong way to go before i get the hang of it.


Front Office


Radio Operator's office
Grenadier37
_VISITCOMMUNITY
Texas, United States
Joined: June 02, 2008
KitMaker: 232 posts
AeroScale: 155 posts
Posted: Wednesday, January 20, 2010 - 06:14 AM UTC
Looks great so far Raj. Isn't it amazing how much better the paint looks using an airbrush.

Being consistent (air pressure, amount of thinner, etc. etc.) is the key to getting the best results. I'll often write down the amounts of paint vs. thinner so I can refer back to it, I always use a pipette to dispense the fluids and count the number of drops, e.g. 20 drops paint, 5 drops thinner. The cans of "air" work, but often give inconsistent pressures. Think about investing in an air compressor. They pay for themselves in the long run.
iflytb20
#501
_VISITCOMMUNITY
Kerala, India / भारत
Joined: August 25, 2009
KitMaker: 292 posts
AeroScale: 194 posts
Posted: Thursday, January 21, 2010 - 07:49 PM UTC
Thanks for the tip. I'll make a note of the Paint to Thinner Ratios for the future.


Quoted Text

Think about investing in an air compressor. They pay for themselves in the long run.


I have that plan too. But the biggest problem is getting a suitable compressor in India. The ones i've seen are so big / powerful that they can blow a hole in the model with the pressure

But i'll keep hunting
CMOT70
_VISITCOMMUNITY
Victoria, Australia
Joined: August 23, 2007
KitMaker: 629 posts
AeroScale: 539 posts
Posted: Saturday, January 23, 2010 - 03:47 PM UTC
Making a start today on my entry for this campaign. The big Russian heavy bomber. This is a big aircraft even in 1/72 scale. Quite a lot bigger than a B-17 or Lancaster anyway.

Luckily i managed to aquire an Eduard mask set for this kit, i was not looking forward to cutting a hundred little windows out manually i can tell you.


Andrew