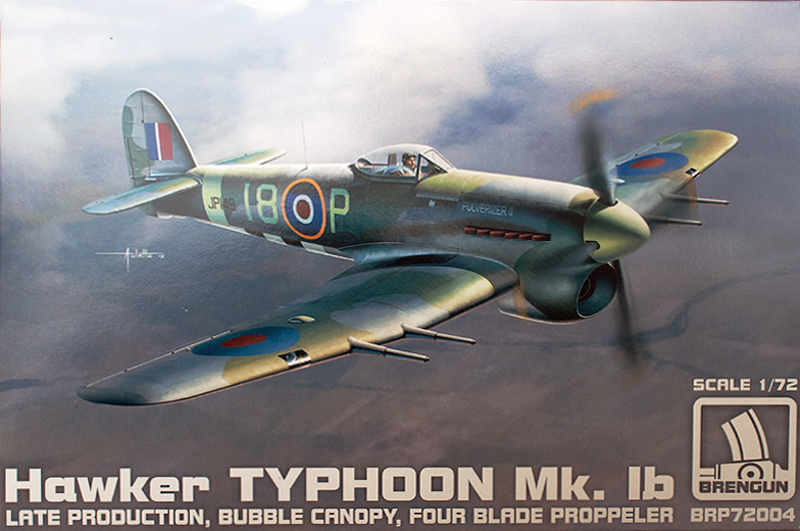
Introduction
The timing of the release of this kit was unfortunate for Brengun, coming just before Airfix announced their new 1/72 Typhoon (also with late tailplane and 4 blade prop). Brengun have tried to cover all options for modelling the Hawker Typhoon, which is great for those who have a particular aircraft in mind. As well as this late production boxing (four blade prop/bubble canopy), there is a mid production boxing (three blade prop/bubble canopy)- these contain the same parts, except the markings; and no doubt soon an early production version will be released (with car-door canopy).
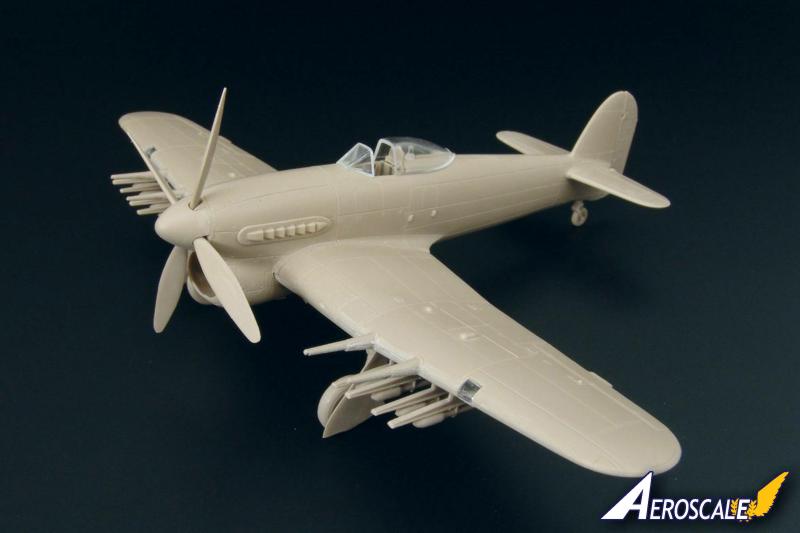
Something to bear in mind when comparing this kit to the New Airfix or older Academy or Hobbyboss ones, is that this is a short-run kit: there are no locating pins on the parts, the backs of several parts have significant ejector posts that need removal. However, there is more surface detail and it is more subtly rendered than the mainstream kits. What remains to be seen is how easily it builds. The size of the sprue and the colour of the styrene suggest to me Brengun is using a manufacturing partner, but Ive not heard even a rumor of this, so Ill leave it up to you to guess who I think it might be.
This review is a little longer and more obsessive with the details than I usually like to be, so I apologise in advance!
Opening the box
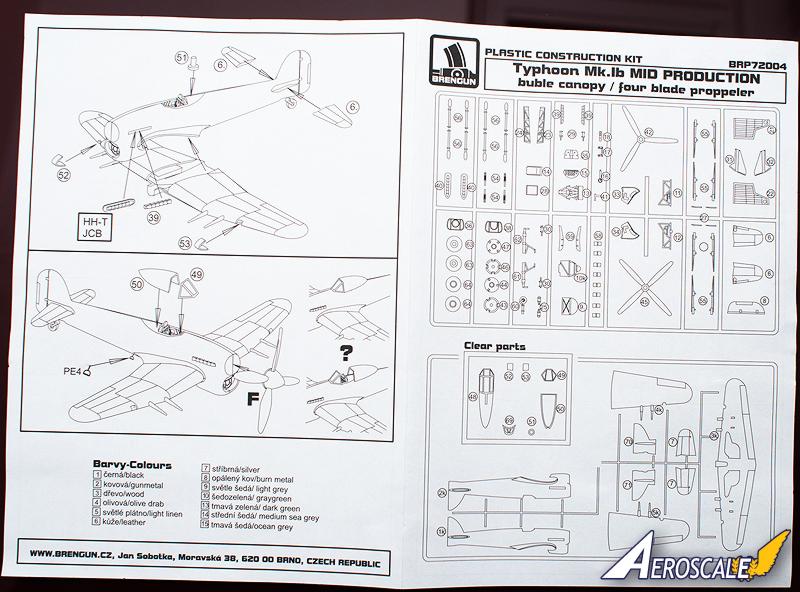
The box is large for a 1/72 single engine aircraft- this is to enable the largest of the four sprues to fit. It is an end-opening box, so is less useful for storing the model during the build. It uses the full-colour rear of the box for the marking illustrations.
Inside the box is a re-sealable plastic bag containing the main sprues of beige polystyrene, and inside that a smaller bag containing the decals, clear parts, and small photo-etched metal fret.
Marking options
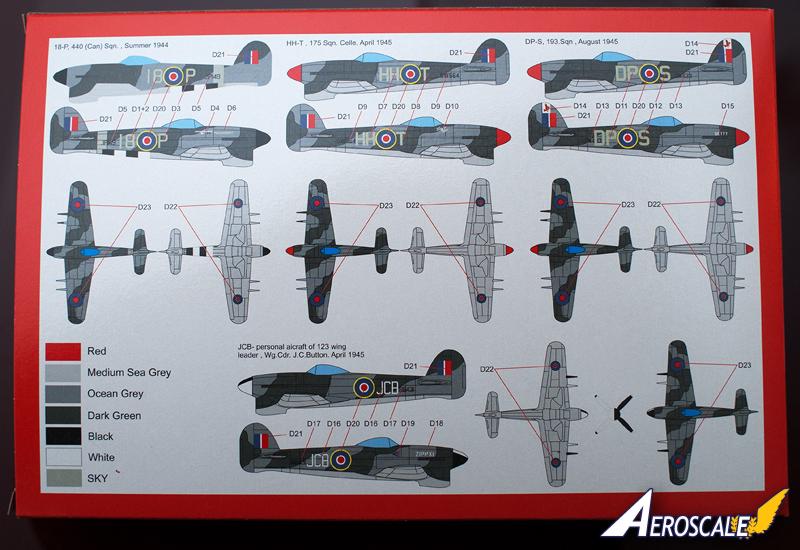
- 18-P, 440 (Can) Sqn, Summer 1944
- HH-T, 175 Sqn, Celle, April 1945
- DP-S, 193 Sqn, August 1945
- JCP, 123 Wing, April 1945
Shapes
I wont be lining the kit parts up against any plans, as I think that can be misleading I read that the Academy nose lined up well with the Arthur Bentley plans, yet the 3D shape looked wrong, and was much too pointy, when compared to photos of the real aircraft. I have looked at a lot of Typhoon photographs, and I think the photos of the made-up kit (provided by Brengun, and included in the images section of this review for reference) show the shape to be very, very good- I could see nothing strange.
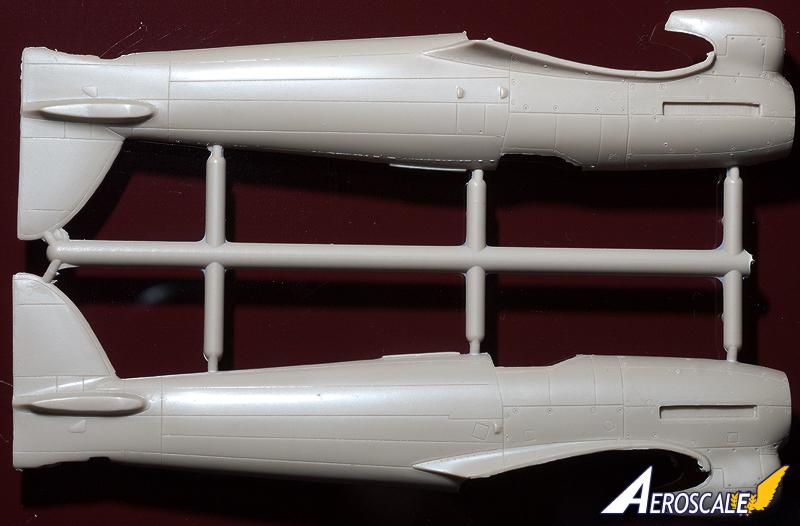
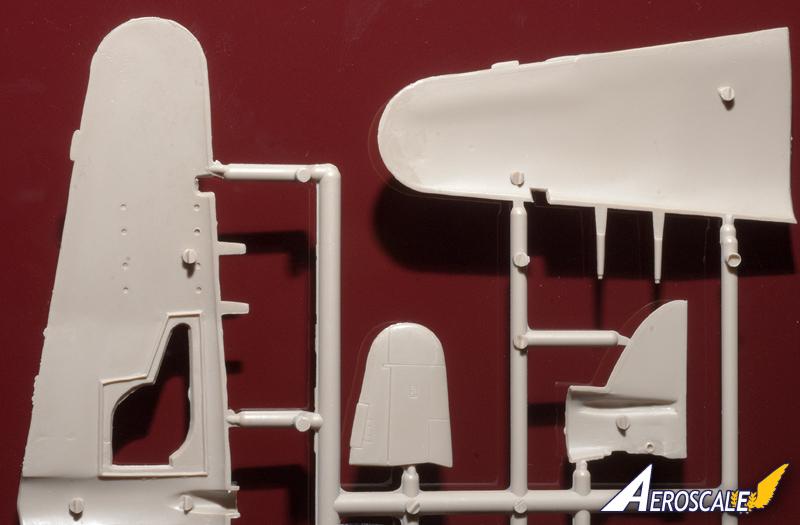
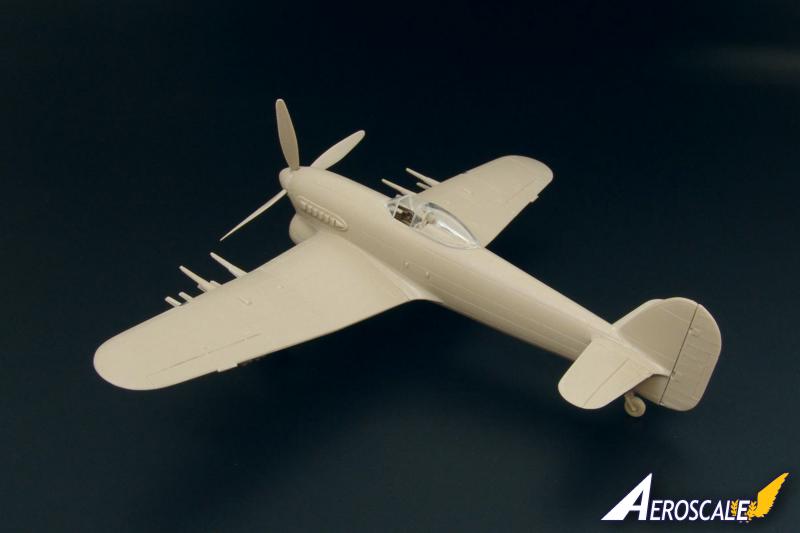
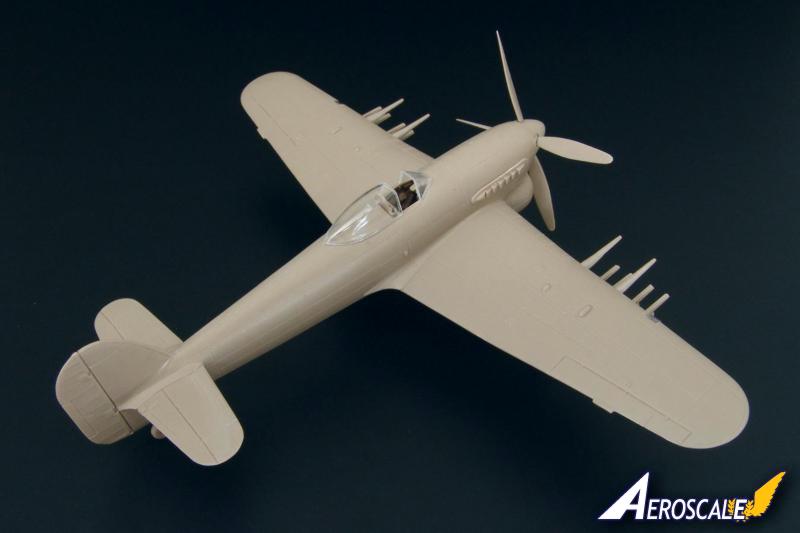
Surface details of wings and fuselage
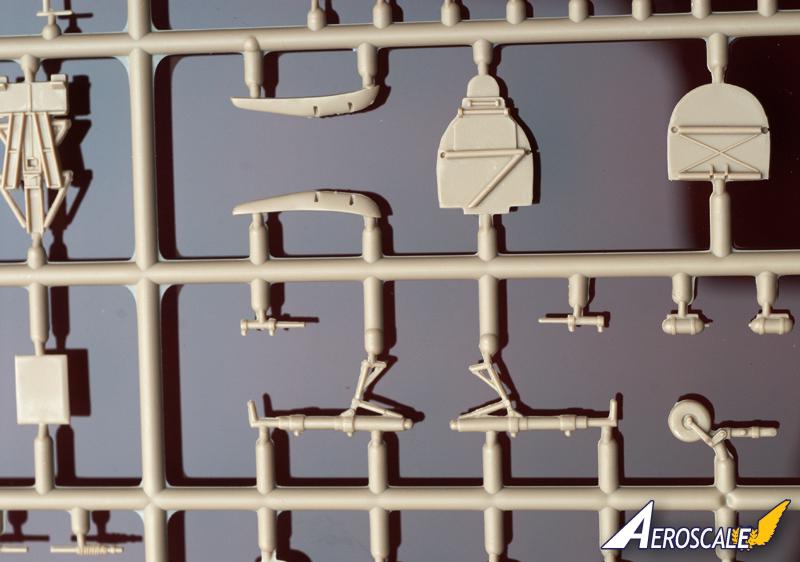
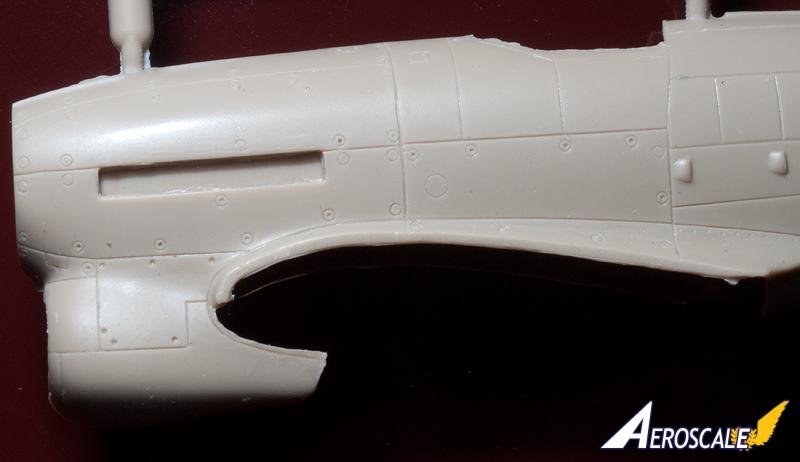
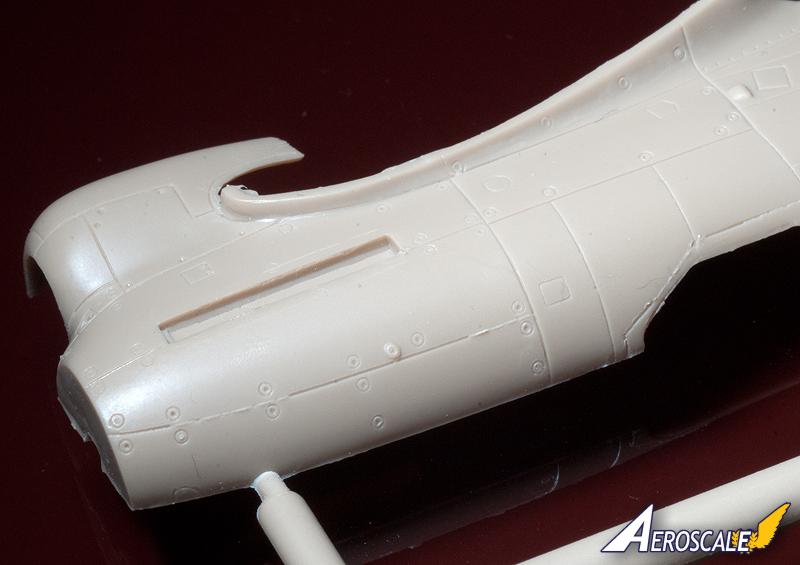
The surface detailing of this kit is very impressive. Finely engraved lines and rivets. Although some of the wing panels are raised slightly, these are not the exaggerated protrusions found on the Academy wings. The cowling fasteners look really excellent. A few of the engraved lines have clogged up at some stage of the mould-making process, but these should be cleared easily with a scribing tool. There is a fair amount of flash on the parts, but nothing that disrupts detailed areas, so I am not worried by it. The rudder is a separate part from the vertical stabiliser, and has a really nice, very subtle, fabric effect.
A closer look at the parts
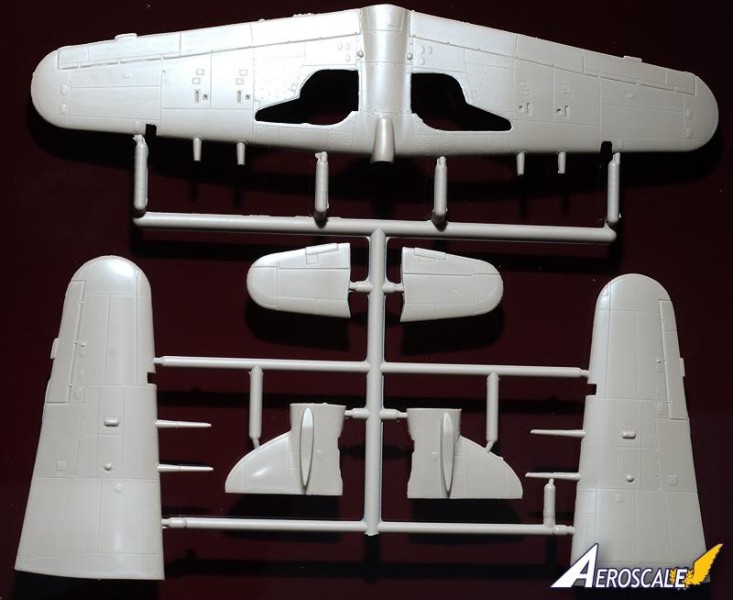
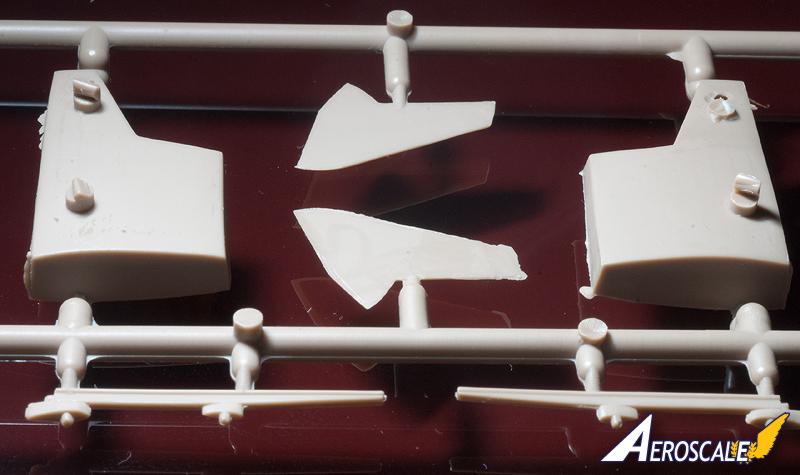
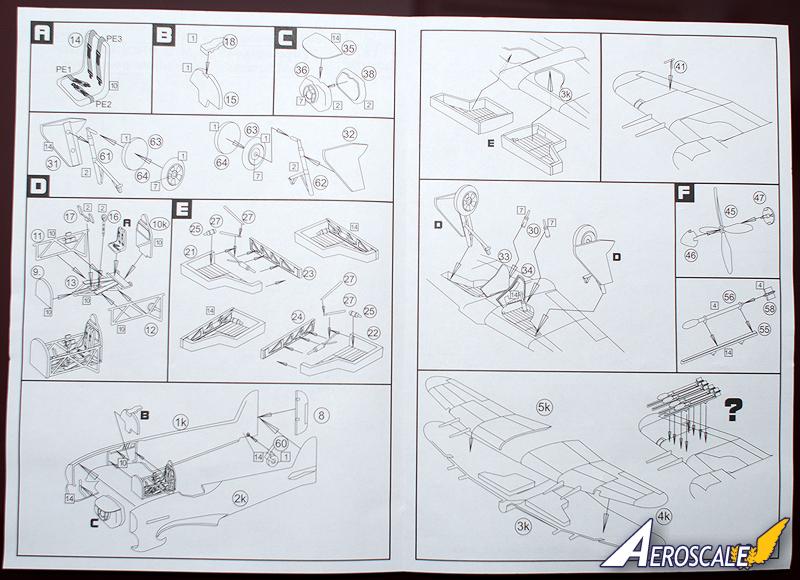
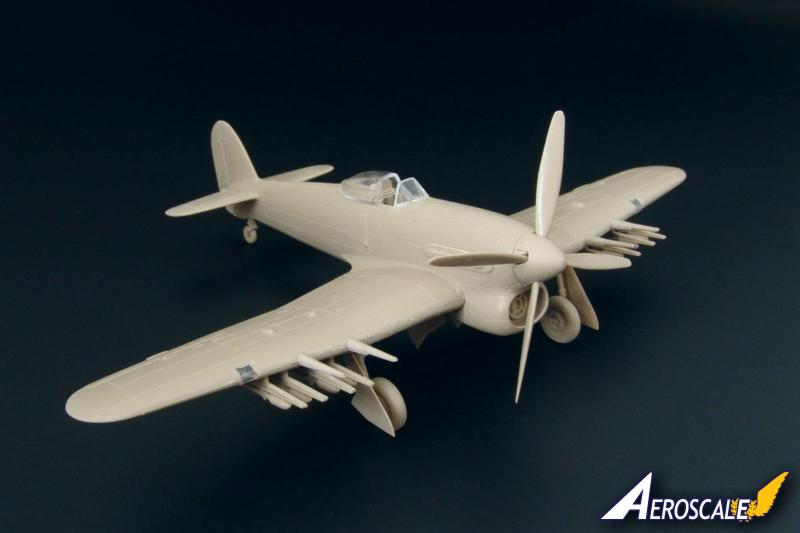
Up until now, there has never been a 1/72 kit of the Typhoon that can be built out-of-the-box with the larger Tempest tailplanes. These were fitted to the later production aircraft, and all aircraft with four-bladed propellers would have had them. Even with aftermarket resin tailplanes, fairing the joint at the roots with filler posed a problem. Brengun has overcome this by offering a whole different tail unit for the larger tailplanes. While this solves the root fairing problem, it means that careful cutting across the fuselage will be needed to make sure everything remains square. I also believe this choice has lead to the kit designer opting to not represent the fishplate reinforcing that were fitted around the tail unit joint probably as they felt they would be too easily damaged by the sanding required to make a clean join. An option I had thought of when considering this tailplane variants problem, was to have the root fairing as part of the tailplane, instead of a part of the fuselage. In any case, Brengun should be praised for offering both tailplanes.
Other options the kit offers are fully shrouded exhausts, or bare exhausts. The Typhoon went through a number of exhaust designs- first bare and quite short, then extra-long stubs were tried as an attempt to reduce carbon monoxide build-up in the engine bay. When this failed, and it was noted that they caused more drag, the original design was re-instated. Then a fully shrouded design was put into production, that surrounded the whole exhaust area of the cowlings- these are what Brengun has provided in this kit. The shrouds were later modified to not require the surrounding area, but still enclose the exhausts themselves (these are what the Hendon Typhoon has). Most of these were removed by the time the Typhoon squadrons moved onto the continent in 1944, leaving the exhausts has they had originally been. The exhausts have a very interesting feature, one missed on nearly every scale model of the Typhoon as the cowlings taper towards the nose, the front-most exhaust should be longer, protruding more, as the engine itself doesnt have any taper. The ends of the exhausts on either side should be parallel. Brengun seems to have represented this correctly.
The kit includes both three and four bladed propellers, so even if you decided after buying the kit to make a 3-blader with aftermarket decals, you wont have to look for an aftermarket prop too. The blade shape looks good to my eye- the Academy blades looked too wide, these dont.
Probably the most characteristic weapon of the Typhoon is the rocket projectile, and this kit features Mk.I rails and separately moulded 60lb rockets. Ideally, Mk.III rails would have been provided additionally, especially for this late production boxing. The kit also provides the bomb racks, but nothing to hang from them. It should be noted that soon after rockets were introduced, it was found to be more efficient for different squadrons to specialise in the use of either bombs or rockets. So check whether what your aircrafts squadron was using before adding either weapon. Of the markings offered in this kit, HH-T (175 Sqn) was rocket-armed, DP-S (193 Sqn) and 18-P (440 Sqn) were bombers, JCP was the personal mount of a Wing Commander (and so could have had either, but bombs might be more likely than rockets as Wg Cdr Button was previously leader of 193 Sqn) personally I would opt for neither in this case.
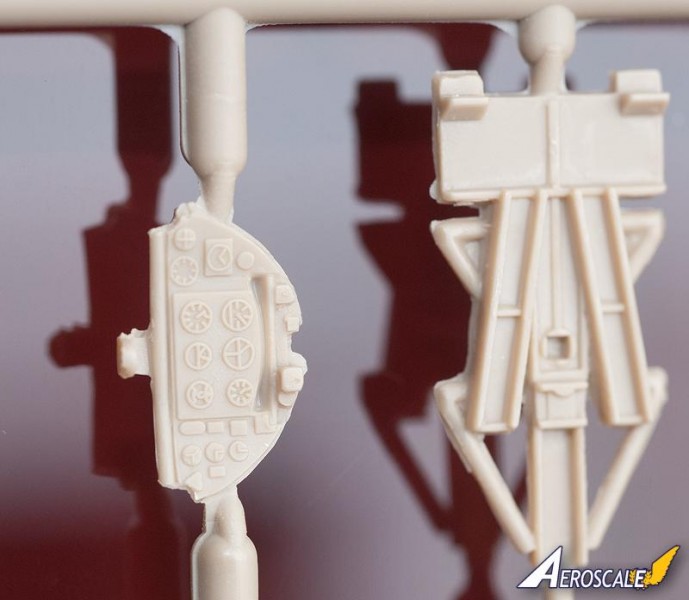
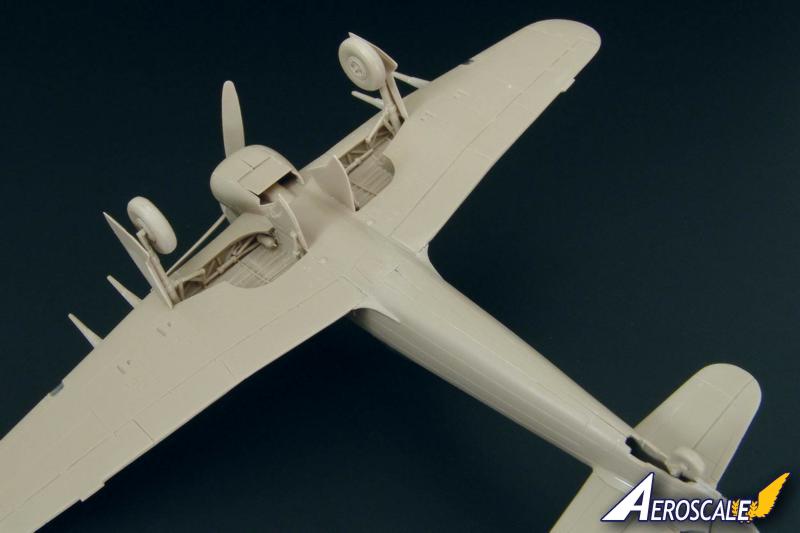
The armoured head rest has been very well represented- the rail for the shoulder straps to run over is present, and it has the correct rounded top. The area behind the head-rest is exactly as it is erroneously represented in the Hasegawa 1/48 kit having a large navigation light, and something attached to the back of the headrest. Both these items were only ever fitted to the prototype bubble-top, and production models never had these. The headrest is important, as the cockpit opening is so small, you dont see much else!
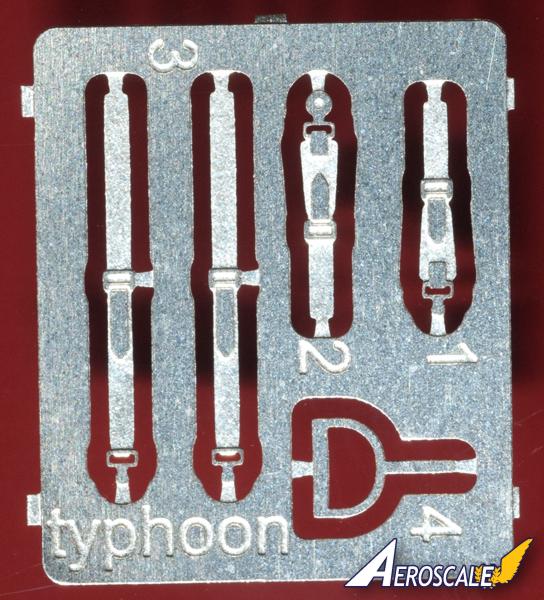
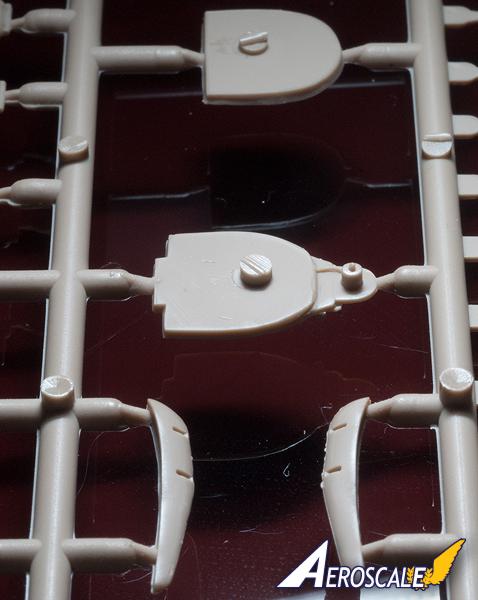
The cockpit is by far the best detailed Typhoon cockpit in a 1/72 kit. Significantly better than the Pavla resin one, and the Academy styrene one. The only thing that lets it down is the gun sight, which is completely wrong. If you Google for images of the surviving Typhoon cockpits, you will see the tubular framework that supports the gun sight. Most bubble-canopy Typhoon gun sights reflected straight off the windscreen (as did those of the Tempest), but some used ones with built-in glass reflectors, as was found on all car-doors types (their windscreens being too steep for this trick to work). There is a compass below the instrument panel, as there should be, something Hasegawa missed from the 1/48 kit. The seat part fell off the sprue, and is missing in the photographs accompanying this review, but is looks good (the very lightly padded back cushion could be added by a diligent modeller), especially with the excellent photo-etched seat belts included in the kit. The boarding foot-stirrup is also included as a PE part, but is not quite accurate (it should be slanted so the foot hold is horizontal while the fuselage is in the sloping position it has when on the ground).
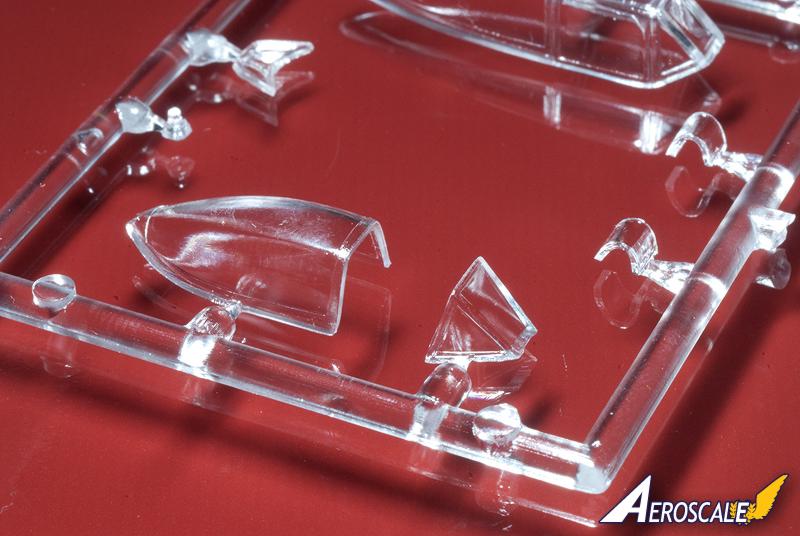
The canopy looks acceptable, but it is not blown enough, the cross section of the real thing changed from the angular frame of the windscreen to a circular one in the middle. It is not possible to mould this sort of overhanging contour in an injection part. The Hasegawa canopy in 1/48 is a very good attempt. The Brengun canopy looks a hundred times better than the Academy (and Hobbyboss) ones- it is not essential to replace it with a vac-form, as it is with those earlier kits if you want a model that looks like a Typhoon.
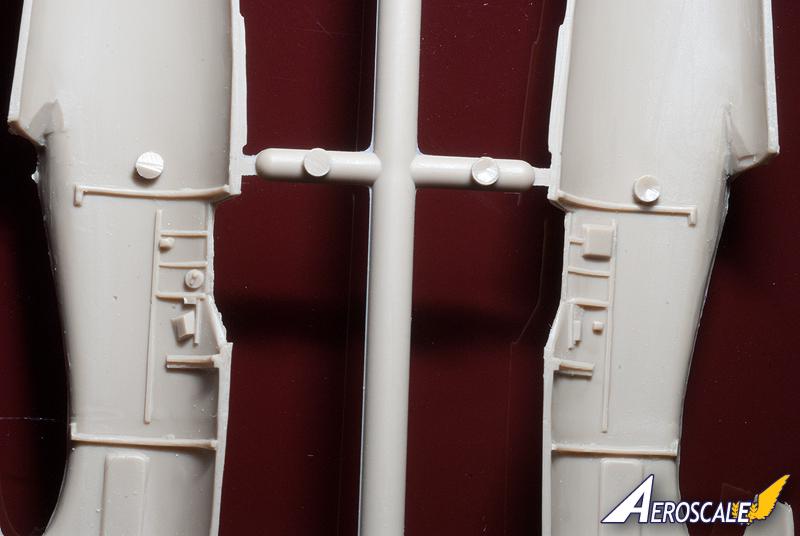
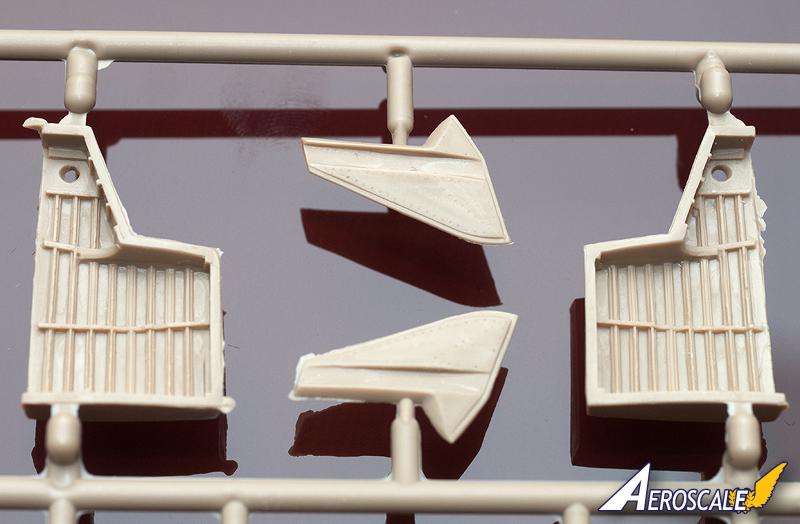
The wheel wells are a particular highlight of this kit- having represented the wing spar visible as the front wall of the wells, and having the squared corners under the overhanging wing undersurface. The compressed air bottles are separate pieces. It should look beautiful painted, especially if the modeller adds a few pipes. Unlike the Pavla kit (that also features separate wheel wells), the upper wing pieces are very thin, and it seems like there is a good chance to fit the separate well parts without having to thin these further.
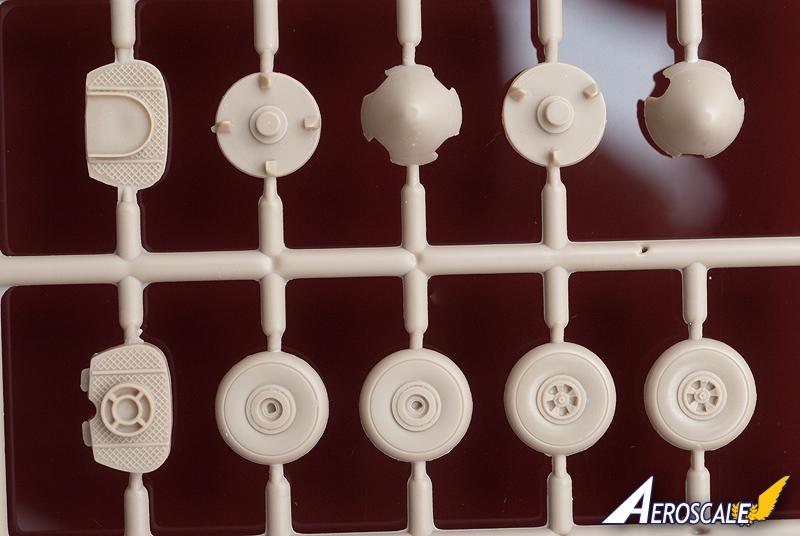
The tailwheel supplied is the early type (round tyre) these late production Typhoons had anti-shimmy tyres fitted. The tyre had a groove running around its edge, so there were actually two contact points with the ground, which prevented the shimmy effect that trailing castered wheels suffer from.
I felt a little let down when I saw the radiator, as it shares the same strange shape as the Academy kit- maybe this is not important as looking from the front opening (which has a good shape), it is not really noticeable in this scale. However, the circular divider is prominent, and I feel it should have been done to the high standards of the rest of the kit. On the plus side, the radiator has a textured rear part, that might be visible, as they have made the cooling flap at the rear of the radiator fairing as a separate part that you can reposition. I think one option that could have been included easily, and is needed for most late war Typhoons, is the cuckoo-door air filter. This sat in front of the radiator, and was quite obvious when looking from the front of the aircraft. The name comes from the one-way doors at the front of the filter that prevented the filter becoming a projectile when the engine backfired. The earlier design of reflector dome (designed and put into production in a matter of days after engines failed after only a few take-offs in the Normandy dust) would have been a good additional part for the mid production boxing. The last few batches of Typhoons were fitted with a belly-mounted air filter, behind the radiator fairing, and this too could have been supplied in this boxing.
Brengun, being primarily an aftermarket manufacturer, may well address many of these limitations of the kit with additional resin and photo-etched parts. Im keeping my fingers crossed.
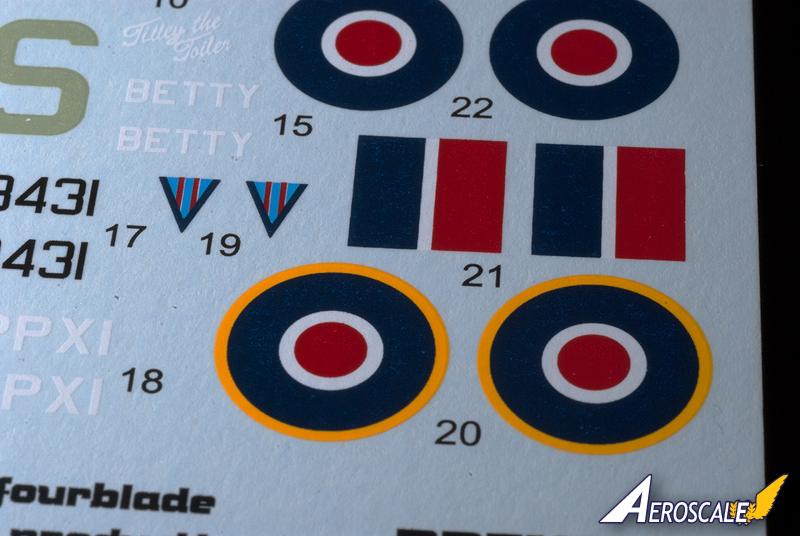
Decals
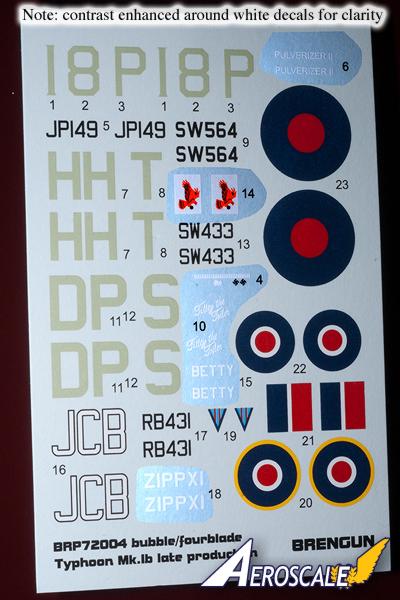
Ill discuss the shortcomings of these in the next section, but they are very well printed, and the colours look good. However, there are no stencils, something I expect to be provided in a kit of this type.
Errors and shortcomings
Before I looked at the markings and instructions, I had a very good feeling about this kit one of the most detailed I have seen in 1/72. But unfortunately this was shaken as I examined the instructions and decals.
Crucially, the instructions miss off the instruction to cut off the small tail unit, and they even say to use the parts for the small tailplanes. I initially thought maybe I had been sent the wrong instructions- they confusingly have a mistake labelling them as for the Mid Production version but the kit number and description of buble canopy / four blade proppeler (sic) lead me to think otherwise. There is no indication in the instructions that HH-T is the only aircraft option that would have had rocket rails fitted.
There are issues are to do with the depth of research into the marking options. I would have hoped that as the kit shows so much time and care for how the aircraft is represented, that care would have been taken in the research too.
Probably the most obvious mistake is the roundels. Orders issued in January 1945 (and photographic evidence suggests completed by April) stated that Typhoons in 2nd TAF should carry National Marking III (known to modellers as C1 type) should be displayed in all six locations. C1 are the type with thin yellow outer rings, and thin white rings (like the kit provides for the fuselage positions). The HH-T, DP-S and JCB options would have had these roundels, which are not provided in this kit.
The instructions should state the wing leading edge landing lights were faired-over on HH-T, DP-S and JCB certainly; and possibly one or both of 18-Ps lights would have been too.
The instructions tell you to use the shrouded exhausts for HH-T and JCB. I have not seen a photograph of HH-T, but from its very late serial number, it would not have had these. JCB definitely didnt. I have only seen a very small number of photographs of bubble-topped Typhoons with the full fairings over the exhausts they are more appropriate for the later car-doors (e.g. in early 1944).
18-Ps serial was actually MP149, not JP149. This is a mistake published in the old Camouflage and Markings book on the Typhoon, and repeated in the Arrow Graphics 1/48 sheet. The train and two swastika kill markings under the row of bombs on the scoreboard for this option are also an error. These are also from the Camouflage and Markings book, and are not present in photographs. The colour of the Pulverizer II text is also likely to be something darker than white, yellow is a good bet, as other colour photographs show this being used by on Canadian Typhoon cowlings, and it matches in tone in the black and white photograph. After Pulverizer II was photographed with one row of bombs on the scoreboard, this was added to with a line of brooms (for sweeps), and a further line of bombs. A flying or diving woman was also added in front of the Pulverizer II text on the cowling. If you plan to make this aircraft, a build of the Academy kit by Geoff McDonell is a feature on the Hyperscale site, and has good references.
DP-S also has an incorrect serial number, it should be SW493, not SW433 as in these decals. The name BETTY should appear on both sides of the cowling (decals are provided but the placement guide only shows it on one side). It should also be further forward on the cowling, almost at the spinner. The colour of the harrier carrying a grenade (the crest of 192 Sqn) on the fin of this aircraft is probably red rather than the orange on these decal maybe the designer was were influenced by a modern version of the this crest that does use an orangey red for this bird. The painting instructions should indicate that the cannon fairings on this aircraft in August 1945 were painted red, like the spinner. Being really picky, the spinner back plate should be white, and the missing cuckoo-door filter would have been red too.
JCB is a really interesting scheme, and I thank Brengun for choosing it, as it is a favourite of mine. Wing Commander J.C. Zipp Buttons personal mount has a very eye-catching balc and white colour scheme. The prop and spinner is half black and half white, with inverted tips to the blades. The painting instructions do indicate this, and the white inner cannon fairings, and black outer ones. However, the instructions and decals dont show the black interior of the undercarriage doors, with white outlining and a white box with the initials JCB in black. In the photograph of this aircraft, the initials on the fuselage are only seen reflected in a puddle, so I dont mind the artistic licence of using a the black outline of the letters in the kit decals (they may or may not have had them), but the reflection does suggest a thicker, and possibly shorter character style. It was common for personal markings to be smaller than the normal full code height. Another interesting thing about this aircraft was that it was used for filming attacks, and so probably had two 35mm film cameras fitted for this purpose (maybe not at the same time). The photograph shows the inner port cannon fairing was short, and the cannon removed, with possible camera lens seen in the fairing. The second camera installation was in the vacant landing light location in the starboard wing, seen as a dark fairing over the light location, with a darker round hole where the lens would be.
There is no mention of aerials these late war Typhoons had a whip aerial just behind the roundel on the top surface of the fuselage, offset slightly from the mid-line (to starboard, if my memory is correct) for their radios; the IFF system used a bladed vertical aerial under the fuselage.
There are no painting instructions for the fuselage area behind the cockpit opening, under the canopy (it should be black). The wheel wells and insides of the doors are marked to be painted as medium sea grey I think aluminium paint is preferred in the current consensus.
Please remember, when contacting retailers or manufacturers, to mention that you saw their products highlighted here - on
AEROSCALE.


Comments