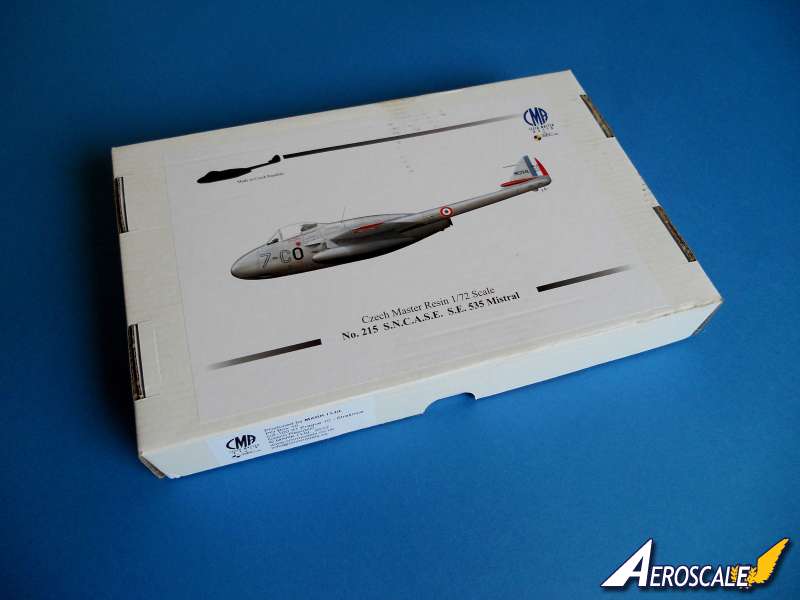
Czech Master Resin [CMR] has released a 1/72 multimedia kit of the S.E. 535 Mistral. The major structures are made from grey and black resin. Eduard has supplied pre coloured and non coloured photo etched parts and paint masks. Also contained are full set of silk screen printed decals providing markings and stencils.
Background:
The French Aviation industry was struggling to catch up with the rapid advances made by both the British and the Americans. As a stop gap the French Air Force decided to purchase a number of Vampire FB Mk 5 from de Havilland and also SNCASE acquired a licence to build further Vampires. A licence to produce the Rolls Royce Nene engine was also acquired. The usual engine for the Vampire was the Goblin so the more powerful Nene needed quite a few modifications to the airframe. The result was the very pleasing looking SNCASE SE 530. The most obvious differences were the new power plant. The wing root intakes were enlarged and the split-trunk intake of the Hawker P.1040 [Seahawk] was adapted to supply more air for the engine. Also there were additional small auxiliary air inlets along the fuselage Fuel tankage was increased, cabin pressurisation introduced and the pilot was provided with an SNCASO ejection seat. Four pre-production aircraft were built, the first of these flying on 1 April 1951. Baptised the Mistral, the SE 532 entered production, the first flying in December 1951 and 97 being built. These were followed by 150 examples of the SE 535, the last of which was delivered on 25 March 1954. The SE 535 was powered by the Hispano-built Nene 104 with similar rating to the Nene of the SE 532. In addition to its four 20mm HS 404 cannon, the Mistral 535 could carry eight T-10 or HVAR rockets, or two 450kg bombs. The Mistral entered Armee dl'Air service in 1952 and was finally withdrawn in 1961.
Contents:
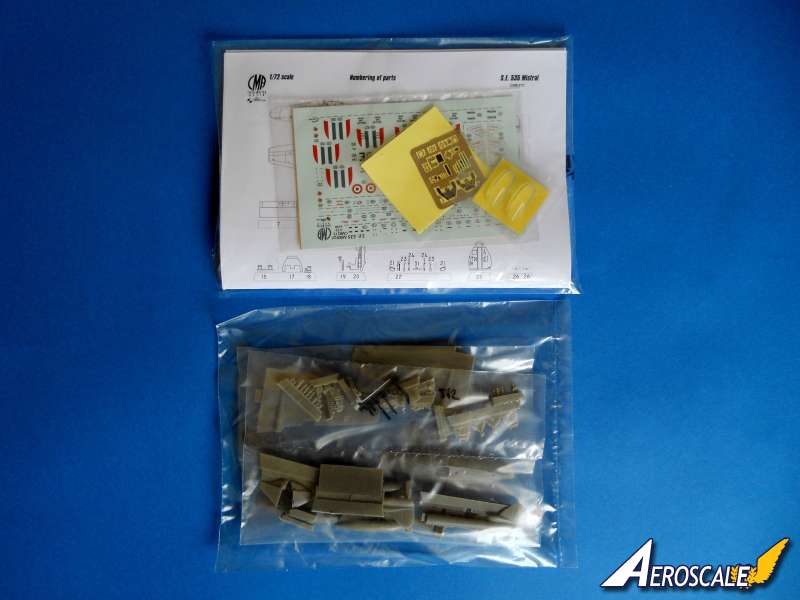
All the parts used in the construction of the Mistral are very well packed in the stout top opening box. The resin parts are contained in a sealed six pouch bag. Also there is a generous amount of bubble wrap to stop any excessive movement of parts in the box. Instructions, vac formed parts, photo etched parts and decals are separately packed in sealed bags. I do like the illustrations that Juanita Franzi is commissioned to do for the CMR kits, well worth cutting out and hanging in your workspace.
Included with this 1/72 multimedia kit is:
-59 x grey resin parts,
-5 x black resin parts,
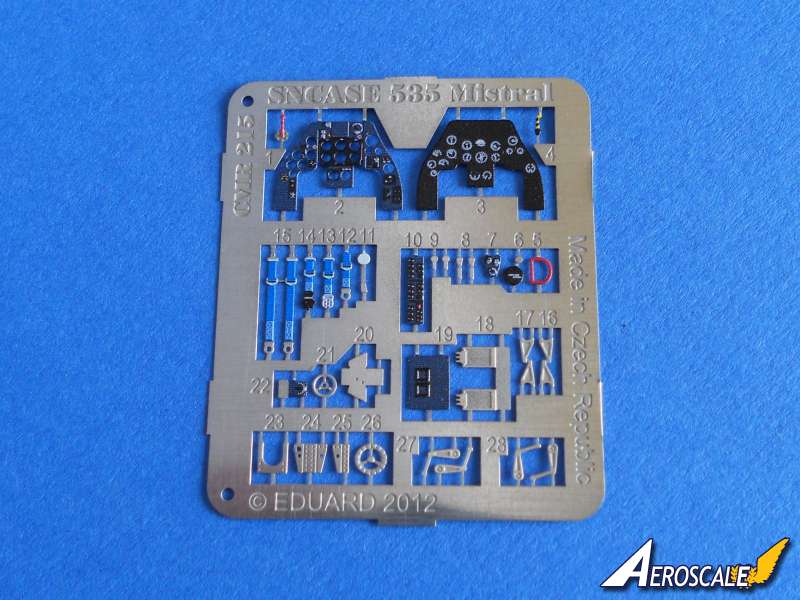
-1 x pre-coloured PE fret from Eduaurd.
-2 x vac-form canopies,
-1 x set of Kubuka masks for the windscreen and canopy, from Eduard.
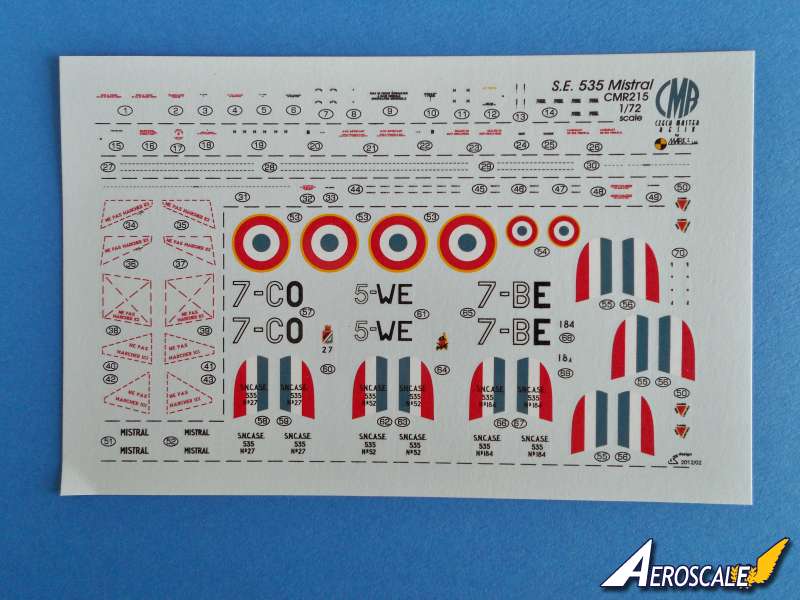
-1 x decal sheet with three options.
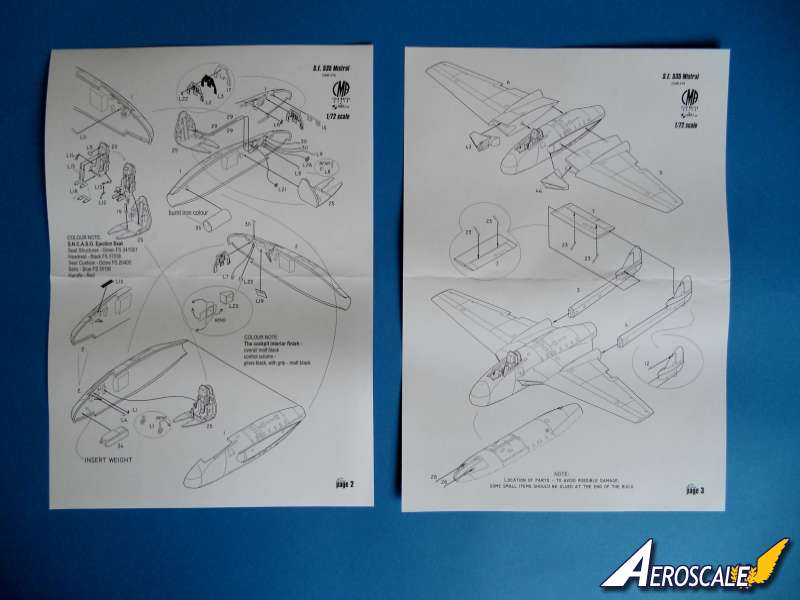
-10 x pages of construction, colour and marking instructions.
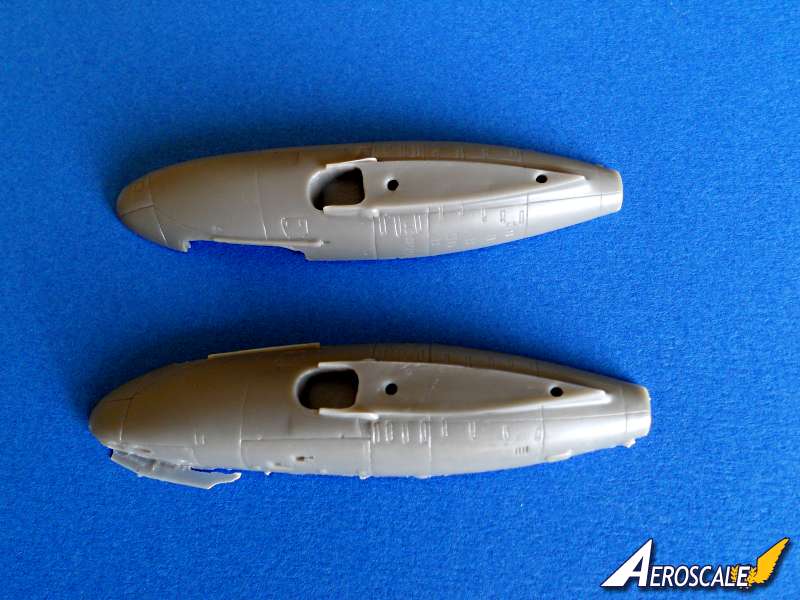
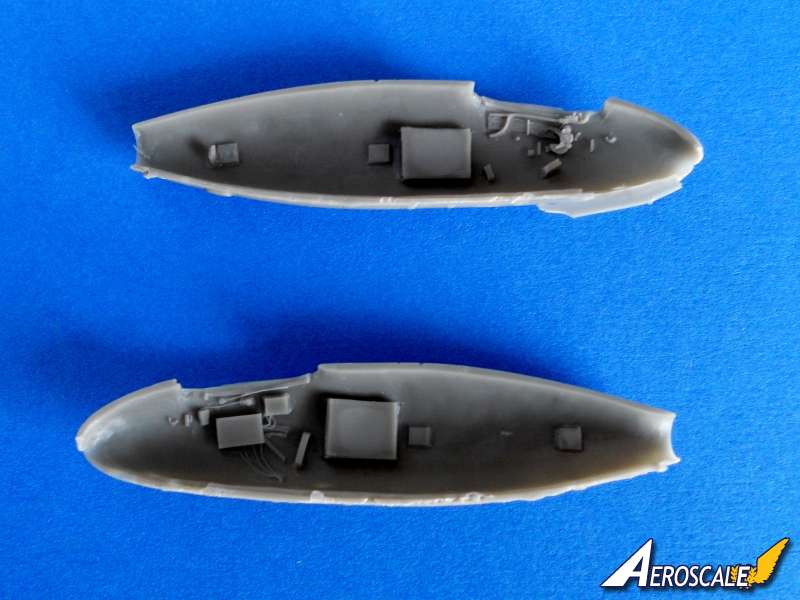
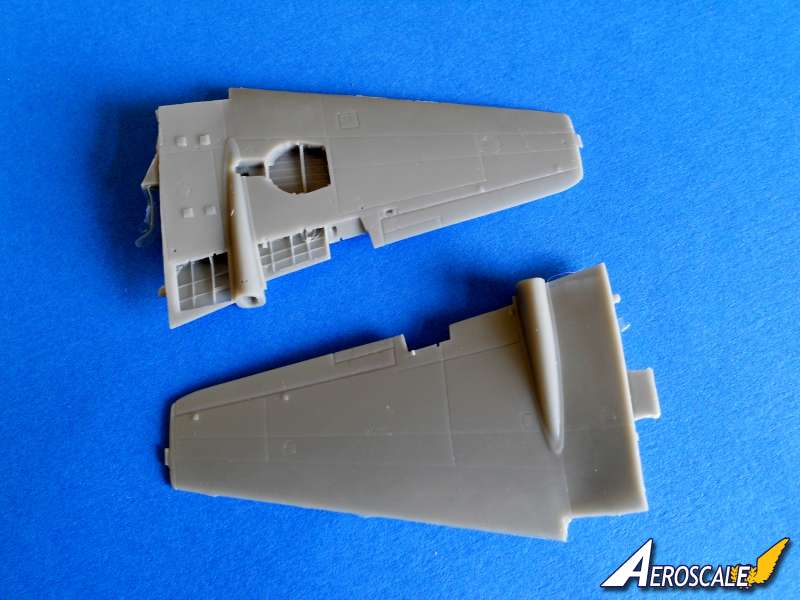
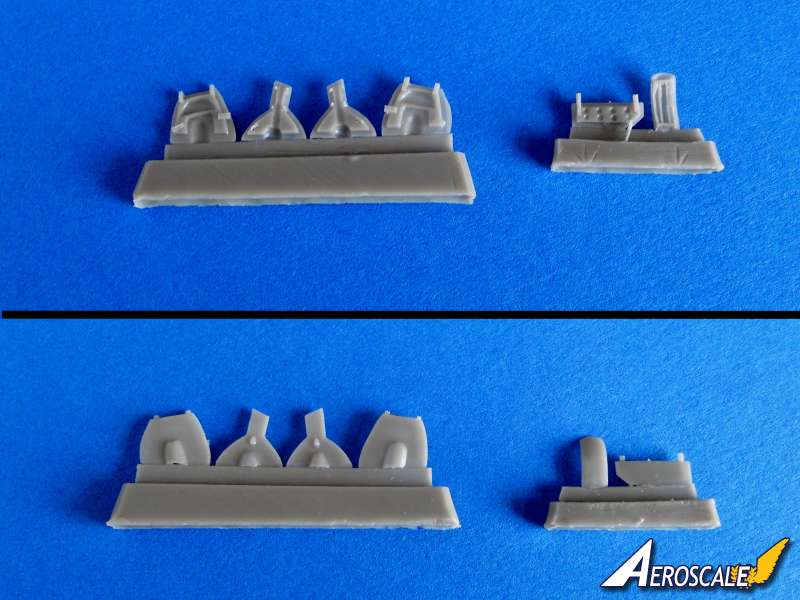
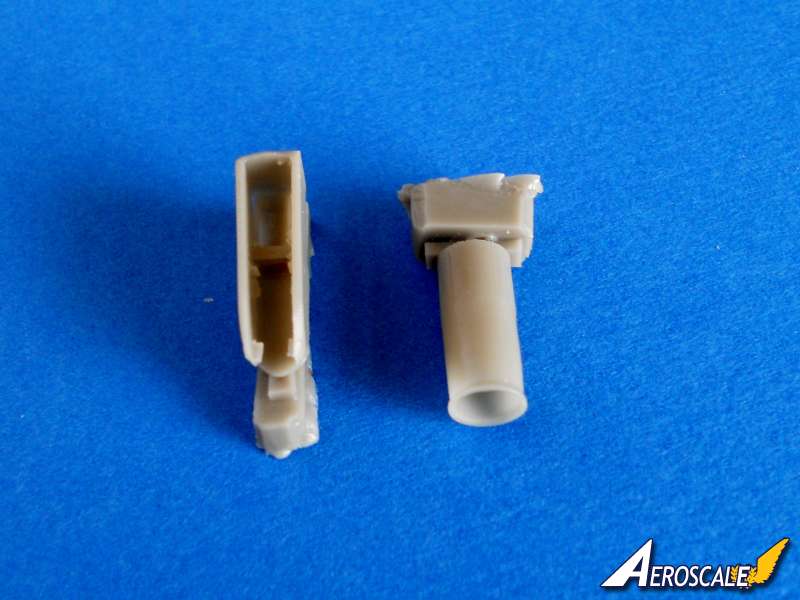
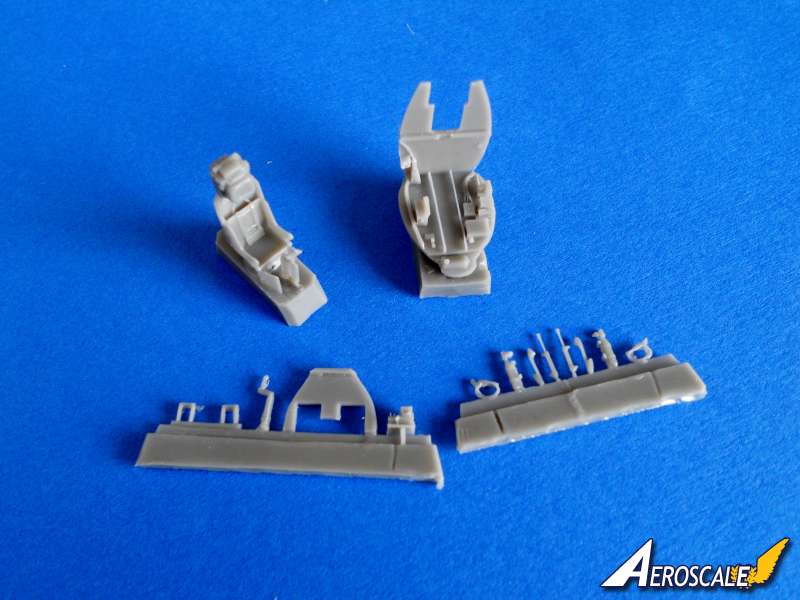
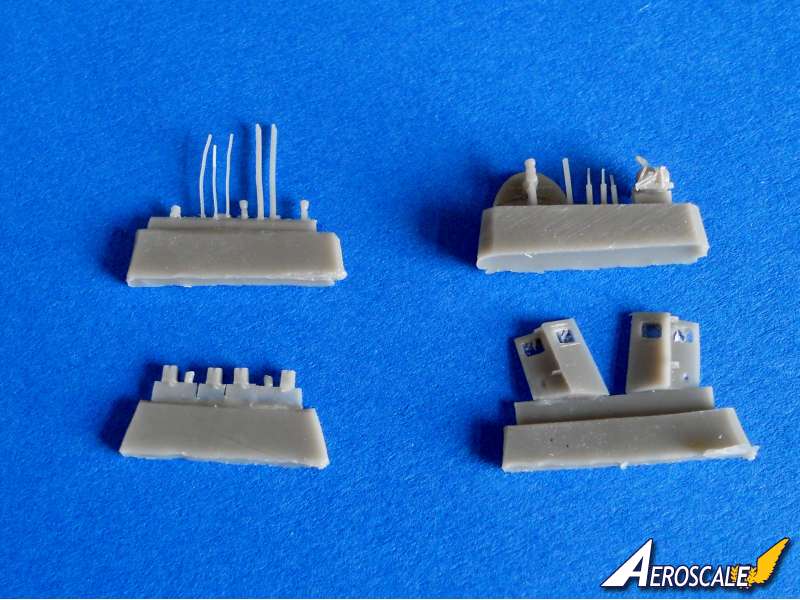
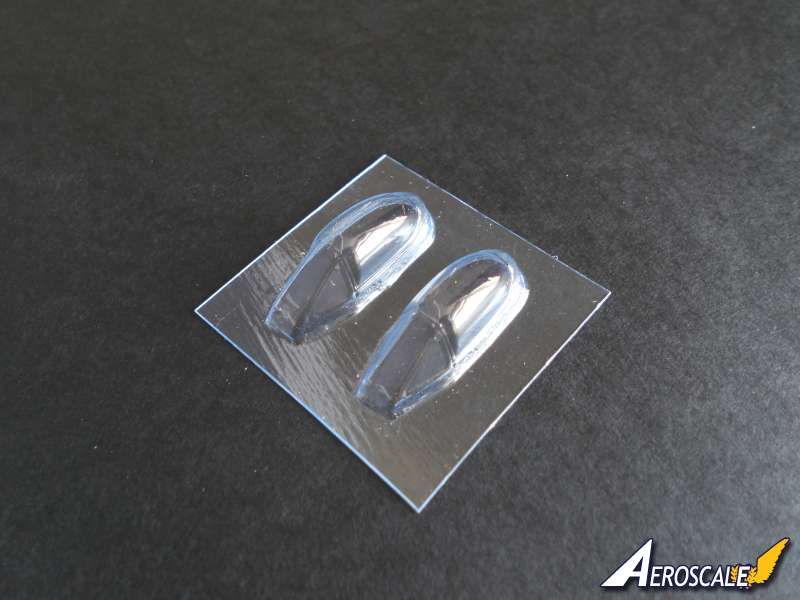
Cockpit is made up from some superbly detailed resin and pre coloured photo etched parts. The cockpit floor and rear bulkhead are one piece, the rear bulkhead has some fine detailing including boxes and cabling. There is some excellent raised detail on the inside of the cockpit walls. The control stick also looks very good. The one piece SNCASO ejection seat looks splendid with wafer thin seat sides. There are harnesses cast onto the seat, but the pre coloured photo etched harnesses look superior. Also included on the PE fret for the seat is the red overhead seat activation handle and un coloured foot rests. The style of the Eduard instrument panel should be the familiar to all. Instrument faces printed on one piece and the instrument panel itself on another. The resin gun sight mount needs the glass part scratch building; there is plenty of excess clear plastic from the canopies to fabricate one. There are various non coloured PE parts to further detail the cockpit. Interior colour is mostly black. All in all the parts will recreate the busy and cramped cockpit of the Mistral very well. The canopy CMR supply two vac formed canopies and they look some of the best I have ever seen. They are formed in one piece, the framing on the windscreen is delicately done and the slightly blown canopy is evident. In fact the canopy is so thin and clear you do not need to separate the windscreen from the canopy to see all that lovely cockpit detail. The fuselage is very petite and is split vertically. The recessed panel lines and fasteners are very well done being light and very consistent. Joining the two halves the panel lines meet right where they should do. I do like the look of the recessed cannon troughs and the cartridge ejection chutes. There are a couple of small resin parts representing the nozzles of the rear most cannons. The numerous auxiliary air intakes are also featured, all are in the closed position. The canopy rail is shown as raised detail and will provide a useful point to attach the canopy. Where the jet pipe protrudes the wall of the fuselage is beautifully thin. The one piece jet pipe is superb, very thin and the rear spool of the engine has been nicely represented deep inside.
Part of the wing root is cast with the fuselage halves and there are a couple of locating holes on each side for location of the pins in the wing. The front undercarriage bay is a separate one piece part. There is a little low relief detail in there, but the real thing does not have a lot of detail anyway.
The casting block for the fuselage halves has been removed, but there is a slight amount of roughness where the separation was done. But it should be easy enough to quickly clean the surface up before joining the fuselage halves. The wings each wing is one piece and quite breathtaking in their detail. The detail on the surface is a mixture of fine recessed lines and raised areas. The stunning detail extends to the rib detail in the undercarriage bays and the exposed areas that are seen when the flaps are dropped. The depth of the undercarriage bays is just right. The air intakes for the engine are separate one piece parts. They look much cleaner than the de Havilland versions that usually have a couple of braces in them. The intake ducts turn 90° into the fuselage so there is not much chance of seeing the forward part of the engine. The duct ends are flashed over preventing seeing into the fuselage. Both the intakes are attached to the same casting block via some very thin flash that should be no problem to remove. In fact they will easily detach with some light pressure using your fingers.
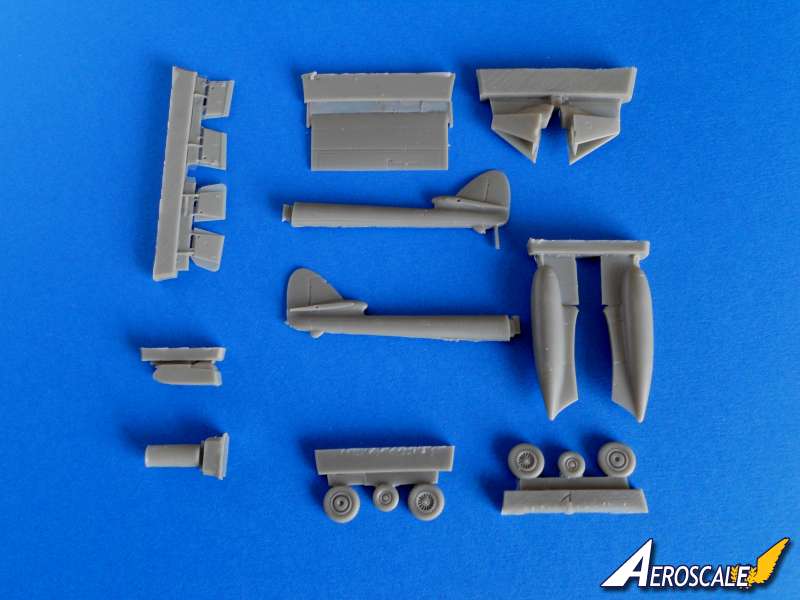
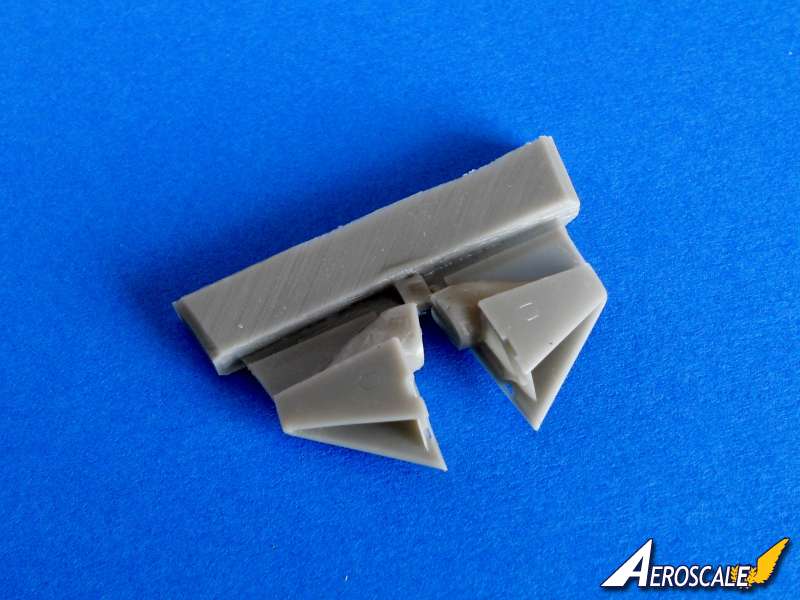
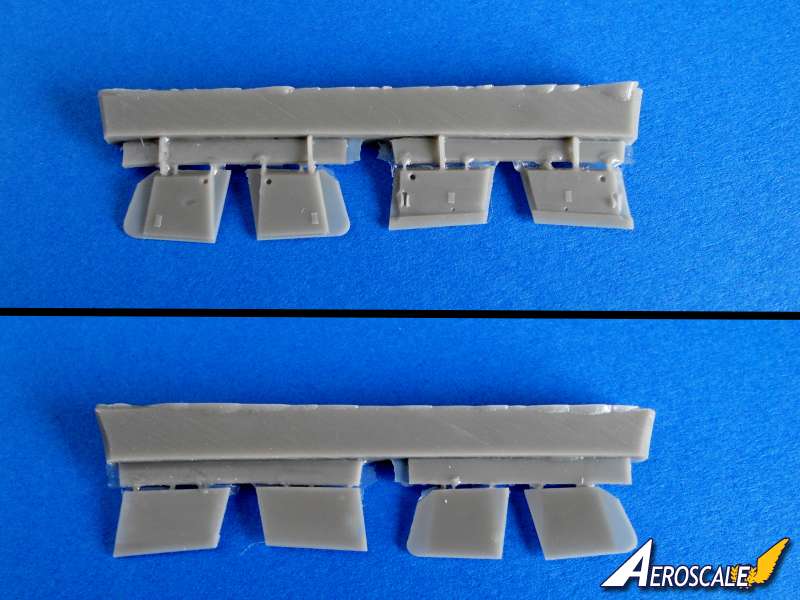
The six separate and highly detailed flaps and air brakes can be displayed retracted or extended. If you are displaying them down then there are numerous resin actuating arms to add.
There is a small tab on the tips of each wing that need to be removed by sanding. These are probably for the wing tip tanks of other versions. There are some remaining parts of the casting block at the wing root that will need to be cleaned up to ensure a good join to the fuselage.
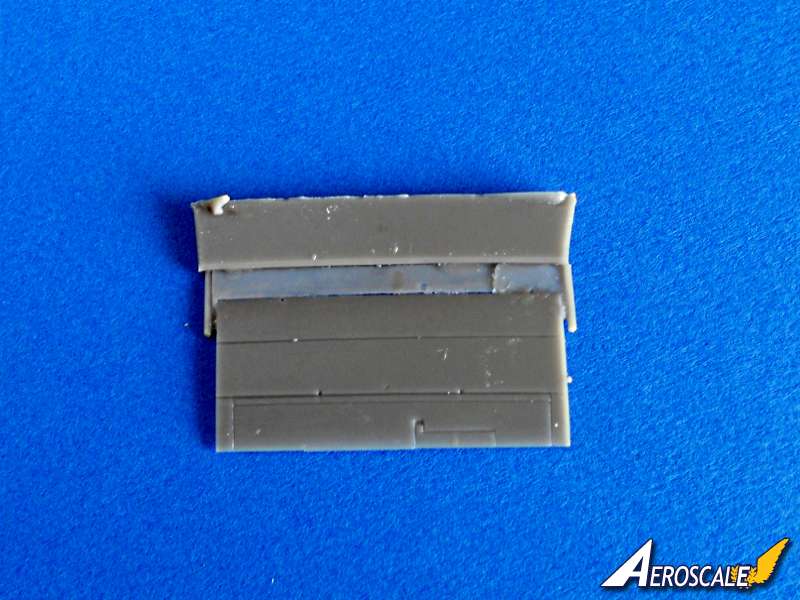
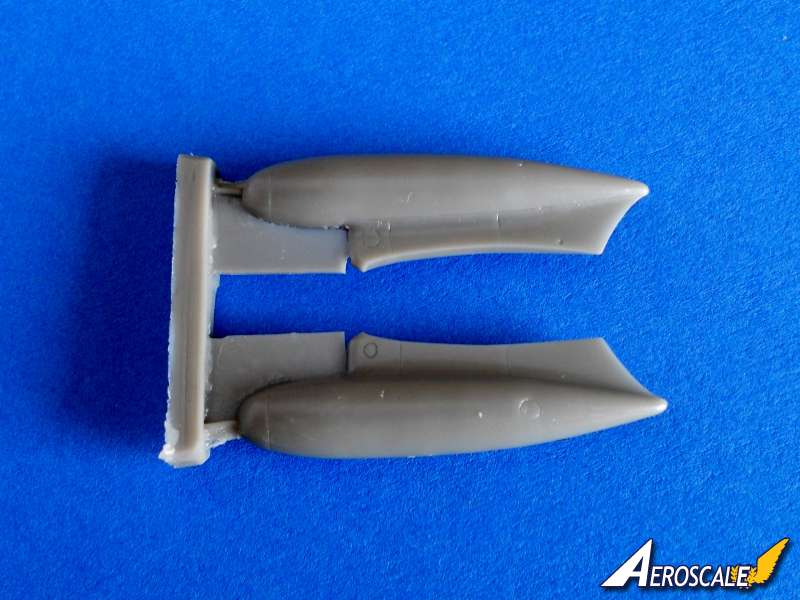
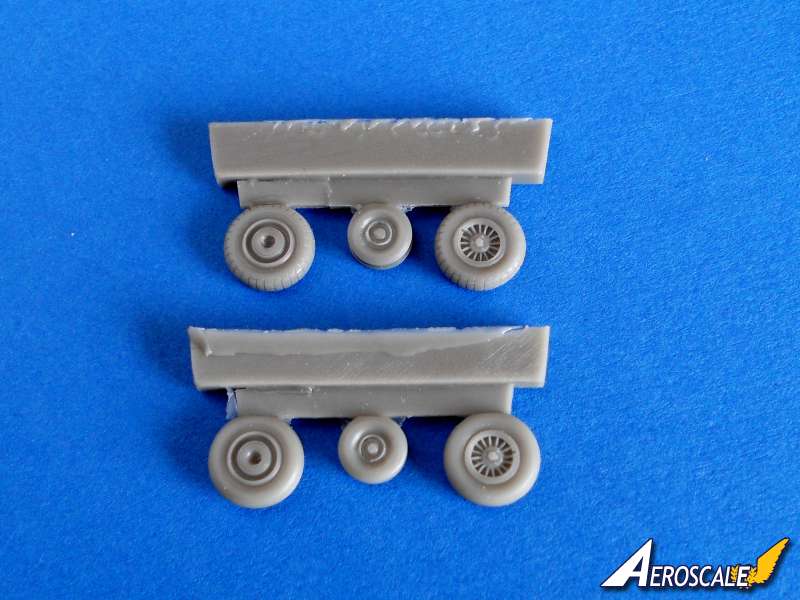
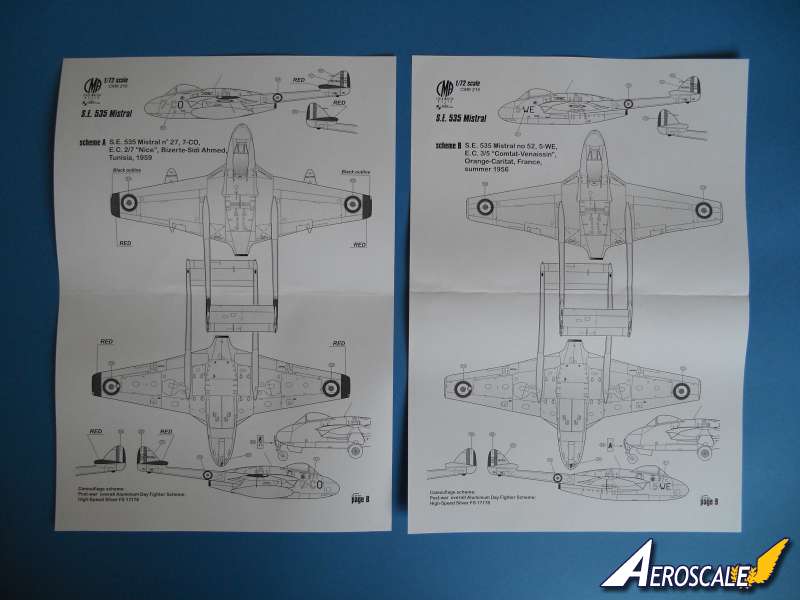
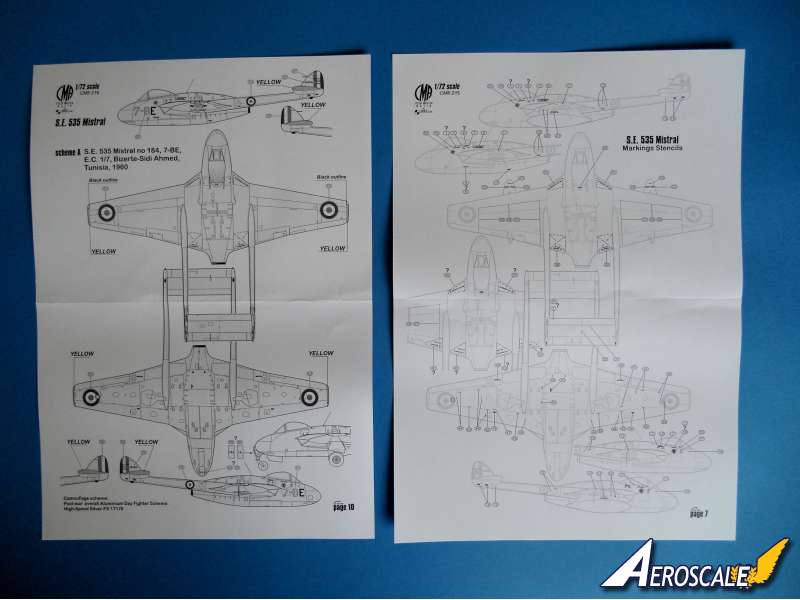
The stabiliser slab is one piece and incredibly thin. It shares the same razor sharp trailing edges of the main wings. There are two separate resin horn balances to add to the lower surface. The tail booms are both one piece with the rudders cast in situ in the neutral position. The attachment point is at the trailing edge of the wing. There is a small stub in the tail boom that fits into a hole in the fairing in the wing. The stub will need trimming down slightly to ensure a tight fit. There are locating holes in the bullet fairing where the pins on the horizontal stabiliser fit. The trailing edges of the rudders are incredibly thin. A little light cleaning up is required on the lower parts of the booms where the casting block was removed. The recessed detail is very good, I particularly like the series of inspection hatches running down the inside of the booms, there are even tiny holes where the screws where located. The undercarriage legs are cast in the stronger black resin along with the retracting jacks for the main undercarriage. They look superb, but great care will be necessary removing the delicate parts from the casting block. The main legs have additional photo etched parts. The detailing on both sides of the gear doors is superb and they are very thin as well. CMR has captured the dimpled look of the inside of the nose wheel door extremely well. There are two sets of resin wheels with different tread patterns. The spoke detail of the main wheels is exquisite. The ordinance includes two one piece 100 gallon fuel tanks fitted under the wing. The pylons are cast integrally with the tanks and they fit the wing beautifully. Accuracy: This one looks spot on with the wing span and length and the outline shape looks very good indeed. Also looking at the many images this kit captures the look of the Mistral very well. Markings there are three options provided with this release the S.E. 535 Mistral: [A] No.52 '5-WE', E.C. 3/5 "Comtat-Venaissin", Orange-Caritat, France, Summer 1956. The wing tips and the tail bullet fairings are painted yellow. [B] No.27 '7-CO', E.C. 2/7 "Nice", Bizerte-Sidi Ahmed, Tunisia, 1959. [C] No.184 '7-BE', E.C. 1/7, Bizerte-Sidi Ahmed, Tunisia, 1960. The wing tips and the tail bullet fairings are painted red.
All the aircraft are finished in overall high speed silver FS 17178
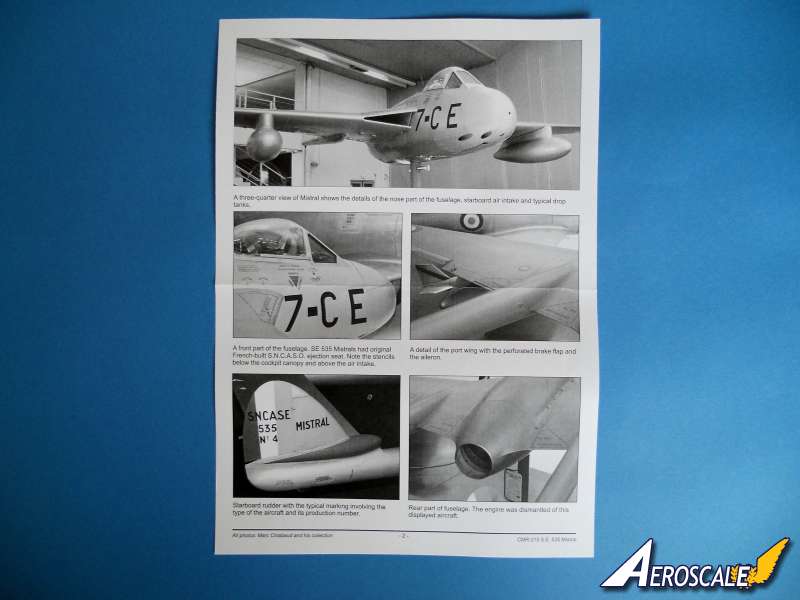
Decals are silk screen printed. The colour density and the definition look very good indeed. There are lots of black and red stencils that should stand out on the high speed silver colour. The ne pas marcher ici [no walking here] decals are also included and take the form of red hatched lines or hatched and solid black lines. The instructions has some fine black line diagrams and the written instructions are in English. They certainly leave you in no doubt where things go or what colour they are painted. The painting instructions and decal guide provide multi view drawings of the aircraft. Federal Standard numbers are provided for the paint references. I do like the inclusion by CMR of the black and white photo references. All the images, seven in all, are of Mistral no 4, 7-CE that is housed at the Musée de lAir, Paris France.
Conclusions:
CMR has taken advantage of being able to produce high quality kits using multimedia parts. Were this kit excels is the use of resin for the major parts of the airframe. You will notice the traditional breakdown with the fuselage from plastic kits, but the big bonus with this release is the one piece wings and booms. The level of detail of the resin parts is superb and they are enhanced with the PE etched parts. Accuracy? I doubt we will see anything that rivals this release in accuracy in plastic soon.
Excellent work CMR.
I will be doing a build log of this kit in the next few weeks so stay tuned.
SUMMARY
Highs: Where do I start? Quality resin castings, great PE and vac formed parts, very accurate, fine looking decal sheet, outstanding instructions.Lows: Some may quibble at the price, but you do get a lot in the box for your money.Verdict: Highly recommended, go out and acquire one before they disappear.
Our Thanks to Czech Master Resin! This item was provided by them for the purpose of having it reviewed on this KitMaker Network site. If you would like your kit, book, or product reviewed, please contact us.


Comments