Eduard is known for their longtime commitment to bringing modelers photo-etched brass upgrades for a vast number of plastic kits in many scales. With their newly launched Brassin (brass resin) line, Eduard is venturing into new (for them) territory by providing fine quality resin details augmented with their high quality etched brass, which in some cases includes their unique color enhanced photo-etch. While this is not an entirely new concept (Aires, for example, does provide photo-etch with some of their resin products), it does seem to be a different kind of marketing in so far as the Brassin sets are limited to specific parts (such as seats and wheels) in a manner similar to Quick Boost parts, instead of outfitting an entire cockpit or other large area. Thus, the Brassin line seems to set on making a niche of providing very specific highly detailed upgrade parts that have the advantages of both resin and pre-colored photo-etch.
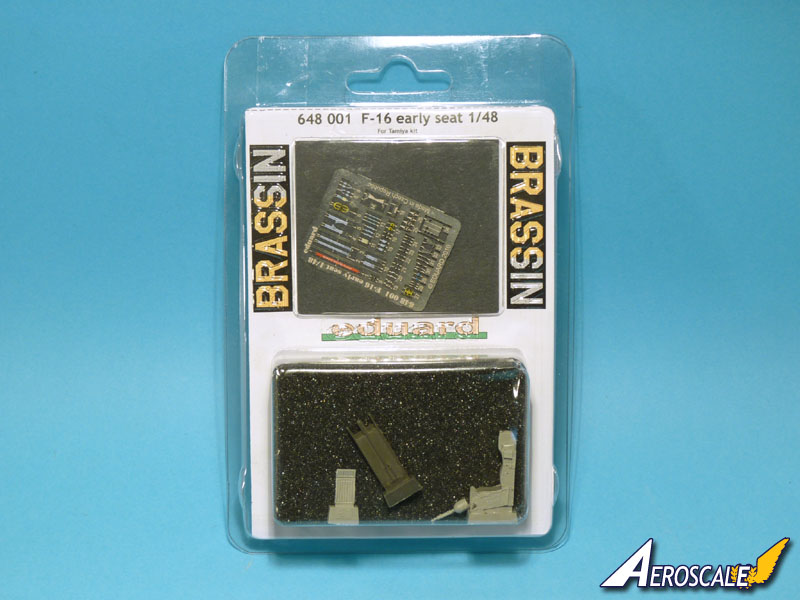
Eduard has clearly aimed their early Brassin sets at 1/48 scale F-16 buffs, providing a compressive early style ACES II ejection designed for the Tamiya F-16 kit, as well as late and early wheels for the F-16 C/D as well as wheels for the F-16 A/B (3 sets in all), also designed for the Tamiya line of F-16 kits. At this time, Brassin also offers the seat and wheels for the F-22 Raptor (designed for the 1/48 scale Academy kit).
CONTENTS
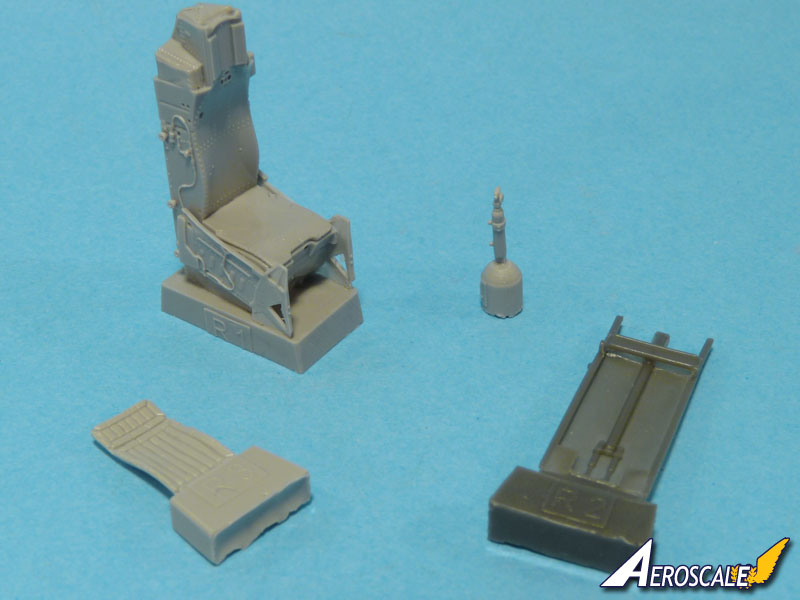
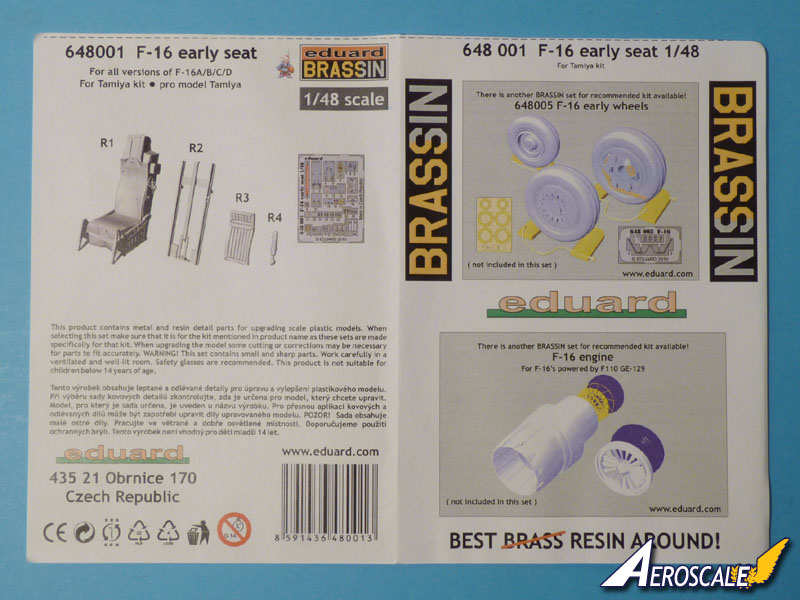
This review covers the Brassin F-16 early seat (Eduard product #648001). The ACES II ejection seat represented in this offering is essentially a mini-kit and takes some time to build. The four resin parts supplied with both kits are cast predominately in high-grade light gray resin that is very crisp and commendably solid, though the thinner details that protrude are quite fragile. The kit also contains a fret of color printed photo-etch consisting of 34 parts! The photo-etch is typical of Eduards high standards with this material.
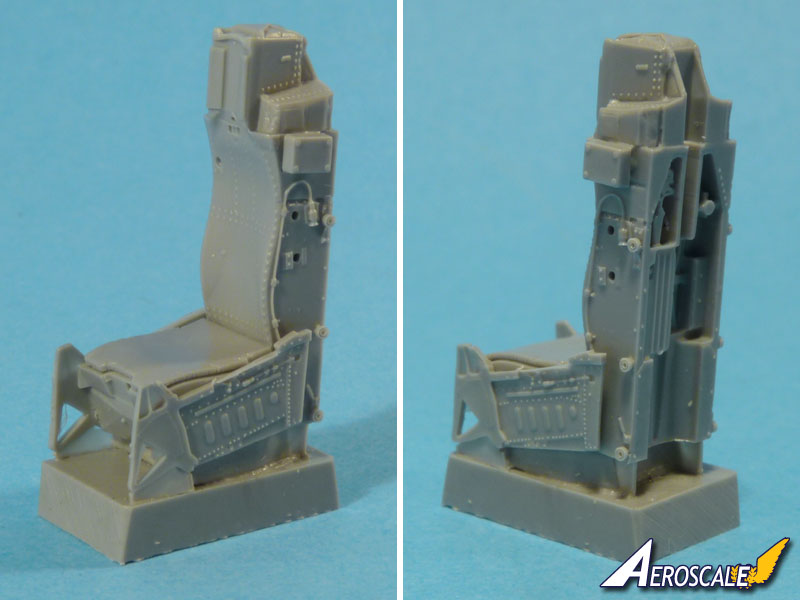
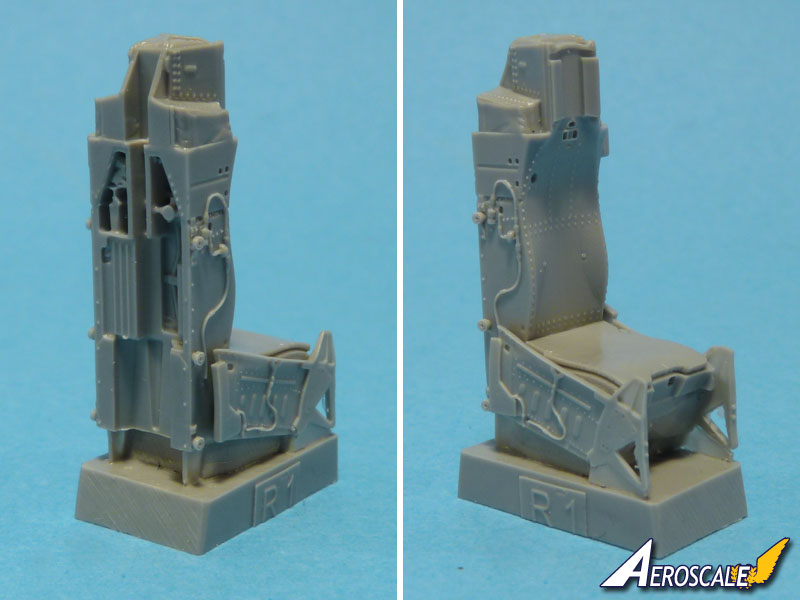
The resin casting that makes up the main seat is exquisitely fine in detail all around, including in areas that ultimately will be unseen. This fine detail is both the main strength and greatest weakness of this set. While the detail is crisp and exceedingly fine, it seems that any part that protrudes significantly from the main body of the seat is destined to break off. The same is true of the ejection rail, which comes with the extra complication of a significant resin flash between the rails that has to be trimmed away. Upon receipt of these parts, one of the ejection rails and one side of the seat were both broken in the box (as shown in the pictures of the parts). The separate back seat cushion makes painting and installing the harness straps significantly easier. The separate emergency oxygen bottle gives a better 3-D representation of this part and again aids in painting. The casting stub is rather serious on the seat and takes some effort with a fine saw to remove (be careful of those delicate details!), but trivial to remove on the other 3 items. For some reason, the ejection rails are cast in a different type of resin that is a darker, slightly brownish gray. The main seat is apparently designed such that it can be modeled without the launch rails (good for a repair facility diorama?), as certain parts of the molding have to be cut off to attach the rails to the seat. The lower cushion is molded on the main seat, and is the least accurate part of the seat in that the deep cut-out between the legs that the ACES II lower cushions have is only a minor indentation in this representation. This is easily corrected by carving out the resin to the correct shape though.
The photo-etch included in this set has many of the parts done up in Eduards unique color printing style, including the harnesses and various plaques that adorn the ACES II ejection seats. While very nicely done, I do have to question the decision to provide the modeler with light blue harnesses Ive seen a lot of ACES II seats, and I know there are several color variations, but I do not recall ever seeing light blue belts. And while the photo-etch plaques are also nicely done, it seems they would be more to scale thickness and MUCH easier to position and apply if they were provided as decals instead. The fact that at least one spare of all the smaller photo-etch parts is provided is greatly appreciated and a huge time-saver (I despise looking for tiny parts I've just dropped on the floor)
No color guide is provided for the seat. While ACES II seats do come in a few color variations, providing the modeler with a basic generic paiting guide would be an extremely useful addition, especially for the back of the seat which is rarely seen in photographs.
CONSTRUCTION
Having a nearly finished 1/48scale Hasegawa F-16A sitting on my shelf that was lacking a reasonable ejection seat, I was quickly taken with the desire to build up the seat for installation therein. I started construction by trying to fix the parts that had broken off in transit. While this was simple enough using tweezers and CA glue, I quickly found that pretty much all the other thin parts sticking off the seat and rails also wanted to break off while I repaired the others. This game quickly became frustrating, especially after sawing off the casting stub produced more broken parts, so I decided to leave off all the parts I had broken off until after I finished assembling the parts that were intentionally supposed to be attached (as opposed to re-attached). After wisely waiting a few days to cool-off before starting again, things when much smoother.
The considerable amount of flash associated with the launch rails had to be cleaned up before attaching this part to the main seat. A fresh, sharp knife blade is called for in this case, lest more breakage of the very fine details associated with the rails is likely. Fortunately I managed to accomplish this without more woe, and once I removed some of the cast-on details on the back outside edges of the main seat, the rails fit on very nicely, though I inadvertently produced a bow in one rail with too much finger pressure - very little was apparently too much as these parts are very thin! Three pieces of photo etch sealed the deal on the backside of the seat. Though the instructions called out several more pieces to go on the back, their indicated placement was not clear. Since none of this will be seen when I install the seat in my lawn dart, I choose to save myself the trouble of installing these bits of photo-etch.
Next I tackled bending into shape and attaching the photo-etched canopy breaker horns onto the head rest. I think these parts are a fair bit over-sized, but they add a lot to the personality of the seat. Attaching the horns was one of the many tests of patience this little seat offered. Since Eduard is making both the resin and photo-etch together in this case, is it too much to ask for things like locating marks and/or slots for bits like this so they have a positive and non-fragile attachment points?
Next I painted the main seat then installed the various placards that are provided as color photo-etch parts. This phase was tedious, as many of these are quite small and hard to see, much less position correctly onto a tiny blob of waiting CA glue. I am of the opinion that the modeler would be better served by having these plaques provided as decals rather than photo-etch, as they are far too thick to be in scale as is, and decals would be significantly easier to position especially in light of how easily the small resin details are to break off while handling the seat and trying to attach the photo-etch bits. By the time I was about 2/3rds the way positioning these placards, I decided enough was enough and skipped the remainder.
At this point I painted the separate seat cushion and installed it onto the main seat. Installing the harnesses onto this part and the molded in bottom cushion was remarkably easy after having done the placards. Several options are provided for different types of buckles on the harnesses. I decided to use the ones that were already on the harness instead of going through the bother of cutting them off and putting other ones on. The emergency oxygen bottle was painted green and attached. Next was folding and attaching the yellow ejection pulls. These were both easier to fold and position than I anticipated.
Finally I reattached all the broken off bits as best I could and touched up the resulting seams with some fresh paint. A little clear flat hid the appearance of the CA glue that got away from me during assembly and I called it done. While the seat set is advertised to work with the Tamiya F-16 kits, the seat dropped in easily to the mostly-complete Hasegawa F-16A I had sitting on one of my shelves that was missing an ejection seat of suitable detail.
SUMMARY
Brassin is a new direction for Eduard, and combines their excellent color photo-etch technology with first rate resin castings to provide what are essentially mini-kits as upgrades for specific kit parts that are often under-detailed. Frankly, the amount of detail provided can be intimidating, and the parts are very delicate, both in the sense of detail and fragility. Assembling the seat took me the better part of 6 hours over the course of a couple days twice as much as most kit stock cockpits! But the result is very nice, despite the broken bits (from both shipping and my own fat fingers) I had to repair. A color guides for painting the seat is sorely lacking and would have enhanced this offering without too much effort on Eduards behalf.
While not for beginners, the faint of heart, or people with failing close-up eye-sight, Eduards Brassin ejection seat does provide outstanding detail and reasonable accuracy for those with enough skill and dexterity to handle it.
Please remember, when contacting retailers or manufacturers, to mention that you saw their products highlighted here - on AeroScale.
SUMMARY
Highs: Excellent detail cast into the resin. Extensive photo-etch printed in color. Spare copies of the smallest photo-etch parts provided. Builds into a highly detailed ACES II seat.Lows: Raised and protruding details on the resin seat and ejection rails are extremely fragile. Canopy breaker horns seem too large. No painting guide provided. Verdict: This is a clever little mini-kit of the early ACES II seats used in F-16s, and builds into an excellent replica if the modeler has enough skill and a light enough touch to handle the fragile resin and tiny photo-etch parts.
Our Thanks to Eduard! This item was provided by them for the purpose of having it reviewed on this KitMaker Network site. If you would like your kit, book, or product reviewed, please contact us.
I have been modeling off and on for 35+ years, probably about 20 of that actively as an 'adult'. I stick primarily to 1/48 scale aircraft (golden age thru modern) and some 1/35 scale armor (WWII and pre-WWII mostly).


Comments