The Nieuport type 17 followed both the Nieuport 10 and Nieuport 11 into French service in the First World War. Known for their manoeuvrability, the earlier Nieuport scouts were light and nimble, but under-powered. The Nieuport 17 was powered by the more powerful 110hp LeRhone rotary engine and was one of the first allied scout aircraft to be fitted with reliable gun synchronisation mechanism, allowing the gun to fire through the propeller arc. The aircraft, like its forbearers, gained its extreme manoeuvrability from its light construction and wing lay out the bottom wing was very narrow in chord, essentially a semi-wing (or sesquiplane). The most widely used variant of Nieuport scout, the Nieuport 17 was used by many French and British aces on the Western Front in France, and also served with Belgium, Italy, Russia and a number of other countries. The aircraft served in front line service in France from July 1916 through to early 1918 a testament to the success of the design.
The Kit
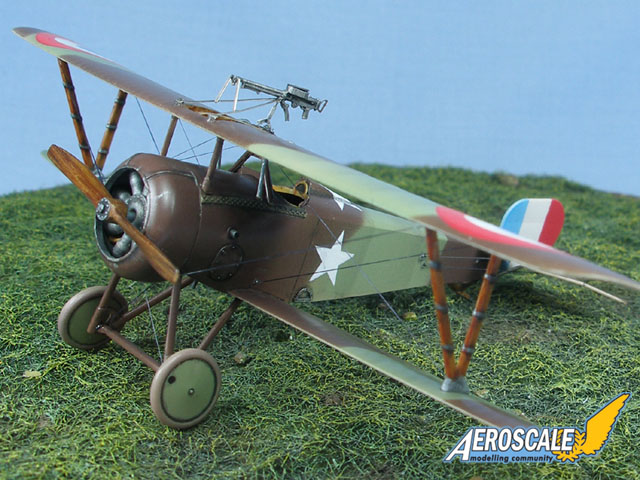
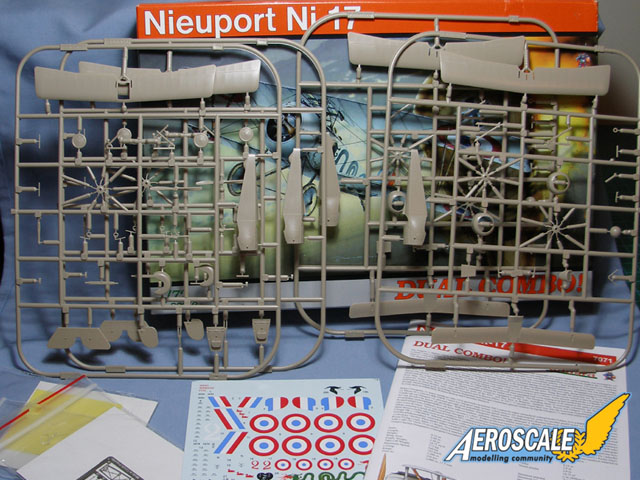
Up until recently, most of the 1/72 Nieuport Ni-17 kits on the market were looking particularly dated all until Eduard recently released their version of this famous aircraft in 1/72 scale. Previously released in a Flyboys boxing, Eduard has released this fine kit in a Dual Combo boxing with authentic French markings. The kit comes in Eduards most recent style of box with the orange strip along the top. The box art shows a very dramatic picture of Sergeant Maurice Boyaus Ni-17 of Escadrille N.77 flaming a German balloon.
Opening the box reveals a large number of goodies. Immediately apparent is that this was not simply a scaling down of their 1/48 versions. Some of Eduards earlier Dual Combo boxings did not have a complete array of photo-etched parts and decals for two aircraft to be built rest assured, with this kit there are enough parts (photoetched and otherwise) and decals to build two complete kits to the same standard.
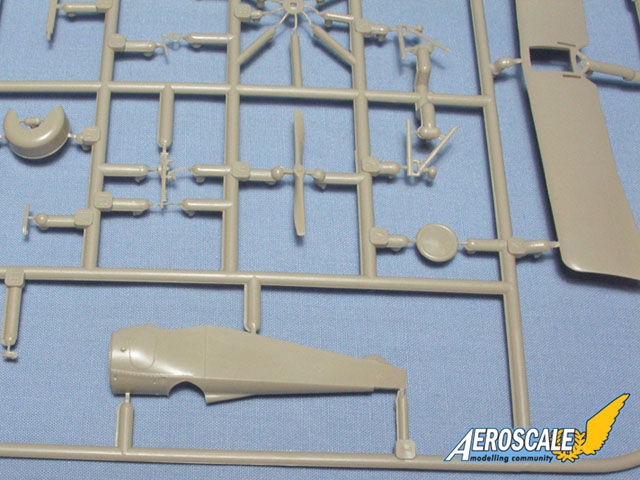
There is a total of 82 plastic parts (41 per aircraft), which are moulded in Eduards usual buff coloured plastic, and the mouldings are up to Eduards usual excellent standard - clean and crisp with no flash. The wing rib detail is restrained and subtle perfect for this scale. Initial dry fitting of the parts indicates an almost perfect fit all round.
Now onto the details - there are enough parts here to build the kits without any of the photo-etched goodies, suggesting a low-tech release may be possible in the future. Two styles of cowling are included, each with different stiffening ribs. Two styles of upper wing are included in each kit one with the open centre section and another with a faired over centre section. Interestingly, there are parts to allow the modeller to build the kit with either a 110hp LeRhone or a 80hp LeRhone engine, and the kit also includes the cut down cowling seen on the Ni-11 and Ni-21 aircraft this will allow an easy conversion to either of these versions of the Nieuport with relative ease (thanks Eduard!). The Lewis and Vickers guns are also especially well done. Included also are 4 different styles of windshield, as well as a cone de penetration as fitted to some aircraft.
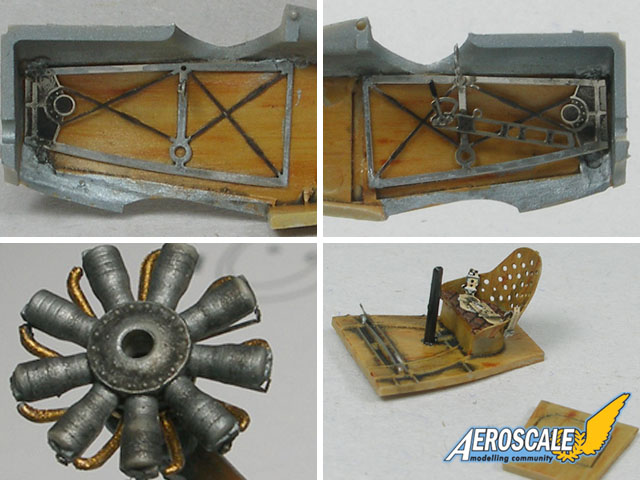
There are 94 photo-etched parts (47 per aircraft), with the seat belts and instrument gauges being pre-coloured which makes painting easier (although some of the gauges are printed off centre on my example not a big deal however). The photo-etched parts replace some of the kit parts, namely the kit seat, interior frame work and other fine details including an excellent Lewis Gun mount for the top wing. The seat is especially well done with the fine lightening holes being present.
There are two sets of masks included for details such as the wheels and other markings. These are in the usual Kaboke material favoured by Eduard.
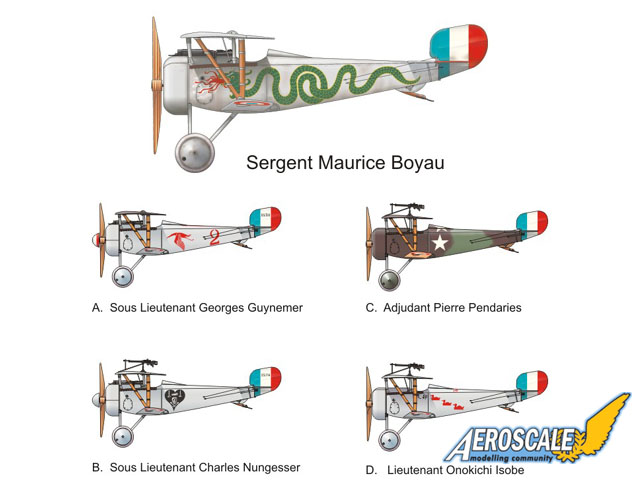
Now onto the decals they are in perfect register and no doubt will be easy to handle like Eduards other decals. There are decals for 5 French machines as follows: - Sergeant Maurice Boyaus Ni-17 of Escadrille N.77, summer 1917; - Sous Lieutenant Geroges Gynemer of Escadrille N.3, August 1916; - Sous Lieutenant Charles Nungesser of Escadrille N.65, summer 1916; - Adjutant Pierre Pendaries of Escadrille N.69, 1916-1917; - Lieutenant Onokichi Isobe of Escadrille C.1, December 1917
Enough national insignias are present to allow two models to be decaled. There are only French markings included in the kit I dare say Eduard will have future releases with British, Italian and Russian markings.
The instructions come in a fine 12 page colour booklet with a brief history on the aircraft, a parts break down, paint break down, diagrammatic instructions, and colour scheme profiles. All alternative parts are tagged to the applicable colour scheme in most cases in some cases, such as in the case of the windscreens, Eduard do not state which style goes with which markings, so some research will be required to get it right. Also included is a rigging diagram. Colour profiles for all of the colour schemes are included in the instructions, although interestingly, Boyaus marking scheme is not assigned a scheme letter and all that is included is a side profile, making selection of the correct parts and wing markings difficult. Why Eduard has done this I am not sure.
Construction
As per usual, the cockpit was the first to be tackled. The cockpit is very well represented and consists of floor boards, seat, control column, rudder pedals, side wall frames, throttle quadrant, cross bar and some nice pre-printed gauges. Eduard tells you to remove all of the moulded side wall detail from the fuselage halves in preparation for the nice photo-etched side walls. The detail is hard to remove at the forward end of the fuselage due to the shape of the parts. I was also careful to maintain the thickness of the bottom part of the forward fuselage as this edge forms part of the underside of the nose. Care needs to be taken in folding the seat to get the contours to match up with the base. The same applies for the headrest part PE17, as this needs to conform to the shape of the cockpit opening The only down side is that the control column is only represented by a single rod of plastic with no handle detail in this scale that isnt too much of a drama however. I had no fit problems whatsoever with the cockpit, and I painted it up in accordance with the kit instructions.
Engine the kit 110hp LeRhone engine is also nicely represented. The cooling fin detail on the cylinders is a little simplified but still looks good in this scale. Crank case bolts are also very finely done and look great under a wash. The air breather pipes (part A12) are well protected on the sprue but are a little tricky to remove and clean up care and patience is the order of the day here. Be careful when aligning the engine on the fuselage as clearance with the cowling is tight. Eduard tells you to sand off the propeller hub detail and replace the hub with a photo-etched part I liked the detail on the plastic part so I left it as it was and painted on the hub after I had painted the prop.
The fuselage halves fit like a dream and no filler was required. The lower wing and underside of the nose is one part which dove-tails into the fuselage halves. Again the fit was excellent and needed no filler but careful clean up around the contoured underside of the nose is needed. The wings have very fine trailing edges although a couple of swipes will be needed with sand paper to just take the seam off the edges. The tail plane and rudder are also finely done and again fit with no problems. The undercarriage struts were easily removed from the sprues and again posed no problems fit or alignment wise (ah its great when it all comes together). The only thing I had to watch out for was the fine carburettor pipes on the sides of the fuselage and another underneath, as well as the moulded on control horns on the control surfaces these are all very finely done and are very easy to break off during construction. The wing struts are very finely done (especially the interplane struts which have some very nice moulded on strap detail) but some have very minor sink holes at their bases this is easily remedied with a little glue as filler. Be careful fitting the aft V-shaped cabane strut again this is very finely moulded and is easy to bend out of shape.
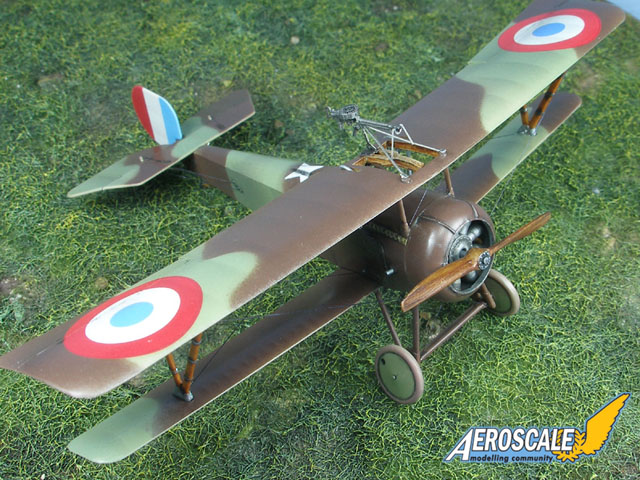
At this point I had to choose which aircraft I was going to model as this would dictate the style of upper wing, engine cowling, windscreen and armament. As I quite liked the look of the camouflaged machine (as opposed to the standard silver that most Ni-17s came in), I chose the machine of Adjutant Pendaries of Esc N69 (option C in the kit markings). The kit instructions tell you to use the cowling with the double stiffening ribs at the upper side, as well as the wing with the centre section cut out. Unfortunately, Eduard do not tell you which of the 4 windscreen options to use. Fortunately, I had a copy of Ospreys Nieuport Aces of WW1 handy page 60 has a photo of this aircraft which shows the flat windscreen being fitted to this aircraft (represented by part PE15). The photo also shows that this aircraft had a rear view mirror mounted on the centre section Eduard supply a mirror in part PE22 but again do not tell you which aircraft it apples to. The only armament on this aircraft was the single Lewis gun on the upper wing.
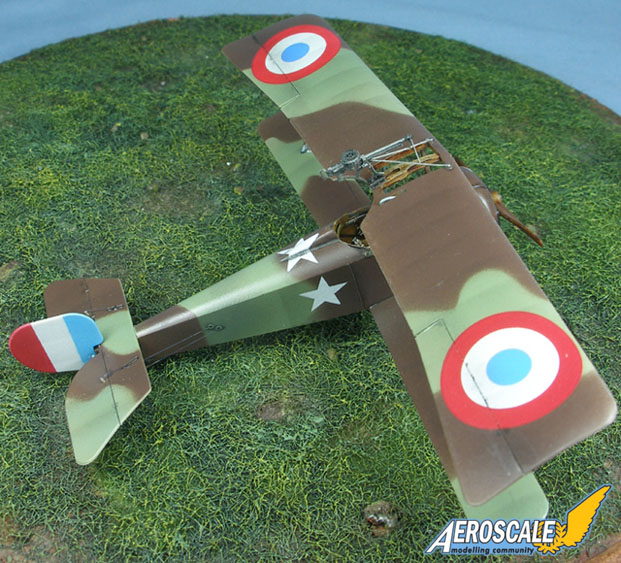
Painting before the upper wing is attached is a must. I used Gunze 85 Sail Colour, Gunze 84 Mahogany and Gunze 312 green, based on paint availability at my local hobby shop more so than anything else. I did deviate slightly from the kit paint scheme there is a profile of Pendaries Ni-17 in Nieuport Aces of WW1 on page 38, which shows this aircraft with brown painted undercarriage and cabane struts this is backed up by the photo on page 60 of the same publication. Eduard instructions show these items as painted silver. After a gloss coat, the decals went on with no problems, however my personal thought is that the red on the roundels is a little too bright. A further gloss coat was followed by a wash using oils which popped all of the fine details out, notably the fastener detail around the engine hatches and the stitching detail on the forward fuselage decking.
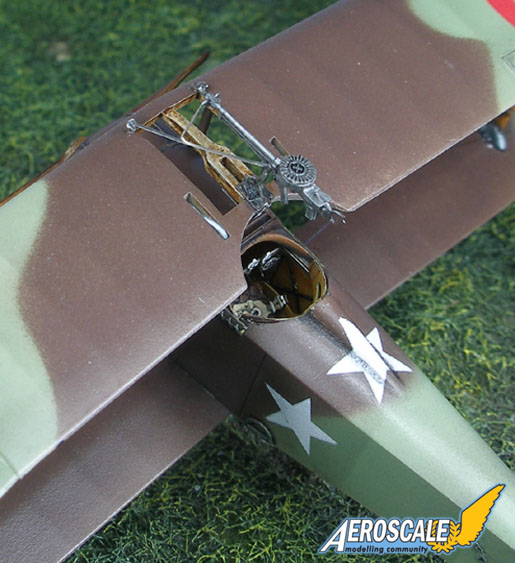
I rigged the aircraft with fine elastic in accordance with the kit rigging diagrams prior to adding the top wing. The top wing also went on without a hitch (thankfully due to the simple strut configuration of the Nieuport this is hard to get wrong). Once the wings were on, I added the undercarriage and the very fine Lewis gun and mounting (which is a mini-kit in itself!). Be careful with the mounting (part PE 24) as it is very fine and requires some tricky folding. Same applies with the Lewis gun a number of parts have to be cut off from it and this can be easy to mess up. Once this was done, the other minor details were added, followed by a matt coat and some light weathering with pastel chalks and paint chips from silver paint. Done!
SUMMARY
Highs: Excellent fit, very good detail, colour photo etch handy, multiple construction options.Lows: Some parts simplified, some options not clear in instructions.Verdict: This kit is quite a breeze to build and will appeal to all WW1 modellers who build in this tiny scale. Detail is very fine, fit is perfect, decals are great, and there are many, many options provided to allow the modeller to build a plethora of aircraft.
Our Thanks to Eduard! This item was provided by them for the purpose of having it reviewed on this KitMaker Network site. If you would like your kit, book, or product reviewed, please contact us.
About Brad Cancian (BradCancian) FROM: QUEENSLAND, AUSTRALIA
the 16 years or so since I began modelling, I have been mainly interested in aircraft modelling, and in recent years I have primarily been interested in modelling aircraft of the Great War 1914 -1918 period. My other modelling interests include 40s era aircraft. My modelling philosophy is "it's ok...
Many thanks for posting the article Jean !
Also, many, many thanks must go to Stephen Lawson for organising the build, and a big thanks too to Aeroscale for the review sample!
As always, comments and tips welcomed!
Cheers,
BC
Hi Brad
Superb work! It's hard to believe it's not larger than 1/72 scale!
Many thanks for submitting the article - here's to many more!
All the best
Rowan
It is a really nice kit. But without a skilful builder, it is only plastic. Great review and build. I think I will go check my closet to see if I can cram another Eduard box in there.
How is this for a timeless build? Here I am 10 years after you posted this to commend you on a fantastic job. I stumbled across here looking for reviews of Eduard's 1/72 biplanes. I do believe I'll be purchasing one of these.


Comments