Germany was by 1942 beginning to feel the effects 0f the RAFs night time bombing offensive particularly with the 1000 bomber raids. Radar equipped night fighters which had previously had some success, were being overwhelmed by the the sheer number of bombers and the counter measures that came with them. The raid and subsequent fire storm suffered by Hamburg on the night of July 24th, 1943 brought things to a head. A Luftwaffe bomber pilot Oberst Hajo Herrmann came up with the idea of using regular single seat day fighters as night fighters to counter the nocturnal bomber threat. A specialist group of flyers based at Bonn-Hangelar was set up using a tactic known as Wilde Sau literally translated as Wild Boar. They took on a free hunting role against the bombers. The specially chosen pilots would fly into the bomber streams using their skill and keen eye sight to hunt and down the bombers. Their debut was on the night of July 3rd/4th during an attack on Köln. Ten of the twelve bombers shot down that night were downed by the Wilde Sau unit.
The aircraft were modified with flame guards [Blendschutzleiste] over the exhaust pipes. The cockpit had extra blind flying instruments, essential for the spatially challenged environment of flying in the night sky. There was a display for the tracking the homing signal, increasing the odds for the pilot returning safely. The FuG 16 ZY lead the pilots to the area being bombed and the FuG 25a provided the radar operators [IFF] with the information were the friendlies where. A great threat to the fighter pilots was being hit by their own flak. Pfeife [whistles] were fitted to the exhausts providing an audible warning that the aircraft were operating in an area. Infra-red lights were also fitted. Erkennungs-signal [flares] were also employed.
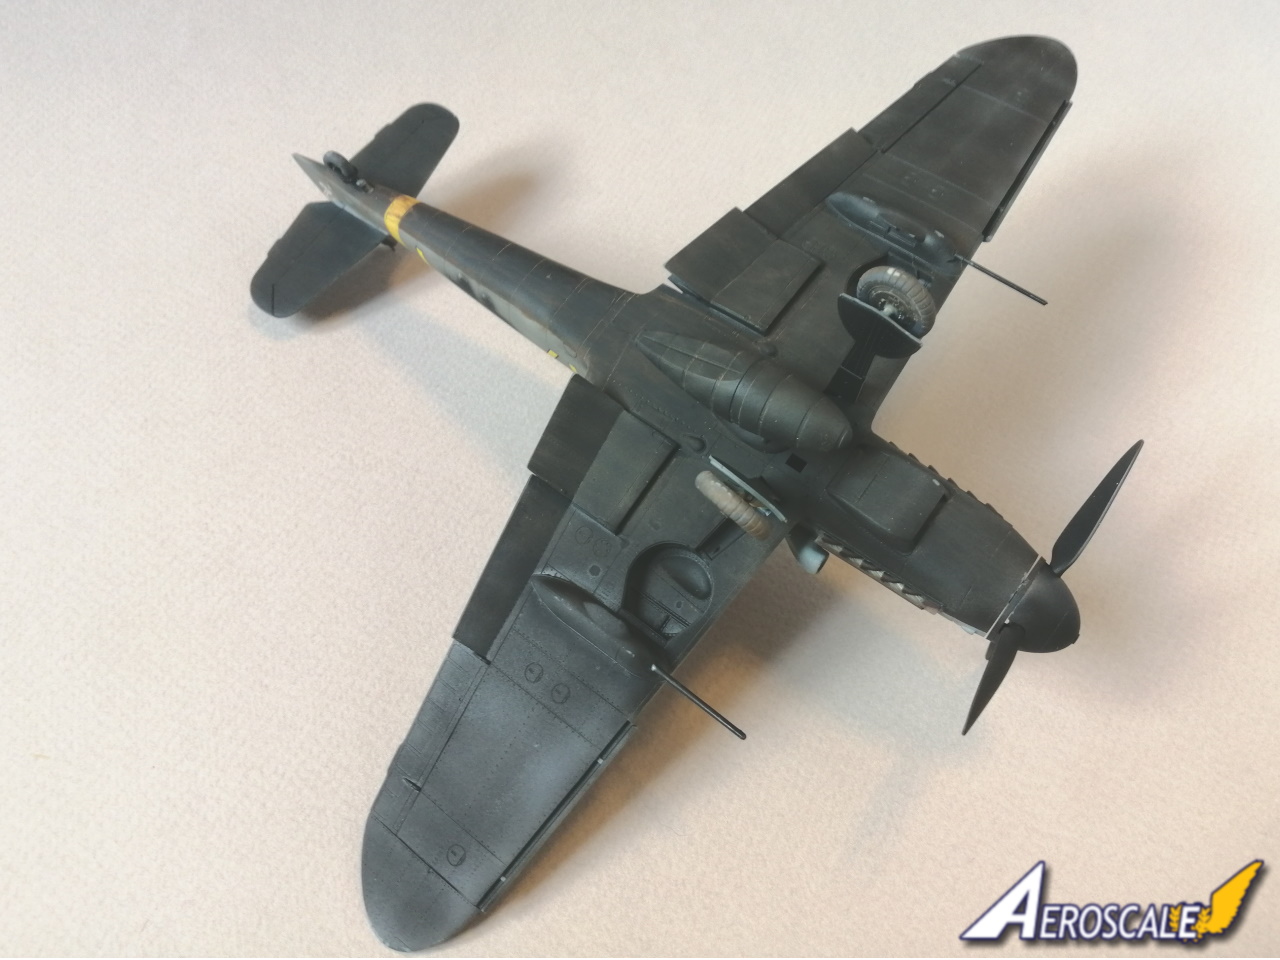
The poor endurance of the Bf-109G was improved with the fitting of external fuel tanks. Three MG 151/20 cannons were fitted, two of which were placed in gondolas under the wing. In addition, two MG 131 machine guns were also fitted. The combination proved quite a punch against the multi engine bombers. Later during operations the armored protection behind the pilots head would be removed. It was deemed inappropriate as it was unlikely that a Wilde Sau aircraft would be engaged from the rear. It also meant that the pilot had a better chance of evacuating the aircraft in the dark.
Taken from Neil Pages excellent notes included in the instructions
The Kit
First impressions, I was expecting a larger box as this is a duo combo. Thankfully its in one of Eduards regular size boxes so should fit in nicely under a trench coat and slide nicely into the stash. The plastic has both raised and recessed all of which is finely done. One thing that really impresses is the range of marking options, Eduard has found some interesting ones that will be different from the normal Gustavs. in fact, some look as if they had been applied in a hurry. Thats one of the appeals of WWII Luftwaffe subjects.
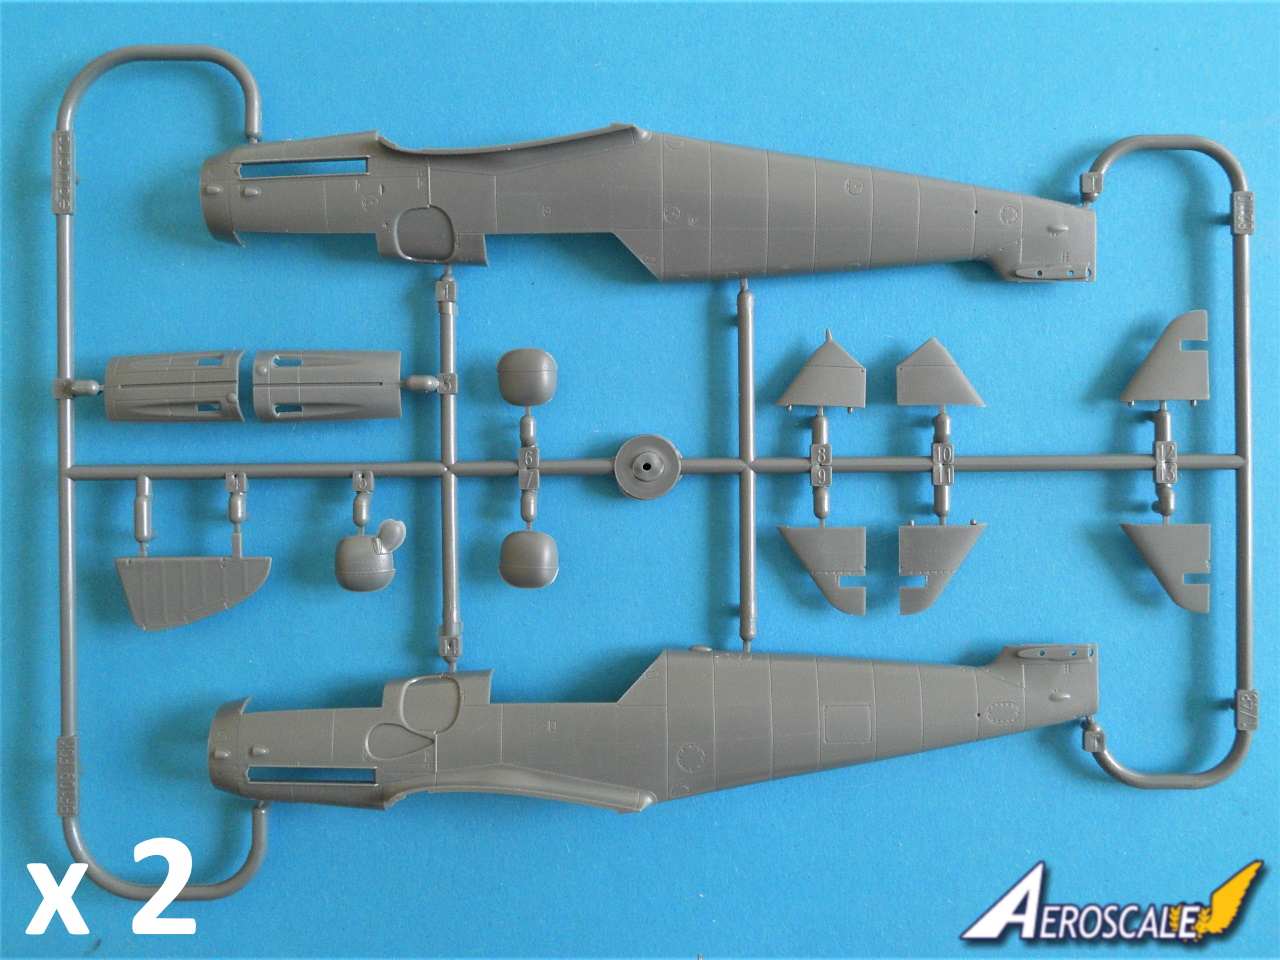
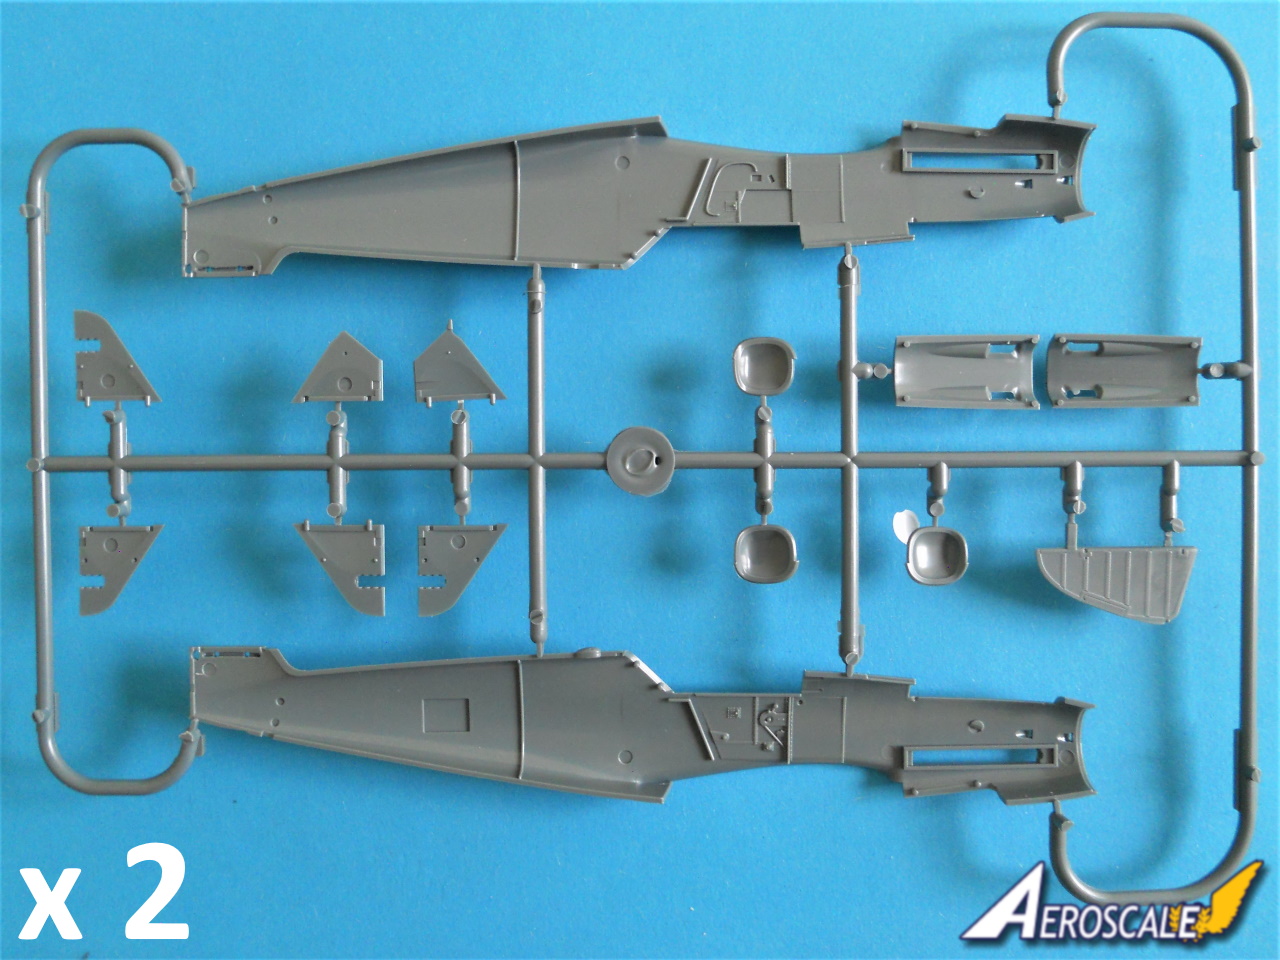
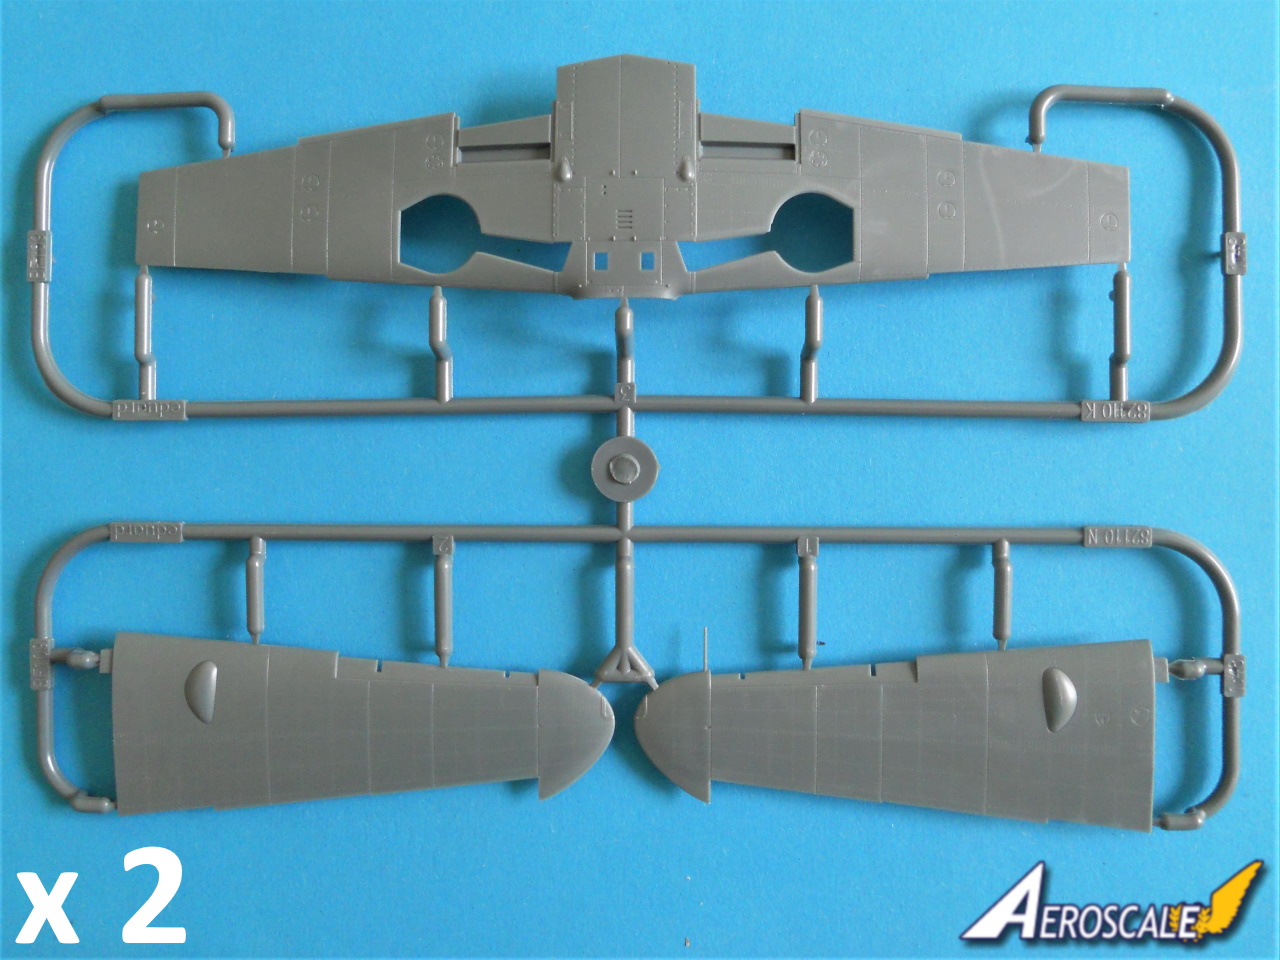
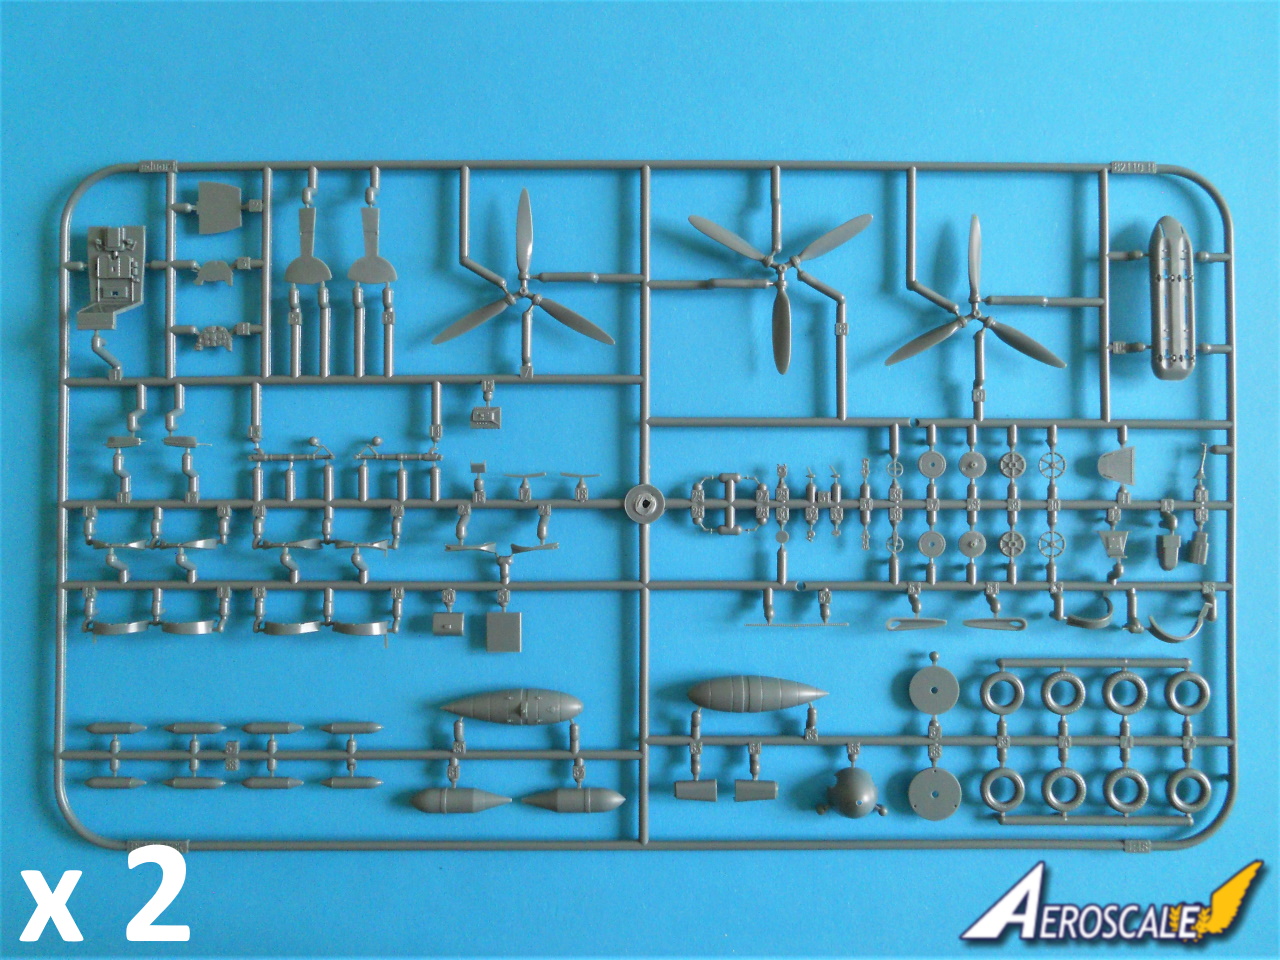
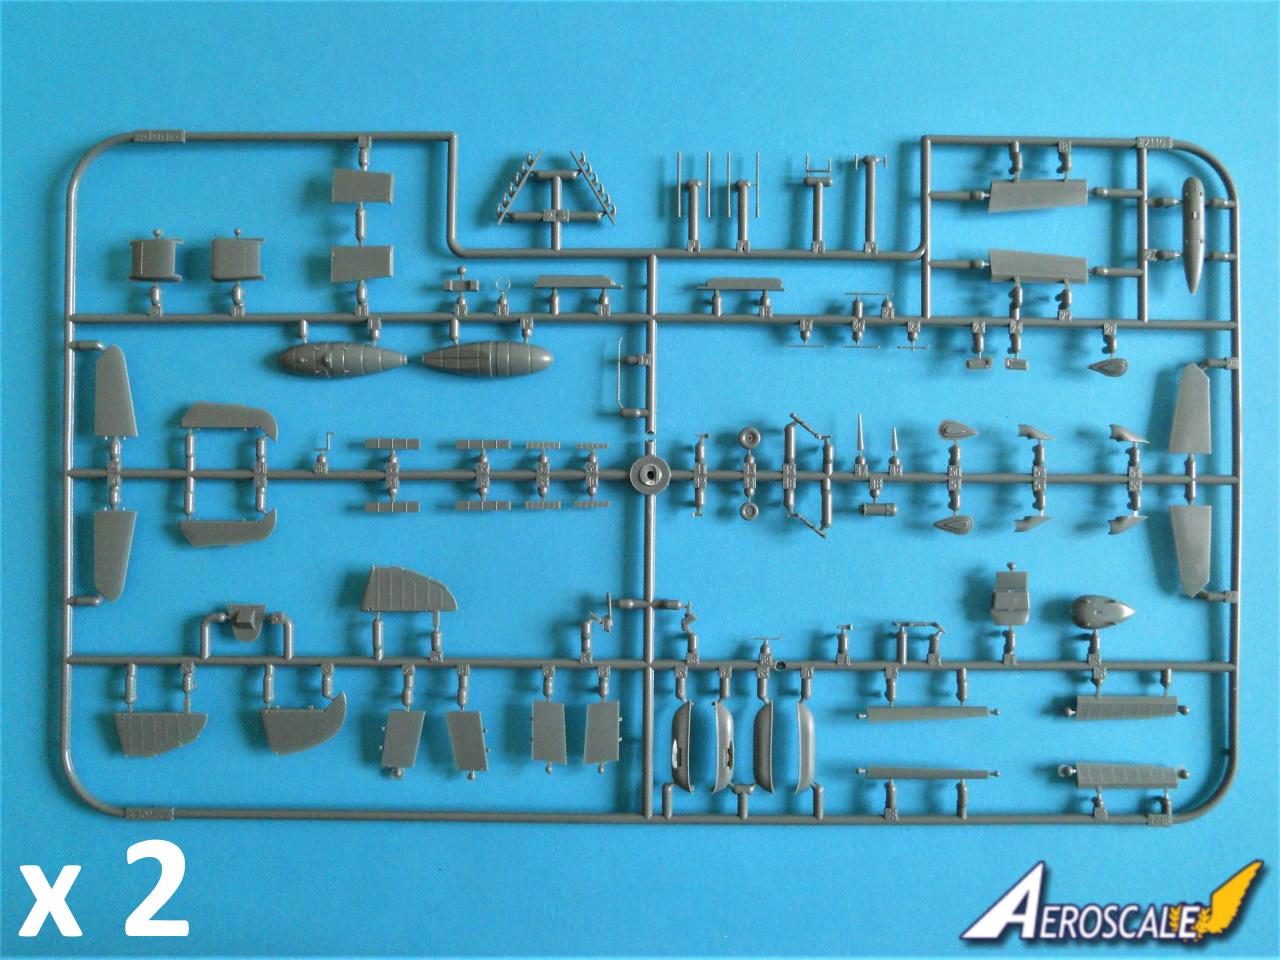
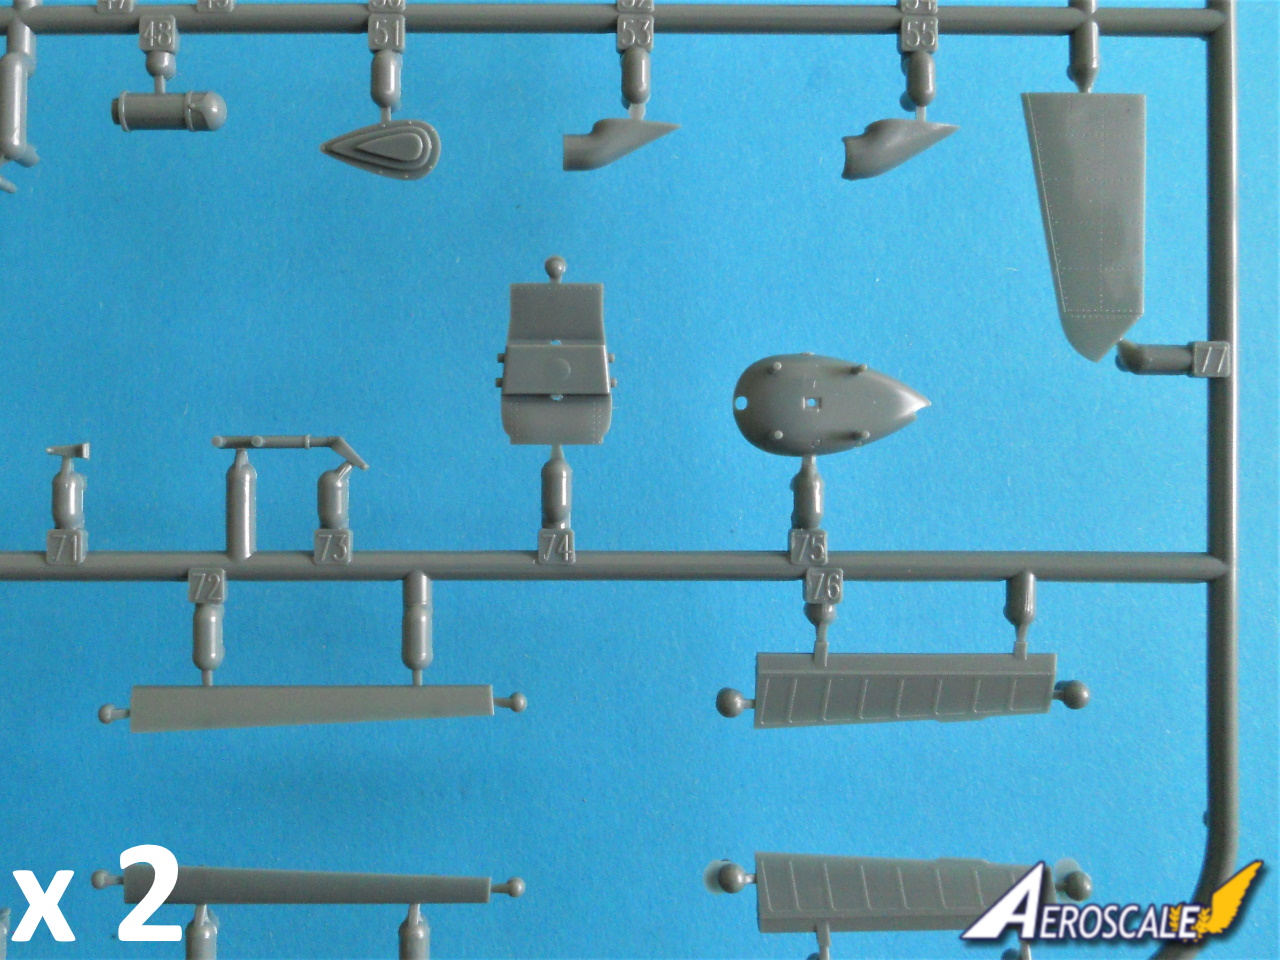
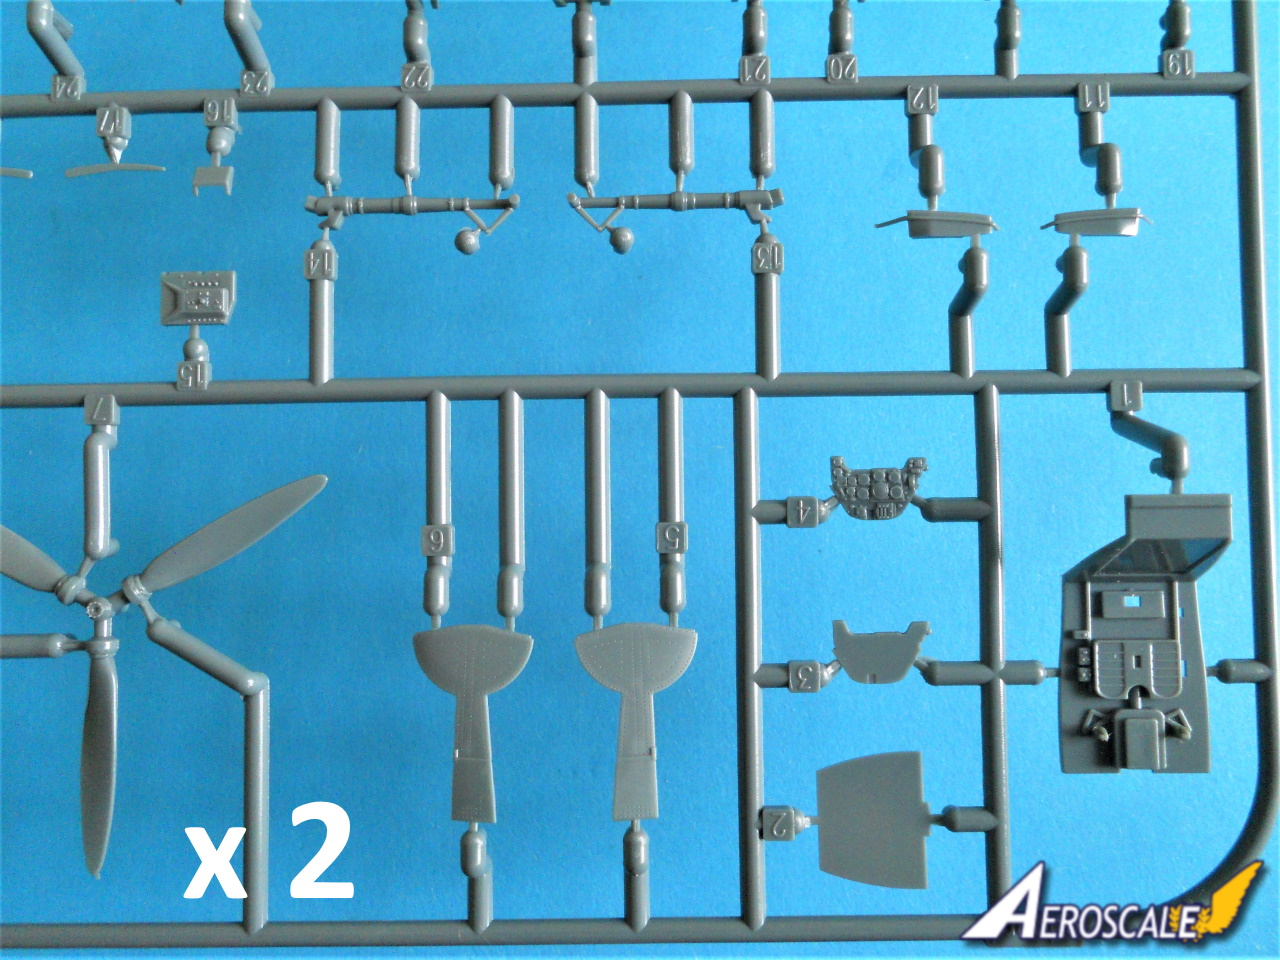
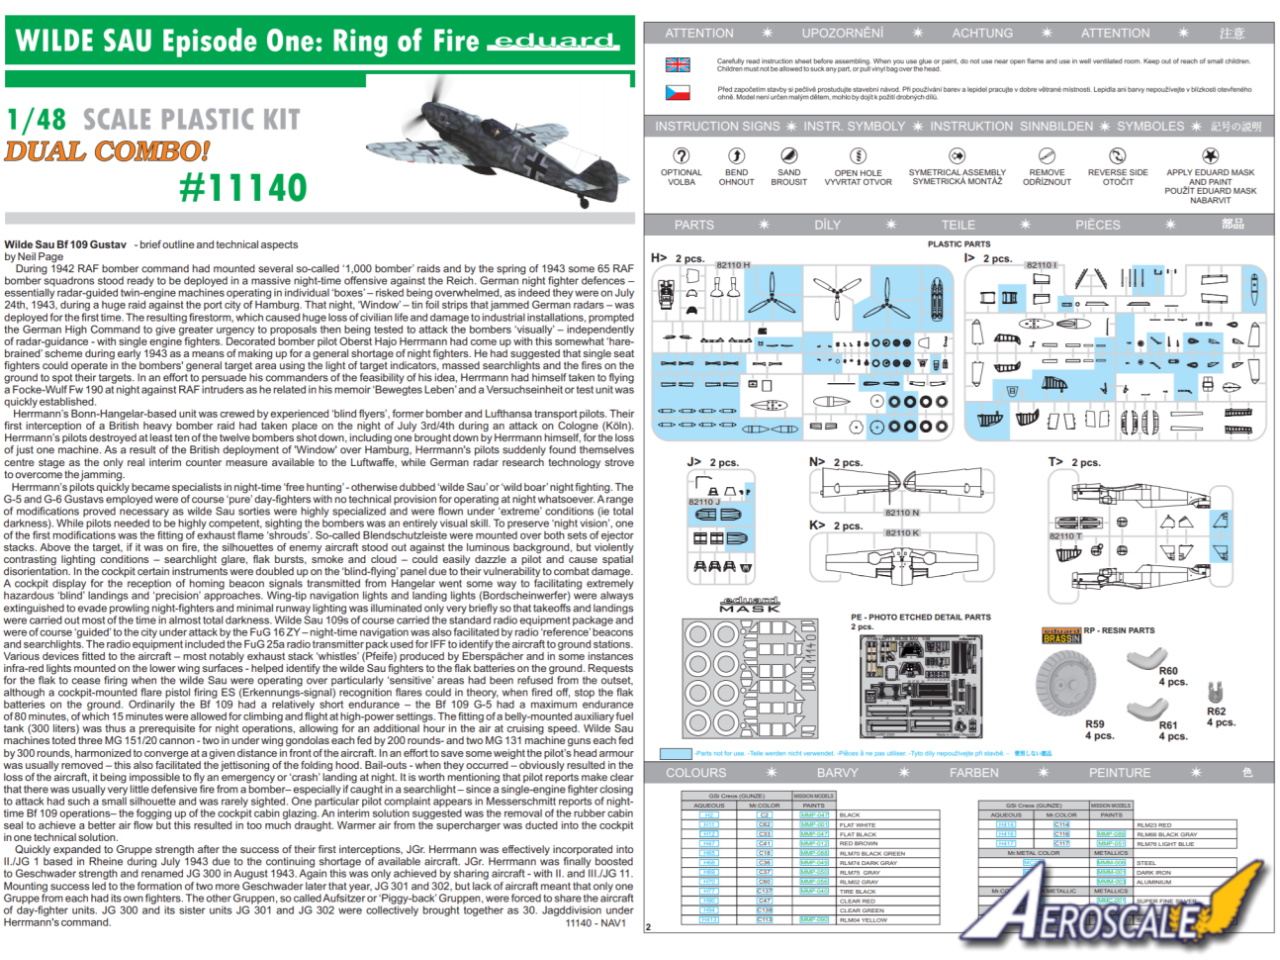
Wilde Sau Episode One: Ring of Fire contains two 1/48 scale Bf 109G-6 kits so you can model the base type or the Bf 109G-6/R6. The top opening box is full of superbly detailed plastic parts. The panel lines and rivet detail are excellent and consistent. Everything is individually wrapped keeping anything that drops off safely stored.
As mentioned, this release is a duo combo with pre-coloured photo etched parts and some resin parts. Included there are:
●10 x Grey plastic sprues
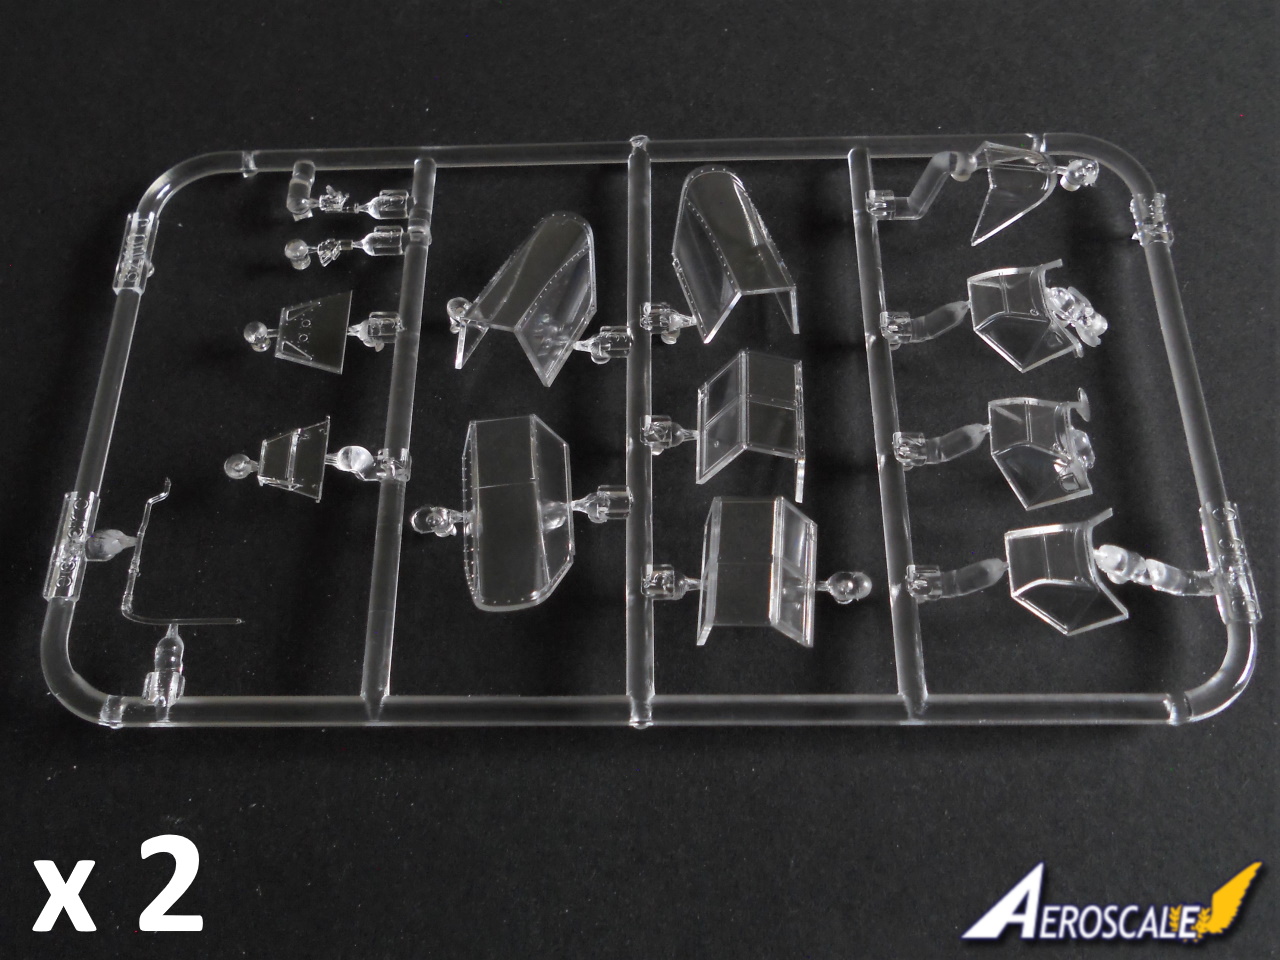
●2 x Clear plastic sprues
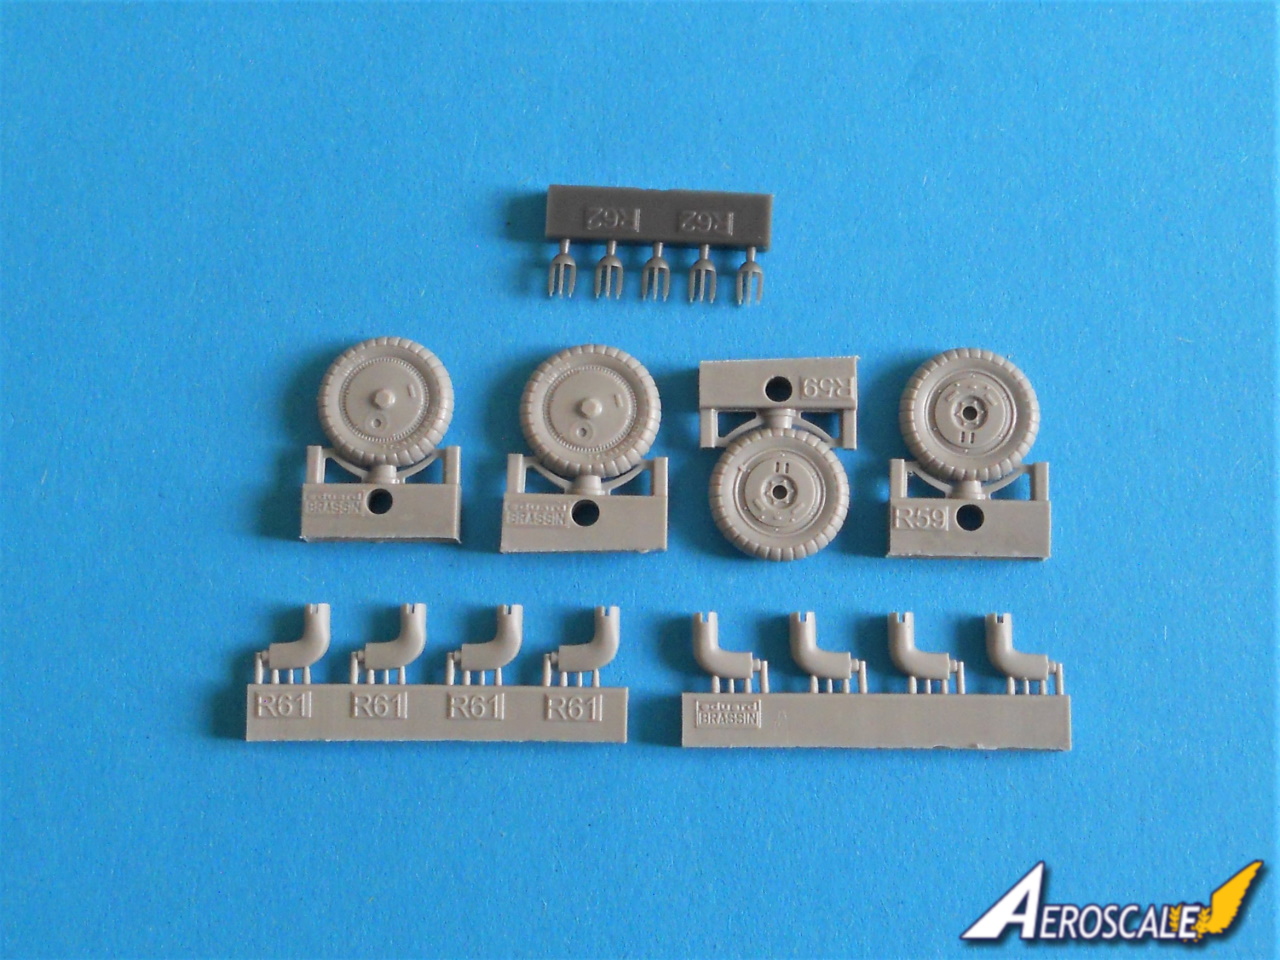
●16 x Resin parts including wheels, Pfeife [whistles]
●2 x Pre-coloured photo etched parts
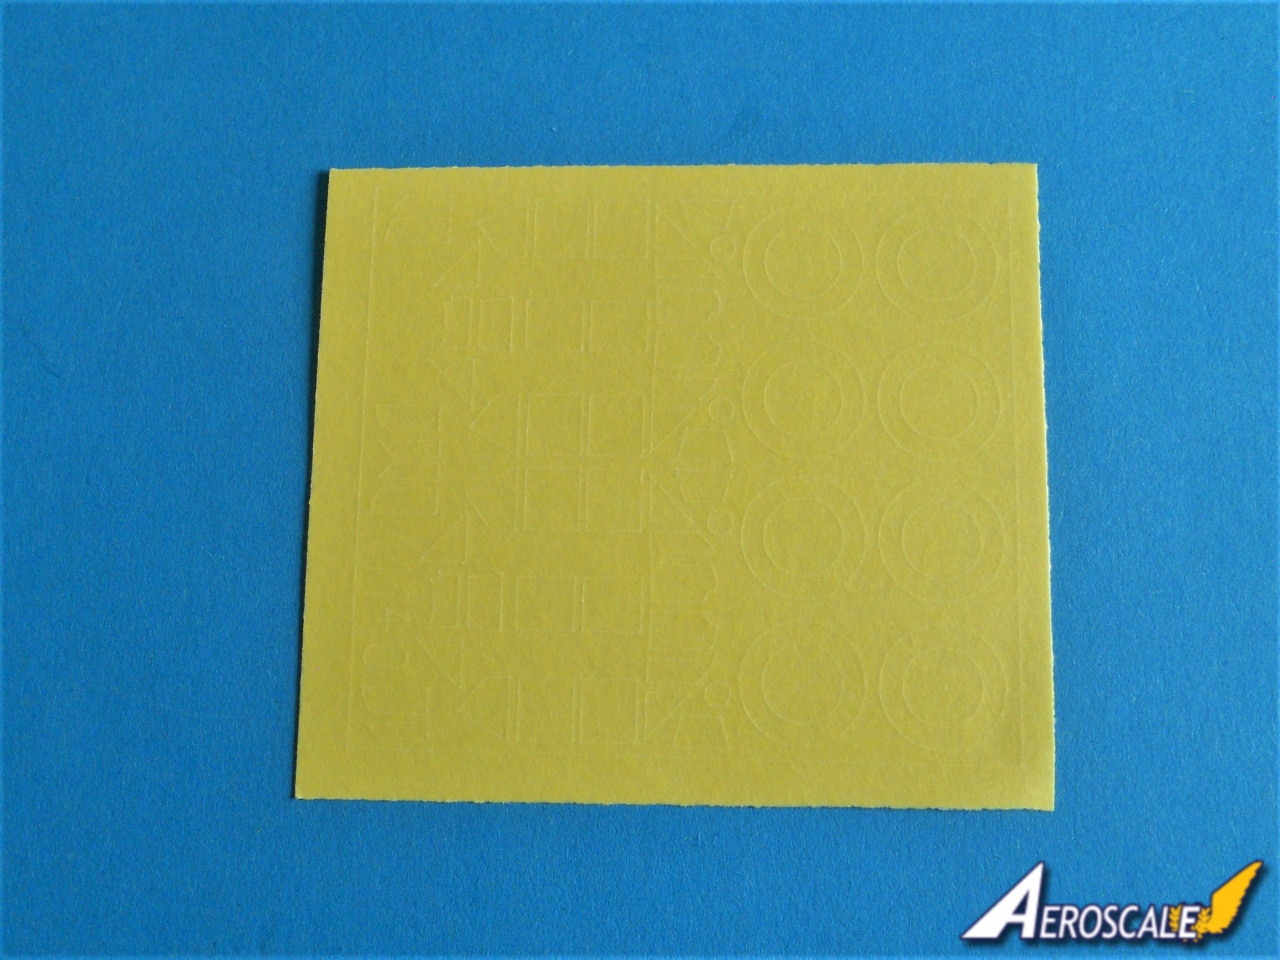
●1 x sheet of paint masks
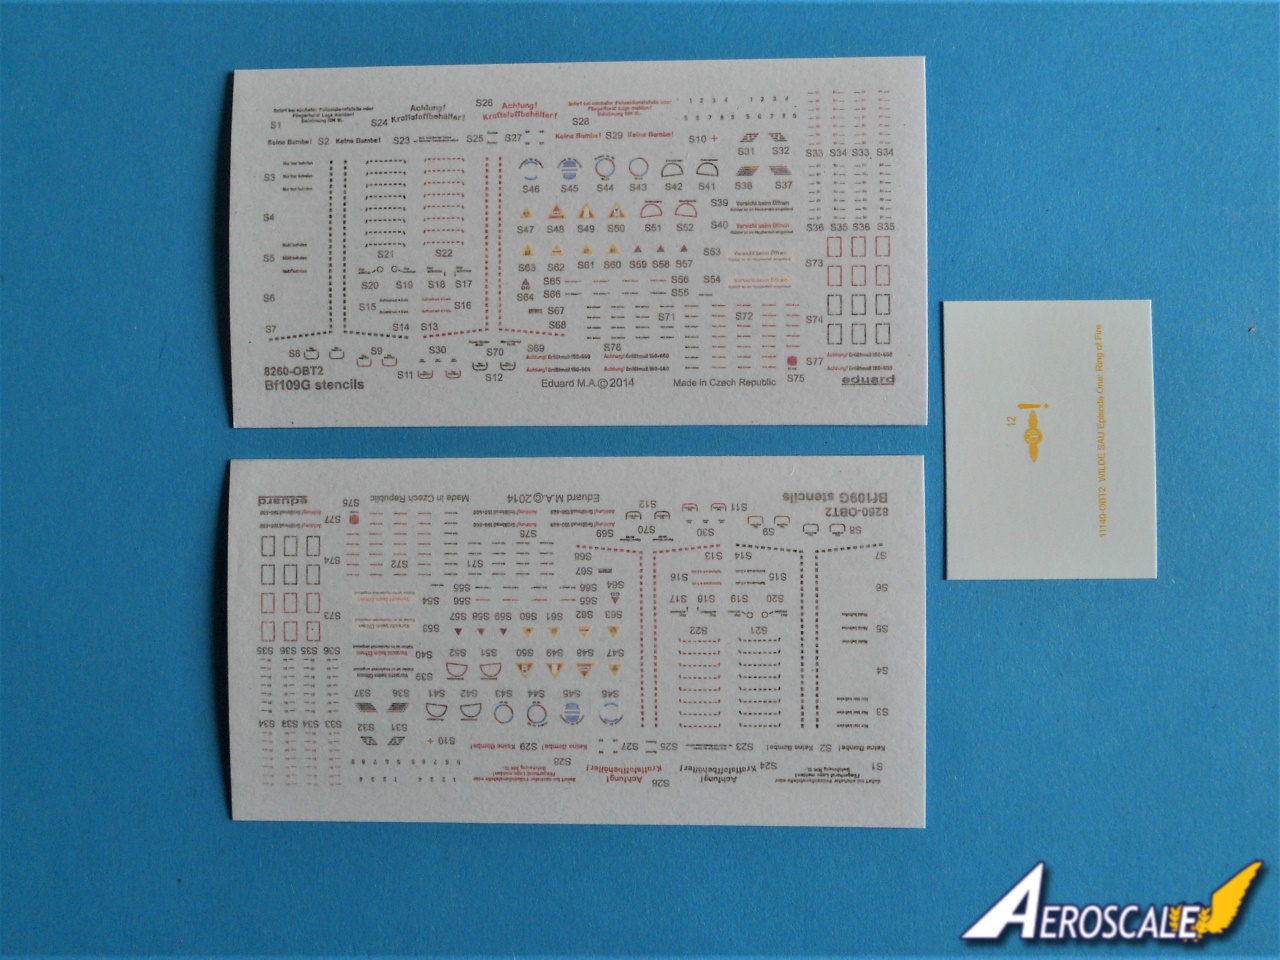
●3 x sheets of decals
●Wilde Sau Pin
●16 page instruction manual
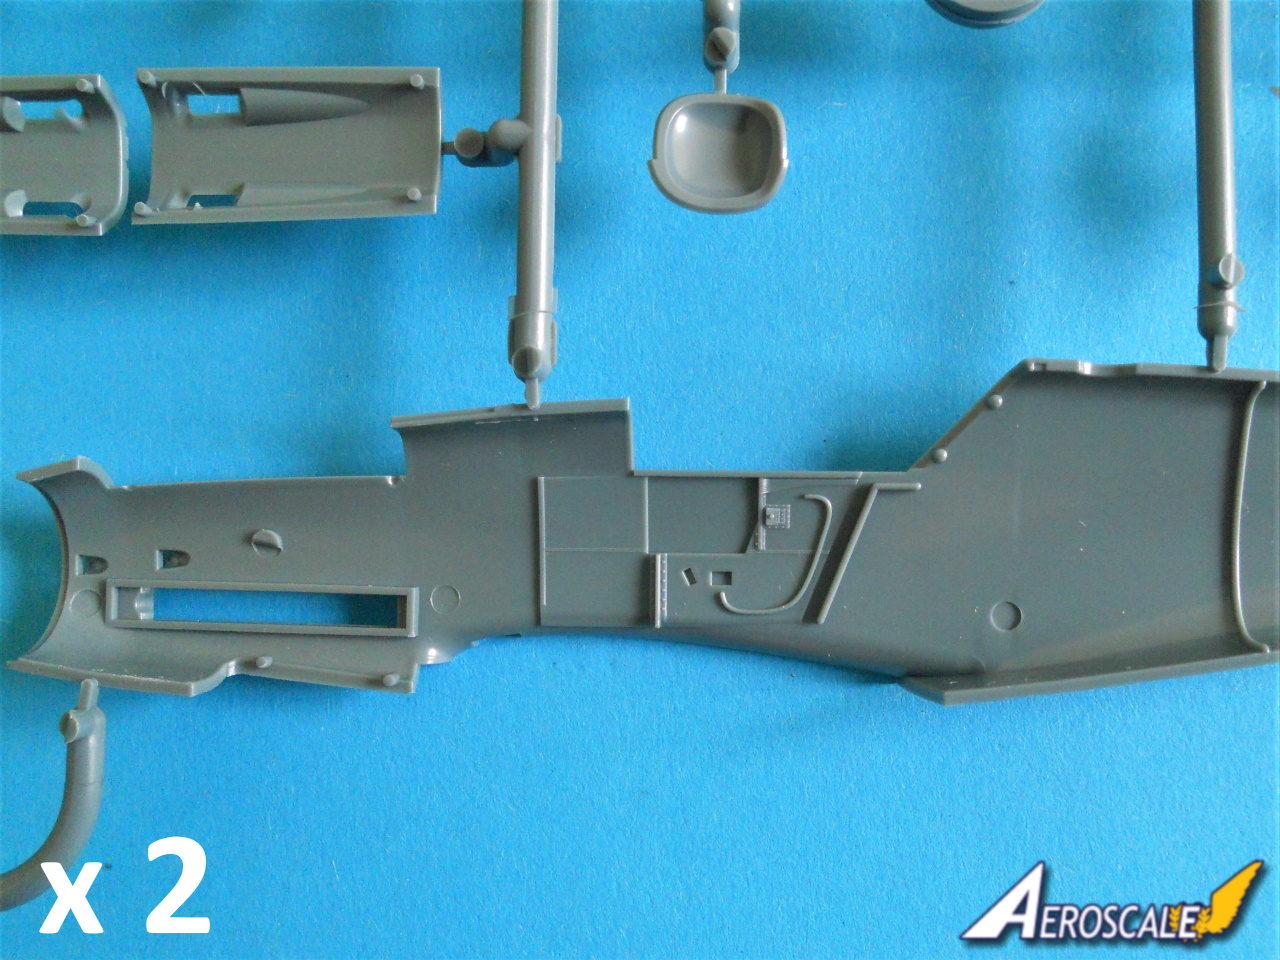
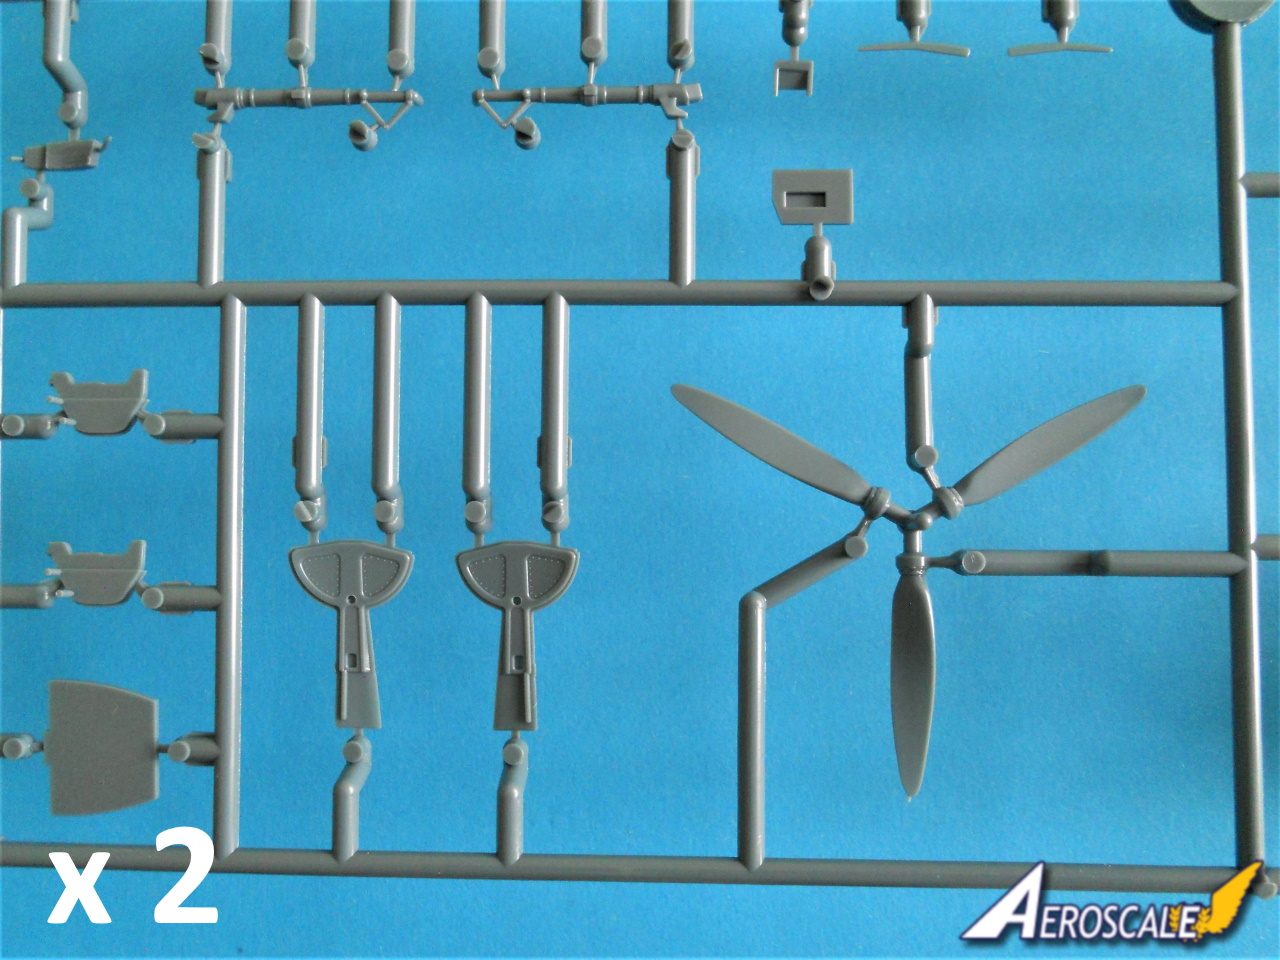
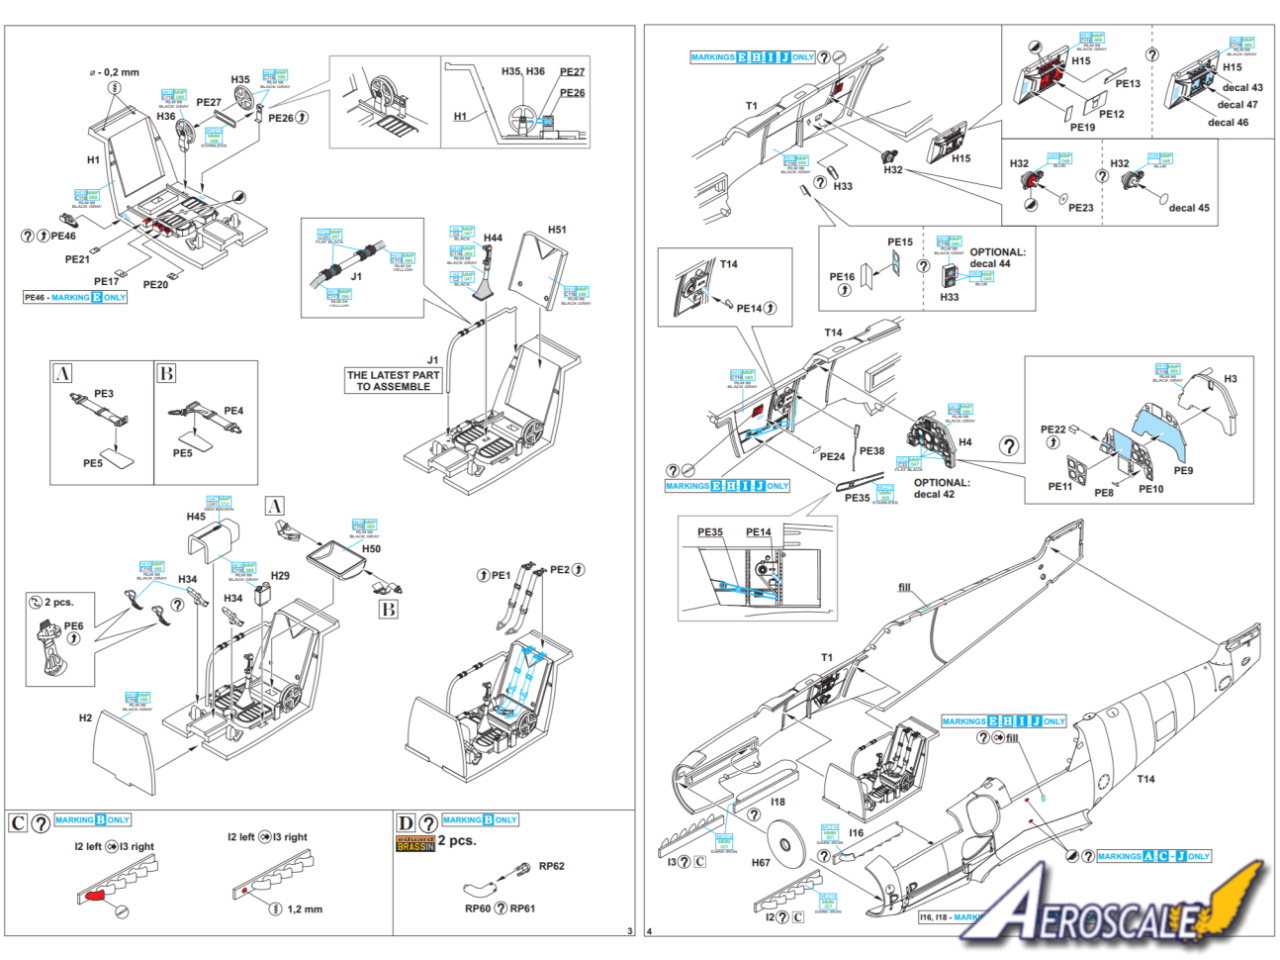
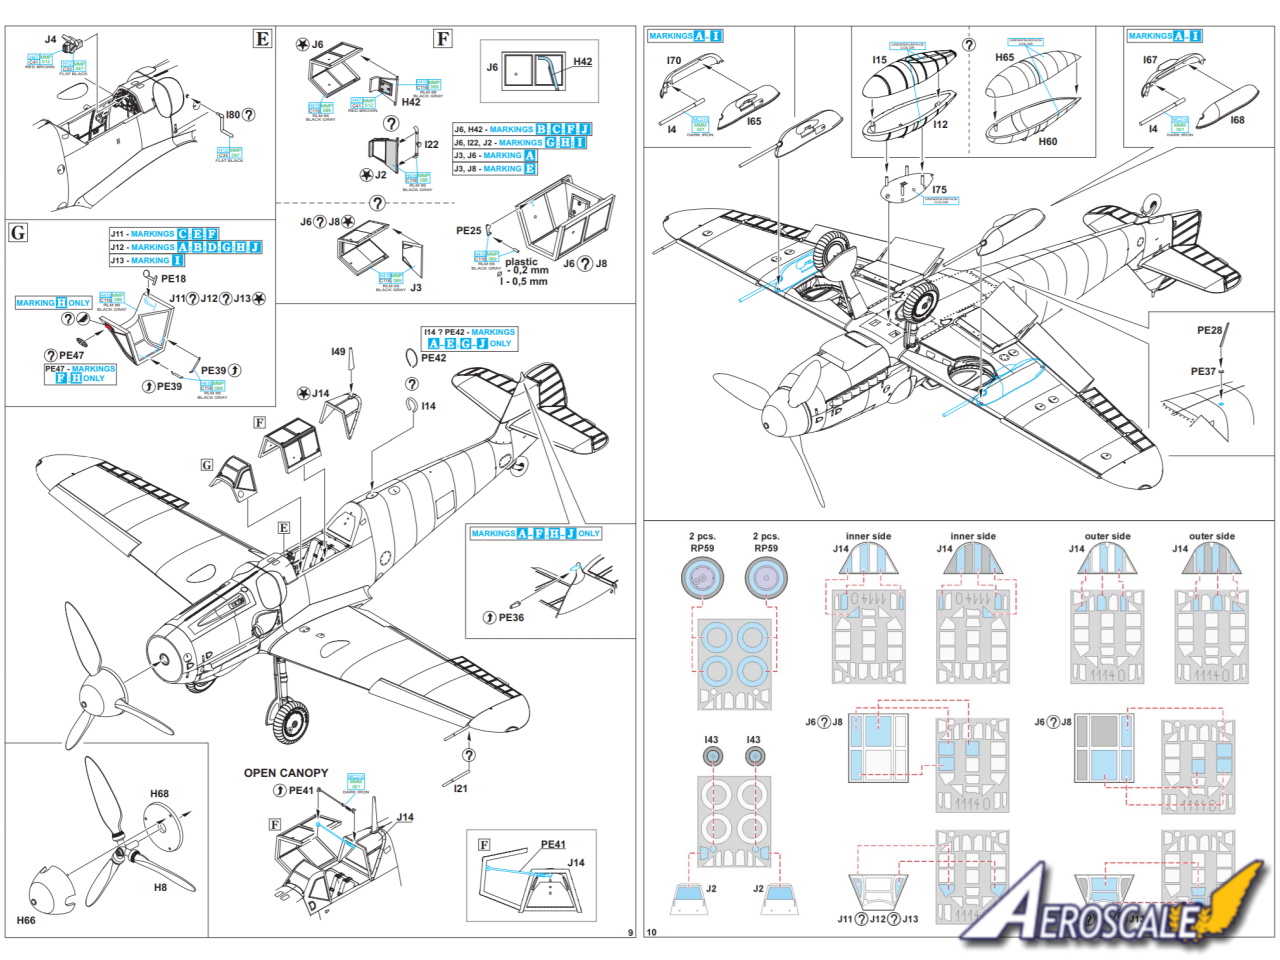
The cockpit will be very detailed by the time you finish it and as is usual with Eduard ProfiPACK releases you can tackle building the cockpit using plastic, photo etched parts and decals. There are around sixteen detailed plastic parts and eighteen photo etched parts, the latter mostly pre-coloured. PE parts include instrument panel [IP]and various panels on the side wall. There is pre-coloured seat harness too. The distinctive looking elevator and flap wheels by the pilots seat on the left wall are made up from two finely detailed plastic parts. The chains are photo etched, one is sandwiched between the two wheels and there is another chain to add to the fuselage wall once the unit is complete. If PE is not for you then the alternate plastic parts for the IP can be used add your own detail or use the decals included. The bulk of the cockpit is made up from a floor that incorporates the rear bulkhead, the two-part bucket seat is placed onto it. There is a pre-painted photo etched seat harness too. The covered end of the central mounted cannon, control stick, and rudder pedals are added to the floor. Theres a choice of plastic or photo etched pedals, the latter incorporate straps. The clear plastic fuel hose to the right of the seat is a nice touch, you just mask the clear part and paint the rest yellow. Just be aware there are three styles of rear armoured head rests to chose from depending on which marking options you go for.
The clear plastic of the canopy and windscreen are crystal clear. The framed canopy can be displayed open or closed, its hinged on the right side. There is even a PE part that represents the cable limiter to prevent the canopy from opening too far. You do need to pay attention to the construction of the canopy as the components vary depending which marking option you are making.
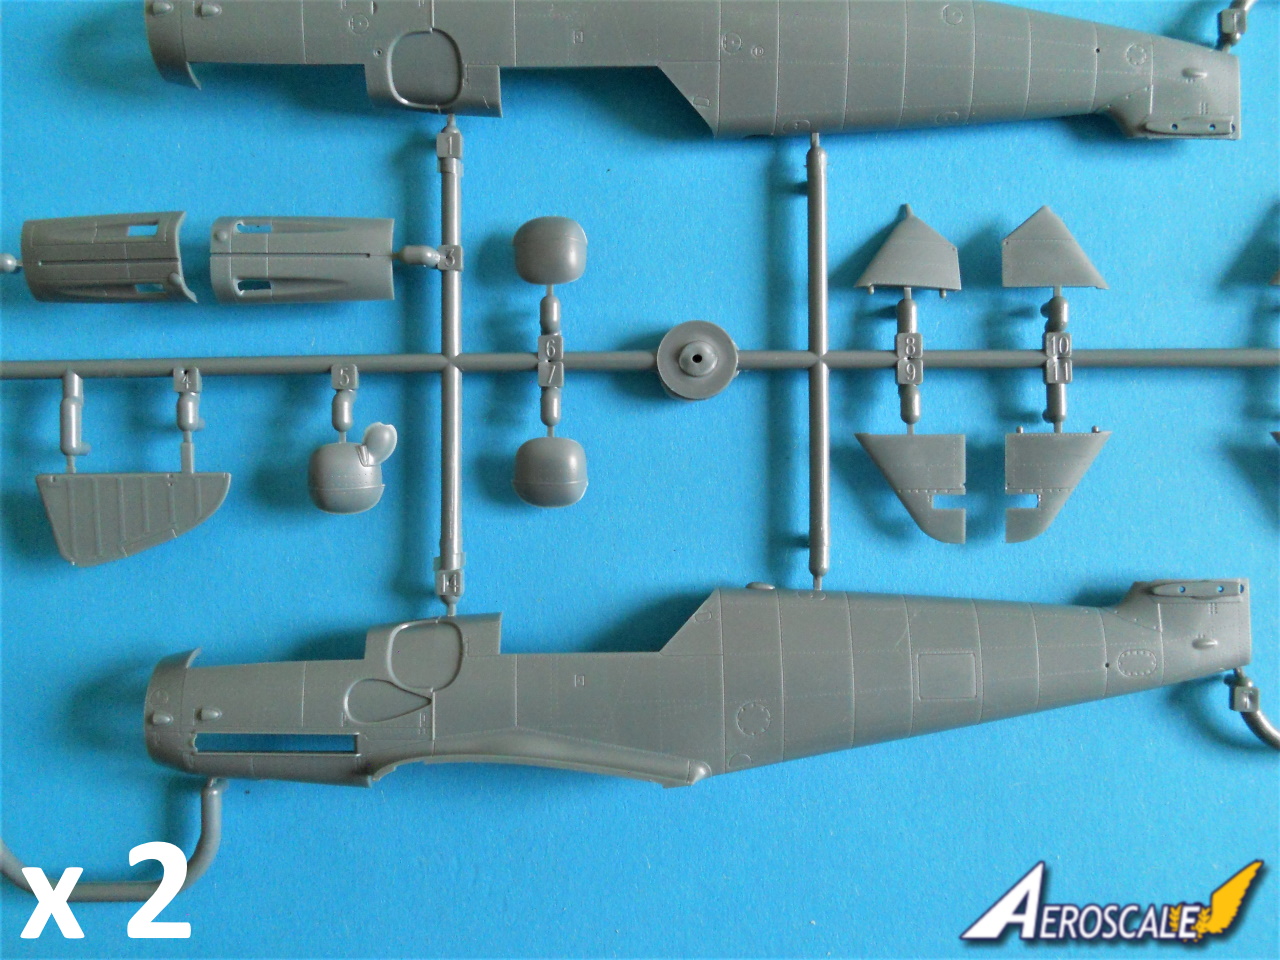
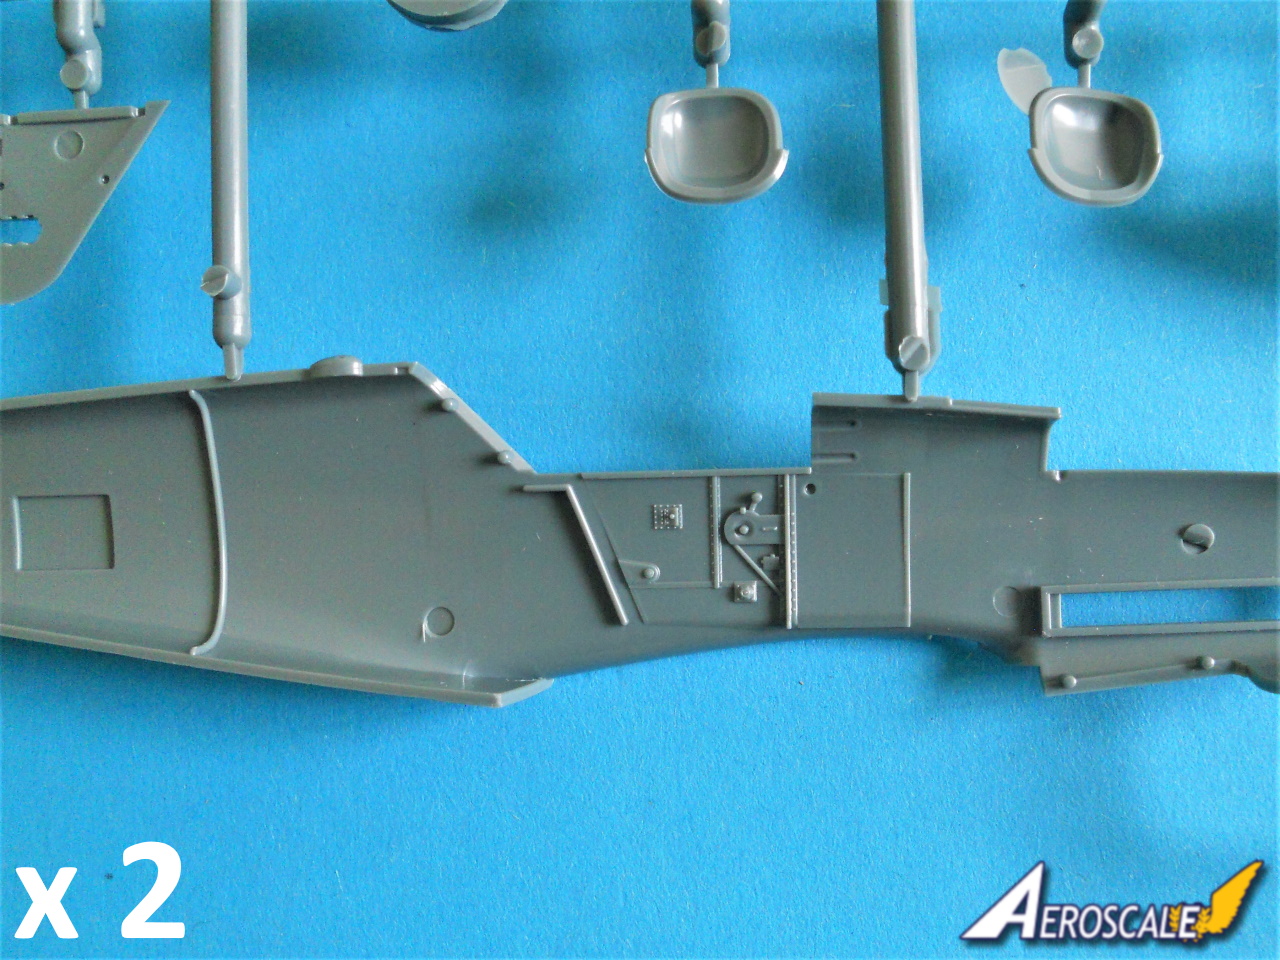
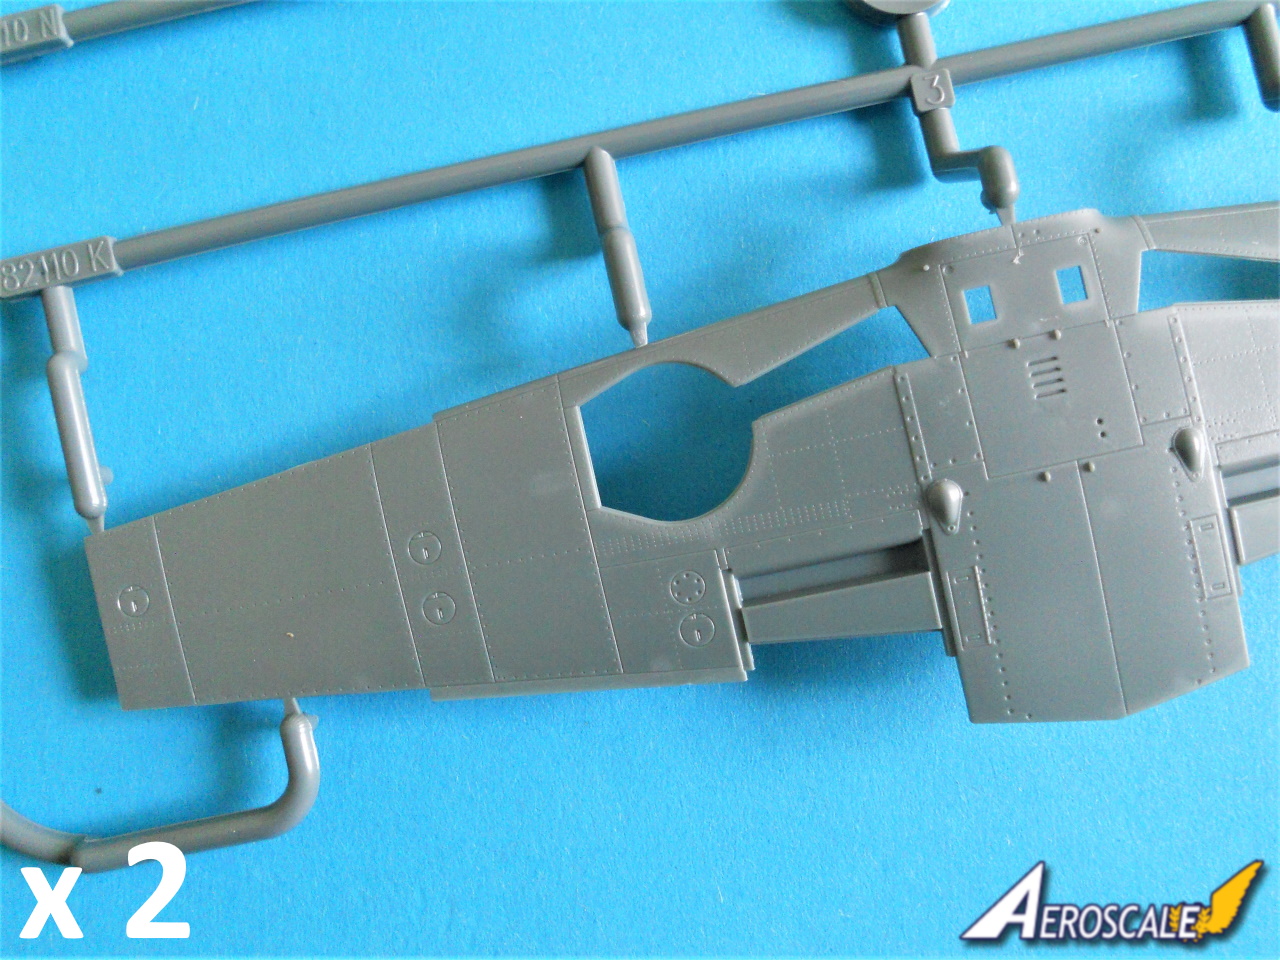
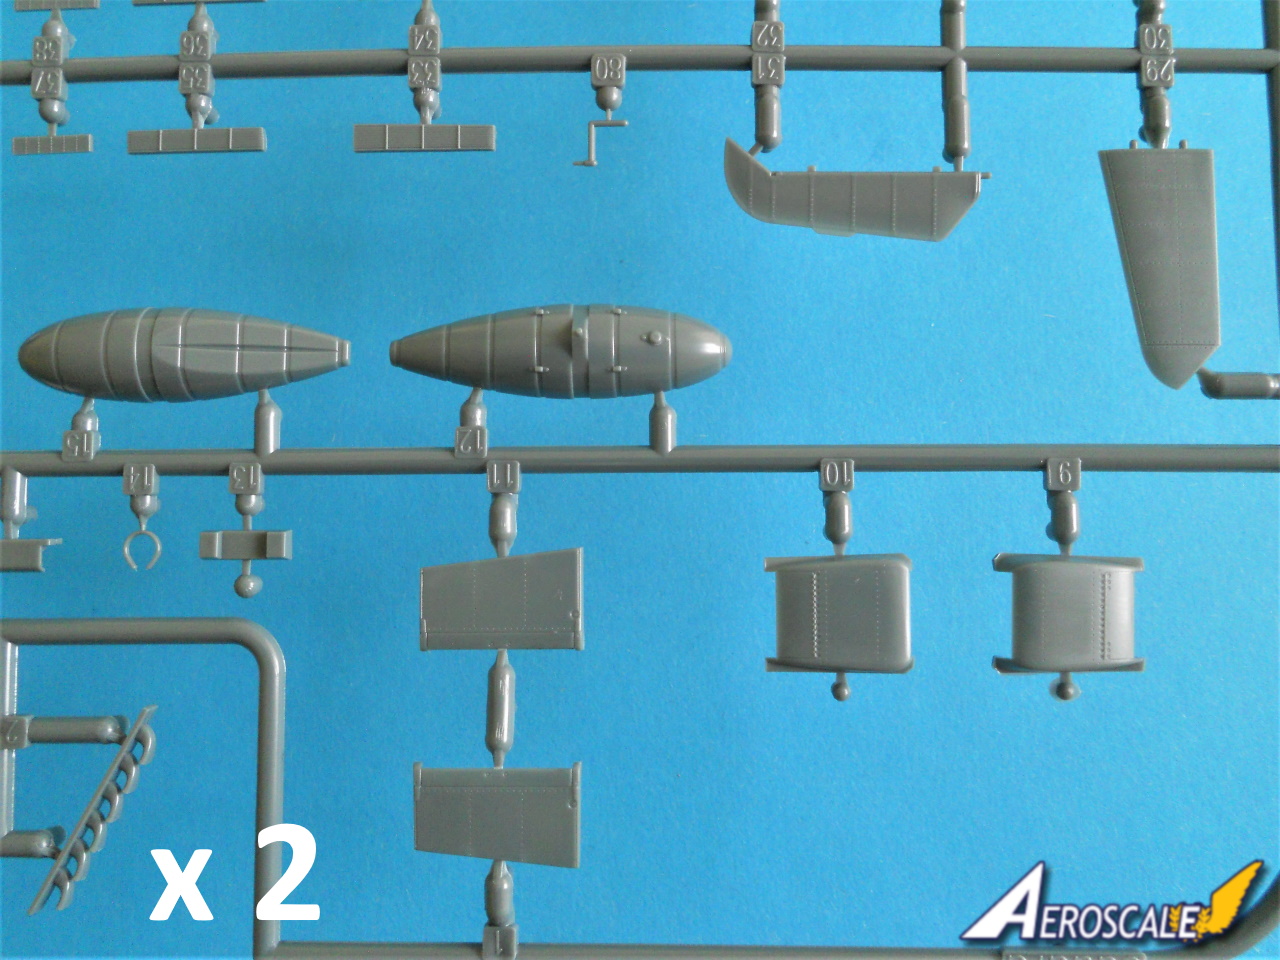
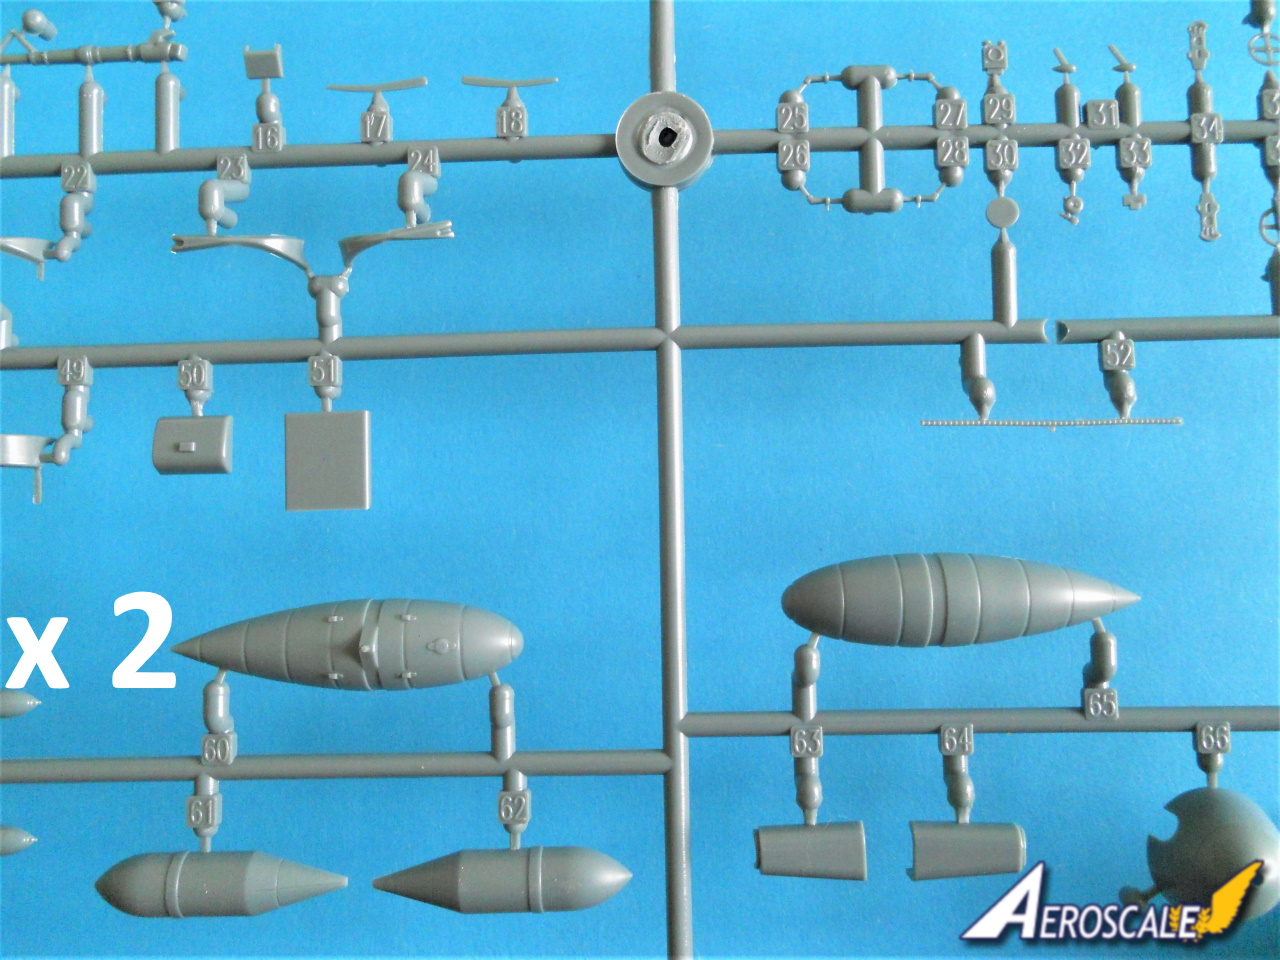
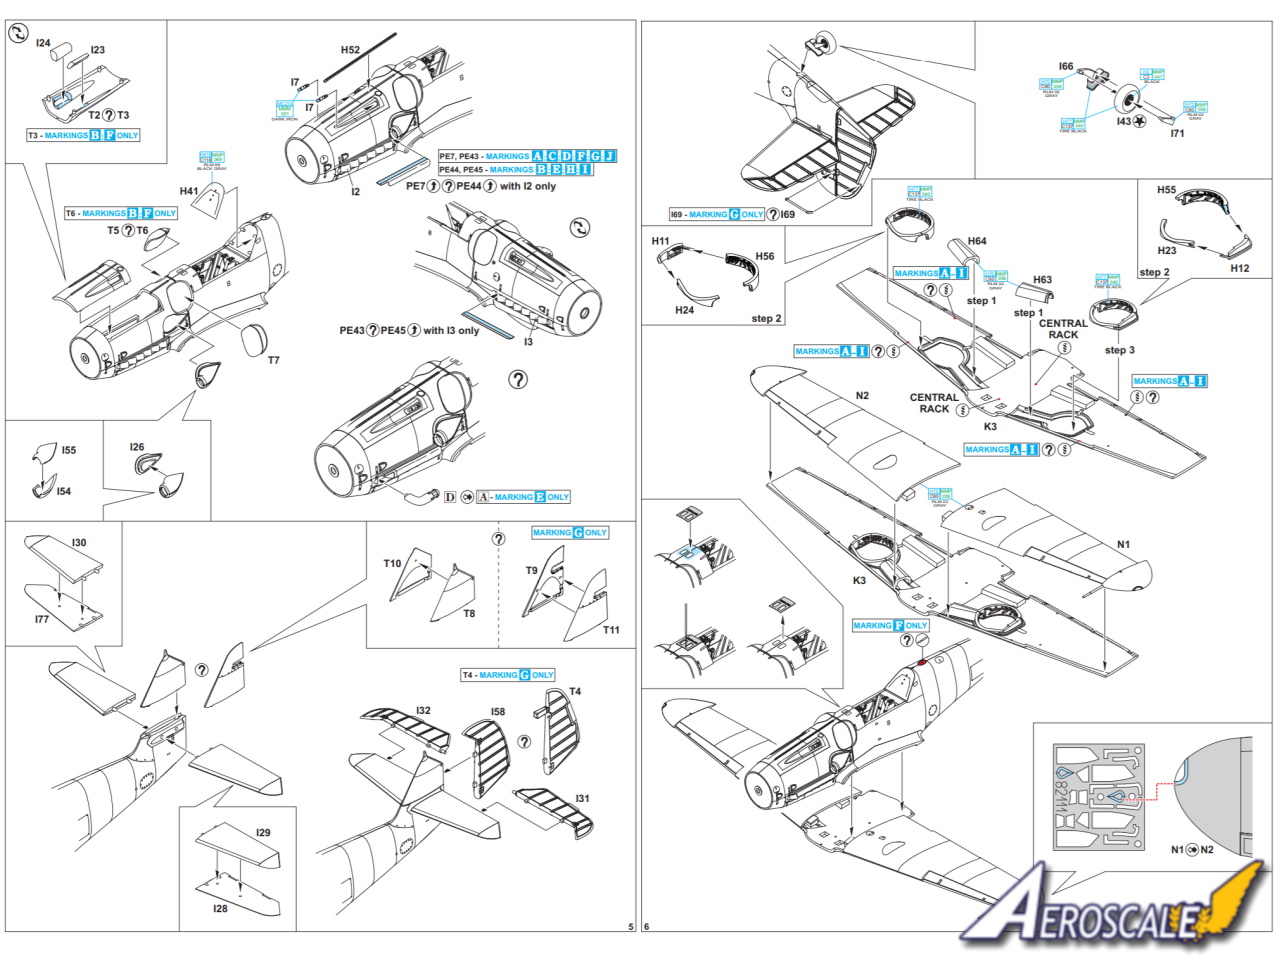
The fuselage is split traditionally with left and right halves. One thing worth noting is that there are no locating pins to aid positioning the two halves when joining. The upper panel with the gun troughs, the fin and rudder are separate parts. Option G has the taller wooden fin and rudder. The upper nose gun nozzles are separate and can be painted and fixed into position after the gun cover is fixed in place. The chin radiator is also separate and features either photo etched or detailed plastic radiator faces. The exhausts have various options. You can fit the resin Pfeife though you need to remove the most forward plastic exhaust pipe and replace it with the resin part. There are plastic exhausts that incorporate the shielding that reduced the glare significantly. Or you can use the photo etched parts included to create the shielding. The impressive one-piece prop has separate spinner and back plate. The plastic forming the hatch for the radio compartment is much thinner than the rest of the fuselage walls, making it that much easier to remove if you want to reveal the bay and the equipment inside.
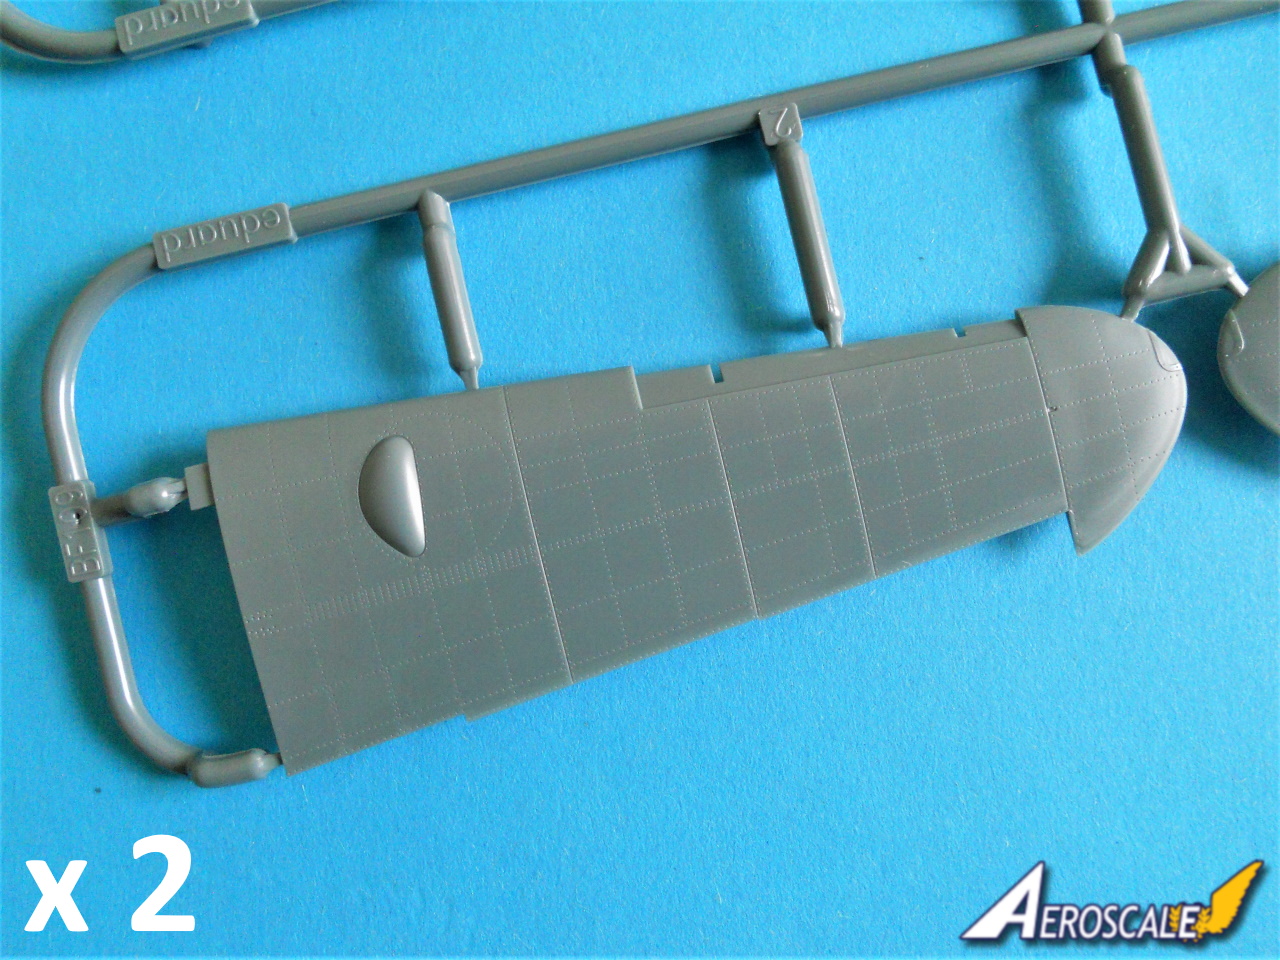
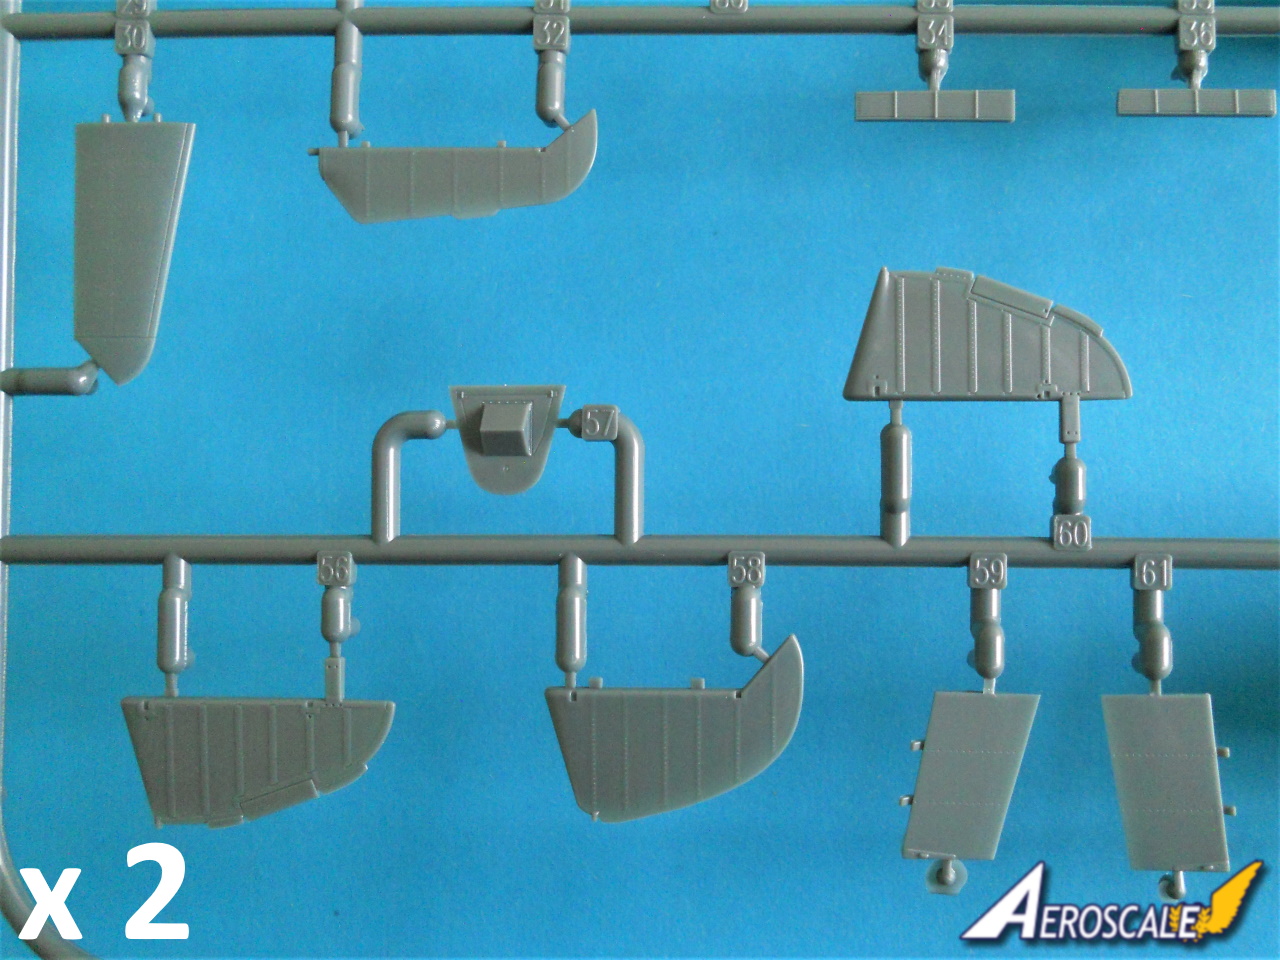
The wings feature a one-piece lower wing and the upper halves feature upper and lower wing tips. There are paint masks for the wing tip lights. Unlike the fuselage there are locating pins included. The control surfaces: slats, ailerons and flaps are separate. The radiators are separate and you have the option of using PE or the detailed plastic radiator faces. The separate radiator flaps are a nice touch. Theres a small diagram in the instructions showing how to set the flaps of the radiator. The undercarriage bays are detailed and, each bay has four parts to create the walls. The surface of the walls features folds replicating the leather that was used on the real thing. The tail wings are both made from two parts and the elevators are each one piece. The rear control surfaces feature raised detail. All the control surfaces have positive attachment points so a strong join can be achieved.
The undercarriage includes one-piece plastic treaded tyres with separate hubs. Or you can go for the one piece, beautifully cast resin wheels. There are paint masks for hubs. The three-piece tail wheel includes a one-piece wheel. The unit is fitted after the fuselage halves are joined.
There are two styles of underbelly fuel tank included its your choice which one you attach. There are two gondolas housing the 30mm cannons to attach to the underwing. There are numerous aerials to fit made from plastic or PE parts.
Resin parts include full wheels and the Pfeife pipes that replace the most forward exhaust pipes. They are made up from two parts and there are a few spares just in case your carpet is hungry.
The photo etched parts are mainly pre-painted parts for the cockpit. There are also PE radiator faces and aerials.
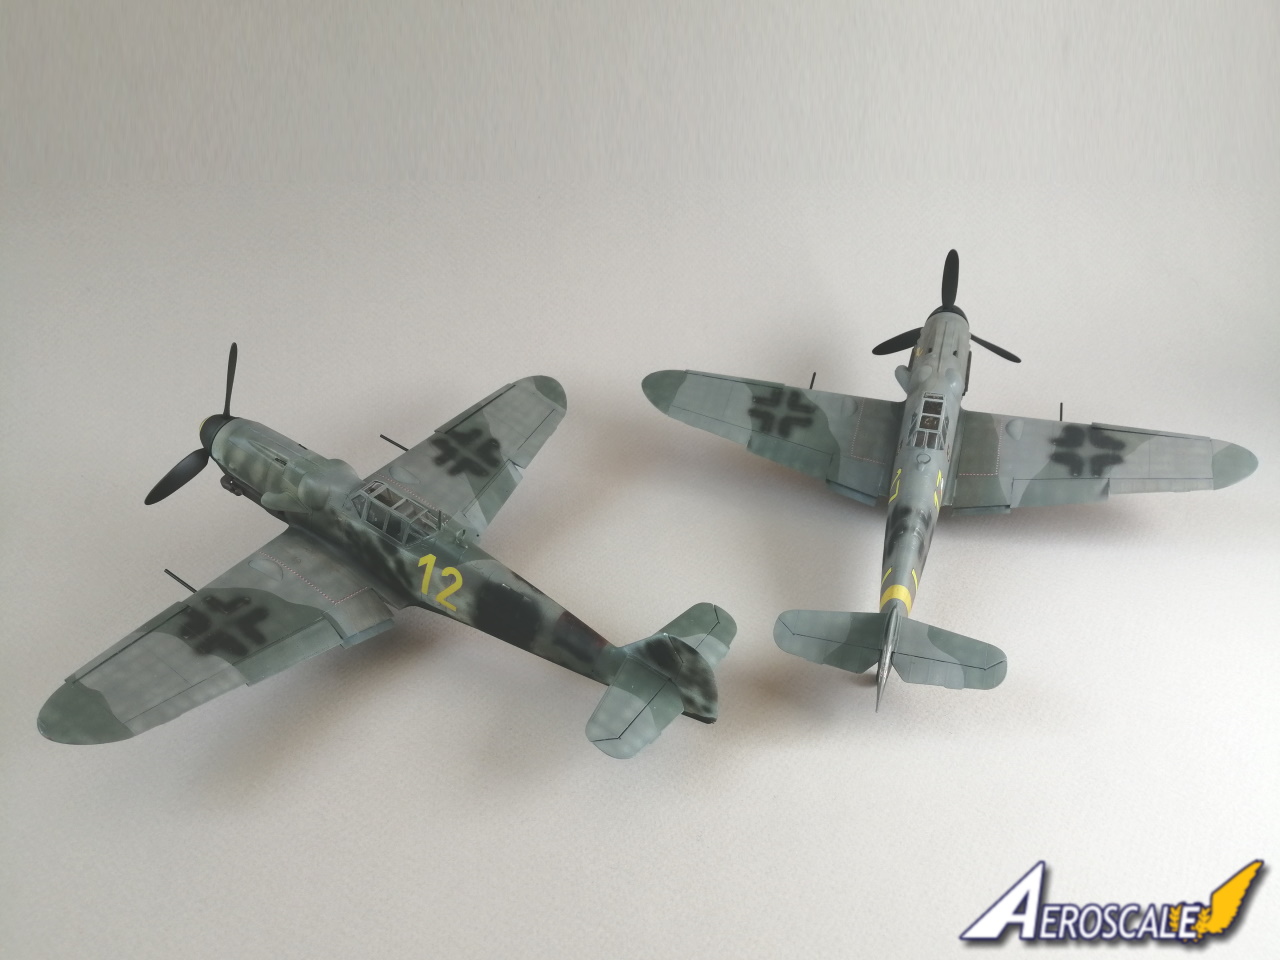
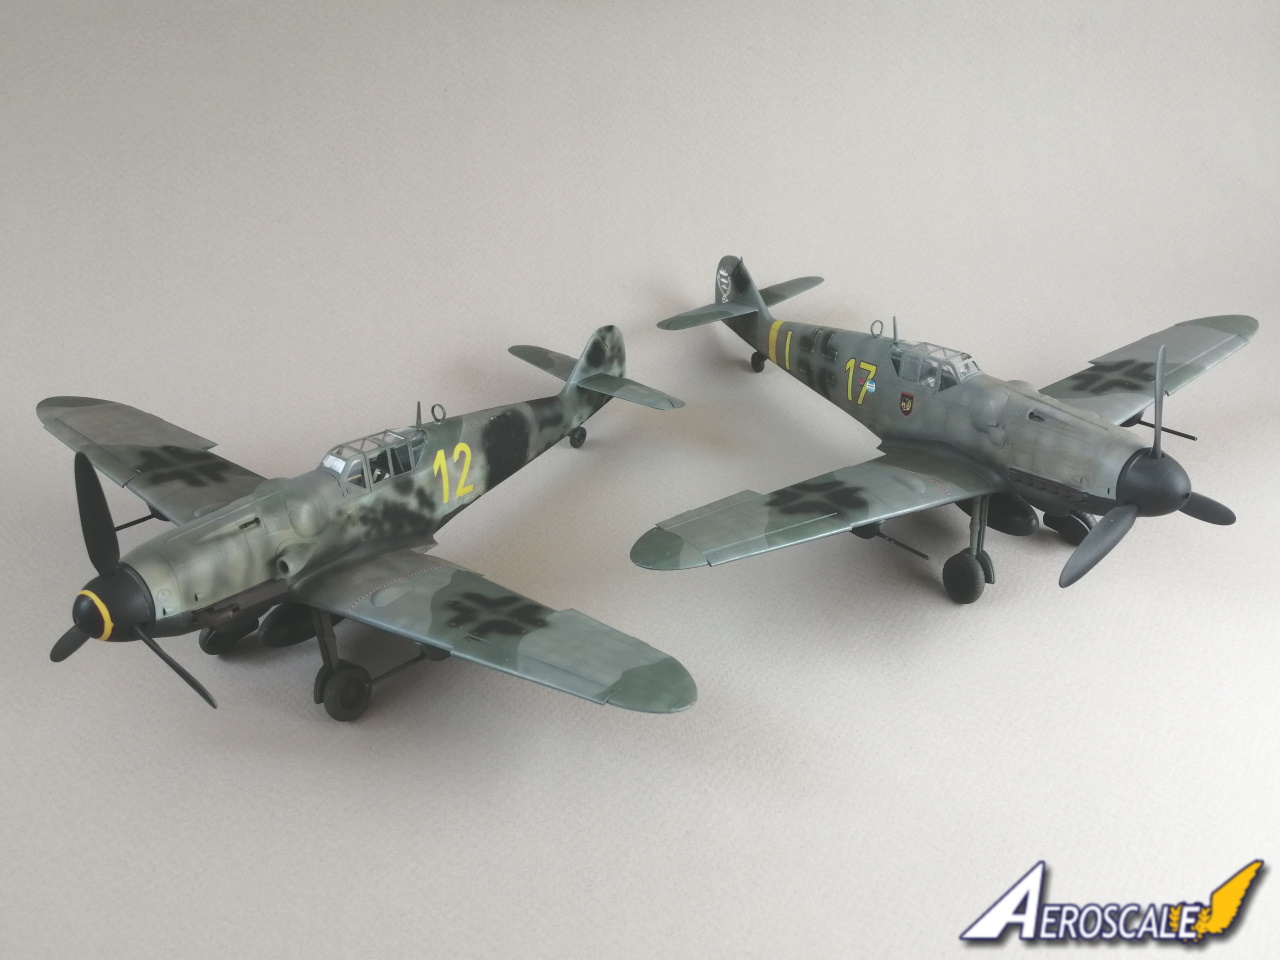
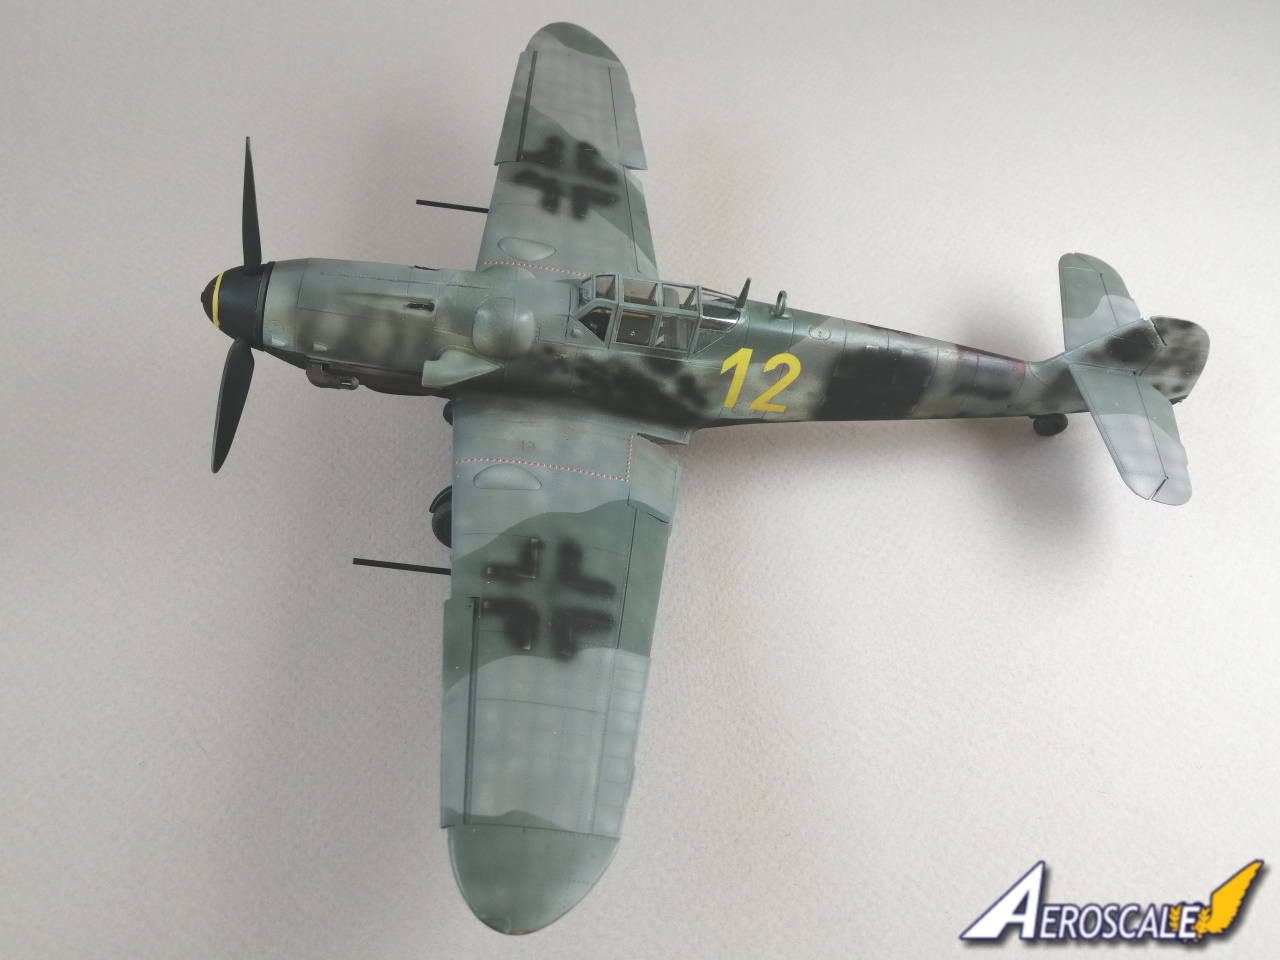
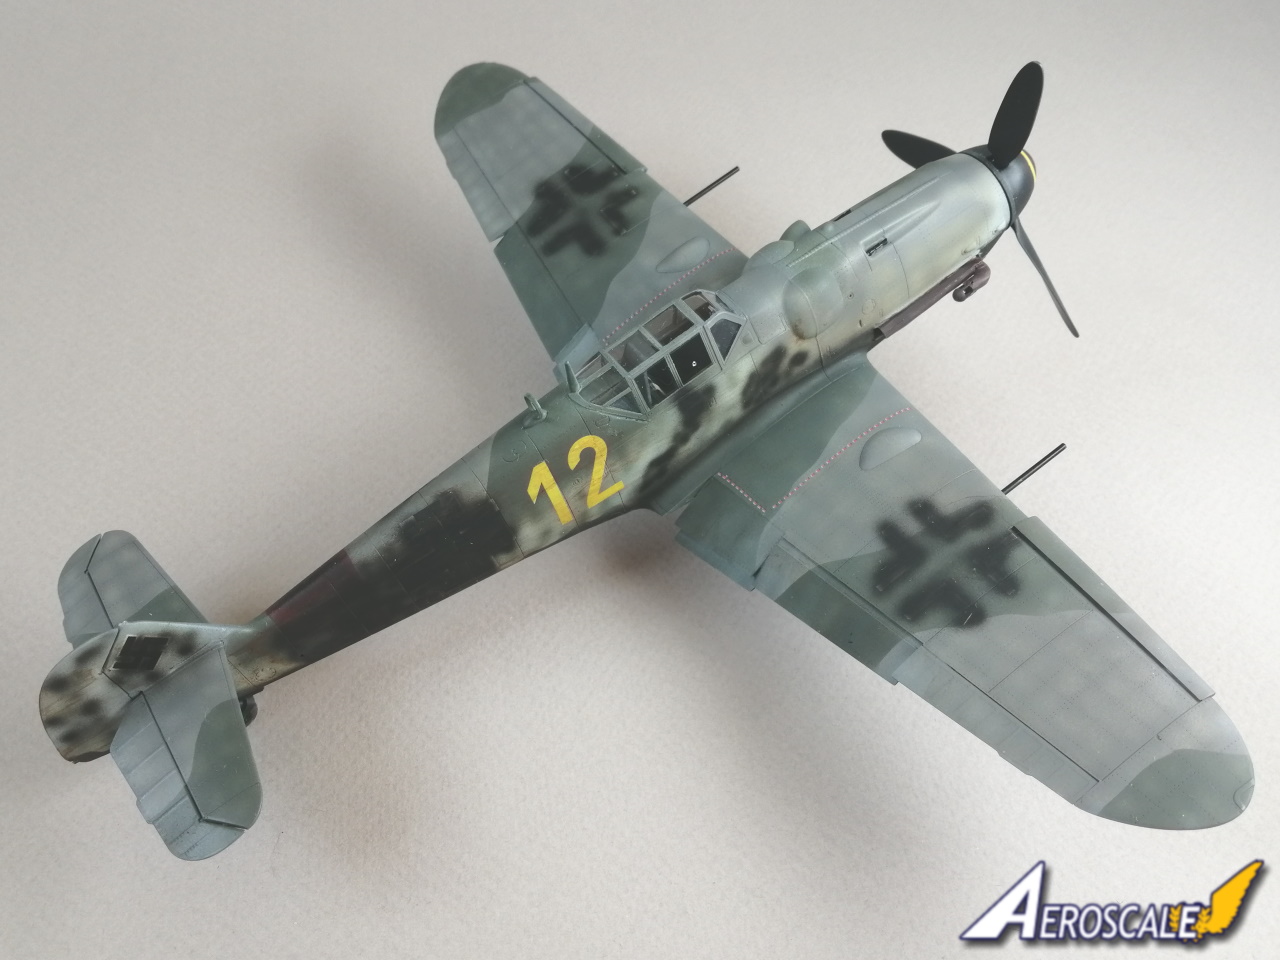
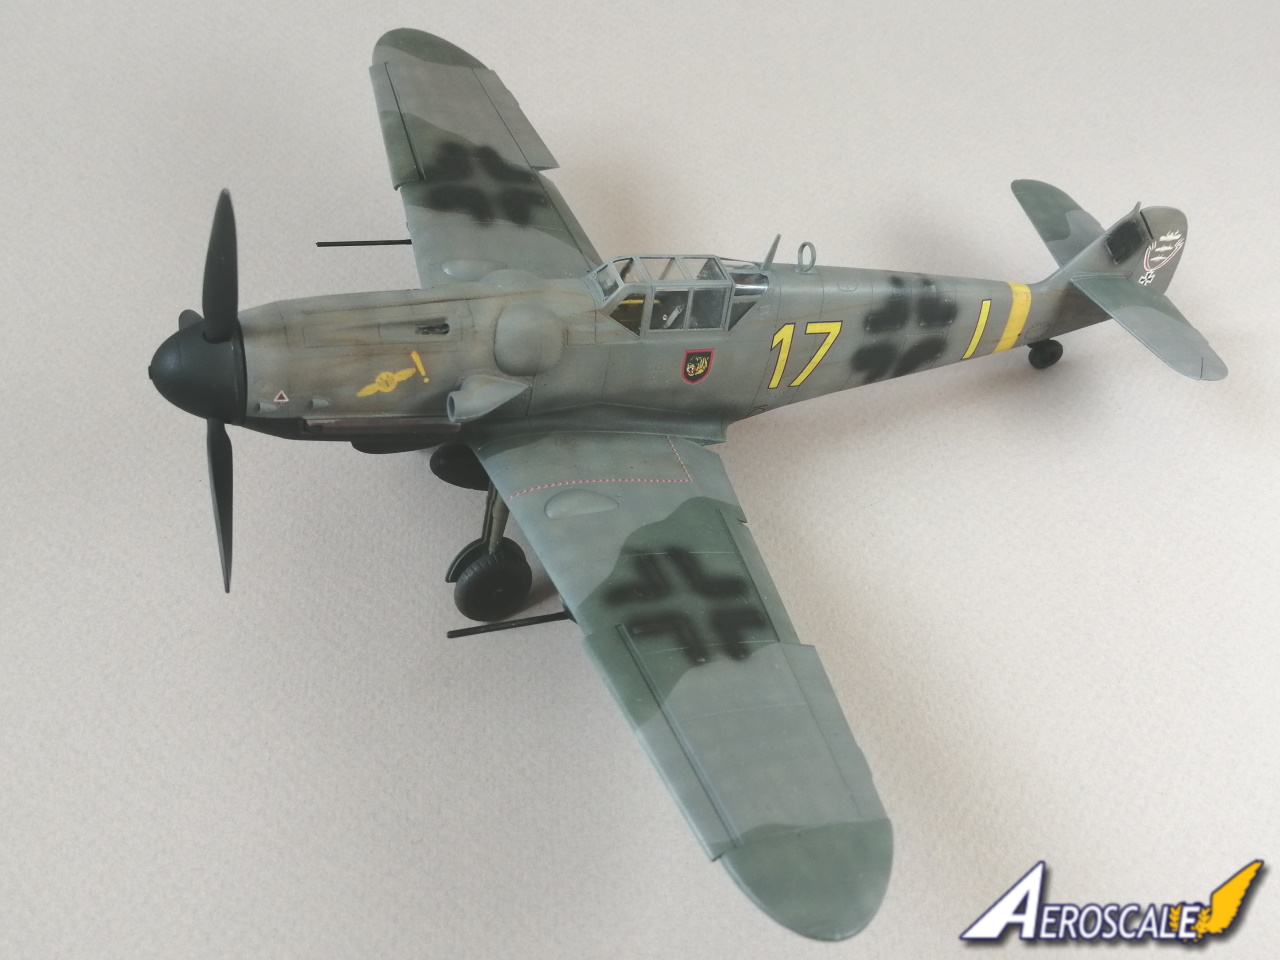
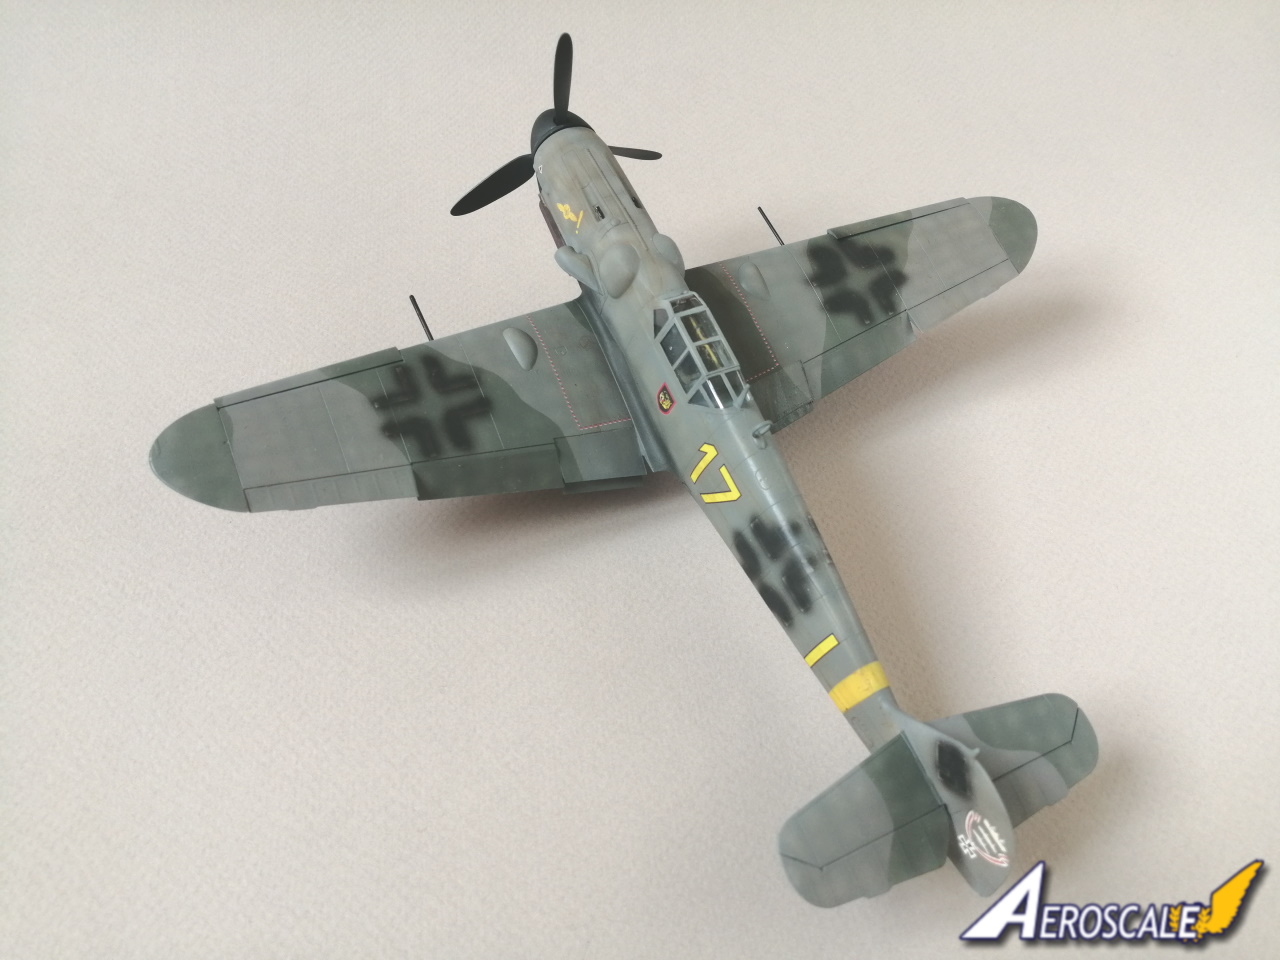
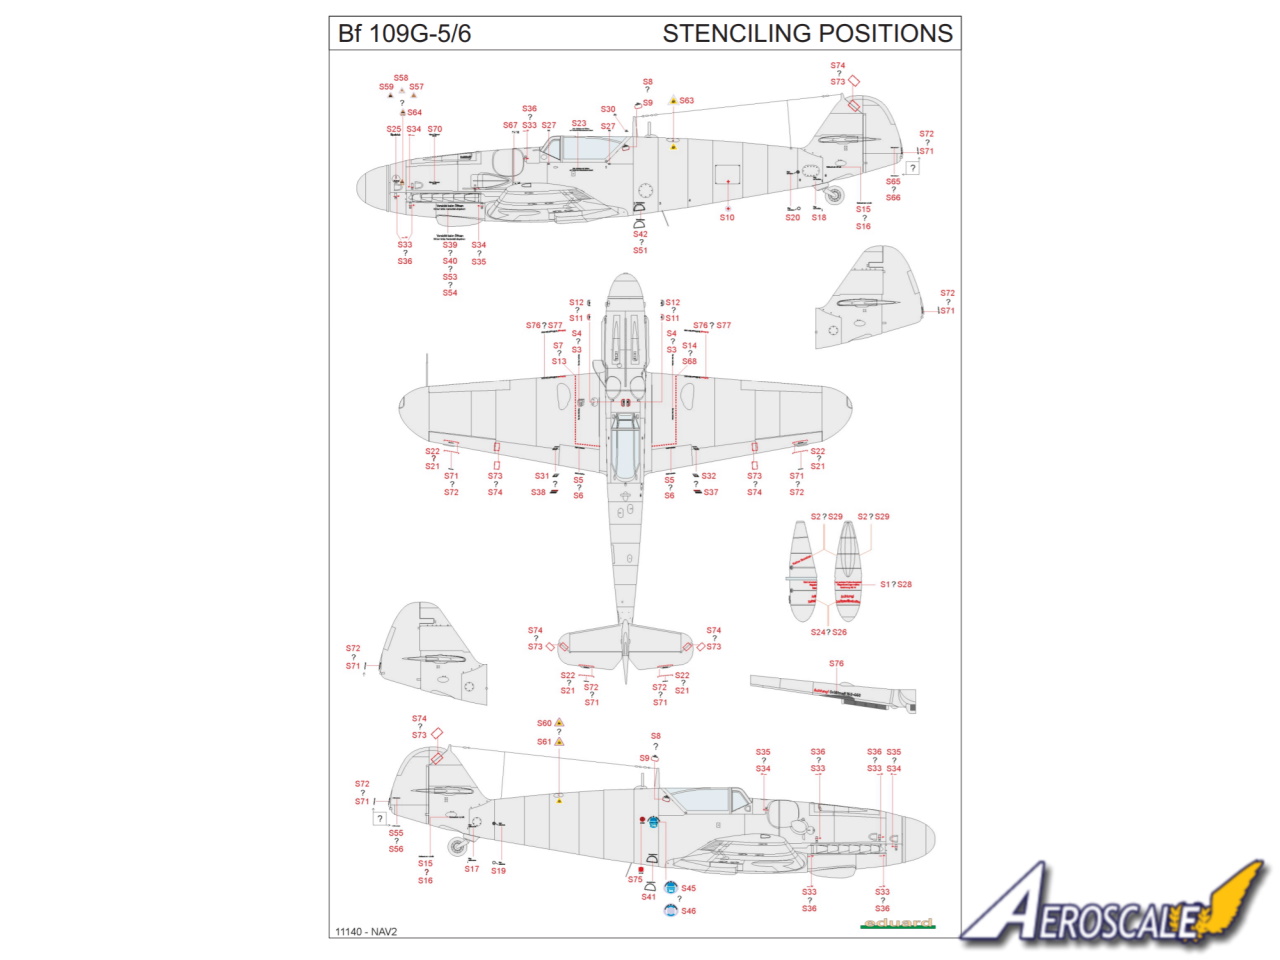
There are two sheets of decals plus a small supplement. The decals look well printed and the definition is excellent. Even the smallest of stencils are legible. Spinner spirals are included. Full national markings including full and partial swastikas are provided, though three of the marking options have all the markings painted over in black
Marking Options
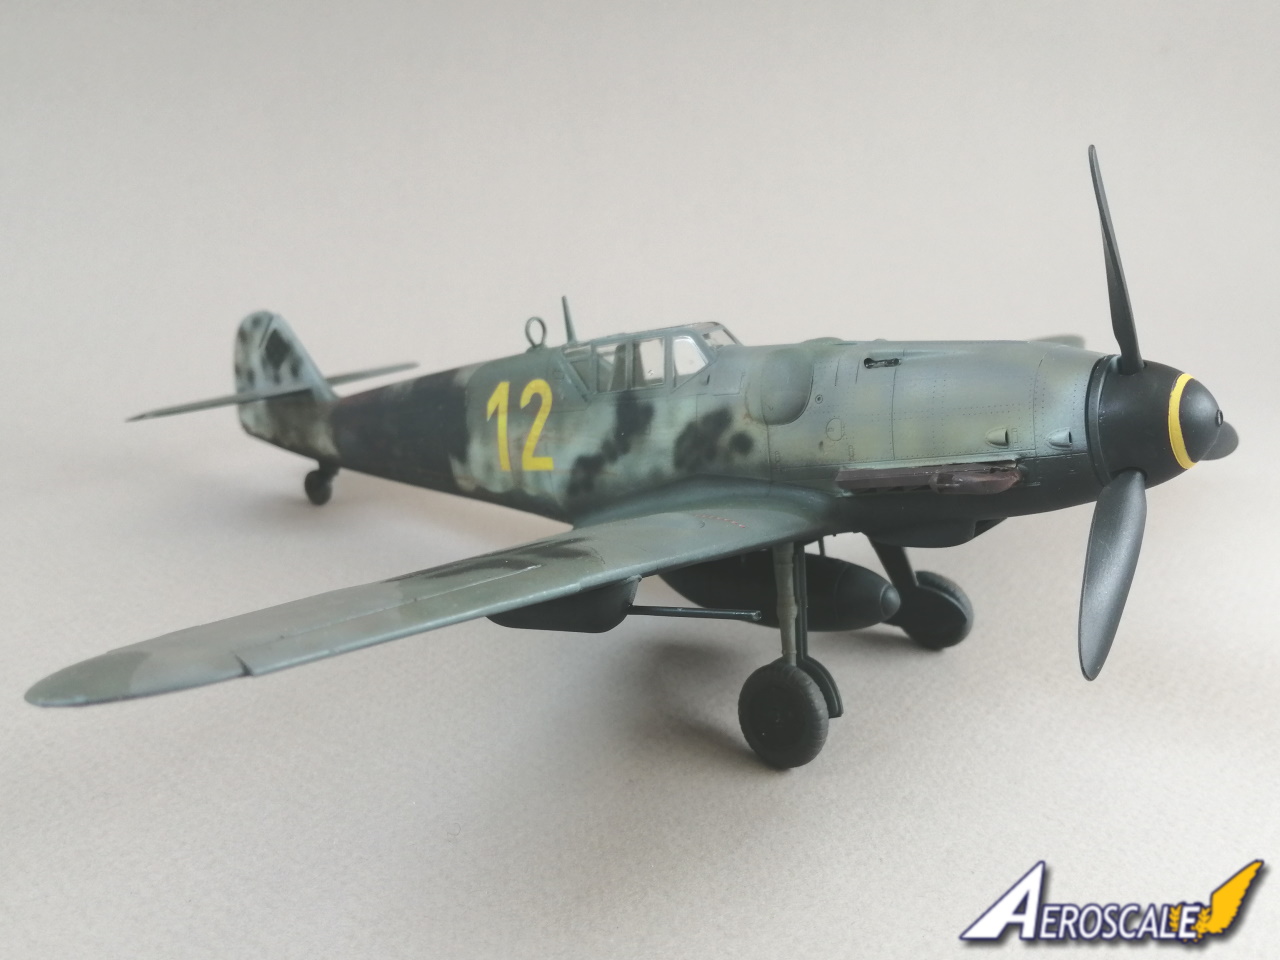
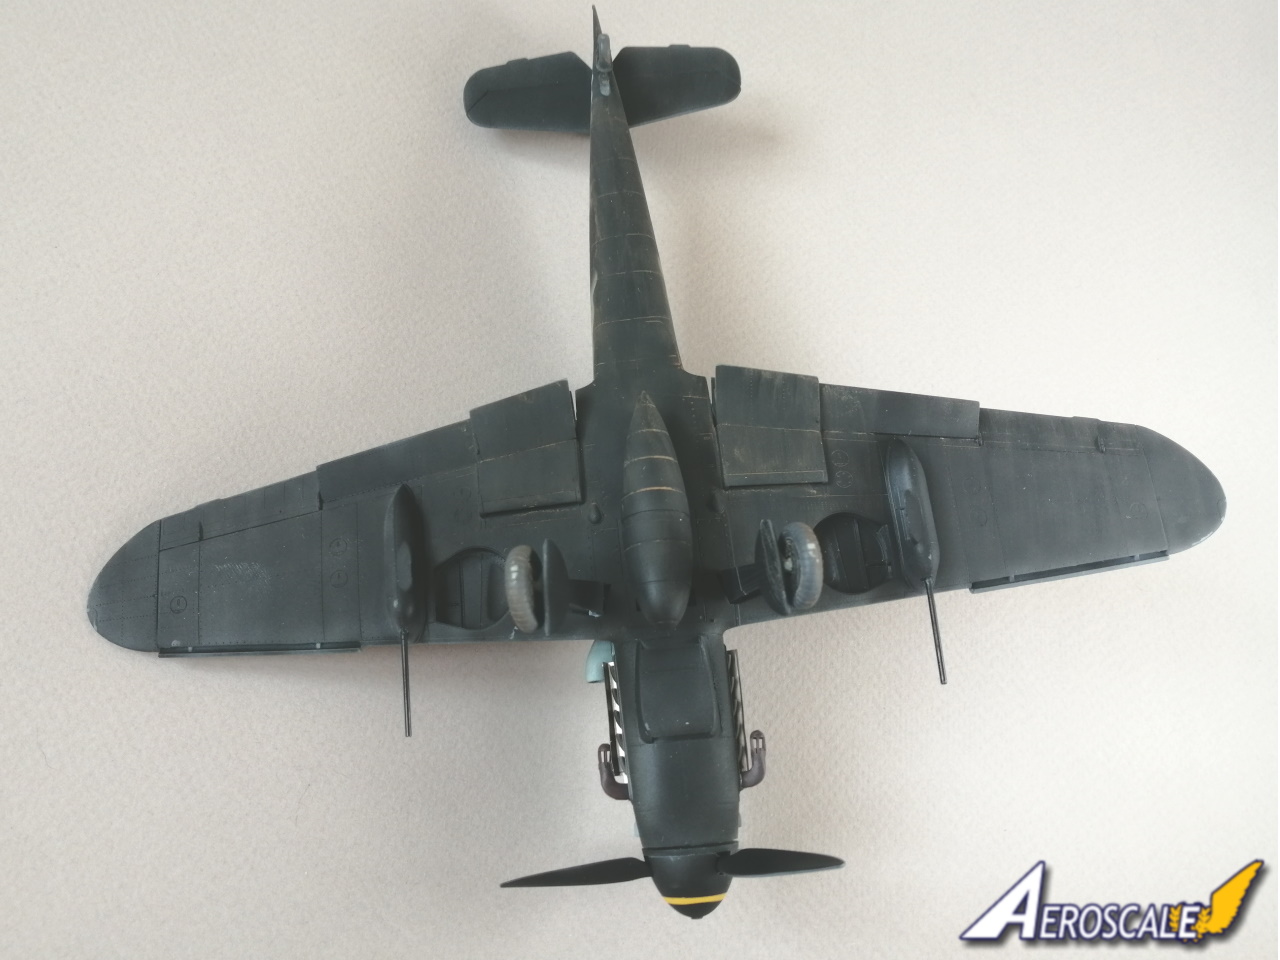
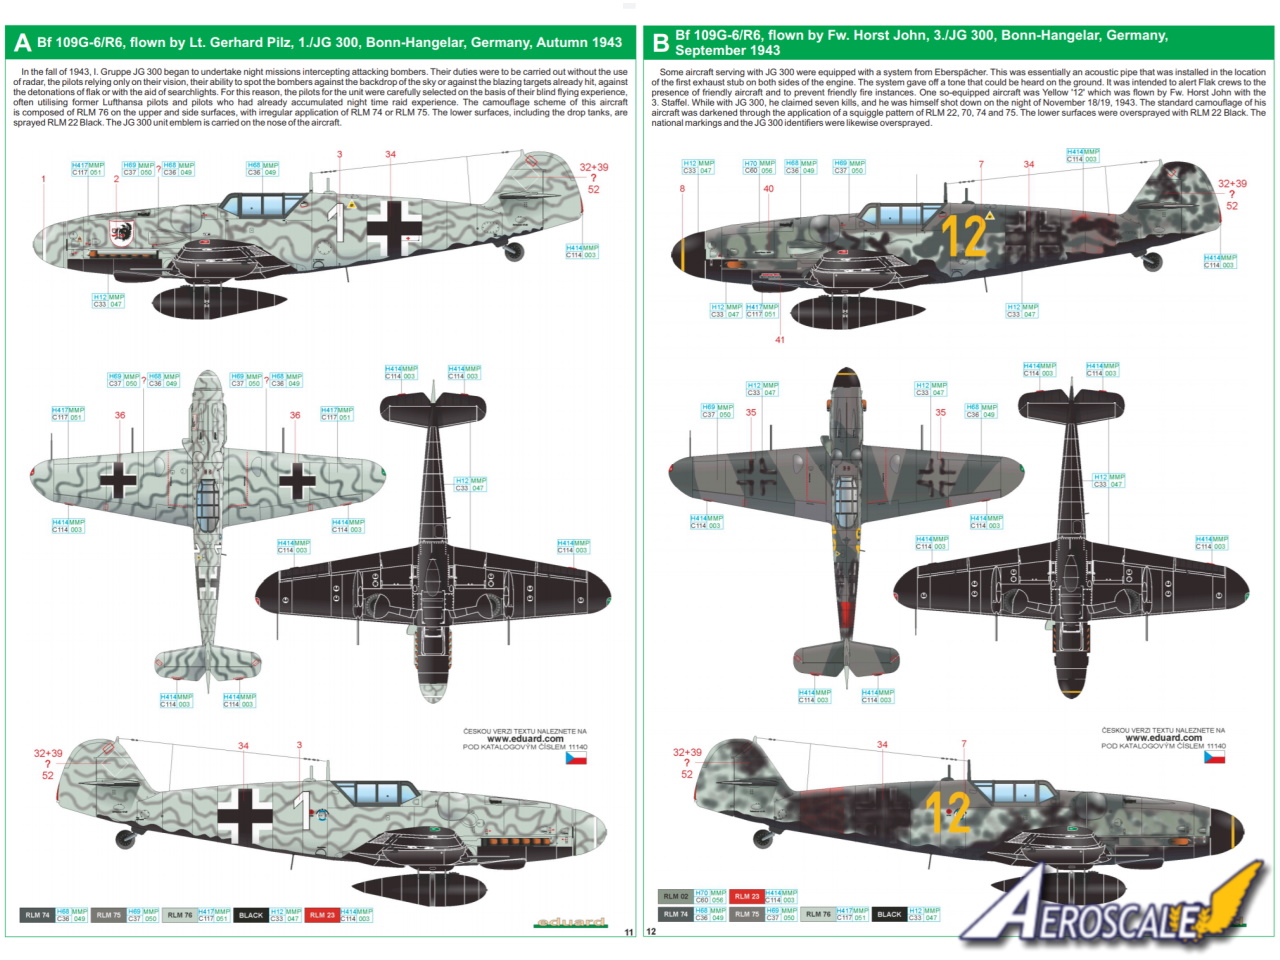
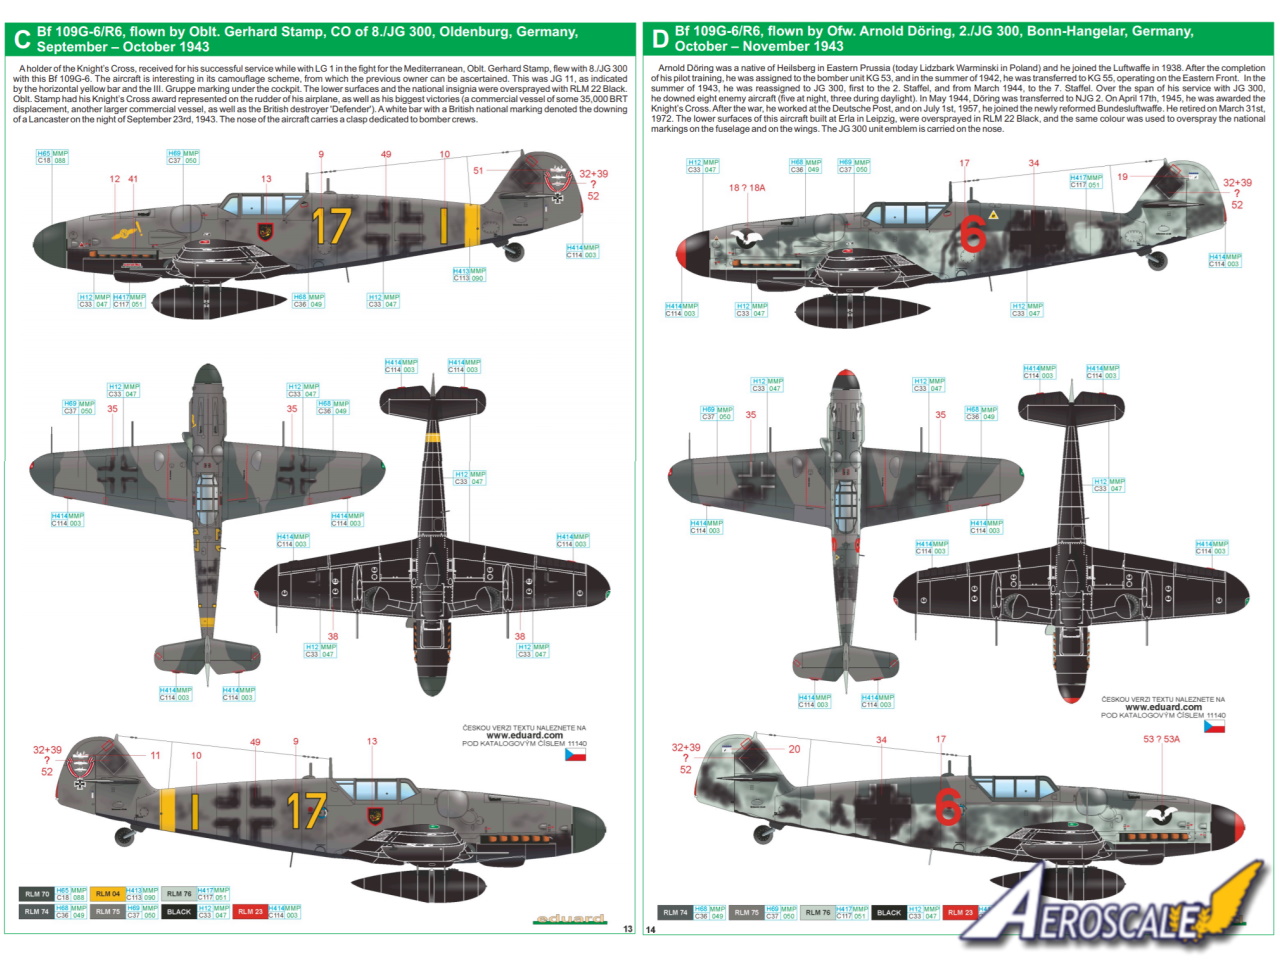
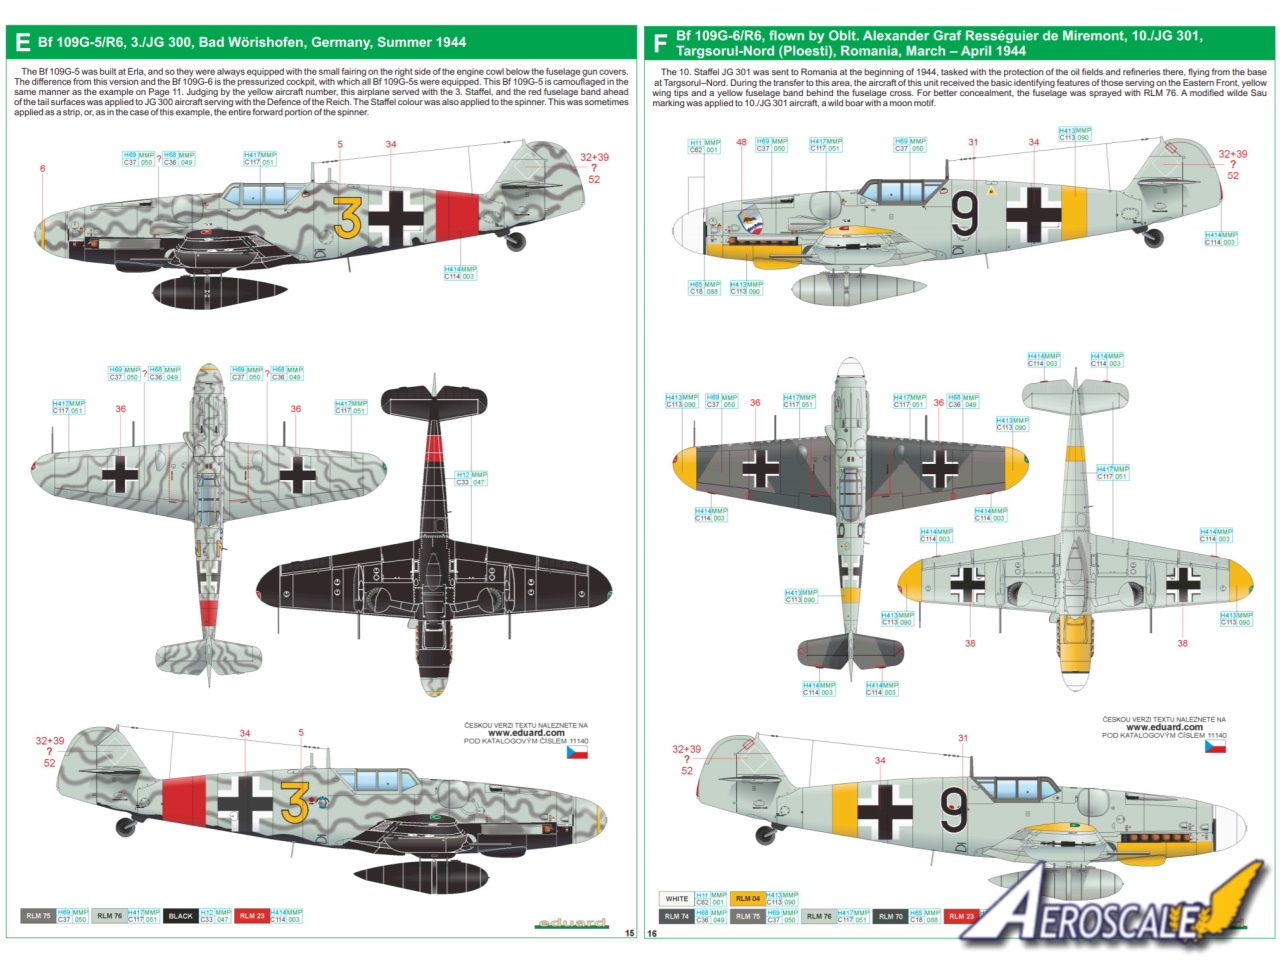
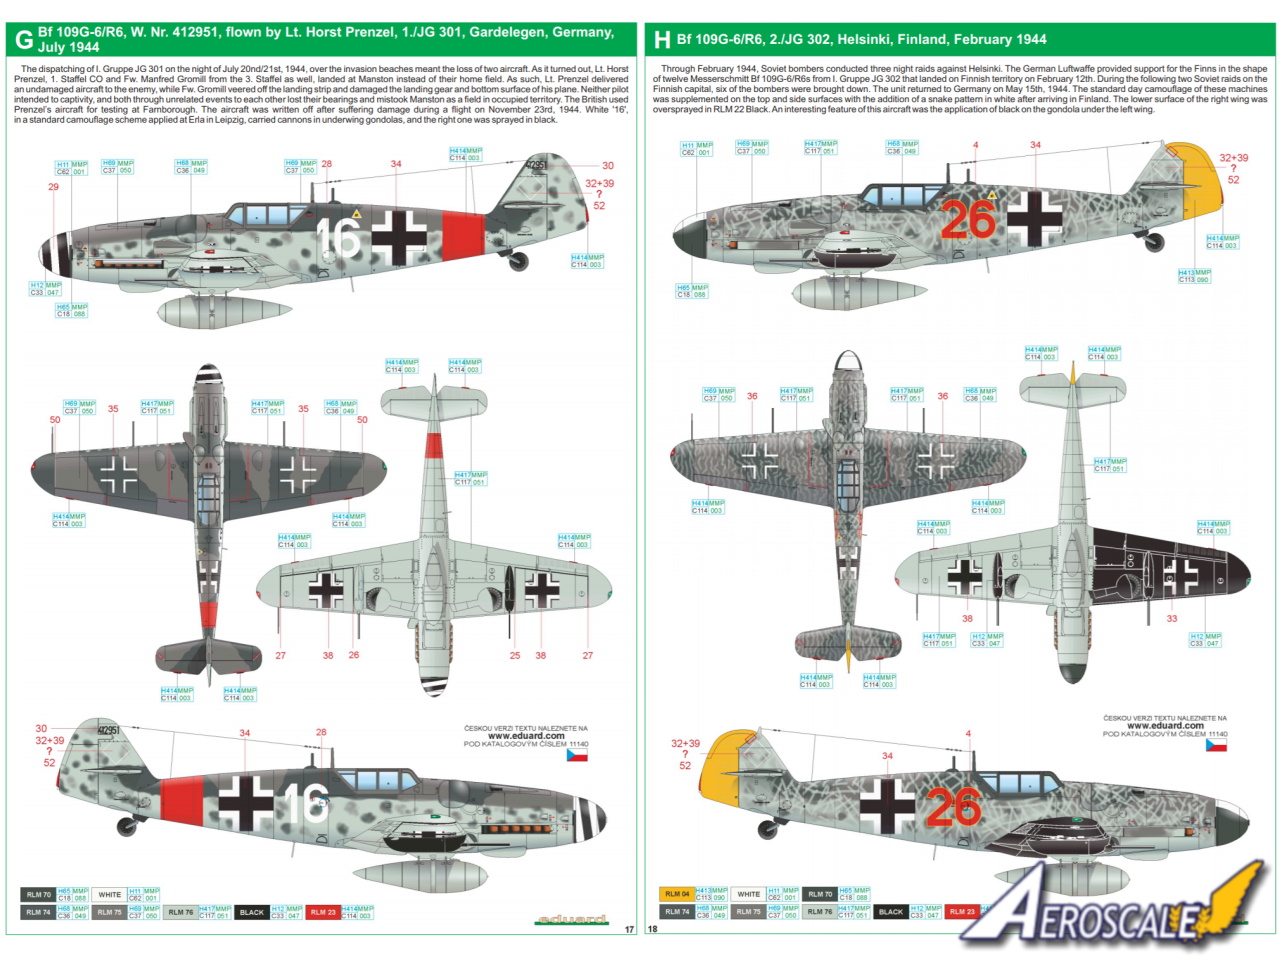
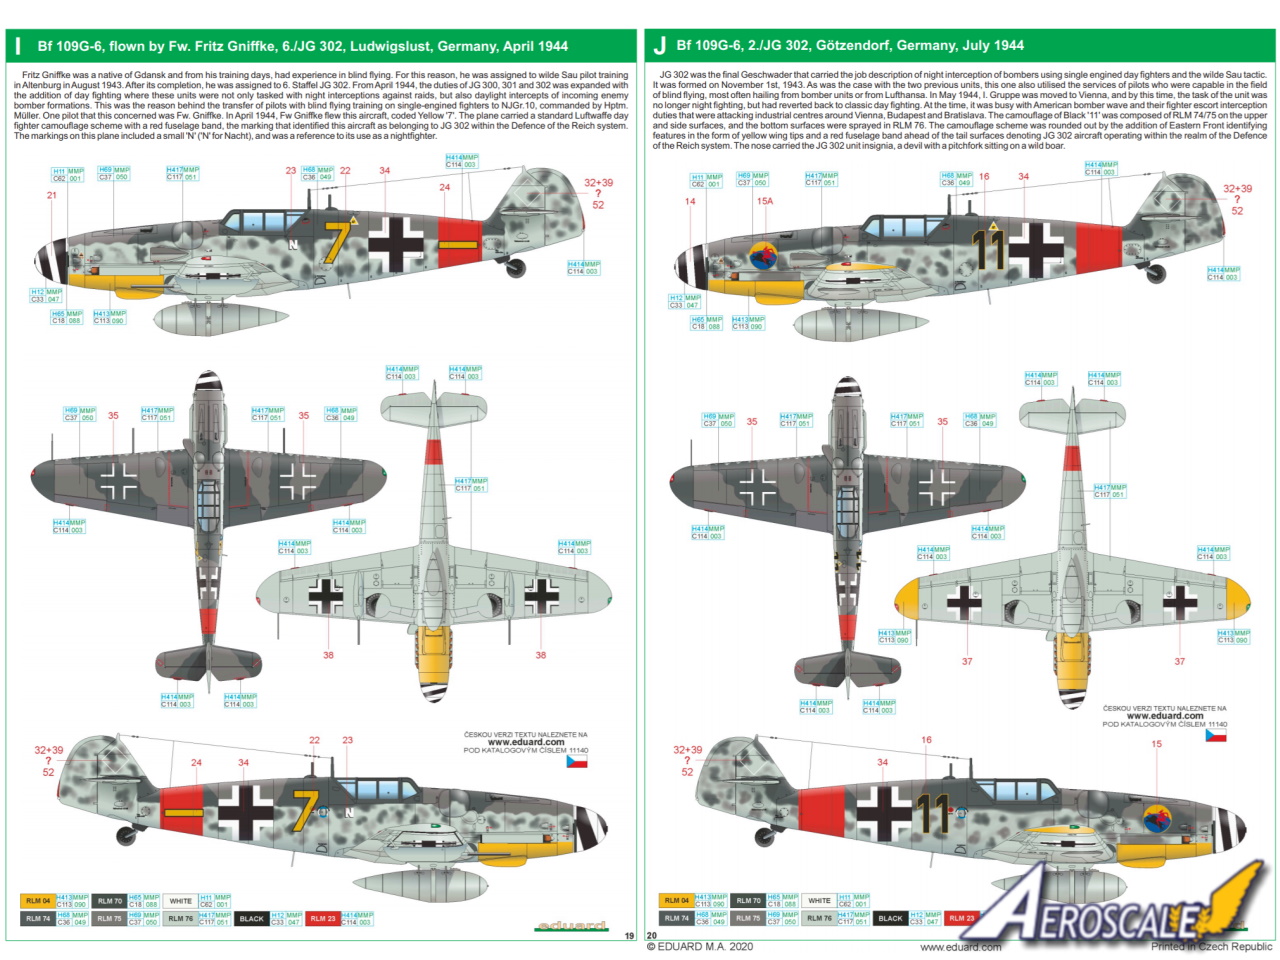
There are ten marking options including: A Bf 109G-6/R6, flown by Lt. Gerhard Pilz, 1./JG 300, Bonn-Hangelar, Germany, Autumn 1943 B Bf 109G-6/R6, flown by Fw. Horst John, 3./JG 300, Bonn-Hangelar, Germany, September 1943 C Bf 109G-6/R6, flown by Oblt. Gerhard Stamp, CO of 8./JG 300, Oldenburg, Germany, September October 1943 D Bf 109G-6/R6, flown by Ofw. Arnold Döring, 2./JG 300, Bonn-Hangelar, Germany, October November 1943 E Bf 109G-5/R6, 3./JG 300, Bad Wörishofen, Germany, Summer 1944 F Bf 109G-6/R6, flown by Oblt. Alexander Graf Rességuier de Miremont, 10./JG 301, Targsorul-Nord (Ploesti), Romania, March April 1944 G Bf 109G-6/R6, W. Nr. 412951, flown by Lt. Horst Prenzel, 1./JG 301, Gardelegen, Germany, July 1944 H Bf 109G-6/R6, 2./JG 302, Helsinki, Finland, February 1944 I Bf 109G-6, flown by Fw. Fritz Gniffke, 6./JG 302, Ludwigslust, Germany, April 1944 J Bf 109G-6, 2./JG 302, Götzendorf, Germany, July 1944
Theres quite a variety of camouflage options included some of which look hurriedly applied in the field.
The A4 format set of instruction has twenty pages, half of the manual features the marking options. Eduard share some of the research of the pilot and aircraft, which adds a huge amount of interest. There is a separate A4 sheet with the stencil information on it. Its well worth taking your time studying the instructions before building as there are some variations with this build. The parts map at the beginning of the instructions is very useful as you can eliminate almost half the parts.
Build
The build was straightforward really. The only part that you need to be careful with is the join of the lower fuselage and the rear of the wing. Just make sure that everything is lined up to save yourself unnecessary sanding and blending. Also make sure that the walls of the undercarriage bay are set in place properly, otherwise there will be a slight gap in the wing joint along the length of the undercarriage bay. The instructions for the instillation of the photo etched anti glare shields on the exhausts was difficult to follow. Just be a little careful applying the decals. The decals grip the surface readily so use water to float them in place rather than decal solution. I used Microset to fix them in place. Also be aware that the decal identifying numbers will break up once immersed in water. The bits will get everywhere. Other than that enjoy a superb kit.
Conclusions
It goes without saying that this is a superb kit from Eduard. Having built the G-10 and the G-14 which both share a lot of common parts with this release I can testify it goes together extremely well. The big attraction for me with this release is the marking options. Yes, a couple of them are challenging, but the blackened painted night fighter gives the already aggressive form of this fighter a much more menacing look.
SUMMARY
Highs: Interesting subject, marking options, good looking kit, that is easy enough to put together.Lows: Non notedVerdict: Well Im going start to build this duo build straight away so look out for the build log. Highly recommended.
Our Thanks to Eduard! This item was provided by them for the purpose of having it reviewed on this KitMaker Network site. If you would like your kit, book, or product reviewed, please contact us.


Comments