England - North, United Kingdom
Joined: October 04, 2002
KitMaker: 1,495 posts
AeroScale: 643 posts
Posted: Tuesday, July 18, 2006 - 11:42 PM UTC
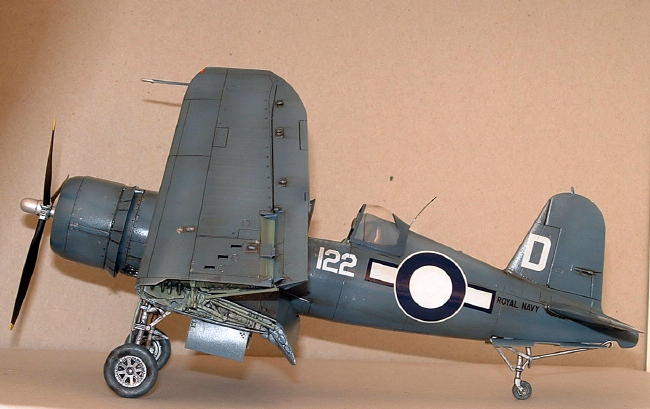
Here's a few pics of my latest kit, Tamiya 1/48 corsair. I decided to do it in Royal Navy Fleet Air Arm livery as I had some decals available. The kit was airbrushed in Xtracrylix gloss dark blue. To this colour i added some white to fade areas of the paintwork. A coat of Clear was applied and then I started on the decals.
This was an absolute disaster. I don't know how long I've had the decals but most of them refused to budge from the backing paper! Time to improvise. I went through my spare decals and came up with the following solution- The "Royal Navy" decals were useable and the tail letter and fuselage number came from spares.
The main fuselage and wing insignia are made up as follows. A large white circle from Tamiya spitfire decals. A slightly smaller blue and white circle from some hurricane decals laid over the top. The "Bars" cut from the "Stars and bars" that came with the kit were placed either side of the roundels. It was a real pain applying each, adding decal solvent and hoping it would settle flat before adding the next bit the next day. The more observant may notice a slight diference in the blues that make up the insignia.

Virginia, United States
Joined: September 26, 2005
KitMaker: 57 posts
AeroScale: 24 posts
Posted: Wednesday, July 19, 2006 - 12:12 AM UTC
WOW. that is some great work. I love the detail and I especially love the weathering.
England - North East, United Kingdom
Joined: December 20, 2004
KitMaker: 111 posts
AeroScale: 0 posts
Posted: Wednesday, July 19, 2006 - 12:35 AM UTC
Hey Martin
You've made a lovely job of that. The weathering is spot on, not too heavy, just enough to break up the monotone colour. Nice detailing around the wing fold area too. Top job, well done!

Harri
"The trick to flying is to throw yourself at the ground and miss."

#029
England - East Midlands, United Kingdom
Joined: December 23, 2005
KitMaker: 6,249 posts
AeroScale: 3,270 posts
Posted: Wednesday, July 19, 2006 - 12:47 AM UTC
Hi Martin.
Congratulations on overcoming your decal problems.Very nice job.
A question about the excellent paint fading.
Did you just spray a general mist of the lighter colur over the whole plane or were you very selective.Ive read of people spraying the middle of panels,which I suppose will complement any preshading,and Id be interested in how you reached the end result with your Corsair.
Thanks for sharing this with us.
Nige
It's not the same, better, but not the same...
Holdfast
 President
#056
England - South West, United Kingdom
Joined: September 30, 2002
KitMaker: 8,581 posts
AeroScale: 4,913 posts
Posted: Wednesday, July 19, 2006 - 01:00 AM UTC
Excellent Corsair Martin, loverly weathering and a nice get out to the decal problem, well done mate

Mal

MAL the MASK
BULLDOG # 6 (President)
BEWARE OF THE FEW
Sappers: First in, last out. (UBIQUE)
It's not the same, better, but not the same.
England - North, United Kingdom
Joined: October 04, 2002
KitMaker: 1,495 posts
AeroScale: 643 posts
Posted: Wednesday, July 19, 2006 - 01:09 AM UTC
thanks for the nice comments guys.
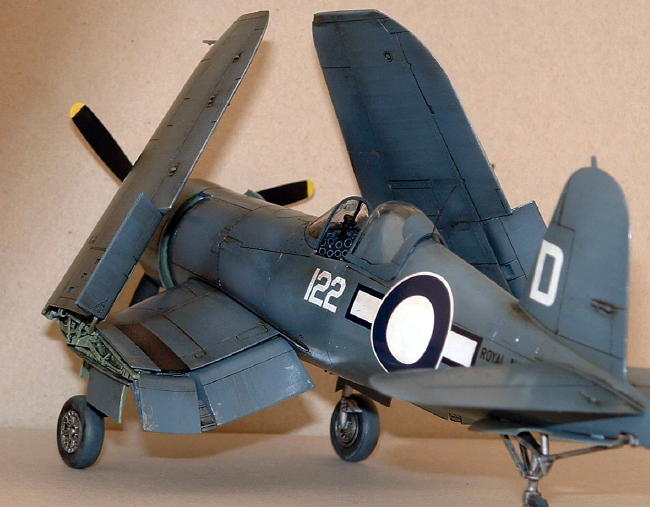
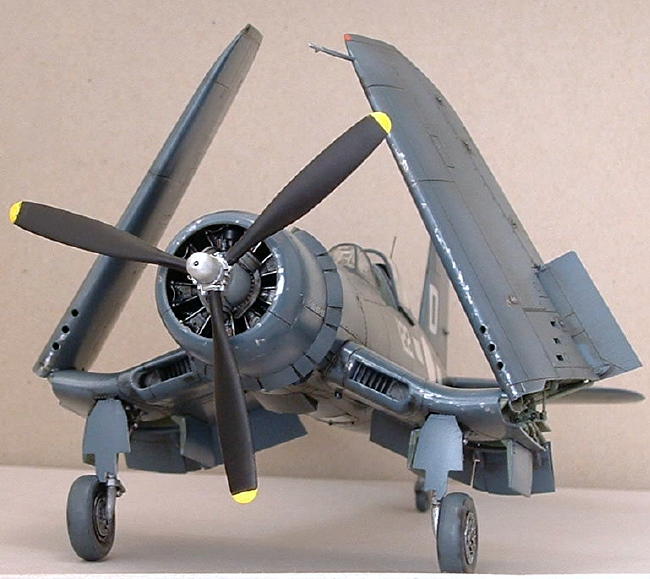
For the paint fading I simply added some white to the base colour, thinned the paint down, reduced the air pressure and sprayed the middle of the panels. I added a bir more white for the fabric areas but much of the effect has disappeared under the varnish and wash for the panel lines. Also the model has quite a bit of paint chipping on the inner wing surfaces but it doesn't really show in the pics.
I found this pic of of a FAA corsair which has carefully been stripped to the original paintwork from 1944. The scratches and wear marks are all original and show the amount of "stick" that these aircraft took.

#029
England - East Midlands, United Kingdom
Joined: December 23, 2005
KitMaker: 6,249 posts
AeroScale: 3,270 posts
Posted: Wednesday, July 19, 2006 - 01:22 AM UTC
Thanks Martin.
That all makes sense.
Nice photo.I noticed there are a couple of Corsairs that have been "retro" restored and I think its a great idea. It certainly shows restored aircraft in a different light rather than the pristine examples we are used to seeing in museums.
Nige
It's not the same, better, but not the same...
betheyn
Senior Editor #019
England - South East, United Kingdom
Joined: October 14, 2004
KitMaker: 4,560 posts
AeroScale: 2,225 posts
Posted: Wednesday, July 19, 2006 - 02:26 AM UTC
Excellent work Martin. Corsairs, in my opinion, always look better faded and used.
i will have to try your technique on the post-shading, as that's one area i really need to practice at.
Andy
It's not the same, better, but not the same...
New York, United States
Joined: June 26, 2005
KitMaker: 82 posts
AeroScale: 47 posts
Posted: Wednesday, July 19, 2006 - 07:52 AM UTC
http://longislandscalemodel.tripod.com/
http://www.americanairpowermuseum.com/
http://www.cradleofaviation.org/
Virginia, United States
Joined: February 26, 2002
KitMaker: 1,218 posts
AeroScale: 424 posts
Posted: Thursday, July 20, 2006 - 06:32 AM UTC
WOW ...Excellent Job, Martin...
Great job in the cockpit as well....

Penny Pierce
"Give me a squadron of Spitfires" -- Adolf Galland
New Jersey, United States
Joined: March 19, 2006
KitMaker: 53 posts
AeroScale: 10 posts
Posted: Thursday, July 20, 2006 - 07:51 AM UTC
Nice job. As I always say, you can never have too many Corsairs. your finish is really good!
TAKE-OFFS ARE OPTIONAL;
LANDINGS ARE MANDATORY!
Negative Ghostrider, the pattern is full....
New Jersey, United States
Joined: March 19, 2006
KitMaker: 53 posts
AeroScale: 10 posts
Posted: Thursday, July 20, 2006 - 07:54 AM UTC
Hey Penny, Long time- no see
TAKE-OFFS ARE OPTIONAL;
LANDINGS ARE MANDATORY!
Negative Ghostrider, the pattern is full....
North Carolina, United States
Joined: March 06, 2004
KitMaker: 1,171 posts
AeroScale: 151 posts
Posted: Friday, July 21, 2006 - 06:00 AM UTC
Very nice !!!
I've got one in the stash awaiting similar FAA treatment ... I'm inpsired by yours ...
John
John Ratzenberger
It's my model and I'll do what I want with it.
All problems are soluble in stout.
Dunedin, New Zealand
Joined: July 12, 2006
KitMaker: 553 posts
AeroScale: 86 posts
Posted: Friday, July 28, 2006 - 04:43 PM UTC
Ditto everyone else; the faded Sea Blue looks very effective, and your improvised markings are top notch. I've been over at the dark side for nearly a year, building ground vehicles. I'm really tempted to reach into the back of my cupboard and find my Tamiya Corsair.

'Non Vi Sed Arte - Not by Strength, by Guile.'
Motto of the Long Range Desert Group.
Stredocesky Kraj, Czech Republic
Joined: October 11, 2005
KitMaker: 2 posts
AeroScale: 0 posts
Posted: Thursday, September 07, 2006 - 08:57 PM UTC
Florida, United States
Joined: January 19, 2003
KitMaker: 322 posts
AeroScale: 44 posts
Posted: Friday, September 08, 2006 - 10:10 PM UTC
Great gob as everyone has said. But I love this FAA version and was wondering how you clipped the wings? The HC kit was done that way in advance, but the Tamiya is not. So what is the secret?

Pig # 97
AF logistics minister of
Der Sonntag Bund
England - North, United Kingdom
Joined: October 04, 2002
KitMaker: 1,495 posts
AeroScale: 643 posts
Posted: Saturday, September 09, 2006 - 12:00 AM UTC
Quoted Text
Great gob as everyone has said. But I love this FAA version and was wondering how you clipped the wings? The HC kit was done that way in advance, but the Tamiya is not. So what is the secret?
I read that the FAA had to cut 8 inches off each wing to get the corsair to fit in the hangars of the RN fleet carriers. This worked out at 4mm in 1/48 scale (if I remember correctly) so I used a razor saw to cut 4mm off the wingtips. From photos I've seen the cut was made parallel to the nearest
panel line.
Florida, United States
Joined: January 19, 2003
KitMaker: 322 posts
AeroScale: 44 posts
Posted: Sunday, September 10, 2006 - 03:20 AM UTC
Understand so far, But what did you do with the tips after you cut off the 8 inches. How did you finish the the tips as thay don;t look as round as americans ones. ANd since thay are not suspose to look round, you are on some track that looks interesting.
Pig # 97
AF logistics minister of
Der Sonntag Bund
England - North, United Kingdom
Joined: October 04, 2002
KitMaker: 1,495 posts
AeroScale: 643 posts
Posted: Sunday, September 10, 2006 - 10:40 AM UTC
Quoted Text
Understand so far, But what did you do with the tips after you cut off the 8 inches. How did you finish the the tips as thay don;t look as round as americans ones. ANd since thay are not suspose to look round, you are on some track that looks interesting.
After cutting off the tips there were no gaps to fill so I gently sanded the edges to get a smooth finish and make sure they were squared up.
Florida, United States
Joined: January 19, 2003
KitMaker: 322 posts
AeroScale: 44 posts
Posted: Tuesday, September 12, 2006 - 08:24 AM UTC
Outstanding and thank you!!
Pig # 97
AF logistics minister of
Der Sonntag Bund
Merlin
Senior Editor #017
United Kingdom
Joined: June 11, 2003
KitMaker: 17,582 posts
AeroScale: 12,795 posts
Posted: Tuesday, September 12, 2006 - 11:39 AM UTC
Hi Martin
Really tasty build! - and neat "lateral thinking" in overcoming the problem with the decals. I wouldn't worry about any slight differences in the blue - period photos show that insignia were prone to varying degrees of bleaching, and naval aircraft were in one of the harshest environments.
Did you ever figure out what had gone wrong with the kit decals? Had they perhaps got damp at some stage?
All the best
Rowan

BEWARE OF THE FEW...
As I grow older, I regret to say that a detestable habit of thinking seems to be getting a hold of me. - H. Rider Haggard
England - North, United Kingdom
Joined: October 04, 2002
KitMaker: 1,495 posts
AeroScale: 643 posts
Posted: Tuesday, September 12, 2006 - 01:18 PM UTC
Quoted Text
Did you ever figure out what had gone wrong with the kit decals? Had they perhaps got damp at some stage?
All I can think is that they were affected by the weather. There were two or three days of really high humidity and instead of putting the decals away out of the way I left them out on my worksurface. Maybe the humidity got into the edges of the decals and caused the adhesive to set.
The cobbled together decals didn't look too bad and don't show at all now as the kit was safely placed in the trashcan (my method of storing my completed airplane kits) .
Merlin
Senior Editor #017
United Kingdom
Joined: June 11, 2003
KitMaker: 17,582 posts
AeroScale: 12,795 posts
Posted: Friday, September 15, 2006 - 04:24 PM UTC
Quoted Text
... the kit was safely placed in the trashcan (my method of storing my completed airplane kits) .
Hi Martin
Wow! Do you really bin them all?! That is more ruthless than I manage to be - I clutter the place up with everything I've never built! :-) I've got half-finished models from 20 years ago... perhaps a clean sweep would do me good.
I was shocked initally by your approach, but then I realised the joy is in the building - and how often do I go back and look at my old finished models anyway?
All the best
Rowan
BEWARE OF THE FEW...
As I grow older, I regret to say that a detestable habit of thinking seems to be getting a hold of me. - H. Rider Haggard
#029
England - East Midlands, United Kingdom
Joined: December 23, 2005
KitMaker: 6,249 posts
AeroScale: 3,270 posts
Posted: Friday, September 15, 2006 - 04:47 PM UTC
Martin.
I did a double take when I read that as well!
Surely not?
I can understand you being ruthless and space being an issue etc,but at least put them on Ebay or something.
They are works of art,,please dont just throw them out with the potato peelings!!
Nige
It's not the same, better, but not the same...
England - North, United Kingdom
Joined: October 04, 2002
KitMaker: 1,495 posts
AeroScale: 643 posts
Posted: Friday, September 15, 2006 - 07:32 PM UTC
Quoted Text
Wow! Do you really bin them all?! That is more ruthless than I manage to be.............
..................I did a double take when I read that as well! Surely not?
Yes I bin them all. To be honest I've never built one I consider worth keeping and as Rowan said the joy (and frustration, anger, foul language and a thank God that one's out of the way) is in the building.
If I had propper display cabinets I might keep one or two but I simply see finished models as dust magnets. If I want to see something I've built in the past I look in my gallery.


