_GOTOBOTTOM
World War II: Great Britain
Aircraft of Great Britain in WWII.
Hosted by Rowan Baylis
Fairey Seafox ... Help wanted!
007
Joined: February 18, 2005
KitMaker: 4,303 posts
AeroScale: 0 posts
Posted: Friday, April 29, 2005 - 04:01 AM UTC
Hey aviators!

For the Air over the Sea campaign I bought today the good-old Matchbox Fairey Seafox 1:72.
Now, I don't have too much experience with planes, it's gonna be a bit new for me.

:-?
So, a few questions to the experts!

As it is a biplane, I was wondering how to make the cables between the wings. I was thinking maybe from melted and stretched sprue? I once tried it with sewing thread but that was not a succes.

Does anybody know (a site) where I can find colour drawings or good ref. pictures of this plane?
I don't have high hopes about the colours mentioned by Matchbox (Gray, Olivegray, Tankgrey and Blue Grey)

Thanks!

PAUL


Holdfast
Staff MemberPresident
IPMS-UK KITMAKER BRANCH
#056
_VISITCOMMUNITY
England - South West, United Kingdom
Joined: September 30, 2002
KitMaker: 8,581 posts
AeroScale: 4,913 posts
Posted: Friday, April 29, 2005 - 11:00 PM UTC
I'm afraid I know absolutely nothing about the Seafox but I can help, possibly, with the rigging although I have never rigged a biplane, yet. Stretched sprue is probably the easiest method, the difficulty is stretching the sprue to the same thickness. For the moment I'll assume that you are happy with sprue stretching. For the rigging, measure the distance between points with a pair of deviders, transfer this to the stretched sprue and cut. Use dabs of white glue, on the ends of the sprue, to secure in place. Work from the inside out. When I, finally, get around to having a go at this, I intend to use invisible mending thread. This will require holes to be drilled for it.
I'm geussing at the colours but, I believe Naval biplanes were painted in a shadow shading colour scheme, where the lower wing uppersurfaces, that were in shadow, were painted in lighter shades of the uppersurface scheme. I think the upper scheme to be Dark Slate Grey and Extra Dark Sea Grey. The lower surfaces may, therefor, have been, Medium Slate Grey? (I'm not sure if this colour exists) and Dark Sea Grey. Can you post a pic of the colour info?
Sorry I can't be more specific, If I get time I'll do a search and see what I can find.
Mal
Holdfast
Staff MemberPresident
IPMS-UK KITMAKER BRANCH
#056
_VISITCOMMUNITY
England - South West, United Kingdom
Joined: September 30, 2002
KitMaker: 8,581 posts
AeroScale: 4,913 posts
Posted: Saturday, April 30, 2005 - 04:52 AM UTC
Well I didn't find much, but here are some links:
Seafox 1
Seafox 2
Seafox 3
Seafox 4

Mal
007
Joined: February 18, 2005
KitMaker: 4,303 posts
AeroScale: 0 posts
Posted: Saturday, April 30, 2005 - 11:29 AM UTC
Mal,

Thank you very much!
Specially on the first link, the picture called "Fleet Air Arm Seafox" is just great. It's the overall alluminium version that has my first choiche and this gives me already more an idea about the plane.
This aluminium version was mentioned as second colourscheme in the manual. But knowing from experience how 'well informed' some manufactures are on AFV colours schemes (which I usually build), I had my doubt about this because of the fabric hull of the plane. But for some reason they did indeed paint the fabric in aluminium colour.
Do you perhaps know if this was for a special reason or "just a colourscheme"?

Thanks also for the tips about the procedure to measure the needed lenght of the sprue.
I'm gonna try the sprue first indeed. Don't want to drill holes (at least, not for now), just keeping KISS: Keep It Simple Stupid!.

I'll post some pics when I got something build and worth posting

PAUL
Holdfast
Staff MemberPresident
IPMS-UK KITMAKER BRANCH
#056
_VISITCOMMUNITY
England - South West, United Kingdom
Joined: September 30, 2002
KitMaker: 8,581 posts
AeroScale: 4,913 posts
Posted: Saturday, April 30, 2005 - 08:31 PM UTC
PAUL,
I'm glad they were of some use
I'm not sure when the Seafox was in service and I know nothing about these earlier schemes. It may be that the Aluminium/Duralamin airframe was left unpainted and the fabric? covered control surfaces were doped aluminium. The airframe could have been painted aluminium and probably was. Fabric coverings were doped, these strengthed the fabric and also tensioned it. On, for example the WWII Lysander the rear fuselage is fabric covered and was doped with red. The Spitfire F.22 was painted overall Aluminium.
As to the reason for the Seafox to be painted Aluminium I don't know. It was possibly a scheme used out of conflict?
Spitfire F.22


Lysander iner fuselage, the dope showed through on the inside as a pinky shade because of the white fabric


Are you hand painting or airbrushing the model?
Mal
007
Joined: February 18, 2005
KitMaker: 4,303 posts
AeroScale: 0 posts
Posted: Sunday, May 01, 2005 - 05:46 AM UTC
Hello Mal,

Here is a scan of the colourscheme.
Colour F is Matchbox Aluminium nr. 99 (= Revell 99).

I'm planning to airbrush the overall aluminium colour.
What brand of aluminium colour do you use / do you think is best to airbrush?

I was thinking to work like this:
I paint the inside and the pilots first. Than build the plane and close up the places where the pilots are with tape. Than spray the plane overall in aluminium.

So, the inside could be a pink/red colour? OK, that's a usefull tip! I almost made it green!!!!
What paint do you use?

Do you, perhaps, happen to know what colour of uniforms the RAF pilots had, Mediterranean Theatre 1939?
The paint instructions say leather brown, but could it be also a bit of blue/gray? I'm not so common with pilots uniforms. Perhaps, black boots, blue/grey trousers, leather jacket, white scarf, leather helmet?

I am used to drybrush and shade my AFV models.
I think the shading is the same (thinned oil paint), but do you drybrush an aluminium plane, and if yes, what colour to use?

Well, as you notice, I'm in for every suggestion and tip I can get out of you :-) :-) !

Paul


007
Joined: February 18, 2005
KitMaker: 4,303 posts
AeroScale: 0 posts
Posted: Sunday, May 01, 2005 - 05:48 AM UTC
By the way: great looking Spitfire!!!!

Paul
Holdfast
Staff MemberPresident
IPMS-UK KITMAKER BRANCH
#056
_VISITCOMMUNITY
England - South West, United Kingdom
Joined: September 30, 2002
KitMaker: 8,581 posts
AeroScale: 4,913 posts
Posted: Sunday, May 01, 2005 - 06:58 AM UTC
Sorry paul I seem to have confused you a little. The interior would be, possibly, pinky red IF the fuselage was fabric covered, and I don't think it is. So the interior would probably be interior green, which is a light grey green.
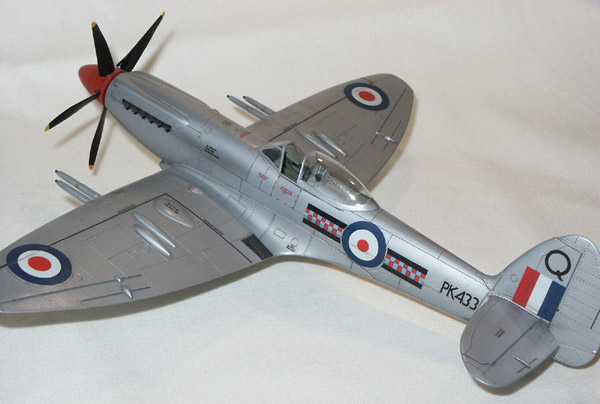
I'm not sure which paint I used for the Spitfire. Use aluminium, rather than silver though, it will look better. Remember other paints do not adhere well to metalic paints, so if you paint over it with another colour, then mask over that you will likely lift it when you remove the tape.
Just incase you don't know, a tip when airbrushing metalic paints. Add a couple off BB's to the paint jar and adgitate them regularly. Metalic paint is made with actual metal flakes, which settle quickly. If, like me you have a gravity feed air brush, with a small colour cup, then use a small amount of paint at a time and use a cocktail stick, or similar to adgitate the paint.
Another point, the fabric covered surfaces would be more matt than the metal areas. You can add a drop or 2 of colour to the basic aluminium to give a different look. I would suggest that you experiment if you do this. You couls also get a different look by apply matt varnish the the fabric areas.
I'm afraid I have no idea of the colour of RAF uniforms in the Med, although it is possible that army gear was used? I've never seen RAF blue shorts. That'ed be my guess, if the crew are waring shorts. Army gear was Kahki, it would have faded pretty fast in the med so would have been a light tan/buff colour.
I don't drybrush the outside of my aircraft models, but if you were to on this scheme then silver, or crome silver would give you highlights.
I use oil paint as a wash, on the Spitfire I used dark grey. You may get away without a protective coat, but I use Klear (Future in the US)
Mal
007
Joined: February 18, 2005
KitMaker: 4,303 posts
AeroScale: 0 posts
Posted: Sunday, May 01, 2005 - 08:05 AM UTC
Thanks again Mal!

Well as far as for the covering:
The review in the second link you send me states about the schemes of an earlier version of this Matchbox kit:
" One of them in overall aluminum (and that is paint as these were fabric covered aircraft) from Malta in 1939."

On an other review I found today it's says:
"The Seafox had an all metal fuselage with silver doped fabric covered flying surfaces with red tips to the floats."

On an an enceclopidia it is said:
"The fuselage was of all-metal monocoque construction, the wings were covered with metal on the leading edge, otherwise fabric"

So, what's the truth? (And what the **** is monocoque ?)
Am I right when I guess the wings where fabric covered and the fuselage was metal?

I gonna surf the net search for pictures of the uniforms.

Paul
Holdfast
Staff MemberPresident
IPMS-UK KITMAKER BRANCH
#056
_VISITCOMMUNITY
England - South West, United Kingdom
Joined: September 30, 2002
KitMaker: 8,581 posts
AeroScale: 4,913 posts
Posted: Sunday, May 01, 2005 - 09:23 PM UTC

Quoted Text

"The fuselage was of all-metal monocoque construction, the wings were covered with metal on the leading edge, otherwise fabric"


Looking at the diagram of the painting instructions I would say this is correct.


Quoted Text

(And what the **** is monocoque ?)


Don't worry about this it refers to the method of construction of a metal fuselage. I think I'm right in saying it means that the fuselage skinning contributed to the overal strength by being riveted dirctly to the formers and stringers.

Mal
007
Joined: February 18, 2005
KitMaker: 4,303 posts
AeroScale: 0 posts
Posted: Saturday, May 14, 2005 - 12:21 AM UTC
Hey Mal!

I made some good progress this week.
I placed it on a new thread on Campaign Central Command.

Please let me know what you think of it.
Thanks!

Paul

Holdfast
Staff MemberPresident
IPMS-UK KITMAKER BRANCH
#056
_VISITCOMMUNITY
England - South West, United Kingdom
Joined: September 30, 2002
KitMaker: 8,581 posts
AeroScale: 4,913 posts
Posted: Saturday, May 14, 2005 - 07:35 AM UTC
Looking good Paul, but you may find it difficult to paint with the rigging in the way. It is probably easier to add the rigging after painting.
Mal
007
Joined: February 18, 2005
KitMaker: 4,303 posts
AeroScale: 0 posts
Posted: Saturday, May 14, 2005 - 07:56 AM UTC
Tom, thanks for that tip. I have bought a 1:32 Nieuwport from Academy for the "Two Wings and a Prayer" campaign and I wil look how it turn out doing it that way. Specially the 'memory' function sounds good.

For this plane (the Seafox that is) I used Mal's tip with stretched sprue and that worked good in this scale (1:72). However Mal told me to use whiteglue I used plastic glue (for I thought it was stronger) and that I suspect is causing the 'hanging through' of some cables. The thin plastic sprue melts a bit using the plastic glue and becomes a bit longer by that, I guess. So Mal, next time I'll take the whole advise and use whiteglue

Mal, the plane is gonna be sprayed, so I thought no harm was done placing the rigging allready. But you've got a point because I have to paint the supports between the wings. ***** why didn't I think of that before???
And glueing the rigging in place after the painting and using whiteglue the paint won't get damaged (as with plastic glue) so... next time I keep that in mind...

Paul
Holdfast
Staff MemberPresident
IPMS-UK KITMAKER BRANCH
#056
_VISITCOMMUNITY
England - South West, United Kingdom
Joined: September 30, 2002
KitMaker: 8,581 posts
AeroScale: 4,913 posts
Posted: Sunday, May 15, 2005 - 11:59 PM UTC
mmmmm, we live and learn. Sorry I should have mentioned the reason for using white glue. When using stretched sprue, or nylon invisible mending thread, any slack can be taken up by holding a heated impliment close to it (I use a pin, heated with a cigerette lighter) you just have to take care not to touch the "rigging".
Like this:

It is also often best to leave the top wing off for painting.
My method for rigging, which I haven't tried yet (cos it's a bit scary) is. Drill 0.2mm holes in the top half of the bottom wing and the bottom half of the top wing. In the correct locations for the rigging. The wing halves are prepared, so that when it comes to joining them they are as near a perfect fir as possible. The Top half of the bottom wing is atteched for painting. After painting the bottom half of the top wing is attached. When dry the rigging is done. By having access to the wing interiors the rigging can be done with one or a few pieces of rigging material. It can be tensioned as you go, using drops of CA to keep it in place. I am considering using very fine stainless steel wire, when I do this. This method actually adds real strength to the model and must be done in even stages to both sides, or warping can occour. When the rigging is complete the remaining wing halves are added and the joints tydied up and re-painted (the section between the wings beeing masked off.
Sounds easy, I'll have to get on with a bi-plane :-)
Mal
007
Joined: February 18, 2005
KitMaker: 4,303 posts
AeroScale: 0 posts
Posted: Monday, May 16, 2005 - 07:46 PM UTC
Hey guys!

Thanks fot that tips Mal, the more techniques, the bether!
Here a picture of the Seafox with his Revell 99 aluminium paintcoat.

I think I make the wings and other 'fabric' parts more matt, like you mentioned before. Gives a bit variation in the colour.

Next step: decals!


Paul
Holdfast
Staff MemberPresident
IPMS-UK KITMAKER BRANCH
#056
_VISITCOMMUNITY
England - South West, United Kingdom
Joined: September 30, 2002
KitMaker: 8,581 posts
AeroScale: 4,913 posts
Posted: Tuesday, May 17, 2005 - 05:50 AM UTC
Looking good Paul, you've done well. I was discussing this with Harri (Jetprovost), whome I work with and it turns out he built this kit (a while ago) and says it is a pig. So you have done well to get it looking so good
Looking forward to seeing the decals.
Mal
007
Joined: February 18, 2005
KitMaker: 4,303 posts
AeroScale: 0 posts
Posted: Sunday, June 12, 2005 - 06:19 AM UTC
Mal,

He's finnished!!!
Thanks for you advices and guidance!

Look here for the final result:
https://armorama.kitmaker.net/forums/53149&page=1

Paul
Holdfast
Staff MemberPresident
IPMS-UK KITMAKER BRANCH
#056
_VISITCOMMUNITY
England - South West, United Kingdom
Joined: September 30, 2002
KitMaker: 8,581 posts
AeroScale: 4,913 posts
Posted: Monday, June 13, 2005 - 08:13 AM UTC
Nice one, I have added comments at your link.
Mal
 _GOTOTOP