_GOTOBOTTOM
World War II: Great Britain
Aircraft of Great Britain in WWII.
Hosted by Rowan Baylis
Spitfire Mk Vb
csch
_VISITCOMMUNITY
Buenos Aires, Argentina
Joined: December 27, 2002
KitMaker: 1,941 posts
AeroScale: 1,040 posts
Posted: Sunday, March 13, 2005 - 10:44 AM UTC
Hi all:

I´ve been working in this kit for a while, it´s a Hasegawa 1/48 Spitfire Mk Vb. It´s a OOB. Now I´m working in masking the canopy (I confess that it´s the worst part for me). Then with the canopy in place I will apply the mate coat, some weathering and it will be finished.
I´ll post more pics then.

Please, coments will be appreciated.


3442
_VISITCOMMUNITY
Quebec, Canada
Joined: March 23, 2004
KitMaker: 2,412 posts
AeroScale: 0 posts
Posted: Sunday, March 13, 2005 - 11:00 AM UTC
considering theres no weathering, which i deduct means it saw no action yet, you could leave the gloss on i guess

it looks very nice, did yodu use carpet for the ground?

Frank
BigTon
_VISITCOMMUNITY
District of Columbia, United States
Joined: February 12, 2005
KitMaker: 102 posts
AeroScale: 0 posts
Posted: Monday, March 14, 2005 - 03:44 AM UTC
The plane as a whole looks fantastic...but what really caught my eye was the cockpit! Very well done!

Is the cockpit stock too, or did you get an aftermarket detail set. The pilot's seat and head rest look fantastic. Once again, well done!
csch
_VISITCOMMUNITY
Buenos Aires, Argentina
Joined: December 27, 2002
KitMaker: 1,941 posts
AeroScale: 1,040 posts
Posted: Monday, March 14, 2005 - 06:16 AM UTC

Quoted Text

The plane as a whole looks fantastic...but what really caught my eye was the cockpit! Very well done!

Is the cockpit stock too, or did you get an aftermarket detail set. The pilot's seat and head rest look fantastic. Once again, well done!


Thanks BigTon.
All the build is OOB, included the entire cockpit. I only used lead foil to make the seat belts.
In the cannons I replaced the ones of the kit with hypodermic needles, to work them I used the Dremel.

Bender
_VISITCOMMUNITY
Wyoming, United States
Joined: October 20, 2002
KitMaker: 323 posts
AeroScale: 0 posts
Posted: Monday, March 14, 2005 - 06:16 AM UTC
I agree, it looks great! very nice paint work and the cockpit does jump out. how well did the kit go together?
csch
_VISITCOMMUNITY
Buenos Aires, Argentina
Joined: December 27, 2002
KitMaker: 1,941 posts
AeroScale: 1,040 posts
Posted: Monday, March 14, 2005 - 06:24 AM UTC

Quoted Text

I agree, it looks great! very nice paint work and the cockpit does jump out. how well did the kit go together?


Hi Bender:

The kit goes together very well. Fit is ok everywhere. The only parts that you have to be carefull is in the wing to fuselage joint and in the upper part of the cowling.
Holdfast
Staff MemberPresident
IPMS-UK KITMAKER BRANCH
#056
_VISITCOMMUNITY
England - South West, United Kingdom
Joined: September 30, 2002
KitMaker: 8,581 posts
AeroScale: 4,913 posts
Posted: Monday, March 14, 2005 - 10:05 AM UTC
Looking good Carlos, make sure you let us see the finished article
Just a couple of points, which you may decide can by fixed easily. The pilots head rest was usually black leather, as was the removable seat back padding. There should only be one stay, the top one, under the rear fixed portion of the canopy, I have no idea why Hasegawa have 3.
This was the last kit I finished, it is posted elsewhere on the forum and I have entered it in February's Model of the Month
Mal
csch
_VISITCOMMUNITY
Buenos Aires, Argentina
Joined: December 27, 2002
KitMaker: 1,941 posts
AeroScale: 1,040 posts
Posted: Wednesday, March 16, 2005 - 12:52 PM UTC

Quoted Text

considering theres no weathering, which i deduct means it saw no action yet, you could leave the gloss on i guess

it looks very nice, did yodu use carpet for the ground?

Frank


Hi 3442:
´For me it looks to glossy. I use the glos (Future) for the decaling process and then to seal the decals.
I will weather it but not too much, just a mate coat and black stains in the sides of the cowling back of the exhausts and in the machine guns. Then some little touch of chipped paint, and that´s all.

For the ground I used a German product that it´s simulated grass for the scenarios of electric trains. It´s like a thin carpet with paper back. I used white glue to fix it.
csch
_VISITCOMMUNITY
Buenos Aires, Argentina
Joined: December 27, 2002
KitMaker: 1,941 posts
AeroScale: 1,040 posts
Posted: Wednesday, March 16, 2005 - 01:03 PM UTC

Quoted Text

Looking good Carlos, make sure you let us see the finished article
Just a couple of points, which you may decide can by fixed easily. The pilots head rest was usually black leather, as was the removable seat back padding. There should only be one stay, the top one, under the rear fixed portion of the canopy, I have no idea why Hasegawa have 3.
This was the last kit I finished, it is posted elsewhere on the forum and I have entered it in February's Model of the Month
Mal


Thank you Mal. I´ll paint the hadreast in black and correct the qty. of stays, but I think I´ll not paint the seat back padding, don´t want to remove the seat belts, I made them of lead foil and then I painted them, they gave me some job. I took notice for my next Spits. Now I started building a Mk Ia (Tamiya), then I have in the list for this year builds a MVb Trop with clipped wings (Tamiya), a Mk VI (Hasegawa), a Mk IXc (Hasegawa) and a Mk XIVc (Academy), all in 1/48.

Tonight I´ll finish this Mk Vb and tomorrow I´ll be posting some more pics.

Carlos.
OllieC-FWOL
_VISITCOMMUNITY
Quebec, Canada
Joined: March 31, 2004
KitMaker: 446 posts
AeroScale: 0 posts
Posted: Wednesday, March 16, 2005 - 03:09 PM UTC
Good show Carlos,

I can't wait to see your sweet Spit finished!

Pixilater
_VISITCOMMUNITY
Massachusetts, United States
Joined: March 16, 2005
KitMaker: 231 posts
AeroScale: 0 posts
Posted: Wednesday, March 16, 2005 - 03:30 PM UTC
Nice job so far, Carlos !
Smooth finish on you paint, and your glosscoat is great !
Keep up the good work !
csch
_VISITCOMMUNITY
Buenos Aires, Argentina
Joined: December 27, 2002
KitMaker: 1,941 posts
AeroScale: 1,040 posts
Posted: Thursday, March 17, 2005 - 12:40 AM UTC
Thanks again. The gloss coat is Future (Glo Coat in my country) applied with a soft flat No 6 brush.
It works great for the decaling and also to give gloss finishes.
csch
_VISITCOMMUNITY
Buenos Aires, Argentina
Joined: December 27, 2002
KitMaker: 1,941 posts
AeroScale: 1,040 posts
Posted: Thursday, March 17, 2005 - 08:27 AM UTC
Hi guys:

Well the Spit is finished, I think so.
Here are some pics, coments will be very much appreciated.


Mal: I painted the headrest in black and left only one lay. I checked in my photographic references and you was right.

Bye.

Holdfast
Staff MemberPresident
IPMS-UK KITMAKER BRANCH
#056
_VISITCOMMUNITY
England - South West, United Kingdom
Joined: September 30, 2002
KitMaker: 8,581 posts
AeroScale: 4,913 posts
Posted: Thursday, March 17, 2005 - 09:08 AM UTC
Excellant Spitfire Carlos, love it and I can't wait to see the rest
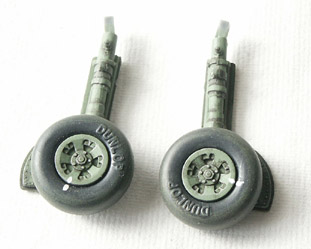
The only thing I would change is the colour of the tyres black, IMHO, just doesn't look right. I use "Tyre Black" (WEMCC C06) by Colourcoats. As you can see it's a dark grey.
My Spitfire Mk 1a undercarriage.

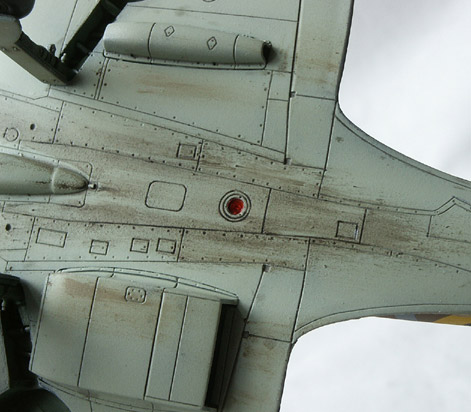
Something you might want to consider when weathering a Spitfire, in the future, (maybe) is the distinctive oil streaks on the undersides.
Again my Spitfire Mk 1a

It looks like my next Spitfire will be a Mk VII (Harri ?) and I'm gearing up to do Johnnie Johnson's Mk IX, hopefully before the end of the year. I also want to get a Mk VIII in the "Grey Nurse" sharks mouth scheme.
and of cours we all know that "you just can't have to many Spitfires"
Again, very nice Carlos.
Mal
csch
_VISITCOMMUNITY
Buenos Aires, Argentina
Joined: December 27, 2002
KitMaker: 1,941 posts
AeroScale: 1,040 posts
Posted: Friday, March 18, 2005 - 06:37 AM UTC
Thanks Mal.
What did you used to make the oil streaks in the underside. Oil paint or chalk powder ? or something else ?

The tires look better in a not so black color, you´re right. In this one I will use some pastel chalk powder to weather them down. In my next one (Mk I in constuction) I will try with Model Master Interior Black (I have a bottle) with the add of just a little of white.Suppose this will give me an appropiate grey for the tires. I´ll see.

Carlos.
Holdfast
Staff MemberPresident
IPMS-UK KITMAKER BRANCH
#056
_VISITCOMMUNITY
England - South West, United Kingdom
Joined: September 30, 2002
KitMaker: 8,581 posts
AeroScale: 4,913 posts
Posted: Friday, March 18, 2005 - 10:36 AM UTC
Sorry I ment to say how I achieved the staining. Small dabs of Burnt Umber neat oil paint, applied with a tooth pick and "pulled back" using a cotton bud or finger. If you get to much on a dab of white spirit will remove a little (go carefully so you don't lift the paint, a dab is not much ) I add similar but much smaller and thinned more, streaks at some (not all, maybe 2 or 3) of the maintenance hatches.
Yep, I used to use panzer grey for this then found Xxtracolor tyre black. I now use Colourcoats tyre black, it covers better and dries much quicker. I also usually dry brush the contact areas of the tyres, and a little of the sidewall, if the aircraft operated from a grass strip, with2 -3 shades of earth, just about visible on the undercarriage pics.
Mal
csch
_VISITCOMMUNITY
Buenos Aires, Argentina
Joined: December 27, 2002
KitMaker: 1,941 posts
AeroScale: 1,040 posts
Posted: Saturday, March 19, 2005 - 05:27 AM UTC
Thanks for the tip Mal.
I have a tube of Burnt Umber oil paint. I´ll use it in my Mk Ia and I´ll try to use it in this finished Mk Vb.

The Mk VII you´re planning to build is a Hasegawa Mk VII kit or a conversion of a Mk IX.
Do you know if the Hasegawa kit has the right span in the aleirons ?

I was thinking in taking pics as I build the Mk Ia and post them in the forum as I progress. Know I´m with the wings and replacing the MG with stainless steel tubing.

Bye.
 _GOTOTOP