_GOTOBOTTOM
Pre-Flight Check
Constructive critique of your finished or in-progress photos.
RAF Mustang 1A
Merlin
Staff MemberSenior Editor
AEROSCALE
#017
_VISITCOMMUNITY
United Kingdom
Joined: June 11, 2003
KitMaker: 17,582 posts
AeroScale: 12,795 posts
Posted: Friday, March 26, 2004 - 10:25 AM UTC
Hi there

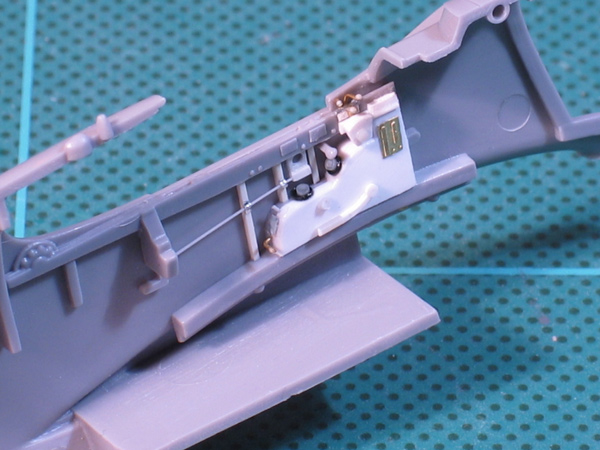
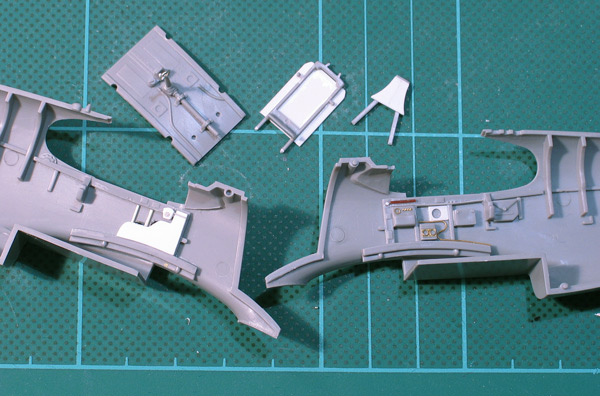
I'm building an RAF Mustang 1A for the Overlord 2004 campaign. I've just started work on the cockpit:


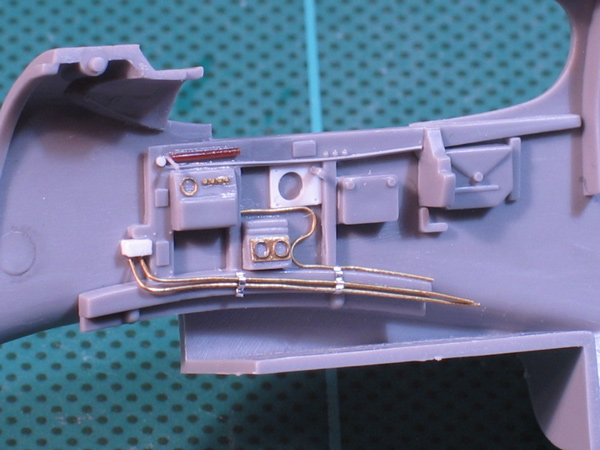
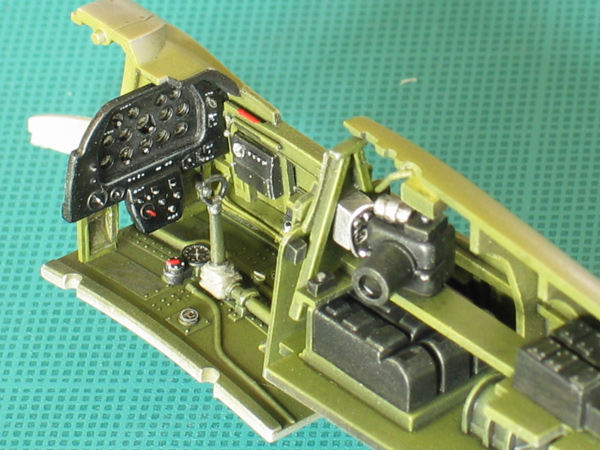
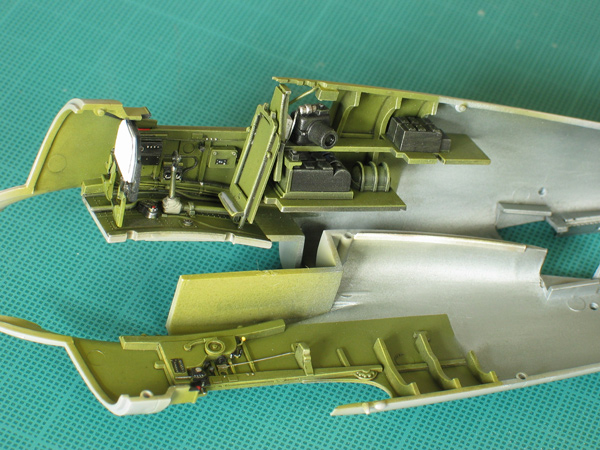
A bit more wiring and pipe-work to do this week-end, but it's a bit closer to pics of RAF cockpit's than the Accurate Miniatures original.

I've replaced the left cosole because a. the proportions seemed wrong, and b. the details didn't match RAF a/c anyway... I've made a few changes on the right, and added an RAF spade-grip, plus armour plating (which is visible in all my refs...). There's a few levers and lamps still to add (I'm not aiming for 100%), but my big question is did the RAF a/c have flare-ports? My refs suggest not... but I'd love to hear now if you know differently! ...

All the best

Rowan
flitzer
_VISITCOMMUNITY
England - North West, United Kingdom
Joined: November 13, 2003
KitMaker: 2,240 posts
AeroScale: 743 posts
Posted: Friday, March 26, 2004 - 10:36 PM UTC
Looking good Rowan...
...oh the glories of 1/48th...detail is so visible.
Must get a stronger set of specs...(ticles)...for my 1/72nd stuff.
Looking forward to the next thrilling installment...

Cheers
Peter.
:-)
Merlin
Staff MemberSenior Editor
AEROSCALE
#017
_VISITCOMMUNITY
United Kingdom
Joined: June 11, 2003
KitMaker: 17,582 posts
AeroScale: 12,795 posts
Posted: Saturday, March 27, 2004 - 07:12 AM UTC
Cheers Peter

Well, as if to order... here's Part 2 of this exciting saga!

If just about finished the basic cockpit. I've added a bit of simple detail to the sidewalls with plastic card, a couple of Reheat bezels, some brass wire and aluminium tape. I've made a new trim wheel, which I'll add after painting.


I've changed some of the details on the floor - RAF Mustangs seemed to feature a compass in place of the console which AM have moulded - and, of course, there's the spade-grip for the control column. The seat is thinned down and the holes in the pan drilled out with a plastic card back to fiinish things off.


There's a little bit of "gizmology" in places, but it gives a nice busy effect. I should get a basic coat of North American Green on tonight (I'm not sure of the exact colour reference... so any help would be most welcome), ready for detail painting tomorrow.

All the best

Rowan
stm
_VISITCOMMUNITY
Florida, United States
Joined: March 07, 2004
KitMaker: 98 posts
AeroScale: 96 posts
Posted: Saturday, March 27, 2004 - 07:29 AM UTC
It is looking terrific so far Merlin. Did you fashion the brass pieces or is that from a PE set? I am assuming this is the AM kit, the parts look familiar.

I am doing the same thing on the P-51B. The basic cockpit is not that bad but especially for the RAF version, you are going to have to change the panel, it is inaccurate in layout. Very nice job modifying the control column. Do not ask me why they left out the armor plate, I am still scratching my head about that one.

Jeesh and to think all that and no aftermarket resin! Kudos! Cannot wait to see the next installment.


Merlin
Staff MemberSenior Editor
AEROSCALE
#017
_VISITCOMMUNITY
United Kingdom
Joined: June 11, 2003
KitMaker: 17,582 posts
AeroScale: 12,795 posts
Posted: Saturday, March 27, 2004 - 07:57 AM UTC
Hi Scott

Many thanks for the kind comments! :-) Yes, it's the AM kit - an original issue, which I finally took down of the shelf for our D-Day build.

The brass bezels and the little panel on the left side are from generic Reheat sets and the "compass" is from an old Akita set - I think it was meant to be a mirror. Other than that it's all from scratch using a punch and die set and wire.

The spade-grip is made using fuse wire, aluminium tape and, again, a punch and die.

Many thanks for the heads up on the control panel! To be honest, I hadn't checked it closely yet... but, not surprisingly, you're absolutely right!... another job for the punch and die!

All the best - and looking forward to seeing your next P-51B pics. :-)

Rowan
Merlin
Staff MemberSenior Editor
AEROSCALE
#017
_VISITCOMMUNITY
United Kingdom
Joined: June 11, 2003
KitMaker: 17,582 posts
AeroScale: 12,795 posts
Posted: Sunday, March 28, 2004 - 06:12 AM UTC
Here's the first stage in the new panel.

As Scott has explained for his P-51B, the centre was cut out and replaced with plastic card. The holes were made with a punch and die set. Some of the holes aren't circular - this is where an adjustment knob was placed on the original, which I'll try to depict with a small plastic button.


The arrangment of the instruments is slightly different from other Mustangs. My refs unfortunately don't show the top right of the panel, so those two instruments are guess-work... but it's still more accurate than the original kit item.

All the best

Rowan
Kiwi
_VISITCOMMUNITY
New Plymouth, New Zealand
Joined: March 14, 2004
KitMaker: 2 posts
AeroScale: 0 posts
Posted: Sunday, March 28, 2004 - 10:31 AM UTC
Hi Merlin
Here is a pic that you may find interesting.
Regards
Kiwi

https://photos.kitmaker.net/showphoto.php?photo=22304


Merlin
Staff MemberSenior Editor
AEROSCALE
#017
_VISITCOMMUNITY
United Kingdom
Joined: June 11, 2003
KitMaker: 17,582 posts
AeroScale: 12,795 posts
Posted: Monday, March 29, 2004 - 10:23 AM UTC
Cheers for the ref Kiwi :-)

It's surprising just how many cockpit differences there were between the Mustang 1 and other P-51s.

I started this build intending it to be a quick one for the Overlord 2004 campaign. I glanced at the cockpit parts and thought "fine" - except for knowing I'd have to make a spade-grip. The trouble started when I got hold of some pictures of the RAF version and I realised just how many items were different. Oh well! That's all part of the fun!

I can't find any decent pics of the camera mount, so I'll be adding more educated guesswork and gizmology there.

All the best

Rowan
Holdfast
Staff MemberPresident
IPMS-UK KITMAKER BRANCH
#056
_VISITCOMMUNITY
England - South West, United Kingdom
Joined: September 30, 2002
KitMaker: 8,581 posts
AeroScale: 4,913 posts
Posted: Wednesday, March 31, 2004 - 08:43 AM UTC
OK Rowan enough, Like Scott you aren't playing the game with this Critics Corner. You know we aren't supposed to just go ooh, aaah. So in the future can you please cock something up so we can make at least one criticism
Seriously it is looking good, it must be a terrible thing having all those references :-)
Spade grip is very well done, I'm intrigued by the seat, is it a drop in piece that gives the hollowed out look (bottom rear) or did you cut away the corner, hollow it out, then rebuild?
What have you used as the cable/pipe clips?
Mal
FrankC
_VISITCOMMUNITY
Colorado, United States
Joined: March 14, 2004
KitMaker: 26 posts
AeroScale: 26 posts
Posted: Thursday, April 01, 2004 - 05:50 AM UTC
Merlin,
looks really good - keep it up!

--Frank
Merlin
Staff MemberSenior Editor
AEROSCALE
#017
_VISITCOMMUNITY
United Kingdom
Joined: June 11, 2003
KitMaker: 17,582 posts
AeroScale: 12,795 posts
Posted: Thursday, April 01, 2004 - 06:30 PM UTC
Hi Mal and Frank

Thanks for the kind words. As regards the need for a few cock-ups... I think I can guarantee those!


Quoted Text

Spade grip is very well done, I'm intrigued by the seat, is it a drop in piece that gives the hollowed out look (bottom rear) or did you cut away the corner, hollow it out, then rebuild? What have you used as the cable/pipe clips?


The seat needs a bit more work to match photos, but the hollowed out look in the pan was simple. AM have actually moulded a step, so the plasic was thinner, but I drilled out the holes and filed away the back to the angled section and then added plastic card at the back.

The cable ties are made from aluminium tape and fall into the "gizmology" category... but they help give a busy look.

All the best

Rowan
brandydoguk
_VISITCOMMUNITY
England - North, United Kingdom
Joined: October 04, 2002
KitMaker: 1,495 posts
AeroScale: 643 posts
Posted: Friday, April 02, 2004 - 12:35 AM UTC
Excellent work Rowan, you've got a good eye for detail.
Q376
_VISITCOMMUNITY
Arkansas, United States
Joined: March 29, 2004
KitMaker: 4 posts
AeroScale: 0 posts
Posted: Thursday, April 08, 2004 - 08:16 AM UTC
You're doing some fine work on that Mustang Rowan, very nice. One thing that intriques me though is the spade grip. Although in my refs there is one picture of a Mustang with a spade grip, that is the only one I have ever seen.
And have yet to find solid info that the spade grip was ever factory installed in the RAF bound P-51s. Would be great to know for sure if they were or perhaps depot installed after the RAF took delivery of them.
Any info appreciated in this 'gray' area, always looking, always learning!
Merlin
Staff MemberSenior Editor
AEROSCALE
#017
_VISITCOMMUNITY
United Kingdom
Joined: June 11, 2003
KitMaker: 17,582 posts
AeroScale: 12,795 posts
Posted: Thursday, April 08, 2004 - 09:34 AM UTC
Hi Craig

Many thanks for your help the other week regarding the cockpit colours used on RAF Mustangs.

I know what you mean about the spade grip... I've got two NAA? photos (of the same aircraft...) and a drawing... hardly conclusive evidence. Sometimes you've just got to make a decision and go for it. Of course, if it turns out not to have been fitted, there's always a trusty pair of Mk1 Tweezers ready to pull out the offending item!

I'm similarly in the dark about the camera mount - none of my photos show it well enough, so the area behind the seat will be pure conjecture.

Thanks again

Rowan
wingman
_VISITCOMMUNITY
Pennsylvania, United States
Joined: December 09, 2003
KitMaker: 880 posts
AeroScale: 654 posts
Posted: Thursday, April 08, 2004 - 11:04 AM UTC
Looks great Merlin, detail is nice and clean, your pics came out very well too, looking forward to seeing it finished, Wingman out.
Merlin
Staff MemberSenior Editor
AEROSCALE
#017
_VISITCOMMUNITY
United Kingdom
Joined: June 11, 2003
KitMaker: 17,582 posts
AeroScale: 12,795 posts
Posted: Sunday, April 25, 2004 - 03:21 AM UTC
Hi again

It's been a while since I've had a chance to do any modelling. I finally managed to get some paint onto the Mustang the other day. Some of the details are guesswok, but it does at least look a bit "busier" than the kit cockpit.

I'll add the seat once I've joined the fuselage halves.


All the best

Rowan
Tin_Can
_VISITCOMMUNITY
Florida, United States
Joined: January 26, 2002
KitMaker: 1,560 posts
AeroScale: 750 posts
Posted: Sunday, April 25, 2004 - 03:35 AM UTC
Rowan, I've been following this from the start but haven't commented because I just didn't see anything wrong. I do have two questions now.

The boot around the bottom of the control stick. Has it been painted yet? It would seem to me that piece would get very weathered/mutilated over time.

The camera lense. Did you place a drop of klear or future in it to simulate the lense? It looks like you may have but just wanted to ask.

Overall, excellent work.
stm
_VISITCOMMUNITY
Florida, United States
Joined: March 07, 2004
KitMaker: 98 posts
AeroScale: 96 posts
Posted: Sunday, April 25, 2004 - 03:58 AM UTC
It is looking better all the time! Your painting is very well defined. I would drybrush a little silver on the insides to make it look worn. Your panel looks great. Don't forget the yellow line around the primary instruments!!! ;-)
Merlin
Staff MemberSenior Editor
AEROSCALE
#017
_VISITCOMMUNITY
United Kingdom
Joined: June 11, 2003
KitMaker: 17,582 posts
AeroScale: 12,795 posts
Posted: Sunday, April 25, 2004 - 12:03 PM UTC
Hi again

Thanks for taking a look at the pics.

Bryan, you've caught me out! The canvas boot is in the middle of a re-paint! I weathered it once, but I wasn't happy with the result. I was going to a gig tonight, so I posted the pics in a bit of a rush... the boot is due for a wash to to bring out the detail (hopefully a bit more subtly than my first attempt!).
The camera lense has got some Humbrol Clearcote on it, but I'll add a bit more to get a good "glassy" look.

Hi Scott, I agree it does need beating up a bit! I've tried scuffing the floor, but it's not showing up too well. As regards the yellow outline, this doesn't show on my NAA reference pics - but I'm unclear whether they're valid for a service a/c.

I'm also not sure about the landing gear handle - often it seems to have been painted black, but in the NAA pics it seems to be Interior Green.

All the best

Rowan
Q376
_VISITCOMMUNITY
Arkansas, United States
Joined: March 29, 2004
KitMaker: 4 posts
AeroScale: 0 posts
Posted: Sunday, April 25, 2004 - 02:17 PM UTC
That pit is really lookin great Merlin. A bit of dry brushing as Scott mentioned will really make it stand out.
The landing gear handle in the pics I'm looking at show it to be IG as you have it, in later variants it was black from the handle end just down past the 'crook'.
I also don't see any yellow line for the major instrument grouping on the early Mustangs, probably due to fewer instruments and differant layout.

Looking forward to seeing the developement of this one!
 _GOTOTOP