_GOTOBOTTOM
General Aircraft: Tips & Techniques
Discussions on specific A/C building techniques.
Advice on stenciling national markings
Wolf-Leader
_VISITCOMMUNITY
New Hampshire, United States
Joined: June 06, 2002
KitMaker: 1,225 posts
AeroScale: 55 posts
Posted: Thursday, November 02, 2017 - 05:33 AM UTC
Hi,
I was told that there might be how to videos or articles on how to stencil national markings on WWII aircraft such as the stars and bars for the US,red spot on the Japanese planes and the swastika on the German planes.
I heard that you can use making tape to make the stencils? I'm not sure about that one.Now I did hear that you can use frisket paper,but I am not sure what that is,so I don't want to use it,if needed.
The reason I'm asking is that it has a better look to it as if it was painted on,instead of using decals.
Has anyone heard of this technique or have done this before?
Thank you
Holdfast
Staff MemberPresident
IPMS-UK KITMAKER BRANCH
#056
_VISITCOMMUNITY
England - South West, United Kingdom
Joined: September 30, 2002
KitMaker: 8,581 posts
AeroScale: 4,913 posts
Posted: Thursday, November 02, 2017 - 12:53 PM UTC
I don't actually know of any videos. But, yes you can cut your own stencils (paint masks). That is the difficult part, for me anyway. I never managed to manually cut masks, apart from single discs, which is what you want for Japanese Hinomaru (meatballs).
If you can measure accurately, which I can, and cut accurately, which I can. Where I failed is cutting accurate concentric circles for RAF insignia, so if you can do all that you shouldn't have a problem in actually cutting the national markings. Washi tape (Tamiya type tape) is good, nice and thin and flexible, and low tack. The big issue with it is that it is opaque so positioning can be difficult, so you will need to be able to measure to the outer edge of the masks and know the exact position required. Frisk film is vinyl and clear but it is thicker and less flexible. There are better alternatives out there, "masking films".
There are commercial produces out there but the big problems with those is that:
A). The material that they use (Oramask 810) separates at the cut line, with 24 hours. And, as it separates deferentially, in the X and Y axes then those masks are pretty much useless!
B) They lack instructions. Some times there are no instructions, with others they are minimal. This is fine if you know what you are doing but I guess that you don't? I can help you there as I am more than happy to send you copies of my instructions

The material to use is "Ultra Mask", you can buy it in A4 size sheets or rolls. It is a light grey translucent vinyl material and is 80 microns thick. This is similar to the Oramask 810 mentioned above but the big difference is that this material does not separate.

You might find that the best route to aim for is to use a machine to cut the masks, I forget the names of the hobby ones but you want one that you can transfer your own files to

I paint all markings on my models but I use a high end plotter and precision ground blades. You will be able to achieve good results though if cutting your own, go for it

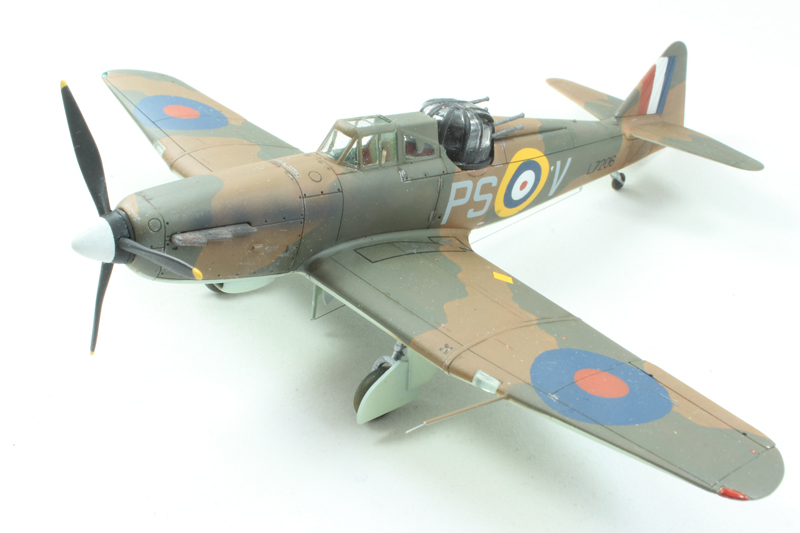
1/72 Airfix Boulton Paul Defiant, all markings painted on.

Wolf-Leader
_VISITCOMMUNITY
New Hampshire, United States
Joined: June 06, 2002
KitMaker: 1,225 posts
AeroScale: 55 posts
Posted: Friday, November 03, 2017 - 01:41 AM UTC
Mal,
Great! Thanks for all the awesome advice.I guess I will have to just practice first before I tackle this on a real model.
Thanks again.
Holdfast
Staff MemberPresident
IPMS-UK KITMAKER BRANCH
#056
_VISITCOMMUNITY
England - South West, United Kingdom
Joined: September 30, 2002
KitMaker: 8,581 posts
AeroScale: 4,913 posts
Posted: Friday, November 03, 2017 - 12:18 PM UTC
Yep, lots of practice
Do this by hand you will not be able to measure to exact scale. I work to 3 decimal points in Corel Draw. For example the upper wing roundel on a spitfire was 56" Dia, which is 29.63mm in 1/48 scale! You wouldn't be able to measure 29.6, let alone 29.63, so you would probably measure to 29.5 and no one would notice. Of course it depends on how accurate your measuring is but if it looks right and you are happy with it it will be all good. You will need a very good circle cutter or a compass.
If you are planning on using Tamiya tape (Washi tape) then you can buy similar in A4 sheets, but that is quite expensive. You can buy large rolls of Washi tape ("Kip tape") at decorators sites. You can get rolls which are wide enough 40mm to cut the above
This is a jpeg of my Generic instructions that take you through the basic process of applying a paint mask with up to 2 elements. If you would like a copy to print off just send me your email address in a PM? I can also send you specific instructions if you like.
The basic idea is to use "transfer tape" (I cut blanks in the same material that I cut the masks in for that purpose) to transfer the mask to the model. I nearly always, with very few exceptions, design masks to be used as nagative masks. That is to apply the mask over the main colours and paint the markings in stages. with Positive masks you would paint the markings first, mask them off then paint the main colours. An approach that I just don't understand. From what I have seen it is practiced by those that don't believe that you can paint light colours over dark, which is nonsense. The second photo shows a 1/48 Bf109E with a painted Swastika. To achieve the very narrow black outline it is necessary to paint the white over the black. And, of course, everything else tha you see is painted on


 _GOTOTOP