_GOTOBOTTOM
World War II
Discuss WWII and the era directly before and after the war from 1935-1949.
Hosted by Rowan Baylis
Eduard, Jugs over Germany 1/48
Twentecable
_VISITCOMMUNITY
Overijssel, Netherlands
Joined: September 13, 2003
KitMaker: 339 posts
AeroScale: 244 posts
Posted: Tuesday, July 05, 2016 - 09:37 PM UTC
Hello guys, somehow my Fokker DVII adventure was a fiasco, I got the rigging wrong, got irritateted by building choices, lost the airbrush nossle and after reveiving a new one had lost interest in the model. Maybe one day I pick it up again.

So I started a new build this one:
 photo boxtop.jpg" BORDER="0">

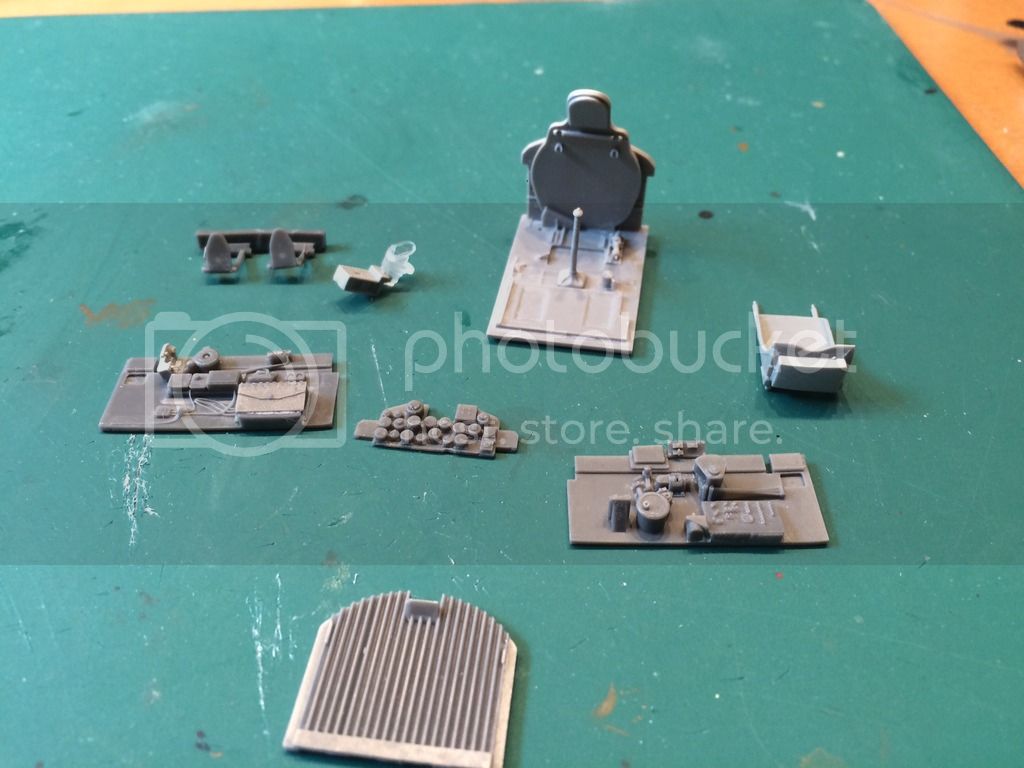
This is a limited edition which means it as a limited run, Acedemy plastic kit parts, Eduard brassin resin parts, PE and masks.


Its a bag full of goodies wich I picked up on Ebay for € 30,- inkl porto! I think quite a bargain for what you get.
Especially the resin parts a very nice.

 photo IMG_1627.jpg" BORDER="0">
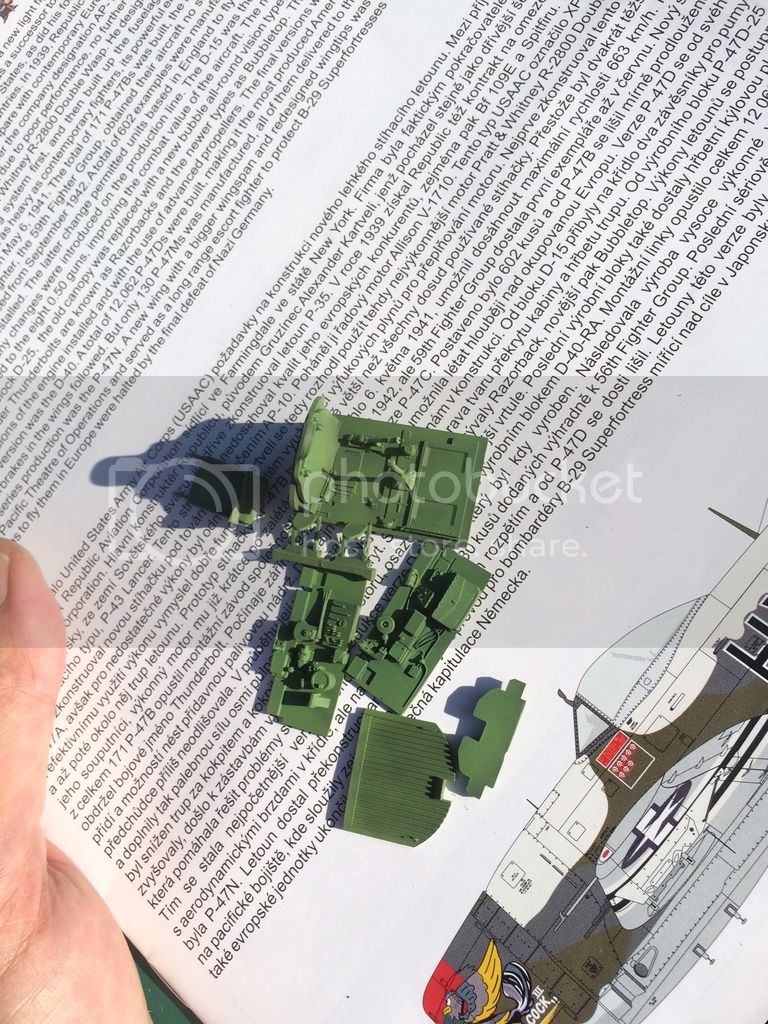
I never worked alot with resin and its been awhile so I made some errors, luckily most wont be all too visible.

After making some sub assemblies I mixed my own chromate green and sprayed it on the parts highlighting things with a slightly lighter shade.

 photo IMG_1630.jpg" BORDER="0">
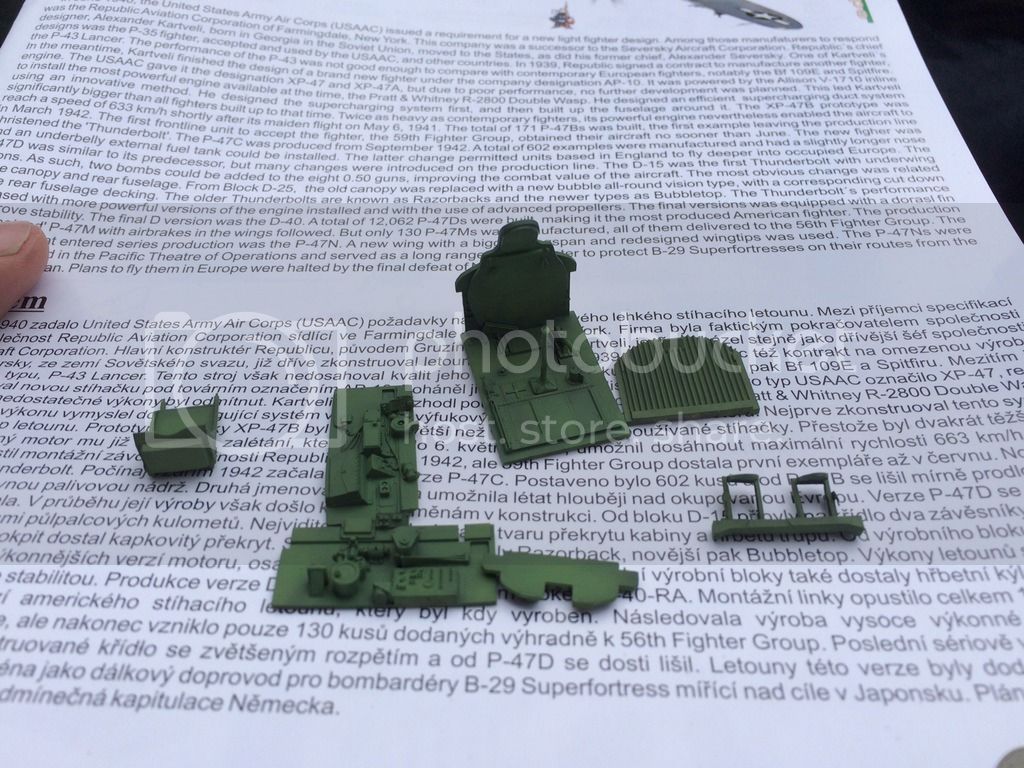
After some tips from members here I gave it all a slightly darker and blueish shade by applying some black and blue filters....

 photo IMG_1631.jpg" BORDER="0">

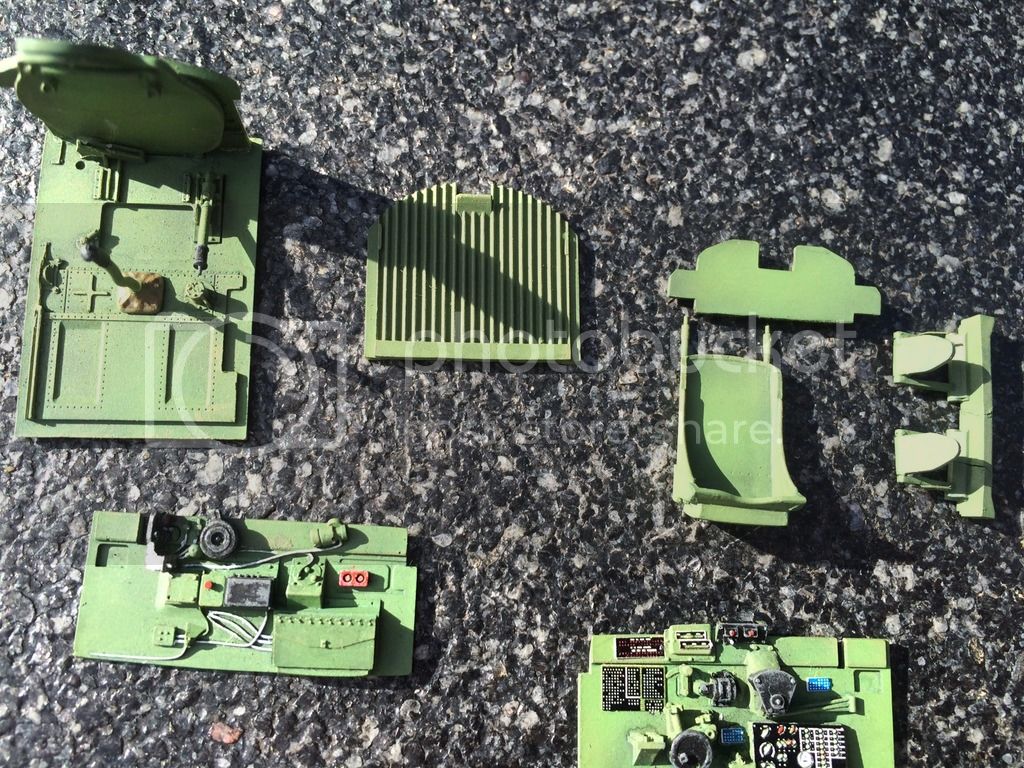
After that I did some detail painting and I used the first bits of PE. Here I noticed that I probably will not mix my own colours again. After making some mistakes I just couldn't find the right shade to work the errors away niceley :-(.

 photo IMG_1638.jpg" BORDER="0">

Now I have another problem. I litererly lost the visor part! It just wasnt there anymore... the weirdest thing that ever happenend to me. Cant find it anymore, even after an extensive search including the duster! Does any one have buildingplan for the Acedemykit and can tell me wich plastic kit parts are used for the visor?

gr TC
lespauljames
_VISITCOMMUNITY
England - South West, United Kingdom
Joined: January 06, 2007
KitMaker: 3,661 posts
AeroScale: 369 posts
Posted: Tuesday, July 05, 2016 - 11:10 PM UTC
Lars the cockpit looks really nice, when I mix custom colours I mix too much and put the rest in a spare pot ! Saved my butt more times than i care to imagine. Can't help with the visor but good luck!
Twentecable
_VISITCOMMUNITY
Overijssel, Netherlands
Joined: September 13, 2003
KitMaker: 339 posts
AeroScale: 244 posts
Posted: Tuesday, July 12, 2016 - 01:59 AM UTC
Hi guys,

small update. I worked on the cockpit again.

Added small PE levers... I am quite satisfied with the results myself... lost no parts (almost one lever :-S).


I added some dusting around the floor...


I had difficulties making the last 2 pictues due to the lightening.

gr TC
Joel_W
Staff MemberAssociate Editor
AUTOMODELER
_VISITCOMMUNITY
New York, United States
Joined: December 04, 2010
KitMaker: 11,666 posts
AeroScale: 7,410 posts
Posted: Tuesday, July 12, 2016 - 05:34 AM UTC
Lars,
The Jugs over Germany/Italy is a pretty good kit by Academy, with plenty of PE and Brassin from Eduard.

Your cockpit is really starting to look quite good. The actual color for the USAAF during that time period was ANA 611, commonly referred to as Interior Green. I've seen references to a few FS numbers, but it never had a true FS number assigned to it. A google search will give you the correct paint or mix for just about any brand of paint you're using. I wouldn't be to concerned about the actual paint color, as a few dark dirty washes will darken it up quite a bit.

I'm not sure what exactly you lost. Is it the windscreen glass or the gunsight glass?

Looking forward to your next update.

Joel
Twentecable
_VISITCOMMUNITY
Overijssel, Netherlands
Joined: September 13, 2003
KitMaker: 339 posts
AeroScale: 244 posts
Posted: Monday, July 18, 2016 - 12:21 AM UTC
Hi guys,

here a little update.
I almost managed to close the pilots office.


This took alot of time. First of all because I didnt follow the 1st rule of modelling... dry fitting. The parts all looked so explicit that I really thought the fit would be as great... well not. First issue was the pedal section. I got luck with unluck there because I first wanted to glue them backwards. After alot of shaving and breaking of parts (like PE levers :-S) I got the thing installed. Luckily you wont see most breaklines when all is closed up.

Afthat I wanted to install the instrument panel. here also the left "arm" is much to thick and has to be sanded down. I had put on some gloss varnish on the dials that afternoon so I will wait a bit untill that is dried so I dont get all kind of smudges on them.


.gr TC

PS Joel I was talking about the gunsight. I will use the plastic kit parts now.
Joel_W
Staff MemberAssociate Editor
AUTOMODELER
_VISITCOMMUNITY
New York, United States
Joined: December 04, 2010
KitMaker: 11,666 posts
AeroScale: 7,410 posts
Posted: Monday, July 18, 2016 - 03:02 AM UTC
Lars,
The pit really looks good. With Resin, fit and dry fit, and make sure you remove all paint from the joining surfaces. Believe I know that only to well.
Joel
Twentecable
_VISITCOMMUNITY
Overijssel, Netherlands
Joined: September 13, 2003
KitMaker: 339 posts
AeroScale: 244 posts
Posted: Tuesday, July 19, 2016 - 01:04 AM UTC
Joel, thx for the comments. I will watch te glue seams and paint residu. Atm there is a "heatwave" in Holland so not much moddeling to do :-).

gr TC
Joel_W
Staff MemberAssociate Editor
AUTOMODELER
_VISITCOMMUNITY
New York, United States
Joined: December 04, 2010
KitMaker: 11,666 posts
AeroScale: 7,410 posts
Posted: Tuesday, July 19, 2016 - 01:29 AM UTC

Quoted Text

Joel, thx for the comments. I will watch te glue seams and paint residu. Atm there is a "heatwave" in Holland so not much moddeling to do :-).

gr TC


Lars,
Same here on Long Island New York. It's reached the 90s or very high 80s everyday. But I'll take the heat over the cold and snow any day.
Joel
GazzaS
#424
_VISITCOMMUNITY
Queensland, Australia
Joined: April 23, 2015
KitMaker: 4,648 posts
AeroScale: 1,938 posts
Posted: Tuesday, July 19, 2016 - 03:08 PM UTC
Lars,
Your cockpit looks good! I didn't think there would be fit problems. You reminded me how important dry fitting is.

Bw

Gs
In_War_and_Peace
Staff MemberAssociate Editor
MODELGEEK
_VISITCOMMUNITY
England - South West, United Kingdom
Joined: September 26, 2015
KitMaker: 116 posts
AeroScale: 71 posts
Posted: Tuesday, July 19, 2016 - 06:23 PM UTC
Lars I really like the work you are doing the colouration is superb of the cockpit I will have to pull up my chair to watch this one further
Twentecable
_VISITCOMMUNITY
Overijssel, Netherlands
Joined: September 13, 2003
KitMaker: 339 posts
AeroScale: 244 posts
Posted: Tuesday, July 19, 2016 - 11:40 PM UTC
@Joel today more hot weather. Took the afternoon off to enjoy a summersday at the lake with wife and kids :-).

@Gazza, thx for dropping by again.

@Adie, thx for the compliment I will try to get the plane a nice finish too.

gr TC
Twentecable
_VISITCOMMUNITY
Overijssel, Netherlands
Joined: September 13, 2003
KitMaker: 339 posts
AeroScale: 244 posts
Posted: Monday, August 08, 2016 - 10:01 PM UTC
Guys,
I am back from a 2 week holiday. Lovely sunbathing in Spain with my wife and kids. I will have a good nights rest and start modelling tommorow again and post some progress pics. I really look forward too it!

cya soon.

gr TC
Joel_W
Staff MemberAssociate Editor
AUTOMODELER
_VISITCOMMUNITY
New York, United States
Joined: December 04, 2010
KitMaker: 11,666 posts
AeroScale: 7,410 posts
Posted: Tuesday, August 09, 2016 - 01:27 AM UTC
Lars,
Nice to hear that you're back at the workbench. Looking forward to your next update.

Joel
AussieReg
Staff MemberAssociate Editor
AUTOMODELER
#007
_VISITCOMMUNITY
Victoria, Australia
Joined: June 09, 2009
KitMaker: 8,156 posts
AeroScale: 3,756 posts
Posted: Tuesday, August 09, 2016 - 03:18 AM UTC
Lovely work so far Lars, your cockpit is looking very good. I am looking forward to more progress on this one, it is good to see the Academy kit being built up and the Eduard additional parts also look very good. We mainly see the great Tamiya kits or the older Monogram kits.

Cheers, D
Twentecable
_VISITCOMMUNITY
Overijssel, Netherlands
Joined: September 13, 2003
KitMaker: 339 posts
AeroScale: 244 posts
Posted: Wednesday, August 10, 2016 - 06:24 PM UTC
@Damian, thx for the compliments. I hope you enjoy the rest of the build log.

Ok I had promised to do an update yesterday but there was not much to show then. Main reason was this part:


Several things got wrong here. First the main rail didnt allign correct. I saw more modelers with the problem. When I figured out how to correct things I had over bent several part and they broke of. I glued the grill on using a rib structure so the part would stick. Then I went on to the side ribs. The should be U shaped. I lost a part to the carpet monster, I rebuild it using old PE. It was alot of work but the result was acceptable. Then I lost another part (it went flying away from my tweezers). I didnt had the energy to try to rebuild it again so I decided to make parts from plastic sheet. Above you can see the result. In the end I tink this part still looks better then the plastic part on the kit.

Next came gluing the fuselage parts and wings. I didnt want to take any risk so I let them cure all night. Here the cockpit in the fuselage.

I already masked the chair so I dont have any trouble painting the rail part wich will come right behind it.

Furthermore I had to do some sanding and filling some gaps. Also I had to work away some glue smudges where I really wonder where they come from...
Well more later maybe I can post some pics of the thing starting looking as a bird tonight.
gr TC
Joel_W
Staff MemberAssociate Editor
AUTOMODELER
_VISITCOMMUNITY
New York, United States
Joined: December 04, 2010
KitMaker: 11,666 posts
AeroScale: 7,410 posts
Posted: Wednesday, August 10, 2016 - 08:19 PM UTC
Lars,
Nice save on that rail assembly for the canopy. The combination of PE and sheet looks very good. Might even look better then the original PE assembly.

Joel
Twentecable
_VISITCOMMUNITY
Overijssel, Netherlands
Joined: September 13, 2003
KitMaker: 339 posts
AeroScale: 244 posts
Posted: Thursday, August 11, 2016 - 02:31 AM UTC
Thx Joel,

I have put on the wings and the main wings need alot of filler. Will finish that tommorow and start the engeine assembly.

gr TC
BlackWidow
_VISITCOMMUNITY
European Union
Joined: August 09, 2009
KitMaker: 1,732 posts
AeroScale: 1,336 posts
Posted: Saturday, August 13, 2016 - 02:51 AM UTC
Lars, nice progress so far with the cockpit. The Academy kit surely is not a bad one. I've built of them (D and N) and still have 2 of them in my stash.

Torsten
TmHippo
_VISITCOMMUNITY
United States
Joined: July 28, 2016
KitMaker: 42 posts
AeroScale: 42 posts
Posted: Saturday, August 13, 2016 - 04:41 AM UTC
Loving your build!!! I have a 1/48 Tamiya P-47M in my stash
But it will wait until I get better at modelling
Twentecable
_VISITCOMMUNITY
Overijssel, Netherlands
Joined: September 13, 2003
KitMaker: 339 posts
AeroScale: 244 posts
Posted: Wednesday, August 17, 2016 - 03:53 PM UTC
Rodney and Thorsten thx for the compliments.
Rodney I would say te Academy kit is a basic good detailed kit wich comes together rather easy. I think it is a very good project for a starting moddeler.

Twentecable
_VISITCOMMUNITY
Overijssel, Netherlands
Joined: September 13, 2003
KitMaker: 339 posts
AeroScale: 244 posts
Posted: Wednesday, August 17, 2016 - 04:02 PM UTC
Ok guys another update.
Though you may think my progress is slow my wife complains all the time that I am only moddeling :-).

Anyway, like I told before I mysteriously lost the nice resin visor part. So I use the plastic kit parts. Wich looks like this:

The visor is nothing more then a blob of clear plastic. I really didnt like the look and decided to make a part of my own. Grabbing my punch & die set I created this part form clear plastic and a strip of sheet.


I know the glass should be more oval. But I dont have an oval punch & die and I still think this will look better then the kit plastic blob once installed.

Finally the thing looks like a bird and is ready to be masked and primed.


After the primer had dried thouroughly I masked the aereas around the wheel well so I could paint them US interior yellow.
.

Now I made a painting mistake on the wing wich resultet in a raised area I am not sure what to do about it... trying to sand it of a bit or see if it equals out with the next layer of paint...

gr TC
Joel_W
Staff MemberAssociate Editor
AUTOMODELER
_VISITCOMMUNITY
New York, United States
Joined: December 04, 2010
KitMaker: 11,666 posts
AeroScale: 7,410 posts
Posted: Wednesday, August 17, 2016 - 09:10 PM UTC
Lars,
The gunsight really looks quite good to me. I do like how you masked out the wheel wells, I'm never nearly that neat as I mostly do it the opposite way of just painting them, then once dry I use foam to mask them.

What raised area on the wings are you referring to? I really can't see it in your pictures.

My wife says the same thing about how much time I spend modeling or in the computer/model room.

Joel
Twentecable
_VISITCOMMUNITY
Overijssel, Netherlands
Joined: September 13, 2003
KitMaker: 339 posts
AeroScale: 244 posts
Posted: Friday, August 19, 2016 - 11:31 PM UTC
Hi Joel,

Well I will mask the inside of the wheelwell again when working the aluminium. The damage is on the top wing. I hope to post some progress tommorow.

gr TC
Twentecable
_VISITCOMMUNITY
Overijssel, Netherlands
Joined: September 13, 2003
KitMaker: 339 posts
AeroScale: 244 posts
Posted: Monday, August 22, 2016 - 12:33 AM UTC
Hi Guys,

another update. The Aluminium paint is on and the result is .... well... terrible. Maybe it is not seen from a distance but you can see every scratch, every hair on the finish and there are alot of them on the model so it seems. Anyway I learned alot from this paintjob and I hope not to repeat my mistakes with the next model. Also I wasnt satisfied with the working awaya of the seams so I tried a differenttechnique and the cowling wich much more pleasing results. Anyway here the model is prepared for putting on the antiglare


And here the results. I put the plane on laquer tonight and let it dry for a day before starting to decal it...


gr TC
GazzaS
#424
_VISITCOMMUNITY
Queensland, Australia
Joined: April 23, 2015
KitMaker: 4,648 posts
AeroScale: 1,938 posts
Posted: Monday, August 22, 2016 - 04:19 AM UTC
Lars,
It looks nice! But it is true that NMF isn't kind even to the faintest of flaws. I often buff parts with newspaper or napkins until the plastic shines. The sheen will help you find flaws, or confirm to you that there aren't any.

BW,

Gs
 _GOTOTOP