Trumpeter F4F-3 Early 1/32
Washington, United States
Joined: August 16, 2004
KitMaker: 603 posts
AeroScale: 565 posts
Posted: Tuesday, July 05, 2016 - 07:47 AM UTC
Biting off more than I can chew part 1.
This will be one of two upcoming projects. This will be my 2016 Pearl Harbor Tribute build.
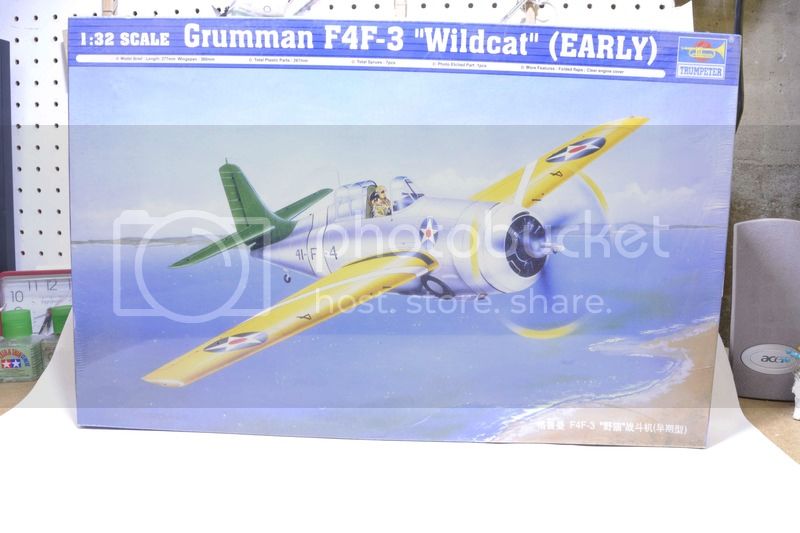
Stay tuned folks. This could get interesting.
Joe
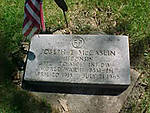
Veterans,
Thank You For Your Sacrifices,
Never To Be Forgotten
[img]http://i.imgur.com/1kRjMlc.jpg[/img]
Washington, United States
Joined: August 16, 2004
KitMaker: 603 posts
AeroScale: 565 posts
Posted: Wednesday, July 13, 2016 - 09:42 AM UTC
Well here I am.
Here we go.
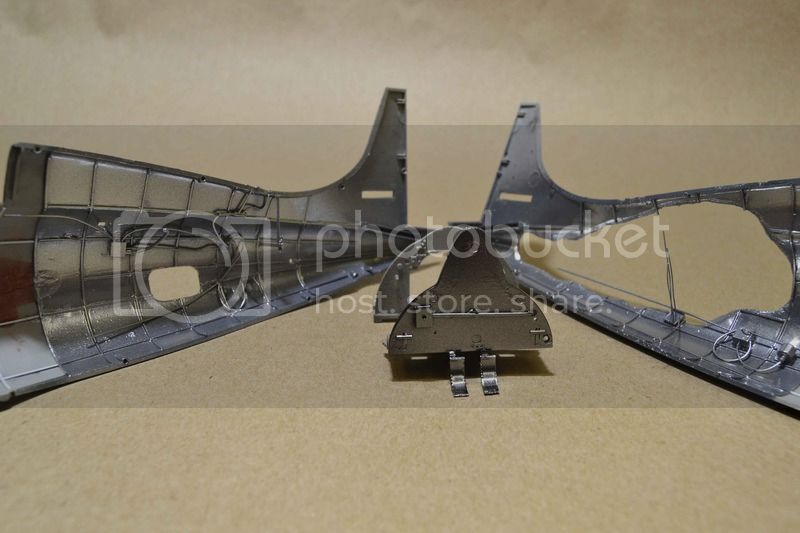
First step is .................well..................some destruction.
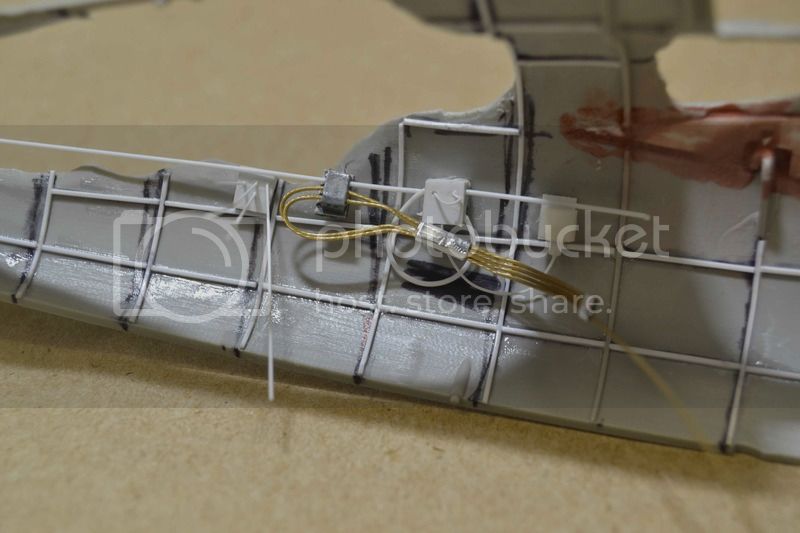
First up was to mock up the mount for the landing gear/engine. From what I remember this is one of the problem areas. I added a bit of styrene to get it to sit level and then centered. I then mocked up the pit floor to make sure where the cuts would end up. Out came the dremmel and after about a half hour.......
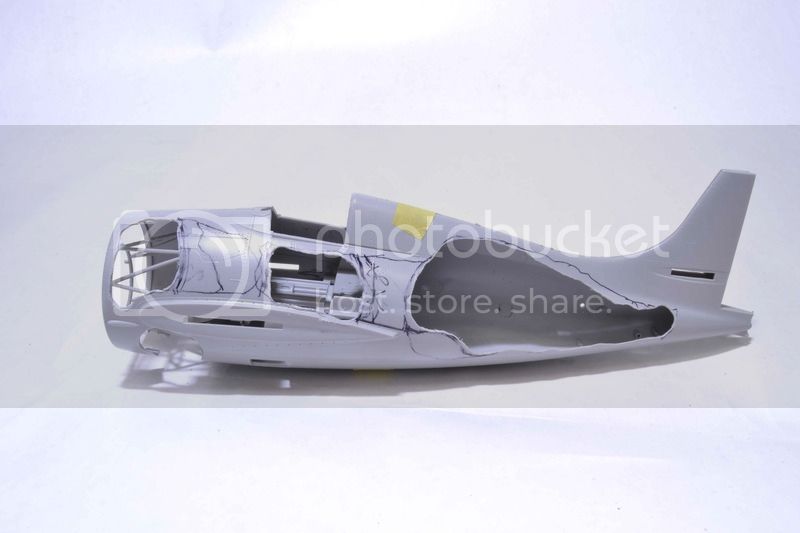
Not much to it. I cut out bits of the upper wing as well. Going to do that a bit different than the previous ones.
Next is clean up and then I can begin to work on the details.
All comments, critiques, and criticism are encouraged.
Joe
Veterans,
Thank You For Your Sacrifices,
Never To Be Forgotten
[img]http://i.imgur.com/1kRjMlc.jpg[/img]
Gauteng, South Africa
Joined: July 03, 2015
KitMaker: 280 posts
AeroScale: 141 posts
Posted: Wednesday, July 13, 2016 - 07:30 PM UTC
Hi Joe,
Tagging along for sure - always enjoy your 'cut-away' builds.
Looking forward to the next update.
Regards,
Kobus
Overijssel, Netherlands
Joined: September 13, 2003
KitMaker: 339 posts
AeroScale: 244 posts
Posted: Wednesday, July 13, 2016 - 10:19 PM UTC
Hi Joe,
this looks interesting count me in :-).
gr TC
Washington, United States
Joined: August 16, 2004
KitMaker: 603 posts
AeroScale: 565 posts
Posted: Friday, July 15, 2016 - 04:07 AM UTC
Thank you all for looking in.
Joe
Veterans,
Thank You For Your Sacrifices,
Never To Be Forgotten
[img]http://i.imgur.com/1kRjMlc.jpg[/img]
Washington, United States
Joined: August 16, 2004
KitMaker: 603 posts
AeroScale: 565 posts
Posted: Friday, July 22, 2016 - 08:58 AM UTC
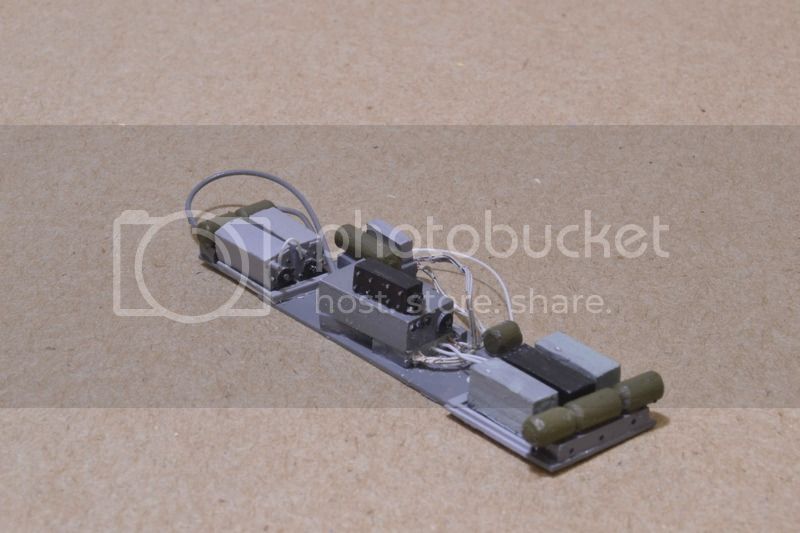
A quickie update to show what little work I have done.
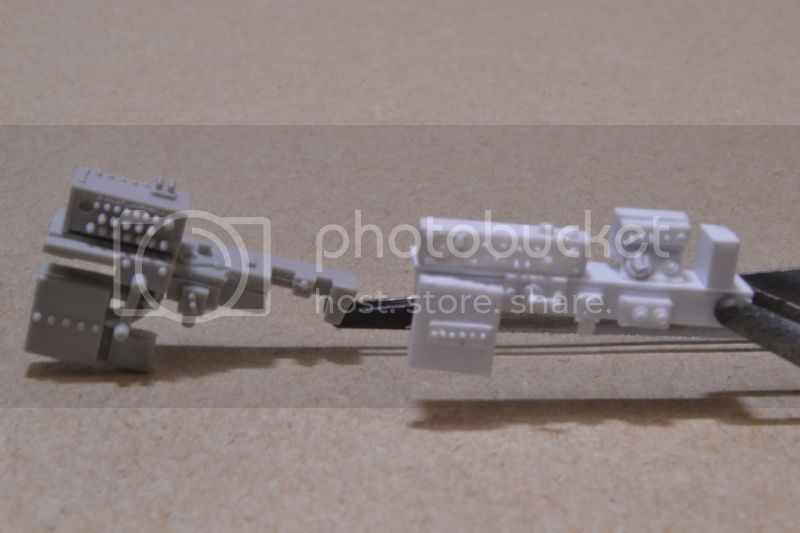
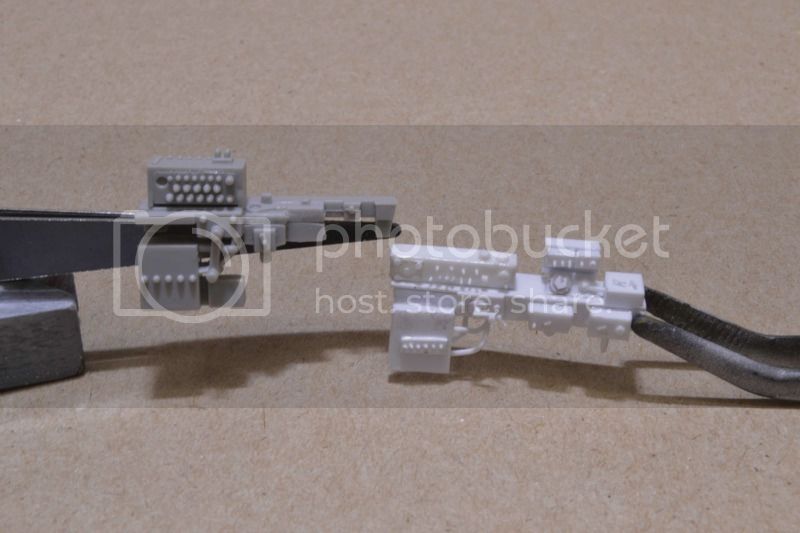
Work was isolated to fabrication of the radio equipment for this aircraft. The SCR-274 N. Composed of several components here is the still very rough initial look.
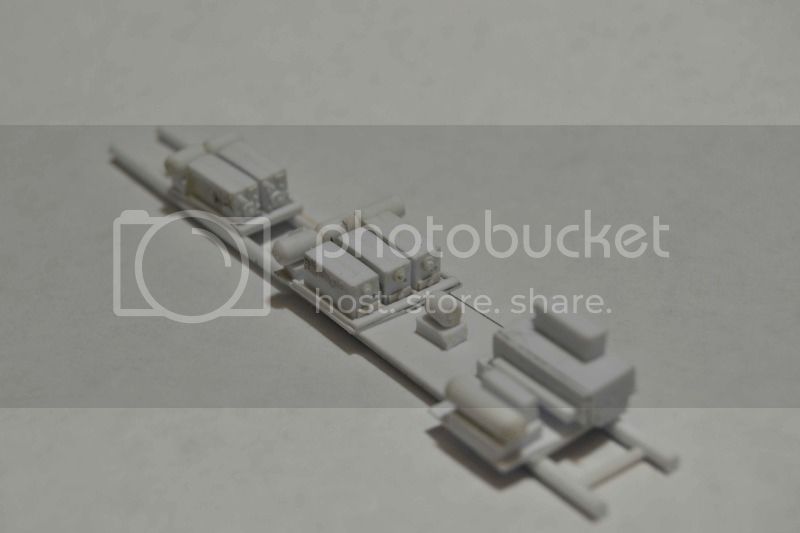
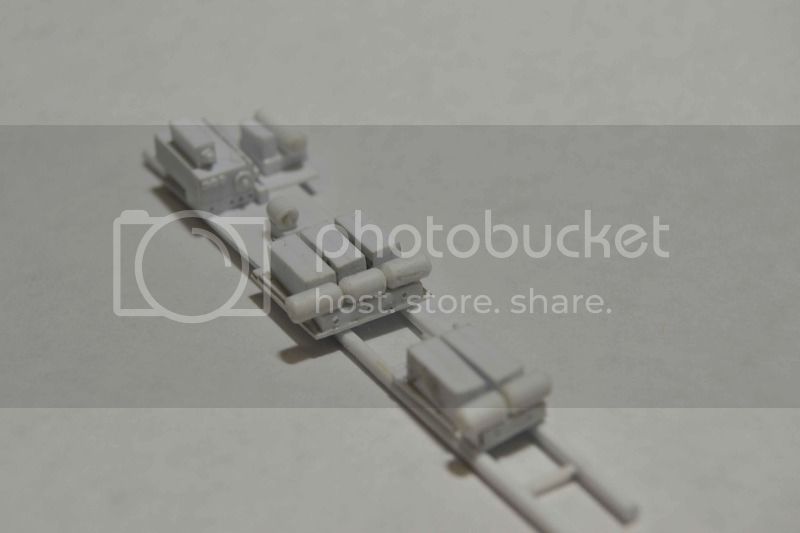
Should be pretty cool when done. Debating on whether to paint it now or wait as I did with the P-40B equipment.
Next will be to continue fabrication of the parts aft the cockpit.
All comments, critiques, and criticism are encouraged.
Joe
Veterans,
Thank You For Your Sacrifices,
Never To Be Forgotten
[img]http://i.imgur.com/1kRjMlc.jpg[/img]
Washington, United States
Joined: August 16, 2004
KitMaker: 603 posts
AeroScale: 565 posts
Posted: Thursday, July 28, 2016 - 09:34 AM UTC
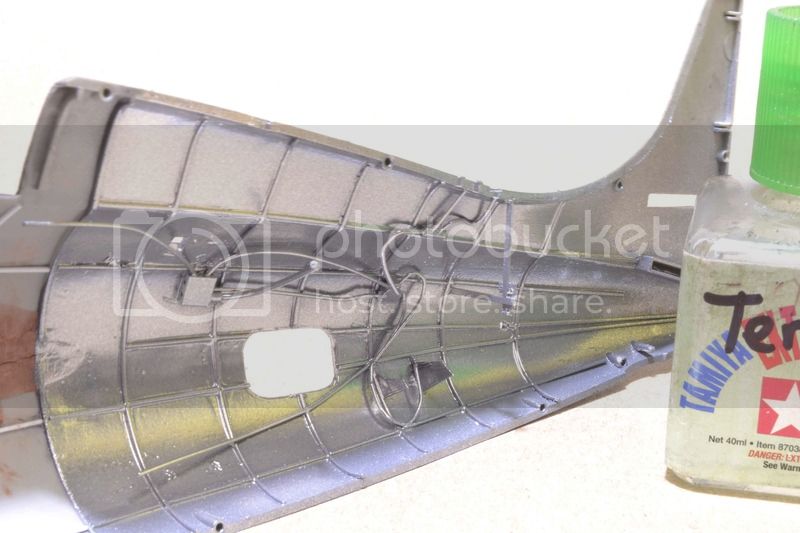
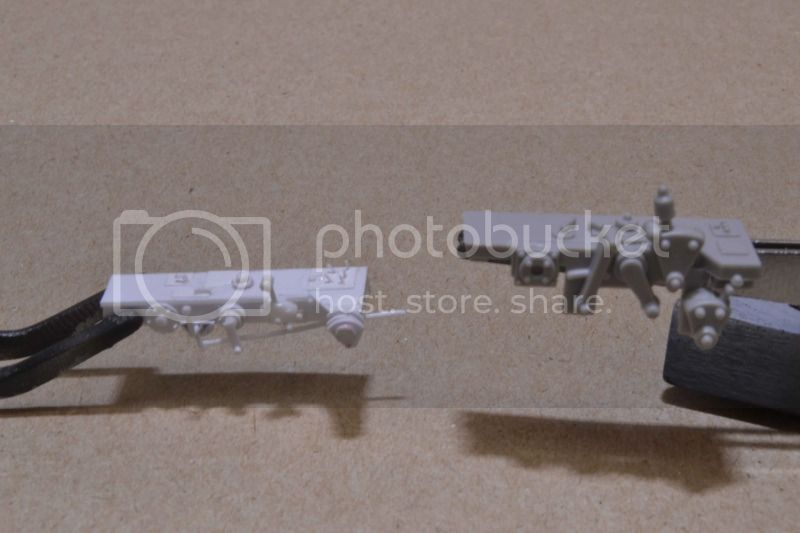
More done on the SCR 274 and a bit to the plumbing on the interior of the fuselage.
Some paint is a good thing right? Going blind with the white work. Using the Testor small bottles I got some color on the different receiver and transmitter equipment.
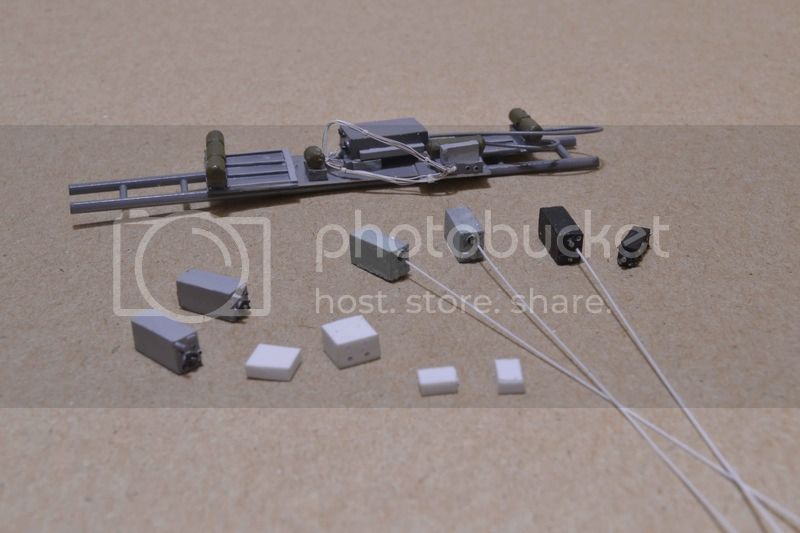
The work on the interior of the fuselage begins with the different boxes and fittings for the starboard side.
The interior is coming right along with much more to do. The wiring and fittings for the radio and then the different boxes and fittings for the port side of the fuselage are next up.
All comments, critiques, and criticism are encouraged.
Joe
Veterans,
Thank You For Your Sacrifices,
Never To Be Forgotten
[img]http://i.imgur.com/1kRjMlc.jpg[/img]
JPTRR
 Managing Editor
#051
Tennessee, United States
Joined: December 21, 2002
KitMaker: 7,772 posts
AeroScale: 3,175 posts
Posted: Thursday, July 28, 2016 - 10:07 AM UTC
Joe,
You amaze me. Looking forward to your F4F.

If they demand your loyalty, give them integrity; if they demand integrity, give them your loyalty.--Col John Boyd, USAF
Any plan where you lose your hat is a bad plan.
Gauteng, South Africa
Joined: July 03, 2015
KitMaker: 280 posts
AeroScale: 141 posts
Posted: Thursday, July 28, 2016 - 12:13 PM UTC
Hi Joe,
WOW!! your detailing is absolutely awesome!
Looking forward to the next update.
Regards,
Kobus
Texas, United States
Joined: February 22, 2008
KitMaker: 5,026 posts
AeroScale: 2,811 posts
Posted: Friday, July 29, 2016 - 05:45 AM UTC
Quoted Text
Hi Joe,
WOW!! your detailing is absolutely awesome!
Looking forward to the next update.
Regards,
Kobus
My thoughts exactly Joe, WOW!
Bob
If it aint broke dont fix it.
Washington, United States
Joined: August 16, 2004
KitMaker: 603 posts
AeroScale: 565 posts
Posted: Saturday, July 30, 2016 - 09:27 AM UTC
Humbled by your kind words. Thank you.
Joe
Veterans,
Thank You For Your Sacrifices,
Never To Be Forgotten
[img]http://i.imgur.com/1kRjMlc.jpg[/img]
Washington, United States
Joined: August 16, 2004
KitMaker: 603 posts
AeroScale: 565 posts
Posted: Saturday, July 30, 2016 - 09:27 AM UTC
Work continues. Two updates in three days, wow.
Watching YouTube was good for me and I was able to make some decent progress.
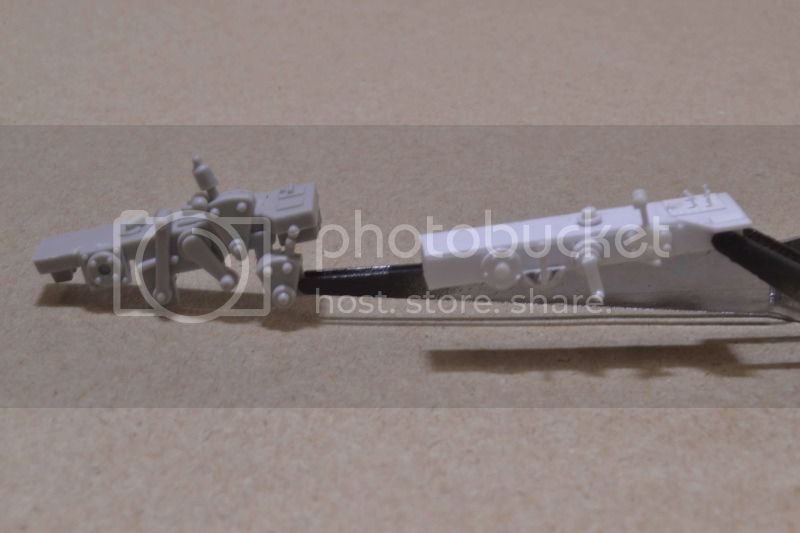
The radio is 99% finished.
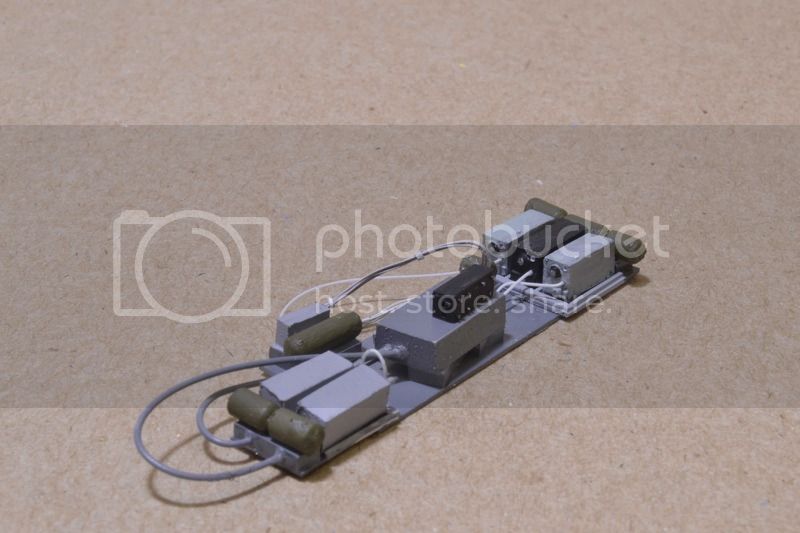
All that is left is the wiring after it is installed into the fuselage.
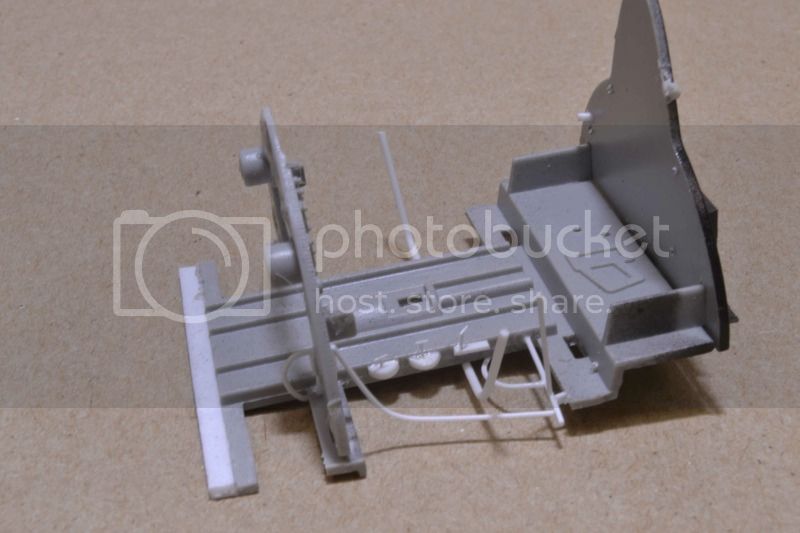
I was able to work a bit on the port side with the fabrication and addition of boxes and fittings.
I worked a bit on the rear of the cockpit bulkhead.
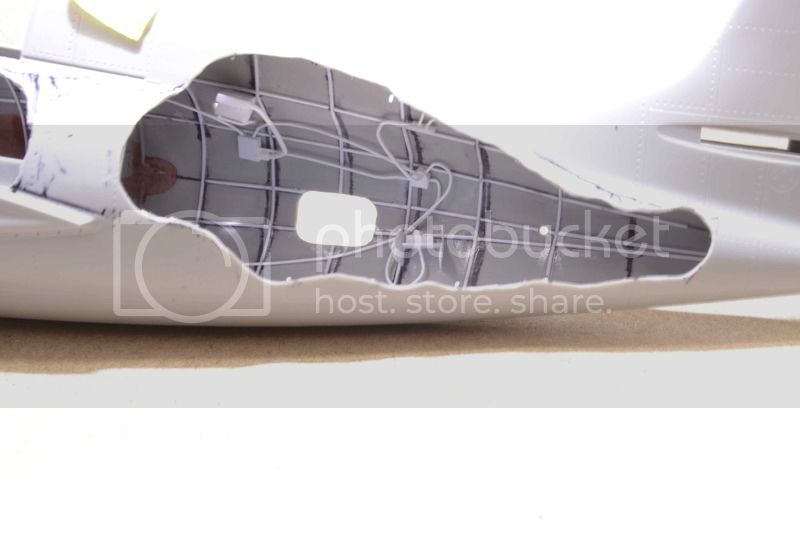
I then threw some paint. On the interior of the fuselage I sprayed Gloss Gray and then Alclad Chrome.
And then with the rear of the cockpit I sprayed Gloss Black and Alclad Chrome. To show the comparison.
There we go. i am thinking I can now move onto the cockpit.
All comments, critiques, and criticism are encouraged.
Joe
Veterans,
Thank You For Your Sacrifices,
Never To Be Forgotten
[img]http://i.imgur.com/1kRjMlc.jpg[/img]
New York, United States
Joined: June 08, 2013
KitMaker: 197 posts
AeroScale: 193 posts
Posted: Saturday, July 30, 2016 - 06:25 PM UTC
Joe
Just catching up and some mighty nice detail work going on.
Keep 'em coming
Peter
Peter
On the Bench
1/32 Tamiya Mosquito Mk VI
Washington, United States
Joined: August 16, 2004
KitMaker: 603 posts
AeroScale: 565 posts
Posted: Sunday, July 31, 2016 - 08:19 PM UTC
Veterans,
Thank You For Your Sacrifices,
Never To Be Forgotten
[img]http://i.imgur.com/1kRjMlc.jpg[/img]
Overijssel, Netherlands
Joined: September 13, 2003
KitMaker: 339 posts
AeroScale: 244 posts
Posted: Monday, August 08, 2016 - 09:22 PM UTC
Simply amazing wiring and sratchbuilding you showing us here. Thanks for that!
gr TC
Washington, United States
Joined: August 16, 2004
KitMaker: 603 posts
AeroScale: 565 posts
Posted: Tuesday, August 09, 2016 - 06:34 AM UTC
You are very kind. Many thanks.
Joe
Veterans,
Thank You For Your Sacrifices,
Never To Be Forgotten
[img]http://i.imgur.com/1kRjMlc.jpg[/img]
Washington, United States
Joined: August 16, 2004
KitMaker: 603 posts
AeroScale: 565 posts
Posted: Tuesday, August 09, 2016 - 06:34 AM UTC
Well folks here I am again and after a couple of days of fighting with Photobucket I can post an update.
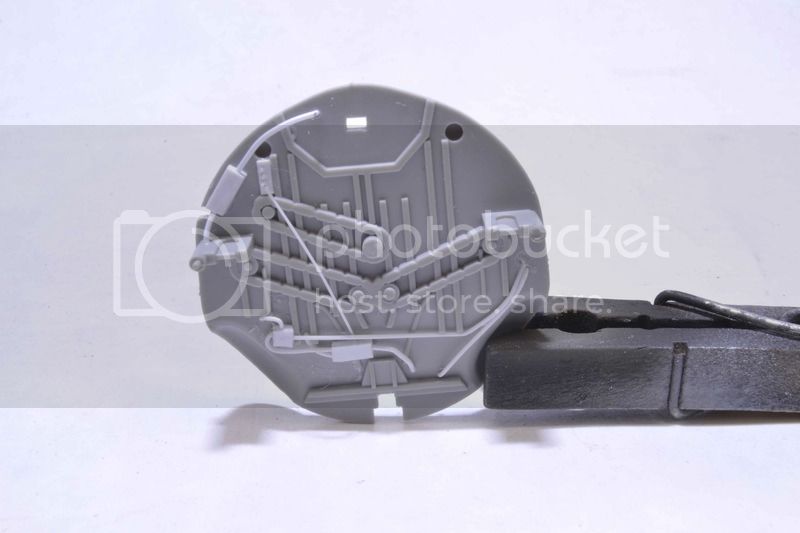
First up I began working on the cockpit. Here is the bare bones and the kit pieces in place.

Using these photos out of Squadron Signal Walk Around for the Wildcat I began to fabricate the sides. This is for discussion only.
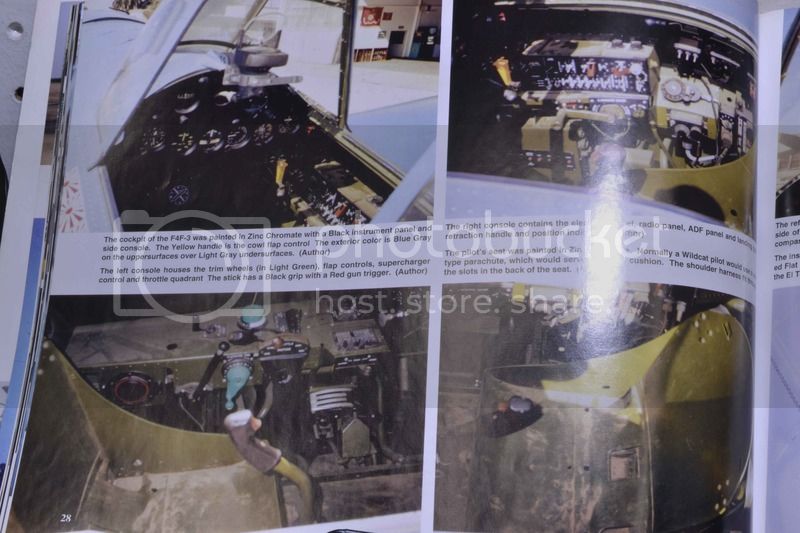
I went off of them and this is what I ended up with.
I was pleased. Then I turned the page and found these. Again for discussion only.
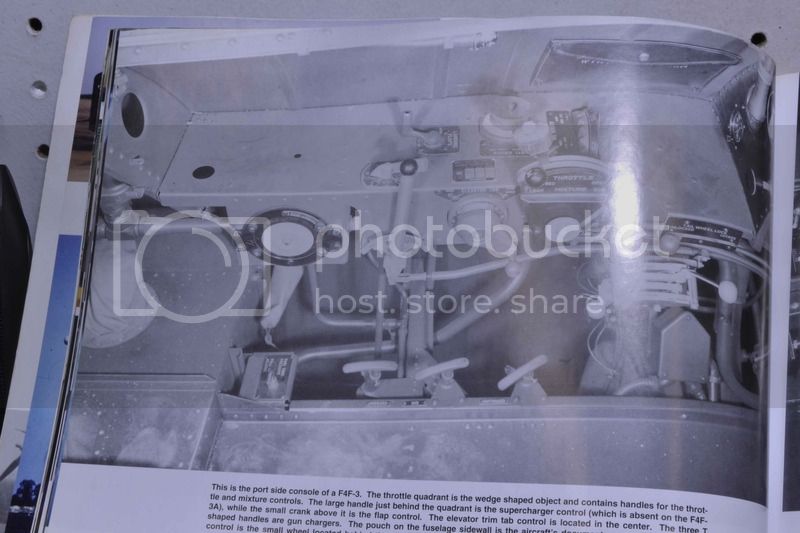

At that point I noticed several big issues that I just could not live with. I scraped some of the detail off and redid it. Here is the result.
And the cockpit floor.
And there you have it.
I like it.
Next up is color for the pit.
All comments, critiques, and criticism are encouraged.
Joe
Veterans,
Thank You For Your Sacrifices,
Never To Be Forgotten
[img]http://i.imgur.com/1kRjMlc.jpg[/img]
Overijssel, Netherlands
Joined: September 13, 2003
KitMaker: 339 posts
AeroScale: 244 posts
Posted: Tuesday, August 09, 2016 - 01:09 PM UTC
Joe, I did like the kit parts

. What have you done? (I like your parts even more

)
gr TC
Washington, United States
Joined: August 16, 2004
KitMaker: 603 posts
AeroScale: 565 posts
Posted: Tuesday, August 09, 2016 - 05:30 PM UTC
Many many thanks Lars.
Joe
Veterans,
Thank You For Your Sacrifices,
Never To Be Forgotten
[img]http://i.imgur.com/1kRjMlc.jpg[/img]
Washington, United States
Joined: August 16, 2004
KitMaker: 603 posts
AeroScale: 565 posts
Posted: Saturday, August 13, 2016 - 07:43 AM UTC
Just a brief update.
Attention is now turned to the cockpit fully. With most of the parts fabricated I can throw a bit of paint on and then some detail painting.
Actually pretty happy with this but I do see some areas that will need a touch up.
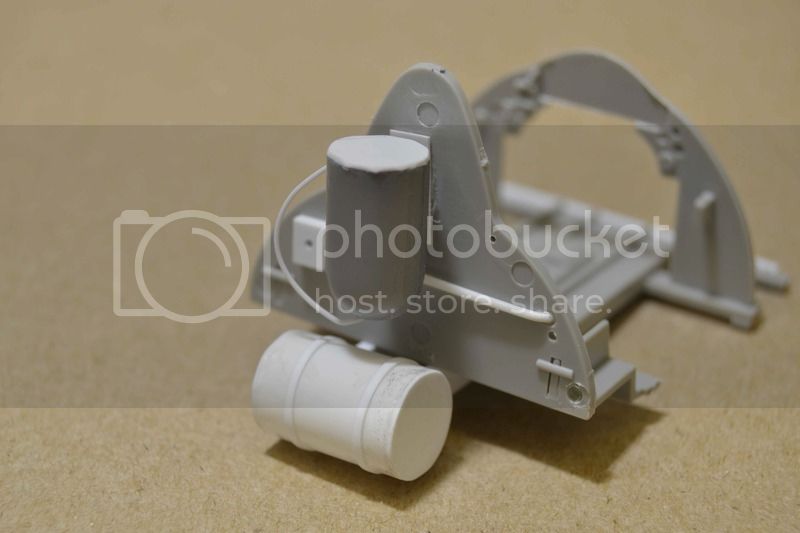
I could not help myself and I jumped ahead a little and started working on the firewall as well.
Still a long way to go before I can turn my full attention to that. Next up is to add some of the detail that I have not fabricated yet as well as working on the instrument panel.
All comments, critiques, and criticism are encouraged.
Joe
Veterans,
Thank You For Your Sacrifices,
Never To Be Forgotten
[img]http://i.imgur.com/1kRjMlc.jpg[/img]
Ontario, Canada
Joined: July 22, 2012
KitMaker: 771 posts
AeroScale: 763 posts
Posted: Saturday, August 13, 2016 - 08:18 AM UTC
Wow, beautiful work - so crisp and clean.
Matt Odom
I've been known to build a few things
Washington, United States
Joined: August 16, 2004
KitMaker: 603 posts
AeroScale: 565 posts
Posted: Thursday, August 18, 2016 - 02:21 AM UTC
Many many thanks Matt.
Joe
Veterans,
Thank You For Your Sacrifices,
Never To Be Forgotten
[img]http://i.imgur.com/1kRjMlc.jpg[/img]
Washington, United States
Joined: August 16, 2004
KitMaker: 603 posts
AeroScale: 565 posts
Posted: Friday, August 26, 2016 - 08:05 PM UTC
Another really quick update.
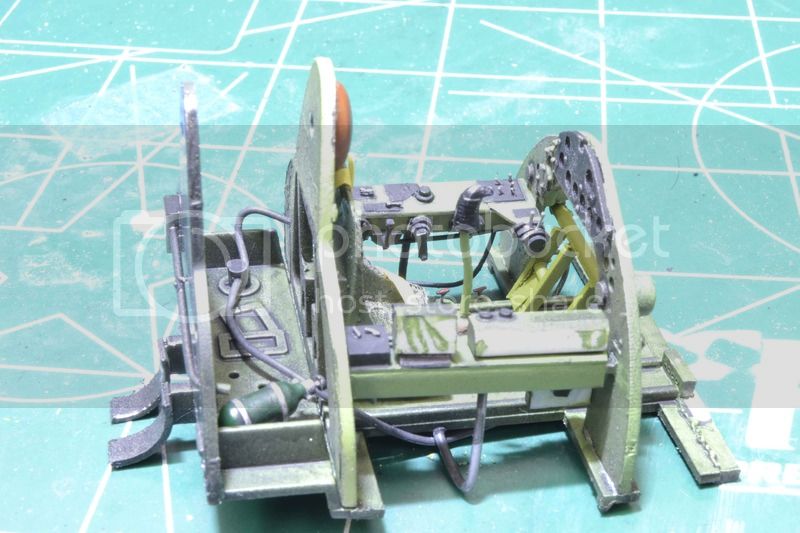
The cockpit comes closer to being finished.
Some detail painting as well as a pretty heavy handed wash with Acrylics.

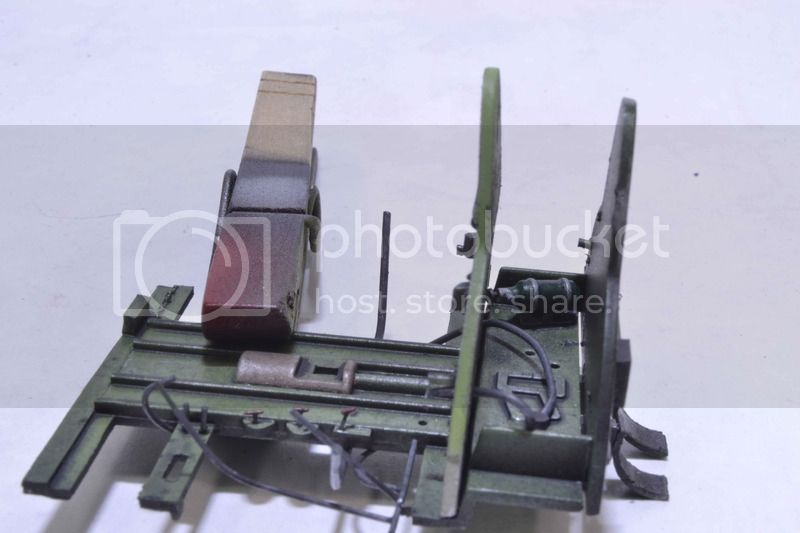

Other than the seat and headrest it is done. I am a bit put off by the seat though and will be searching for a replacement. Next up will be to finish it off and then set it aside.
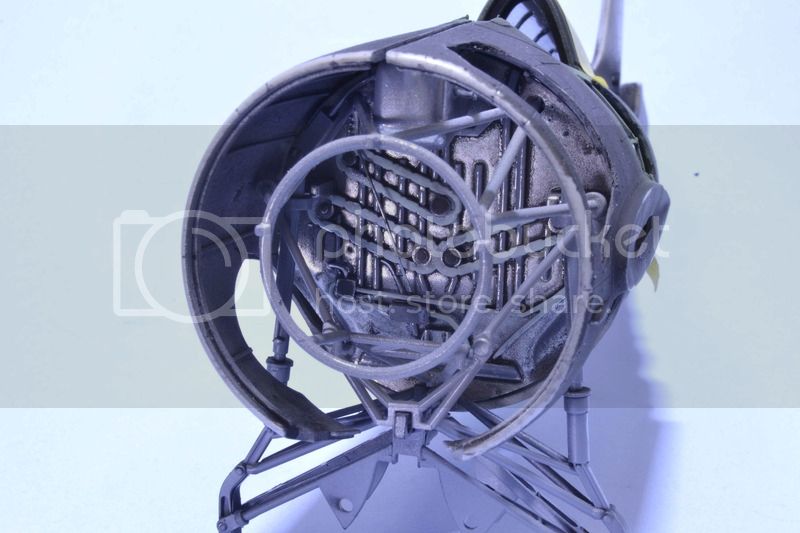
I also did a bit more on the firewall and gave it color and an over all wash.
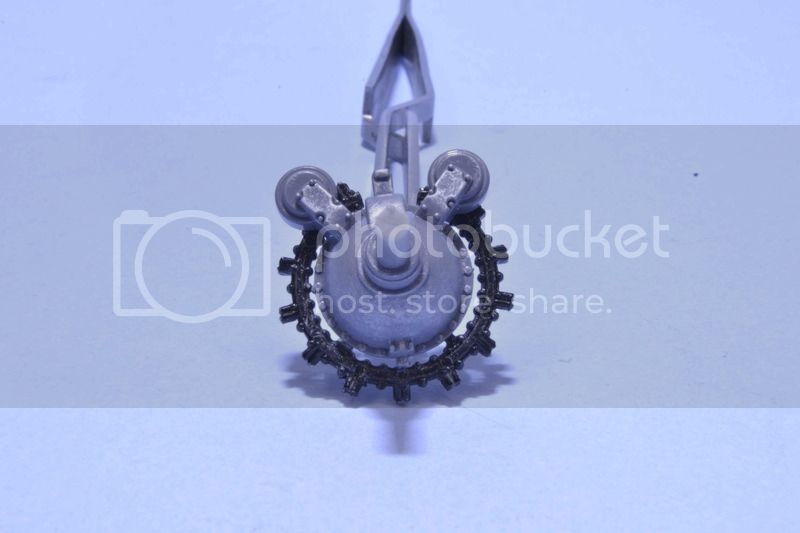
The color is Alclad Chrome over Testors Gloss Gray. I still have to pick out some of the details. And I will say this now. The chain gear are going to stay. I had zero luck trying to get my hands on replacements. I know they are out there but I had no luck finding chain that looked anywhere near what the real chain looked like.
Time to put color on the engine/landing gear mount and get it detailed.
All comments, critiques, and criticism are encouraged.
Joe
Veterans,
Thank You For Your Sacrifices,
Never To Be Forgotten
[img]http://i.imgur.com/1kRjMlc.jpg[/img]
Washington, United States
Joined: August 16, 2004
KitMaker: 603 posts
AeroScale: 565 posts
Posted: Tuesday, August 30, 2016 - 07:42 PM UTC
An update.
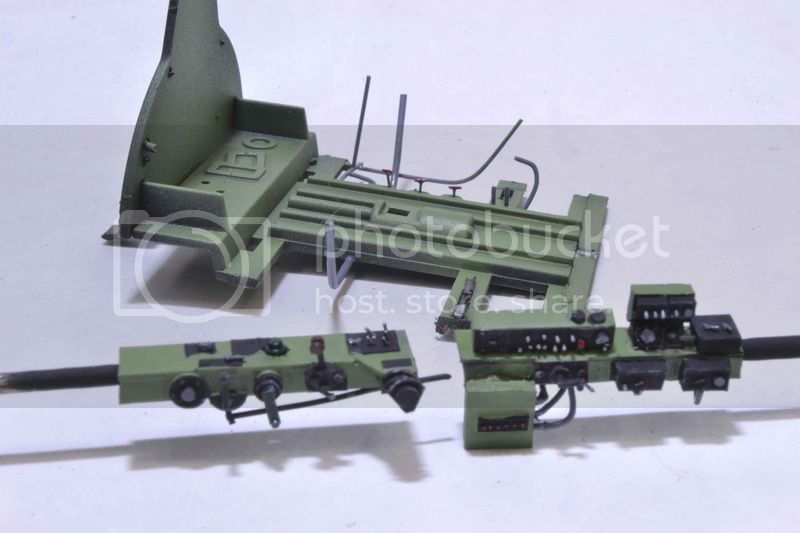
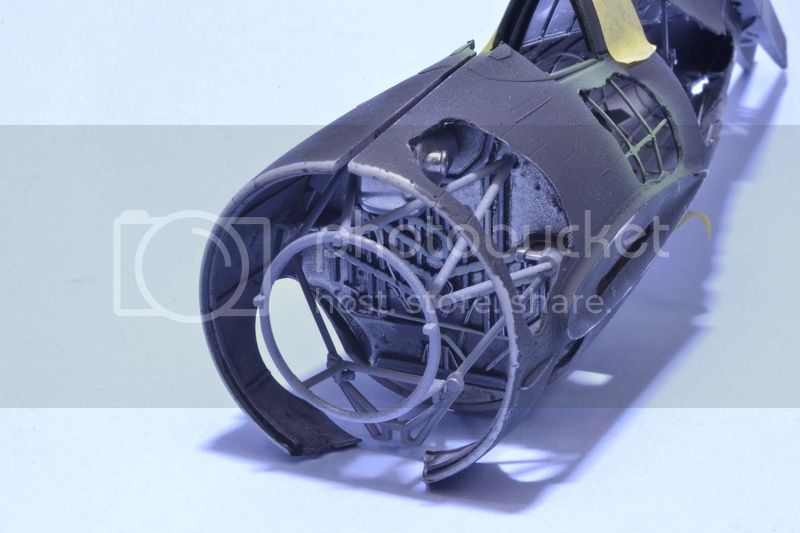
The cockpit is finished off. From the kit we have the floor, rear bulkhead, inner frame (where the seat rests), the control stick, and the instrument panel and frame. The seat is a resin cast of the seat out of the Hasegawa P-40E. All the detail work is scratchbuilt.
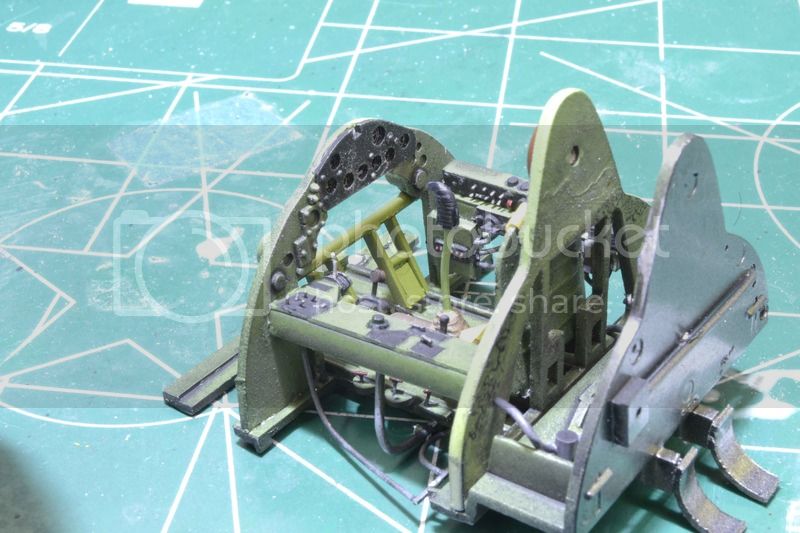
The firewall is almost complete. I went with the molded in chains for the gear as I could not get my hands on decent replacements. I also added a number of things that I had seen in pictures but were not represented in the kit.
Now next, logically, should be the engine. I am going to detour just a bit and work on the landing gear as there are some hoses and fittings that will need to be constructed and they fit into the firewall.
All comments, critiques, and criticism are encouraged.
Joe
Veterans,
Thank You For Your Sacrifices,
Never To Be Forgotten
[img]http://i.imgur.com/1kRjMlc.jpg[/img]
Washington, United States
Joined: August 16, 2004
KitMaker: 603 posts
AeroScale: 565 posts
Posted: Tuesday, September 06, 2016 - 07:56 AM UTC
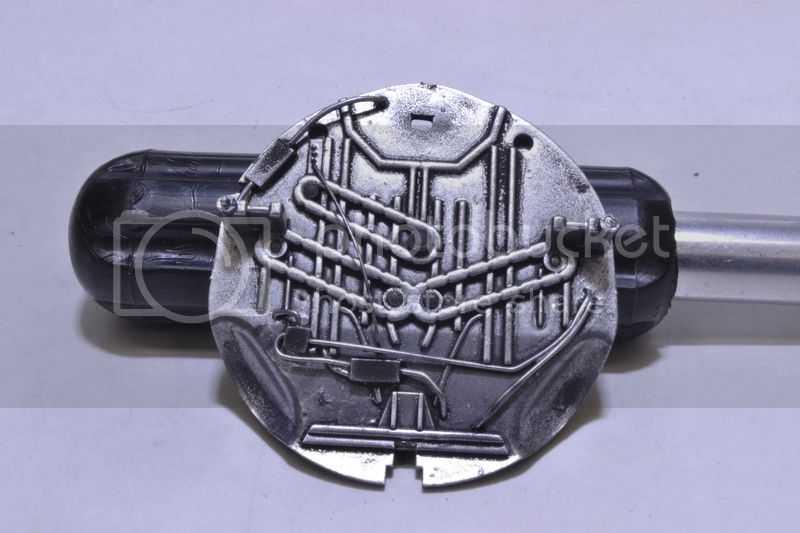
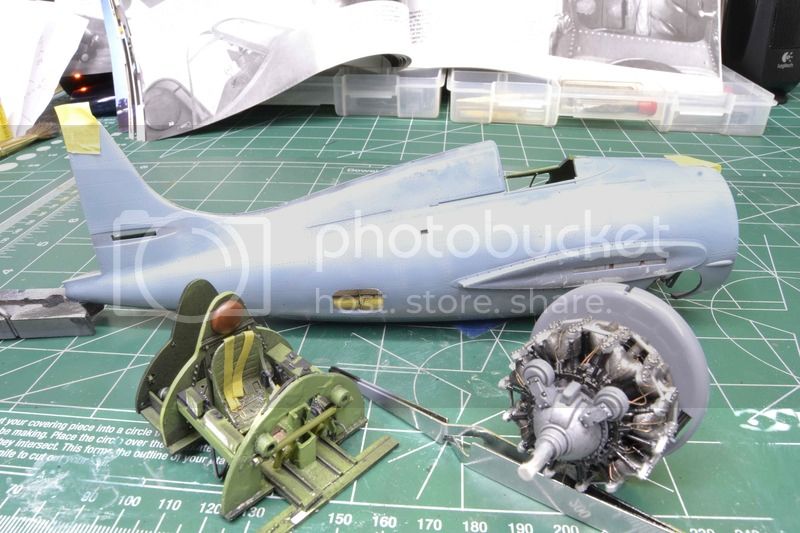
Back again and the interior is getting close.
With a bit of fixing on the cockpit I was able to move on to working on the engine. Once the parts were cleaned up a bit I used Alclad Polished Aluminium, Gloss Grey, Gloss Black, and a wash of Acrylic Black.
To this point other than a bit of wiring the forward sections are now done.
There are just a couple of items left and then I can hook it all up and close her up.
Oh so very very close.
Next will be finishing up the little stuff and then installing into the fuselage and closing it up.
All comments, critiques, and criticism are encouraged.
Joe
Veterans,
Thank You For Your Sacrifices,
Never To Be Forgotten
[img]http://i.imgur.com/1kRjMlc.jpg[/img]