_GOTOBOTTOM
World War II
Discuss WWII and the era directly before and after the war from 1935-1949.
Hosted by Rowan Baylis
1/48 scale ARII Ki-44 Shoki
GazzaS
#424
_VISITCOMMUNITY
Queensland, Australia
Joined: April 23, 2015
KitMaker: 4,648 posts
AeroScale: 1,938 posts
Posted: Tuesday, November 03, 2015 - 03:04 AM UTC
Hi everyone,
The 1945 Campaign started this weekend, and up until yesterday I've been without an airbrush, so I started this build while my N1K1J has had to wait.


As you can see, it's a relatively simple affair, but has the novelty of a pilot.

And, for the first time ever, I've added some plumbing to a radial Engine:

I found painting the pilot very challenging. Unfortunately, I think the fella has a short neck, and large head.

Thank you for looking!

Gary
heavyjagdpanzer
_VISITCOMMUNITY
Georgia, United States
Joined: February 17, 2013
KitMaker: 173 posts
AeroScale: 108 posts
Posted: Tuesday, November 03, 2015 - 06:35 PM UTC
Gary, nice wiring. I have not tried that yet.
GazzaS
#424
_VISITCOMMUNITY
Queensland, Australia
Joined: April 23, 2015
KitMaker: 4,648 posts
AeroScale: 1,938 posts
Posted: Tuesday, November 03, 2015 - 10:54 PM UTC
Thanks, Bill. It definitely makes the front end of the beast look a bit more appealing.

Gary
matrixone
_VISITCOMMUNITY
Oregon, United States
Joined: February 07, 2004
KitMaker: 869 posts
AeroScale: 862 posts
Posted: Wednesday, November 04, 2015 - 05:44 AM UTC
Great work so far, funny thing is I was thinking about building this very same kit. Since you are building one of these I will build a Ki-61 instead.


Matrixone
GazzaS
#424
_VISITCOMMUNITY
Queensland, Australia
Joined: April 23, 2015
KitMaker: 4,648 posts
AeroScale: 1,938 posts
Posted: Wednesday, November 04, 2015 - 12:22 PM UTC

Quoted Text

Great work so far, funny thing is I was thinking about building this very same kit. Since you are building one of these I will build a Ki-61 instead.


Matrixone


Hah, Les I have a Ki-61 by Hasegawa from a ways back. I had to take the decals from this plane, the Tony, and an old Tamiya 109E3 and leave them on the dashboard of my car to fade the yellowing out for three days. It was a toss-up which I would do. The Tojo won out because it's the one I know the least about.

Gary
berndm
_VISITCOMMUNITY
Niedersachsen, Germany
Joined: March 26, 2014
KitMaker: 844 posts
AeroScale: 630 posts
Posted: Wednesday, November 04, 2015 - 03:45 PM UTC
Nice start on an older but still nice kit. Your engine looks great, self made plumbing is on my to do list as well.
My Tamiya Zero kits could a good match dor something like this.
1945 campaign ?
GazzaS
#424
_VISITCOMMUNITY
Queensland, Australia
Joined: April 23, 2015
KitMaker: 4,648 posts
AeroScale: 1,938 posts
Posted: Wednesday, November 04, 2015 - 10:56 PM UTC

Quoted Text

Nice start on an older but still nice kit. Your engine looks great, self made plumbing is on my to do list as well.
My Tamiya Zero kits could a good match dor something like this.
1945 campaign ?


Bernd,
Thank you! It's not very difficult if you drill smalls holes into which you sink the ends of you wires.
Haven't you ever visited the Campaign section of the Aeroscale forums?

Gary
matrixone
_VISITCOMMUNITY
Oregon, United States
Joined: February 07, 2004
KitMaker: 869 posts
AeroScale: 862 posts
Posted: Wednesday, November 04, 2015 - 11:26 PM UTC
Gary,
I was going to start work on the Ki-61 earlier today and as I cut off several parts from the sprues and did some dry fitting I noticed the plastic had a greasy feel to it so I washed all the parts in dish soap and warm water and they are now drying. Washing the parts before assembly is not something I do often but the plastic in this kit needed it.

Maybe its just my kit but it felt like the plastic had a lot of mold release agent left on it and I wondered if your kit had the same greasy feel to the plastic.

Matrixone
GazzaS
#424
_VISITCOMMUNITY
Queensland, Australia
Joined: April 23, 2015
KitMaker: 4,648 posts
AeroScale: 1,938 posts
Posted: Thursday, November 05, 2015 - 10:08 AM UTC

Quoted Text

Gary,
I was going to start work on the Ki-61 earlier today and as I cut off several parts from the sprues and did some dry fitting I noticed the plastic had a greasy feel to it so I washed all the parts in dish soap and warm water and they are now drying. Washing the parts before assembly is not something I do often but the plastic in this kit needed it.

Maybe its just my kit but it felt like the plastic had a lot of mold release agent left on it and I wondered if your kit had the same greasy feel to the plastic.

Matrixone


Les,
Mine is bone dry and clean. Honestly, I've never had a kit I felt needed washing. They all say to do it, but seems like a waste of time.

Gary
matrixone
_VISITCOMMUNITY
Oregon, United States
Joined: February 07, 2004
KitMaker: 869 posts
AeroScale: 862 posts
Posted: Thursday, November 05, 2015 - 10:26 PM UTC
Gary,
Washing parts before assembly is usually something I don't bother with, the lone exception being Huma kits as every single one I have built had the plastic feeling greasy enough to where I thought it could possibly effect parts from staying together after being glued.


Matrixone
berndm
_VISITCOMMUNITY
Niedersachsen, Germany
Joined: March 26, 2014
KitMaker: 844 posts
AeroScale: 630 posts
Posted: Friday, November 06, 2015 - 12:22 PM UTC

Quoted Text


Quoted Text

Nice start on an older but still nice kit. Your engine looks great, self made plumbing is on my to do list as well.
My Tamiya Zero kits could a good match dor something like this.
1945 campaign ?


Bernd,
Thank you! It's not very difficult if you drill smalls holes into which you sink the ends of you wires.
Haven't you ever visited the Campaign section of the Aeroscale forums?

Gary


Thanks for the info, Gary. This Gb sounds interesting, will have a look this weekend about how to get in and may i find something that fits
GazzaS
#424
_VISITCOMMUNITY
Queensland, Australia
Joined: April 23, 2015
KitMaker: 4,648 posts
AeroScale: 1,938 posts
Posted: Friday, November 20, 2015 - 03:14 PM UTC
Hello Everyone,
I'm back to this Ki-44 despite the heat and despite the need to Christmas shop. I'm a quick shopper, and she buys the most for others. I just hafta make sure her gift is real nice.

Our pilot is in his cockpit.

Unfortunately I rubbed a little paint off from his flying helmet and will have to touch it up later. This kit has some molding flaws. That big black blob is Damian's miracle putty made from Tamiya cement and dissolved sprue...it sands real nice!

Fun with Aotake! The IJA's answer to Zinc Chromate Yellow. Not sure if the IJN didn't use it, too.

The wheel wells were sprayed with Alclad polish aluminum and then a thin-ish coat of my interpretation of aged Aotake. The canopy was sprayed in reverse.
The Landing gear and covers got the same treatment as the wheel wells. But the pieces are so small, and the lighting not right to get that translucent look.

You'll notice the thin bit of Aotake on the wing trailing edge. That this is painted Aotake is pure speculation on my part. Nobody online seems to know for certain.

BTW, when I started dry fitting the wings, I thought I had bought a crap kit. I was quite upset and wasn't far from marching to my LHS and buying one made by hopefully Tamiya or Hasegawa. After searching online, I discovered it's supposed to be that way. That little fillet is part of the butterfly flaps.

Thank you for looking!

Gary
Twentecable
_VISITCOMMUNITY
Overijssel, Netherlands
Joined: September 13, 2003
KitMaker: 339 posts
AeroScale: 244 posts
Posted: Friday, November 20, 2015 - 04:12 PM UTC
Hi Gary,

nice wiring...
Your figure looks a bit glossy to me. Maybe you can try to break up the colours a bit more (if the detail on the figure makes it possible), with more layers, dry brush and washing.

gr Lars
GazzaS
#424
_VISITCOMMUNITY
Queensland, Australia
Joined: April 23, 2015
KitMaker: 4,648 posts
AeroScale: 1,938 posts
Posted: Friday, November 20, 2015 - 05:00 PM UTC
Lars,
Thank you for your response. The gloss is natural to artist acrylics. Once dullcoated, the sheen will disappear.

Best Wishes,

Gary
c4willy
#305
_VISITCOMMUNITY
Christchurch, New Zealand
Joined: February 01, 2006
KitMaker: 1,673 posts
AeroScale: 1,517 posts
Posted: Saturday, November 21, 2015 - 02:22 AM UTC
Hi Gary ... like you I've never washed a kit in my life, I also don't undercoat them ... yes yes heresy I know but I've never encountered an issue yet. There is always a first time for everything though huh?

I like the Arii kit for the Shoki, I had always thought they were the Hobbycraft of the Japanese manufacturers! I've built some of their kits and rudimentary was an understatement. But this kit seems quite well detailed for an Arii kit.

I have a Hasegawa 1/32 scale kit to build of this aeroplane. I have the Wolfpack conversion for the 40mm cannon which includes a service tech (a really nice touch)! This aeroplane holds huge sentimental value for me as it was the first kit my dad and I built together (actually dad built it I just handed him the tools LOL) more years ago than I care to think about. I just love the pugnacious and aggressive lines of this aeroplane!

I really like what you've done so far Gary keep up the awesome work!
GazzaS
#424
_VISITCOMMUNITY
Queensland, Australia
Joined: April 23, 2015
KitMaker: 4,648 posts
AeroScale: 1,938 posts
Posted: Saturday, November 21, 2015 - 04:40 AM UTC
Hi Chris,
Thank you. I like the detailed skin of this kit. On the negative side are the molding flaws in the wings, and the shallow lines between the wing control surfaces and wing proper. Also the cooling flaps weren't grooved very deeply, and scribing is something I've yet to master. I spent over an hour on the cooling flaps this morning. I have no idea how the finish will turn out to be honest.

Gary
GazzaS
#424
_VISITCOMMUNITY
Queensland, Australia
Joined: April 23, 2015
KitMaker: 4,648 posts
AeroScale: 1,938 posts
Posted: Tuesday, November 24, 2015 - 08:46 AM UTC
Hi Everyone,
Been a few days since my last and I've been plodding along at little things.

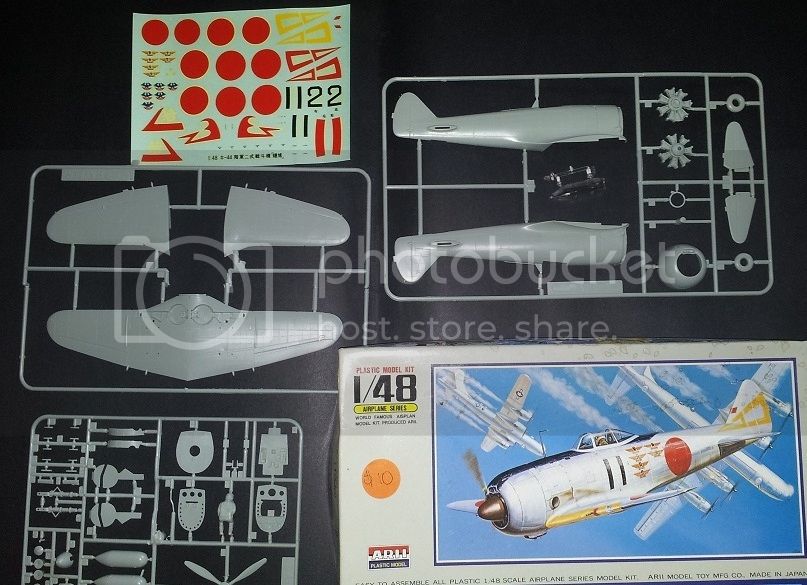
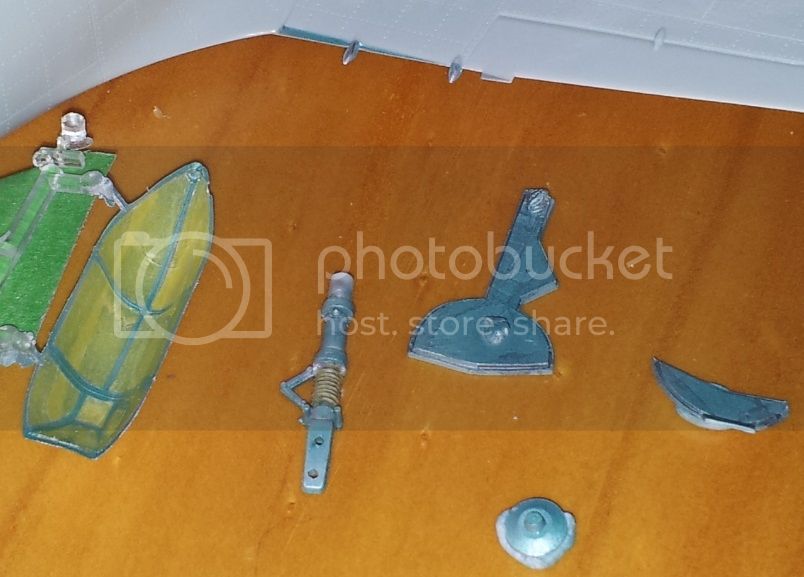
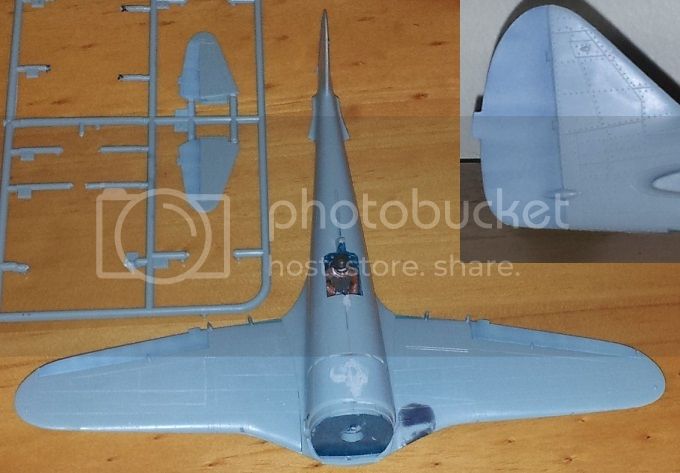
The Ki-44 had fabric covered control surfaces. I've seen them modelled in light gray, so I've followed suit. Tried to add a little texture with my airbrush.


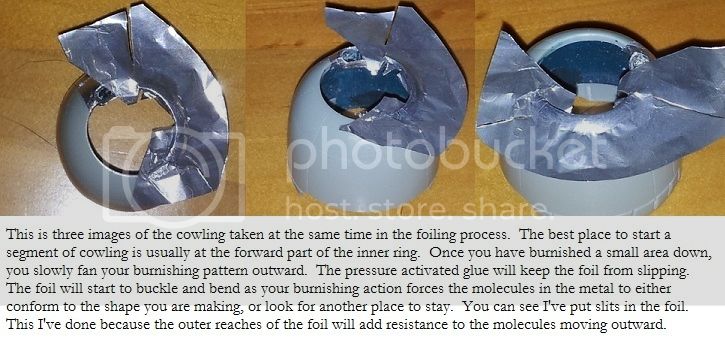
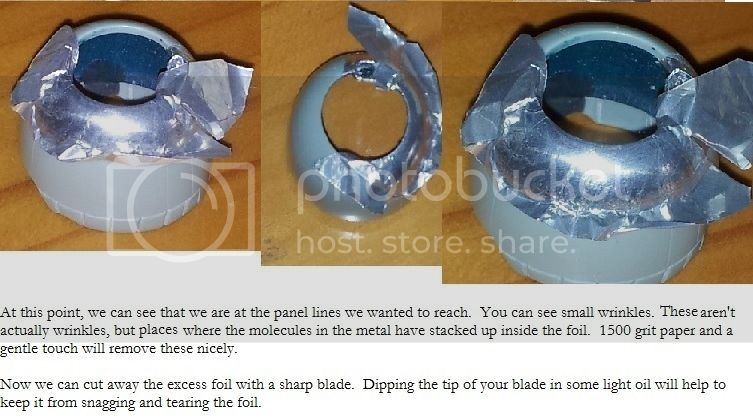
Then I could start foiling.

Again, the hardest areas are those at joints between wing, fuselage, and vertical stab.

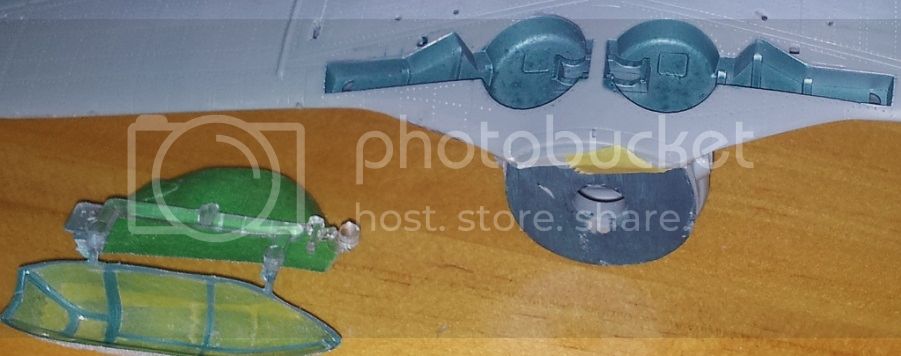
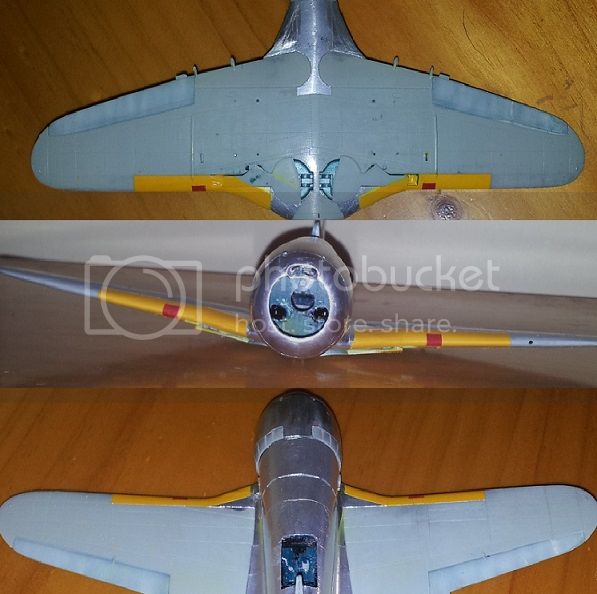
The Ki-44 had it's exhaust coming from two large pipes immediately aft of the engine, over the leading edge of the wing.

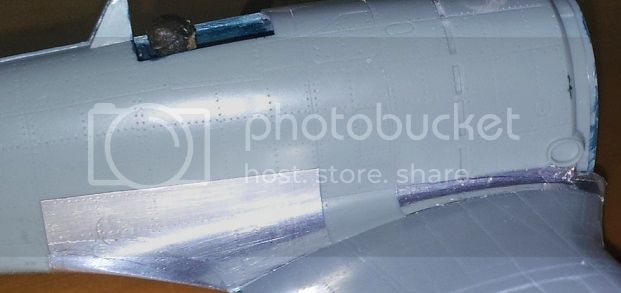
You can see by the photo that the kitmakers didn't do too much to make the exhaust pipes look hollow. and unfortunately for me, I waited until I'd started foiling to decide I could do a little better.

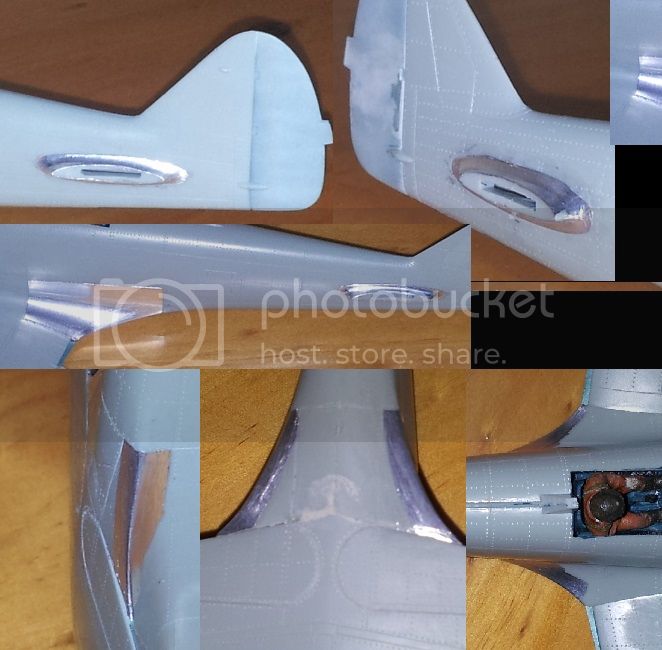
I drilled out both exhausts and drilled holes into the firewall.

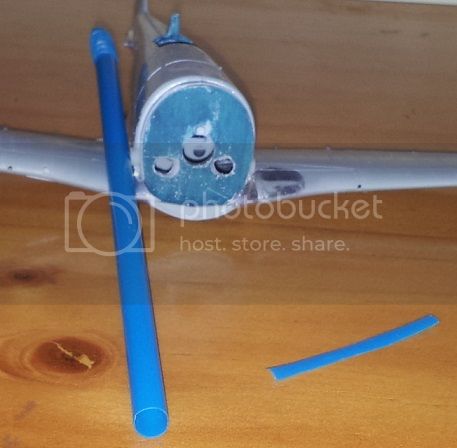
Then I glued in small troughs I'd made from a disposable drinking straw.
Taken outside, this picture shows the exhaust to look black and deep now.

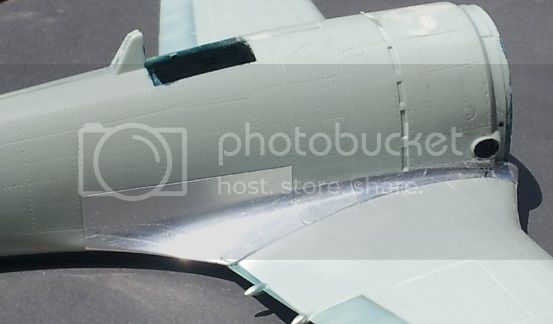
And importantly, no light comes through either side.


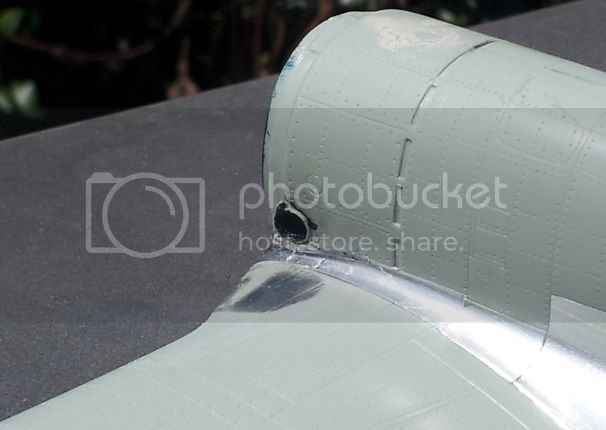
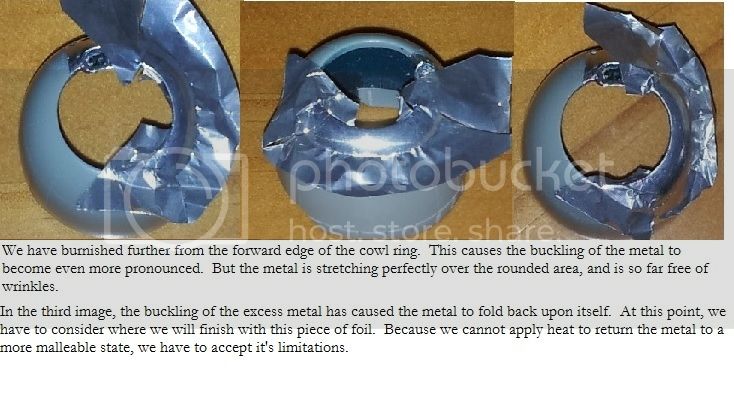
This next image of the tails shows how little the foil will give sometimes.

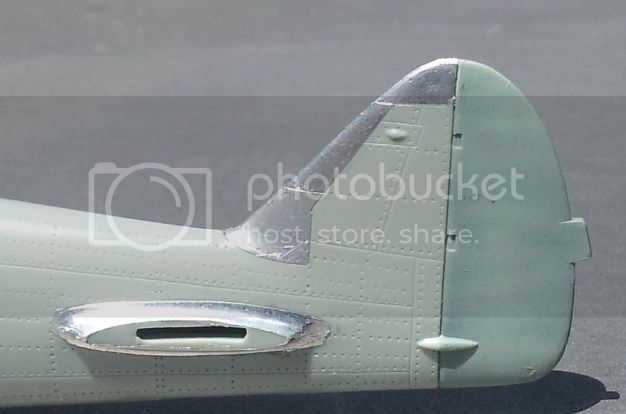
First I tried to do the leading edge of the tail with one piece of foil. Didn't work, so I tried it with 2 pieces. Still there were too many competing angles for the foil to go as many places as I wanted it. I had to use three separate pieces just for the leading edge of the tail.

Thank you for looking!

Gary
Twentecable
_VISITCOMMUNITY
Overijssel, Netherlands
Joined: September 13, 2003
KitMaker: 339 posts
AeroScale: 244 posts
Posted: Wednesday, November 25, 2015 - 02:33 AM UTC
Oh my god you are not going to foil the whole thing again do you?
Well I admire your persitance in this foiling job. Looks good!

gr TC
GazzaS
#424
_VISITCOMMUNITY
Queensland, Australia
Joined: April 23, 2015
KitMaker: 4,648 posts
AeroScale: 1,938 posts
Posted: Wednesday, November 25, 2015 - 10:58 AM UTC

Quoted Text

Oh my god you are not going to foil the whole thing again do you?
Well I admire your persitance in this foiling job. Looks good!

gr TC


Of course I am. There will be much less paint, this time. It is the only way I can do NMF.

Bw, GS
c4willy
#305
_VISITCOMMUNITY
Christchurch, New Zealand
Joined: February 01, 2006
KitMaker: 1,673 posts
AeroScale: 1,517 posts
Posted: Wednesday, November 25, 2015 - 11:29 AM UTC
Nice work Gary! Should make it easy to accent the panel joins with the foil. Complex curves can obviously lead to complex headaches LOL.
GazzaS
#424
_VISITCOMMUNITY
Queensland, Australia
Joined: April 23, 2015
KitMaker: 4,648 posts
AeroScale: 1,938 posts
Posted: Wednesday, November 25, 2015 - 11:08 PM UTC
Hey Chris,
Thanks. Foiling isn't really that difficult enoughh to cause headaches. Unless of course a person really hates redoing things. Sometimes your are almost finished adding a piece and you make a tear, or see a mote of dust that is trapped under the foil. You can temper it with realizing just how inexpensive the process is and how stunning real metal looks compared to metalic paint.

...or you can stomp off leaving a trail of expletives behind you...lol

Gary
GazzaS
#424
_VISITCOMMUNITY
Queensland, Australia
Joined: April 23, 2015
KitMaker: 4,648 posts
AeroScale: 1,938 posts
Posted: Friday, November 27, 2015 - 06:04 AM UTC
Hi everyone,
Another small update after hours of learning and testing and trying.

On my first two foiled aircraft I had troubles caused by masking lifting off the Aluminum surface. In an attempt to reduce the chances of this happening, it dawned on me to do some of the painting before all of the foil had been put on, then my tape would only be sticking to a small area of foil, and a large area of bare plastic.

This is the identification marking applied to the forward edges of the wings of all Japanese fighters later in the war. The red square surrounds the gun embrasure of each wing 12.7mm MG. The identification marker for this plane also covered part of the landing gear covers, so I held them in place with Bluetack while I masked the rest. Happily, no foil was lifted when removing the mask. I might be on to something here.

This next portion I'm adding for anyone who is interested in learning more technique. I studied some metal working a while back, and the small amount I'd learned I was able to apply to the foil.


Thank you for looking!

Gary
Joel_W
Staff MemberAssociate Editor
AUTOMODELER
_VISITCOMMUNITY
New York, United States
Joined: December 04, 2010
KitMaker: 11,666 posts
AeroScale: 7,410 posts
Posted: Friday, November 27, 2015 - 06:19 AM UTC
Gary,
An oldie but a goodie for sure. Nice start to another one of your specialty foil NMF. The start really does look quite good.

You're also getting quite good at wiring up those radial engines. All of my wired WW11 engines have been USA designed, and thus have duel ignition systems, so when I looked at your wiring of the Nakajima Ha-41 engine, the single spark plug wire for each cylinder looked odd to me. I did a few Google searchers, and sure enough every picture I saw had it that way.

I'll be subscribing and following along to it's completion.

Joel

mrockhill
_VISITCOMMUNITY
Pennsylvania, United States
Joined: June 17, 2009
KitMaker: 566 posts
AeroScale: 507 posts
Posted: Friday, November 27, 2015 - 06:52 AM UTC
Gary, your shoki is looking great! Watching you build a ki-44 struck a nerve and a hasegawa 1/48 shoki came home with me from the LHS as a result. Pugnacious looking little thing isnt it, Trying hard not to build it for the 1945 campaign, dont want to crowd the shoki field! Still vascililating over my many applicable choices

Your foil work looks outstanding. Ive always found it intriguing and I'm bound to try it sometime but I certainly appreciate getting to read about your experiences for now. That was a nice tutorial you did above, thank you!
AussieReg
Staff MemberAssociate Editor
AUTOMODELER
#007
_VISITCOMMUNITY
Victoria, Australia
Joined: June 09, 2009
KitMaker: 8,156 posts
AeroScale: 3,756 posts
Posted: Friday, November 27, 2015 - 07:13 AM UTC

Quoted Text

That was a nice tutorial you did above, thank you!


I agree! I've never tried foiling but would like to give it a try some day. Can you please expand a bit, what foil do you use, what tools for burnishing, what glue?

Excellent work so far, looking forward to more progress.

Cheers, D
 _GOTOTOP