Heinkel He 51B - Roden 1/48 scale
Germany
Joined: September 07, 2005
KitMaker: 5,609 posts
AeroScale: 5,231 posts
Posted: Wednesday, September 09, 2015 - 01:15 PM UTC
Hi again,
I got this model last weekend as a review sample (
for those who read German ) and as I was doing some test fit I got started with this project...
The most critical fit is the fuselage halfs to the u/c centerpiece. Here a s a bit of old school modelling required: test fit--> sand--> testfit--> grind--> sand.... Finally I applied a goood layer of Tamiya extra thin on one fuselage fixed strut half and the center piece. Then I let it soften the plastic and added more glue on top of it. I then pressed the parts together and clamped it with crocodile clamps.
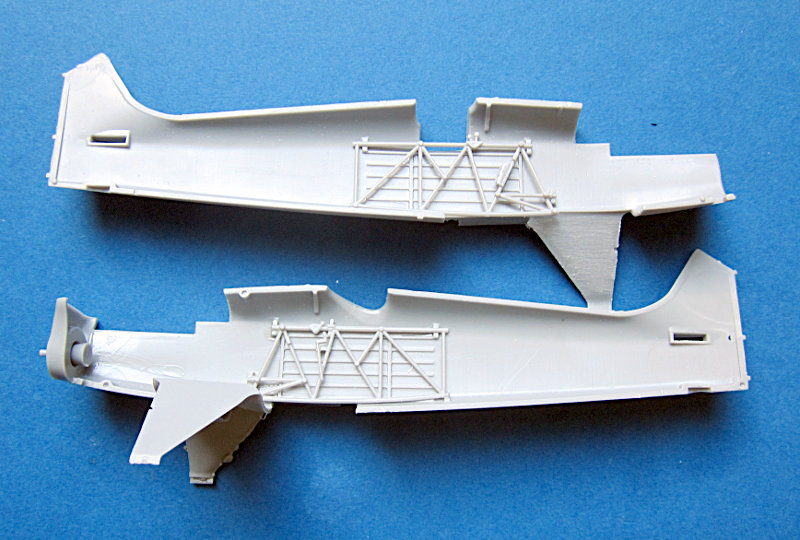
This has to dry over night (or a bit more) before the pressed out plastic can be cleaned and the wheel strut sanded.
I forgot to mention that I like Rodens approach with this wheel struts!
BTW I test fit the cockpit cage to the fuselage sides, but removed it to build up the whole structure as a single piece.
all the best
Steffen
DULCE ET DECORUM EST PRO HOBBY MORI
Germany
Joined: September 07, 2005
KitMaker: 5,609 posts
AeroScale: 5,231 posts
Posted: Wednesday, September 09, 2015 - 06:26 PM UTC
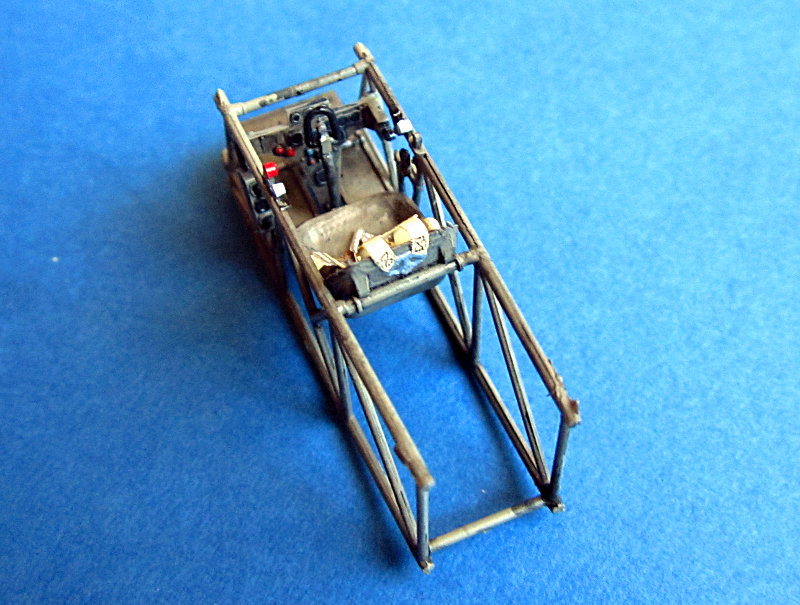
So here we have the basic interior.
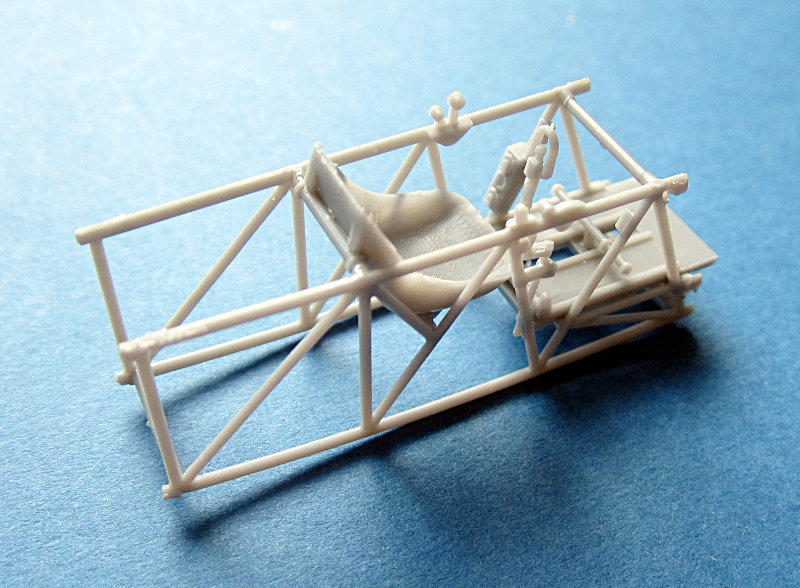
It is a bit tricky to get all the bars straight, but the floor stabilized things and when the Tamiya Extra thing has soften the plastic you have a few minutes to correct the sit of the rods without debonding them. The seat was grinded at the edges to make it look more scale-like.
cheers
Steffen
DULCE ET DECORUM EST PRO HOBBY MORI
Joel_W
 Associate Editor
New York, United States
Joined: December 04, 2010
KitMaker: 11,666 posts
AeroScale: 7,410 posts
Posted: Wednesday, September 09, 2015 - 08:19 PM UTC
Steffen,
Nice start to a very interesting build. I had to laugh (and I really needed one after being in the hospital the last few days), about the old school techniques. So many of us today expect a kit to literally fall together with little to no effort.
Looking forward to following your build blog.
Joel
On my Workbench:
Monogram 1/24 scale 427 Shelby Cobra
Just Completed:
Beemax 1/24 scale BMW M3 E30 1992 Evolution II
Germany
Joined: September 07, 2005
KitMaker: 5,609 posts
AeroScale: 5,231 posts
Posted: Wednesday, September 09, 2015 - 08:32 PM UTC
Cheers Joel! Glad I could be of help!

I want make one thing clear: this is a good model kit and I like Rodens approach doing things! IMHO it is far superior to Classic Airframes kit except the decals. (had bad experiences with Roden and I do not trust these).
Testfitting and some TLC is good when I know beforehand. It really was fun as I like this kind of stuff. I do not like it whe I get a Tamiygawa kit where I expect everythig falls together and I notice in the last step that nothing fits...
take care!
Steffen
P.S. another hint for those who consider buying this kit: get yourself a Hypercut Saw (0,1mm -- Flexifile has them now too) and Hasegawa Trytool Scriber Saws. Else it would be difficult to get all the small parts from the sprues in one piece (Especially Sprue E)
DULCE ET DECORUM EST PRO HOBBY MORI
Germany
Joined: September 07, 2005
KitMaker: 5,609 posts
AeroScale: 5,231 posts
Posted: Thursday, September 10, 2015 - 09:40 AM UTC
The cockpit and fuselage interior was airbrushed RLM 02. Everything got washes with black(Tamiya) and grey(AoM) washes "mixed" on the model. Detail painting was done with several Tamiyal, Gunze and Citadel colours.
I used Eduards superfabric German Bomber seat belt. I am totally happy with the result! When Jan Z showed us this stuff on one of the previous Nuremberg Toy fairs they only thought it would be useful for smaller scales but I think this is more than sufficient for Quarterscale too.
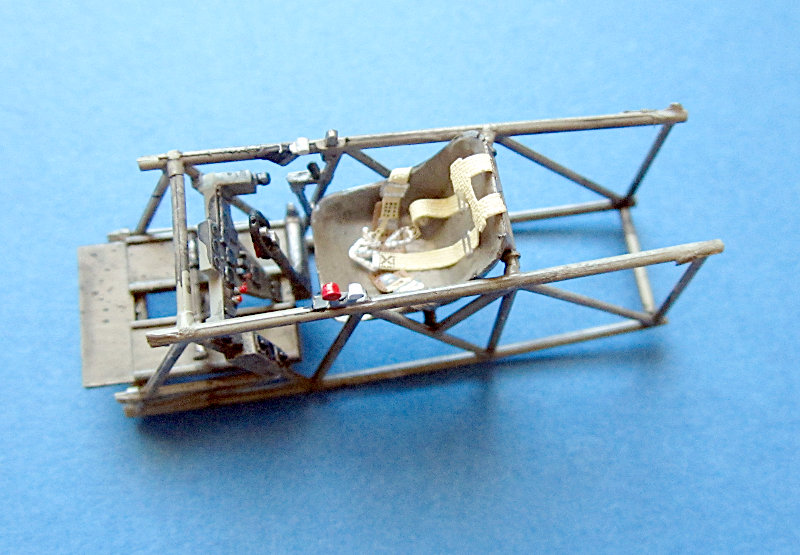
I am a big fan of this kind of stuff!
all the best
Steffen
DULCE ET DECORUM EST PRO HOBBY MORI
Joel_W
Associate Editor New York, United States
Joined: December 04, 2010
KitMaker: 11,666 posts
AeroScale: 7,410 posts
Posted: Thursday, September 10, 2015 - 06:58 PM UTC
steffen,
The tubular interior and cockpit looks fantastic. Just a great job of some realistic weathering. The Paint chipping is the final touch that pulls it all together.
Joel
On my Workbench:
Monogram 1/24 scale 427 Shelby Cobra
Just Completed:
Beemax 1/24 scale BMW M3 E30 1992 Evolution II
Germany
Joined: September 07, 2005
KitMaker: 5,609 posts
AeroScale: 5,231 posts
Posted: Thursday, September 10, 2015 - 07:36 PM UTC
Thanks mate,
at least someone is interested in this pre WW2 fighter aircraft.
As for paint chipping: nope, nothing done. I sprayed it RLM 02 and gave it a wash/filter with several tones, that's it.
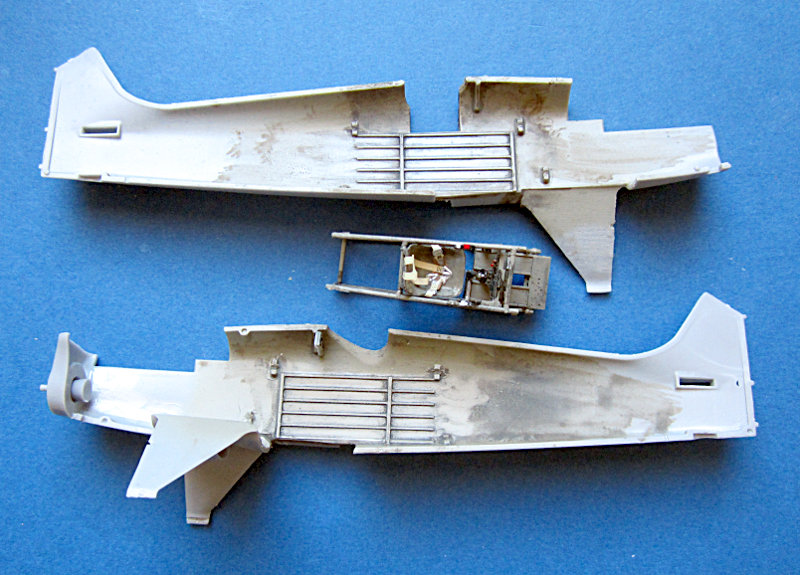
Now I closed up the fuselage. You may have noticed that I attached the front plate early. I felt this was the best way to assure a perfect fit. After the cockpit was glued in, only the rear fuselage up to the strut were glued with Tamiya extra thin (wheel strut - same procedure as opposite side).
The front plate was again aligned "perfectly" and fixed with CA glue. On the bottom stays a gap of about half a millimeter. Here I applied some Tamiya Extra thin which briged the gap with softened plastic. I closed it with Magic Sculp when everything was dry.
all the best
Steffen
DULCE ET DECORUM EST PRO HOBBY MORI
Nordrhein-Westfalen, Germany
Joined: March 22, 2015
KitMaker: 671 posts
AeroScale: 614 posts
Posted: Thursday, September 10, 2015 - 08:32 PM UTC
Quoted Text
Thanks mate,
at least someone is interested in this pre WW2 fighter aircraft.
Steffen, don´t worry, the thread is still young!

Your build log is very interesting. I have a Heinkel 51 in scale of 1/72 in the stash. So I´ll be following and learn.
Keep on
Oliver

On the desk: Probably a Panzer III.
Merlin
Senior Editor 
#017
United Kingdom
Joined: June 11, 2003
KitMaker: 17,582 posts
AeroScale: 12,795 posts
Posted: Friday, September 11, 2015 - 01:06 AM UTC
Hi Steffen
Great start on the He 51!

Unfortunately, through no fault of Roden's, the kit is prohibitively expensive in the UK, so I've gone shopping in Europe to buy mine (approximately half the price).
All the best
Rowan
BEWARE OF THE FEW...
As I grow older, I regret to say that a detestable habit of thinking seems to be getting a hold of me. - H. Rider Haggard
Germany
Joined: September 07, 2005
KitMaker: 5,609 posts
AeroScale: 5,231 posts
Posted: Friday, September 11, 2015 - 11:28 AM UTC
Thank you Oliver and Rowan!
Oliver ... it was just a littly provocation as there are many views but few comments...
Rowan: it is about 33 here in Germany, not cheap but better than 38GBP. That's one of the problems when Ukraine chose the US $ instead of the Ruble.
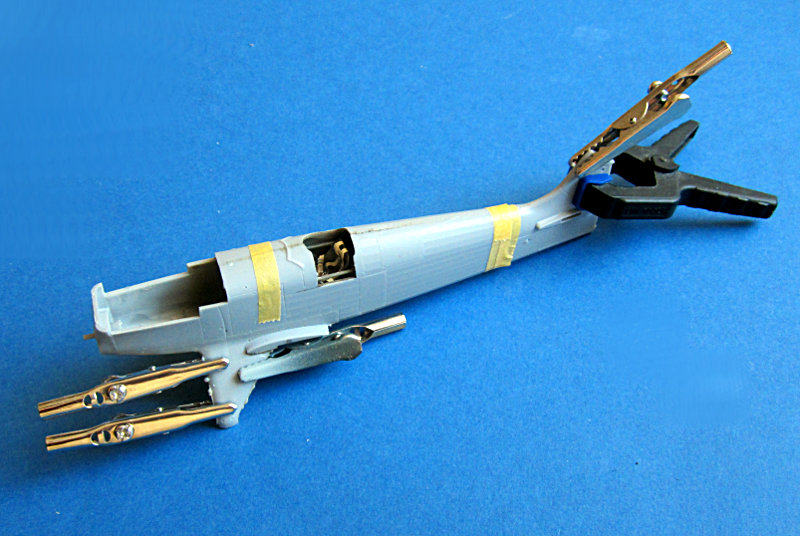
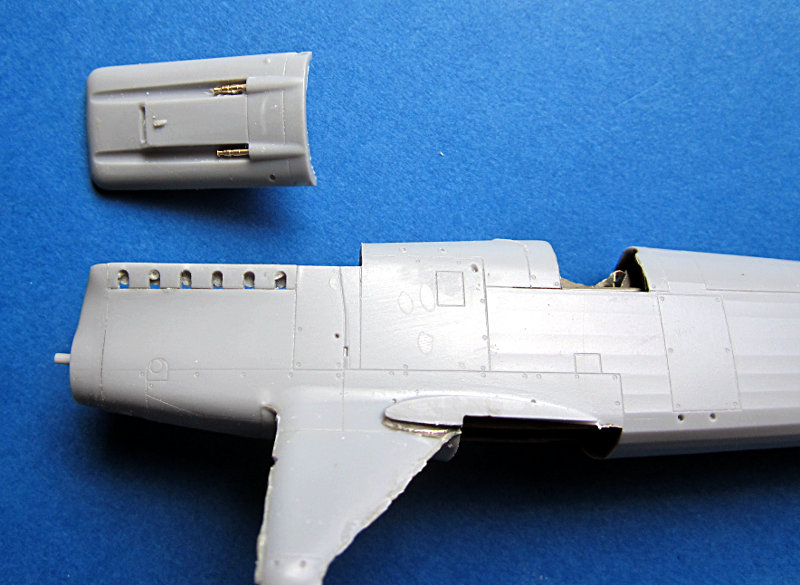
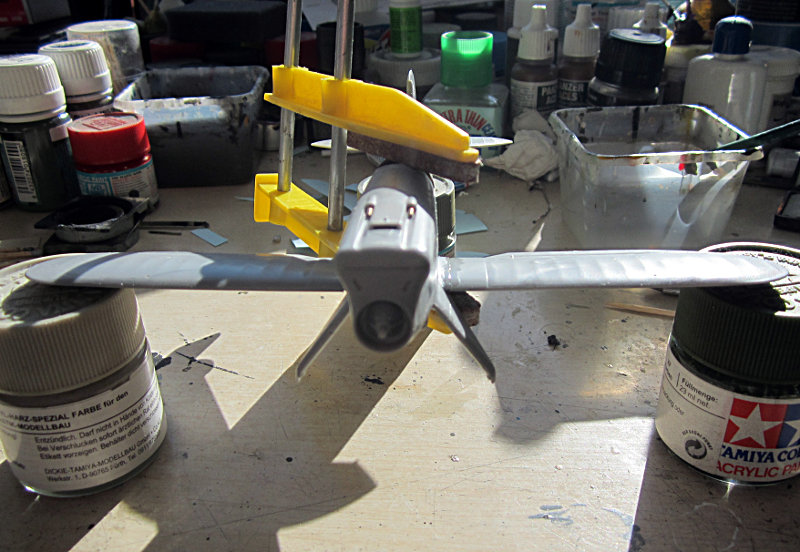
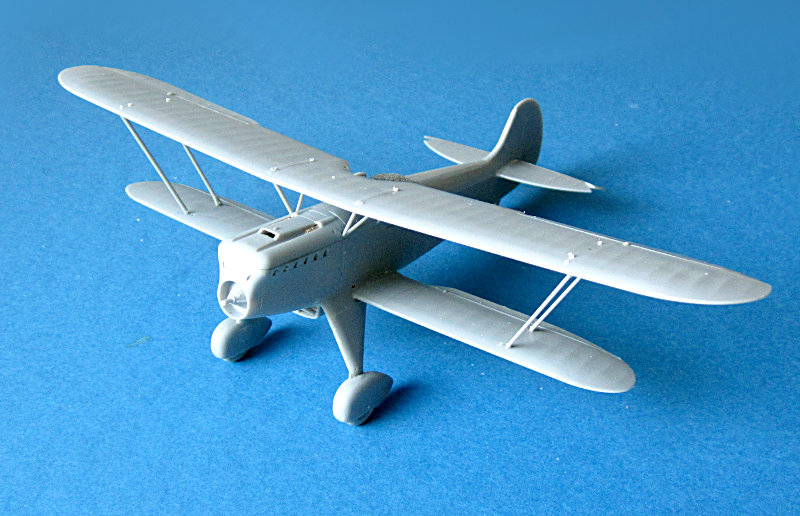
Sooo, back to my model next thing were the exhaust stacks. Roden wants you to trap the stacks between the fuselage and an insert. The latter has a few sinkholes and has to be adjusted to sit flush with the fuselage.
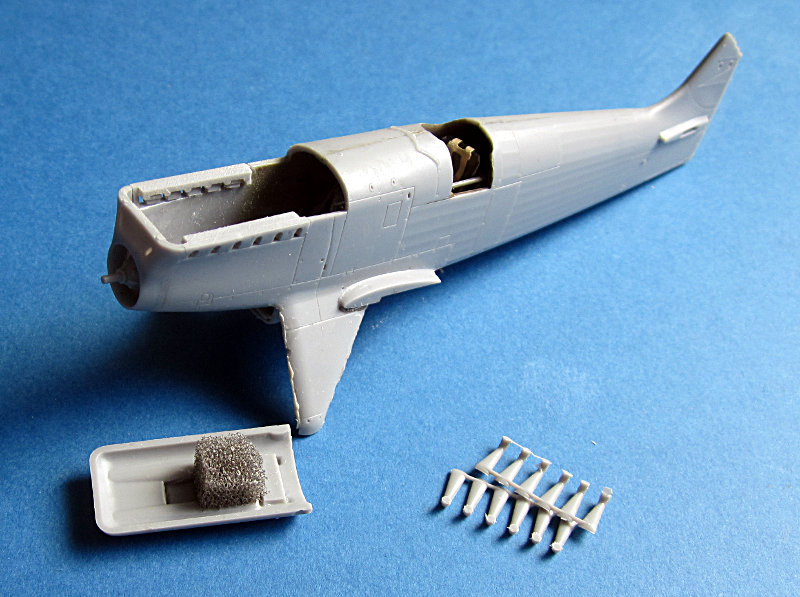
Besides painting this is why I chose to saw off the stacks from their "rack". I glued the two parts together and fittet it to the fuselage. After dry I sanded it to shape. The upper side was sanded flush with the fuselage to have a good fit for the engine cover.
Furthermore I added two MG 17 gun barrels from a Master set for the Bf 109E. The small intake was sanded with a very small file to reduce the wall thickness. I then glued some foam (the stuff you get with Eduard Brassin sets) behind it to avoid a see through effect as there is no bulkhead included. I also blanked off the hole on the chin.
All the best
Steffen
DULCE ET DECORUM EST PRO HOBBY MORI
Germany
Joined: September 07, 2005
KitMaker: 5,609 posts
AeroScale: 5,231 posts
Posted: Friday, September 11, 2015 - 09:07 PM UTC
Well, it is time to attach the lower wing. Again some more dryfitting and sanding to get the wing level and straight.
The clamp is mainly there to add some weight while the glue sets.
all the best
Steffen
DULCE ET DECORUM EST PRO HOBBY MORI
Merlin
Senior Editor #017
United Kingdom
Joined: June 11, 2003
KitMaker: 17,582 posts
AeroScale: 12,795 posts
Posted: Saturday, September 12, 2015 - 12:16 AM UTC
Hi again Steffen
Nice progress.
I'm looking forward to seeing the kit "in the flesh", so to speak. I bought mine at
Modelimex for only 25.25 Euros, so it worked at at a phenomenal £20 saving over the UK list price.
All the best
Rowan
BEWARE OF THE FEW...
As I grow older, I regret to say that a detestable habit of thinking seems to be getting a hold of me. - H. Rider Haggard
Germany
Joined: September 07, 2005
KitMaker: 5,609 posts
AeroScale: 5,231 posts
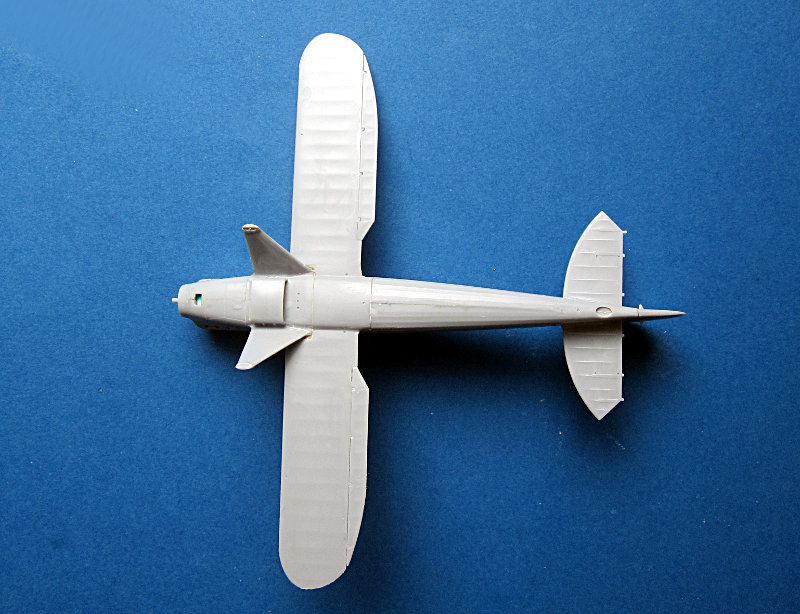
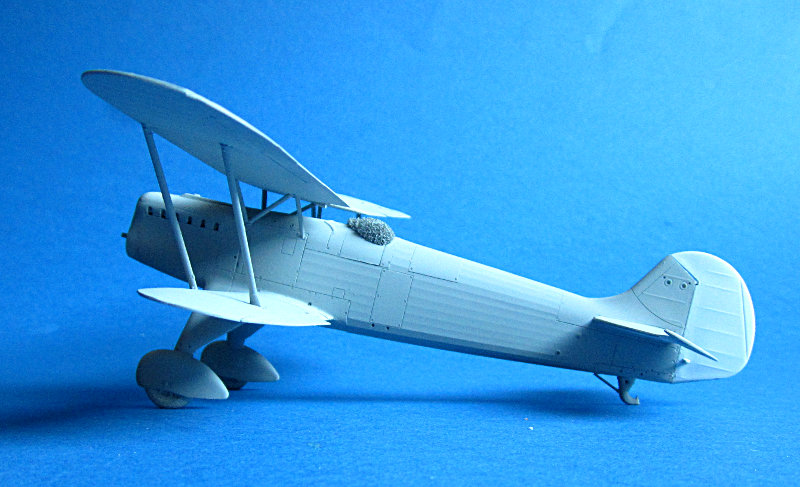
Posted: Saturday, September 12, 2015 - 11:53 AM UTC
Thanks Rowan!
Well here is the model after theglue has set. As you can see I also added the rudder and the elevator fins.
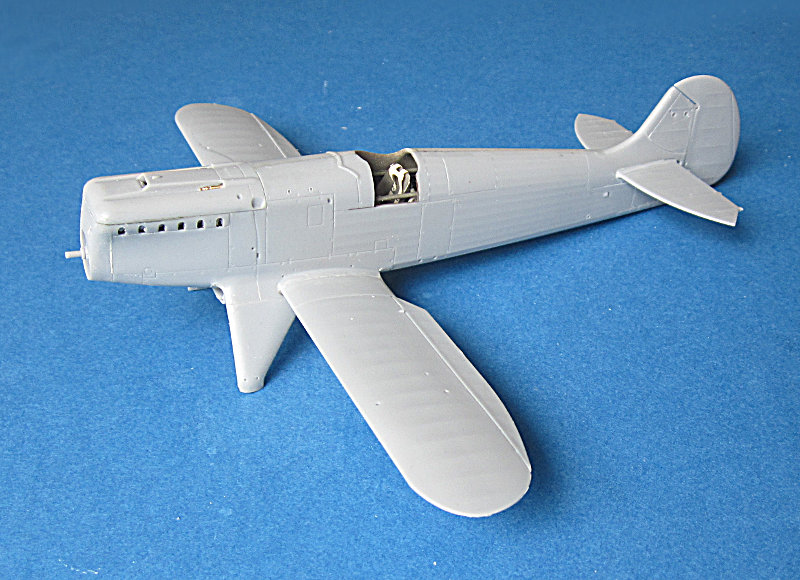
The gaps at the lower side were closed with Magic Sculp. A primer layer will show the imperfections once I got the basic airframe together.
all the best
Steffen
DULCE ET DECORUM EST PRO HOBBY MORI
AussieReg
Associate Editor #007
Victoria, Australia
Joined: June 09, 2009
KitMaker: 8,156 posts
AeroScale: 3,756 posts
Posted: Saturday, September 12, 2015 - 07:44 PM UTC
Looking good Steffen, I'll be following this build.
Cheers, D
ON the bench
Revell 1/24 '53 Corvette (building as '54)
Revell 1/24 BMW 507 Coupe and Cabrio
Italeri 1/48 Me262 B-1a/U1 Nightfighter
Monogram 1/24 '57 Chevy Nomad
Dragon 1/350 USS Frank Knox DD-742
Germany
Joined: September 07, 2005
KitMaker: 5,609 posts
AeroScale: 5,231 posts
Posted: Saturday, September 12, 2015 - 10:16 PM UTC
Thanks for watching Damian!
Well, my vacation coming to an end this build will loose some of it's drive. Yesterday I was completing the undercarriage. First I glued the wheel halfs together (earlier this week). Once dry they were cleaned up and I added a flat spot. Then I put them between the fairing halfs and glued the latter together (the wheels not glued and still able to rotate). I attached the tail skid and sanded the fairngs smooth.
A bit tricky was the intallation of the fairings to the u/c struts. The fit is faily good but you have a bit of play. So I let the glue cure a bit and then optimizing the sit of the fairings so these are parallel to each other, parallel to the roll axis and not kinked. When the glue hat fully cured (over night) I put a bit of glue on the wheel axis, sat both flat spots down and left it to dry.
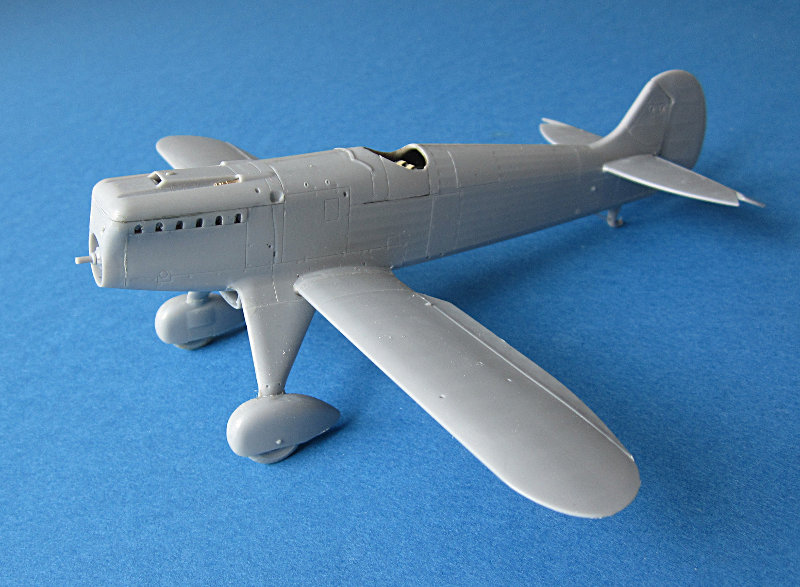
I also put in the door but this is just clipped in for painting. Next is choosing the right colours for Harro Harder's 2o64.... also I am not sure if I should use profiles or wire for rigging (I had a project that went very bad with the profiles ... who said Avia

)
all the best
Steffen
DULCE ET DECORUM EST PRO HOBBY MORI
Uusimaa, Finland
Joined: March 30, 2004
KitMaker: 2,845 posts
AeroScale: 1,564 posts
Posted: Sunday, September 13, 2015 - 02:55 AM UTC
Quoted Text
at least someone is interested in this pre WW2 fighter aircraft.
Count me in as well!

Looking really good!
Seems it's a kit that goes together rather well, at least judging from your brisk building pace.
I don't like exhausts that mount like that either, opting to handle them as parts you paint separately and glue in later.
I really like the looks of the biplanes of this era. The He 51 kind of reminds me of the
Curtiss R3C.
Looking forward to seeing your build progress.
Joel_W
Associate Editor New York, United States
Joined: December 04, 2010
KitMaker: 11,666 posts
AeroScale: 7,410 posts
Posted: Sunday, September 13, 2015 - 07:18 PM UTC
Steffen,
Excellent progress. Looking forward to following how you attach the top wing and struts, as I've just ordered my 1st bi-plane, the 1/32 Lukgraph Curtiss C7F-1Seahawk, and it's my biggest reservation about the build.
I too am a fan of the between the wars Golden Age of Aviation.
Joel
On my Workbench:
Monogram 1/24 scale 427 Shelby Cobra
Just Completed:
Beemax 1/24 scale BMW M3 E30 1992 Evolution II
Germany
Joined: September 07, 2005
KitMaker: 5,609 posts
AeroScale: 5,231 posts
Posted: Sunday, September 13, 2015 - 10:26 PM UTC
Eetu: Thanks for watching!
Have you read the thread? .. this is no shake and bake kit and requires quite a bit of work. I started it on monday last week so the progress is from a whole week, though I started posting on Thursday. I was not sure if I would proceed or just glue some pieces together and put it back in the box ... looks good now.
Joel: I do not expect the top wing to be a problem. The center struts are pretty short and straight up and (I think) will hold the weight. For the moment I am focussing on the Hurricane to have a chance to finish in time for the BoB75 campaign. The Heinkel will only get some time during the weekend. Still need to chose the colours for Harders plane.
all the best
Steffen
DULCE ET DECORUM EST PRO HOBBY MORI
Merlin
Senior Editor #017
United Kingdom
Joined: June 11, 2003
KitMaker: 17,582 posts
AeroScale: 12,795 posts
Posted: Wednesday, September 16, 2015 - 01:56 AM UTC
Hi Steffen
My kit arrived today. It looks a real gem! I see what you mean about using a fine razor saw to remove the detail parts from the sprues - some of them are wonderfully delicate and true-to-scale.
All the best
Rowan
BEWARE OF THE FEW...
As I grow older, I regret to say that a detestable habit of thinking seems to be getting a hold of me. - H. Rider Haggard
Germany
Joined: September 07, 2005
KitMaker: 5,609 posts
AeroScale: 5,231 posts
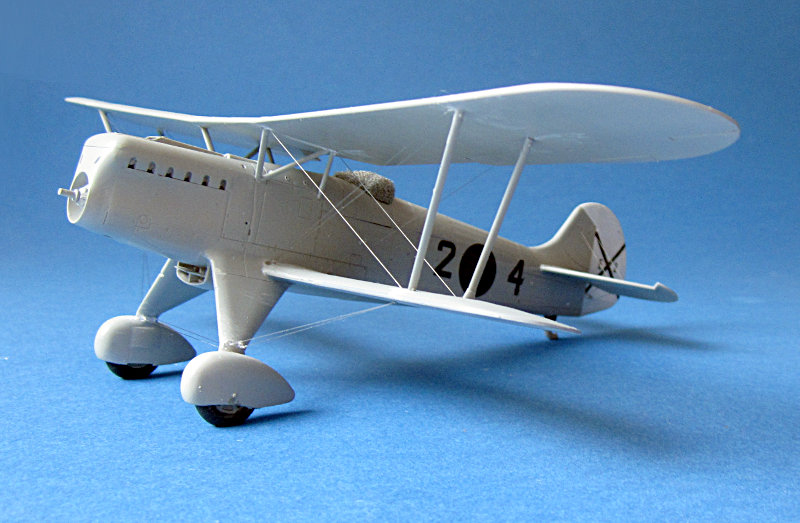
Posted: Thursday, September 17, 2015 - 10:03 PM UTC
Hi again,
well, I am still looking for the right colours for the camouflaged 2o64 so I decided I will go with another aircraft first (I still have 2 Classic Airframes kits). It will be 2o4 of Hannes Trautloft. he was forced down in this one, but returned the favor 5 times in other He 51.
Furthermore he is the person that developed modern fighter tactics after his deployment in Spain and thus together with Mölders who refined these the father of the Jagdwaffe successes in the following years.
This also makes things a bit easier as I can put the whole plane together first and then paint it. For thsi I first glued on the cabane struts yesterday. These were angled a little bit tighter than necessary to make the upper wing click into the fuselage. Today I drilled the rigging holes through the wing. I used the plans from this publication:

(click img)
Now I glued the wing to the fuselage and added the outer struts. This is as easy as it is written! It now sits in the shelf to dry.
For the RLM 63 I tend to use XF 80 wich is a warm light grey ... maybe I have to lighten it a bit...
all the best
Steffen
P.S: hope this works this time the last try was cropped...
DULCE ET DECORUM EST PRO HOBBY MORI
Germany
Joined: September 07, 2005
KitMaker: 5,609 posts
AeroScale: 5,231 posts
Posted: Saturday, September 19, 2015 - 12:09 PM UTC
Sooo now we have some paint on.
XF 80 looks pretty good to me even if it may not be the perfect match for L40/52 hellgrau: I like it!
Next will be a gloss coat. (but After I have masked and airbrushed my Hurricane.
all the best
Steffen
DULCE ET DECORUM EST PRO HOBBY MORI
Germany
Joined: September 07, 2005
KitMaker: 5,609 posts
AeroScale: 5,231 posts
Posted: Friday, October 23, 2015 - 04:50 PM UTC
Hi again,
well the lack of updates does not mean I was idle. First I searched a week or so for my photo etched rigging (which looks oval once painted) sadly I could not make it work with the wires that V-shaped (so two of these would end in one hole). So I had to rip it all off and start over with my standard method and "invisible thread".
Here is the actual state. For teh crossed wires between the outer struts I will be using UvdR normal rigging thread as I can strech this better. But it is no easy task.
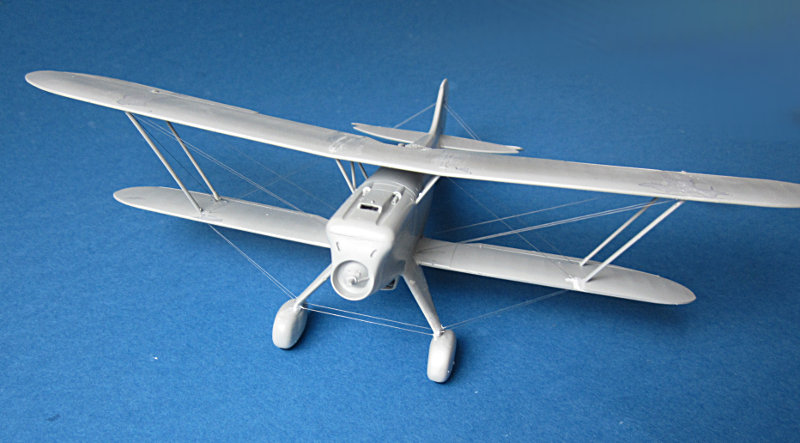
Not sure one can see all wires in these pix ... there are quite a few and everything done with the help of teh publication mentioned above ... no rigging plan in the instructions!
all the best
Steffen
DULCE ET DECORUM EST PRO HOBBY MORI
#522
New Jersey, United States
Joined: January 20, 2013
KitMaker: 1,460 posts
AeroScale: 1,443 posts
Posted: Saturday, October 24, 2015 - 12:14 AM UTC
WOW. What a clean build! And an attractive looking A/C too. I daresay you feel it makes the CA offering obsolete? Makes me want to make one . . . if I ever get my B-17 done.

Best,
Brian
On my Workbench: 1/48 B-17F Luscious Lady (with H.G. Barnes and Karl Hauffe - Research) and with Contributions from the late Arthur T. Babiarz, Jr.
Two Special Hobby AF-2 Guardians, one AF-2W, and one AS-2S
#424
Queensland, Australia
Joined: April 23, 2015
KitMaker: 4,648 posts
AeroScale: 1,938 posts
Posted: Saturday, October 24, 2015 - 01:02 AM UTC
Steffen,
Your rigging looks good. I wouldn't have caught the 2-lines-in-1-hole if you hadn't mentioned it. I have no idea how you could weather around it without ruining it.
Good Luck,
Gary
"Artillery adds dignity, to what would otherwise be an ugly brawl."
Frederick The Great
Germany
Joined: September 07, 2005
KitMaker: 5,609 posts
AeroScale: 5,231 posts
Posted: Saturday, October 24, 2015 - 12:20 PM UTC
Thank you Brian and Gary!
@Brian: it is a good kit but requires some TLC. The Classic Airframes kit is not as good as this new offering (I especially prefer the flatter sides od the fuselage cross section and the u/c construction) but I do not think it should be binned if you have already one.
@Gary: this is not finished yet. I will have to respray the wings and some areas of the fuselage. I will not apply my usual weathering though. Seen with the bare eye it looks o.k. already but this is a bit too little effect for the photos so I will do a pin wash with a medium grey in the few panel lines.
all the best
Steffen
DULCE ET DECORUM EST PRO HOBBY MORI


