

Hi all, following is a series of posts laid out as a mini build log. This is the model I entered into Feb's MOM and I mulled over whether to post some photos of it from construction to finish. At any rate here it is.
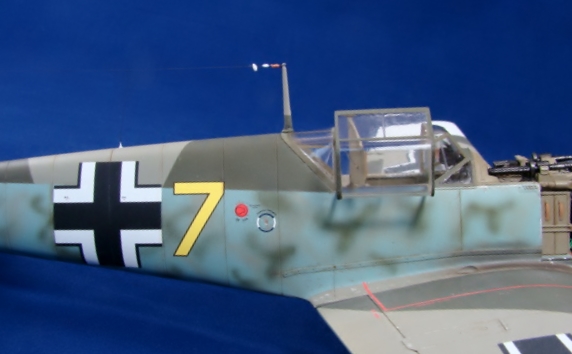
First a bit of history about the actual aircraft. Yellow 7 was flown by Uffz Heinz Grabow who was assigned to 3./JG3 in August 1940. On 05 September Grabow was shot done over Kent while escorting Do17 Z-2 bombers. His engine was hit and he managed to glide done to a belly landing near Wichling, Kent, going into captivity for the rest of the war. His aircraft survived the crash landing in good enough condition to be sent to Australia to be used as a recruiting aid. Very likely, the aircraft was finished in a high demarcation 70/71 splinter scheme with a heavy mottle of what is believed to have been 02 and 71 on the fuselage sides with the uppersurfaces of the wings and tail planes also appearing to have a similar finish. The rudder, the tips of the main wings and one half of the spinner were painted white, the latter was also painted black. The white Tatzelwurm emblem was applied to both sides of the cowling and was thinly outlined in black with a red tongue.
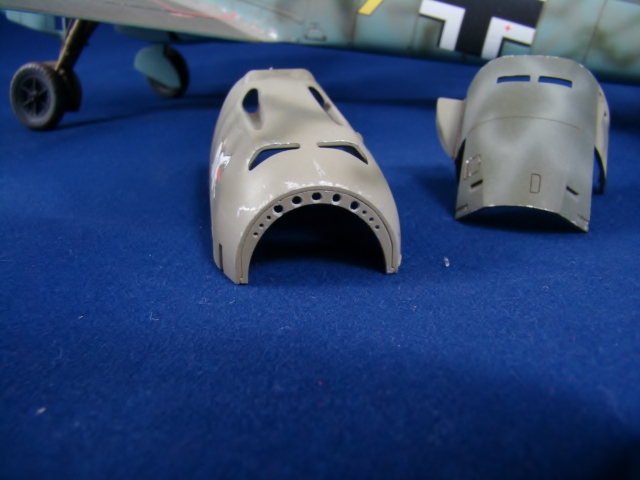
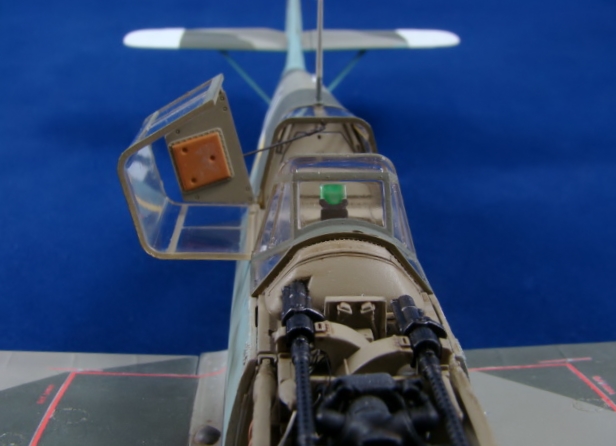
Very few AM products were used in the build, being limited to Radu's seatbelt and PE radiator screens along with Master barrels for the guns. I decided to build the model with the cowl and MG tray cover off and the lower access swung open as I wanted to super detail the engine and MG tray. I also added a few bits to the cockpit and antenna. Well, let's see how this turned out.
The first few photos are dedicated to the DB601A engine, which is pretty good out of the box, but does need some things added if you are going to display it. I did not achieve 100% accuracy in everything, but I think I got fairly close.
Base engine after painting
Not a good picture, but here is the radiator with the fittings that I scratched to put the coolant lines into.
I had to remake the weld lines on the exhausts with stretched sprue after sanding a couple of them off.
Front view of the engine after quite a bit of the plumbing has been installed.
Rear of the engine. Unfortunately most of the lines and pipes will not be easily seen when the engine is installed.
And finally a side view of the mostly completed engine. I still need to paint a few of the lines.
World War II
Discuss WWII and the era directly before and after the war from 1935-1949.
Discuss WWII and the era directly before and after the war from 1935-1949.
Hosted by Rowan Baylis
Bf109 E-3 Gelb 7

greif8

Joined: January 17, 2006
KitMaker: 673 posts
AeroScale: 492 posts

Posted: Wednesday, March 11, 2015 - 05:12 PM UTC
greif8
Joined: January 17, 2006
KitMaker: 673 posts
AeroScale: 492 posts
Posted: Wednesday, March 11, 2015 - 05:28 PM UTC
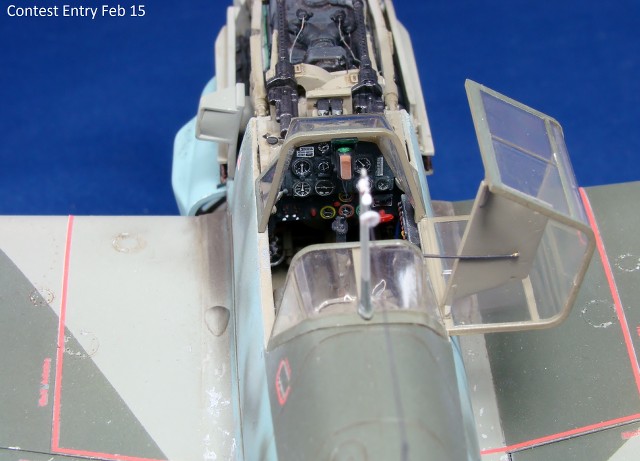
I'll show some photos of cockpit construction in this post. The pit is pretty good in this kit. As I found out, most of the stuff I added either can barely be seen or can't be seen at all; so falls into the "At least I know its there!" catagory.
Overview of the completed general contruction. The small thing with two wires coming out of both sides is the O2 distributer that I scratch built. It will get a couple more line once glued in place.
A close up of the distributer and the O2 bottle with added lines.
The completed IP. I used MDC decals for the instruments, every thing else is hand painted.
Cockpit sides after a brown wash.
Cockpit center directly after a wash. Radu's seatbelt looks pretty good to my eyes.
And finally, another view.
greif8
Joined: January 17, 2006
KitMaker: 673 posts
AeroScale: 492 posts
Posted: Wednesday, March 11, 2015 - 05:39 PM UTC
This post will be the second to last with photos of the construction phase.
A couple of shots showing some of the kit's PE hinges. These were a bit fiddly to install but look good once in place.
I sprayed a few specific areas with Alclad II aluminum as I planned to use hairspray chipping in a few areas of the kit.
I opted to spray a gloss coat, decal and flat coat the kit at this point to protect the finish while I worked on the MG tray and prepped the firewall to recieve the engine's various pipes and lines.
Still a long way to go at this point.
greif8
Joined: January 17, 2006
KitMaker: 673 posts
AeroScale: 492 posts
Posted: Wednesday, March 11, 2015 - 05:50 PM UTC
The final post showing contruction is dedicated to the few photos of the MG tray, synchronizing gear and firewall.
Here you can see the firewall with various sized/located holes in it. None of the lines/cables are painted at this point. Getting everything lined up while installing the engine turned out to be challenging and I am afraid the air was a bit blue at times.
A very simple scratch build added the electronic control boxes and some of the wiring to the MG tray.
Though hard to see, I scratch built the sychronizing gear at the top rear of the engine. You can see the wiring leading from the two gears towards the rear.
A better, but still not good shot of the installed engine with the sychronizing gear at the top rear. One can also see some of the various wiring on and around the MG tray.
This final shot shows the bits and bobs the best. I still have to finish running and painting a few wires and lines.
Joel_W

Joined: December 04, 2010
KitMaker: 11,666 posts
AeroScale: 7,410 posts
Posted: Wednesday, March 11, 2015 - 09:05 PM UTC
Ernest,
outstanding attention to those details. Your engine and engine compartment really looks the part.
Joel
outstanding attention to those details. Your engine and engine compartment really looks the part.
Joel


matrixone
Joined: February 07, 2004
KitMaker: 869 posts
AeroScale: 862 posts

Posted: Wednesday, March 11, 2015 - 10:54 PM UTC
Amazing work Ernest!
Thanks for posting.
Matrixone
Thanks for posting.
Matrixone
Holdfast

#056

Joined: September 30, 2002
KitMaker: 8,581 posts
AeroScale: 4,913 posts

Posted: Thursday, March 12, 2015 - 11:54 AM UTC
Now that does look good 


Redhand

#522
Joined: January 20, 2013
KitMaker: 1,460 posts
AeroScale: 1,443 posts
Posted: Thursday, March 12, 2015 - 04:27 PM UTC
Very impressive. Really beautiful work!


magnusf

Joined: May 02, 2006
KitMaker: 1,953 posts
AeroScale: 1,902 posts
Posted: Thursday, March 12, 2015 - 05:33 PM UTC
It's a beautiful build, I like the early war look on the 109! I might have missed it but what scale and what kit is it?

Magnus
Magnus
greif8
Joined: January 17, 2006
KitMaker: 673 posts
AeroScale: 492 posts
Posted: Thursday, March 12, 2015 - 08:07 PM UTC
Thank you for the kind words guys! Magnus, the kit is Cyberhobby's BF109 E-3 and the scale is 1/32.
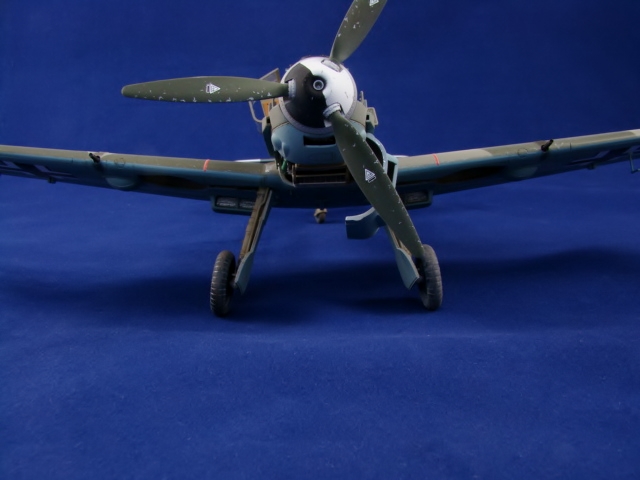
The next few posts will cover the finished kit. First up a few overall shots.
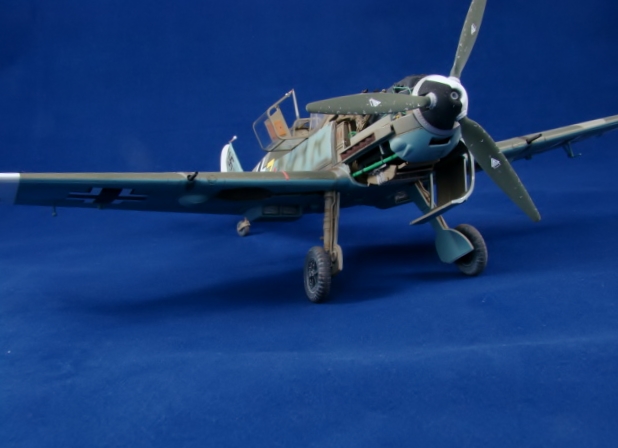
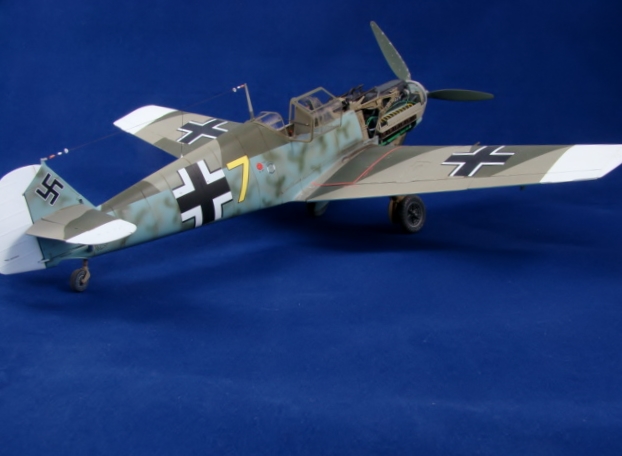
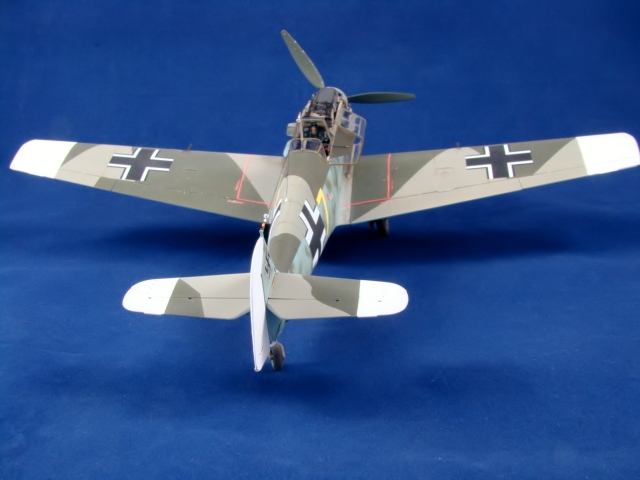
The next few posts will cover the finished kit. First up a few overall shots.
greif8
Joined: January 17, 2006
KitMaker: 673 posts
AeroScale: 492 posts
Posted: Thursday, March 12, 2015 - 08:10 PM UTC
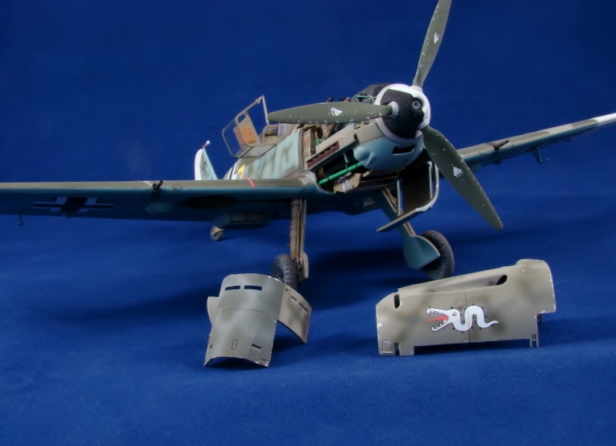
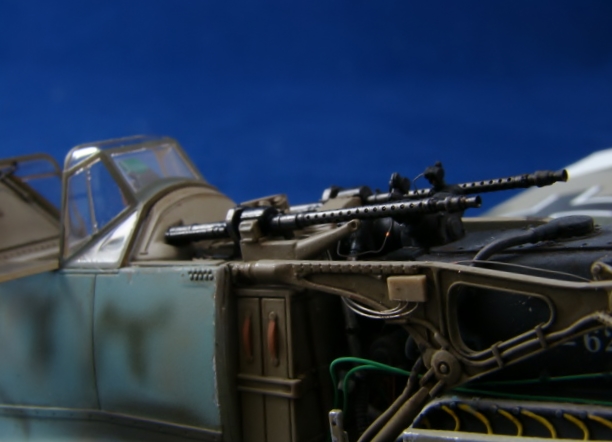
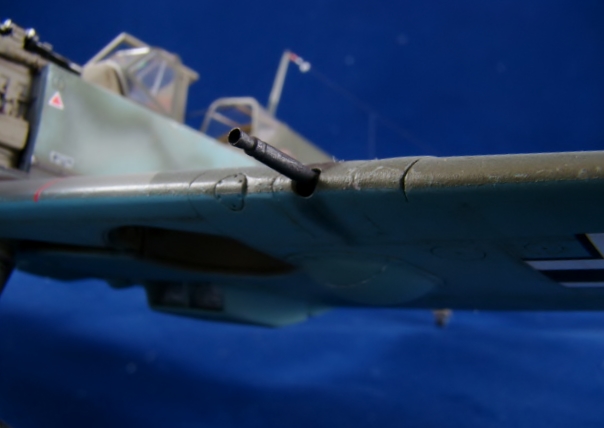
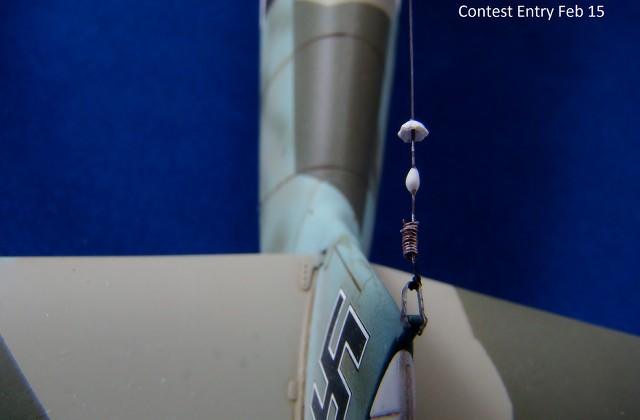
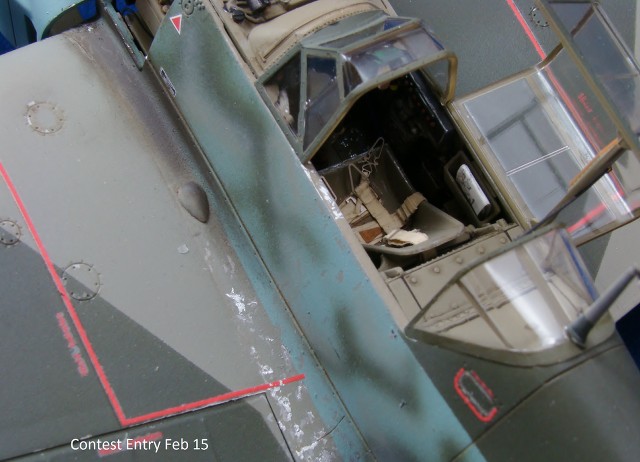
Some closer photos of the aircraft.

greif8
Joined: January 17, 2006
KitMaker: 673 posts
AeroScale: 492 posts
Posted: Thursday, March 12, 2015 - 08:14 PM UTC
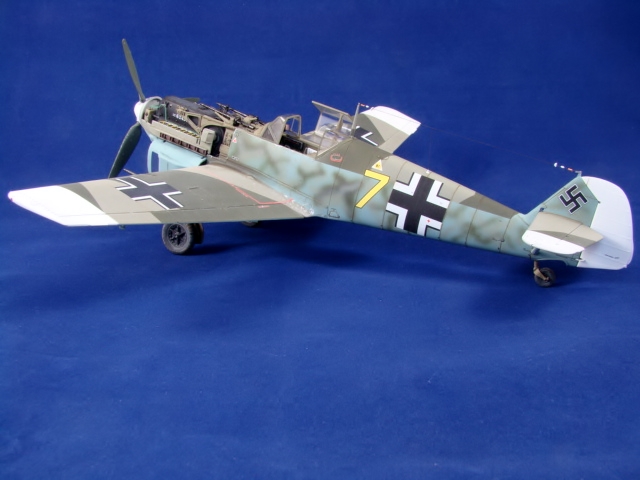
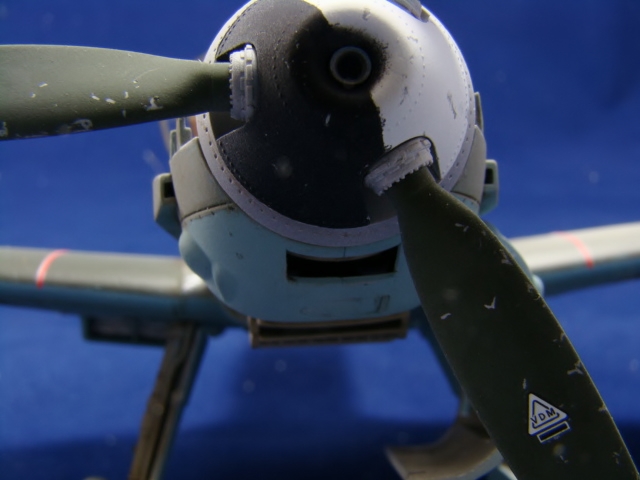
And finally some close ups. This was the first time I used my new photo tent and it certainly made a difference in the quality of the photos. I still have to figure out how to make the darn blue base lie flat though.


stooge

Joined: June 20, 2013
KitMaker: 210 posts
AeroScale: 210 posts
Posted: Friday, March 13, 2015 - 03:51 AM UTC
Mind boggling work there, just awesome.
With white rudder and bits Uffz Heinz Grabow must have been a formation leader at some level. Staffel or Gruppe?
With white rudder and bits Uffz Heinz Grabow must have been a formation leader at some level. Staffel or Gruppe?

Scrodes

Joined: July 22, 2012
KitMaker: 771 posts
AeroScale: 763 posts
Posted: Friday, March 13, 2015 - 07:21 AM UTC
Stunning looking build. Good on ya! Shame you didn't win MoM
Joel_W
Joined: December 04, 2010
KitMaker: 11,666 posts
AeroScale: 7,410 posts
Posted: Friday, March 13, 2015 - 06:25 PM UTC
Just an outstanding build. Your paint work and decaling is simple dead on perfect. You've taken full advantage of 1/32 scale with all the detailing to take the kit to the next level.
Joel
Joel
 |

WEB HOSTING BY


Copyright ©2021 AeroScale and Kitmaker Network, a subsidiary of Silver Star Enterprises
All Rights Reserved. Please read our Conditions of Use and Privacy Policy.
All Rights Reserved. Please read our Conditions of Use and Privacy Policy.