_GOTOBOTTOM
World War II
Discuss WWII and the era directly before and after the war from 1935-1949.
Hosted by Rowan Baylis
Trumpeter Ju 87R 1/32 finished
cnq007
_VISITCOMMUNITY
Ontario, Canada
Joined: June 07, 2014
KitMaker: 102 posts
AeroScale: 102 posts
Posted: Sunday, July 27, 2014 - 04:30 AM UTC
I finished this model few weeks ago. Just want to show you guys some pictures.


Jessie_C
_VISITCOMMUNITY
British Columbia, Canada
Joined: September 03, 2009
KitMaker: 6,965 posts
AeroScale: 6,247 posts
Posted: Sunday, July 27, 2014 - 04:56 AM UTC
That's nice. I'd like to offer three little bits of constructive criticism though, in the spirit of improving your next build.

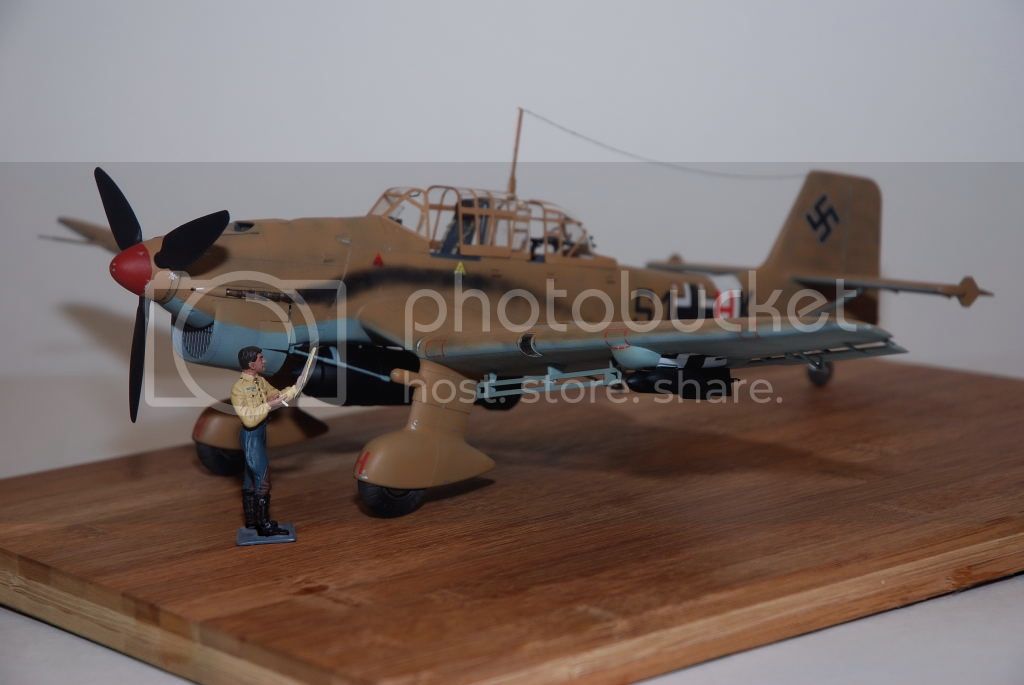
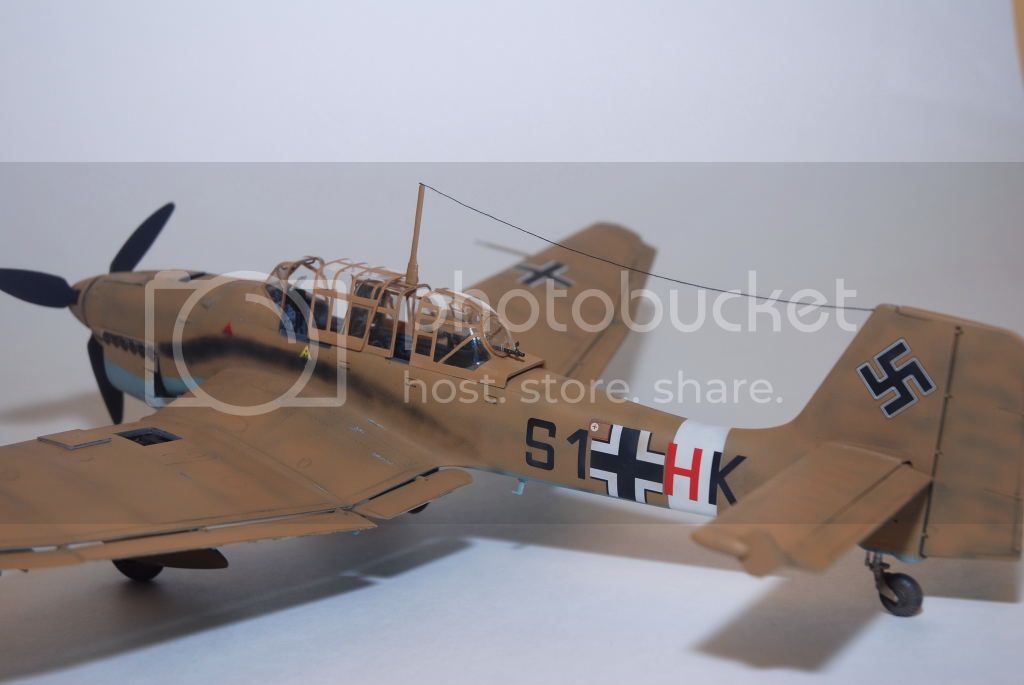
1) The exhaust stain looks a trifle harsh. Perhaps mix a bit of brown and grey into the black and allow them to fade slightly more at the edges. You can probably solve that on this model by a thin grey-brown overspray overtop the black.

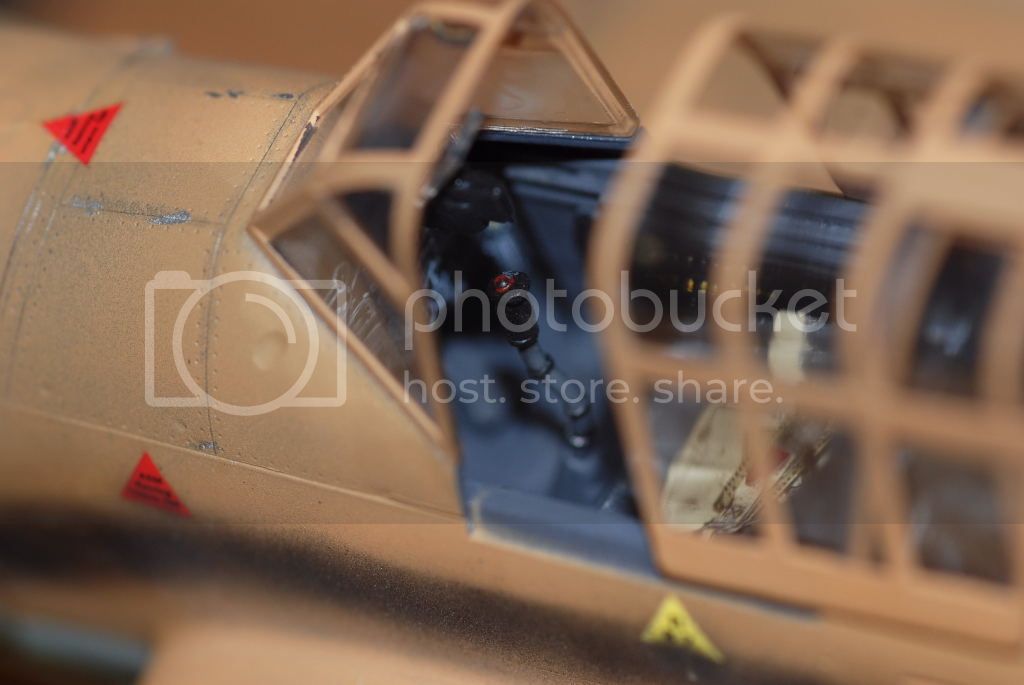
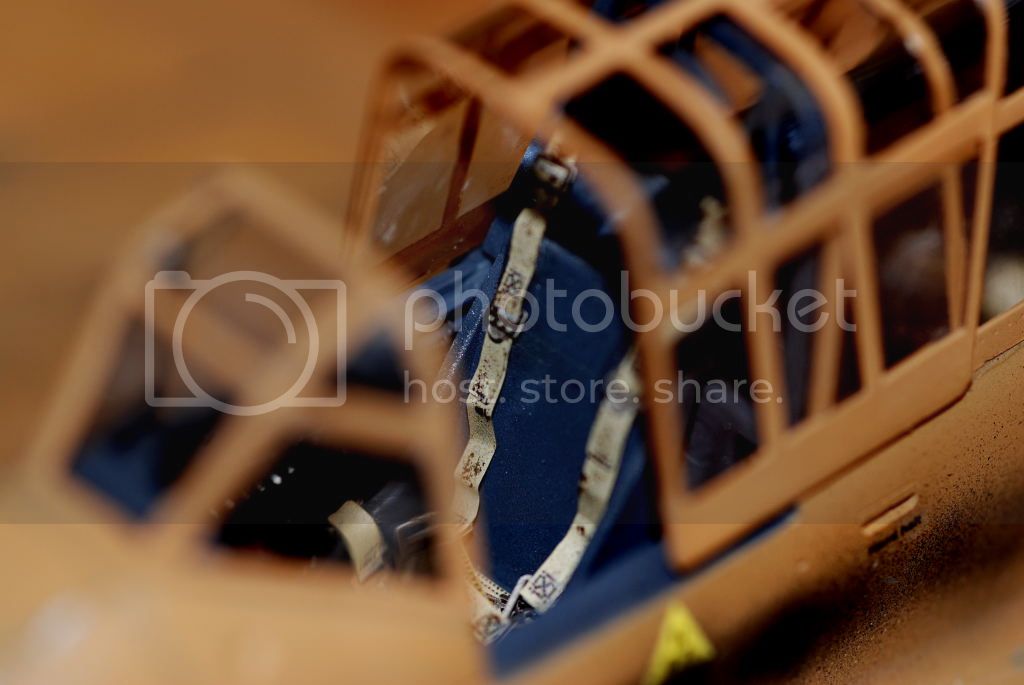
2) The exterior is looking nicely weathered, but the interior is almost factory fresh. Try a bit of beating up inside. Worn areas of metal showing through on the high spots and edges, and washes of slightly mucky colour in the crevices and recesses make the cockpit look lived in

3) The canopy framing is nicely crisp, but the exterior colour can be seen through the inside of the glass where one would expect to see the inside colour instead. This is especially important in 1/32. The way to solve it is to paint the interior colour first, let it dry, and then apply the exterior colour before taking off the masking. It gives the canopy some depth. Extend your wear and chipping onto the canopy frames to blend them into the rest of the model. Don't forget to paint the edges of the canopy and well as the sides.

Now all that sounds like I'm ripping the model to shreds, so on to the things I like:

The weathering is just right. Not overdone and not too light. It very nicely portrays a well-used aircraft in its prime.

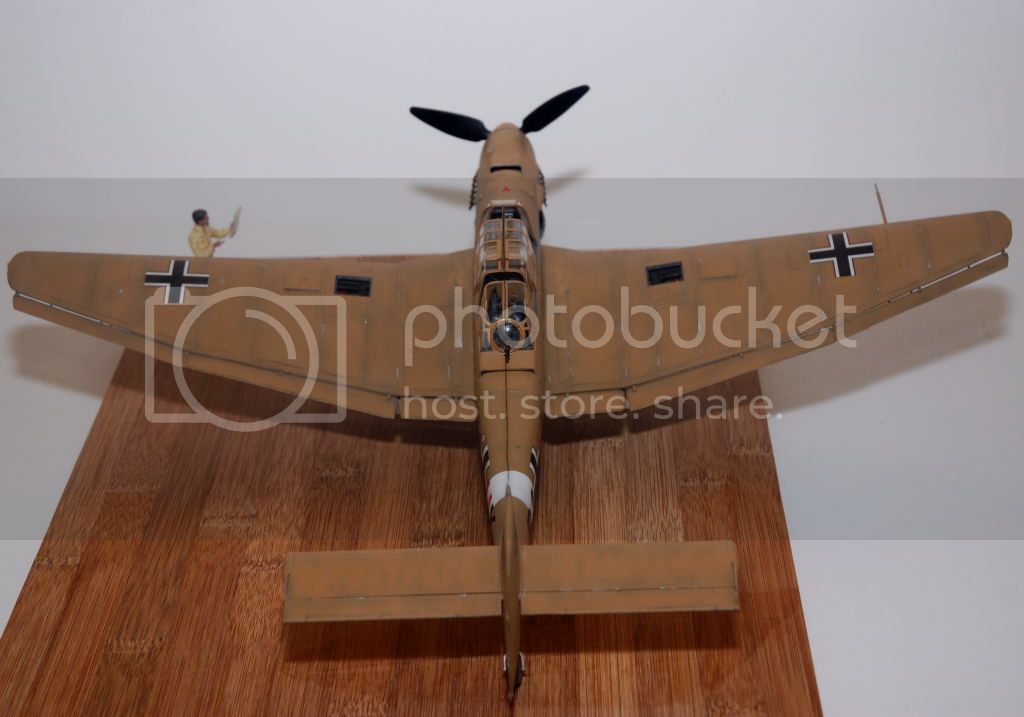
The paintwork is very even and completely lacking any runs, sags, heavy application and other common traps. And just as importantly, the decals don't have any silvering. They look properly painted on.

I can't see one gap that shouldn't be there. You've got your basic building and painting skills down solidly where they ought to be.

All that said, I very much look forward to seeing your next model. I'm sure it will be worth looking at
cnq007
_VISITCOMMUNITY
Ontario, Canada
Joined: June 07, 2014
KitMaker: 102 posts
AeroScale: 102 posts
Posted: Sunday, July 27, 2014 - 07:49 AM UTC
Jessica, thanks for the feed backs. I'm still learning new things everyday. I'll follow your advise to make improvement on my next model

I copied the exhaust stain on the Stuka based on these attached pictures.


JPTRR
Staff MemberManaging Editor
RAILROAD MODELING
#051
_VISITCOMMUNITY
Tennessee, United States
Joined: December 21, 2002
KitMaker: 7,772 posts
AeroScale: 3,175 posts
Posted: Sunday, July 27, 2014 - 08:54 AM UTC
Nguyen,

I think Jessica summed up your model's high quality appearance, and she offered some great tips for your next model.

Your exhaust stains are good with me. Those Jumos engines spewed out a horrendous amount of soot.

Jessie_C
_VISITCOMMUNITY
British Columbia, Canada
Joined: September 03, 2009
KitMaker: 6,965 posts
AeroScale: 6,247 posts
Posted: Sunday, July 27, 2014 - 03:29 PM UTC
Yes, Jumos were horribly sooty beasts, but the thing is they built up their soot in layers every time the engine ran, not all at once in a neat trail. You need to make the exhaust stain a bit more spread out and layered. Make it ragged and deep; less like a sprayed line of one colour of paint. It takes a lot of pracsise to do well
MrMtnMauler
_VISITCOMMUNITY
Washington, United States
Joined: January 15, 2011
KitMaker: 224 posts
AeroScale: 223 posts
Posted: Monday, July 28, 2014 - 12:44 PM UTC
Nice looking Stuka my friend! I've followed the chat and may I suggest you try out Tamiya's X-19 Smoke for exhaust staining. I think it's the best thing since sliced bread. I hope that is helpful. Take care and keep up the good work.
Jim
Gremlin56
Joined: October 30, 2005
KitMaker: 3,897 posts
AeroScale: 564 posts
Posted: Tuesday, July 29, 2014 - 05:22 AM UTC
An excellent build Nguyen,
If we are going exhaust stain try Vallejo "Smoke", a lovely dirty brown color.
cheers mate,

Emeritus
_VISITCOMMUNITY
Uusimaa, Finland
Joined: March 30, 2004
KitMaker: 2,845 posts
AeroScale: 1,564 posts
Posted: Tuesday, July 29, 2014 - 08:41 AM UTC
Very nice looking build indeed!
All suggestions for future builds I had in mind have already been mentioned so I don't have anything to add.

Btw, how's Vallejo's "smoke"? Is it a regular transparent paint or one of their washes?

For exhaust and gun stains, I've been using the following Citadel washes with great results: nuln oil, agrax earthshade, seraphim sepia (i.e. black, brown, sepia).
While they can airbrushed straigth from the bottle, I feel they benefit from a little bit of further thinning. And they work great as regular brush-painted washes as well.

Vallejo has washes in their paint range as well, but I don't have experience of those.
cnq007
_VISITCOMMUNITY
Ontario, Canada
Joined: June 07, 2014
KitMaker: 102 posts
AeroScale: 102 posts
Posted: Tuesday, July 29, 2014 - 02:09 PM UTC
Thank you guys for the feed backs. Since I've already had the Tamiya smoke bottle, I'm going to give it a shot
Gremlin56
Joined: October 30, 2005
KitMaker: 3,897 posts
AeroScale: 564 posts
Posted: Tuesday, July 29, 2014 - 03:56 PM UTC

Quoted Text

Very nice looking build indeed!
All suggestions for future builds I had in mind have already been mentioned so I don't have anything to add.

Btw, how's Vallejo's "smoke"? Is it a regular transparent paint or one of their washes?

For exhaust and gun stains, I've been using the following Citadel washes with great results: nuln oil, agrax earthshade, seraphim sepia (i.e. black, brown, sepia).
While they can airbrushed straigth from the bottle, I feel they benefit from a little bit of further thinning. And they work great as regular brush-painted washes as well.

Vallejo has washes in their paint range as well, but I don't have experience of those.


The Vallejo Smoke is a normal acrylic paint Eetu. I thin it down and airbrush it on. Then black pigments brushed over it to add a soot effect.
The "old" Citadel paints were very good and their inks were great for washes etc. I have a couple of their new "dry" paints arriving today ordered after Marcus Nichols mentioned them in the "How to build" book on the Airfix Typhoon.

 _GOTOTOP