_GOTOBOTTOM
World War II: Japan
Aircraft of Japan in WWII.
Hosted by Rowan Baylis
1/72 Fine Molds Ki-100-1a
magnusf
_VISITCOMMUNITY
Stockholm, Sweden
Joined: May 02, 2006
KitMaker: 1,953 posts
AeroScale: 1,902 posts
Posted: Thursday, April 10, 2014 - 08:15 PM UTC
A Japanese aircraft campaign is probably exactly what was needed for me to finally start this kit! I have realised that this was a much sought-after kit for Japanese aircraft enthusiasts (nowadays there are alternatives), I got it as a gift from a friend many years ago and since then it has just sat there in the stash...


Fine Molds box art from the early nineties, a bit like Hasegawa but in subdued colours. I like it, fells classy !


When looking into the box it is readily apparent how close the cooperation was between Hasegawa and Fine Molds: This is really the Hasegawa Ki-61 (note the extra fuselage) with an added sprue from Fine Molds for the Ki-100 specific parts.


As a final addition to the package, there are a few nicely done white metal parts.

I'll leave for Easter now but there will be more to come later on in April!


Magnus
Joel_W
Staff MemberAssociate Editor
AUTOMODELER
_VISITCOMMUNITY
New York, United States
Joined: December 04, 2010
KitMaker: 11,666 posts
AeroScale: 7,410 posts
Posted: Friday, April 11, 2014 - 04:50 AM UTC
Magnus,
Looks like a interesting build. Naturally, I'll be following alone. Does the kit have recessed or raised panel lines?
Joel
magnusf
_VISITCOMMUNITY
Stockholm, Sweden
Joined: May 02, 2006
KitMaker: 1,953 posts
AeroScale: 1,902 posts
Posted: Friday, April 11, 2014 - 06:31 AM UTC
Recessed panel lines, both on the new and the old parts!


Magnus
Mcleod
_VISITCOMMUNITY
Alberta, Canada
Joined: April 07, 2010
KitMaker: 1,028 posts
AeroScale: 939 posts
Posted: Friday, April 11, 2014 - 07:22 AM UTC
I always enjoy your build threads, Magnus.

Sad to see the model has a closed canopy while the white metal seat looks so nice and interior detail seems sufficient, at least from far away. It appears the seated pilot has a commonly seen 'hole' right in the middle of the torso. All in all though, it does look like a fine kit of a really cool looking subject.
This should prove to be a watcher.
JPTRR
Staff MemberManaging Editor
RAILROAD MODELING
#051
_VISITCOMMUNITY
Tennessee, United States
Joined: December 21, 2002
KitMaker: 7,772 posts
AeroScale: 3,175 posts
Posted: Friday, April 11, 2014 - 09:56 AM UTC
Magnus,

I look forward to your Ki-100. I hear it is a gem of a kit.
magnusf
_VISITCOMMUNITY
Stockholm, Sweden
Joined: May 02, 2006
KitMaker: 1,953 posts
AeroScale: 1,902 posts
Posted: Friday, April 11, 2014 - 06:14 PM UTC
Ben! Thanks! I'll do my best to keep you entertained . Regarding the canopy, I assume it is available from Falcon in one of their sets. I might even have it!

Frederick! Quality is Hasegawa from the eighties (=good) but the Fine Molds parts are actually a little rougher even if that Ki-61 has been around for ages before that!

When it comes to Japanese aircraft I am pretty much in the dark when it comes to colours: any suggestions from the Hasegawa or Gunze ranges? There is a Gunze recipe included in the instructions but that's a real witch's brew of colours, I have never seen a recipe containing so many colours before. It even ends with two drips of toad spit !


Magnus
magnusf
_VISITCOMMUNITY
Stockholm, Sweden
Joined: May 02, 2006
KitMaker: 1,953 posts
AeroScale: 1,902 posts
Posted: Tuesday, April 15, 2014 - 06:42 PM UTC
After a few days in London with my family (lovely spring weather, visiting Harry Potter and Hamley's, generally just walking about and having a good time, only case of giving in to dad's interests were having a good look at HMS Belfast from the shore , big girl (9) said that next time in London she will go on board with dad to make him extra happy ) I'm back at the workbench!


Interior parts glued. This is what there is in the kit, some photo etch would come in handy if doing it with an open canopy. When on the subject, I might have picked up some after market for this one years ago. I'll have to go digging!


A few simple modifications that I think will enhance the final result: cutting away the pylon behind the seat and substituting it with a piece of plasticard and also installing exhaust pipes. There are none in the kit, the area where they should be is just moulded flat. I use a sharp scalpel blade and just scrape my way inwards until I get a thin edge for the cooling flaps. I'll use brass tubing for the pipes, I had none of correct dimensions but I have ordered some more that will be in the mailbox in a few days.


This is what it should look like. Photo taken at Hendon in 2006, this is a later-version bubble-top Ki-100 but I'll make do with that. You can't be too picky when it comes to taking photos of preserved Japanese aircraft!


The rivet wheel at work! This is one of those things I never should have started doing...


Rivets in full scale...


Magnus
magnusf
_VISITCOMMUNITY
Stockholm, Sweden
Joined: May 02, 2006
KitMaker: 1,953 posts
AeroScale: 1,902 posts
Posted: Friday, April 25, 2014 - 08:18 AM UTC
Some progress... Riveting finished and now on with the usual modelling!


Look what I found!


And some further findings from the stash. I have no idea when I bought this but it probably was intended for this kit!


Some of the PE installed. Not too impressive but at least better than blank plastic... And now you got a bit of "part on sticks" as well, eagerly awaited of course ?


Magnus
AussieReg
Staff MemberAssociate Editor
AUTOMODELER
#007
_VISITCOMMUNITY
Victoria, Australia
Joined: June 09, 2009
KitMaker: 8,156 posts
AeroScale: 3,756 posts
Posted: Friday, April 25, 2014 - 02:20 PM UTC

Quoted Text

And now you got a bit of "part on sticks" as well, eagerly awaited of course ?


I feel terribly cheated Magnus, I didn't get to see the sticks! It is not a true "parts on sticks" pic if all we see is parts and partial alligator clips!

Great work so far, I really enjoy seeing the uncommon subject matter being built like this one.

Cheers, D
JPTRR
Staff MemberManaging Editor
RAILROAD MODELING
#051
_VISITCOMMUNITY
Tennessee, United States
Joined: December 21, 2002
KitMaker: 7,772 posts
AeroScale: 3,175 posts
Posted: Friday, April 25, 2014 - 03:53 PM UTC

Quoted Text

When it comes to Japanese aircraft I am pretty much in the dark when it comes to colours: any suggestions from the Hasegawa or Gunze ranges? There is a Gunze recipe included in the instructions but that's a real witch's brew of colours, I have never seen a recipe containing so many colours before. It even ends with two drips of toad spit !


Hi Magnus,

I am in awe!

Here is a URL I go to for color mixes:

http://www.j-aircraft.com/research/jmixes.htm

See this page, very bottom:

http://www.j-aircraft.com/research/otherres.htm#Camo

BTW, your build has been linked to this site:
http://www.aviationofjapan.com/2014/04/a-172-fine-molds-ki-100-build.html

magnusf
_VISITCOMMUNITY
Stockholm, Sweden
Joined: May 02, 2006
KitMaker: 1,953 posts
AeroScale: 1,902 posts
Posted: Saturday, April 26, 2014 - 07:15 AM UTC
Damian! I'm sorry for that breach of protocol, I didn't notice that there actually weren't any sticks at all in that photo. Adjusted below!

Frederick! Thanks for the links, I'll check the colour links with great interest. As for the last one, I didn't realise becoming a minor celebrity was this easy ! Some interesting facts about the kit there as well, I had no idea that they were remade by Fine Molds later, substituting the Hasegawa Ki-61 parts with ones of their own making!


No parts, just the sticks...


Magnus
magnusf
_VISITCOMMUNITY
Stockholm, Sweden
Joined: May 02, 2006
KitMaker: 1,953 posts
AeroScale: 1,902 posts
Posted: Friday, May 09, 2014 - 08:59 AM UTC
Interior finally painted! My usual strategy: even if it isn't detailed, it should LOOK detailed!


And finally our poor cousin, the OTHER fuselage half!


Magnus
thegirl
_VISITCOMMUNITY
Alberta, Canada
Joined: January 19, 2008
KitMaker: 6,743 posts
AeroScale: 6,151 posts
Posted: Friday, May 09, 2014 - 02:27 PM UTC
Over all it has pretty good detail . Never built one of their kits so will follow along on this one . Not sure about the white metal though for the landing gear . Will you replace this ?


Terri
magnusf
_VISITCOMMUNITY
Stockholm, Sweden
Joined: May 02, 2006
KitMaker: 1,953 posts
AeroScale: 1,902 posts
Posted: Monday, May 12, 2014 - 08:27 AM UTC
Terri! They are very Hasegawa-like and for Japanese aircraft fans they were god-sent when they were released. Nothing wrong with the white metal landing gear, I'll use them as they are!

I think the weakest part of the model is the lack of exhaust pipes and I planned to rebuild them from the start. Today, finally the Albion brass tubing I ordered for the project arrived in the post.


I made a simple "tool" to be able to press the round tubing into an oval section with consistent results for all the exhaust tubes. A taped piece of plasticard limits the closing of the pliers.

I started by rolling the tube gently under the scalpel, scoring marks at even distances around the tube. I then pressed the tube to an oval section and finally broke the tube into short pieces, the scores acting as break lines.


Tubing in the pliers!

In order to get some margins for adjustment I glued the tubes using epoxy, it gets you some much needed time to get everything lined up before setting compared to super glue.

And the final result take 1...


...and take 2! I'm very pleased with myself !


Magnus
AussieReg
Staff MemberAssociate Editor
AUTOMODELER
#007
_VISITCOMMUNITY
Victoria, Australia
Joined: June 09, 2009
KitMaker: 8,156 posts
AeroScale: 3,756 posts
Posted: Monday, May 12, 2014 - 10:33 AM UTC
Very nice work Magnus, a neat solution and a great little tutorial.

Cheers, D
thegirl
_VISITCOMMUNITY
Alberta, Canada
Joined: January 19, 2008
KitMaker: 6,743 posts
AeroScale: 6,151 posts
Posted: Monday, May 12, 2014 - 11:54 AM UTC
Very neat trick , this would work well on the 190 exhaust with some trail and error . I'm going to look into their line of kits . I like what I'm seeing so far .


Terri
Joel_W
Staff MemberAssociate Editor
AUTOMODELER
_VISITCOMMUNITY
New York, United States
Joined: December 04, 2010
KitMaker: 11,666 posts
AeroScale: 7,410 posts
Posted: Tuesday, May 13, 2014 - 04:01 AM UTC
Magnus,
Your interior came out excellent. Glad you found those "goodies", makes a huge difference.

As for your solution to those exhaust heads pipes. You really got it right, no perfect would be a better description.

BTW, glad you're back at the bench, and back with us.

Joel
magnusf
_VISITCOMMUNITY
Stockholm, Sweden
Joined: May 02, 2006
KitMaker: 1,953 posts
AeroScale: 1,902 posts
Posted: Wednesday, May 14, 2014 - 07:54 AM UTC
Damian, Terri and Joel! Thanks!


Wing to fuselage fit is less than excellent... I went for this solution, we'll see how it turns out! Will fill the leading edge with Milliput before going to bed tonight!


Magnus
FredrikA
_VISITCOMMUNITY
Uppsala, Sweden
Joined: January 09, 2008
KitMaker: 92 posts
AeroScale: 90 posts
Posted: Wednesday, May 14, 2014 - 08:48 AM UTC
Sorry Magnus, but I couldn't help myself...

Hasegawa like and the missing exhausts was the biggest problem, wasn't that what you wrote not so long ago... and then there was that leading edge.

But given your knack for nifty solutions, like the exhausts, I'm sure the wing will turn out just fine. It seems like a good idea for a solution.

/F
magnusf
_VISITCOMMUNITY
Stockholm, Sweden
Joined: May 02, 2006
KitMaker: 1,953 posts
AeroScale: 1,902 posts
Posted: Saturday, June 07, 2014 - 08:26 AM UTC
Fredrik! Please let me re-state: ALMOST Hasegawa-like ! It is quite obvious that there were a bit of trouble making the old and the new parts fit!

Sorry for the delay but I have been moving my photo library (almost 1 Tb worth of photos from twelve years of digital photography) and I didn't want to mess around before everything was up and running again!


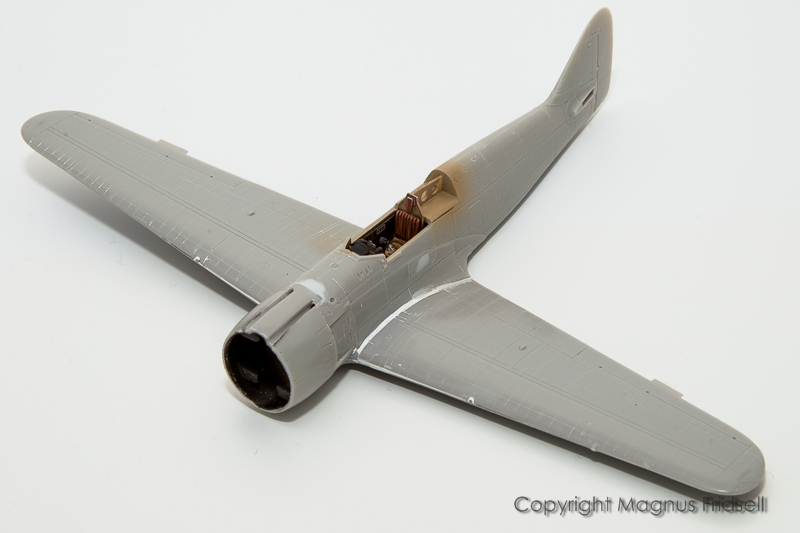
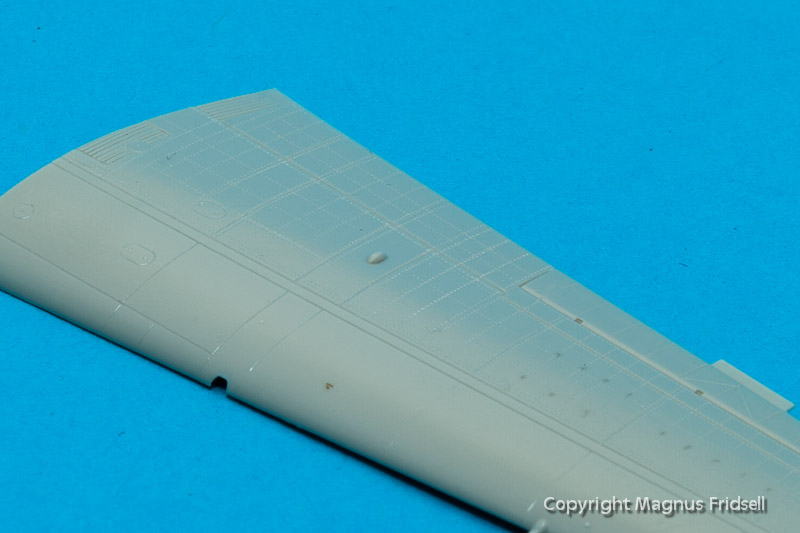
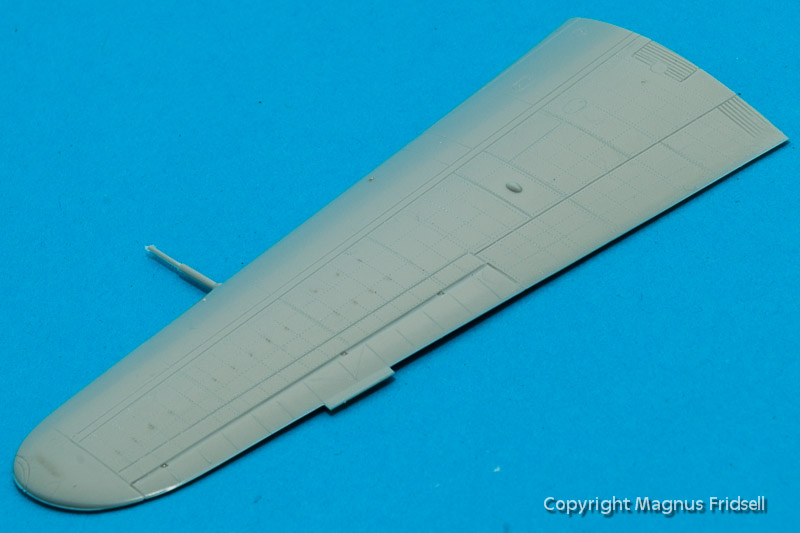
That wing leading edge and wing root joint was just a minor problem. Milliput made my day (once again!)!


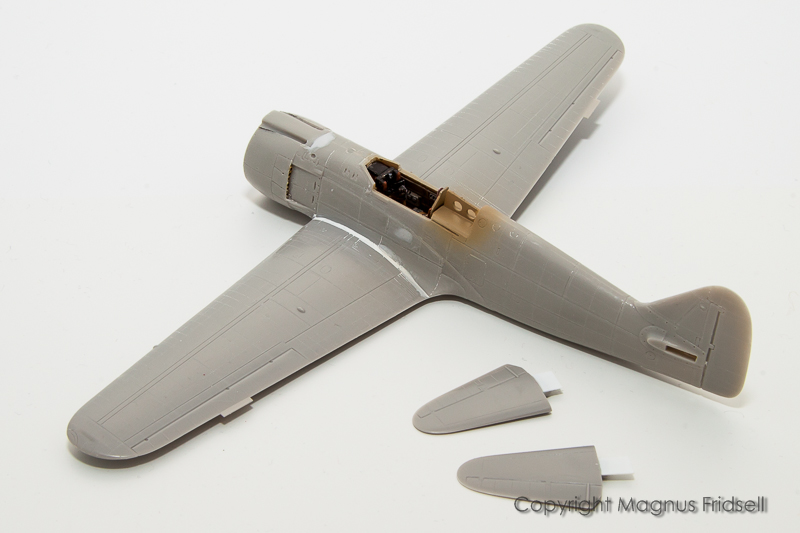
Stabilizers ready for attachment. Another part that needed a bit of adjustment to fit!


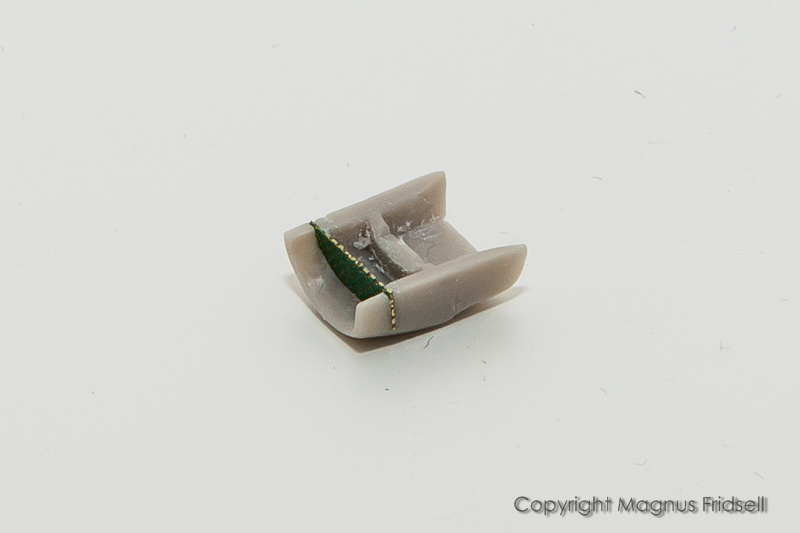
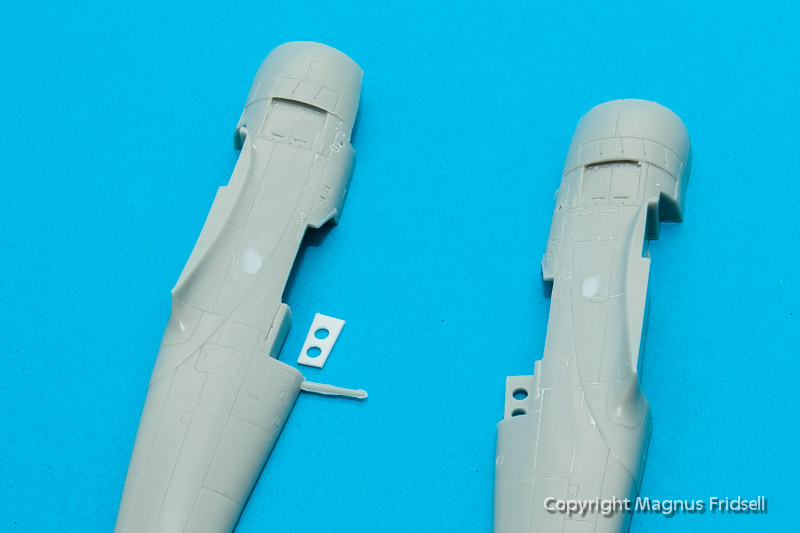
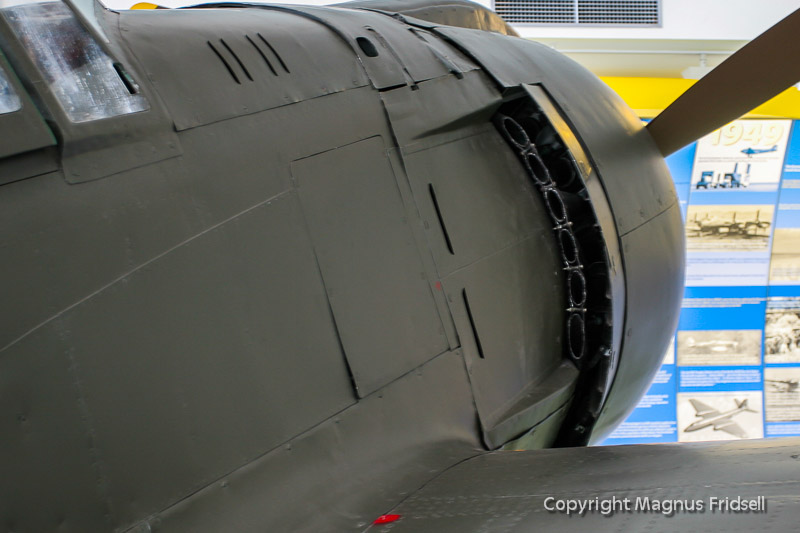
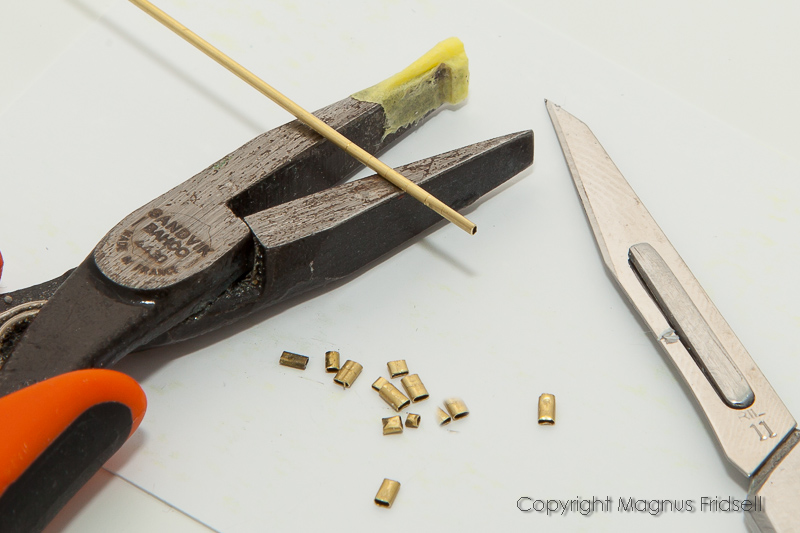
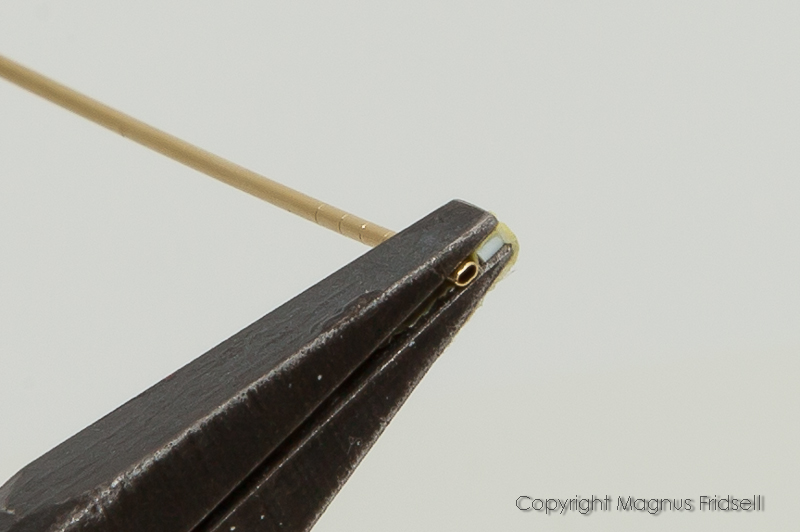
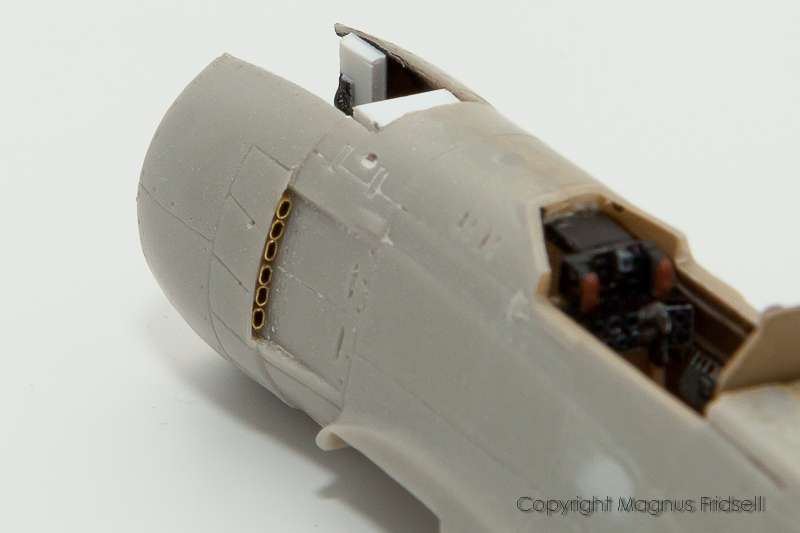
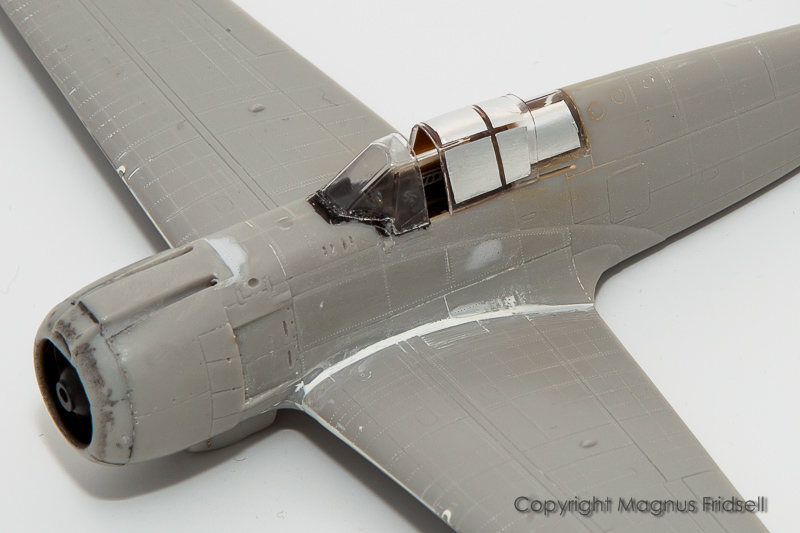
Nose intake dressed up using some left-over PE. I made a cut using a razor saw almost through the part, slid the PE in place, soaked the edges using CA glue and trimmed the excess and sanded smooth. Easy-peasy!


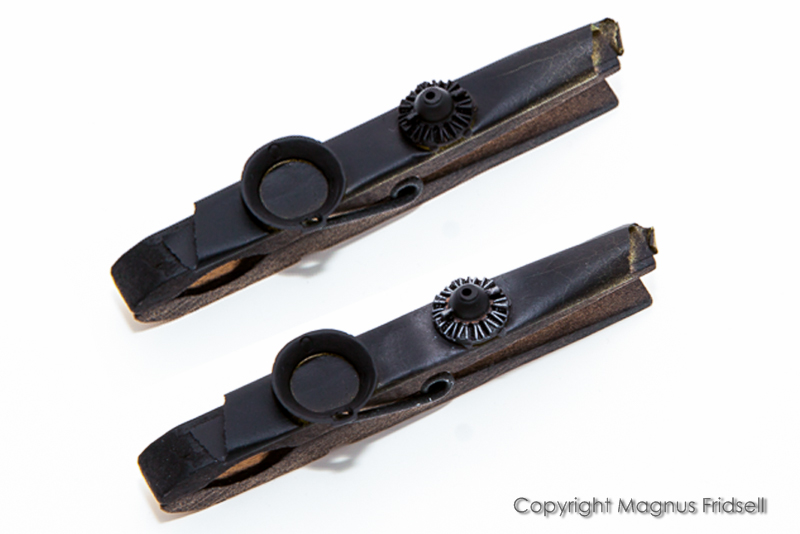
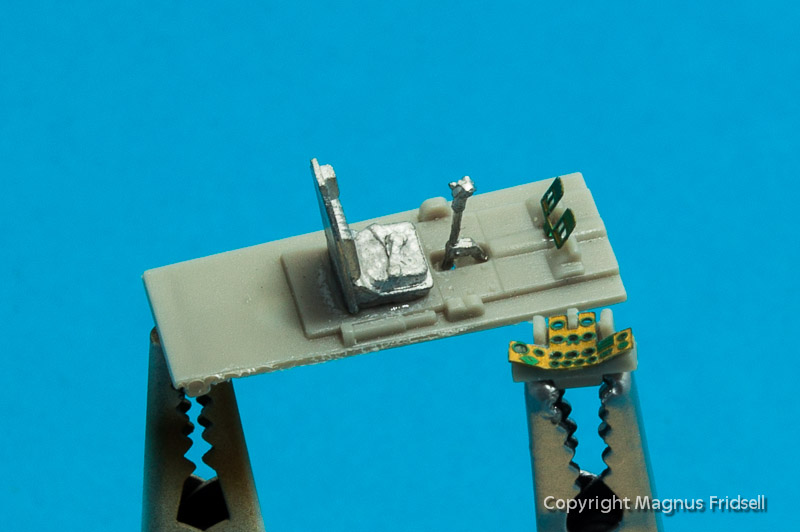
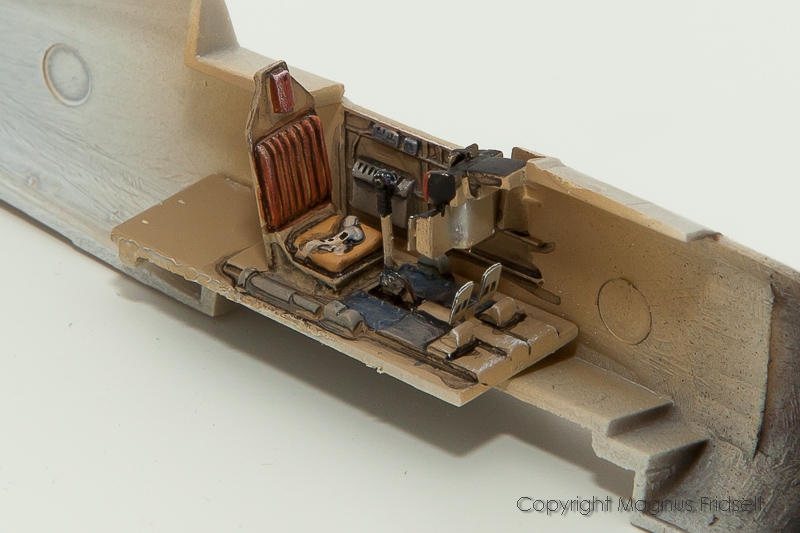
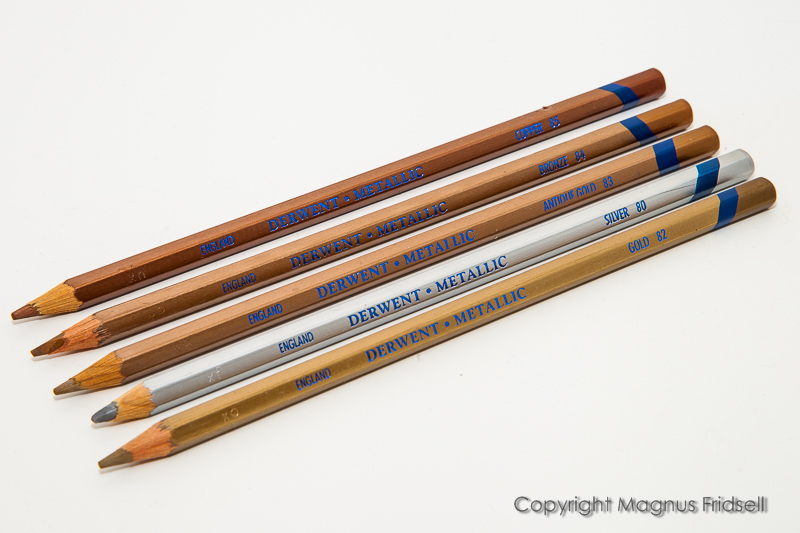
Composite image of engine showing it before and after detail painting. If using silver and copper pencils is allowed to be called "painting"... An easy trick that I will try to use more in the future!


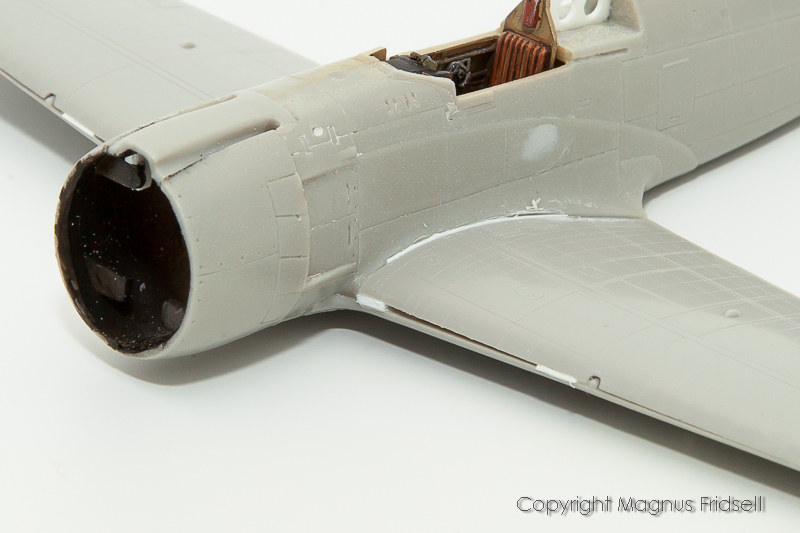
And finally the model with the intake installed!


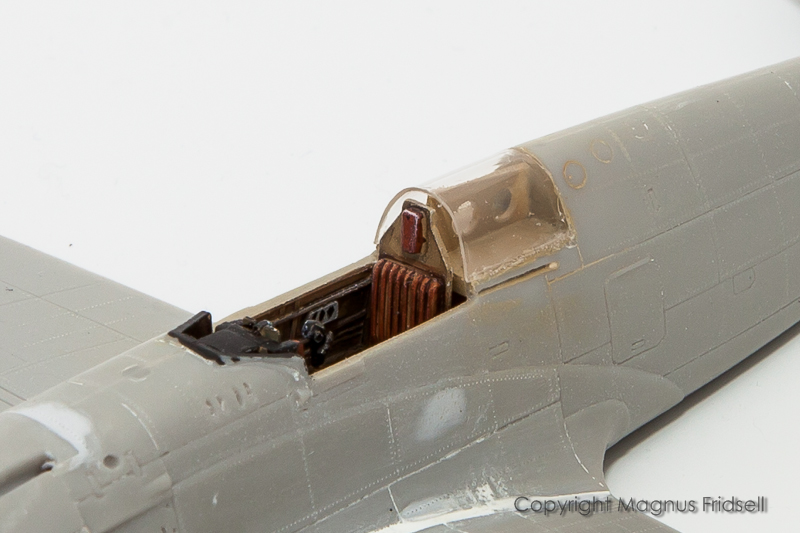
Oh, I almost forgot! Rear part of canopy has been installed, and it reminds me why I utterly dislike vacform canopies. They are hard to glue (no, it doesn't work with white glue, it simply doesn't bite good enough and epoxy is all rubbery and impossible to sand afterwards and the bloody CA fogs the plastic and isn't really that strong even if it sounds like that) and difficult to sand and polish. This one was finally installed using Humbrol Clearfix (the least bad of them all: less weak than white glue and bites better into the plastic, not as rubbery as the epoxy and not as generally abominable (never thought I would need that word) as CA glue) with the remaining crevices filled using CA (couldn't stay away from that stuff anyway...). In short: vacform canopies don't pull my strudel. Not at all...


Magnus
AussieReg
Staff MemberAssociate Editor
AUTOMODELER
#007
_VISITCOMMUNITY
Victoria, Australia
Joined: June 09, 2009
KitMaker: 8,156 posts
AeroScale: 3,756 posts
Posted: Saturday, June 07, 2014 - 12:06 PM UTC
Coming together very nicely Magnus, neat work on the wing and intake fixes!

Have you tried dipping the clear parts in "Future" then using CA? You shouldn't get any fogging through the extra clear coat and it will give the part some extra strength.

Cheers, D

P.S. Is "Parts on Pegs" the new "Parts on Sticks"?
magnusf
_VISITCOMMUNITY
Stockholm, Sweden
Joined: May 02, 2006
KitMaker: 1,953 posts
AeroScale: 1,902 posts
Posted: Saturday, June 07, 2014 - 09:34 PM UTC
Damian! Didn't you see the sticks posted earlier in this thread? I would NEVER, EVER, exchange pins for pegs. They simply aren't the same!


No parts, just the sticks...


On the IPMS Stockholm forum (crossposting in Swedish, have a look, might be interesting ) someone asked what kind of pencils I was using for the engine. They are Derwent Metallic pencils that I bought many years ago for doing chipping, which I found to be difficult at best. Since then they have just been laying around in my rather full "redundant tool's box" but this time they came in handy. As usual: never throw anything away (or in this case, more likely, hand it over to the kids ).


Magnus
phumbles
_VISITCOMMUNITY
Australia
Joined: June 14, 2013
KitMaker: 82 posts
AeroScale: 81 posts
Posted: Saturday, June 07, 2014 - 11:32 PM UTC
Hi Magnus, been following your build and enjoying it. Some clever solutions in there and filing them away for future reference. Cheers Phil
magnusf
_VISITCOMMUNITY
Stockholm, Sweden
Joined: May 02, 2006
KitMaker: 1,953 posts
AeroScale: 1,902 posts
Posted: Wednesday, June 11, 2014 - 08:33 AM UTC
Phil! Thanks!


Windscreen freshly glued!

I split the sliding part of the canopy from the windscreen, the fit gets a bit more forgiving then. I've also masked some of the clear parts using BareMetal foil as ususal. Painting is slowly creeping closer...


Magnus
magnusf
_VISITCOMMUNITY
Stockholm, Sweden
Joined: May 02, 2006
KitMaker: 1,953 posts
AeroScale: 1,902 posts
Posted: Sunday, June 15, 2014 - 08:23 AM UTC
Tonight I have a little party-trick to show. Or at least a masking trick but that might be more appropriate around here ! Hang on!

A few years ago I bought a box of plastic erasers, I suppose I meant to use them the common way: for erasing... However, since most of my work nowadays is done in 3D in the computer (all erasing done electronically, simply great ), they just sat there until I figured out that they could come in handy for modelling.

Since then, I have used them in all kinds of ways, the two favourite ones being cutting them into custom-made contoured sanding sticks for those hard-to-reach places and for masking.


Cut an even slice of eraser the width you would like your prop tip bands. Make a slit through it with a scalpel blade (backing the eraser with your thumb will offer a nasty surprise by the way...) (Slicing the eraser to measure makes it easier to judge the width of the band since you just stick the blade through the slit until it is level with the outside of the masking slice but I suppose the eraser can be cut wider and the distance to the edge of the band can then be measured from the spinner out as well!)


I suffer badly from paint paranoia: I add bits of masking tape to protect the tips of the prop. Even if I paint carefully I am convinced that I would end up with brown-edged prop tips if I didn't add the tape...


Painting. I consider this method quite safe but I do try to avoid spraying straight towards the intersection between the eraser and the prop blade.


And the final result! Fairly even but maybe a bit wide, I'll have to adjust this later.


Magnus
 _GOTOTOP