_GOTOBOTTOM
World War II
Discuss WWII and the era directly before and after the war from 1935-1949.
Hosted by Rowan Baylis
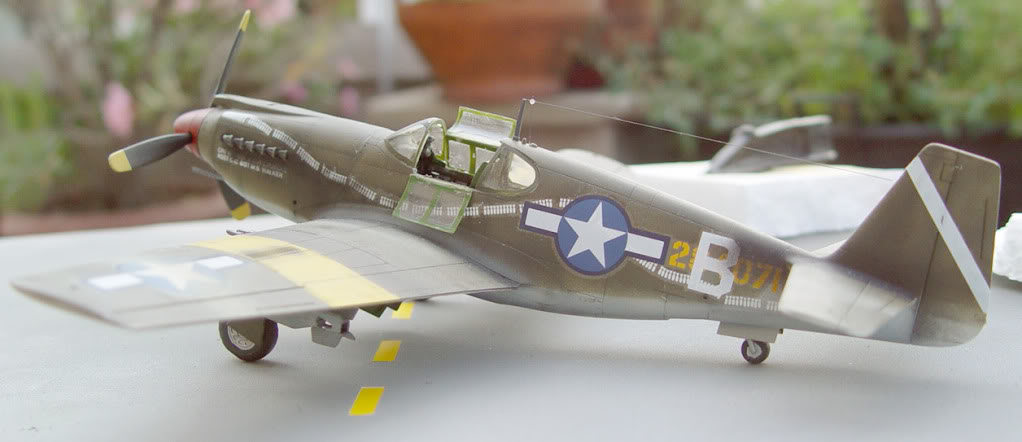
A-36 APACHE, 1/48 by Accurate Miniatures
cinacchi
_VISITCOMMUNITY
Agrigento, Italy
Joined: April 01, 2013
KitMaker: 15 posts
AeroScale: 8 posts
Posted: Tuesday, October 08, 2013 - 11:51 PM UTC
This was the first airplane model where i tried to use a stronger weathering.
For this A-36 Apache, Vallejo Aircolors were used, airbrished with an Iwata Eclipse. The yellow strips were airbrushed too. Some streaks where airbrushed on the wings, to reproduce the look found on reference photos.
If you like to see more pics, you can see them on on my site:

A-36 APACHE, 1/48 by Accurate Miniatures

Mcleod
_VISITCOMMUNITY
Alberta, Canada
Joined: April 07, 2010
KitMaker: 1,028 posts
AeroScale: 939 posts
Posted: Wednesday, October 09, 2013 - 01:58 AM UTC
Nice job, Luca. The Apache certainly looks used; you were successful in weathering effort.
I might suggest you secure a tripod to improve your photo efforts. There not bad photos, just a little fuzzy on your site.
Joel_W
Staff MemberAssociate Editor
AUTOMODELER
_VISITCOMMUNITY
New York, United States
Joined: December 04, 2010
KitMaker: 11,666 posts
AeroScale: 7,410 posts
Posted: Wednesday, October 09, 2013 - 06:33 AM UTC
Luca, WTG! A really nice OOB build, painted and weathered that has that "Used but not Abused look" which I really like. I went to your site and checked out all your pictures. A really nice paint effort on the canopy glass. The Interior Green on the insides of the glass looks great.

One thing that is apparent in many pictures is that there is some silvering around several decals. Not sure if it's from a surface not glossy enough, but that problem does cause me some issues from time to time as well. I've found that by air brushing a really thinned coat of earth or dust as your final weathering stage, it will cover up the silvering issues, as well really blend in the decals so they look like they were actually painted on.

Joel
cinacchi
_VISITCOMMUNITY
Agrigento, Italy
Joined: April 01, 2013
KitMaker: 15 posts
AeroScale: 8 posts
Posted: Friday, October 11, 2013 - 03:48 AM UTC
Thanks.. i know, the old photos are too "soft" (to be kind, lol... better to say blurred).
The most recent should be better, having started to use a nice light that deliver a decent light.
cinacchi
_VISITCOMMUNITY
Agrigento, Italy
Joined: April 01, 2013
KitMaker: 15 posts
AeroScale: 8 posts
Posted: Friday, October 11, 2013 - 03:56 AM UTC
Thanks. The decal problem in this model is odd, and i forgot to mention it. The fault is mine only (the Ac. Min. decals indeed were no bad at all). This happened for 2 reasons:
- at that time, i was not able to spray a decent mat finish, after the Future and decaling (i then discovered that i was airbrushing at too low pressure, like normal paint. Better instead more high pressure, so it can do a more mat rough look), and so i didn't use the Future, hoping for the best, and going for the worst... lol
- at that time i was using for the dcal the humbrol fixer, that it is (or it was) just like water an nothing more. Using another products (the Mr. I-don't-remeber-the-name), lot of patience and repeated applications along 1 or 2 days, and when dry covering everything with one more layer of Future, give me usually good results.
 _GOTOTOP