_GOTOBOTTOM
Early Aviation
Discuss World War I and the early years of aviation thru 1934.
1:72 AZ Beech 17 Staggerwing
cliffnetherlands
_VISITCOMMUNITY
Zuid-Holland, Netherlands
Joined: September 25, 2013
KitMaker: 86 posts
AeroScale: 83 posts
Posted: Wednesday, September 25, 2013 - 03:44 AM UTC
a repost because i posted the thread in the wrong place at first

Let’s see if i can get a nice build report started here..

Inspired by this book...


I started on a Beech 17 staggerwing. The kit is from AZ model. And is a short run kit.


And this is what you may expect on mould details from this kit..and how much on clean up work


And last but not least a picture to show you the colour schemes that come with the kit…


But because i want to make a civilian version.. They ended up in the spare box.

As with any airplane build we start with the cockpit… AZ wants us to build the inside as a single unit.


But it beeing a short run kit, i would strongly advice against that. In my version the cockpit elements are too big for the fuselage, And need to be sanded down quite a lot. So it is a case of sanding and fitting, more fitting and sanding... and yet more sanding again...


Before painting and committing to glue. Off course...that is said with hindsight. So yesterday evening was spend carefully sanding down already painted cockpit parts. Especially the dashboard and the floorboard. But i’m getting ahead of myself…

As always i started with the dashboard.


Quickly followed by the rest of the interieur


The Floor got a carpet made out of sanding paper…


The sidepanels new grips out of leadwire


And i also made new footpedals. Based upon reference pictures..


Wich all together looked something like this..


Then i decided to already prepare the striping on the sides. Now that it was still easily reachable..


After masking of the glasswork it was time to finish off the interieur. Give it a last coat of colour..


…and then nicely join the fuselage parts up. To continue with the next step….Or maybe not..


Here the fit without the dash..


Still not brilliant. But better..So the job for the next few days. Sanding and fitting…

Although i did manage to fit in the seatbelts for the front Seats..And with that picture i’m gonna leave you till the next update..

JackFlash
_VISITCOMMUNITY
Colorado, United States
Joined: January 25, 2004
KitMaker: 11,669 posts
AeroScale: 11,011 posts
Posted: Wednesday, September 25, 2013 - 04:01 AM UTC
Well the staggerwing did first fly in 1932. Most of our reviews and builds go with the variations for civilian, WWII and seaplane uses. Also very decnt build in this scale. Model on!
cliffnetherlands
_VISITCOMMUNITY
Zuid-Holland, Netherlands
Joined: September 25, 2013
KitMaker: 86 posts
AeroScale: 83 posts
Posted: Wednesday, September 25, 2013 - 04:03 AM UTC
Thank you. I had to check myself on wikipedia if it would be right here. I had the same reasoning..'32 and civilian.

later edit. I also see the title has been adjusted. I'll stick to that prefered way of putting it up in future. Thanks.
md72
#439
_VISITCOMMUNITY
Washington, United States
Joined: November 05, 2005
KitMaker: 4,950 posts
AeroScale: 3,192 posts
Posted: Wednesday, September 25, 2013 - 11:27 AM UTC
Verry interesting..I think I have a Roden 1/48 Staggerwing in the stash somewhere.
cliffnetherlands
_VISITCOMMUNITY
Zuid-Holland, Netherlands
Joined: September 25, 2013
KitMaker: 86 posts
AeroScale: 83 posts
Posted: Wednesday, September 25, 2013 - 07:28 PM UTC
Thank you. What I've heard of the Roden kit isn't a bad one.
This is my first build of a 30's oldtimer. And seeing what I can do with it. It won't be my last...
Joel_W
Staff MemberAssociate Editor
AUTOMODELER
_VISITCOMMUNITY
New York, United States
Joined: December 04, 2010
KitMaker: 11,666 posts
AeroScale: 7,410 posts
Posted: Saturday, September 28, 2013 - 01:17 AM UTC
Cliff, interesting build, as the Staggerwing was one of the more interesting 1930's aircraft that made an impression on me. Will certainly be following it to conclusion.

I don't envy you with having to literally clean up every single piece. Same goes for the interior to get everything to fit so that you can close up the fuselage halves. Just takes a lot of time, but from your pictures, you're getting there.

One question, you already masked for the fuselage striping. Did you pre-paint it, as there is no mention of doing that.

Joel
cliffnetherlands
_VISITCOMMUNITY
Zuid-Holland, Netherlands
Joined: September 25, 2013
KitMaker: 86 posts
AeroScale: 83 posts
Posted: Saturday, September 28, 2013 - 01:27 AM UTC
Thank you Joel.

It ís a lot of work. On the other hand. It's also good for me. I have to admit i'm a bit of a sloppy modeller. This kit challenges me to be more precise. And that's just what i need to be honest. I tend to enthousiasticly go for a job..in stead of slowing down and doing some measuring first. Not smart with this one.

I did prepaint the stripes. The outside is gonna be the contrary of the inside. So that would be red with white striping. But by now i had to do some much sanding and handling of the fuselage sides. That i have to redo part of it.
Oh well. It seemed smart at the time.

Cliff
robot_
_VISITCOMMUNITY
United Kingdom
Joined: March 08, 2009
KitMaker: 719 posts
AeroScale: 691 posts
Posted: Saturday, September 28, 2013 - 09:13 AM UTC
Great build so far Cliff. If you still haven't closed the fuselage, and if you care enough about accuracy, I believe you have the control wheel on upside-down (I only know as I made the same mistake building this kit.

The stage that provided the most entertainment for me was the area behind the undercarriage- it needed quite a lot of filler. I also had to study a lot of photos of the undercarriage to enable me to cut up the single part that contains all the different cover parts for both legs. Having just checked the AZ instructions, they now show what to do quite clearly. I built in from the older Sword boxing, and it didn't show what to cut off and where to put the bits. I've seen several builds with it wrong.

Anyway, good luck and looking forward to the rest of the build!
cliffnetherlands
_VISITCOMMUNITY
Zuid-Holland, Netherlands
Joined: September 25, 2013
KitMaker: 86 posts
AeroScale: 83 posts
Posted: Saturday, September 28, 2013 - 09:06 PM UTC
Krijg nou het heen en weer..Buggers. Your right. I DID turn the control wheel up side down.
I looked at numerous references pictures to get the dash right. Even the colour of the control wheel. And i never picked up on it. Talking about staring yourself blind.
I am gonna leave it. trying to get it loose will probably destroy the whole column. From now on i'll just blame it on the maintenance crew not putting it on right after maintenance...

I'm now turning my attention to the landing gear area. I found this really cool restauration project. And that gave me a lot of inspiration.

http://staggerwingrestoration.blogspot.nl/

And i have to say. The quality of builds on this forum also makes me wanna push the boat a bit further then i problably would have done a few weeks ago even.
So at the moment i'm still in the middle of sanding down excess moulding. And scratching some extra's. Hopefully i can show some progress next weekend.

Cheers Cliff
cliffnetherlands
_VISITCOMMUNITY
Zuid-Holland, Netherlands
Joined: September 25, 2013
KitMaker: 86 posts
AeroScale: 83 posts
Posted: Sunday, October 06, 2013 - 08:58 AM UTC
Time to show some progress on the Staggerwing. First thing was to correct a mistake i made


I first thought it would be easiest to glue the front window parts in the fuselage..And then marry the two. But i was wrong. It is wiser to first glue the whole front window togeter. And afterwarts put it into place.
Oh well...If at first you don't succeed.

Then it was sanding time. The arrow on the dash shows what needed to be removed there..(on opposite sides off course)

The bodemplate i drew over with a pencil..so i had a edge to show me how much to remove..and i had a guidance to keep the general shape of it.


And the fuselage itself needed work off course . Oh well it's the love you get from a short run kit i suppose...

In between sanding sessions i was looking at this site for inspiration.... http://staggerwingrestoration.blogspot.nl/


And in the picture above, you can see that the line, going from the fuselage into the wing, is a straight one..It doesn't flow with the fuselage (lengthwise) as the mauld wants it to be..


The upper part is already adjusted.. The lower part still shows the original line...In the picture below i managed to get the square shape in there.


The plastic, luckely, is thick enough to easily adjust this mistake...Thick enough even , to leave ugly edges around the landing gear. Now i have to admit. Before joining this forum i would have probably left it.. But the level here is higher then i'm used to..and it inspired me to pick up my game a bit. So out came the sanding paper again


On the right is already been done..Left still to go..


And one after another i sanded down the edges to a more realistic level. (Thanks to Thegirl for doing the same in her latest build. It made me realize i had to do it too.)

Now on the dutch forum i put on building logs, there are sometimes comments that details on small cockpits and landing gears are a bit of a waste of time. Based on the fact that' you don't see them that much'. I wanted to make a point that that is not true..


Ok. no one will really mind if i would leave this hole black. You wouldn't really notice the lack of detail in this scale..But let's put a bit of colour there anyway.


I was aiming for a kind of wood colour, using the paint i had available today..

During the drying process i also put my Revell iron paint to good use..


With that done it was time to play with a bit of masking tape. And some grey paint..


And i ended up with this...


Wich did prove my point that, although you don't miss the detail on a smaller scale..You do notice it when it is added

And on that bombshell it's time to leave...

Oh before i go. Another picture of that lovely Staggerwing restauration. That i'm using as reference.

[/quote]

It shows where my idea came from. It also shows that the woodwork is actually to thick. Something i have to keep in mind next time when i attempt this. For this build i think i'm gonna leave it,and accept it as a learning point.

feedback, advice and tips are always welcomed
Greetz Cliff
Removed by original poster on 10/06/13 - 21:02:06 (GMT).
cliffnetherlands
_VISITCOMMUNITY
Zuid-Holland, Netherlands
Joined: September 25, 2013
KitMaker: 86 posts
AeroScale: 83 posts
Posted: Sunday, October 13, 2013 - 06:25 AM UTC
Time for a small update. Work lately concentrated on the last interior bits..Like the wooden plate at the bottom, where the landinggear is..It needed to be turned from plain yellow to real wood..


And then a lot of adding of dots, and damping it down again with a wet pencil with terpentine. I wanted to create a nice variaty of shades and colours, to make it as natural as i could.


And i'm happy with this first try. Definity a good base to build my skills on

I also wanted to add a wee bit more detail in the backwheel gear opening.


All a free interpretation of the reference pictures i have from the staggerwing restauration site. All in all it was time to put the interior together. (And yes, also the white backwallthing needed sanding down for fitting..


By now the fuselage halves could finally marry up...Although they needed a bit of convincing


Ok, they needed a whole lot of convincing...But i managed...Now the whole thing is drying up..and we' re all set for the next stage tomorrow...Which would be fuel tank.

Greetz
Cliff
cliffnetherlands
_VISITCOMMUNITY
Zuid-Holland, Netherlands
Joined: September 25, 2013
KitMaker: 86 posts
AeroScale: 83 posts
Posted: Wednesday, February 12, 2014 - 07:34 PM UTC
Hey there all. Welcome back to my Staggerwing build.

I have to admit it came to a major halt for quite some time, because of private stuff. But that has been settled. And finally i'm back behind my desk. There i found the staggerwing with a nice wooden floor in his belly. But...


There are a lot more details to be found in that belly. Details that would be on show too. So it was obvious to do some more scratching...


...wich left me with nice iron frame..and two gastanks. One (on the left) the right size..but ahm..."shame"..pretty crappy in the way it turned out. And one (on the right) bit oversized. although better built and nicer overall.

It was clear i had to get the modelling feel back in my hands. And at point still get all the mess out of my head to get more focussed. I have to admit. I tend to be a modeller that measures less then he should. and just goes with the flow and his eyes a bit to much..And that sooo does not work when your not focussed or not in the flow.
anyho..when i discovered that i would only see the front of the gastank anyway. I decided for this time the scrappy tank was good enough..


Looking at more reference pictures i saw that there are quite some cables running onderneath too


And i decided it would be a good practise to try to duplicate some. (Keeping in mind i also need to do some rigging on the wings later. I rather screw it up in the belly then in full view on the wings.)

My plan was to do it with fishing wire. Rubbing it with a black pen was to dark in my eyes. So i tried drybrushing it with Revell aqua aluminium. And i liked the effect.


And then i discovered i had even thinner wire. 0.08...again dry brushed with a bit of grey and black mix.


Lets see how that looks when fixed in place..
Then there were just a few small fixes to do. The nose was a bit to tight..and there was some small damage to one cilinder in the engine. But checking how it would be visible when build in..a easy fix was more then enough...


And then it was time to get out the paint. Air brushing was something i didn't do for a long time as well. And i was only a novice with the technique anyway. So i was a bit sceptical what i could achieve. But i was pleasently suprised. :-)

The colours of choice


And all i did in this spray run..


In more detail..First the engine. Light grey as a base, and then filling it with a mixture of dark grey and black for dept. Followed by a dry brush with vallejo steel.for the cilinders, and the pipes brushed with revell aqua alluminium.
The prop itself was done with alclad aluminium. (first time ever i used that)..and the fixing "bold" in the middle (securing the prop.) done with vallejo steel again. With a bit of the dark mixture on the joints for added dept.


The gastank also got a coat of alclad. (wich made it clear how much you indeed see using the stuff.) Followed by the iron work getting a coat of grey paint to protect it. (Just as the reference plane i'm using..
And i ended up replicating the fixing 'strips' with a bit of tamiya tape and vallejo steel..(That was before i discovered it should have been grey too..


and the reference i all base it on.


The session ended with putting some ground paint on the items i need for the little scene i want to build around the staggerwing.


From now on i'll have more time on my hands for modelling. Wich is nice. I can finally get a rythm going wich will benefit my skills. And develop my own style even more. Up till then..well i can already show how much fun modelling is. That's already worth something.

Greetings
Mcleod
_VISITCOMMUNITY
Alberta, Canada
Joined: April 07, 2010
KitMaker: 1,028 posts
AeroScale: 939 posts
Posted: Thursday, February 13, 2014 - 03:37 AM UTC
Exceptionally interesting post, Cliff. Very inspiring, with good modelling and good direction.
Is that Aclad brass on your gate?
cliffnetherlands
_VISITCOMMUNITY
Zuid-Holland, Netherlands
Joined: September 25, 2013
KitMaker: 86 posts
AeroScale: 83 posts
Posted: Thursday, February 13, 2014 - 03:46 AM UTC
Ahm..thank you Ben.."blushing"...

No it's Mr Hobby gold. I first wanted to try out a version of Alclad before i start buying the whole range, and aluminium was the obvious one to start with.

I find the gate a bit blend and a bit light actually. I want a bit warmer darker look. So i'm planning to give it another cote with Revell aqua gold (wich seem a bit darker). and then highlight it with the Mr Hobby version.
cliffnetherlands
_VISITCOMMUNITY
Zuid-Holland, Netherlands
Joined: September 25, 2013
KitMaker: 86 posts
AeroScale: 83 posts
Posted: Thursday, February 13, 2014 - 06:42 AM UTC
This afternoon i started work on the steering cables. First time doing it. The glue was a bit old and stringy..it wasn't connecting as fast as it should. And the fishing wire had it's own memory. So it wanted to curl up again, instead of staying straight, (You can also argue i wasn't patient enough, But all in all not a bad result for a first time...


...So a perfect moment to let it be and carry on with something else, ....i said carry on...As in leave it..NO DON'T..!!!! I:(


..sigh...

Enter another dive in the tackling box to try and save this....


Wich actually worked. And all that because i "needed" to cut away the pieces of wire sticking out on the front. Yes the ones painted brown.


And di you see those in the end...Noooo of course not. :? As they say: "Patience is a virtue.."


What you DO see is the glue pieces sticking out. So that's something to keep in mind when i do this on the wings themselves..
As well as making a fool out off myself in front of the watching cat, i also painted the fixing straps of the gastank light grey.
And then i glued the whole framework in place. Before i got the 'sudden urge'to fix some more fiddly bits..


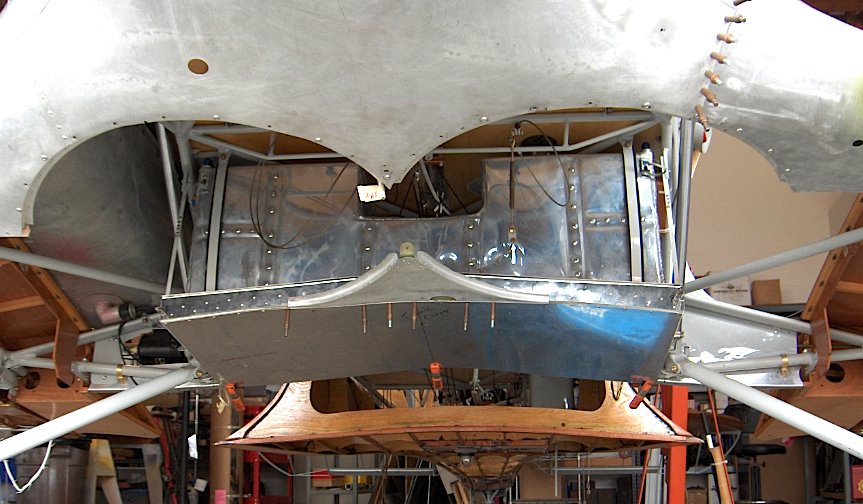
Back to the reference picture. There is this upright bar, coming from the V shape, up to the skin of the plane itself..


And because it would give some extra height and intrest i decided that still had to be copied


And after that i straight away closed the wheelbay area. Leaving me with the obvious overview pictures.


Tomorrows job. Getting in the windows..
JackFlash
_VISITCOMMUNITY
Colorado, United States
Joined: January 25, 2004
KitMaker: 11,669 posts
AeroScale: 11,011 posts
Posted: Thursday, February 13, 2014 - 05:04 PM UTC
Thanks for posting the progress!
cliffnetherlands
_VISITCOMMUNITY
Zuid-Holland, Netherlands
Joined: September 25, 2013
KitMaker: 86 posts
AeroScale: 83 posts
Posted: Wednesday, February 26, 2014 - 10:51 AM UTC
It was about time to put the windows back into the staggerwing. But first i needed to mask them again..


A modeler on Modelbrouwers, (The dutch forum i started my internet moddeling career), suggested doing it with tape and masking paint..


A method i really like i must say. By now the windows are all in..And i'm aplying tape to mask of the seams. Ready for putty.


On modelbouwers quite a lot of people use putty for cars. Easy to use and cheap. We also quite often use nailpolish-remover to get rid of excess putty. (be carefull it also removes paint.) Dont know if it's a trick that also is used in england.


..And presto. We have a nice filled seam that's hardening out.


While i was at it. I also filled the seam between the windows with gatorglue.


Who ever thought it was smart to make that window out of two sections..is nuts. ...As nuts as i was, while fixing the bottom plate...


If i would have spotted that ride before committing to glue, it would have been an easy fix..Now i had to fill it up with some styreen plate. And sand it into shape later on...


Oh well. That will be the first time i'll try out recribing panellines..
By now it was time to fix the engine unit..And some air intakes-exhausts-cheek-kinda-things


And last but not least the tailfin could be put into place. No pin in hole fix. Nope. I needed an old fashioned fixing rig.


improvised with some rulers. And with that it's time to pose again for our staggerwing... Say cheese..:-)


SHAKY962
_VISITCOMMUNITY
Buenos Aires, Argentina
Joined: May 21, 2012
KitMaker: 765 posts
AeroScale: 316 posts
Posted: Thursday, March 20, 2014 - 04:51 PM UTC
Excellent work!!!!!!!!!!!!!!
I see this kit last week.... but when I take a look I run!!!!
 _GOTOTOP