_GOTOBOTTOM
World War II: Great Britain
Aircraft of Great Britain in WWII.
Hosted by Rowan Baylis
FR Typhoon– Photo M
robot_
_VISITCOMMUNITY
United Kingdom
Joined: March 08, 2009
KitMaker: 719 posts
AeroScale: 691 posts
Posted: Monday, October 29, 2012 - 10:50 AM UTC
This is a Hasegawa 1/48 Hawker Typhoon, with a few tweaks.


Notice anything missing?


Quite fiddly and tedious– opening up the exhausts (note how Hasegwa has only moulded one exhaust entering each nozzle at the base– there should be two per nozzle).
Also opened the hand and foot holds in the starboard fuselage insert– these will have open covers made later.


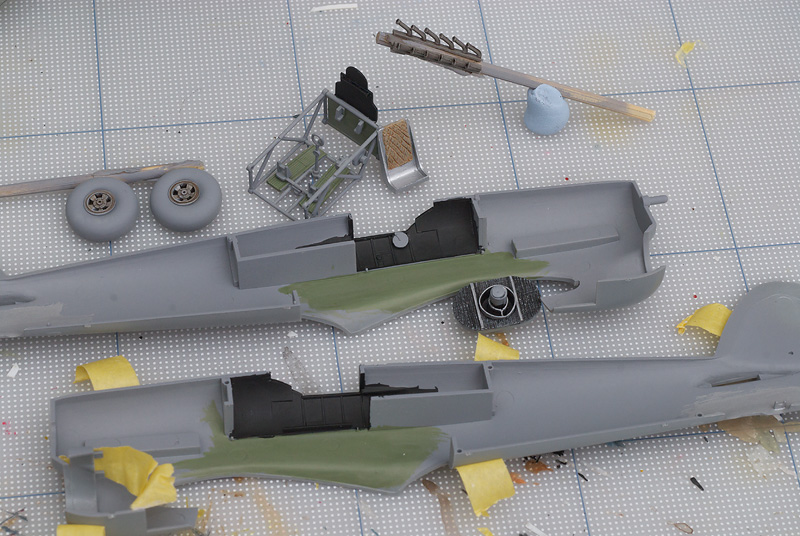
Filling the inner port shell chutes (used miliput for the first round, as it scribes better than the green squadron putty).


Added a landing light reflector made from foil (pushed over the rounded end of a paintbrush, then cut around the end of the brush with a knife– I don't have a round punch set to make a disc first). The three-spoke wheel at the front of the reflector was made from fine copper wire painted black– took an hour to get one that didn't look a mess). Unfortunately, this is an inaccuracy, as by this point in the war, Typhoons had these faired over. I think they add interest, so I'll be keeping them (and I wanted to try making the three-spoke wheel part, ever since of recently saw some posh photo-etched versions).


You can also see the leading edge camera aperture (20" lens equipped F.24 camera, behind a 5" square glass registration plate). Also note the three scribed panels where the original 3 F.24 cameras locations were covered.


Another view of the scribing- done using a needle, then sanded, then cleaned out using a sharpened piece of sprue– this cannot scratch the surrounding plastic if you slip. The circles were done with a frame hanger's nail hole as a template, and the rounded rectangle was done with the hole in a modelling knife blade.


Foot stirrup hole in lower fuselage opened.


New radiator front scratch-built (texture from an old black T-shirt soaked in superglue– take care the fumes are bad for you, particularly your eyes). The central part will form the base for the the 'cuckoo-door' air filter, to be fitted after most of the painting is done.


Cockpit almost out of the box (seat thinned on all sides, height reduced a bit to allow us to see the scratch-built bar over which the shoulder straps run. Headrest armour thinned down (this also removes a sink mark). Padded seat back added (geeky detail: the diamonds on this are taller than wide, MDC's 1/32 seat has them incorrectly wider than tall).
robot_
_VISITCOMMUNITY
United Kingdom
Joined: March 08, 2009
KitMaker: 719 posts
AeroScale: 691 posts
Posted: Monday, November 26, 2012 - 10:17 AM UTC


This photo shows how I made the landing lights- copper wire stuck down to masking tape, joined with super glue. Imperfect reflector made using end of paint brush, then cut around. The flaw in this plan was that the clear covers supplied in the kit didn't fit over the new reflectors. I could have tried smash moulding a new set of covers, but as this aircraft didn't have the landing lights, I decided to fair them over, using the clear parts as a start.


I could help myself taping the kit together to see how it looks.


I've looked at a lot of Typhoon photographs, and the Hasegawa kit really captures the shape very, very well.


I managed to spray some grey primer (Halfords Plastic Primer) on when the weather permitted, but it is hard to see in these photos as the plastic is exactly the same colour! I then brush-painted some interior grey-green, black and silver bits.

(ignore 1/32 Revell/MDC/scratch cockpit– it's quite ugly in places, but the canopy will be closed on that one)


Not 100% accurate, but I am happy at how the radiator looks at this stage.


Wheel wells simply painted Citadel Mithryl silver (with a touch of grey added to tone down the shininess), with their first wash.


Cockpit painting has only just begun.

If you want to see how the Hasegawa wheel wells and cockpit really should be detailed, take a visit to Jon Kunac-Tabinor's Work In Progress on Britmodeller.
robot_
_VISITCOMMUNITY
United Kingdom
Joined: March 08, 2009
KitMaker: 719 posts
AeroScale: 691 posts
Posted: Friday, January 11, 2013 - 08:42 AM UTC
Slowly crawling along: seat belts done


Made from paper, cut with a knife from a print-out of a scaled photograph of a 1/24 photo-etch fret.
robot_
_VISITCOMMUNITY
United Kingdom
Joined: March 08, 2009
KitMaker: 719 posts
AeroScale: 691 posts
Posted: Sunday, January 13, 2013 - 09:40 AM UTC
Quiet here in this thread....


Calling the cockpit complete now. Need to get this closed up and moving on...


Drybrushed the instrument panel, then went over needles in white.
Added brown surround to coolant temperature gauge, and red-orange around oil level and oil temperature gauges.
Touched up the black-lining around the seat belts.
Drybrushed the foot plates (that had already had an ink wash), then added some dried mud in brown inks and paints.

AussieReg
Staff MemberAssociate Editor
AUTOMODELER
#007
_VISITCOMMUNITY
Victoria, Australia
Joined: June 09, 2009
KitMaker: 8,156 posts
AeroScale: 3,756 posts
Posted: Sunday, January 13, 2013 - 11:50 AM UTC
Very neat work Ben, on the mods and the scratchbuilding. Great to see some more progress on this one.

Cheers, D
robot_
_VISITCOMMUNITY
United Kingdom
Joined: March 08, 2009
KitMaker: 719 posts
AeroScale: 691 posts
Posted: Saturday, January 19, 2013 - 09:39 AM UTC
Thanks Damian, it feels really good to make progress at last.

Closed her up tonight.

Needed two spreaders made from sprue (beige pieces in photo below). There was quite a gap at the wing roots without these (see photo in last post).


Gaps gone.


I probably didn't need this much filler, but I'd got it out for a tiny bit of filling on the join in the radiator intake, and though I might as well at a bit here and there.

robot_
_VISITCOMMUNITY
United Kingdom
Joined: March 08, 2009
KitMaker: 719 posts
AeroScale: 691 posts
Posted: Sunday, January 27, 2013 - 09:23 AM UTC
Did some more detailing. Cockpit nearly complete.
rochaped
_VISITCOMMUNITY
Lisboa, Portugal
Joined: August 27, 2010
KitMaker: 679 posts
AeroScale: 669 posts
Posted: Sunday, January 27, 2013 - 09:40 AM UTC
Nice work Ben like ur scratch approach, very good results indeed.
Just one question thou: was there a typhoon with uneven wing guns?
Seems a bit odd to me, always assumed that guns came in pairs because it is needed to maintain balance when firing.
robot_
_VISITCOMMUNITY
United Kingdom
Joined: March 08, 2009
KitMaker: 719 posts
AeroScale: 691 posts
Posted: Sunday, January 27, 2013 - 09:59 AM UTC
Thanks Pedro.

Yes, these FR Typhoons left the factory with three cannon, I believe. But as you say this is unbalanced when they fired and led to the removal of the other inner cannon very soon after they entered service. Initially it was just they cannon itself that was removed, then the end section of the fairing, and finally a few had the cannon fairing completely removed.

I am not sure in which state I will depict this aircraft- but it is a decision I need to take soon.
magnusf
_VISITCOMMUNITY
Stockholm, Sweden
Joined: May 02, 2006
KitMaker: 1,953 posts
AeroScale: 1,902 posts
Posted: Thursday, January 31, 2013 - 08:04 AM UTC
Ben! Glad your building again - Typhoon, what else ? I'll do the Airfix kit when it is released!


Magnus
Jessie_C
_VISITCOMMUNITY
British Columbia, Canada
Joined: September 03, 2009
KitMaker: 6,965 posts
AeroScale: 6,247 posts
Posted: Thursday, January 31, 2013 - 02:32 PM UTC

Quoted Text

I am not sure in which state I will depict this aircraft- but it is a decision I need to take soon.


My vote is for the end fairing removed and sealed off so it still looks visually unballanced (thus catching the viewer's interest), yet not as though it's got three cannon.
robot_
_VISITCOMMUNITY
United Kingdom
Joined: March 08, 2009
KitMaker: 719 posts
AeroScale: 691 posts
Posted: Tuesday, July 02, 2013 - 08:43 AM UTC
I'm keeping the three full-length cannon.

Back to work on this one now.

Took a couple of goes to get a good coat of primer on. I sprayed the first coat in the rain! Left craters where the water displaced the spray (Halfords Plastic Primer). I had quite a few spots to fill with Mr Surfacer 500 anyway. Second coat was decanted Halfords primer into air brush, which worked well.


The preshading is not finished. I was using some old citadel acrylics (by old, I mean 1992 vintage). The blue in particular was over thinned, and came out of the airbrush without any backwards pressure. I recently completely stripped down my airbrush, so no I suspect the nozzle is not centred over the needle, or I have enlarged the nozzle, bent it or something. Anyway, I will ad some white panels and some green to the removable ones.
stooge
_VISITCOMMUNITY
South Australia, Australia
Joined: June 20, 2013
KitMaker: 210 posts
AeroScale: 210 posts
Posted: Tuesday, July 02, 2013 - 12:51 PM UTC
An awesome report and beautiful pics of progress. Inspirational. And I did not know until now there was a FR Typhoon. Your learn something new every day.
Littorio
_VISITCOMMUNITY
England - South East, United Kingdom
Joined: September 15, 2004
KitMaker: 4,728 posts
AeroScale: 1,351 posts
Posted: Tuesday, July 02, 2013 - 05:06 PM UTC
Ben, nice to see your build and progress, it makes me want to start my three Hasegawa tiffies but they need to wait their turn until the bench is clear, which at my current build rate will be mid next year.

I'll keep watching.
robot_
_VISITCOMMUNITY
United Kingdom
Joined: March 08, 2009
KitMaker: 719 posts
AeroScale: 691 posts
Posted: Thursday, July 04, 2013 - 06:06 AM UTC
Thanks guys!

I'm happy to be making progress again. This psychedelic painting is fun (I've never done it before, so it is bit of a gamble!).


The camera panel under the wing has been highlighted by green, as it could have been repainted after the covers were put over the old camera openings. I've painted invasion stripes roughly, so that they show through a little as if they have been overpainted.
robot_
_VISITCOMMUNITY
United Kingdom
Joined: March 08, 2009
KitMaker: 719 posts
AeroScale: 691 posts
Posted: Saturday, July 06, 2013 - 09:44 AM UTC
I ended up doing the upper camouflage freehand, as I didn't find the white-tac. 1/48 is probably the smallest scale where you can get away with it.

I'm not 100% sure all the preshading was worth the effort. I was airbrushing in very poor light this evening, and I still haven't had a good look at how the effects have worked out. Here is a quick shot in poor lighting:

robot_
_VISITCOMMUNITY
United Kingdom
Joined: March 08, 2009
KitMaker: 719 posts
AeroScale: 691 posts
Posted: Saturday, July 06, 2013 - 06:10 PM UTC
Up early, so I painted the Medium Sea Grey underside colour.


robot_
_VISITCOMMUNITY
United Kingdom
Joined: March 08, 2009
KitMaker: 719 posts
AeroScale: 691 posts
Posted: Tuesday, July 09, 2013 - 08:36 PM UTC
Started the painting of the national markings. I'm not following the order that Miracle Masks suggests, and this may be causing me problems- it was quite time consuming to get the yellow even all the way around. I've already painted the inner white too- I did this at the same time as the undercoat for the yellow outer.


plastickjunkie
_VISITCOMMUNITY
Florida, United States
Joined: December 31, 2009
KitMaker: 399 posts
AeroScale: 132 posts
Posted: Wednesday, July 10, 2013 - 02:16 AM UTC
That is excellent work. Although most of the pre shading was lost on top, it still peeks thru showing great results.

My British favs are the Typhoon and Sea Fury. They both look just plain deadly!
golfermd
_VISITCOMMUNITY
Maryland, United States
Joined: March 01, 2013
KitMaker: 152 posts
AeroScale: 98 posts
Posted: Wednesday, July 10, 2013 - 04:40 AM UTC
Great progress Ben. It's very apparent you've spent quite a bit of time doing your mods. I'm at the beginner stage of modeling. For the first time in my life I was able to apply decals in the right place, and got them there without folding or tearing. And they stuck! A true accomplishment.
chris1
_VISITCOMMUNITY
Auckland, New Zealand
Joined: October 25, 2005
KitMaker: 949 posts
AeroScale: 493 posts
Posted: Wednesday, July 10, 2013 - 07:51 AM UTC
Hi Ben

She 's looking good can't wait to see her finished.
But and this is bugging me why only 3 cannons,I'm guessing a camera or similar in the 4ths place.
Was this normal for a PR version? Just looks odd.

Cheers


Chris
robot_
_VISITCOMMUNITY
United Kingdom
Joined: March 08, 2009
KitMaker: 719 posts
AeroScale: 691 posts
Posted: Wednesday, July 10, 2013 - 09:10 AM UTC
No it was not a normal camera fit. The FR Typhoons left the factory with three cameras in the inner port cannon ammo bay. They were supposed to replace Mustang I and Ia aircraft for low level tactical photography. How ever this aircraft was one of three unofficially lent to a Typhoon wing that wanted to get their own strike result photographs. These had a forward facing camera installing the wing where the barrel of the cannon would have been. It was much easier for non-photo specialists to get photos with this than the original installation which was tricky to aim.
Holdfast
Staff MemberPresident
IPMS-UK KITMAKER BRANCH
#056
_VISITCOMMUNITY
England - South West, United Kingdom
Joined: September 30, 2002
KitMaker: 8,581 posts
AeroScale: 4,913 posts
Posted: Wednesday, July 10, 2013 - 07:13 PM UTC

Quoted Text

Started the painting of the national markings. I'm not following the order that Miracle Masks suggests, and this may be causing me problems- it was quite time consuming to get the yellow even all the way around. I've already painted the inner white too- I did this at the same time as the undercoat for the yellow outer.


I'm sure that your method will work The method that I describe in the instructions did take me about a year to work out though The way that you are doing this is interesting but confuses me However there are many ways in which the masks can be used so if it works for you its the right way I had to come up with a method that I could describe and that was foolproof I'm looking forward to the results. I ought to post the pictures of my painted 1/32 Spit Mk V?
Joel_W
Staff MemberAssociate Editor
AUTOMODELER
_VISITCOMMUNITY
New York, United States
Joined: December 04, 2010
KitMaker: 11,666 posts
AeroScale: 7,410 posts
Posted: Thursday, July 11, 2013 - 03:02 AM UTC
Ben, just found your build thread, and will be subscribing so I can follow it through to it's conclusion. Excellent detailing on the interior, radiator & cannon/camera modifications.

Interesting use of so many various colors for pre-shading. On my screen it hardly shows on the upper surfaces, but too much of the blue shows through on the lower surfaces. The color just doesn't look quite right. I would have opted for a darker shade of your base color.

Looking forward to your next update.
Joel
robot_
_VISITCOMMUNITY
United Kingdom
Joined: March 08, 2009
KitMaker: 719 posts
AeroScale: 691 posts
Posted: Thursday, July 11, 2013 - 06:41 AM UTC
I have now finished the roundels- it was tedious! The two problems were having to manually centre some of the rings, and having to mask around the gaps in the masks. Both these were caused by me thinking i knew better than the instructions, and thinking I would save one change of colour in the airbrush (doing the white undercoat for the yellow at the same time as the white ring).

I used xtracrylix for the yellow, and xtracolour for the roundel red and blue. I have heard from many places that White Ensign have good RAF roundel colours, but I also heard several different opinions of which versions of the roundel colours they are supposed to represent. As I like the colours of the Xtradecals I've used in the past, I decided to go with the xtracolours that match the decals. I've never airbrushed enamels (and not used them at all since I was a child). The benefits seem to be the nozzle not clogging and I found it easier to get a mix that gave very controllable translucent coats without any splatter. The negative was that I found it hard to judge how much wet paint was building up, as the paint is very glossy so looks wet even when dry, and I found that I could accidentally build up the paint to the point that it ran. The easier cleaning of the airbrush is another plus- everything comes off with white spirit without fuss.


I've just removed the masks. Pretty happy with the results. There is a bit of residue on the uppers from the masks, but I think this should go with a gloss coat (fingers crossed).

Mal: I am sure your method is much, much easier than the complex operation that I ended up doing! Do you have any experience with getting rid of the residue- I used Tamiya acryllic paints for the camo colours?


Quoted Text

On my screen it hardly shows on the upper surfaces, but too much of the blue shows through on the lower surfaces. The color just doesn't look quite right. I would have opted for a darker shade of your base color.


Joel: Yes, using the blue was to achieve a contrast with the oranges I was using on the uppers, and I didn't really think much about the underside- I just had a lot of blue in the airbrush and carried on underneath. The top paintwork is currently supposed to be showing different fading of the pain on different panels. The underside, not being exposed as much, would not have faded too much, and the preshading was supposed to show dirt build-up around the joints. I am hopeful that the oil washes and streaks, which will be in dark browns, will counter the blue tint that is seen in the photos.
 _GOTOTOP