World War II: Great Britain
Aircraft of Great Britain in WWII.
Hosted by Rowan Baylis
There's a storm front coming
TheModeller
_VISITCOMMUNITY
England - South East, United Kingdom
Joined: March 01, 2010
KitMaker: 127 posts
AeroScale: 61 posts
Posted: Monday, March 25, 2013 - 05:44 AM UTC

Quoted Text


Note the huge difference in wheel well position between Italeri and Hasegawa: It is a huge discrepancy, and the Hasegawa is obviously the correct one: The Italeri wheel wells are right up to the leading edge: No Hurricane was like that that I am aware of...

This is on the bottom, but really disqualifies the Italeri kit in my opinion.

I am surprised few reviewers make note of this, as this kind of thing is usually more up their alley than canopies...

Gaston


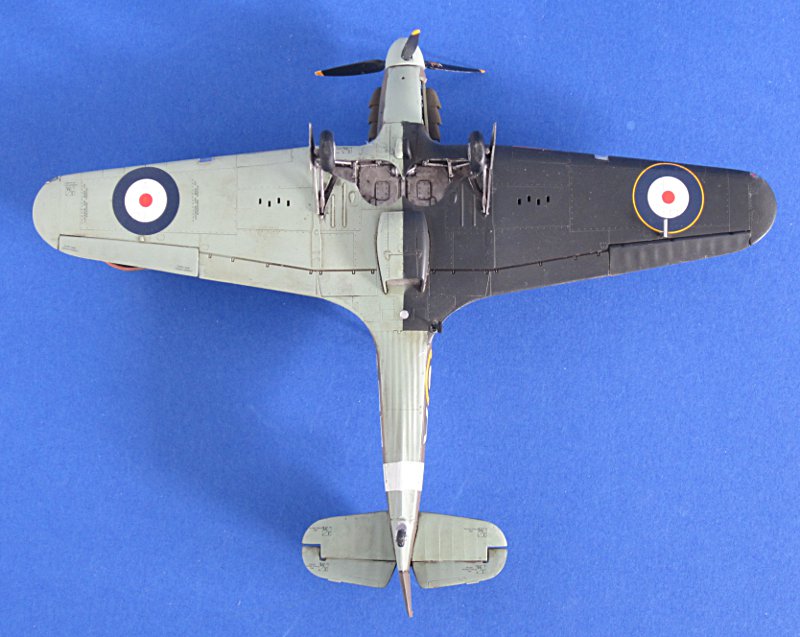
And note the picture of the underside of the finished model that clearly shows the wheel well is in the right place.

Yet again trashing a kit you don't own because of your flawed interpretation of someone elses photograph.

It doesn't surprise me in the least though.
GastonMarty
_VISITCOMMUNITY
Quebec, Canada
Joined: April 19, 2008
KitMaker: 595 posts
AeroScale: 507 posts
Posted: Monday, March 25, 2013 - 11:02 AM UTC

Quoted Text


Quoted Text


Note the huge difference in wheel well position between Italeri and Hasegawa: It is a huge discrepancy, and the Hasegawa is obviously the correct one: The Italeri wheel wells are right up to the leading edge: No Hurricane was like that that I am aware of...

This is on the bottom, but really disqualifies the Italeri kit in my opinion.

I am surprised few reviewers make note of this, as this kind of thing is usually more up their alley than canopies...

Gaston


And note the picture of the underside of the finished model that clearly shows the wheel well is in the right place.

Yet again trashing a kit you don't own because of your flawed interpretation of someone elses photograph.

It doesn't surprise me in the least though.


Sigh...

Finished model photo in question...:


Hasegawa:


The Hasegawa is abbout OK, but may be a tiny trifle too far back... In any case you can't argue both kits are the same...

Amazing, isn't it, that most aircraft kits of the same thing are completely different, and yet we are to believe they are ALL fine...

Gaston

SunburntPenguin
_VISITCOMMUNITY
Australian Capital Territory, Australia
Joined: March 15, 2011
KitMaker: 121 posts
AeroScale: 112 posts
Posted: Monday, March 25, 2013 - 08:13 PM UTC
Gaston

How many aircraft and kits of said aircraft are you the sole arbiter of accuracy of them?

Get on with building, as all we build are scale representations of the real aircraft, not millimetre perfect reproductions.

It's supposed to be a hobby that provides enjoyment, not nitpicking rivet counting.
TheModeller
_VISITCOMMUNITY
England - South East, United Kingdom
Joined: March 01, 2010
KitMaker: 127 posts
AeroScale: 61 posts
Posted: Tuesday, March 26, 2013 - 05:11 AM UTC
I can argue they are the same, or at least as near as makes no difference, I have examples of both the Hasegawa and Italeri kits, and from the pictures you've culled from Google I really can't see the problem Gaston.

You got 3 pics, all at different angles, all taken with differing camera setups and you're trying to highlight fractional differences between them in order to bad mouth a kit you obviously don't own...

Again...

Tell you what Gaston, I've heard of this hobby where people make little plastic models of airplanes and tanks and ships and all sorts of stuff... You should try it sometime.
Troy_Smith
_VISITCOMMUNITY
United Kingdom
Joined: April 08, 2013
KitMaker: 5 posts
AeroScale: 4 posts
Posted: Sunday, April 07, 2013 - 02:31 PM UTC
Hi Les

while Gaston pontificates about the front edge of the wheelwell, there are A LOT more errors in the Italeri kit...the more I look, the more I find.

OK, I'm a Hurricane anorak, but, if Italeri had invested in a set of AL Bentley's plans there would not be this list.
I'm glad I looked at this again, as I need to check the fin leading edge out as well.

OK, here we go
here's a list of correction for the Italeri kit I have compiled ...

The Italeri hurricane is a mixed bag, overall it's well shaped, but has a load of stupid mistakes that really should not have been made.

Two items that stand out in need to replacement/work, the Prop, and the wheels

props, the DH type I think is unsalvageable, the Rotol could be corrected.
use DH back plate, cut Rotol back at base by approx 1mm until fits the DH backplate. Reshape spinner.
Quickboost do a replacement DH type, but I not examined it. The Airfix and Ark kits both have options of different props, the Rotol ones from these can be used, though the overall diameter of the rotol blades needs reducing. They also have the early Spitfire type included, as fitted to some early planes. The Ark kit also has the longer Hurricane Rotol which was retrofitted to MkI's later on.
[for example, the Hendon MkI has the later type rotol and MkII type tailwheel fitted from it's days in Training command]

Wheels, They really cocked up adding 3 spoke wheels, as that's something I've [u]never[/u] seen on a Hurricane!
Real shame as the 5 spoke are used on the early production, all fabric wing and a lot of early metal....[Classic Airframes missed this too, so kit that had 4 and 5 spoke would have been a real boon.]
The wheels don't look quite right. The 4 spoke wheel hubs might be salvageable, if you remove the moulded 'rim' on the tyre they look useable.

[the Hasegawa wheels are wrong too by the way...hubs are too small.]
The 'best' replacement wheels I've seen are the True Details ones, but they need the overdone weight bulges reducing.
The ones from Brengun look pretty good but not seen in personally.

tail wheel too high, with no hole for it.

gun ports too high in front of wing,

fabric overlapping metal on tailplane, by this I mean the tailplane fillets are metal fairings, the fin fabric juts out above this! This will require building up the fillets.

fantasy fasteners/rivets on wing panels. [just wrong, do not exist]

no wing walkway plates, but provided as decals.

Underwing shell ejector ports look too short and one is wrongly placed, the real ones are not symmetrical, the kits one are. Funnily enough the painting guide shows the correct layout!!!

I knew there was something funnty about the upperwing gun access panels
Eventually i got around to resetting up my scanner, propped the wing up so it was flat in relation to the scanner bed, and then overlaid it on the Bentley drawings in a graphics program

Bentley panel lines black, Italeri white...


oh dear. Weirdly enough it's not that horrible seen in isolation, though it just looked wrong on closer inspection. Doing this shows why!

Note also the mismatched root panels and the too wide aileron.

the landing light when viewed from the front have side that are at right angles to the ground, but they should be at right angles to the wing.

I think the gun muzzle ports are little to high in the wing leading edge, I'm not certain, but something here looks funny.
Given the nature of them it's not going to be much more work moving them down.

The wheel well lacks detail, as do the inside of the gear doors.

there is a 'bumped up' panel line on the access panel above the front wing root.

curved corners on the small rectangular 2nd fabric panel on the starboard side.

a cockpit floor!

wrong shaped control column grip.

there are build reports that the open engine panels do fit well in the closed position, though I think that they just require careful fitting from inside, possibly with added plastic card tabs.

I should say I have only test fitted the kit, and when I do get around to building it other issues may arise.

I've seen a few OOB builds on Britmodller and gone 'eh' at the upper wing roundel position, this being being too far outboard.

A look at the decal placement guide shows why!

Ironically the correct info is in the booklet!
Underwing can be seen on page 7, upperwing on page 9 and page 30, the MkI at the RAF museum.

OK, this may seem to be nitpicking, but if it was a Spitfire...

Pretty much everything is easily correctable with some modelling skill for for a kit with a RRP of 30 GBP it's a bit much.

Noe, the hasegawa kit, while mostly very good has one glaring flaw, the fabric covred side access panels.
To save cluttering up this thread, please see here

http://www.britmodeller.com/forums/index.php?/topic/234934849-classic-airframes-hurricane-worth-getting/#entry1241894

for more information and comparison pictures of this problem.
The big problem is correcting this one, or correcting it easily

Hope of interest to folks here
T
TheModeller
_VISITCOMMUNITY
England - South East, United Kingdom
Joined: March 01, 2010
KitMaker: 127 posts
AeroScale: 61 posts
Posted: Sunday, April 07, 2013 - 08:31 PM UTC
Hi Troy.

I don't dispute that the Italeri kit is far from perfect, its advantage is that its available off the hobbyshop shelves, the Hasegawa kit, which, as you mention, has its own problems is rarely seen in shops these days and examples on eBay seem to fetch stupidly high prices.

My real point is that while you have found and identified these errors by examining the kit, making measurements and comparisons and doing your research, Gaston is quite happy to slag it off based on a few pictures of other peoples work, or culled from a Google search, he's never looked at the actual plastic, its a habit he's far too fond of in my opinion.
alpha_tango
_VISITCOMMUNITY
Germany
Joined: September 07, 2005
KitMaker: 5,609 posts
AeroScale: 5,231 posts
Posted: Sunday, April 05, 2015 - 04:26 PM UTC
Hmm kind of a Zombie thread but still I did work on the kit from time to time.

Somhow I did not take a picture of the finished camo and applied decals. Now I have ordered Airfix' Hurricane I need some space in my shelf of doom so I try to finish this one.

I am sure someone will find a fatal flaw in this distorsioned picture. It is just intended to show the added plastic parts (exhausts, tail wheel and Prop)


I decided against the Griffon (CZ) tail wheel assembly in favor of the better strength of the plastic part. I forgot to order some Ultracast exhausts, but the kit items are not that bad. I drilled out the aft round exhausts and will treat the others with a dot of black paint. The prop is the from the Classic Airframes early Hurricane. I assembled it as per instructions but it is not right. I will not glue it to the model and search for an appropriate replacement later.

Decals are from the decal stash (maybe Skydecals), Reference Hyperscale article

all the best

Steffen
Joel_W
Staff MemberAssociate Editor
AUTOMODELER
_VISITCOMMUNITY
New York, United States
Joined: December 04, 2010
KitMaker: 11,666 posts
AeroScale: 7,410 posts
Posted: Sunday, April 05, 2015 - 07:10 PM UTC
Steffen,
Talk about slow but steady I've got to hand it to you, that after all this time you've picked up the Hurricane and will be finishing it.

The overall of the kit looks rather good. Looking forward to seeing the final set of RFI pictures.
Joel
alpha_tango
_VISITCOMMUNITY
Germany
Joined: September 07, 2005
KitMaker: 5,609 posts
AeroScale: 5,231 posts
Posted: Sunday, April 05, 2015 - 09:00 PM UTC
Cheers Joel,

well I have a lot of started and half-finished models and if I feel in teh mood I work on them. There are only a few that are that bad that I try to forget them (shall I say Fw 200, older Aeroscalers may remember).

So this one is close to its finish. Today i got the was on and a final flat coat. Demasking and re-attaching the broken off aerial mast. There are still some parts missing but all-in-all I am quite happy with it.


all the best

Steffen
JClapp
#259
_VISITCOMMUNITY
Massachusetts, United States
Joined: October 23, 2011
KitMaker: 2,265 posts
AeroScale: 1,715 posts
Posted: Sunday, April 05, 2015 - 09:36 PM UTC
Ha Stephan. I see you almost finished your 2015 Hanger Queen.

Looks great! don't forget to put pictures in the gallery.
alpha_tango
_VISITCOMMUNITY
Germany
Joined: September 07, 2005
KitMaker: 5,609 posts
AeroScale: 5,231 posts
Posted: Monday, April 06, 2015 - 12:30 AM UTC
Cheers Jonathan!

It definitely is a candidate, but I hope to finish some more.

all the best

Steffen
alpha_tango
_VISITCOMMUNITY
Germany
Joined: September 07, 2005
KitMaker: 5,609 posts
AeroScale: 5,231 posts
Posted: Thursday, April 09, 2015 - 04:05 PM UTC
So now this thing is close to finished. I have added the foot rest, a clear rear navigation light with Bondex (UV hardening, clear "glue"/resin from the hardware store) and of course teh aerial with UvdR rigging thread "Normal"


Not sure if I will ever change the prop so I call it finished (for now). The 10 pic WA will follow later today.

all the best

Steffen
alpha_tango
_VISITCOMMUNITY
Germany
Joined: September 07, 2005
KitMaker: 5,609 posts
AeroScale: 5,231 posts
Posted: Thursday, April 09, 2015 - 10:33 PM UTC
Here are the finished pix. All in all this is not a stellar build but it is finished (though I want to exchange the prop later)

Stanford_Tuck_01.jpg

Stanford_Tuck_02.jpg

Stanford_Tuck_03.jpg

Stanford_Tuck_04.jpg

Stanford_Tuck_05.jpg

Stanford_Tuck_06.jpg

Stanford_Tuck_07.jpg

Stanford_Tuck_08.jpg

Stanford_Tuck_09.jpg

Stanford_Tuck_10.jpg

all the best

Steffen
Merlin
Staff MemberSenior Editor
AEROSCALE
#017
_VISITCOMMUNITY
United Kingdom
Joined: June 11, 2003
KitMaker: 17,582 posts
AeroScale: 12,795 posts
Posted: Friday, April 10, 2015 - 01:49 AM UTC
Nice one Steffen!

A really fine finale to the epic double build. And perfectly timed for the arrival of your new-tool Airfix kit. If you're not "Hurricaned-out" it'll be great to see what you do with the new one.

All the best

Rowan
alpha_tango
_VISITCOMMUNITY
Germany
Joined: September 07, 2005
KitMaker: 5,609 posts
AeroScale: 5,231 posts
Posted: Friday, April 10, 2015 - 10:51 AM UTC
Thanks Rowan!

This was intended to hold some more builds (incl. Typhoon and Tempest).

Though, I am not sure if I should start the Airfix kit now. It looks really nice and if it builds half way like it looks in the box the Italeri and Hasegawa are obsolete, especially considering the good price of the new kit. BUT: I also would like to finish some more of my older projects and of course the "Dackelbauch".

all the best

Steffen
thegirl
_VISITCOMMUNITY
Alberta, Canada
Joined: January 19, 2008
KitMaker: 6,743 posts
AeroScale: 6,151 posts
Posted: Friday, April 10, 2015 - 06:10 PM UTC
For something that ended up as a shelf queen. Sure turned out looking pretty damn good Steffen


Terri
goodn8
_VISITCOMMUNITY
Berlin, Germany
Joined: October 12, 2008
KitMaker: 709 posts
AeroScale: 651 posts
Posted: Friday, April 10, 2015 - 08:07 PM UTC
Very well done, Steffen! Great paint and weathering, I like this much
Thomas
alpha_tango
_VISITCOMMUNITY
Germany
Joined: September 07, 2005
KitMaker: 5,609 posts
AeroScale: 5,231 posts
Posted: Friday, April 10, 2015 - 09:22 PM UTC
Thank you Terri and Thomas!

I am happy with the result...

all the best

Steffen
Holdfast
Staff MemberPresident
IPMS-UK KITMAKER BRANCH
#056
_VISITCOMMUNITY
England - South West, United Kingdom
Joined: September 30, 2002
KitMaker: 8,581 posts
AeroScale: 4,913 posts
Posted: Saturday, April 11, 2015 - 11:13 AM UTC
Now that looks very good Steffen
alpha_tango
_VISITCOMMUNITY
Germany
Joined: September 07, 2005
KitMaker: 5,609 posts
AeroScale: 5,231 posts
Posted: Sunday, April 12, 2015 - 08:30 PM UTC
Thanks Mal!

and it is not even a Spitfire

I think I used your camo masks on this kit, but I am not sure. Of course I will do on the new Airfix kit!

all the best

Steffen
Joel_W
Staff MemberAssociate Editor
AUTOMODELER
_VISITCOMMUNITY
New York, United States
Joined: December 04, 2010
KitMaker: 11,666 posts
AeroScale: 7,410 posts
Posted: Sunday, April 12, 2015 - 09:33 PM UTC
Steffen,
Congrats on finally finishing the Hurricane. It sure turned out quite nice. Excellent camo scheme which I'm sure you depicted the correct version

Joel
alpha_tango
_VISITCOMMUNITY
Germany
Joined: September 07, 2005
KitMaker: 5,609 posts
AeroScale: 5,231 posts
Posted: Monday, April 13, 2015 - 09:53 PM UTC
Thanks Joel,

well, I took the given refenrence and I am pretty sure I used Mals masks so what could go wrong... otoh much went wrong with the Italeri kit.

cheers

Steffen
alpha_tango
_VISITCOMMUNITY
Germany
Joined: September 07, 2005
KitMaker: 5,609 posts
AeroScale: 5,231 posts
Posted: Friday, September 11, 2015 - 06:42 PM UTC
Hello again,

another Hurricane started. This time for the BoB75 campaign, it will be hard to finish until the end of teh month but I'll try.

I will build Airfix' new Hurricane Mk.I. Decals come from the box (boxtop markings). I will add some aftermarket, nonetheless this project falls in my "almost oob" category as these are mostly replacements)


I just started with some cockpit bits, but there is not much to show yet.

all the best

Steffen
alpha_tango
_VISITCOMMUNITY
Germany
Joined: September 07, 2005
KitMaker: 5,609 posts
AeroScale: 5,231 posts
Posted: Friday, September 11, 2015 - 09:30 PM UTC
Hi again,

so here is the first pix. I started with the cockpit as per instructions. Sadly teh wing spar was pretty warped so I glued the assembly to the lower wing early (using lots of glue and clamps)... this was a bit disappointing. You might guess, that i forgot to insert some wheel well parts which hat to be fiddled in. Luckily this was no big deal.


I also began with Eduards fold seat not my favorite stuff. This time soldering the thing together worked out nicely. Nonetheless I will attach all other parts with Gators glue as there is not that much strength required. One day I need to get more practice with the iron...


all the best

Steffen
alpha_tango
_VISITCOMMUNITY
Germany
Joined: September 07, 2005
KitMaker: 5,609 posts
AeroScale: 5,231 posts
Posted: Saturday, September 12, 2015 - 03:47 PM UTC
Hi again

I do not want to bore you with my dislike for certain parts of modelling. So lets just say the kit is progressing:


all the best

Steffen