

 "Q"
"Q"Air Campaigns
Want to start or join a group build? This is where to start.
Want to start or join a group build? This is where to start.
Hosted by Frederick Boucher, Michael Satin
OFFICIAL: P-40, Work Horse of WWII Campaign
Red4

Joined: April 01, 2002
KitMaker: 4,287 posts
AeroScale: 1,164 posts

Posted: Friday, March 11, 2011 - 04:00 PM UTC
Page 3 Bob. "Q"
"Q"
Bigrip74
Joined: February 22, 2008
KitMaker: 5,026 posts
AeroScale: 2,811 posts

Posted: Friday, March 11, 2011 - 05:12 PM UTC
Quoted Text
Page 3 Bob.
I appologize Matt, I meant has the ever been a photo thread of Armorama / AeroScale members airbrush/compressor setups like the dirty workbench?
Bob
Red4
Joined: April 01, 2002
KitMaker: 4,287 posts
AeroScale: 1,164 posts
Posted: Saturday, March 12, 2011 - 02:45 AM UTC
My bad... Hmm, now that you mention it, I don't think so. That might be kinda cool to see. I know when I first started I had a really noisy Badger compressor my wife got me. My modeling room was right next to our bedroom and I would frequently be in there at 3am building. Many a night I woke her when I fired that little thing up. Lets just say she made a sad face, and I caught hell for it. 
I'd jump in on that one if you start the thread.
"Q"
I'd jump in on that one if you start the thread.
"Q"

AaronW
Joined: August 03, 2003
KitMaker: 197 posts
AeroScale: 42 posts
Posted: Saturday, March 12, 2011 - 04:09 AM UTC
All I'd be able to show was my airbrush in the box next to a dusty air compressor. 
It could be very inspirational though, its been on my must start using so I can get comfortable with it list for years now.
It could be very inspirational though, its been on my must start using so I can get comfortable with it list for years now.
Bigrip74
Joined: February 22, 2008
KitMaker: 5,026 posts
AeroScale: 2,811 posts
Posted: Saturday, March 12, 2011 - 04:10 AM UTC
Matt, I do not have to be the one that starts it. You have a gift with vocabulary, mine is southern and most people have a little trouble with it.
Bob
Bob

29Foxtrot

Joined: September 19, 2003
KitMaker: 708 posts
AeroScale: 674 posts

Posted: Saturday, March 12, 2011 - 07:50 AM UTC
Damian,
I got both the P40e and P40k kits about 2 years ago, with the intent on doing the 'E' as an RAAF 'Milne Bay' shark mouth bird and 'K' as John Gorton's AM-E, but after opening the 'K' box elected to do the 'Cobra Head' with it's unique scheme.
Matthew,
Your 'B' is progressing nicely, [I'm still toying with the idea of getting that kit to do Clive Caldwell's RAF North African bird].
To both thanks for your kind words on the progress build.
On another note: I used to teach Airbrushing to beginners, when I worked in the retail side of the industry, a lot of my old students, clients and club members keep coming back for refresher lessons.
3 pix of the 'Milne Bay' RAAF P40e:
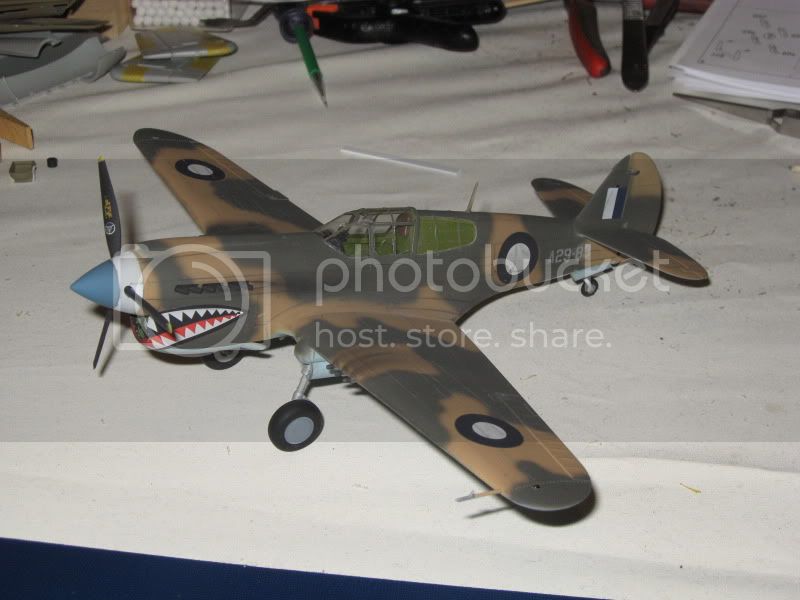


I'd like to build this subject again, along with 'Truscott's P40e [A29-142] and John Gorton's P40k.
But there are another 19 model subjects on the go, for either a couple of campaigns, contract builds or exhibition consignments and their not all aircraft, they include 350 scale 'Tirpitz', Franklin aircraft carrier and German sub's, a 72 scale PT boat and 32 scale aircraft types.
Off Topic: I'd be happy to add my input into putting info together on airbrushing set up's and uses.
I got both the P40e and P40k kits about 2 years ago, with the intent on doing the 'E' as an RAAF 'Milne Bay' shark mouth bird and 'K' as John Gorton's AM-E, but after opening the 'K' box elected to do the 'Cobra Head' with it's unique scheme.
Matthew,
Your 'B' is progressing nicely, [I'm still toying with the idea of getting that kit to do Clive Caldwell's RAF North African bird].
To both thanks for your kind words on the progress build.
On another note: I used to teach Airbrushing to beginners, when I worked in the retail side of the industry, a lot of my old students, clients and club members keep coming back for refresher lessons.
3 pix of the 'Milne Bay' RAAF P40e:
I'd like to build this subject again, along with 'Truscott's P40e [A29-142] and John Gorton's P40k.
But there are another 19 model subjects on the go, for either a couple of campaigns, contract builds or exhibition consignments and their not all aircraft, they include 350 scale 'Tirpitz', Franklin aircraft carrier and German sub's, a 72 scale PT boat and 32 scale aircraft types.
Off Topic: I'd be happy to add my input into putting info together on airbrushing set up's and uses.

Bigrip74
Joined: February 22, 2008
KitMaker: 5,026 posts
AeroScale: 2,811 posts
Posted: Saturday, March 12, 2011 - 08:56 AM UTC
Rob, where do I meet you for one of those lessons? 
Bob
Bob
Red4
Joined: April 01, 2002
KitMaker: 4,287 posts
AeroScale: 1,164 posts
Posted: Saturday, March 12, 2011 - 10:06 AM UTC
I got in some early morning building today before heading into the mountains with the wife for some photography. All the hard stuff is done. Now it just needs some refinement and gentle tweaking. Hoping to begin painting here shortly. More to follow soon. And...on a side note, I'll get something going with this airbrush thread too once I get back from the mountains tomorrow. Thanks, "Q"


Thanks, "Q" Bigrip74
Joined: February 22, 2008
KitMaker: 5,026 posts
AeroScale: 2,811 posts
Posted: Saturday, March 12, 2011 - 01:12 PM UTC
@ Matt, you are rockin away with that 1/32 C and it is looking good.. Did ya know WD 40 in not easy to find here in CA. I still have pause on the laquer thinner until I am able to gain my own place to live ( I a young niece here) so until then it will be just acrylics and alchohol.
@ Rob: [quote] Off Topic: I'd be happy to add my input into putting info together on airbrushing set up's and uses.[quote]
I would be all for some sort of input/tutorial on your setup/techniques/ tips as would others I am sure. I have printed out some of what Matt and others have posted to my inquiry into airbrushing. And how fast do you build if you were in a hurry. And how do you gain your soft edged effect on the (2) tone camo?
@ Aaron: after Matts post I got the idea on a "AT THIS MOMENT WHAT DOES YOUR AIRBRUSH SET UP LOOK LIKE" to help my own learning process, so your input is well appreciated. You never know what will spark that idea into practice
I do not know which forum to place the "AT THIS MOMENT WHAT DOES YOUR AIRBRUSH SET UP LOOK LIKE" ? Spare Parts maybe.
Bob
NickZour

Joined: May 01, 2008
KitMaker: 1,437 posts
AeroScale: 1,241 posts
Posted: Sunday, March 13, 2011 - 06:07 AM UTC
Here is the progress on my P-40 (Really Beautifull A/C )
It's not something special, but It's because I want to finish the little "Hurri" first


Cheers Nick
)It's not something special, but It's because I want to finish the little "Hurri" first
Cheers Nick
Bigrip74
Joined: February 22, 2008
KitMaker: 5,026 posts
AeroScale: 2,811 posts
Posted: Sunday, March 13, 2011 - 12:51 PM UTC
Nick, what is that you marked in red on the bottom wing?
Bob
Bob
Red4
Joined: April 01, 2002
KitMaker: 4,287 posts
AeroScale: 1,164 posts
Posted: Sunday, March 13, 2011 - 01:30 PM UTC
Moving right along.. I got the first bit of paint applied to the ole girl this afternoon. Once it has had a chance to dry a bit, I'll mask for the brown using poster tack for a good hard demarcation line. Paints used are Tamiya acrylics cut with lacquer thinner, light gray for the bottom and olive green for the top. I was going to chip the spinner a lot hence the silver color of it, but have decided against that. I used some foam earplugs to mask inside the air intakes. Works like a charm as they conform to the shape of the openings and are easy to remove once done. Everything else is taped off. Getting close....more to follow. "Q"


Red4
Joined: April 01, 2002
KitMaker: 4,287 posts
AeroScale: 1,164 posts
Posted: Sunday, March 13, 2011 - 01:58 PM UTC
Off and running Bob. http://armorama.kitmaker.net/forums/173111&page=1
Didn't know how to just have the thread name in there...but it works..
"Q"
http://armorama.kitmaker.net/forums/173111&page=1Didn't know how to just have the thread name in there...but it works..
"Q"
Bigrip74
Joined: February 22, 2008
KitMaker: 5,026 posts
AeroScale: 2,811 posts
Posted: Sunday, March 13, 2011 - 03:31 PM UTC
Matt, thanks for the AIRBRUSH thread I think that ti will help many of us along with myself. I will tryout my set up on Monday for the first time with the air regulator and will share how your input has helped.
Your P-40B/C is really looking good plus you and Rob must have gone to the same speed course, you both build twice as fast as I do.
Bob
Your P-40B/C is really looking good plus you and Rob must have gone to the same speed course, you both build twice as fast as I do.
Bob

mpatman
Joined: March 09, 2006
KitMaker: 248 posts
AeroScale: 160 posts

Posted: Sunday, March 13, 2011 - 03:56 PM UTC
Mathew, the 1/32 is looking great!
Question for you, how did you mask up th exhaust? I am leaving mine off in my 1/48 build until after the plane is painted?
Mark
Question for you, how did you mask up th exhaust? I am leaving mine off in my 1/48 build until after the plane is painted?
Mark
mpatman
Joined: March 09, 2006
KitMaker: 248 posts
AeroScale: 160 posts
Posted: Sunday, March 13, 2011 - 06:16 PM UTC
Hi all,
Time for an update on my build. I have finished the cockpit, joined the fuselage and attached the bottom section of the wing:


I have been happy with the fit so far but there seems to be a gap when dry fitting the top wing sections:

Means some Mr Surfacer 500 and sanding and re-scribing I guess?
Cheers,
Mark
Time for an update on my build. I have finished the cockpit, joined the fuselage and attached the bottom section of the wing:
I have been happy with the fit so far but there seems to be a gap when dry fitting the top wing sections:
Means some Mr Surfacer 500 and sanding and re-scribing I guess?
Cheers,
Mark
emroglan

Joined: December 16, 2004
KitMaker: 1,163 posts
AeroScale: 255 posts

Posted: Sunday, March 13, 2011 - 08:56 PM UTC
Hello Mark,
I think you made a bad decision to attach the lower wing half first. I did the reverse, I first glued on the upper parts of the wings to the fuselage. The lower wing half is rather flexible, once the upper half is dry you can attach it and bend it to mate the wing halves. That way there isn't lots of puttying work to do, you only have to watch out for the dihedral angle.
Matthew, did you use any masks to paint those greens or are they free-hand?
I'm still battling with my Hasegawa P-40. The machine gun parts do not fit well to the wings, I spent the last night puttying and sanding them, as well as repairing the damage I gave trying to install the metal barrels. I'll hopefully finish the putty-sanding job tonight, mask the cockpit and get some Mr Surfacer on my model to check for irregularities. I REALLY hope that once I get to painting things will progress faster.
By the way, does anyone have any paint recommendations for Azure Blue? Which manufacturer and which color number? I think I have Humbrol's No:157, would that work?
Red4
Joined: April 01, 2002
KitMaker: 4,287 posts
AeroScale: 1,164 posts
Posted: Monday, March 14, 2011 - 12:05 AM UTC
Thanks for the kudos guys. Mark, I didn't mask the exhaust stacks. Once the camo has been applied, I will mask off around them instead and respray the exhausts. Kind of double duty really as I already had them painted when I built up the engine. No masks were used for the camo pattern. All free hand up to this point. I'll be using poster tack to do the dark brown camo next. Will also employ a circle template to do the painted over U.S. Markings on the wings. More to follow soon. Gotta get my daily chores done first. "Q"
"Q"NickZour
Joined: May 01, 2008
KitMaker: 1,437 posts
AeroScale: 1,241 posts
Posted: Monday, March 14, 2011 - 04:07 AM UTC
Quoted Text
Nick, what is that you marked in red on the bottom wing?
Bob
I have marked a mistake: There was a glue leak when I was gluing the wings & I accidentally touched it
 . Not something special anyway, but something that has to be done
 Keep it going Mr. Mathew, your P-40 is pretty awesome until now
Cheers Nick
29Foxtrot
Joined: September 19, 2003
KitMaker: 708 posts
AeroScale: 674 posts
Posted: Monday, March 14, 2011 - 05:04 AM UTC
Emre,
Model Master make the RAF Azure Blue in both enamel and acrylic, Gunze Sangyo also have RAF Azure Blue in one of their Aircraft Paint sets I'm not familar with which set number it is, {CS-652 or CS-654}, Life Color have Azure Blue in one of their paint sets.
Humbrol #157 is to dark for the RAF Azure Blue, Humbrol #47 would be the closest match from a Humbrol tinlet of Azure Blue.
The RAF and the USAAC both had Azure Blue but the USA mix was a different formula to the RAF colour.
Can you tell me which camo scheme and which P40 version you are building.
Hope this helps a little.
29Foxtrot
Joined: September 19, 2003
KitMaker: 708 posts
AeroScale: 674 posts
Posted: Monday, March 14, 2011 - 05:59 AM UTC
Bob,
Meeting for an airbrush lesson would be a little difficult as I'm in Melbourne Australia. I'd be happy to pass a lesson or two your way if our paths could cross. Even though I'm heading into the early lower part of my 60's, I retired almost 6 years ago from the retail side of the industry, as working in the shop and with contract / consignment builds, [one of which is the Australian Air Force, did not mix well together, so I took the early retirement to concentrate on the contract builds]. But still have a lot of old clients and customers, or friends {who don't have the time} that get me to work on model subjects and the odd Garden Gnomes.
Matthew and Bob,
Off Topic on the airbrush set up that I run, I use a custom built compressor unit running 2 airbrushes. The pressure I use is set at 15 psi, once the trigger is depressed and all my upper surface camo is done free hand.

My setup:
I mainly use the Lenco 301 airbrush for 95% of my airbrushing work.

This airbrush is over 10 years old, used almost on a daily basis and has been rebuilt twice. The adjustment on the end is a needle lock which can be altered from almost a human hair width to a 6mm spray cone.
A friend {who I build a lot of models for} acting as a student.


Note: The use of a cotton glove over the hand holding the model, this practice reduces finger prints on fresh paint, as paint will not penetrate the cotton. This is a 72 scale bird that is painted in reverse, as the under surface is Black.
Have a look at http://scalemagic.atfreeforum.com under 'Tips and Hints' is a guide to basic Airbrushing.
Hope this helps a little.
Meeting for an airbrush lesson would be a little difficult as I'm in Melbourne Australia. I'd be happy to pass a lesson or two your way if our paths could cross. Even though I'm heading into the early lower part of my 60's, I retired almost 6 years ago from the retail side of the industry, as working in the shop and with contract / consignment builds, [one of which is the Australian Air Force, did not mix well together, so I took the early retirement to concentrate on the contract builds]. But still have a lot of old clients and customers, or friends {who don't have the time} that get me to work on model subjects and the odd Garden Gnomes.
Matthew and Bob,
Off Topic on the airbrush set up that I run, I use a custom built compressor unit running 2 airbrushes. The pressure I use is set at 15 psi, once the trigger is depressed and all my upper surface camo is done free hand.
My setup:
I mainly use the Lenco 301 airbrush for 95% of my airbrushing work.
This airbrush is over 10 years old, used almost on a daily basis and has been rebuilt twice. The adjustment on the end is a needle lock which can be altered from almost a human hair width to a 6mm spray cone.
A friend {who I build a lot of models for} acting as a student.
Note: The use of a cotton glove over the hand holding the model, this practice reduces finger prints on fresh paint, as paint will not penetrate the cotton. This is a 72 scale bird that is painted in reverse, as the under surface is Black.
Have a look at http://scalemagic.atfreeforum.com under 'Tips and Hints' is a guide to basic Airbrushing.
Hope this helps a little.
Bigrip74
Joined: February 22, 2008
KitMaker: 5,026 posts
AeroScale: 2,811 posts
Posted: Monday, March 14, 2011 - 06:49 AM UTC
Rob, thanks for the post on a/b and tips  I am in the upper 50s and retired also with toooo much time on my hands.
Bob
I am in the upper 50s and retired also with toooo much time on my hands.Bob
Red4
Joined: April 01, 2002
KitMaker: 4,287 posts
AeroScale: 1,164 posts
Posted: Monday, March 14, 2011 - 10:22 AM UTC
Nice set up Rob. I'm retired and like Bob, have lots of time on my hands. "Q"
"Q" Removed by original poster on 03/14/11 - 23:50:27 (GMT).
Removed by original poster on 03/15/11 - 00:10:36 (GMT).
 |

WEB HOSTING BY


Copyright ©2021 AeroScale and Kitmaker Network, a subsidiary of Silver Star Enterprises
All Rights Reserved. Please read our Conditions of Use and Privacy Policy.
All Rights Reserved. Please read our Conditions of Use and Privacy Policy.