Thessaloniki, Greece / Ελλάδα
Joined: April 15, 2008
KitMaker: 90 posts
AeroScale: 89 posts
Posted: Sunday, June 06, 2010 - 03:58 AM UTC
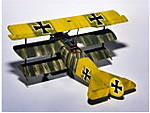
Finaly i finished my Roland.
This model build as a review model and i would like to thank Eduard for the kit and Helmo for allowing me to build it.
As you can see is an OOB contruction ( with few exeptions) like rigging and some other basic details, but i fill free to play as i wish, with the painting and i realy enjoy it very much.
The construction started as usual from the cockpit. This time i decide to spray a primer first, and i spray Alclads 2 Gray primer and micro filler. I was very satisfied with the result and then paint all the inside surfaces in Cunzes RLM 76 adding couple drops of white, except the dashboard and the floor which i paint then in natural wood finish using a mix of Tamiya Desert yellow, Yellow and White in mat finish just to be ready for the oils wash.


http://www.facebook.com/pages/Agioplanes/353328611448659
Thessaloniki, Greece / Ελλάδα
Joined: April 15, 2008
KitMaker: 90 posts
AeroScale: 89 posts
Posted: Sunday, June 06, 2010 - 04:07 AM UTC
http://www.facebook.com/pages/Agioplanes/353328611448659
Thessaloniki, Greece / Ελλάδα
Joined: April 15, 2008
KitMaker: 90 posts
AeroScale: 89 posts
Posted: Sunday, June 06, 2010 - 04:23 AM UTC
http://www.facebook.com/pages/Agioplanes/353328611448659
Thessaloniki, Greece / Ελλάδα
Joined: April 15, 2008
KitMaker: 90 posts
AeroScale: 89 posts
Posted: Sunday, June 06, 2010 - 04:36 AM UTC
http://www.facebook.com/pages/Agioplanes/353328611448659
Thessaloniki, Greece / Ελλάδα
Joined: April 15, 2008
KitMaker: 90 posts
AeroScale: 89 posts
Posted: Sunday, June 06, 2010 - 04:45 AM UTC
http://www.facebook.com/pages/Agioplanes/353328611448659
Texas, United States
Joined: February 01, 2007
KitMaker: 365 posts
AeroScale: 356 posts
Posted: Sunday, June 06, 2010 - 06:28 AM UTC
Dimitris,
Absolutely beautiful project my friend.Your painting of the interior is quite impressive.Can't wait to see your next update.
Regards,
Gregory Jouette

Colorado, United States
Joined: January 25, 2004
KitMaker: 11,669 posts
AeroScale: 11,011 posts
Posted: Sunday, June 06, 2010 - 08:57 AM UTC
Fine work! Very subtle details. Here is my build from last year.
Click here.". . .The most important thing is to know why you build and then get the most that you can out of building." via D.D.
West Virginia, United States
Joined: December 18, 2006
KitMaker: 1,121 posts
AeroScale: 1,063 posts
Posted: Sunday, June 06, 2010 - 10:30 AM UTC
Great to see you posting the build, Dimitris. You always produce great builds! I look forward to more.
Mark
Alberta, Canada
Joined: January 19, 2008
KitMaker: 6,743 posts
AeroScale: 6,151 posts
Posted: Sunday, June 06, 2010 - 02:24 PM UTC
Very nice progress Dimitris ! The weathering is super , not too much , just the right amount of flavor . Looking forward to your next up date

Thessaloniki, Greece / Ελλάδα
Joined: April 15, 2008
KitMaker: 90 posts
AeroScale: 89 posts
Posted: Monday, June 07, 2010 - 06:36 AM UTC
Thank yoy Gregory,
thanks Stephen,
thank you Mark,
and thank you Terri!!!


http://www.facebook.com/pages/Agioplanes/353328611448659
Thessaloniki, Greece / Ελλάδα
Joined: April 15, 2008
KitMaker: 90 posts
AeroScale: 89 posts
Posted: Monday, June 07, 2010 - 06:45 AM UTC
http://www.facebook.com/pages/Agioplanes/353328611448659
Thessaloniki, Greece / Ελλάδα
Joined: April 15, 2008
KitMaker: 90 posts
AeroScale: 89 posts
Posted: Monday, June 07, 2010 - 07:13 AM UTC
and i have to make those buble shape aerodynamic covers at lower wings


Puting the undercarriage

making dril holes for the rigging

http://www.facebook.com/pages/Agioplanes/353328611448659
Thessaloniki, Greece / Ελλάδα
Joined: April 15, 2008
KitMaker: 90 posts
AeroScale: 89 posts
Posted: Monday, June 07, 2010 - 07:41 AM UTC
http://www.facebook.com/pages/Agioplanes/353328611448659
Arizona, United States
Joined: December 12, 2008
KitMaker: 1,423 posts
AeroScale: 1,319 posts
Posted: Monday, June 07, 2010 - 09:12 AM UTC
Great work on the interior. Looking good thus far, and looking forward to more pictures.
Best
Mark
We few, we happy few........
New York, United States
Joined: December 15, 2006
KitMaker: 365 posts
AeroScale: 344 posts
Posted: Monday, June 07, 2010 - 01:24 PM UTC
Dimitris,
Excellent progress, beautiful work on the interior.
Dwayne
Milano, Italy
Joined: November 30, 2007
KitMaker: 642 posts
AeroScale: 382 posts
Posted: Monday, June 07, 2010 - 08:42 PM UTC
Dimitris,
I can only second what Dwayne has already said!
You did a great job, I like the interior very much, and I can't wait to see it painted!
Keep on going!
Ciao
edo
Alberta, Canada
Joined: January 19, 2008
KitMaker: 6,743 posts
AeroScale: 6,151 posts
Posted: Tuesday, June 08, 2010 - 01:06 AM UTC
Looking very shape so far Dimitris , was just yesterday when you posted and already more progress - SUPER !
Thessaloniki, Greece / Ελλάδα
Joined: April 15, 2008
KitMaker: 90 posts
AeroScale: 89 posts
Posted: Tuesday, June 08, 2010 - 04:43 AM UTC
Thanks Mark,
thanks Dwayne,
thanks Edoardo,
Terri the model is already finished, i amm just posting the progres in steps just to be easy to anser in any question(if there is one) and i think this more interesting than posting the model finished. (Dont wory it wont take too long).
http://www.facebook.com/pages/Agioplanes/353328611448659
Thessaloniki, Greece / Ελλάδα
Joined: April 15, 2008
KitMaker: 90 posts
AeroScale: 89 posts
Posted: Tuesday, June 08, 2010 - 04:54 AM UTC
http://www.facebook.com/pages/Agioplanes/353328611448659
Thessaloniki, Greece / Ελλάδα
Joined: April 15, 2008
KitMaker: 90 posts
AeroScale: 89 posts
Posted: Tuesday, June 08, 2010 - 05:37 AM UTC
As i said before this is an OOB constraction and beacause i cant do what i wish to do with this kit, i deside to play with painting.

I think that this is very good chanse to see what can we do, only with, what we take from the kit and what the resault will be compering with more complicated builds.
So lets play with Painting.
http://www.facebook.com/pages/Agioplanes/353328611448659
Thessaloniki, Greece / Ελλάδα
Joined: April 15, 2008
KitMaker: 90 posts
AeroScale: 89 posts
Posted: Tuesday, June 08, 2010 - 05:45 AM UTC
http://www.facebook.com/pages/Agioplanes/353328611448659
Thessaloniki, Greece / Ελλάδα
Joined: April 15, 2008
KitMaker: 90 posts
AeroScale: 89 posts
Posted: Tuesday, June 08, 2010 - 05:56 AM UTC
Masking the ribs, spar and the crosses.


for the color i use Gunze White + RLM78

first remove the cross

another hand of thined paint

then i remove the spar tape and give another hand of thined paint

http://www.facebook.com/pages/Agioplanes/353328611448659
Thessaloniki, Greece / Ελλάδα
Joined: April 15, 2008
KitMaker: 90 posts
AeroScale: 89 posts
Posted: Tuesday, June 08, 2010 - 06:04 AM UTC
then the ribs and another one hand of paint

the same way for the lower wings and the tail

Next come the uper surfases of wings and tail

http://www.facebook.com/pages/Agioplanes/353328611448659
Scotland, United Kingdom
Joined: February 07, 2008
KitMaker: 1,699 posts
AeroScale: 1,384 posts
Posted: Tuesday, June 08, 2010 - 07:20 AM UTC
Great stuff and thanks for demonstrating this build.
May I ask what the masking of the cross is for?
and are the brown lines rib tapes or will they get further shading?
Thanks
JP
Thessaloniki, Greece / Ελλάδα
Joined: April 15, 2008
KitMaker: 90 posts
AeroScale: 89 posts
Posted: Tuesday, June 08, 2010 - 08:36 AM UTC
Thank you John Paul, Well the reason of masking the crosses is the same that i mask the spars and the rib tapes and for being more understood i explain. At many aircrafts of the period and especialy those covered with clear doped linen if someone look under the wings when the light cames from above it can see almost all the details from the wing structure, the absence of colour makes the fabrick almost ""transparent"", so the same is for all the Rollands painted with that pale blue-gray colour, if for instance look at almost any period photograph of the type this is an obvious evident
Now the surfases that are more close to the fabrick of the under side of wings are more sharp as an image thas the ribs, the spars which are a litle more far they looking altle fade and as for the crosses that their painted black to the uper surfase of the wings, you understand that must apear just alitle. I dont know if i gave you to anderstand what i mean because of my bad English,if i dont please forgive me. Please check carfully as much photographs as posible and you willsee what i try to represent.
http://www.facebook.com/pages/Agioplanes/353328611448659