World War II: Germany
Aircraft of Germany in WWII.
Hosted by Rowan Baylis
Fw190D-9 Duo Review Build
Merlin
Staff MemberSenior Editor
AEROSCALE
#017
_VISITCOMMUNITY
United Kingdom
Joined: June 11, 2003
KitMaker: 17,582 posts
AeroScale: 12,795 posts
Posted: Thursday, February 18, 2010 - 08:59 PM UTC
Hi Jean-Luc

Looking good! I'm relieved to see I didn't just make a stupid mistake somewhere in not being able to fit part #W1. With the fuselage together, I've also found a little sanding on the top of it helps the gun-troughs fit neatly. In fact, if in any doubt, you could trim the top down heavily, because it's all tucked out of sight.

All the best

Rowan
Merlin
Staff MemberSenior Editor
AEROSCALE
#017
_VISITCOMMUNITY
United Kingdom
Joined: June 11, 2003
KitMaker: 17,582 posts
AeroScale: 12,795 posts
Posted: Thursday, February 18, 2010 - 09:57 PM UTC
Hi again

I forgot to mention last night that, although I've used the styrene panels, the configuration of the instruments on the lower section doesn't actually tally with my references:


I think the etched version is correct, with a slightly different layout and raised bezels (the plastic panel with inset instruments seems a better match for earlier A-series '190s).

All the best

Rowan
thegirl
_VISITCOMMUNITY
Alberta, Canada
Joined: January 19, 2008
KitMaker: 6,743 posts
AeroScale: 6,151 posts
Posted: Friday, February 19, 2010 - 01:07 AM UTC
Rowan , if you keep going at the speed of which you are doing now . You just might be finished before Jean-Luc That would be a first !

Excellent job on painting up the pit , the small fit issue is nothing really , couldn't you also sand down the exhaust part as well ? It is a shame that not a full engine is included in the kit . Would have been nice to show that off .

Nice progress as well Jean-luc , the PE parts look great , I can see myself feeding the carpet monster the tiny leavers though !


Looking forward to more Guy's !
alpha_tango
_VISITCOMMUNITY
Germany
Joined: September 07, 2005
KitMaker: 5,609 posts
AeroScale: 5,231 posts
Posted: Friday, February 19, 2010 - 01:25 AM UTC
Hi all

@Terri: Rowans problem never was building speed but to focus on one (or a few) projects. One time along the road he will loose interest and shelve it ... as he did with numerous projects before. I am guilty myself, so I am not throwing stones and I would be happy to see this model finished by both of the guys ...

hope to get one too, so I'll join in later

@Rowan and Jean-Luc: great progress and already good hints! I am looking forward to more!

all the best

Steffen
Merlin
Staff MemberSenior Editor
AEROSCALE
#017
_VISITCOMMUNITY
United Kingdom
Joined: June 11, 2003
KitMaker: 17,582 posts
AeroScale: 12,795 posts
Posted: Friday, February 19, 2010 - 03:07 AM UTC
Hi again

Cheers guys. Yes, Steffen's quite right - it's keeping the momemntum going to see a build through to the end that's become my problem over the last few years. But that's the "old Rowan" - I'm limiting the number of builds I undertake now to avoid distraction, and trying to get better at picking up on the unfinished ones (I actually did a bit of work on the Spit and the Seagull the other day while a sub-assembly of the Dora dried. ).

All the best

Rowan
TedMamere
_VISITCOMMUNITY
Moselle, France
Joined: May 15, 2005
KitMaker: 5,653 posts
AeroScale: 4,347 posts
Posted: Saturday, February 20, 2010 - 01:50 AM UTC
Hi all,

Some more progress...

Fitting everything inside the fuselage prooved to be easy for the cockpit tub (I didn't used any glue) but more fiddly for the gun bay and rear engine assembly...


However, with some persuasion and a lot of tape, the fuselage halves did go together and the wings as well. I didn't had to sand the rear face of the spar and the front of the bays like Rowan but maybe it is because I used other wing root gun bay parts. Remember, I will build my Dora all closed so I have used optional parts here. However, I have noticed that, at the front, were the wings meet the underside, there was a small step so I have used a clamp and a piece of plastic to keep the surface level while the glue dried...


For the fuselage guns, I haven't followed Eduard's instructions. They want you to use optional part Y22 which only represents the gun muzzles. Since the MGs are visible from the wheel bay opening, I wanted to find another solution, so I cut the forward end of plastic parts W12 and W20 which were designed for the opened gun bay option and sanded them until they didn't interfere with the cowling part anymore. This way I can show the model all closed but when looking from the bottom, the machine guns will remain visible. To illustrate what I did, below is a picture which shows the modified gun on the left while the other is still complete. Note also that a small piece of the ammunition box (part W27) has been cut as well...


Today I will try to glue the engine and gun cowlings and the horizontal tail planes.

Jean-Luc
NickZour
_VISITCOMMUNITY
Attica, Greece / Ελλάδα
Joined: May 01, 2008
KitMaker: 1,437 posts
AeroScale: 1,241 posts
Posted: Saturday, February 20, 2010 - 02:06 AM UTC
Congratulations to both of you Gentlemen


Cheers Nick
Merlin
Staff MemberSenior Editor
AEROSCALE
#017
_VISITCOMMUNITY
United Kingdom
Joined: June 11, 2003
KitMaker: 17,582 posts
AeroScale: 12,795 posts
Posted: Saturday, February 20, 2010 - 08:44 PM UTC
Hi again

Great progress Jean-Luc - and nice to see the clamps in action again for your collection of kit torture shots!

This was where I'd got to as of yesterday morning (the nose cowl is only test-fitted - I still need to work on the gun bay.):


I won't be able to work on the Dora for the next few days, because I must clear my workbench to take some product-shots for Reviews. Now he's up to speed, I wouldn't be surprised if Jean-Luc's finished by the time I get back underway!

All the best

Rowan
TedMamere
_VISITCOMMUNITY
Moselle, France
Joined: May 15, 2005
KitMaker: 5,653 posts
AeroScale: 4,347 posts
Posted: Wednesday, February 24, 2010 - 07:35 AM UTC
Hi Rowan,


Quoted Text

I wouldn't be surprised if Jean-Luc's finished by the time I get back underway!


Unfortunately (or should I say fortunately for you ) I haven't finished my Dora yet. I have glued the upper and wing root gun covers though. But I had to glue the upper cover twice. Indeed, after my first attempt, once everything was aligned, I noticed that the yellow coolant tank was still on my workbench!


Anyway, getting the upper gun cover piece loose wasn't a problem so everything is alright now.

Below are a few photos which show the overall fit of the Eduard kit. While it is not perfect, with some adjustments and a minimum amount of filler, I think it will be acceptable...


The fit on the underside is excellent though...


I suppose I have to do some surface work to get the airframe ready for painting now...

Jean-Luc
Merlin
Staff MemberSenior Editor
AEROSCALE
#017
_VISITCOMMUNITY
United Kingdom
Joined: June 11, 2003
KitMaker: 17,582 posts
AeroScale: 12,795 posts
Posted: Wednesday, February 24, 2010 - 08:58 AM UTC
Hi Jean-Luc

I know it won't effect your build, because you have the covers closed, but I'm pretty sure the tank is the wrong way 'round in your picture - I think the filler cap should be at the rear:


It's interesting how the fit seems different between our two kits - it looks like I got a neater joint at the wing roots, but the lower wing and rear fuselage didn't match very well on mine and I had to smooth down a noticeable step and fill a gap.

Thanks (or no thanks!) to being ill, I'm running several days behind schedule now. Once I've got the reviews sorted that I'd planned for the beginning of this week, I'll try to get back to the Dora at or around the weekend.

All the best

Rowan
TedMamere
_VISITCOMMUNITY
Moselle, France
Joined: May 15, 2005
KitMaker: 5,653 posts
AeroScale: 4,347 posts
Posted: Wednesday, February 24, 2010 - 10:13 AM UTC
Hi Rowan,


Quoted Text

I know it won't effect your build, because you have the covers closed, but I'm pretty sure the tank is the wrong way 'round in your picture - I think the filler cap should be at the rear


Well, I think I got it right in the end. I only shot this picture to illustrate my mishap, so I didn't payed attention to the way the coolant tank was positioned to be honest. If you have to be accurate even when you shot illustration photos, were are we going in our hobby!

Jean-Luc
Merlin
Staff MemberSenior Editor
AEROSCALE
#017
_VISITCOMMUNITY
United Kingdom
Joined: June 11, 2003
KitMaker: 17,582 posts
AeroScale: 12,795 posts
Posted: Wednesday, February 24, 2010 - 12:00 PM UTC
Hi again

Don't say that! Children the world over won't be able to sleep tonight for worrying whether that little yellow thingamajig is the right way 'round!

All the best

Rowan
alihann
_VISITCOMMUNITY
United Kingdom
Joined: November 13, 2008
KitMaker: 5 posts
AeroScale: 4 posts
Posted: Saturday, February 27, 2010 - 06:27 AM UTC

Quoted Text

Hi Rowan,


Quoted Text

I wouldn't be surprised if Jean-Luc's finished by the time I get back underway!


Unfortunately (or should I say fortunately for you ) I haven't finished my Dora yet. I have glued the upper and wing root gun covers though. But I had to glue the upper cover twice. Indeed, after my first attempt, once everything was aligned, I noticed that the yellow coolant tank was still on my workbench!


Anyway, getting the upper gun cover piece loose wasn't a problem so everything is alright now.

Below are a few photos which show the overall fit of the Eduard kit. While it is not perfect, with some adjustments and a minimum amount of filler, I think it will be acceptable...


The fit on the underside is excellent though...


I suppose I have to do some surface work to get the airframe ready for painting now...

Jean-Luc


Hi,

On the pic showing the underside, none of that should be filled in. The two doors giving access to the engine splits down the centre.

http://rlm.at/cont/gal31.htm NOt my model but the quickest to find! Check the bottom right pic

Other than that they both look great!
Merlin
Staff MemberSenior Editor
AEROSCALE
#017
_VISITCOMMUNITY
United Kingdom
Joined: June 11, 2003
KitMaker: 17,582 posts
AeroScale: 12,795 posts
Posted: Sunday, February 28, 2010 - 11:17 PM UTC
Hi Alastair

Cheers for the reminder to reinstate the panel line under the cowling. And welcome aboard, if I haven't already said that in another thread.

I'm going to try to get back underway today. I haven't managed to catch up with all the reviews I should publish, but I don't want to let my build stall. I'll aim to post an update this evening.

All the best

Rowan
Merlin
Staff MemberSenior Editor
AEROSCALE
#017
_VISITCOMMUNITY
United Kingdom
Joined: June 11, 2003
KitMaker: 17,582 posts
AeroScale: 12,795 posts
Posted: Monday, March 01, 2010 - 08:05 AM UTC
Hi again

Well, back underway as promised.

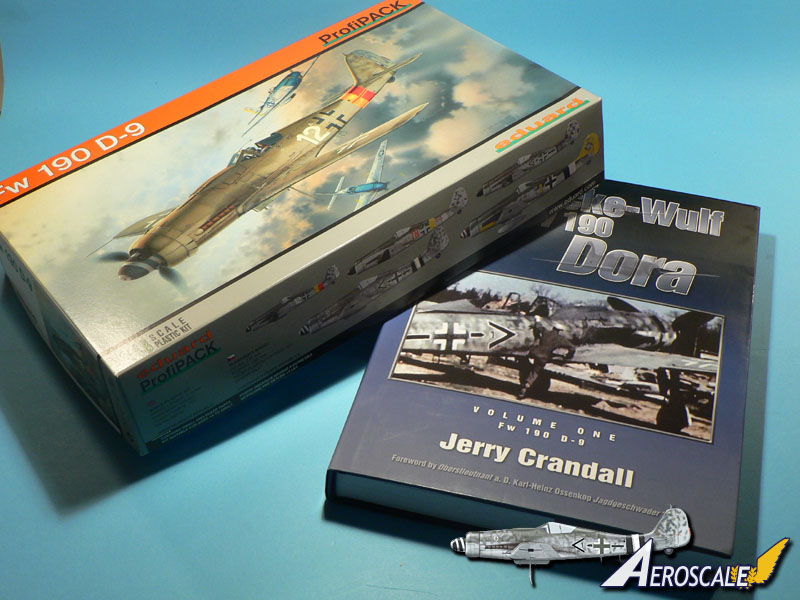
The first job was a real pain... somehow or other, the kit's rudder has decided to go walkabout! So, I've bitten the bullet and made a new one. The basis was cut from a battered old Tamiya '190A and thinned down massively (Eduard's matches the thickness in plans much better). I then traced the rib pattern from the plans in Jerry Crandall's book and skinned the replacement:


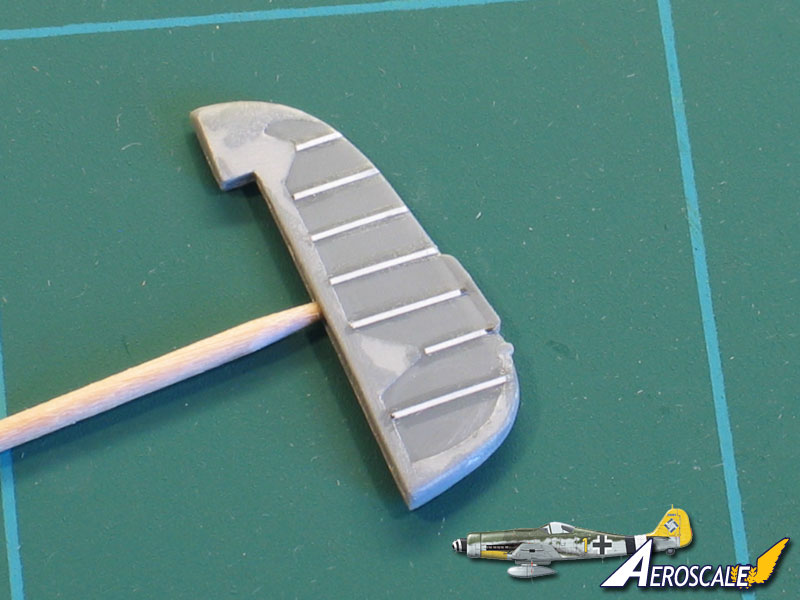
I'll give the new rudder a good coat of gloss paint, flooded on a bit, to both soften the "stuck on" look of the ribs and highlight the inevitable faults where more work's needed.

Next it was time to add a few items that Eduard have missed in the kit.

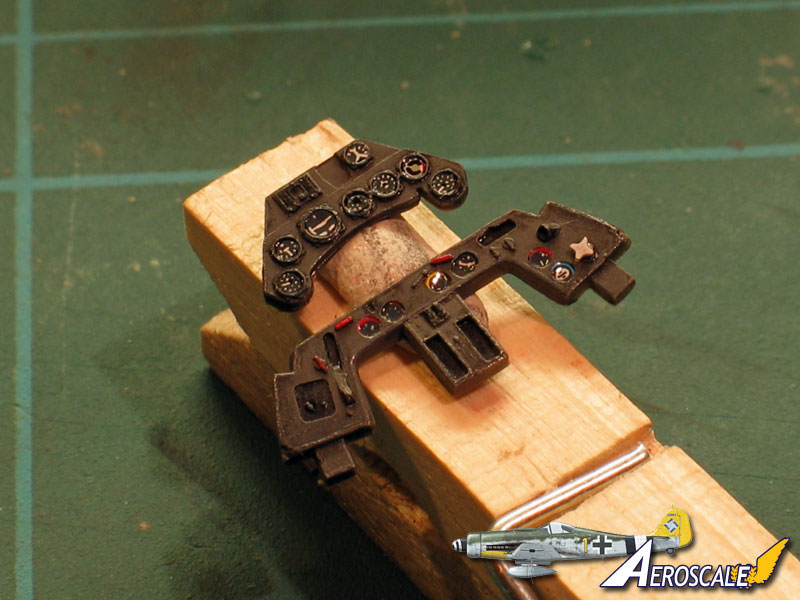
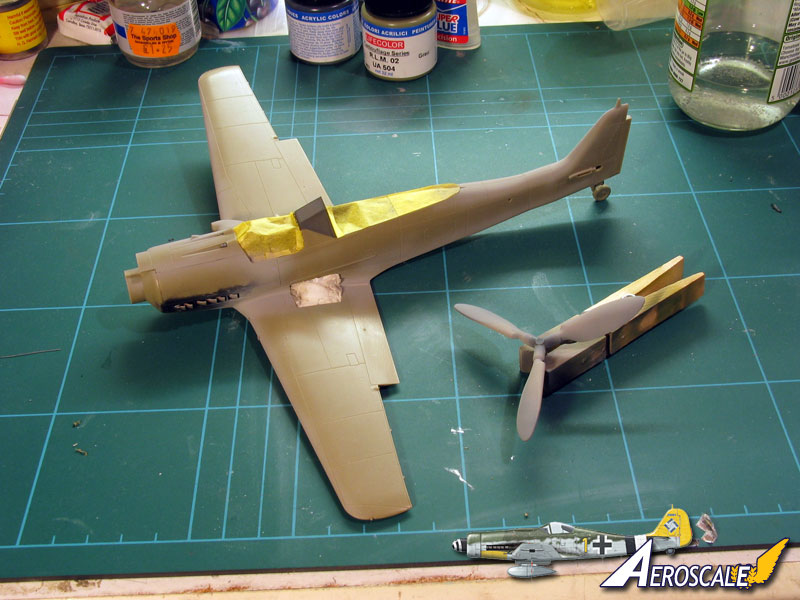
The instruments coaming should have a padded lip, so I masked it off and built one up from "supafiller". It dries really quickly, so I was able to sand it down and paint later on:


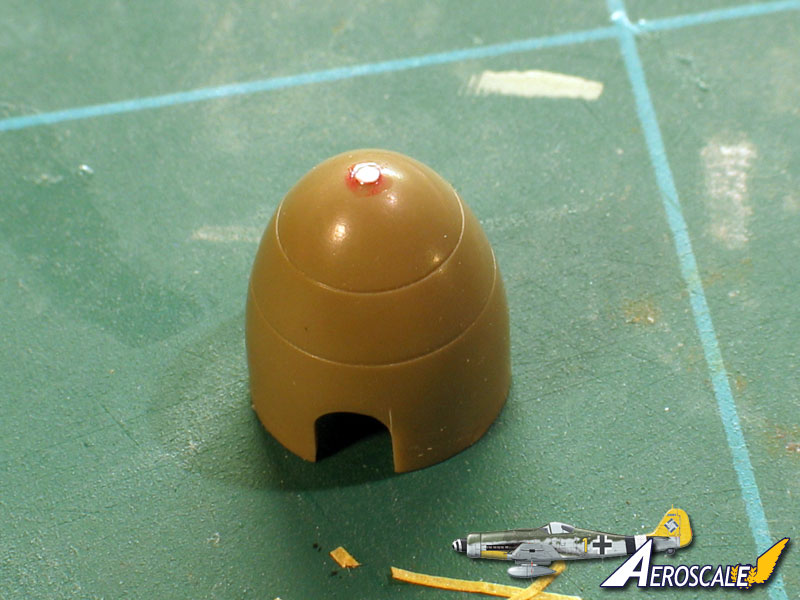
On the tip of the spinner there's a raised circular disk evident in photos:


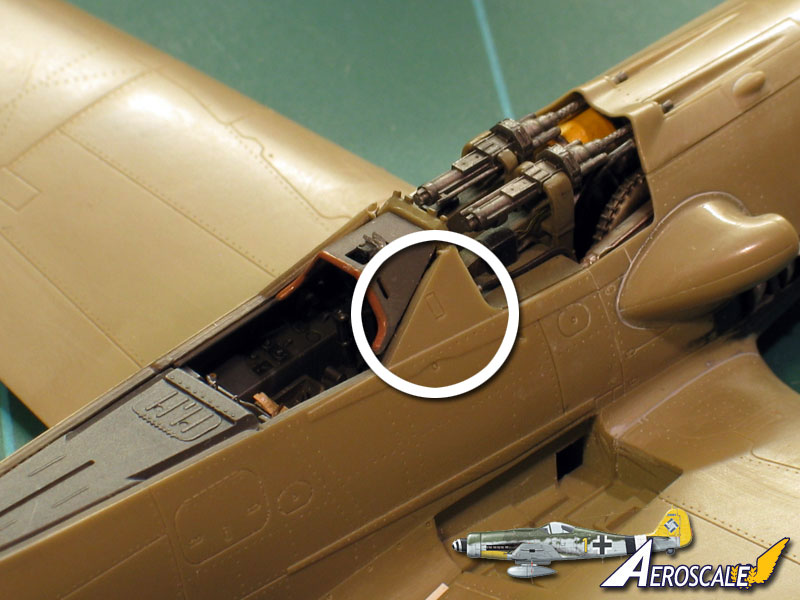
And, above the starbord exhausts there should be a small shield to prevent exhaust gases going into the intake above. It doesn't show well in the photo, but this is actually slightly curled downwards:


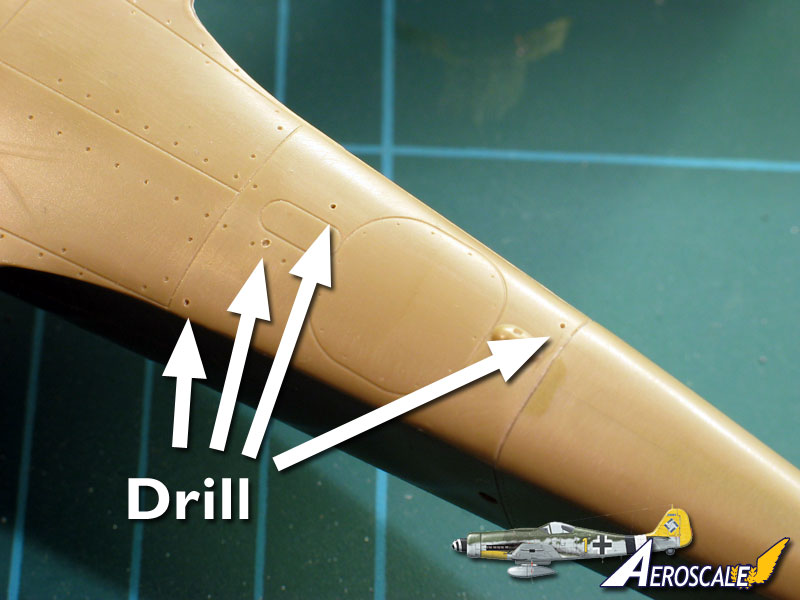
And finally the little strips rivetted to the wingroots. Eduard will probably include both these and the exhaust shield in a future etched set:


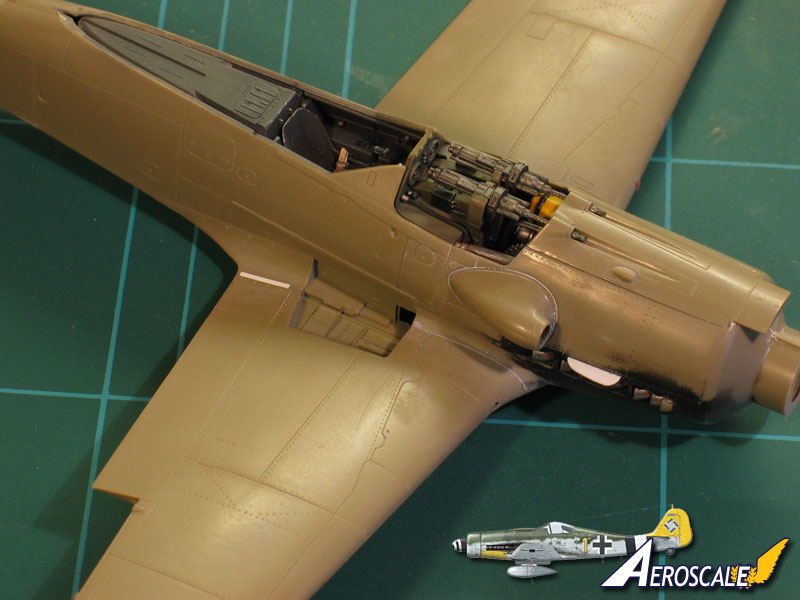
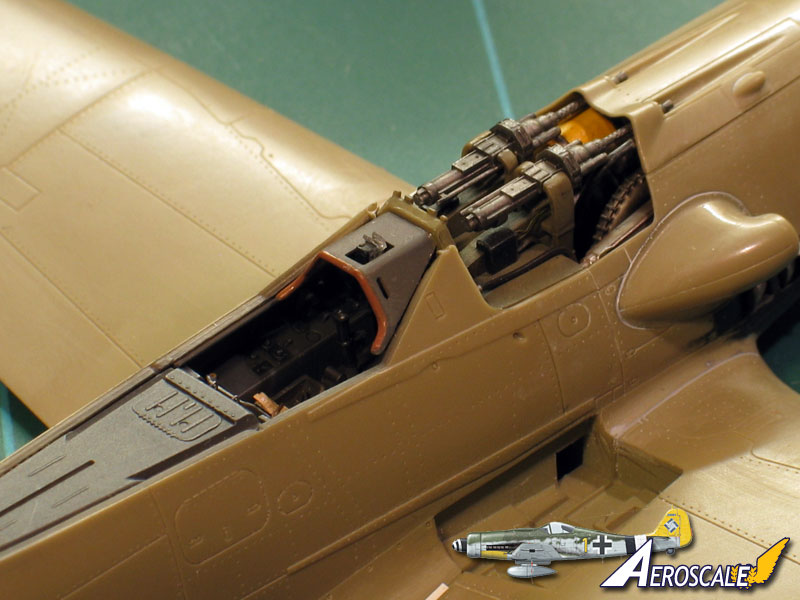
As you can see, I've got the guns in and the cowling on. The supercharger is attached, although I'm not altogether sure the shape is correct.

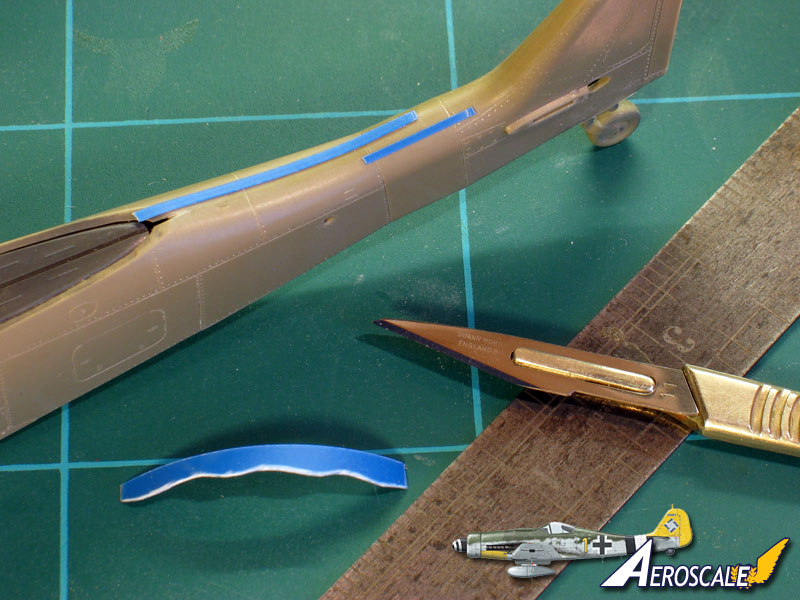
While that lot dried, I got on with scribing in the fuselage seams. On the real aircraft the skin was overlapped slightly, resulting in the panel line being offset from the centre. According to the Jerry Crandall book's plans this offset was reversed on on the fuselage insert (perhaps for strength?):


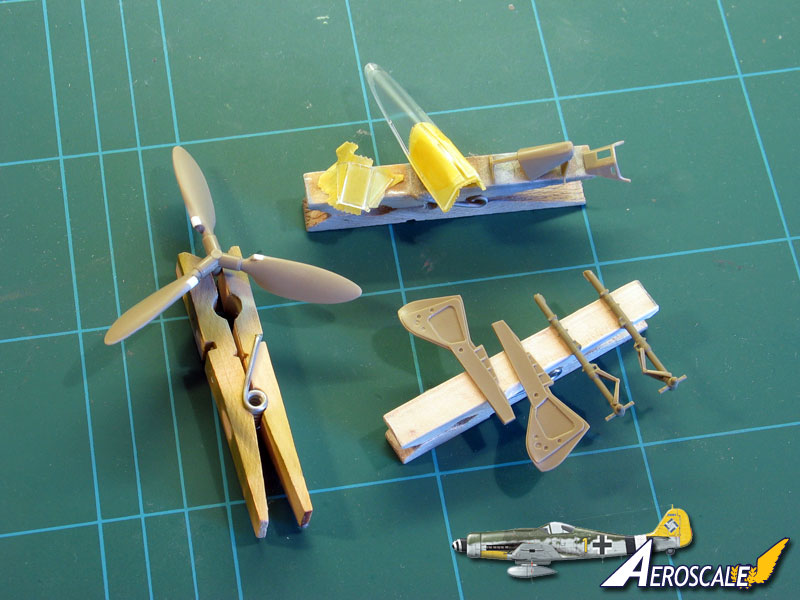
So, time for things to go off for painting (there's one other pain - the windscreen in my kit is cracked (perhaps damaged in transit). Luckily, it should be largely hidden by the open gun cowl...) :


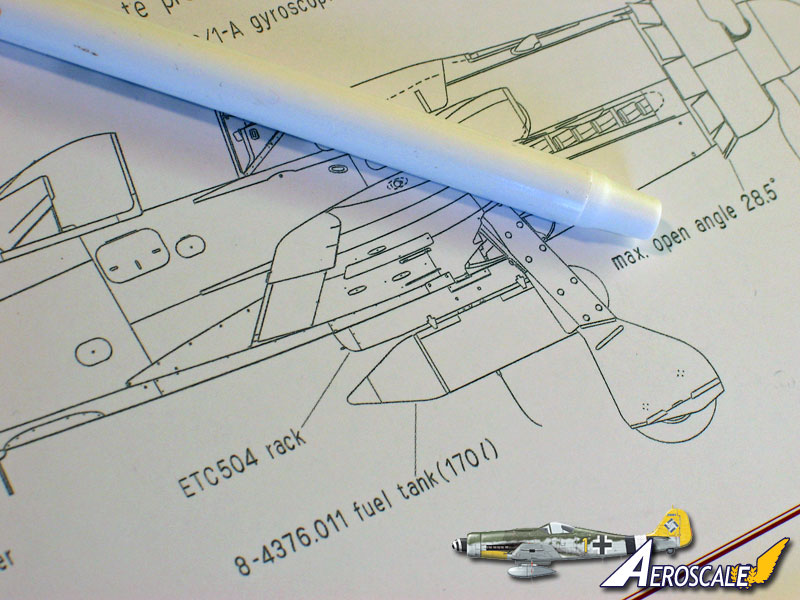
and to start a crazy scheme... a new drop tank to match the cylindrical type that is often in photos of Doras at the end of the war. The old ballpoint pen body is just about correct in diameter, so I'll see what I can come up with...


That's it for now.

All the best

Rowan
Merlin
Staff MemberSenior Editor
AEROSCALE
#017
_VISITCOMMUNITY
United Kingdom
Joined: June 11, 2003
KitMaker: 17,582 posts
AeroScale: 12,795 posts
Posted: Monday, March 01, 2010 - 10:32 AM UTC
Hi again

One last update for the evening - I've fitted the instrument panel and coaming:


Tomorrow's tasks... I think the undercarriage, and maybe start to plan the exterior finish.

All the best

Rowan
TedMamere
_VISITCOMMUNITY
Moselle, France
Joined: May 15, 2005
KitMaker: 5,653 posts
AeroScale: 4,347 posts
Posted: Tuesday, March 02, 2010 - 06:51 AM UTC
Hi Rowan,

Very nice progress and great job on that rudder!

Today I have received my Dora book from Jerry Crandall. It is as big as the kit's box!


The model is almost ready for painting. The supercharger intake needs some sanding to slide into the recess of the fuselage (A). I have rescribed the engine's underside cowling and added the three latches which disappeared in the sanding process (B). There are no panel lines were the wings meet the fuselage at the leading edge wing root (see arrow on picture C) since the fairing is one piece. I have also filled two small rectangular panels which I found nowhere on pictures nore drawings in the Crandall book or in the Squadron Walkaround...


Now where are my RLM camouflage colors...

Jean-Luc
enrico1960
_VISITCOMMUNITY
Italy
Joined: January 25, 2010
KitMaker: 6 posts
AeroScale: 3 posts
Posted: Tuesday, March 02, 2010 - 07:27 AM UTC
Good work . Especially for me, i don't see the shape of the propeller. Thanks.
Merlin
Staff MemberSenior Editor
AEROSCALE
#017
_VISITCOMMUNITY
United Kingdom
Joined: June 11, 2003
KitMaker: 17,582 posts
AeroScale: 12,795 posts
Posted: Tuesday, March 02, 2010 - 07:32 AM UTC
Hi Jean-Luc

There's another little panel to fill before you start painting:


That small rectangle under the windscreen should only be on the port side (Eduard have it both sides).

All the best

Rowan
TedMamere
_VISITCOMMUNITY
Moselle, France
Joined: May 15, 2005
KitMaker: 5,653 posts
AeroScale: 4,347 posts
Posted: Tuesday, March 02, 2010 - 08:25 AM UTC
Hi Rowan,

Thanks for the heads up. I will fill it right away. Let's see if we can find another one!

Jean-Luc
Merlin
Staff MemberSenior Editor
AEROSCALE
#017
_VISITCOMMUNITY
United Kingdom
Joined: June 11, 2003
KitMaker: 17,582 posts
AeroScale: 12,795 posts
Posted: Tuesday, March 02, 2010 - 08:43 AM UTC

Quoted Text

Hi Rowan,

Thanks for the heads up. I will fill it right away. Let's see if we can find another one!

Jean-Luc


Hi Jean-Luc

Ditto on the cowling panels and the wing-roots - I'm double checking I got them really smooth.

Anyway - not something to fill, but rather to drill. Some little drain holes under the rear fuselage:


All the best

Rowan
TedMamere
_VISITCOMMUNITY
Moselle, France
Joined: May 15, 2005
KitMaker: 5,653 posts
AeroScale: 4,347 posts
Posted: Tuesday, March 02, 2010 - 06:03 PM UTC
Hi Rowan,


Quoted Text

not something to fill, but rather to drill. Some little drain holes under the rear fuselage


According to the Squadron Walkaround, two are on the lower engine cowling as well: the coolant and oil overflow lines.

Jean-Luc
Merlin
Staff MemberSenior Editor
AEROSCALE
#017
_VISITCOMMUNITY
United Kingdom
Joined: June 11, 2003
KitMaker: 17,582 posts
AeroScale: 12,795 posts
Posted: Tuesday, March 02, 2010 - 08:19 PM UTC
Cheers Jean-Luc

I don't have the Squadron Walkaround - at least, I couldn't find it when I grabbed some books out of the boxes from London (that means it'll probably turn up when I finish this build!). Eduard marked the coolant drain and a crankcase breather on the cowling - the former is a little faint, so maybe it got lost in sanding on your kit? Anyway, I've beefed them both up a bit. I'll look forward to your next photo to see where the oil overflow drain should be.

All the best

Rowan
chukw1
_VISITCOMMUNITY
California, United States
Joined: November 28, 2007
KitMaker: 817 posts
AeroScale: 729 posts
Posted: Wednesday, March 03, 2010 - 03:39 AM UTC
What an enjoyable thread- cheers, gents! I'm always a bit amazed att eh level of fascination this bird holds for the modeling community at large- I just might get sucked in by all this enthusiasm. Looks like Jerry's going to sell another couple of books...
Merlin
Staff MemberSenior Editor
AEROSCALE
#017
_VISITCOMMUNITY
United Kingdom
Joined: June 11, 2003
KitMaker: 17,582 posts
AeroScale: 12,795 posts
Posted: Wednesday, March 03, 2010 - 08:56 AM UTC
Cheers Chuck

It sure would be great to see you do one of your "kitchen sink" routines on a '190!

I can't report any great progress today, because it's been fine weather here, so I grabbed the chance to get out in the garden and prepare to plant some Recession-busting vegetables . But between digging sessions I dusted on some enamel undercoat to check the seams and propeller. As you can see, I've given up trying to protect the pre-painted exhaust area - nice idea but, to misquote the military saying... no plan survives first contact with a kit!


I've also been tinkering with the undercarriage tonight. I'll add some brake-lines etc. and really dirty it up a bit later:


All the best

Rowan