

Early Aviation
Discuss World War I and the early years of aviation thru 1934.
Discuss World War I and the early years of aviation thru 1934.
Hosted by Jim Starkweather
Eduard 1:48 Spad XIII

guitarlute101

Joined: December 18, 2006
KitMaker: 1,121 posts
AeroScale: 1,063 posts
Posted: Tuesday, September 22, 2009 - 09:54 AM UTC
I agree, very nice work, Louis.
Mark

Louis

Joined: May 21, 2006
KitMaker: 472 posts
AeroScale: 471 posts
Posted: Tuesday, September 22, 2009 - 10:59 AM UTC
Hi
Thank you for your nice words.
yes, I knew this story.
This plane was usually flown by Major John. Huffer (WS N°32 p35). He would not have had to lend it......
Thank you for your nice words.
yes, I knew this story.
This plane was usually flown by Major John. Huffer (WS N°32 p35). He would not have had to lend it......
thegirl

Joined: January 19, 2008
KitMaker: 6,743 posts
AeroScale: 6,151 posts
Posted: Wednesday, September 23, 2009 - 01:41 AM UTC
beautiful work Louis ! Truly inspirational 
Louis
Joined: May 21, 2006
KitMaker: 472 posts
AeroScale: 471 posts
Posted: Wednesday, September 23, 2009 - 08:17 AM UTC
Thank you!

JackFlash
Joined: January 25, 2004
KitMaker: 11,669 posts
AeroScale: 11,011 posts
Posted: Wednesday, September 23, 2009 - 11:28 AM UTC
Greetings Louis,
Will you add the bomb rack?
Will you add the bomb rack?
Louis
Joined: May 21, 2006
KitMaker: 472 posts
AeroScale: 471 posts
Posted: Thursday, September 24, 2009 - 02:20 AM UTC
Well.....I think no. The photo don't show it very well.
A+
A+
Louis
Joined: May 21, 2006
KitMaker: 472 posts
AeroScale: 471 posts
Posted: Saturday, October 10, 2009 - 04:53 AM UTC
Salut,
I varnished drift and.... "Silvering" everywhere.

after the brush I acquire this:


we still see the edge of decals a bit....
The weathering is begun with the oil painting:

The underside of the airframe is glued together and wings set up.
There are holes!


I blocked hole with white "Milliput" and a brush. Under the hood the slit is very fine but a party of beige painting was scratched letting appear white plastic. At the back of wings and under the airframe slits are more visible.
A+
I varnished drift and.... "Silvering" everywhere.
after the brush I acquire this:
we still see the edge of decals a bit....
The weathering is begun with the oil painting:
The underside of the airframe is glued together and wings set up.
There are holes!
I blocked hole with white "Milliput" and a brush. Under the hood the slit is very fine but a party of beige painting was scratched letting appear white plastic. At the back of wings and under the airframe slits are more visible.
A+
thegirl
Joined: January 19, 2008
KitMaker: 6,743 posts
AeroScale: 6,151 posts
Posted: Sunday, October 11, 2009 - 02:05 AM UTC
Very well done Louis ! This has been a real treat so far watching the building stage of this kit .
Louis
Joined: May 21, 2006
KitMaker: 472 posts
AeroScale: 471 posts
Posted: Thursday, October 29, 2009 - 09:20 AM UTC
Thank you Terri
The "hood" is glued together as well as the fins of the radiator and the radiator. Joints between airframe and hood were repainted.
Adjustment is very rough. However this type of circular hood is common on the planes of WW2 ( isn't it?). This one does not pose so much problems( on the plane of WW2).
Eduard will seriously have to think about question next time....


The hood is a bit brought forward towards right and the fins of the radiator are not therefore wholly vertical.
The gate is correctly put in the ring. However the stem under the radiator is not in the centre and I should have put the hood even more towards right......
So many splendid pieces of plastic which gather so badly, it is so sad...


it will be necessary to paint pneumatic tube in light grey (?):

The aircraft propeller is painted in ink brown " prince august "and "hazelnut" with brush, but became too dark. I would do again it without doubts.

A+
The "hood" is glued together as well as the fins of the radiator and the radiator. Joints between airframe and hood were repainted.
Adjustment is very rough. However this type of circular hood is common on the planes of WW2 ( isn't it?). This one does not pose so much problems( on the plane of WW2).
Eduard will seriously have to think about question next time....
The hood is a bit brought forward towards right and the fins of the radiator are not therefore wholly vertical.
The gate is correctly put in the ring. However the stem under the radiator is not in the centre and I should have put the hood even more towards right......
So many splendid pieces of plastic which gather so badly, it is so sad...
it will be necessary to paint pneumatic tube in light grey (?):
The aircraft propeller is painted in ink brown " prince august "and "hazelnut" with brush, but became too dark. I would do again it without doubts.
A+
thegirl
Joined: January 19, 2008
KitMaker: 6,743 posts
AeroScale: 6,151 posts
Posted: Monday, November 09, 2009 - 02:10 AM UTC
Sorry Louis , but I totally missed your last post .
Can I have it when you are done ? Very impressive as always !
Looking forward to your next up date
Can I have it when you are done ? Very impressive as always !
Looking forward to your next up date
Louis
Joined: May 21, 2006
KitMaker: 472 posts
AeroScale: 471 posts
Posted: Thursday, November 19, 2009 - 10:14 PM UTC
Hi Terri and other.
I'm starting again propeller's painting.
I'm painting propeller with brown ink (prince august pg 091) with bruch. It's easy and dry fast.

Varnish gloss 3 or 4 coat.

sandpaper and new varnich

Next time, machine gun....
I'm starting again propeller's painting.
I'm painting propeller with brown ink (prince august pg 091) with bruch. It's easy and dry fast.
Varnish gloss 3 or 4 coat.
sandpaper and new varnich
Next time, machine gun....
Louis
Joined: May 21, 2006
KitMaker: 472 posts
AeroScale: 471 posts
Posted: Friday, November 20, 2009 - 10:51 AM UTC
Tire is grey hu129 weathering with pastel and oil paint.


Machine gun are a little too big (?).
Painting with gun metal. When dry, grey blue "diluted" with airbrush.
The mantle is grey. Black and grey oil paint with a little sponge to make marks on the mantle.
The breech is black, dark grey. Edge (arris?) are rubed with 0.5mm Pencil graphite.
Every parts of are not put on the machine gun. It's very difficult to lign up mantle and breech. Mantle is glued first on the plane.


MG is too short (1mm), but it's too late.
A+
Machine gun are a little too big (?).
Painting with gun metal. When dry, grey blue "diluted" with airbrush.
The mantle is grey. Black and grey oil paint with a little sponge to make marks on the mantle.
The breech is black, dark grey. Edge (arris?) are rubed with 0.5mm Pencil graphite.
Every parts of are not put on the machine gun. It's very difficult to lign up mantle and breech. Mantle is glued first on the plane.
MG is too short (1mm), but it's too late.
A+
NickZour

Joined: May 01, 2008
KitMaker: 1,437 posts
AeroScale: 1,241 posts
Posted: Friday, November 20, 2009 - 10:43 PM UTC
Looks great!! 
Cheers Nick
Cheers Nick
thegirl
Joined: January 19, 2008
KitMaker: 6,743 posts
AeroScale: 6,151 posts
Posted: Saturday, November 21, 2009 - 01:16 AM UTC
Most excellent of the guns Louis ! Nice to see some one else do weathering with pastels which I feel you can't really achive with just paint . As for the sizes of the guns they look alright in my eye
Looking forward to your next run of update pic's !
Looking forward to your next run of update pic's !
Louis
Joined: May 21, 2006
KitMaker: 472 posts
AeroScale: 471 posts
Posted: Saturday, November 21, 2009 - 09:38 AM UTC
Thank you Terri and Nick.
I forgot....
envisage some (a lot of) mastic to put under the two small perforated hoods which covers cylinder head of the motor. You can re-sharpen them but then, they become too flat... I used some "miliput" mastic with a brush and water.
Good luck.
I forgot....
envisage some (a lot of) mastic to put under the two small perforated hoods which covers cylinder head of the motor. You can re-sharpen them but then, they become too flat... I used some "miliput" mastic with a brush and water.
Good luck.
Louis
Joined: May 21, 2006
KitMaker: 472 posts
AeroScale: 471 posts
Posted: Wednesday, December 30, 2009 - 09:52 PM UTC
Hi
Exhaust pipes are painted in brown then soaked in rusty pigment before they dry. Then the excess of powder is brushed. Clear nuances are applied with pastels reduced drift with a piece of sandpaper. All this to have a very lightly granular aspect...


On wings masts are very fine. they cannot be tightened before gluing on the wing otherwise they fold under the tension of cables.

The small parts on the hood are glued together before putting down superior wing.

A small headrest is sharpened in the plastic card and glued together after painting. The wooden triangle underneath is badly put in the cockit....

... and must be moved forward:

Shock absorber is made again:


Superior wing is put down. On your right glued together, on your left the wing hanging. It is therefore necessary " to go back up " to glue them....

Regards
A+
Exhaust pipes are painted in brown then soaked in rusty pigment before they dry. Then the excess of powder is brushed. Clear nuances are applied with pastels reduced drift with a piece of sandpaper. All this to have a very lightly granular aspect...
On wings masts are very fine. they cannot be tightened before gluing on the wing otherwise they fold under the tension of cables.
The small parts on the hood are glued together before putting down superior wing.
A small headrest is sharpened in the plastic card and glued together after painting. The wooden triangle underneath is badly put in the cockit....
... and must be moved forward:
Shock absorber is made again:
Superior wing is put down. On your right glued together, on your left the wing hanging. It is therefore necessary " to go back up " to glue them....
Regards
A+
NickZour
Joined: May 01, 2008
KitMaker: 1,437 posts
AeroScale: 1,241 posts
Posted: Wednesday, December 30, 2009 - 11:00 PM UTC
I loved it!!!! 
Keep going
Cheers Nick
Keep going
Cheers Nick
thegirl
Joined: January 19, 2008
KitMaker: 6,743 posts
AeroScale: 6,151 posts
Posted: Thursday, December 31, 2009 - 12:33 PM UTC
Well louis , what can I say . Very nicely done so far ! For a kit with a few issues you have show it justice on a higher level .
Looking forward to the next up-date
For a kit with a few issues you have show it justice on a higher level .Looking forward to the next up-date
Louis
Joined: May 21, 2006
KitMaker: 472 posts
AeroScale: 471 posts
Posted: Saturday, January 02, 2010 - 09:47 AM UTC
Thank you.

The most thick wire (the brown) in diagonal are flat and double.


I sharpened them in a leaf of evergreen plastic 1 / 10mm (0.0039 in). I put only one instead of two.
You can tighten it with heat as a plastic wire.
Regards
The most thick wire (the brown) in diagonal are flat and double.
I sharpened them in a leaf of evergreen plastic 1 / 10mm (0.0039 in). I put only one instead of two.
You can tighten it with heat as a plastic wire.
Regards

Mgunns
Joined: December 12, 2008
KitMaker: 1,423 posts
AeroScale: 1,319 posts

Posted: Sunday, January 03, 2010 - 10:56 AM UTC
Your work is truly outstanding. It is coming along nicely with the addition of rigging. Your attention to detail and the extra effort to make it all fit is definately paying dividends.
I am looking forward to the finished product.
I am looking forward to the finished product.

CaptainA
Joined: May 14, 2007
KitMaker: 3,117 posts
AeroScale: 2,270 posts
Posted: Sunday, January 03, 2010 - 12:13 PM UTC
You are doing an extreemly fine job on a not so easy kit. This is going to be a contest winner. Is the G.IV next?


gajouette
Joined: February 01, 2007
KitMaker: 365 posts
AeroScale: 356 posts

Posted: Monday, January 04, 2010 - 03:59 AM UTC
Louis,
That's one excellent SPAD XIII my friend.All those tiny details you have included in the build truely do the SPAD justice. Very impressive.
Regards,
Gregory Jouette
That's one excellent SPAD XIII my friend.All those tiny details you have included in the build truely do the SPAD justice. Very impressive.
Regards,
Gregory Jouette

Kalt

Joined: June 14, 2006
KitMaker: 222 posts
AeroScale: 219 posts

Posted: Monday, January 04, 2010 - 05:31 AM UTC
Very very nice Louis, congratulations!
thegirl
Joined: January 19, 2008
KitMaker: 6,743 posts
AeroScale: 6,151 posts
Posted: Monday, January 04, 2010 - 03:24 PM UTC
Quoted Text
Very very nice Louis, congratulations!
I second that !
Louis
Joined: May 21, 2006
KitMaker: 472 posts
AeroScale: 471 posts
Posted: Monday, January 25, 2010 - 10:23 AM UTC
Hi,
Thank you very much for your nice words.
Rigging is finished and it is complicated:


Mobile parts are glued:

Propeller must be weathering and must be less bright (varnish?). The central party is 3 photo etched piece from "PART".

I must removed a lot of dust and finnished the weathering yet. She look like a "big toy" under the light of the flash...
I'm building a pilot with an Eduard pilot from "Aeronautique Militaire Francaise 1916" for a small diorama.
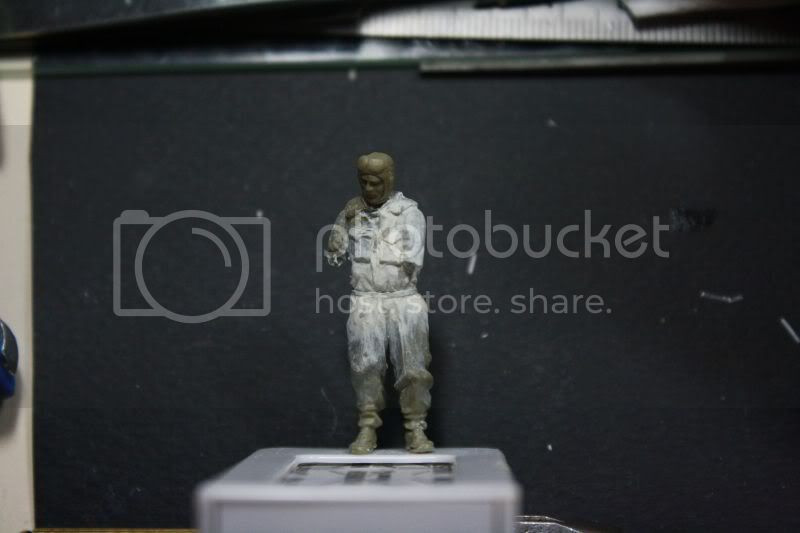
Click here.
Regards
A+
Thank you very much for your nice words.
Rigging is finished and it is complicated:
Mobile parts are glued:
Propeller must be weathering and must be less bright (varnish?). The central party is 3 photo etched piece from "PART".
I must removed a lot of dust and finnished the weathering yet. She look like a "big toy" under the light of the flash...
I'm building a pilot with an Eduard pilot from "Aeronautique Militaire Francaise 1916" for a small diorama.
Click here.
Regards
A+
 |

WEB HOSTING BY


Copyright ©2021 AeroScale and Kitmaker Network, a subsidiary of Silver Star Enterprises
All Rights Reserved. Please read our Conditions of Use and Privacy Policy.
All Rights Reserved. Please read our Conditions of Use and Privacy Policy.