

1⁄35French Rescue Goose
15
Comments
Painting
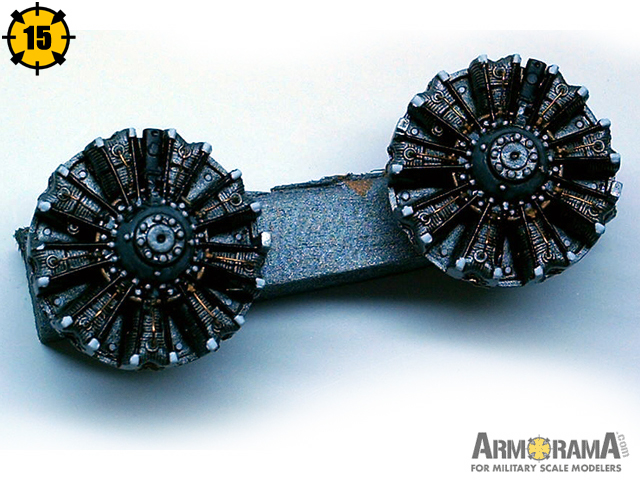
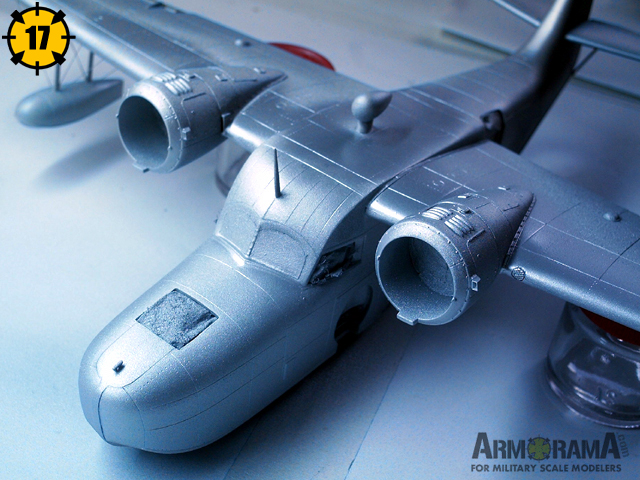
I decided the Goose needed some rest and I first painted the engines (picture 15). As you can see they are very detailled and apart from the copper wires they are molded in one piece! Another masterpiece from Signifer! I also decided to glue the floats in place and therefore had to do some rigging. I used my "Secret Weapon" for that: a toothpick fitted with a 0,3 mm drill! (picture 16) You just have to make small holes in the plastic (or resin in this case) by twisting the toothpick between you fingers. 1 or 2 mm are enough. Then you can put your thread in the resulting hole with some CA glue. With Fishing line (0,14 mm) it works like a dream and it's very strong!Then it was time for the real painting! I first sprayed a coat of Humbrol Metal Coat to make some paint shipping later (picture 17). This is also a good test to reveal any imperfection. The second coat was a mix of Tamiya XF8 Flat blue and XF17 sea Blue. I did no pre- or post-shading this time. With those dark colors I think it is not really necessary.
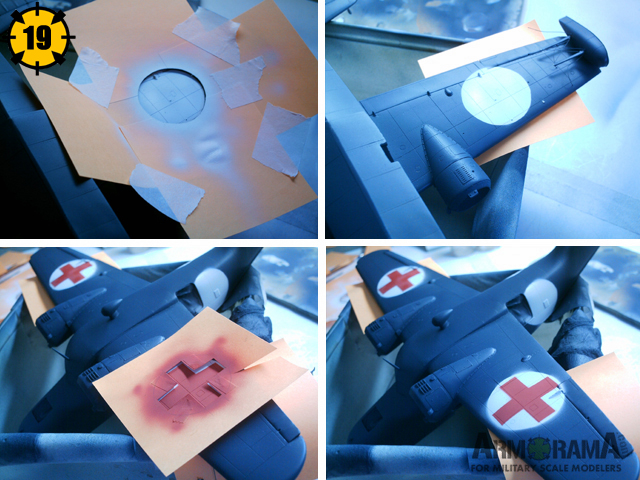
Once all the aircraft was coated with tinted Future, it was time to add the Red Cross roundels as the plane I wanted to represent carried EVASAN (Evacuations Sanitaires) markings. I totally forgot these while glueing the floats in place and I had to break them off to be able to paint. Damn! I first tried to use Tamiya masking tape, but the blue color ripped off! Even with two coats of paint and one coat of Future! Damn again! The only acceptable solution was to use Post-It paper as masks. It didn't work as I expected because the Post-It paper wasn't sticky enough, so white paint managed to get under the paper(picture 19). But with some additional touch-ups it was OK. I sprayed another coat of Future to blend the markings and added the decals (picture 20). They worked fine and my only complaint would be about the red of the roundels... I think they are too bright. Having no spare ones available, I decided to live with them.


About the Author


FROM: MOSELLE, FRANCE
I'm mainly interested in WW2 aircraft and I build them in 1/48 scale.
Comments

Simply stunning! I cant wait to see what you build next. Congrats on a job well done!
OCT 15, 2005 - 05:52 AM

Hi all!
Thanks Dave, Rob and tapper...
My next build? A Tamiya 1/48 Schwimmwagen... my first vehicle since I build the whole Matchbox armor line more than 20 years ago! Maybe I will switch to armor now?
Jean-Luc
OCT 15, 2005 - 11:40 PM

Hi Jean-Luc,
The Goose! I tend to like floaty-boaty wingy-thingies and the Goose and the Duck are two of my favorites ,
Thanks for this article. Both the model and article are very enjoyable. You did a fabulous job on this bird
OCT 28, 2005 - 11:48 AM

thats one pandoras box that was worth opening! the tape on the tyres is a neat looking idea, and how did you get that drill into that cocktail stick?
if you switch to armour ill miss my sparring partner! (although i have a tamiya 250 halftrack, and a railway "tank" from revell!)
OCT 29, 2005 - 01:07 AM
Thanks Fred and Rick!
Phil, I first drilled a hole in the cocktail stick using my Dremel then put the drill in it wich I secured with CA glue... voilà!
I seize the opportunity of this message to say that Signifer added a link to my review and feature of the Goose on their website. Maybe this will help Armorama to have more French readers...
Jean-Luc
OCT 30, 2005 - 08:38 PM

Great plane and great review! I immediately ordered it through Hobbyeasy in Hongkong (which by the wauy is a GREAT webstore and cheap!! Thanks Jean Luc!
NOV 11, 2005 - 08:46 AM
Hi Michiel!
Thanks for your kind words! I wish M. Meissonier (owner of Signifer) could read such posts! :-)
Jean-Luc
NOV 11, 2005 - 09:55 AM

Awesome! Congratulations Jean-Luc!
It's great to know Signifer recognize the superb work you're showing here.
All the best
Rowan
NOV 11, 2005 - 10:02 AM

Wow thats one fantastic kit you made there Jean-Luc. Back when i was building planes, the part i dreaded most was to place both halves of the fuselage and many a times given up on a model at that point.
Fantastic tutorial and one for the bookmarks.
NOV 11, 2005 - 10:17 AM

A superb model and review. A good couple of pointers there for the inexpierienced builders amongst us (me included). Ted absolutely GENIUS with the tyres, i wouldn't have thought of that in a thousand years.
Thank you Ted and Rowan.
Andy
NOV 11, 2005 - 10:34 AM
Copyright ©2021 by Jean-Luc Formery. Images also by copyright holder unless otherwise noted. The views and opinions expressed herein are solely the views and opinions of the authors and/or contributors to this Web site and do not necessarily represent the views and/or opinions of AeroScale, KitMaker Network, or Silver Star Enterrpises. Images also by copyright holder unless otherwise noted. Opinions expressed are those of the author(s) and not necessarily those of AeroScale. All rights reserved. Originally published on: 2005-10-15 00:00:00. Unique Reads: 19250

WEB HOSTING BY


Copyright ©2021 AeroScale and Kitmaker Network, a subsidiary of Silver Star Enterprises
All Rights Reserved. Please read our Conditions of Use and Privacy Policy.
All Rights Reserved. Please read our Conditions of Use and Privacy Policy.