

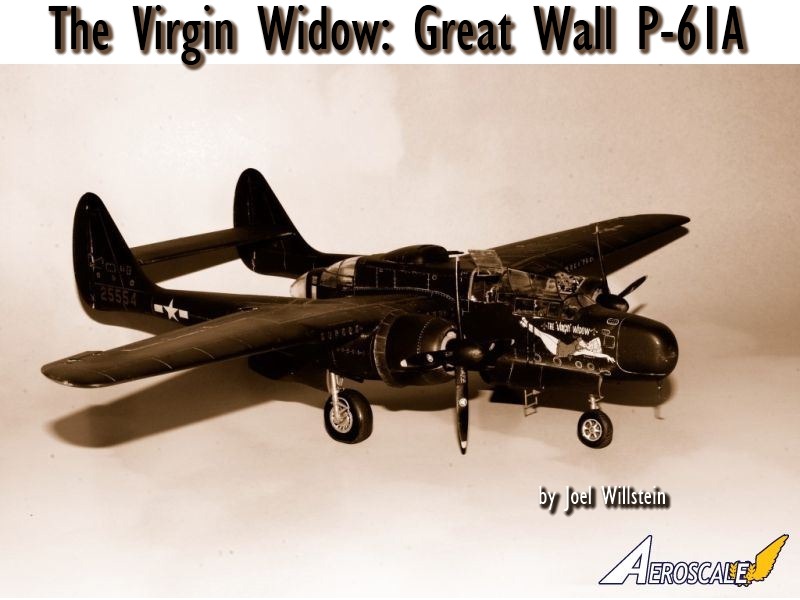
1⁄48The Virgin Widow: Great Wall P-61A
19
Comments
History
The Northrop P-61 Black Widow, was the first USA operational military aircraft that was designed specifically for night interception, and was the first specifically designed to use radar. The P-61 flew with a crew of three: pilot, gunner, and radar operator. Armament consisted of four fixed position 20 mm Hispano M2 forward firing cannons mounted in the lower fuselage, and four .50 in M2 Browning machine guns in a side to side moving turret.Construction was a all-metal, twin-engine, twin-boom design, similar is scope to the P-38 fighter, that was developed during World War II. The first test flight was on 26 May 1942, and production began in October 1943. The last operational aircraft was retired from service in 1954.
On August 14,1945, the "Lady in the Dark", a P-61B from the 548th Night Squadron, was unofficially credited with the last Allied victory of the air war before VJ Day.
It was effectively operated as a night-fighter by United States Army Air Forces in the European Theatre, the Pacific Theatre, the China Burma India Theatre and the Mediterranean Theatre.
The P-61 proved itself very capable against the majority of German aircraft it encountered, it was clearly outclassed by the newer aircraft arriving in the last few months of war. It was very capable against all Japanese aircraft it encountered.
It lacked external fuel tanks until the last months of the war, an addition that would have extended its range, thus saving many crews that were looking for a landing site in darkness and bad weather.
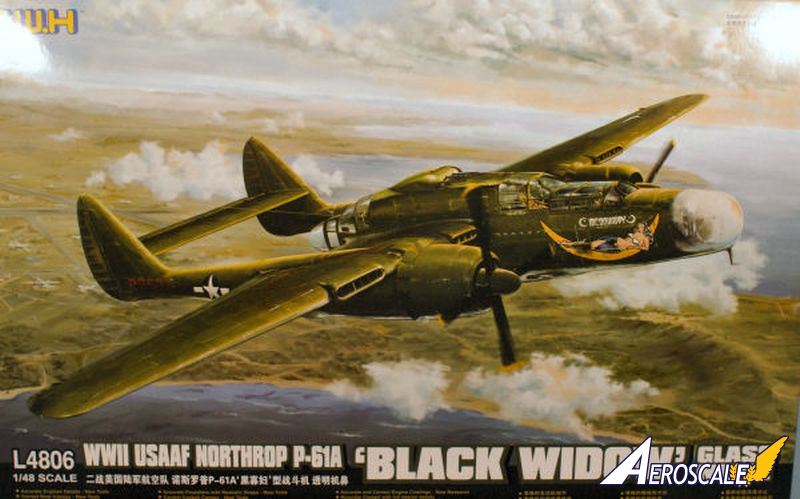
The Kit
The Lion Roar/Great Wall Hobby 1/48 scale P-61A, 2nd boxing, is the kit that I used for this build. Molded in grey plastic, which consists of 13 sprue, and two clear sprues, plus an additional fret of PE. The following items were corrected by GWH from their 1st boxing:- Transparent radome
- Rear canopy corrected
- Windscreen frame corrected
- Interior cockpit details updated
- Correct propellers and spinners
- Correct cowlings
- Correct engine crank case and magnetos
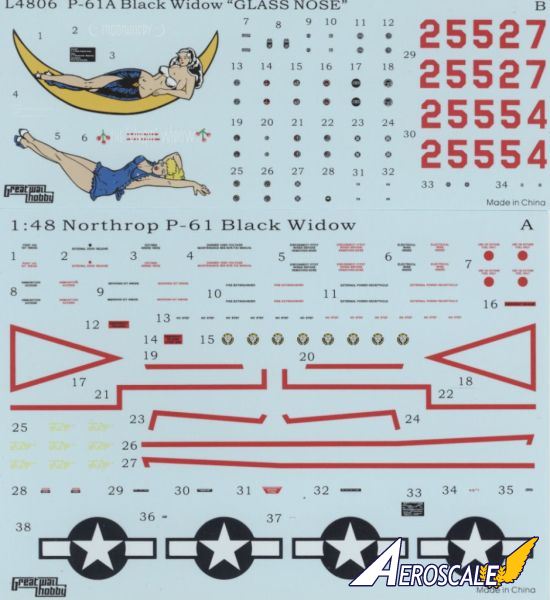
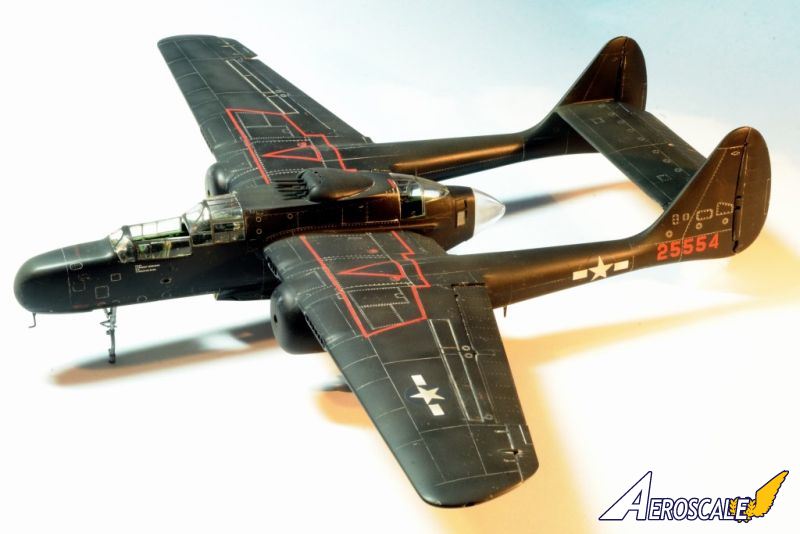
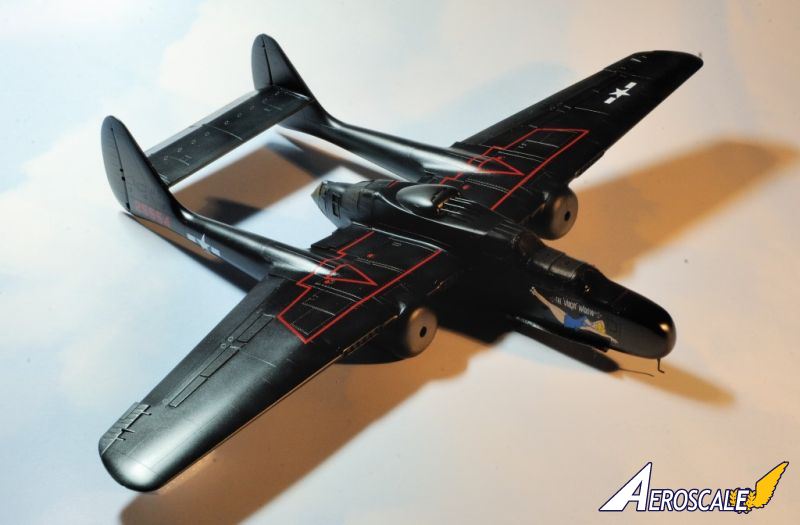
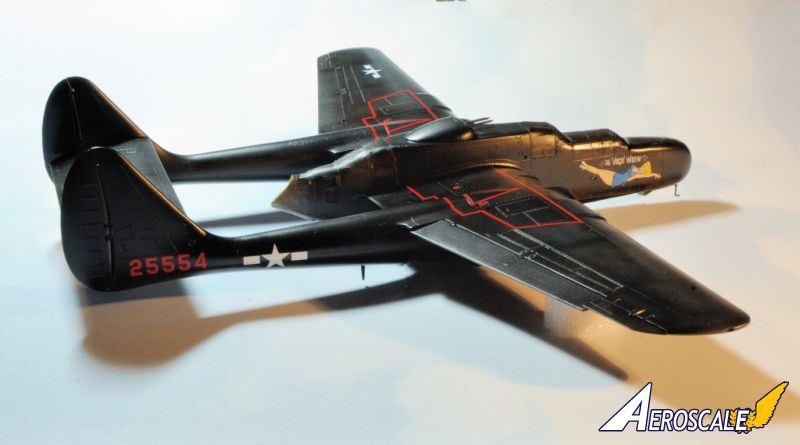
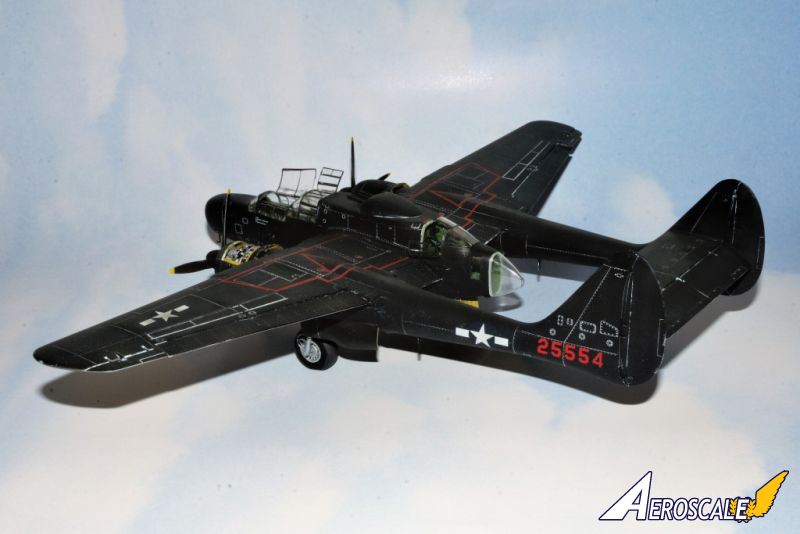
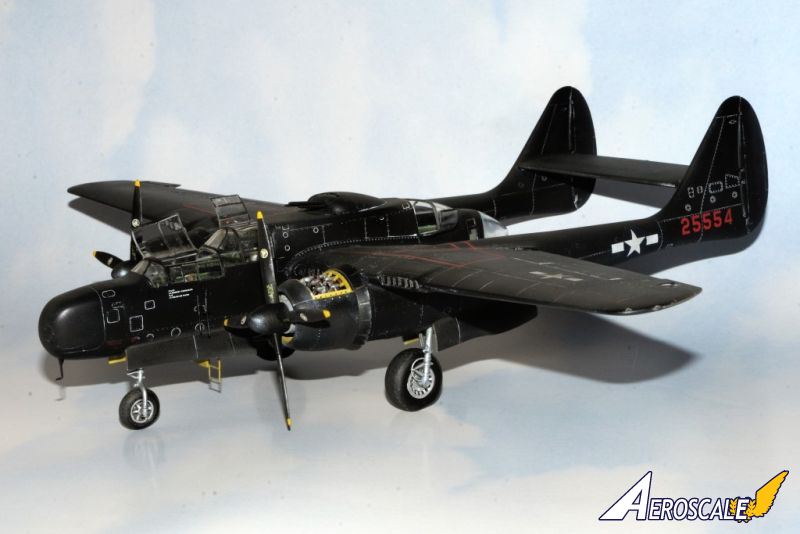
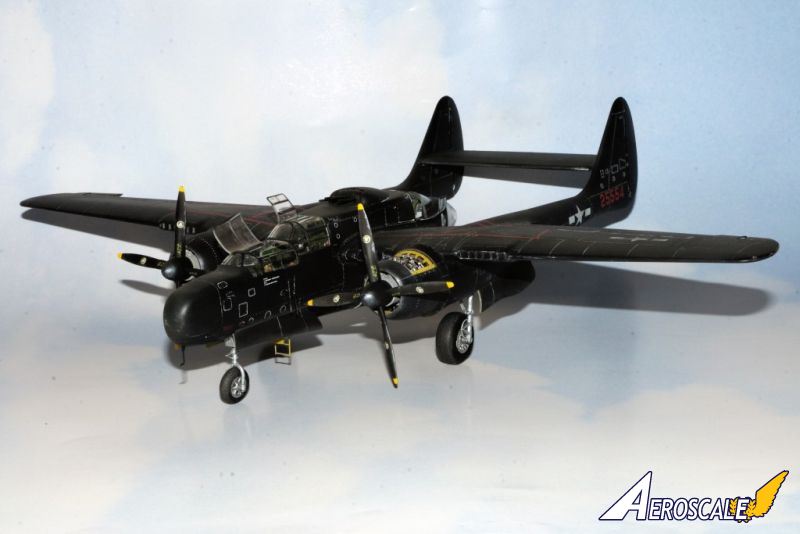
- P-61A-1-NO, 42-5527, 6 NFS, Saipan, 1944, 'Moonhappy'
- P-61A-5-NO, 42-5554, 6 NFS, Saipan, 1944, 'The Virgin Widow'
Construction
A fully detailed blog of my build can be found in the WW II forum.With this build, I wanted to further detail the model, thus kicking it up a few notches, but more importantly, pushing myself to the next level and off my comfort zone.
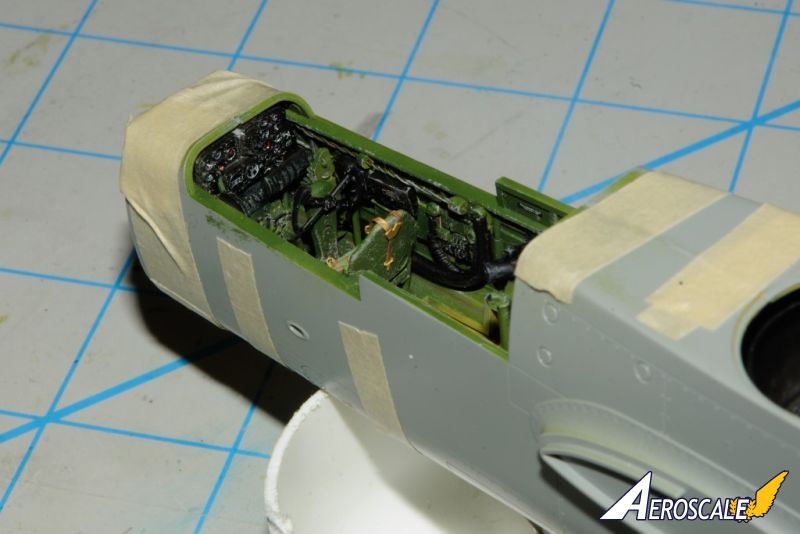
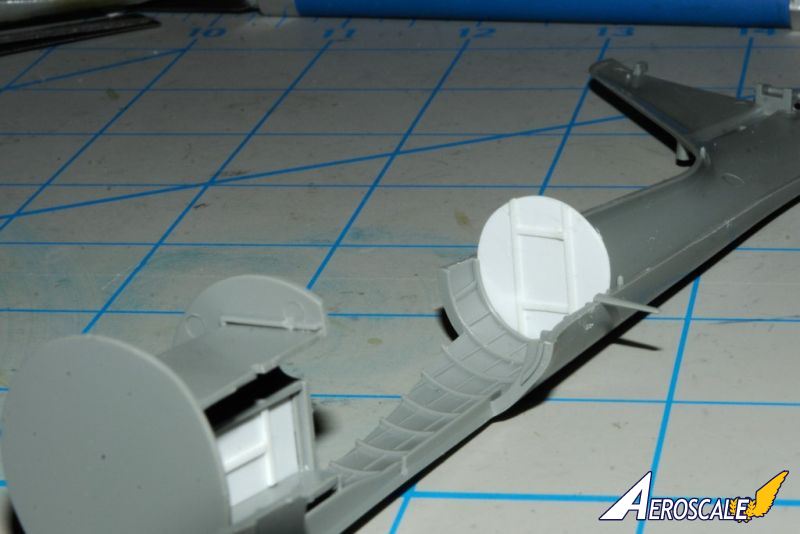
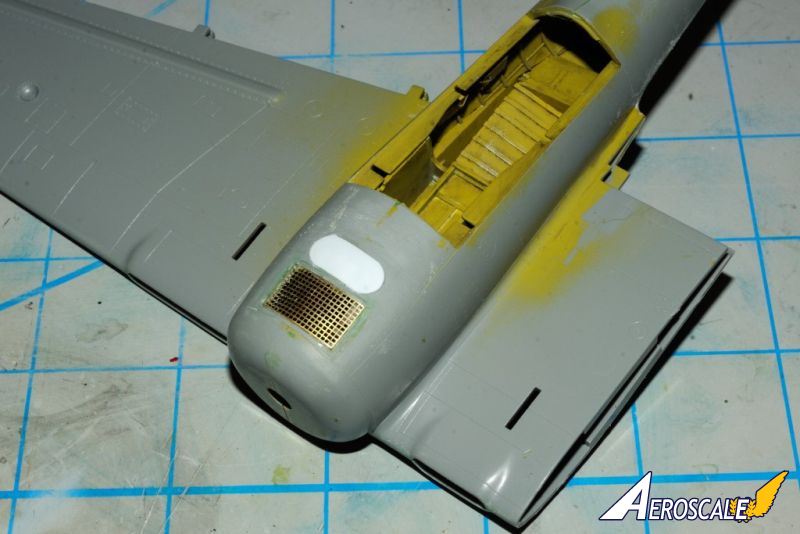
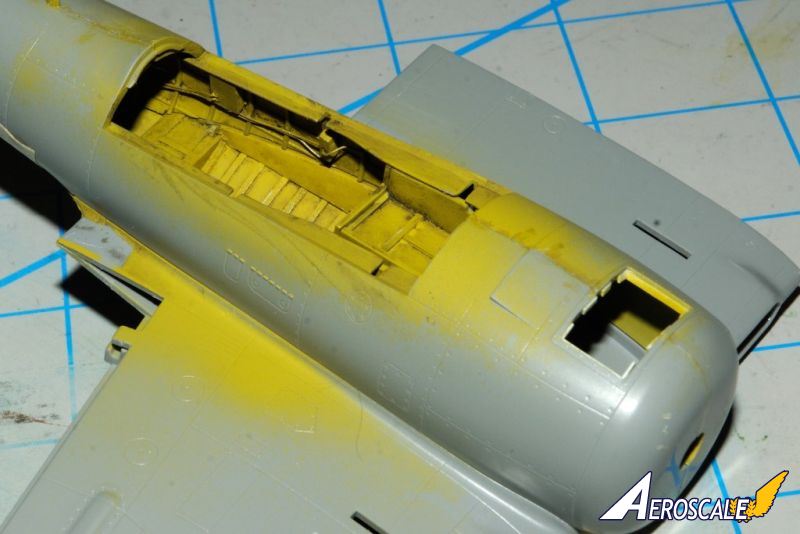
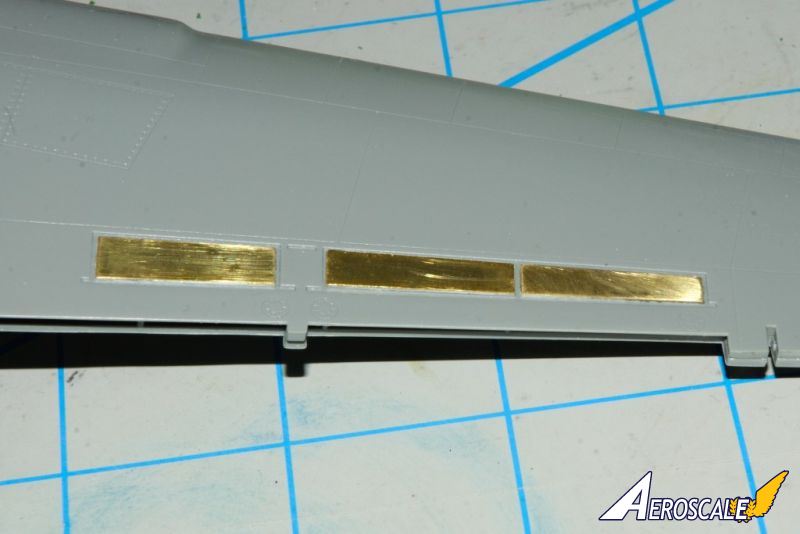
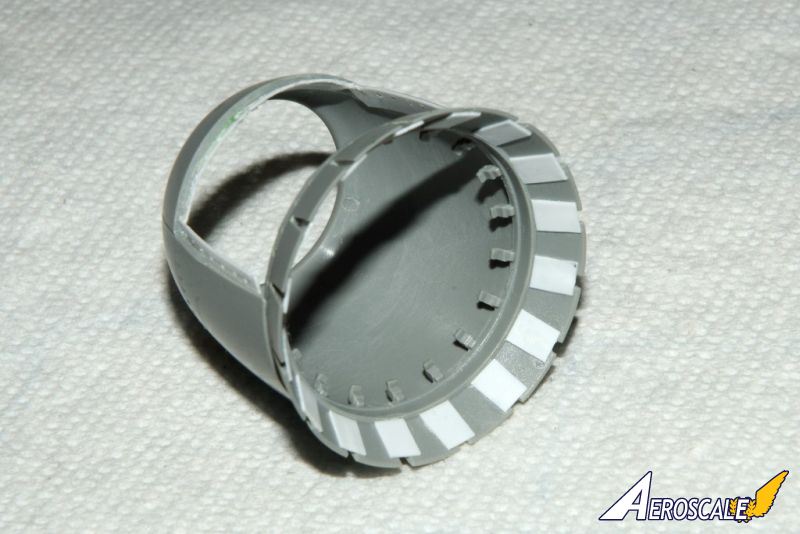
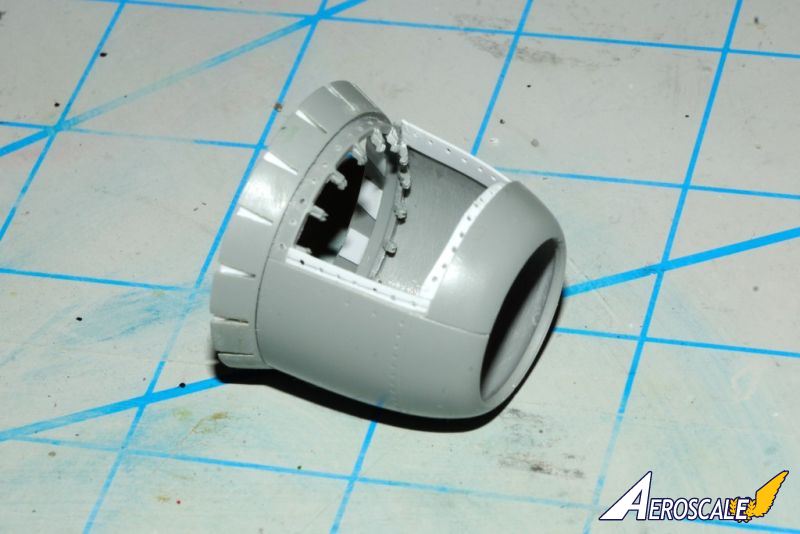
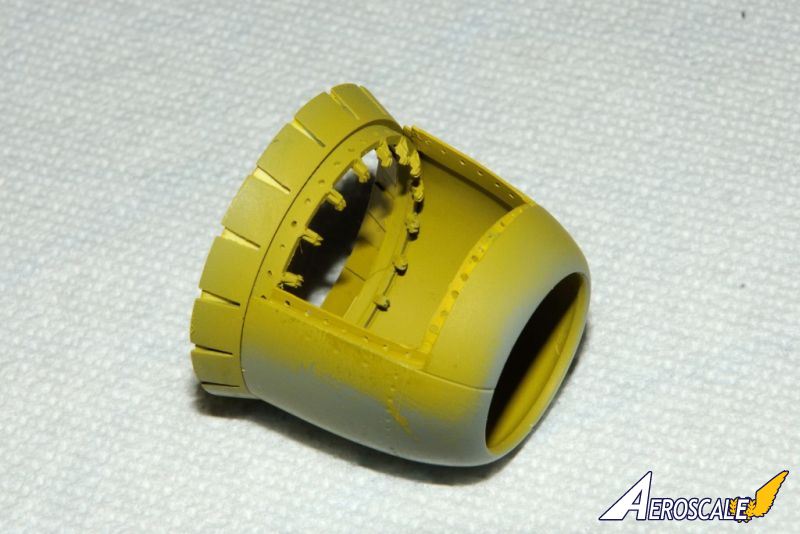
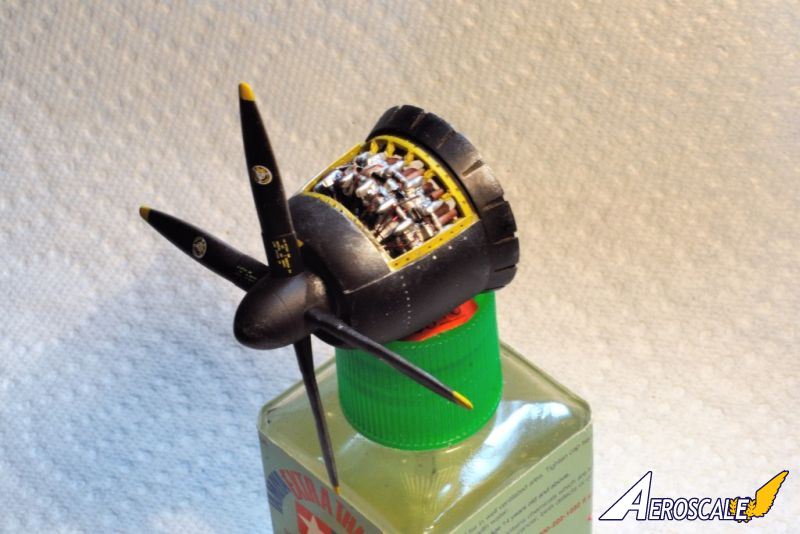
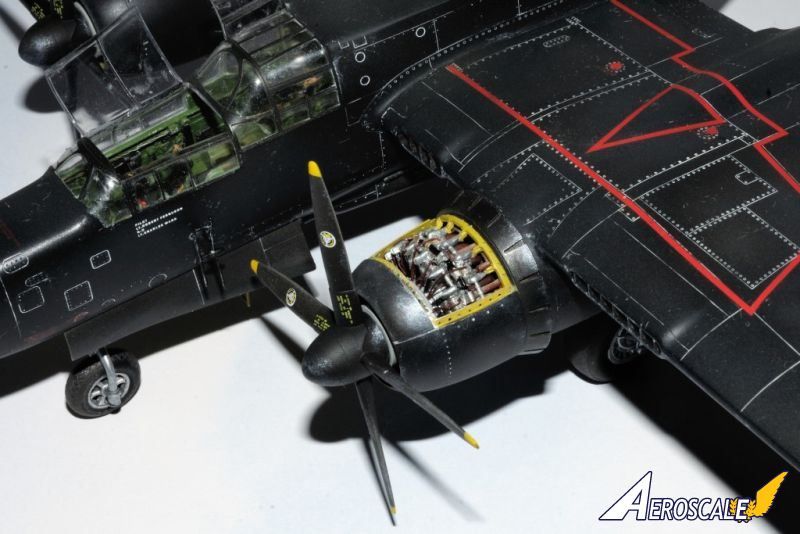
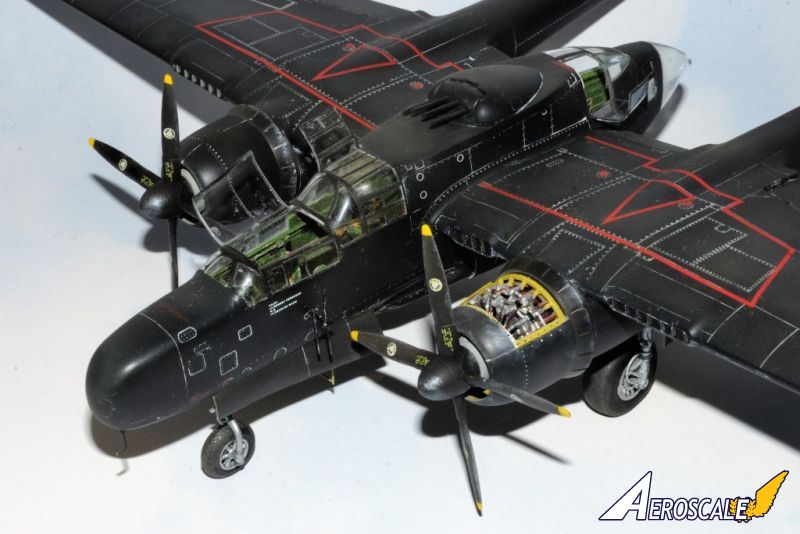
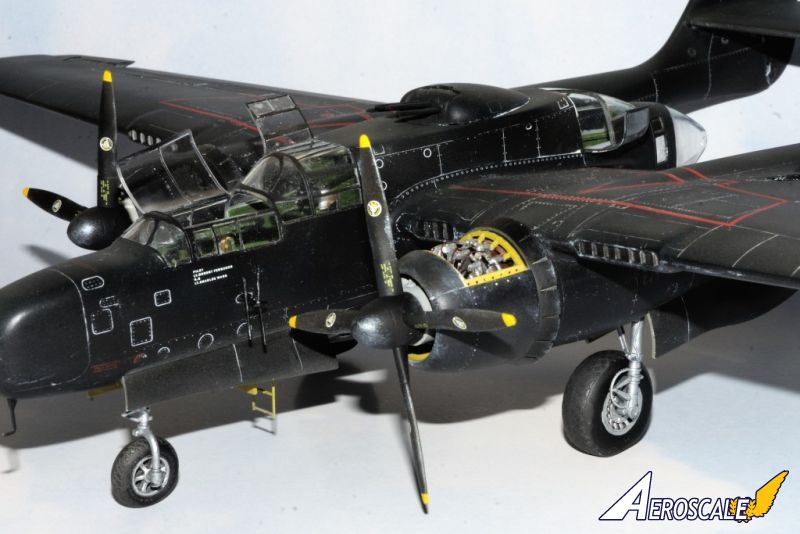
I decided to start with the engine booms. My plan here was to cut open one of the engine cowl panels to expose the very well detailed Pratt & Whitney R-2800-10 Double Wasp 18-cylinder radials engines. Additional detail was added with ignition wiring for both banks of cylinders, an electrical Conduit located between both banks of cylinders, and the mounting brackets for the conduit made from masking tape. I also added from sheet plastic the framing for the cowl panel securing tabs. The open cowl flaps needed to be corrected with the addition of small pieces of sheet plastic to cover the openings between the individual flaps as they were on the real aircraft. The bottom of the booms had a recessed area where the radiator screening goes right behind the cowl. The screen is PE, which fits perfectly. My issue is that you really don't get the sense of any open space behind it, so I cut it out,then mounted the screening. There is a exhaust duct right behind the screening, which in reality should be a cover plate. I sanded it down, and fashioned a plate out of sheet plastic. Next up was the detailing of the wheel wells. This is one area that the kit was pretty bare in its offerings. I enclosed the area with sheet, added ribs,and formers, electrical boxes, and assorted misc. wiring.
Next up was to build the wings and attach the engine booms. All the flying surfaces are positionable. After assembling each of them, I glued them in a more natural position, rather then just being in the default neutral position. Each wing contains 3 PE dive brakes. When the aircraft is parked these brakes are always in the down position. The issue was that they were just a tad too shallow to the surface of the wing. I solved this problem by gluing them to .040 sheet plastic, then to the wing. Each wing on the lower surface had the 3 ID lights represented as just scribed circles. I drilled each one out to a concave shape, then painted it chrome silver. A mixture of Pledge and the proper colour was then applied little by little. Finally clear Pledge on top was built up till they were flush with the wing surface. Same procedure was used for the landing light. Each wing leading edge houses a pair of radiator intake ducks. I modified the kit parts by using .040 sheet to extend the blades to the edge to the front of the wings. They look better, but in reality I should have spent the time to scratch build the ducting assemblies.
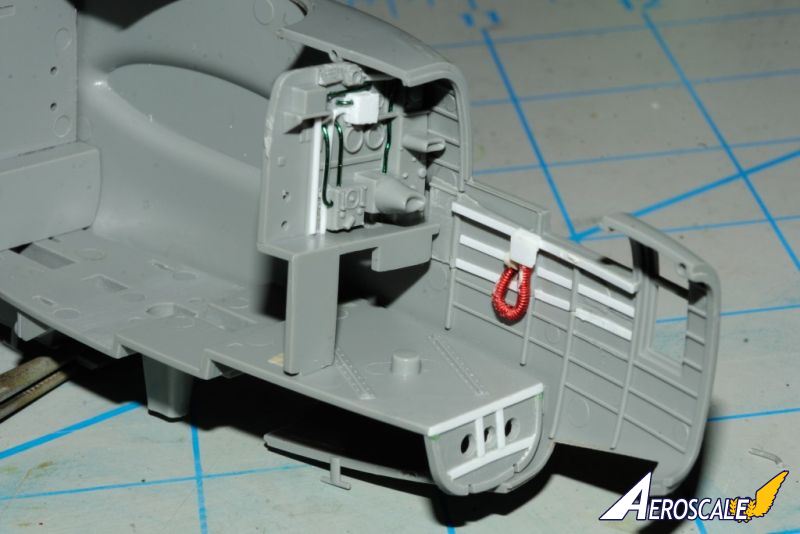
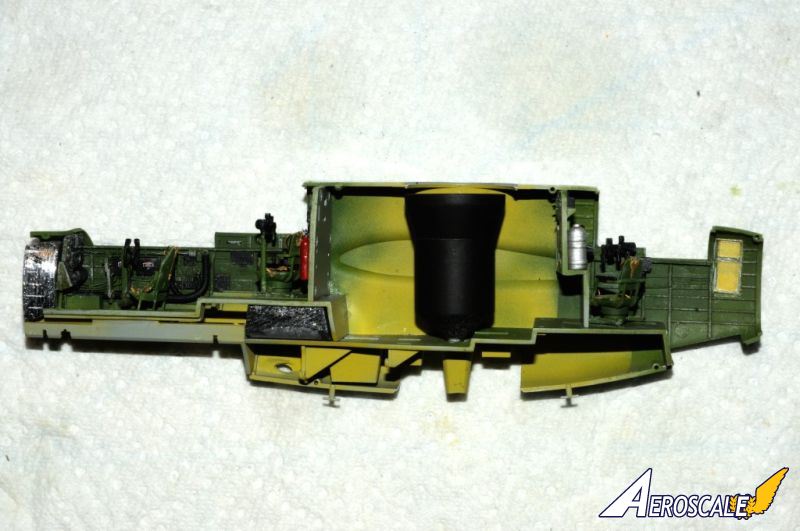
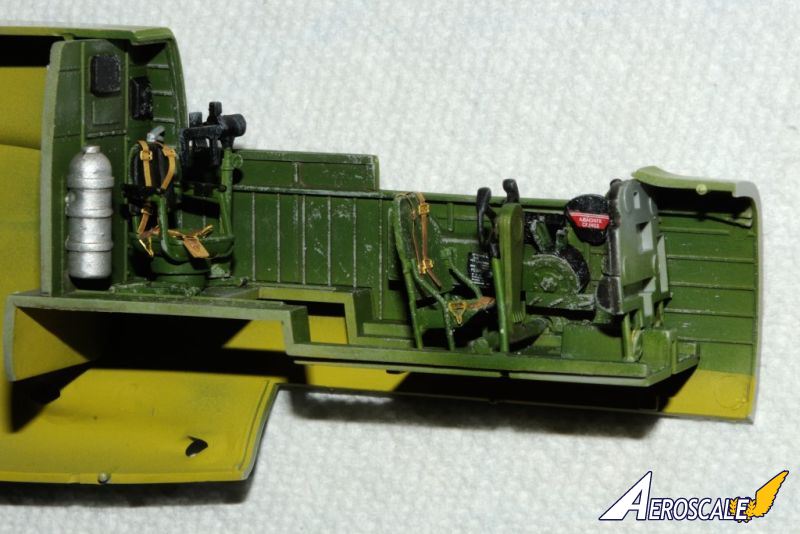
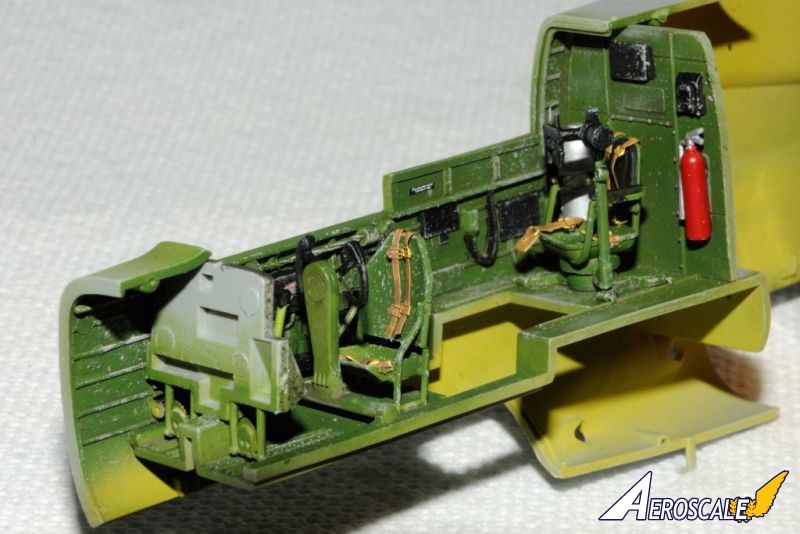
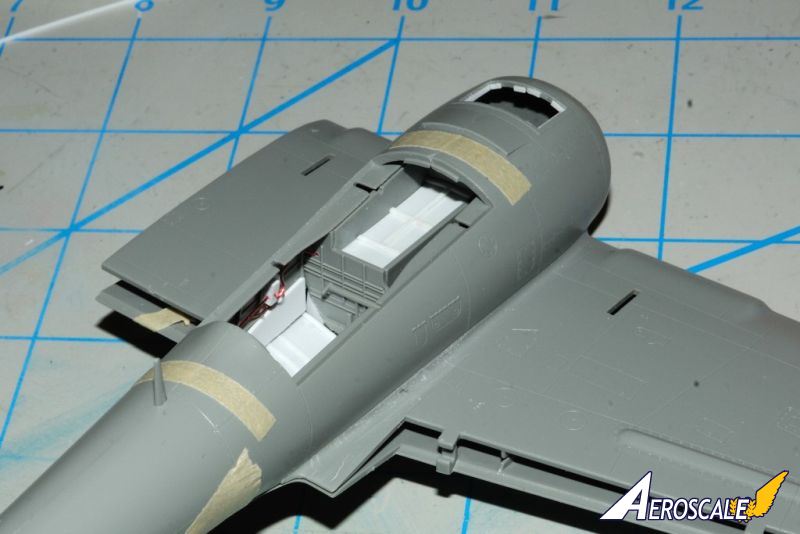
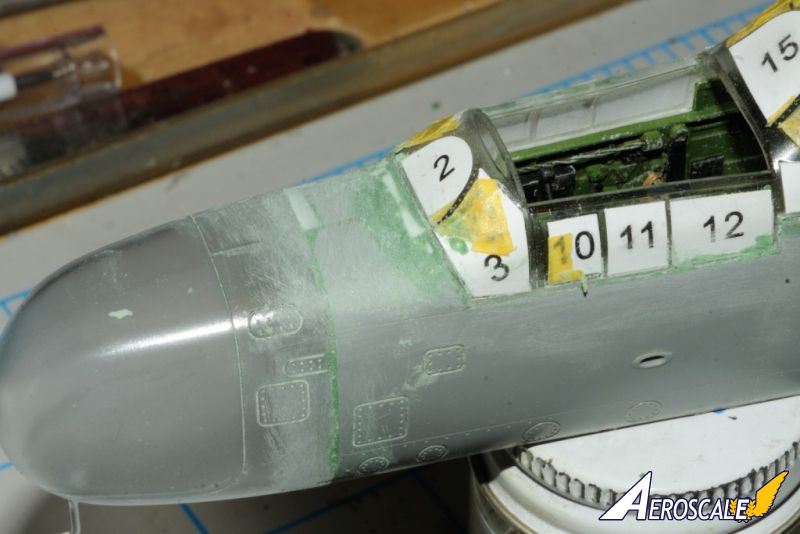
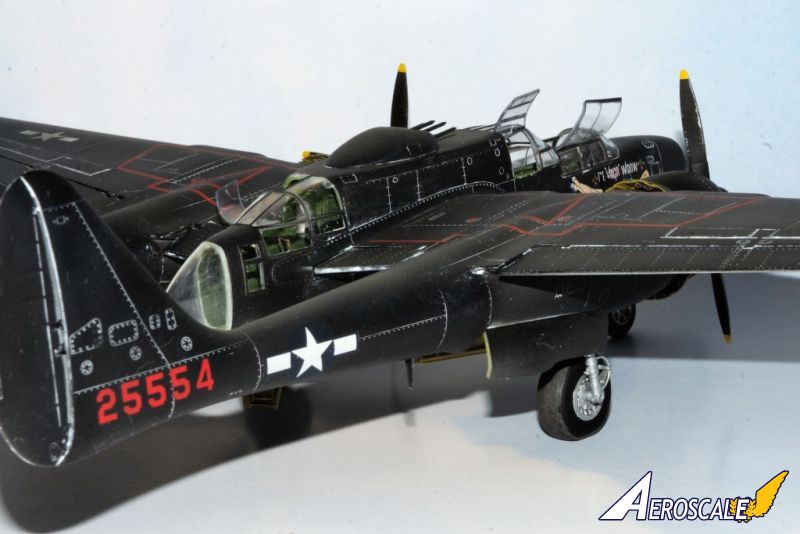
Construction of the cockpit was next. The kits cockpit is very well detailed with a lot of PE parts including seat belts and Harnesses. The 3 seats are mini kits, and build up to some of the best seats I've ever seen. They're that good. I did add some electrical boxes, and a lot of electrical wiring, as well as new oxygen hoses.
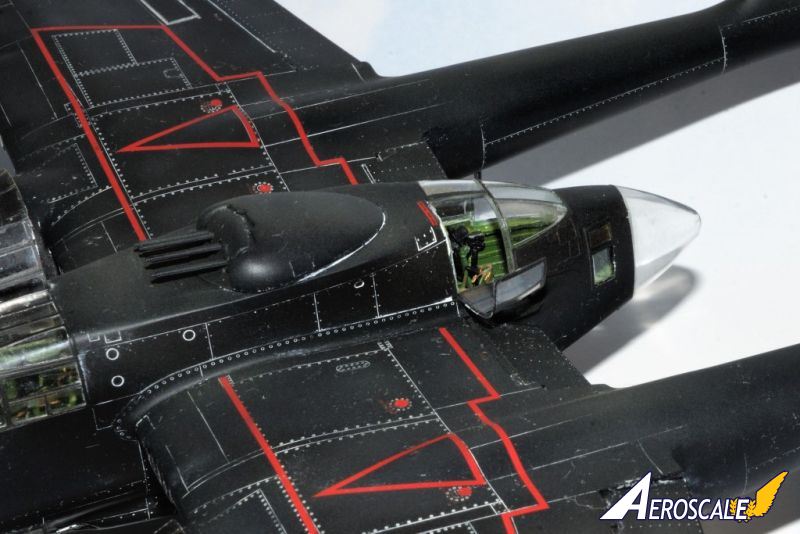
The fuselage consists of the cockpit, the radar operator's station in the rear, and the lower part is the 4 cannon bay. I planned to just have those gun bay doors slightly open as the area is very bare, even though the cannons are beautifully detailed. So I cheated here, and just left the cannons out. I added spare gun barrels glued from the outside at the end of the build. The top remote 4 machine gun turret is completely wrong. The old Monogram turret is much closer to the real deal. Our own Jessica Cooper stepped up and sent me one. Thank you Jessica. The last step was the inclusion of a pair of lead weights that I purchased from Terry Dean. Just a little bit of filing, and they fit perfectly.
With the centre fuselage boom finished and glued together. it was time to install all the glass, and there is a lot of it. The gunners tail glass fit perfectly, but since there is no frame, you end up with a nasty seam that needs sanding, and polishing. As a usual practice I glue all the glass with Tamiya Xtra Thin. I've never had any fogging issues, and the glass never pops off. The radar dome glass is molded as a frosted piece for those wanting to do that version. I opted for a painted version, so I just glued it on, sanded in, and that was that. The main cockpit glass is another issue. The overall fit is just OK on the sides, which needed some blending in, but the front windshield turned into a major effort. There is a major gap that is also higher then the nose top. I ended up making a plastic shim that was resembled a 3 piece step from sheet. Then blending in with a lot of green stuff. Sheet was used to blend in a few other spots as well. The front glass took numerous attempts with priming in between to finally get it to acceptable levels. GWH includes vinyl masks, a nice touch, but as with their Devastator kit, some masks are to big, some don't stick well enough on compound curves, and some stick too well, leaving a sticky residue when removed. I used a combination of their masks and a lot of Tamiya tape.
I was more then a little concerned when when it came time to glue the wing assemblies to the fuselage boom. There just didn't seem like there was enough surface area to hold the wings securely, as this is a very heavy model. I was going to use tube glue!! But in the end I just flooded the joints with Tamiya Xtra Thin over a few applications, and so far they've stayed on. Then I glued the horizontal tail in place. Only a little putty and sanding was necessary as the fit is that good.
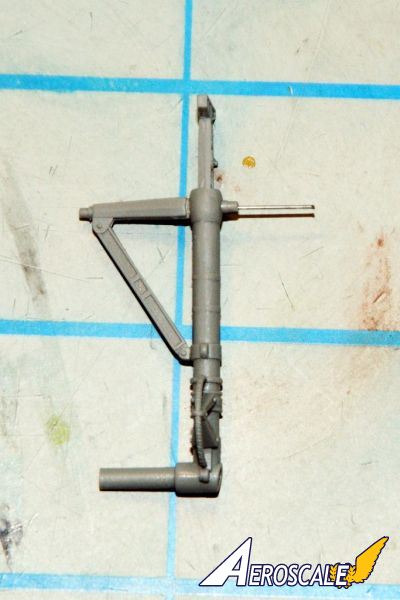
The last issue was the landing gear. The front gear installed without any issues. In a few build threads it was mentioned that the main landing gear bracket that was held in place by gluing just one small pin into the gear strut, soon failed when the aircraft was placed on its gear. Not a pleasant thought. One suggestion was to drill through the bracket and almost through the strut, then install a steel rod. And that's what I decided to do. It was as a lot easier then I thought it would be.
Painting and Weathering
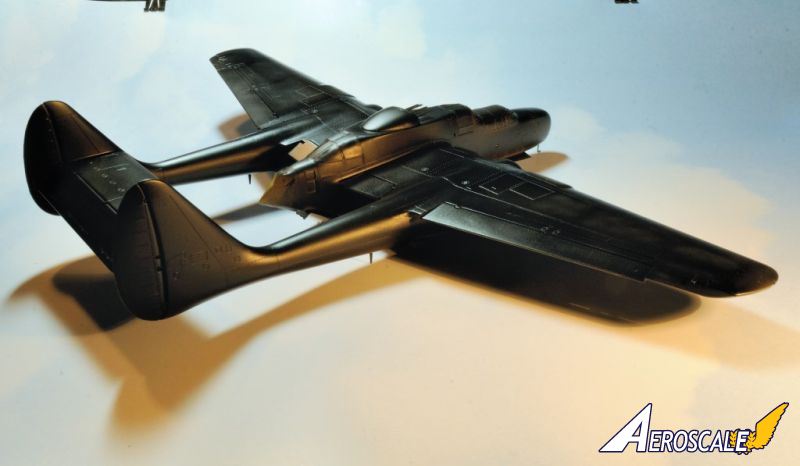
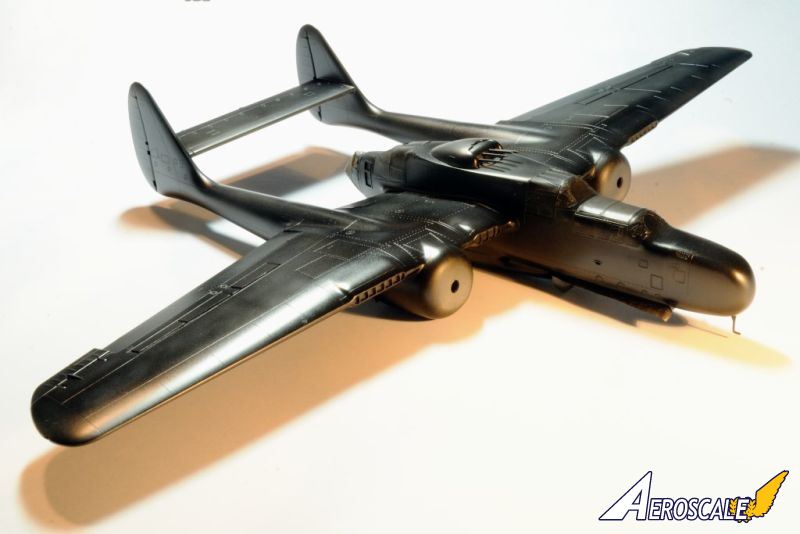
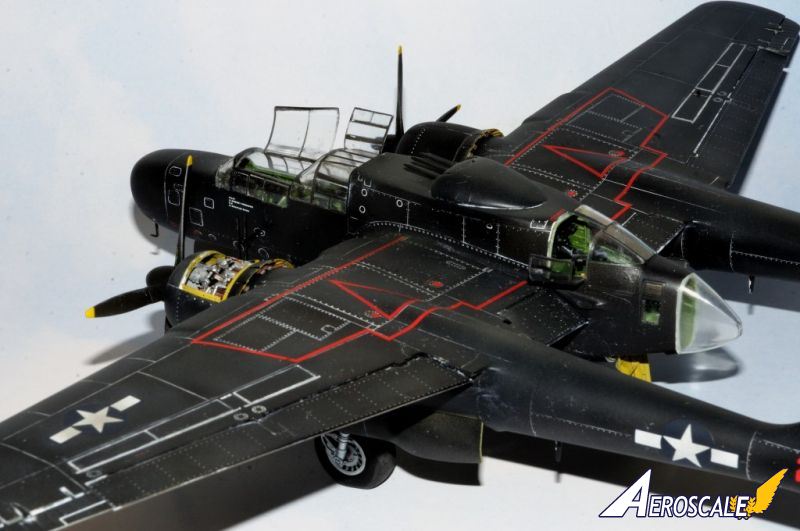
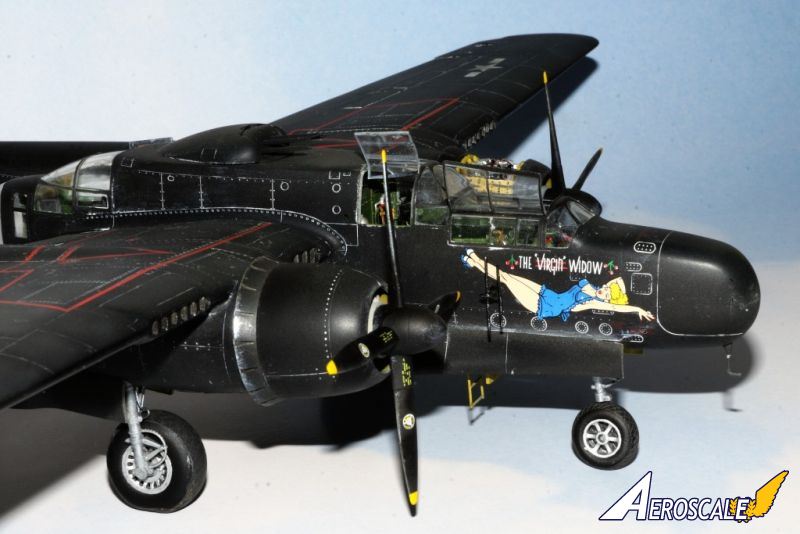
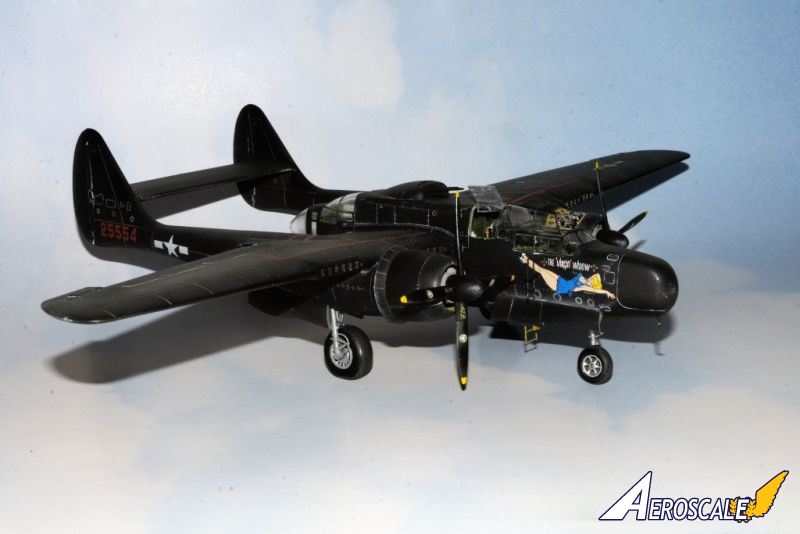
The entire model was primed with Tamiya Gray lacquer primer, corrections done as necessary (mostly that pesky windscreen), and then several coats of Tamiya semi gloss black. Like I said this is a big model,and it took what seemed forever to paint the bottom one day, then the top a few days later. Then the top and sides of the aircraft was airbrushed a few times in a random blotchy pattern of the base colour mixed with various greys and whites to hopefully simulate fading.After several days of drying I applied a clear coat of Pledge, let it dry for a day or two. Then the decalling process started, which took a week to accomplish. The red gas tank lines looked very daunting. Following the number sequence they went on without any issues. For that matter, so did all the decals. When I finally got to the Virgin Widow decal, it cracked in several places. This was my fault, as I let the decal curl in the warm water, then flattened it out on paper towel while the water softened the glue. That's when it cracked. I very carefully applied the decal and used Micro Set over and over again till the cracks disappeared. I let the decals dry for a few days, then a protective layer of Pledge was applied.
Weathering was next. Since the aircraft is going to be a semi-weathered mattish black, the normal dark coloured pin wash wouldn't do. I've seen several dark to black aircraft done is contrasting lighter pin washes, so that's the way I went. Then a lighter shade of a sludge wash. A few more days of drying, then I airbrushed on a few very light coats of dust. Finally, a few coats of Testors Dullcoat.
The time came to remove the masks, then glue on the three open glass panels, install the cockpit access ladder, the rear gunner's access hatch, and the rest of the misc pieces I left off.
Conclusion
Overall, I really enjoyed this build. It was quite a learning experience for me. The model is now the showcase of my ever growing collection.GWH has produced an excellent kit, took the time to heed the issues that were expressed by fellow modellers with their 1st release, and corrected them with their 2nd release. All manufactures should follow this process. After all, they're producing these expensive kits for a very small niche market.
About the Author


FROM: NEW YORK, UNITED STATES
I've been a plastic scale modeler on and off for most of my life since I 1st found them on a shelf at a local toy store way back in the very early 1960s. Once in High School modeling stopped until the mid 1970s when I got married, and needed a hobby that would keep me at home. After 10 years I to...
Comments

What an amazing build Joel and much enjoyed reading the interesting article..Carmel
FEB 08, 2014 - 10:33 PM
My sincerest thanks to all of you for taking the time to not only stop by and read my feature article, but also for your more then kind words and comments.
Joel
FEB 09, 2014 - 02:21 AM

Joel, beautiful work indeed. One of the toughest tasks as a modeler is to bring life to a black paint scheme but you executed it perfectly. Really a well done Widow. A true nocturnal predator.
FEB 09, 2014 - 05:05 AM

Michael, thanks so much for those kind words. Glad you enjoyed the build, and got something out of it you can use.
Joel
FEB 10, 2014 - 11:06 AM

Joel, excellent review and how-to blog! I agree that your handling of the black camouflage is wonderful.
FEB 10, 2014 - 04:04 PM
Fred, Thanks for your positive comments. The black paint scheme was certainly a new challenge for me as I've always shied away from them. They seem to show every error and screw up. If you look close enough, you'll see that I made my fair share of them.
Joel
FEB 13, 2014 - 03:30 AM

Copyright ©2021 by Joel Willstein. Images also by copyright holder unless otherwise noted. The views and opinions expressed herein are solely the views and opinions of the authors and/or contributors to this Web site and do not necessarily represent the views and/or opinions of AeroScale, KitMaker Network, or Silver Star Enterrpises. Images also by copyright holder unless otherwise noted. Opinions expressed are those of the author(s) and not necessarily those of AeroScale. All rights reserved. Originally published on: 2014-02-08 19:53:01. Unique Reads: 9523

WEB HOSTING BY


Copyright ©2021 AeroScale and Kitmaker Network, a subsidiary of Silver Star Enterprises
All Rights Reserved. Please read our Conditions of Use and Privacy Policy.
All Rights Reserved. Please read our Conditions of Use and Privacy Policy.