

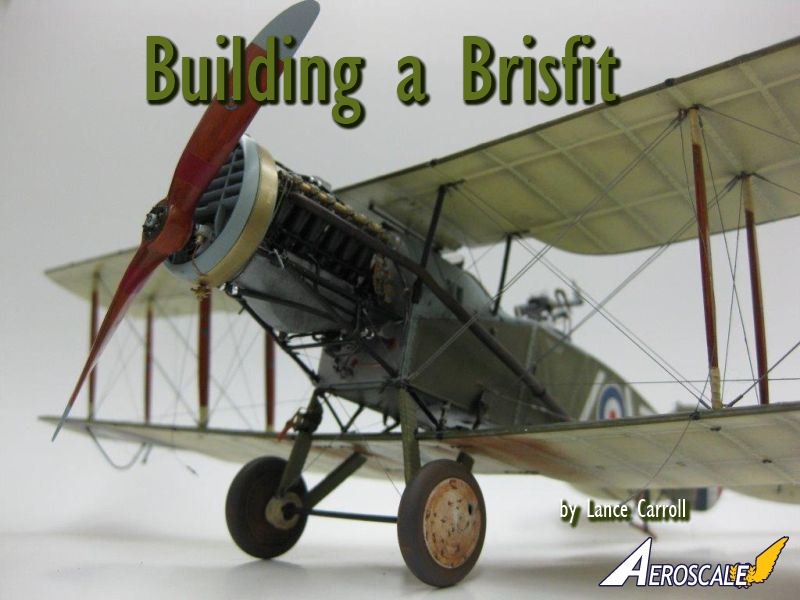
1⁄32Building a Brisfit
17
Comments
history
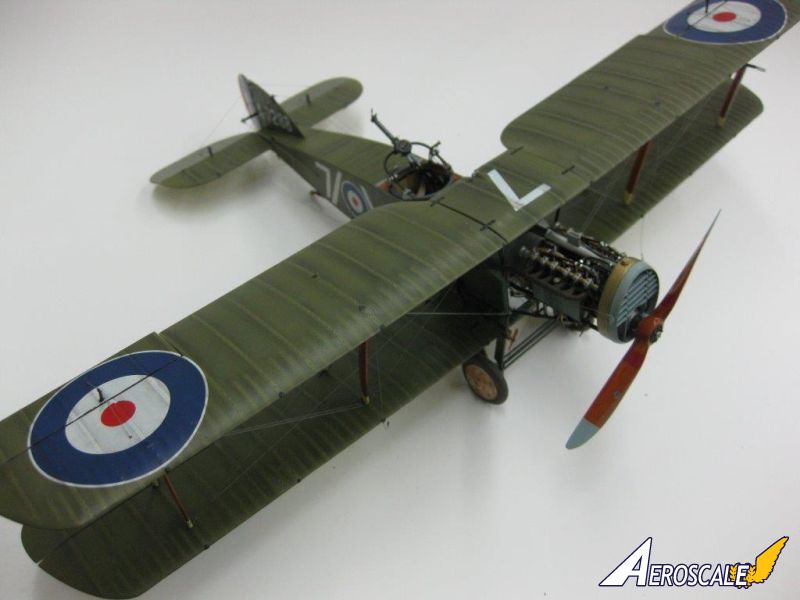
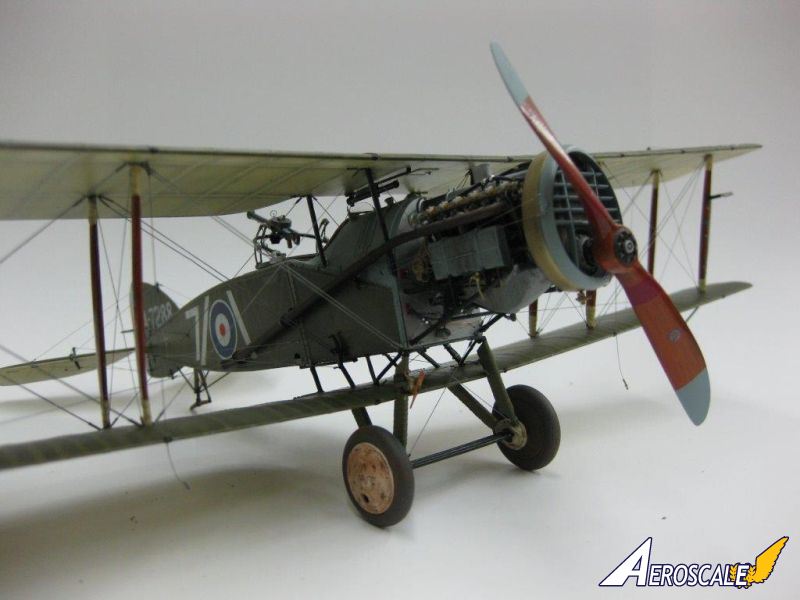
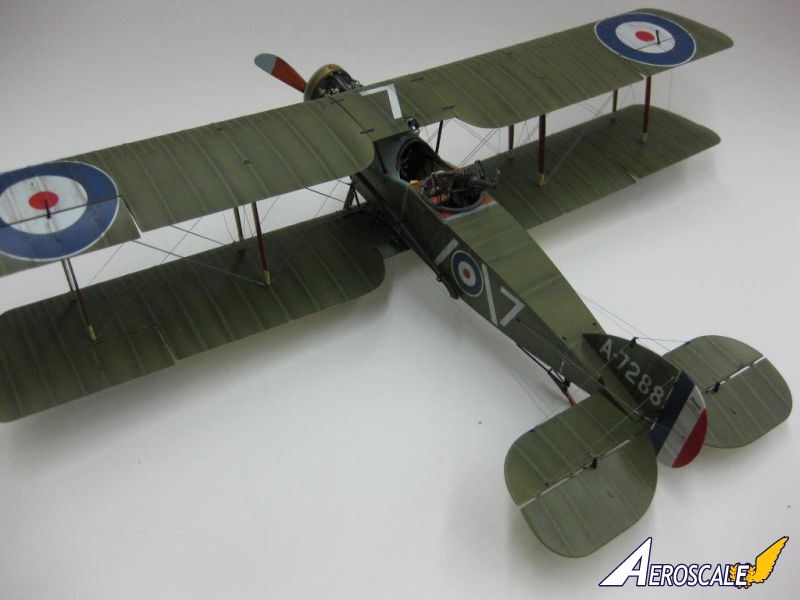
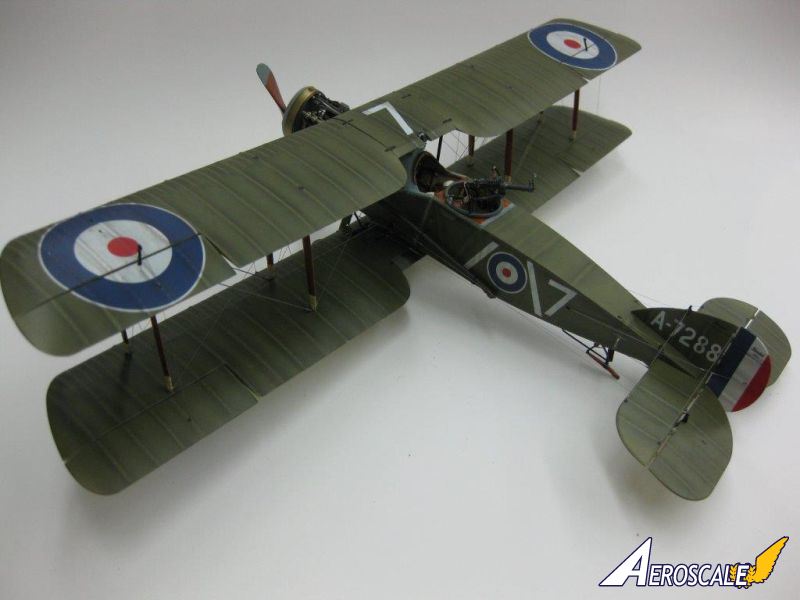
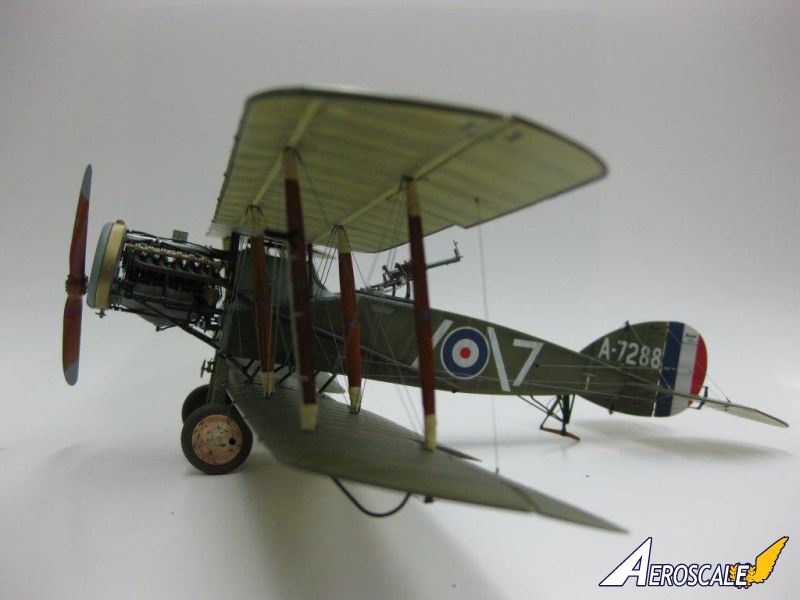
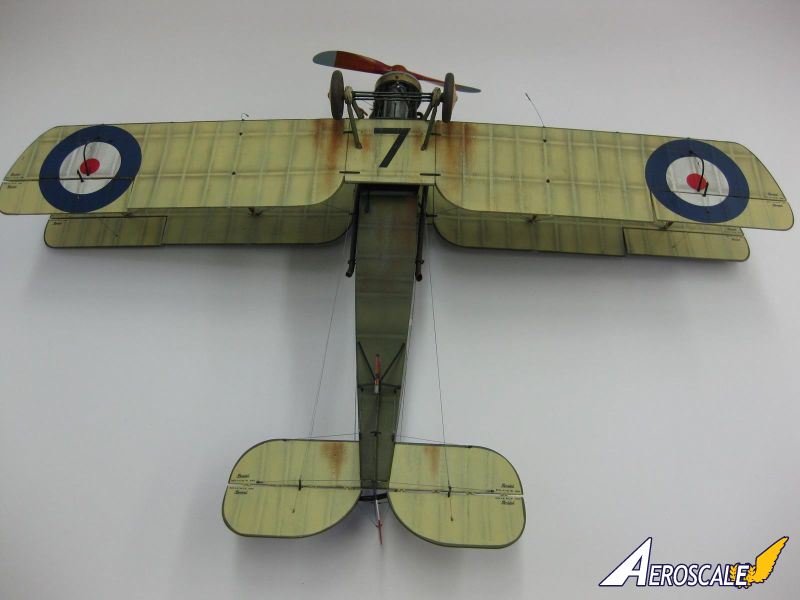
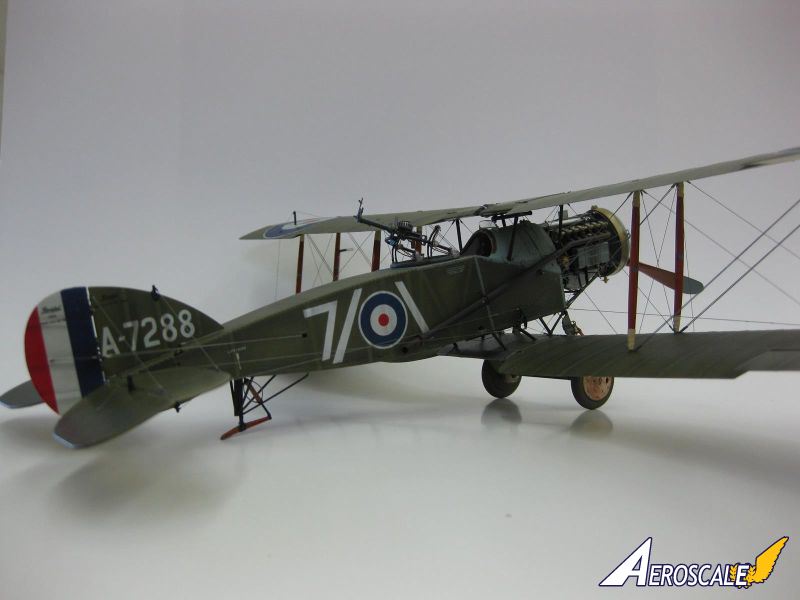
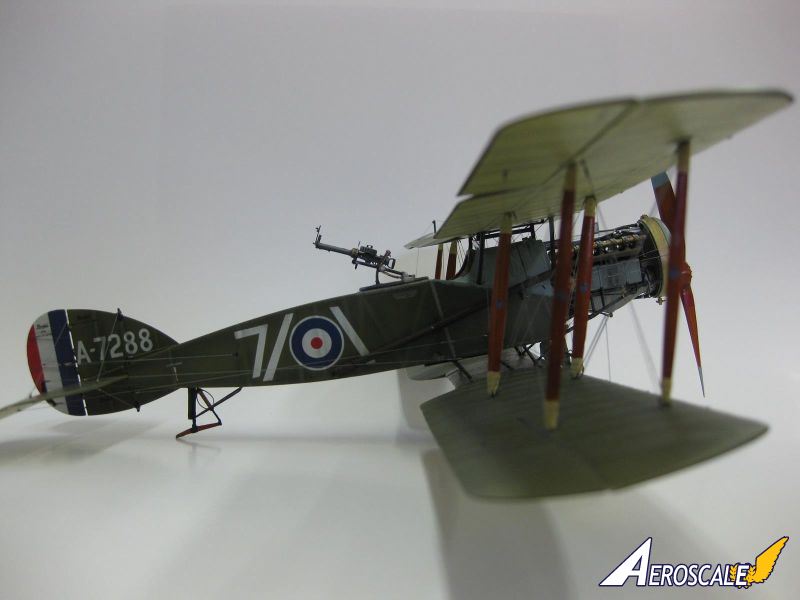
On 30 Nov 1917 Canadian Capt. Andy McKeever and his Observer/Gunner 2Lt. Leslie Powell engaged a superior force of 9 German aircraft and were credited with the destruction of 4 in this, their last combat flight of the war. The aircraft they flew on that mission was a Bristol F2b Fighter, S/N A7288, and this is the aircraft I chose to model.Immediately after a disastrous introduction to the Front on 5 April 1917 when Capt. William Leefe Robinson lost four of his six aircraft Flight to enemy action the F2bs tactics were changed and the aircraft flown and employed much like the single seat Fighters, with spectacular results. The most successful Biff Pilot was McKeever with 31 credited Kills. His British Observer, 2Lt. Powell was credited with 19 kills, all but one scored from McKeevers back seat.
I always strive for Canadian content in my Models, thus when the Biff came out of the stash, Andy McKeevers mount was the natural choice.
the kit and accessories
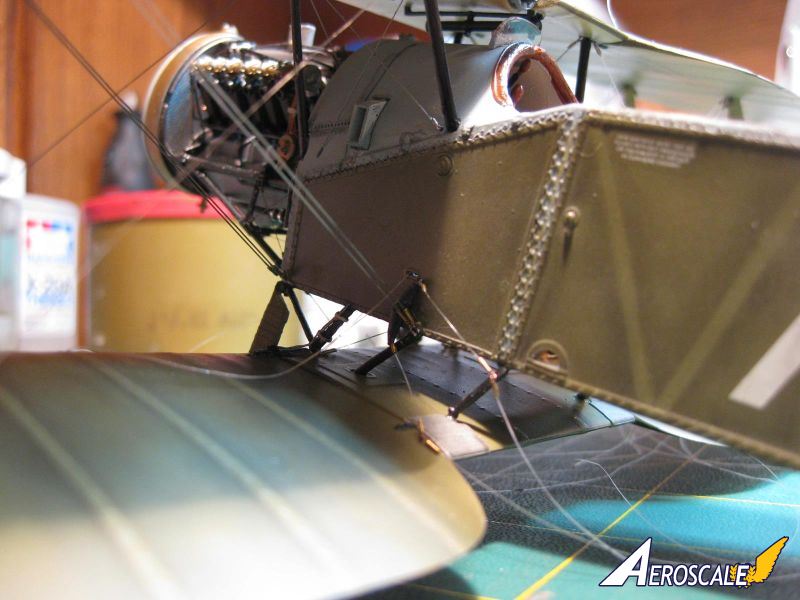
Like all of Wing Nut Wings products, this Kit is, in a word, spectacular. From the classic Instructions Booklet to their on-line References and a technically superb bunch of sprues etc. all packed into a very attractive box this one is a winner. Despite the fact that this Kit is, in my opinion, one of the best packages available from this incredibly quality driven Company, I did have a challenge or three mounting the bottom wing, getting the four cabane struts properly aligned, and determining the best sequence for the considerable amount of rigging, especially with the addition of the external flight control cables.building and finishing
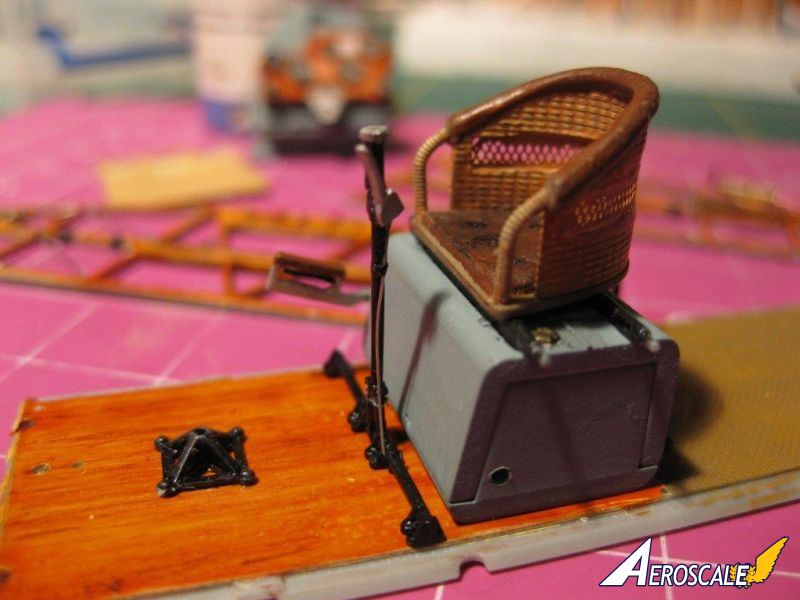
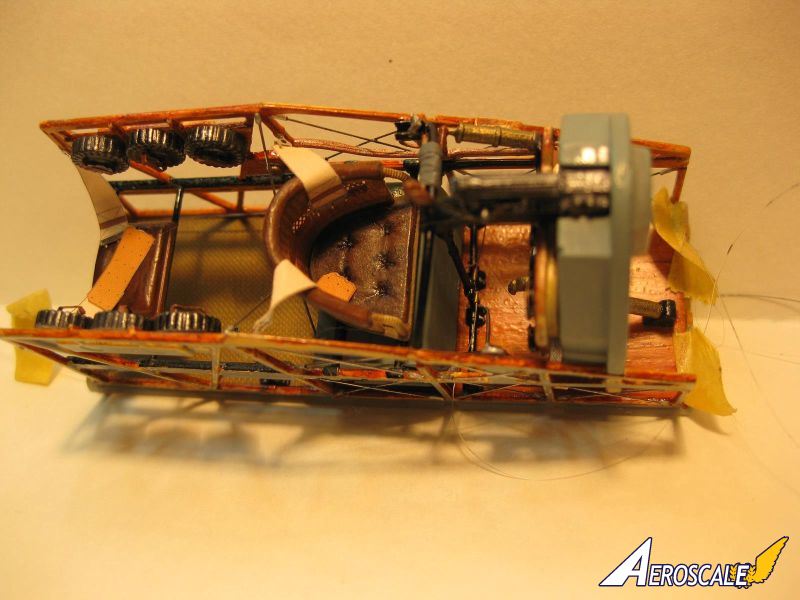
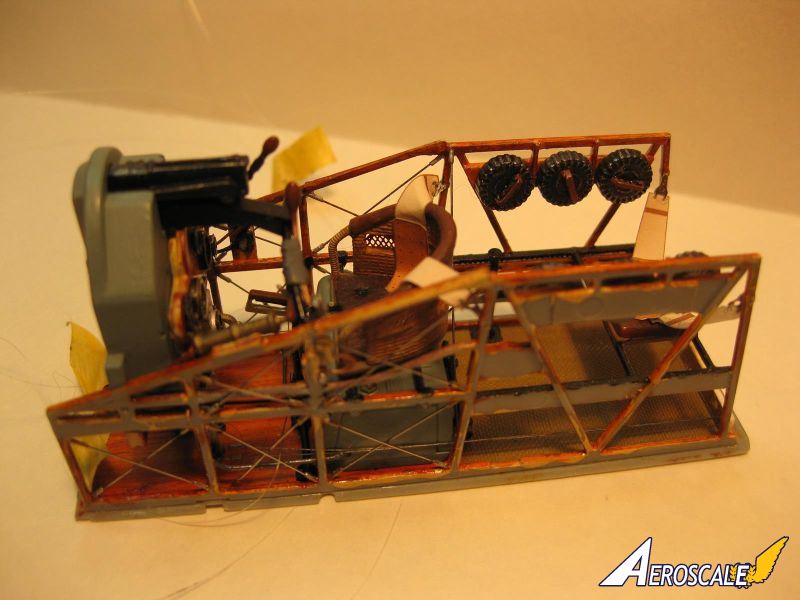
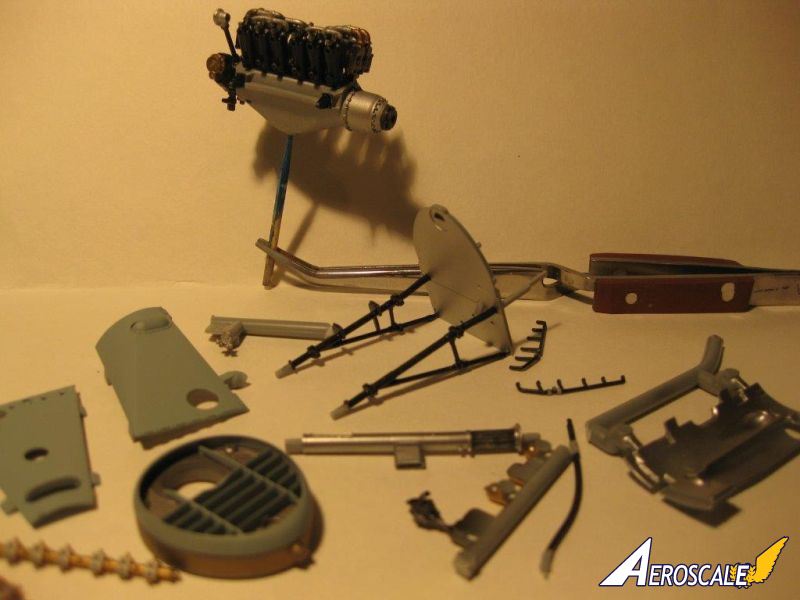
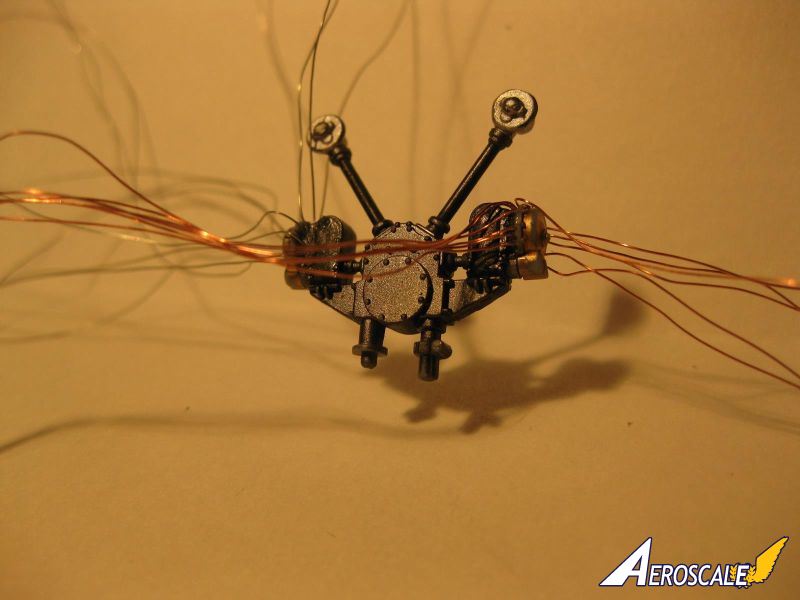
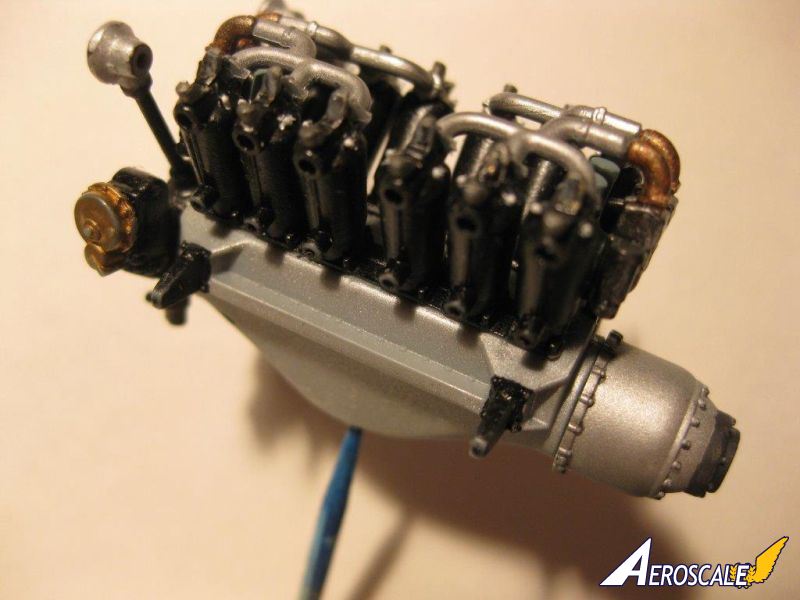
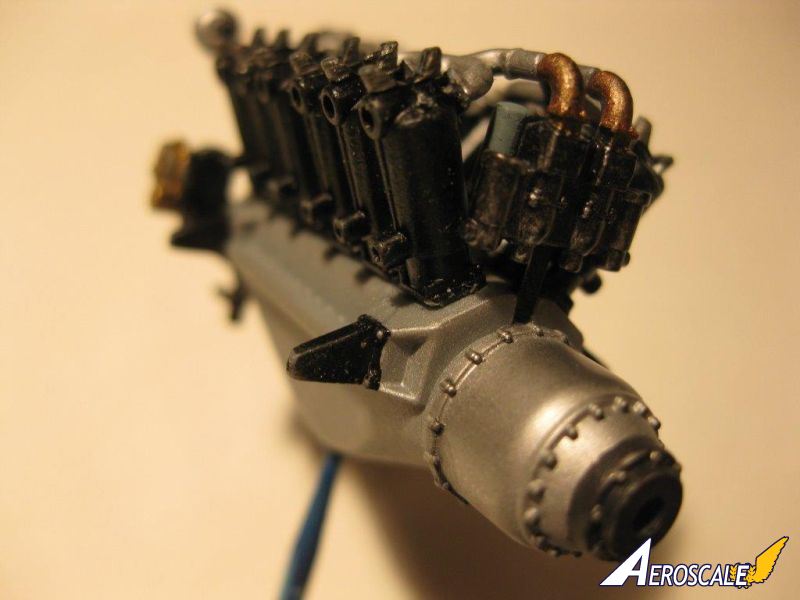
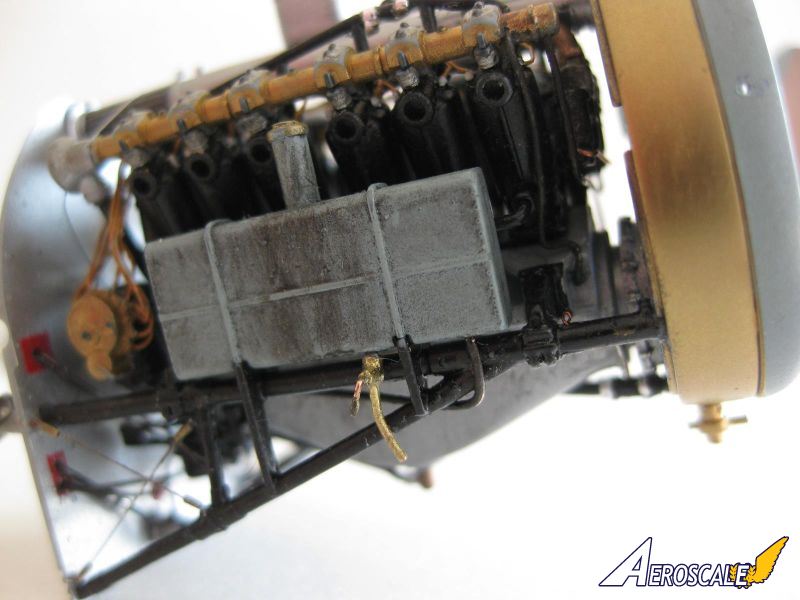
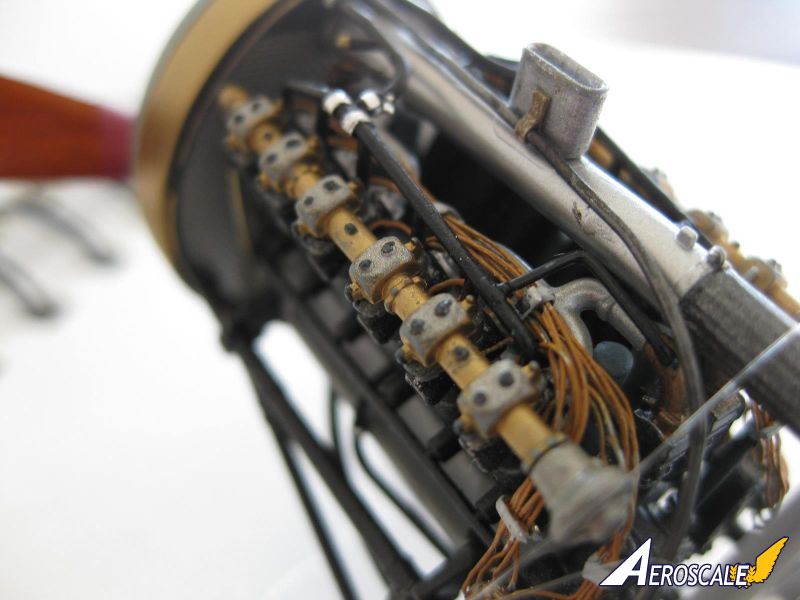
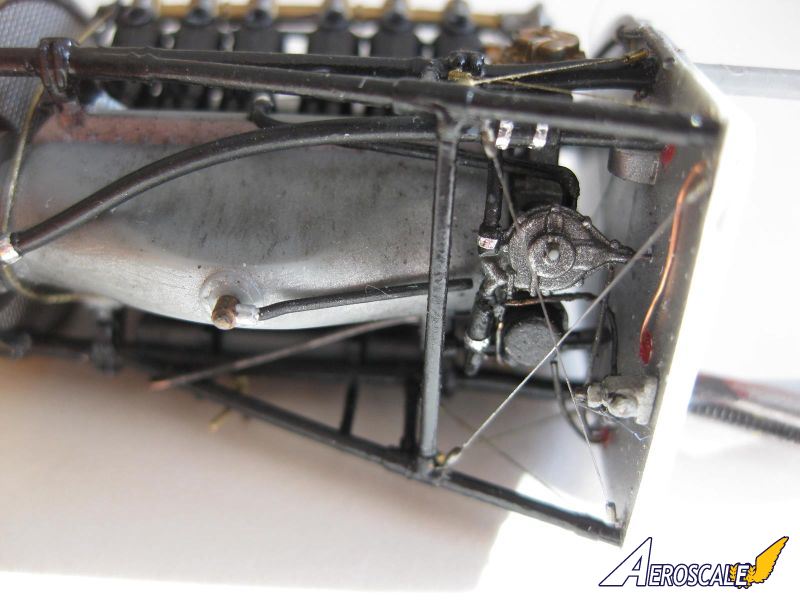
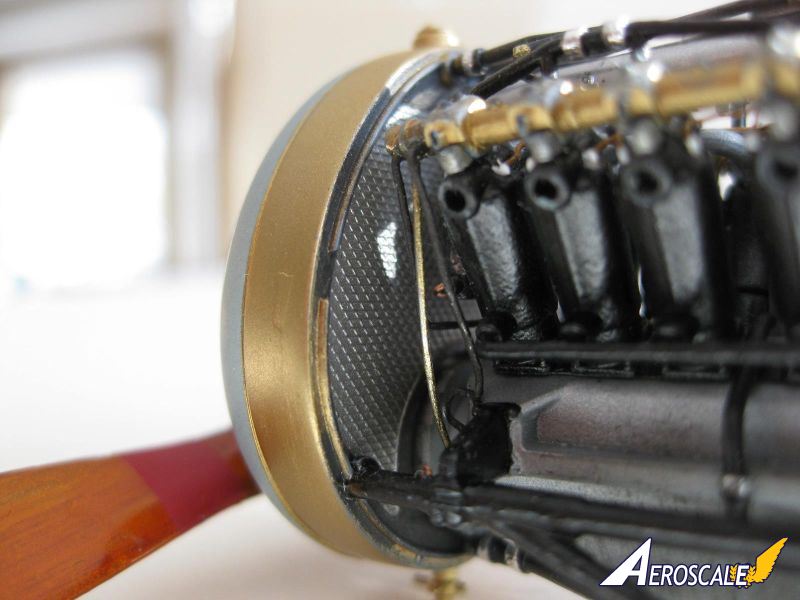
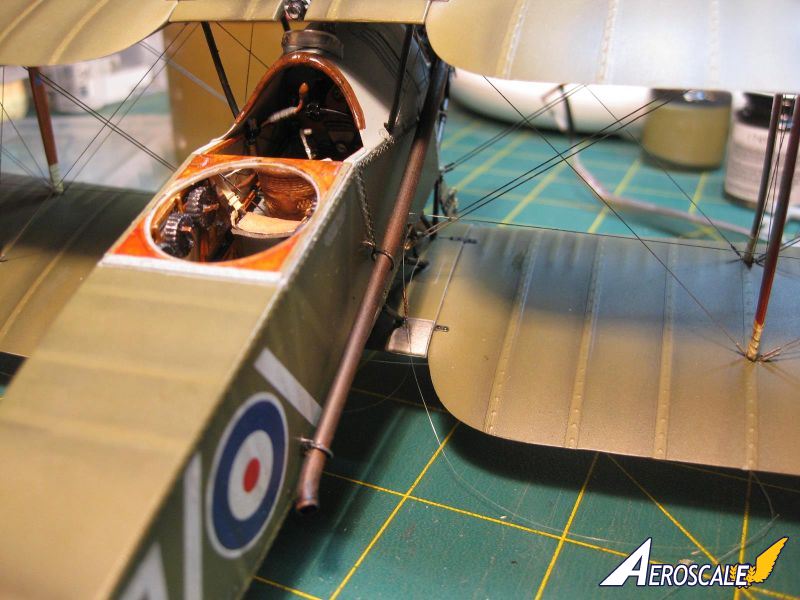
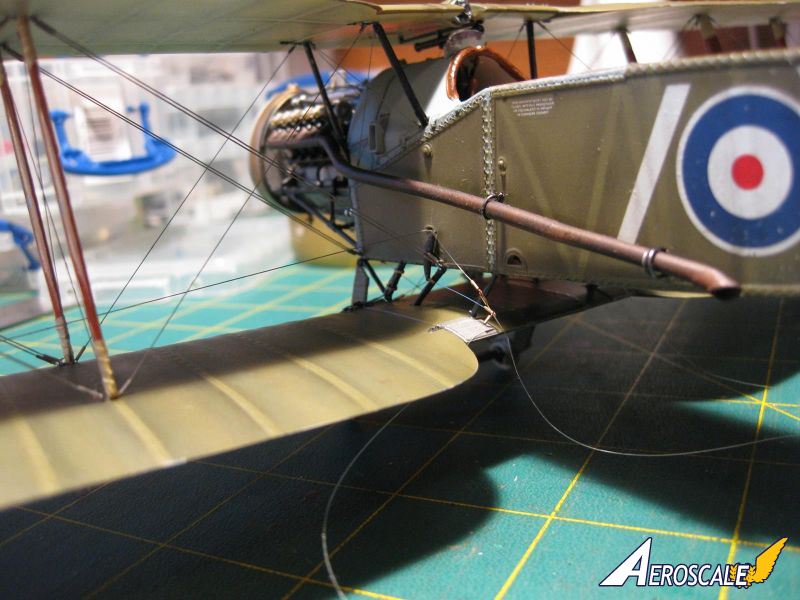
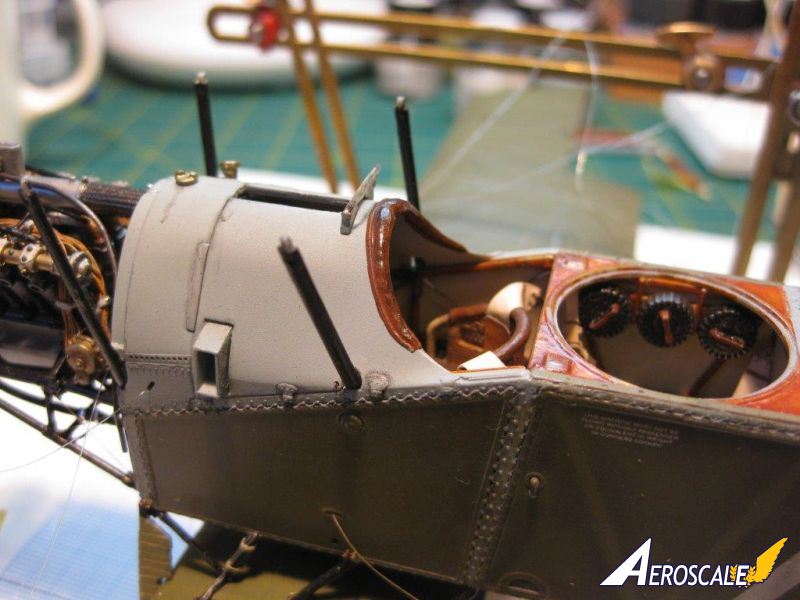
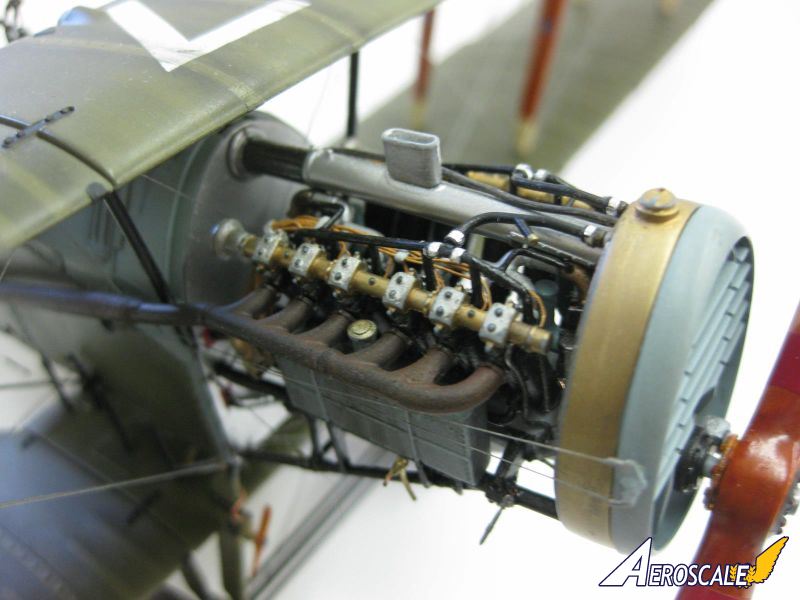
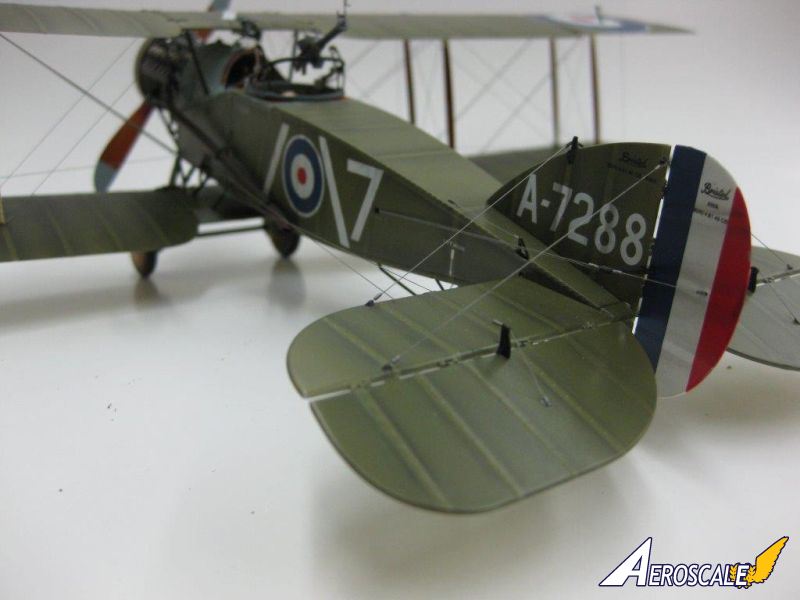
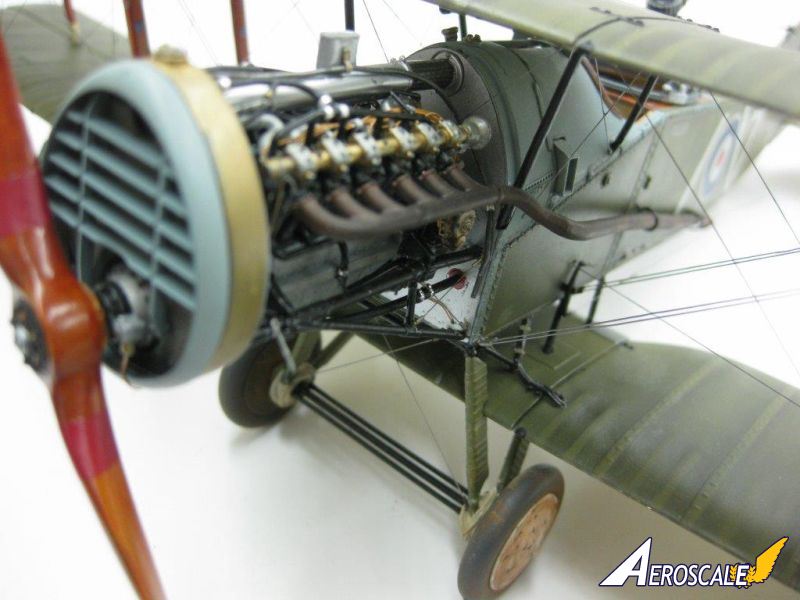
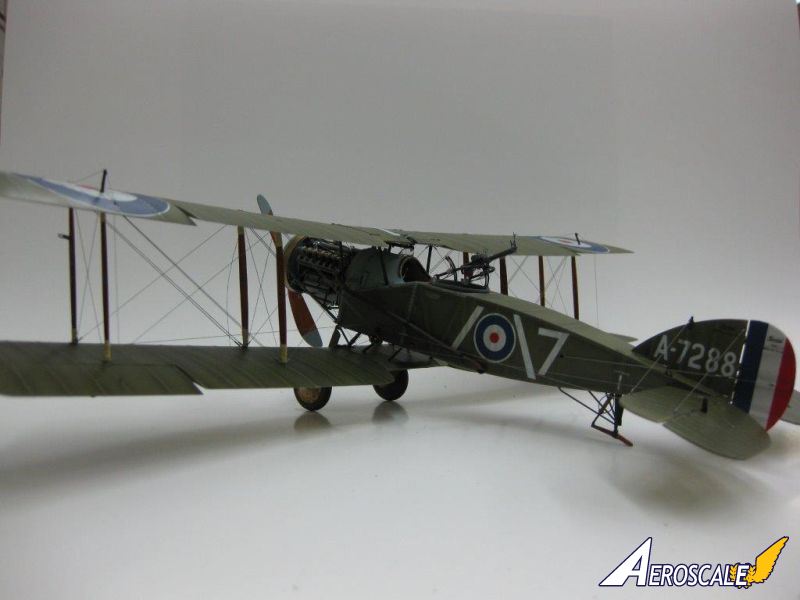
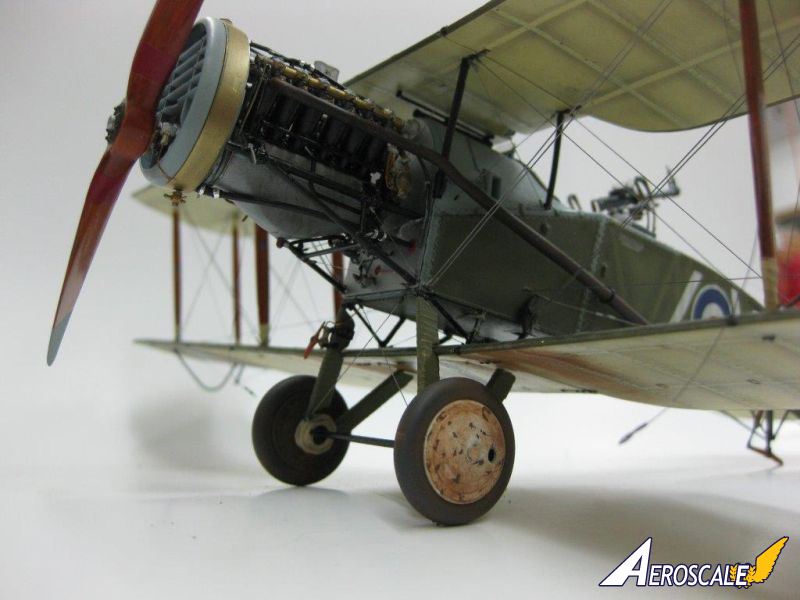
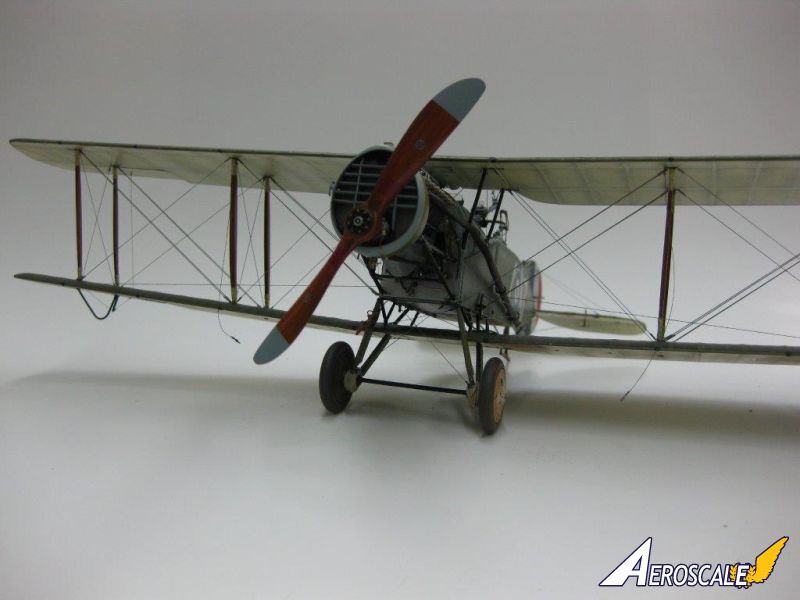
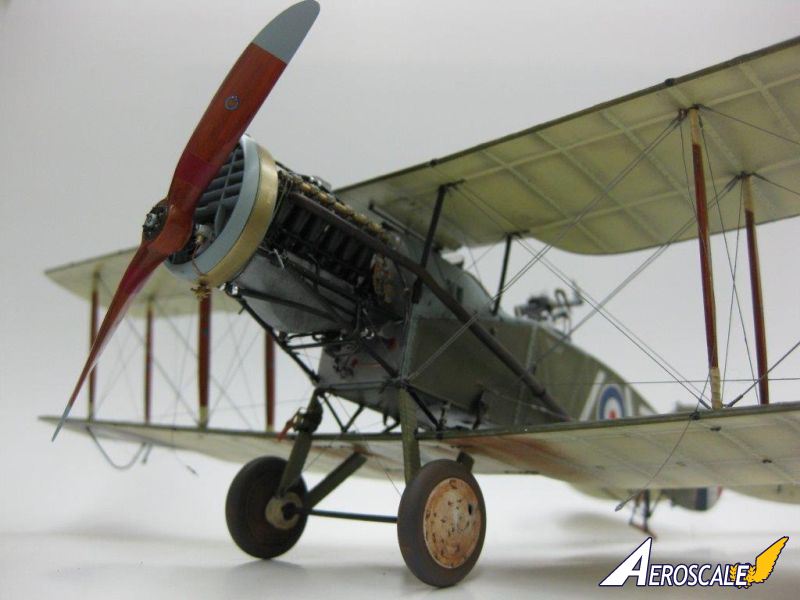
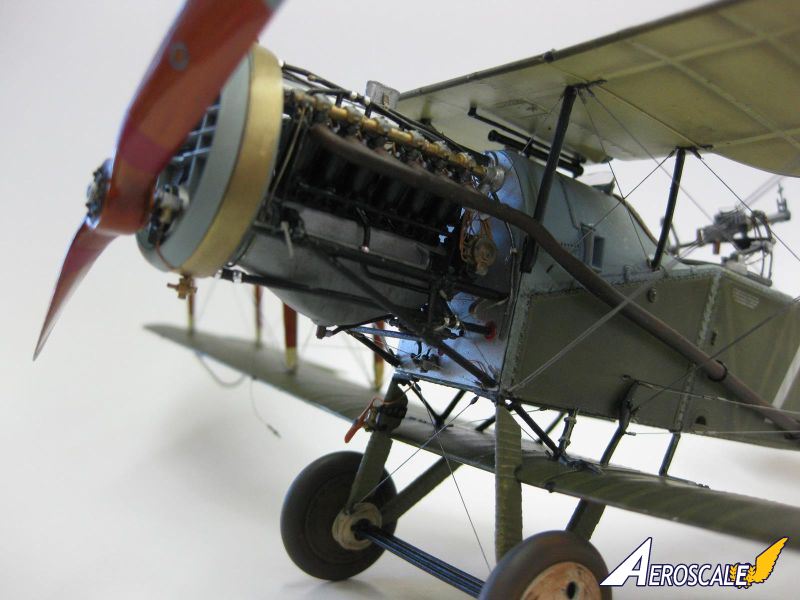
I added a pretty fair load of Aftermarket and scratch built goodies and bits to the Build. In the cockpit in step #1 I fashioned a pilots Squeeze trigger for the Vickers gun. The instrument panel was sanded flush, instruments added using scratch built components, Aeroclub instrument bezels, Airscale Instrument and kit decals, added copper and lead wire plumbing and Future instrument glasses. The cockpit, a full build, had the control cables added, more plumbing, and the gunners canvas seat was scratch built. The pilots seat was modified with the addition of a stripe of PE open weave mesh from the spares stash. The regular single point seat belts were from the HGW Set.The Rolls Royce Falcon engine turned into a build in itself. I chose to leave it totally exposed thus all is visible and much had to be added. Approximately a dozen components including a full wiring harness, several water and oil lines, several drain cocks, and numerous small components were added, most being from scrap at this point. Bare metal foil, cut into appropriate strips was used as cable clamps on the water and oil lines.
Paints used on the engine were various shades of Alclad II with Model Master Enamels used on the lines etc.
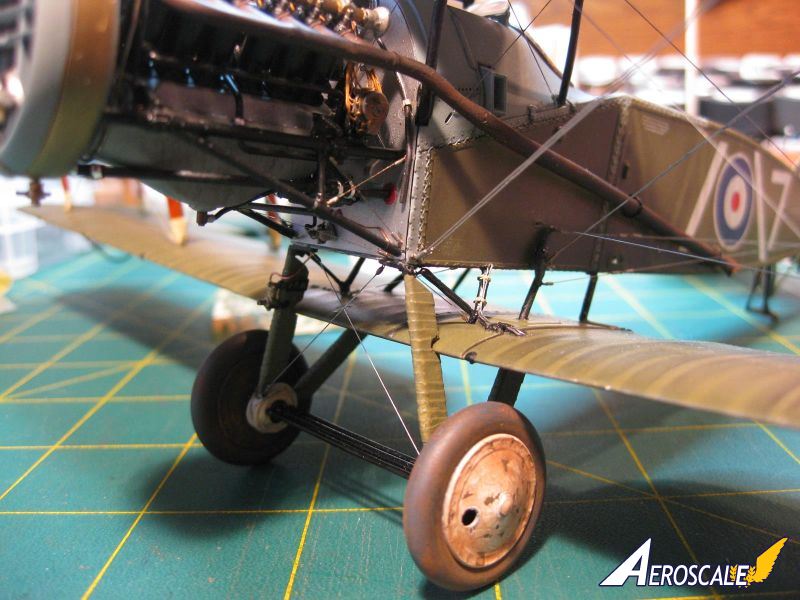
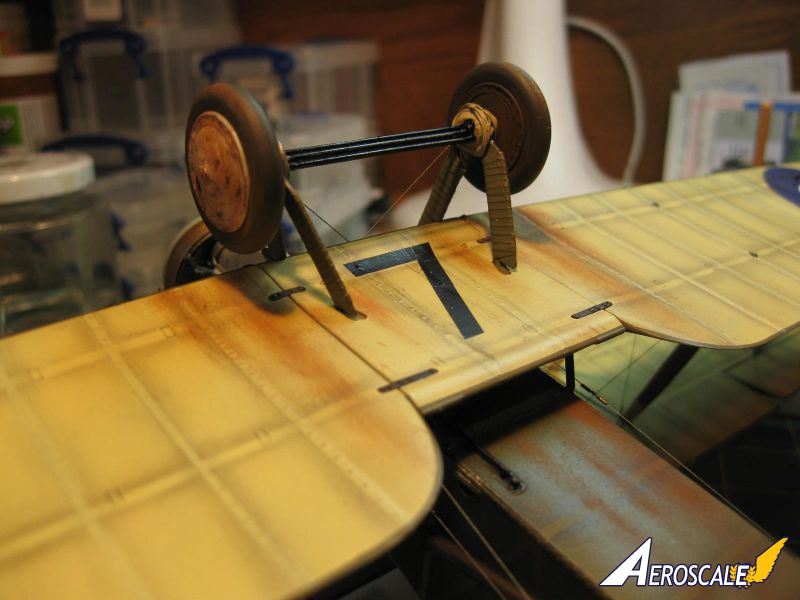
I also installed my own Bungee cords on the models undercarriage using lead wire. A missing line from the air driven fuel pump was added using copper wire, a radiator drain cock and one for the oil tank were scratched and added and a scratch built Constaninesco Synchroniser drive gear assembly and generator added to the propeller hub assembly along with the associated oil line.
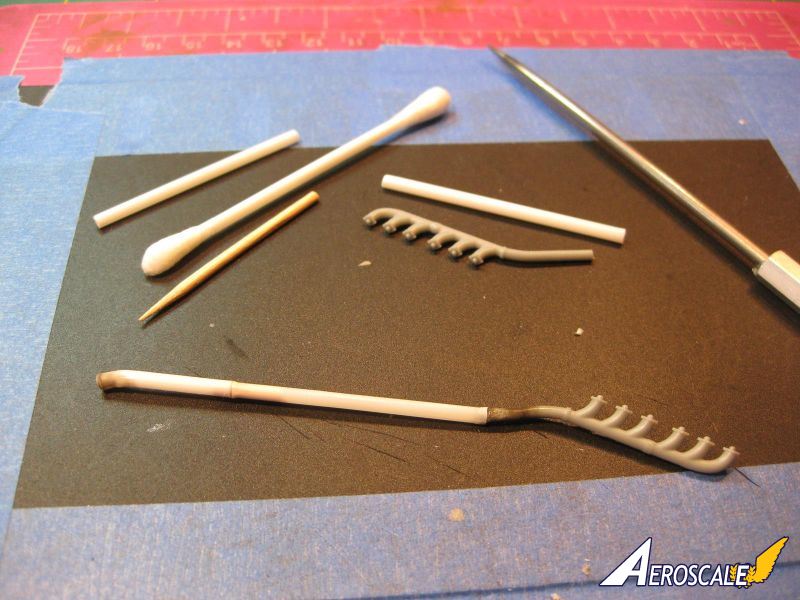
The extended exhaust pipes were scratch Built from the plastic shafts of Dollar Store Q-tips/Plastic Buds and careful heating and stretching produced the correct flared ends; the kit manifolds were used and supports added from fine wire.
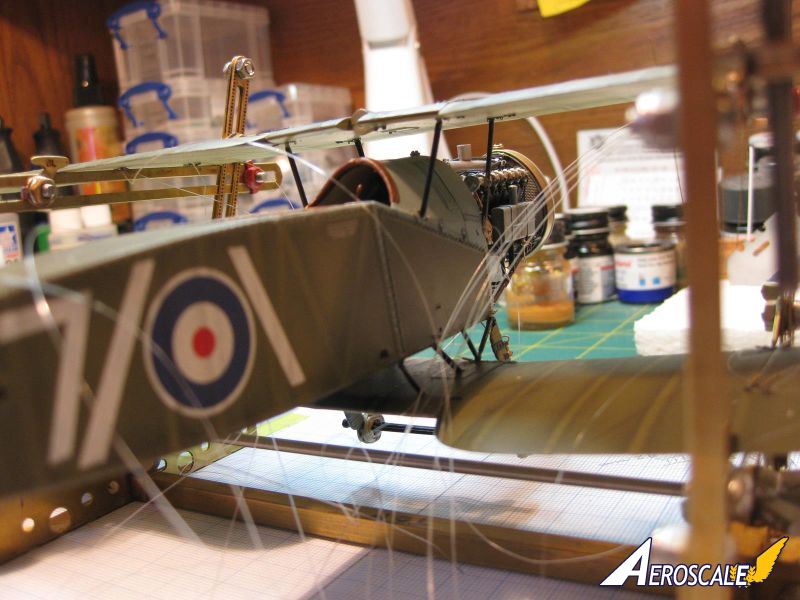
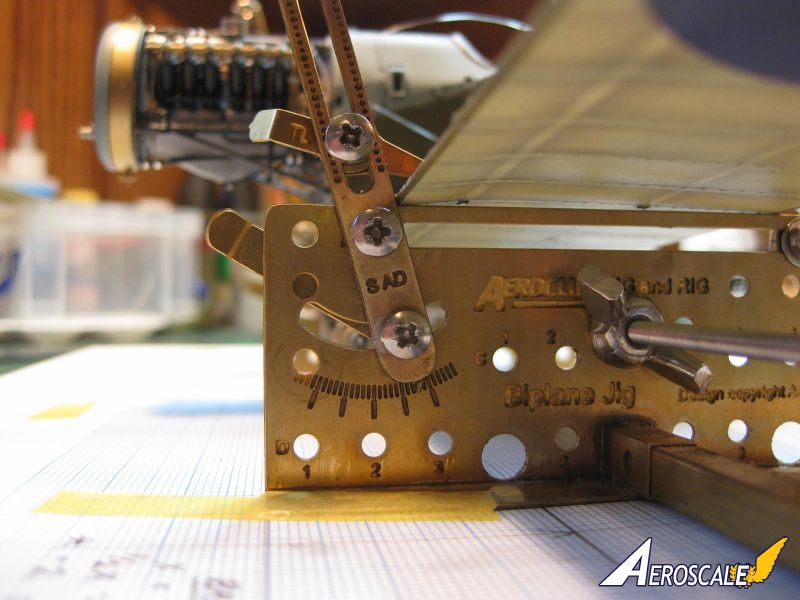
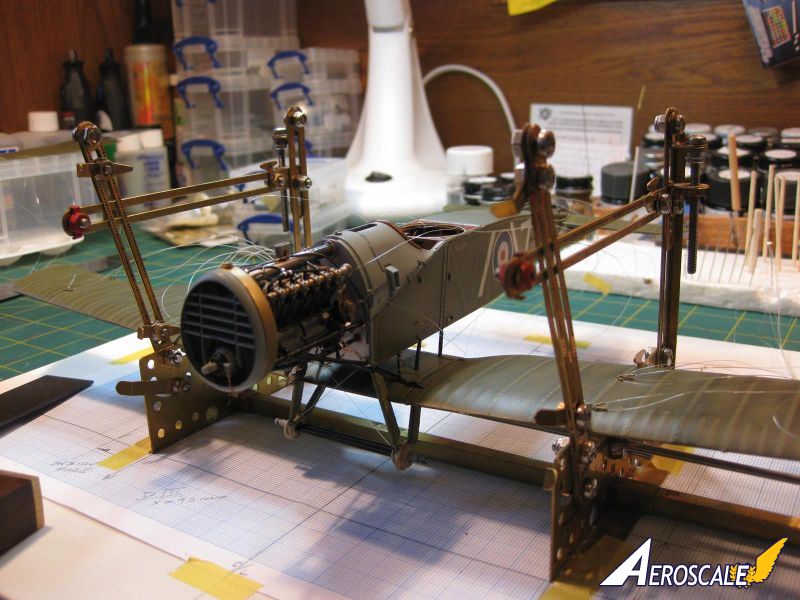
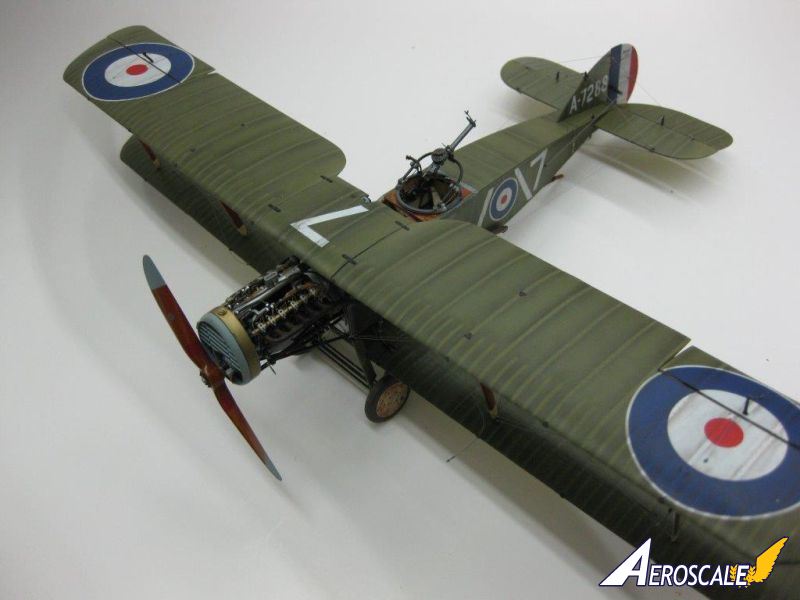
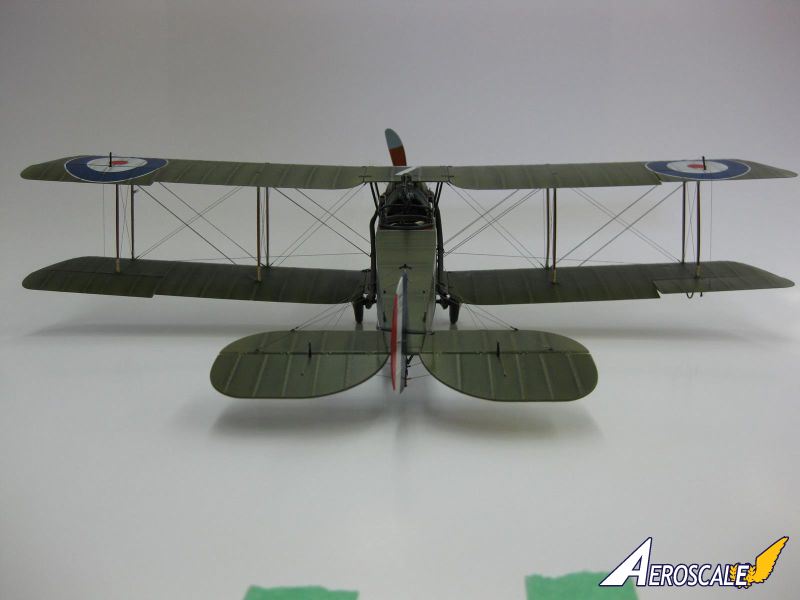
The upper wing went on easily once the spacing and alignment of the cabane struts was achieved using the Aeroclub Biplane Assembly Jig, a tool I use on most of my Builds.
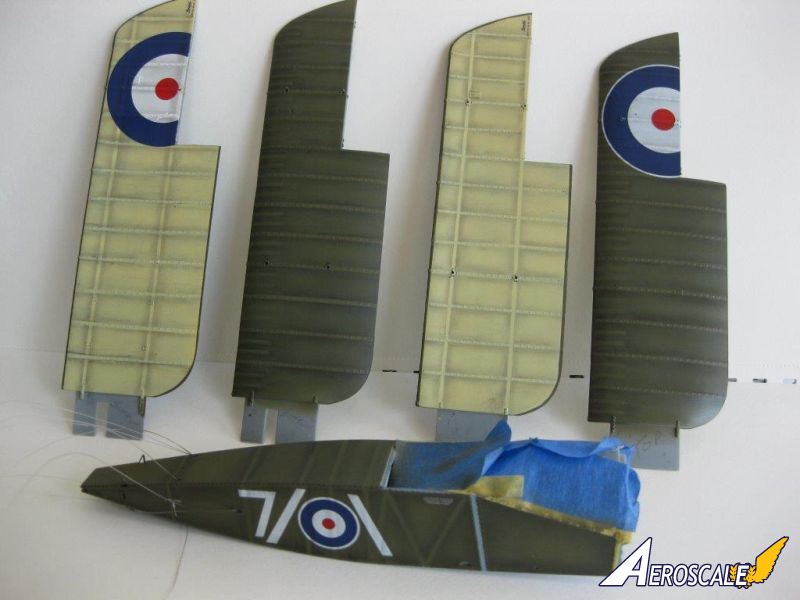
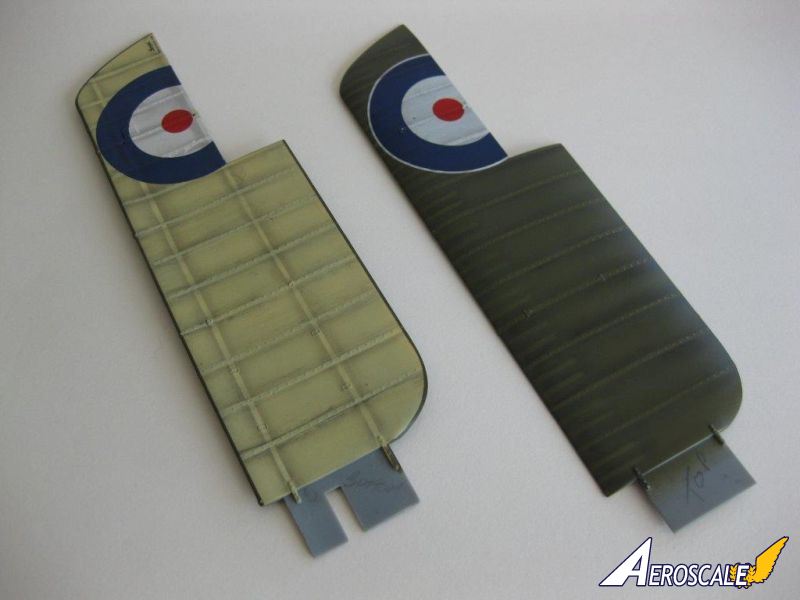
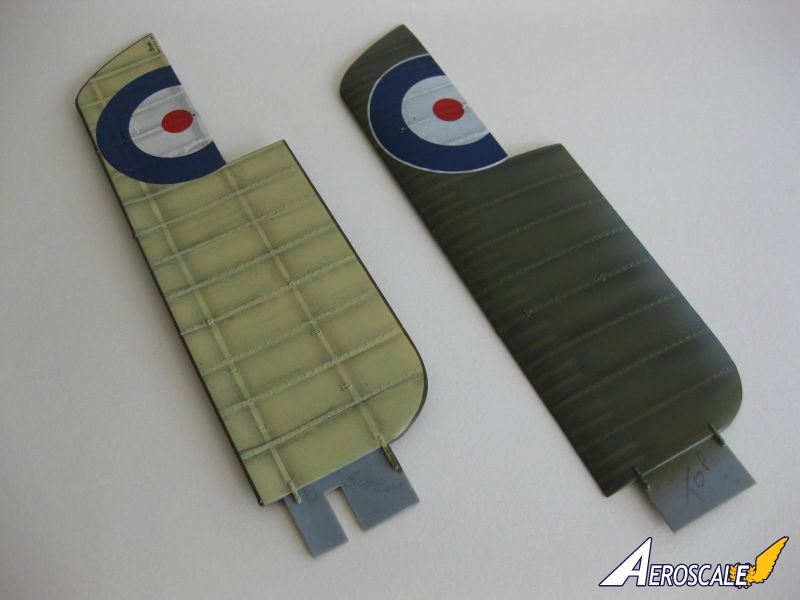
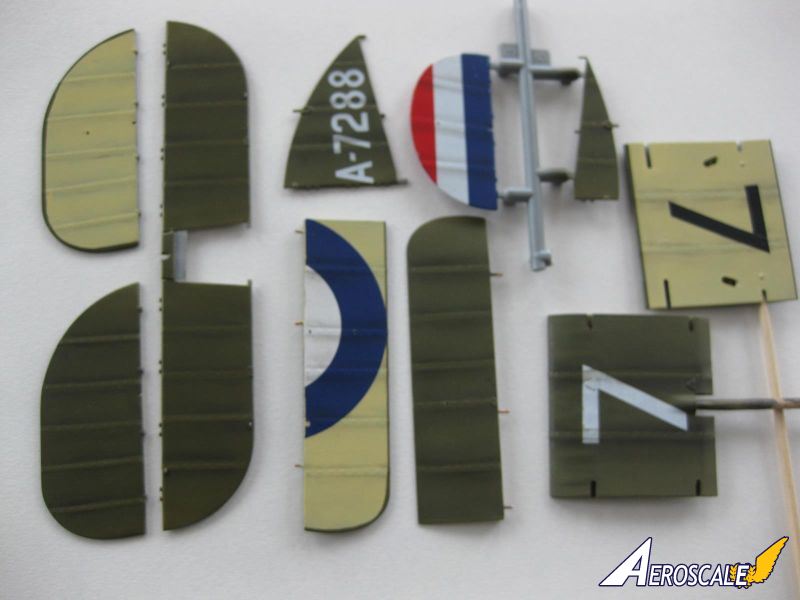
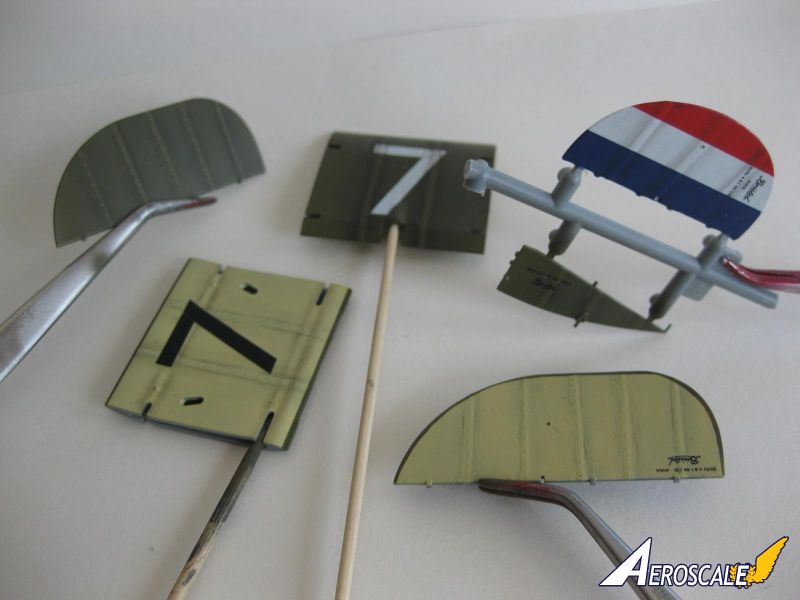
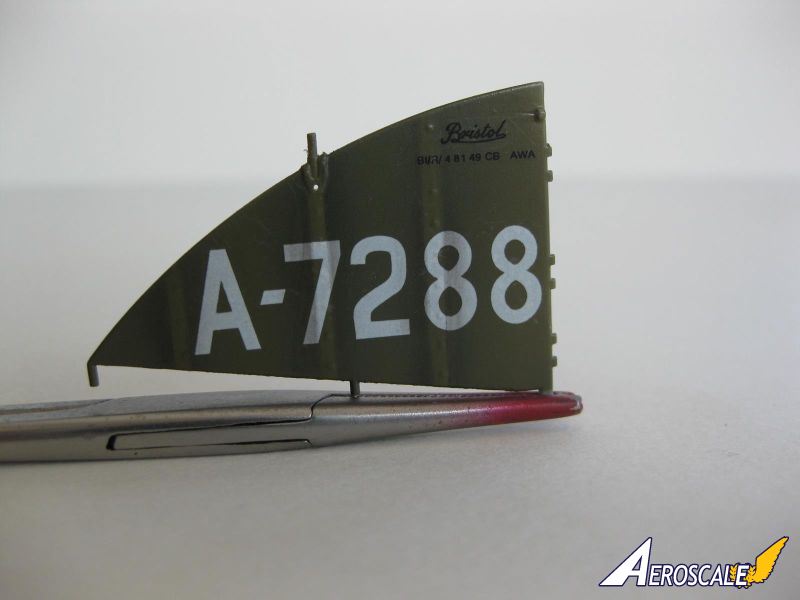
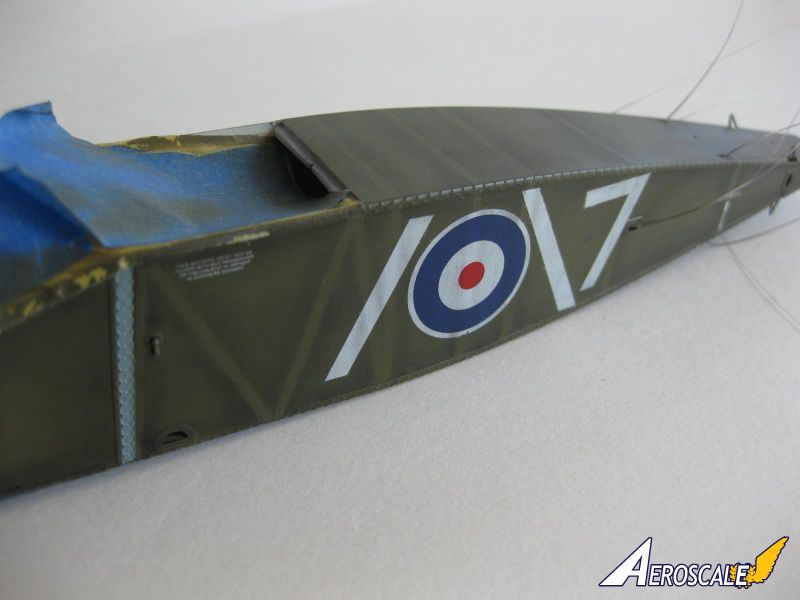
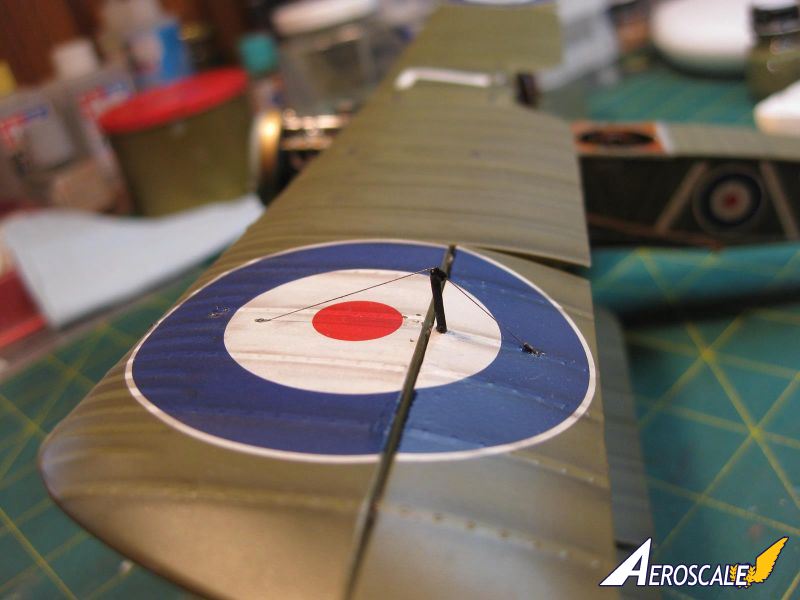
The model was painted with Modelmaster enamels, both the PC10 and grey being mixed to my own interpretation of the colours. I did a complete Pre-Shading however found the final results too muted therefore did a full Post-Shading of the main surfaces using chalk pastels and pigments after the decals were applied and a sealing coat of Modelmaster Acryl Semi Gloss was added. The decals were Pheon's 32005 Bristol Fighter Aces in France Set and worked perfectly as usual. Kit Decals were used where required as well. Some pin shading was done with a very thinned out semi gloss black mix, oil stains and some dirt added to weather the aircraft, and minimal chipping added with the hairspray method. The rigging was done with various diameters of Mono fishing lines starting with the wings, then the flight control cables, and finally the empennage.
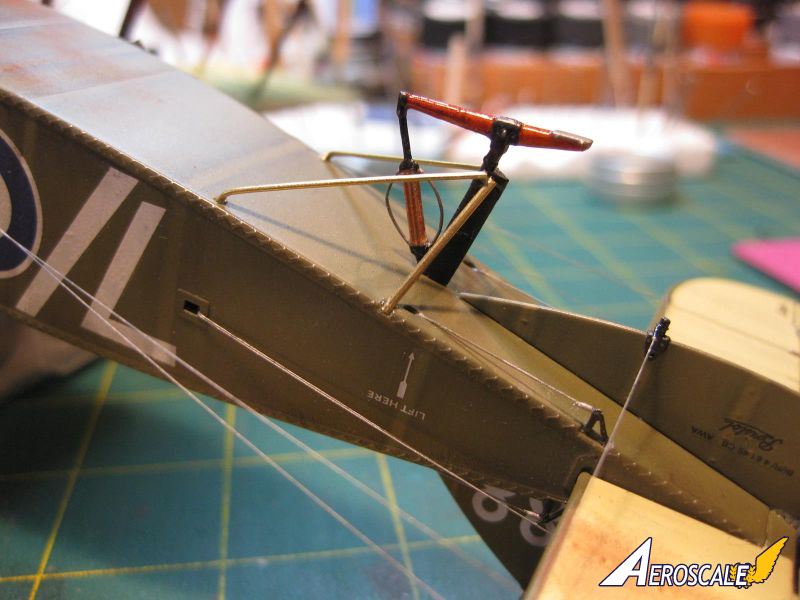
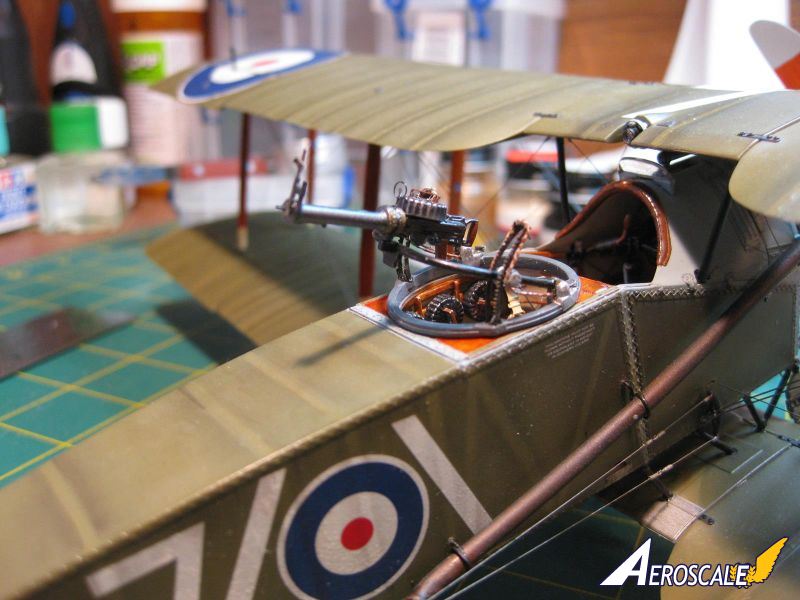
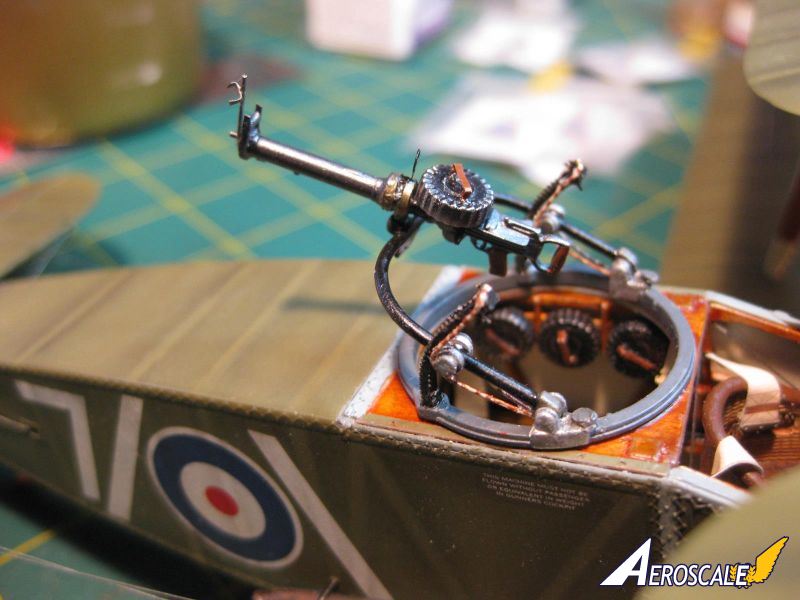
The last step was the Observers Lewis Gun to which I added a ring sight, foresight and wind compensator device. Last, bungees were added to the Scharf Ring assembly and she was finally complete after 11 and ½ months of on and off building!
conclusion
A magnificent kit well up to the Wingnut Wings standard weve come to expect, probably one of if not their best. Though not recommended for a beginner the instructions are clear and a slow considered approach will produce a very fine model. I thoroughly enjoyed the Build and may try a Post war Bif in the future.


About the Author


FROM: ALBERTA, CANADA
Lifetime passion for all things WW1 Aviation. Served 37 years in RCAF/Canadian Forces, mostly as a Fighter Pilot. Second career in Oil and Gas Industry, Manager of Security, Enforcement, and Military Liaison Section for an Oil and Gas Corporation. Now retired and re-discovering the joys of scale mod...
Comments
Beautiful. What did you use for the cabling? Are those Gaspatch turnbuckles?
NOV 26, 2013 - 10:17 AM


Joel, Mikael, and Torchy,
Thanks!
Torchy, it's a genuine "dream Kit"; enjoy the Build but watch the lower wing struts and assembly.
Cheers,
Lance
DEC 03, 2013 - 02:19 PM
Bill,
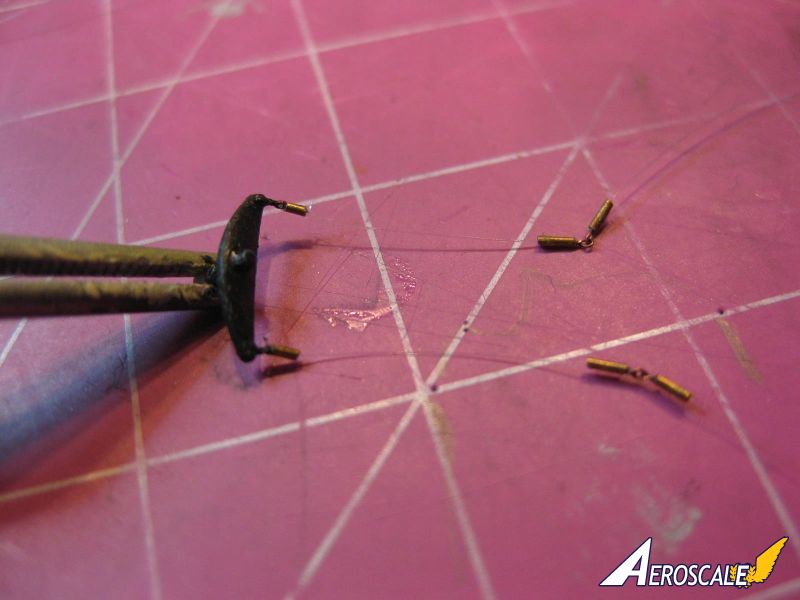
The rigging is all monofil fishing/fly tying line of various thicknesses. The turnbuckles are "Bob's Buckles" Brass Tubing with added eyelets etc; some of the control cables have "double eyelet" connectors.
Cheers,
Lance
DEC 03, 2013 - 02:23 PM

Nit pick Alert Nit pick Alert Nit pick Alert Nit pick Alert
On your fantastic kit.... It's nice that the cowelings are off, but mechanics don't put cowels in front of where they work. The panels are leaned against the wing or stacked on the ground, Out of the way (under the wing, a neat pile near the wing tip)left panels on the left side, right on the right.
Personal experience... AND No one will notice.
"Never mind"
Captn Tommy
DEC 04, 2013 - 02:03 AM
Hey Capt Tommy,
All in good fun and you are correct in a perfect world. I just tossed them into the photos where ever I thought they'd fit the frame. In my 7800 hours of flight time, mostly fighters, I saw many silly things, including a small access panel placed in my intake so "it wouldn't get damaged or lost"!!
My eventual plan is to enhance the Display base with a small bench or two, a ladder, and proper placement of the panels.
Thanks for the compliment, this Build was a lot of fun and I'm pleased with the invitation to provide a Feature on her. Like nearly all Builds she has a few "warts" but I'm pretty sure I was able to not include them in the photos!
Cheers,
Lance
DEC 04, 2013 - 08:37 AM

Fantastic work. I'm constantly surprised by what everyone seems to producing from Wingnut kits. Its just too bad they are outside of my price range.
DEC 09, 2013 - 09:11 AM

Fantastic build Lance, seems to be a lot more than just the WNW kit. I sympathise with Stephen about the price of the kits but I suppose if I built one a year it could be a more expensive kit and it would ease the storage/display problem. I used to build ships and build several that took over three years each, the secret being to regard each component as a model in it's own right, something I can't do at the moment with aircraft.
DEC 16, 2013 - 08:04 AM

Copyright ©2021 by Lance Carroll. Images also by copyright holder unless otherwise noted. The views and opinions expressed herein are solely the views and opinions of the authors and/or contributors to this Web site and do not necessarily represent the views and/or opinions of AeroScale, KitMaker Network, or Silver Star Enterrpises. Images also by copyright holder unless otherwise noted. Opinions expressed are those of the author(s) and not necessarily those of AeroScale. All rights reserved. Originally published on: 2013-11-23 00:18:39. Unique Reads: 6361

WEB HOSTING BY


Copyright ©2021 AeroScale and Kitmaker Network, a subsidiary of Silver Star Enterprises
All Rights Reserved. Please read our Conditions of Use and Privacy Policy.
All Rights Reserved. Please read our Conditions of Use and Privacy Policy.