

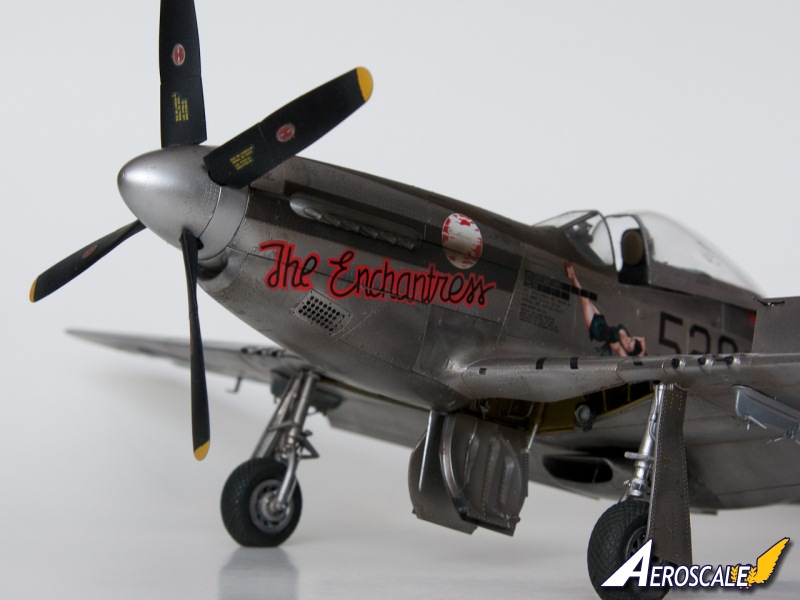
1⁄32The Enchantress
14
Comments

history
The North American P-51 Mustang was almost an accidental success story. Originally built to a British Purchasing Commission specification, it at first did not find favour with the USAAF, and was first assigned to the less than glamourous attack role when it was finally taken up by American forces. It wasn't until it was equipped with the Rolls Royce Merlin engine that the Mustang was able to perform to its full potential as the world-beating aircraft it always was. Most famous for its exploits in Europe, its long range was put to good use in the Pacific, where Mustangs escorted B-29s on gruelling attacks on the Japanese islands from bases on Iwo Jima. Mustang operations in the Pacific has not been given historians' attention in the volume they deserve.Tamiyas 1/32nd P-51D Mustang: an aftermarket tour-de-force
It seems theres an ongoing trend in the modelling community these days one I myself have participated in; the Almost-Out-of-Box Build. I know I have read a lot of build articles and have also written a few starting with some statement to the effect of I didnt want to go completely over the top, so I decided to build the kit as-is with some minor improvements.This is NOT that article.
This is, in effect the polar opposite end of the spectrum. After several consecutive OOB builds and my Hayate build with a single Eduard set as featured on Hyperscale, I was finally ready to tackle Tamiyas Mustang. I decided that anything worth doing is worth overdoing and I carefully set about researching the barrage of aftermarket sets we were treated shortly after the kits release, then I contrived a dozen clever plans to purchase (most) of them and sneak them into the house unnoticed. What followed was a 2-300 hour build, my first attempt at super detailing, and my first natural metal finish.
In writing this article, I have tried to keep in mind that this kit has been endlessly reviewed and is even the subject of an entire book. Armed with that knowledge, Ive tried to tailor this article more towards being a review of the aftermarket accessories used and a decent build article with helpful hints and things I made special note of in an effort to help others build this gorgeous kit.
accessories used
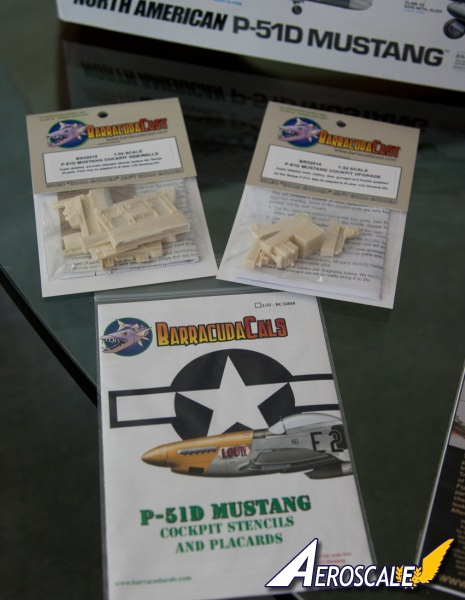
- Barracudacast P-51D Mustang Cockpit Sidewalls
- Barracudacast P-51D Mustang Cockpit Upgrade
- Barracudacal P-51D Mustang Cockpit Stencils and Placards
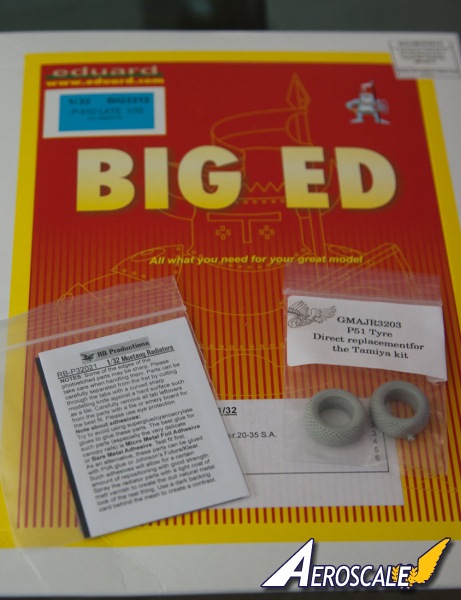
- Eduard Big Ed set specifically the P-51D exterior, engine, gun bay late, interior late and canopy mask sets
- Red Series Kagero Decals Pacific Mustangs Pt. 1
- Scale Aircraft Conversions P-51 Landing Gear
- Grey Matter Figures (Jerry Rutman) P-51 Direct Replacement Tires
- RB Productions Mustang Radiators
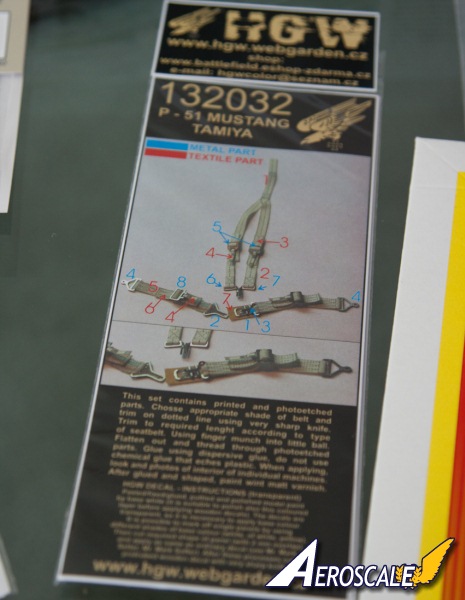
- HGW harness
the plan of attack
Step one was the easiest acquire the kit. It is always a pleasure dealing with Spruebrothers, but no one needs me to tell them about Gordons excellent customer service. From there my next step before even cutting a part from a sprue was to purchase and read the newest book from ADH Publishings How to Build Series. I read this from cover to cover and I enjoyed the layout and thought that went into it. From the in box review, through the OOB review and then the helpful Very-Long Range (VLR) Mustang build by Mark Glidden and ultimately reaching its peak with the superdetailed effort by Roy Sutherland. I found this book to be an invaluable resource as far as interior photos, ideas and inspiration. I honestly could have done this whole build armed with this book as my sole resource ..of course I didnt.resources
- ADH Publishing How to Build Tamiyas P-51D Mustang by Brett Green
- Osprey Aviation Elite Units Very Long Range P-51 Units of the Pacific War
- Osprey Aviation Production Line to Front Line North American P-51 Mustang
- Cockpit; an Illustrated History of WWII Aircraft Interiors
- Mustang The Story of the P-51 Fighter
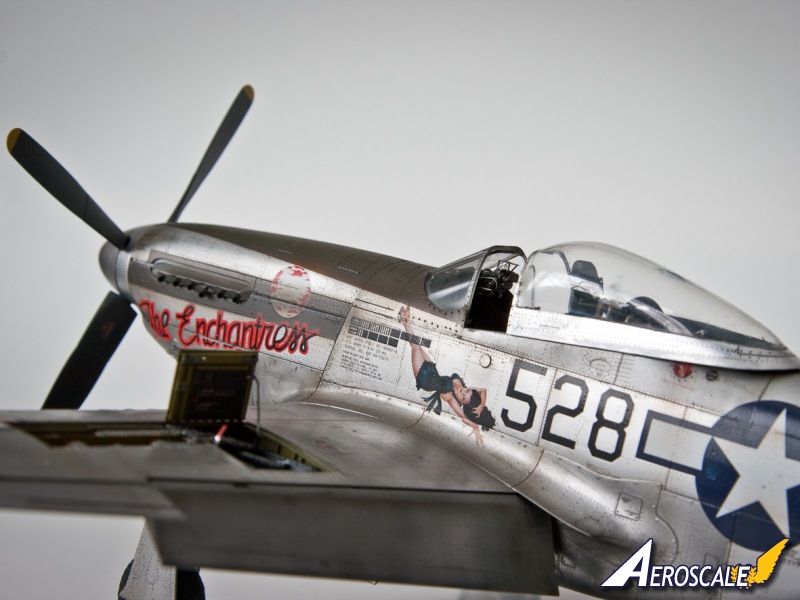
The hardest part of this build for me was resisting the urge to build Colonel John C. Meyers gorgeous mount decals for which are supplied in the kit. I have already completed this scheme on Tamiyas 1/48th offering, and besides I always like doing something different. This was made easier by my affliction for building Pacific theatre mounts, and Kageros Pacific Mustangs Pt1 decal sheet.
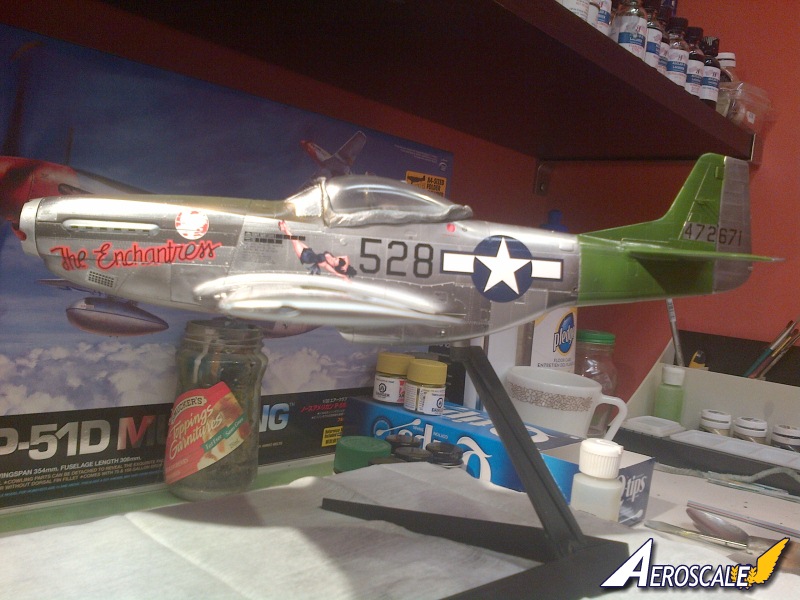
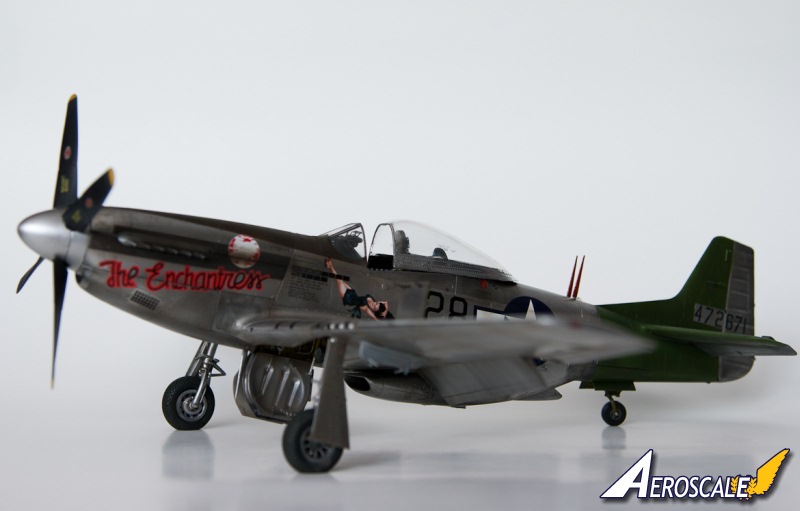
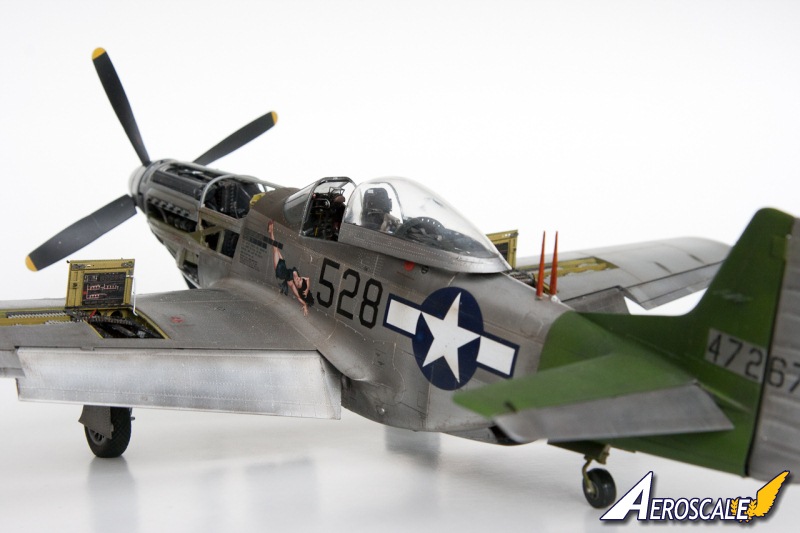
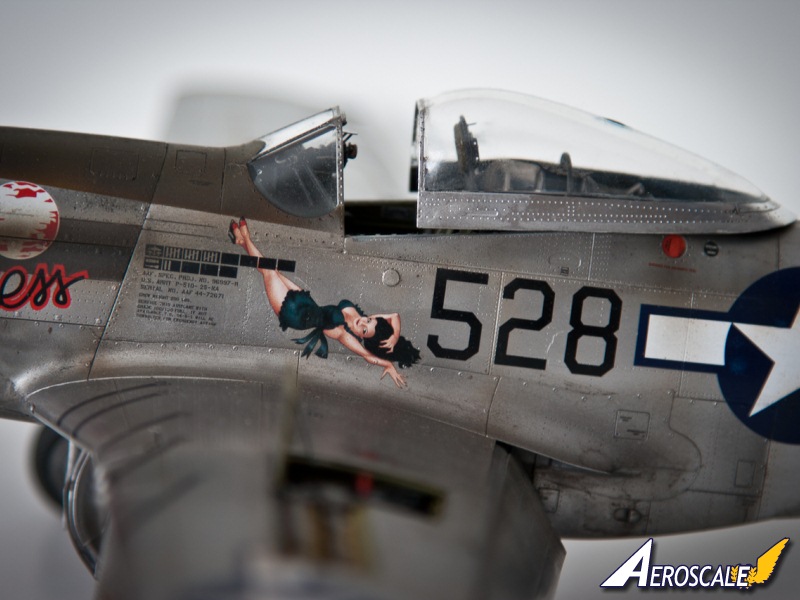
Once I the sheet was delivered, I chose to build P-51D-25-NA serial number 44-72671; The Enchantress. Flown by 2nd Lt. William Saks, 457th FS, 506th FG based at North Field, Iwo Jima. On June 1945. 2nd Lt. William E. Saks was one of 24 fighter pilots who never returned to the base due to very bad weather conditions during the VLR escort mission on June 1 1945. That day was later called Black Friday.
The last thing to accomplish was some research on what needed to be done to create this late model D. Luckily there are a number of great websites, the ADH book, and even several photos of this airframe to assist in determining what needed to be done to most accurately represent this VLR Mustang. Of course upon finishing this model, I discovered that Tamiya has finally released their VLR Pacific Theater Mustang boxing within a week of my finishing this build.
the build
This portion represents not only the meat and potatoes of this article, but also the second half of my calendar year for 2012. I deliberately didnt keep a build log because I didnt want to have to justify the amount of time spent at the bench, but I conservatively estimate this was a 200+ hour build. Most of that time was just my stumbling around in the dark trying to figure out how to tie together all the aftermarket items into one decent build.engine
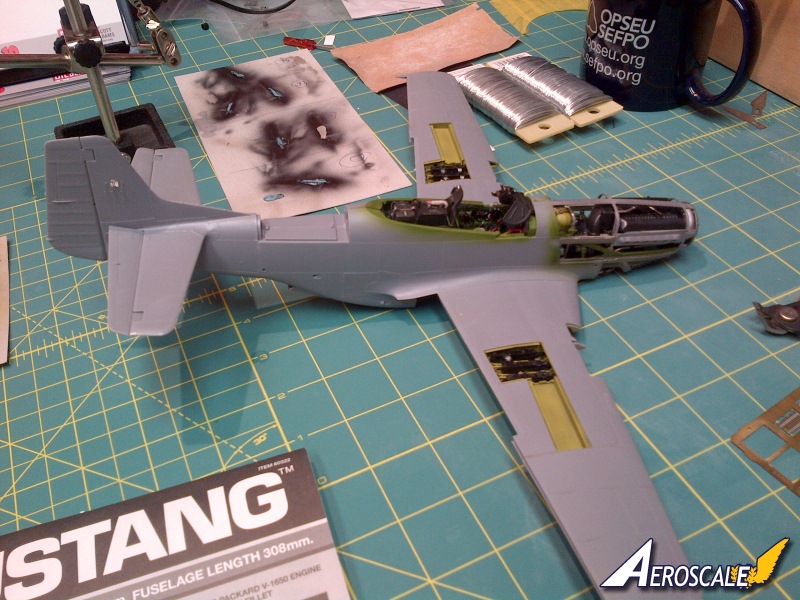
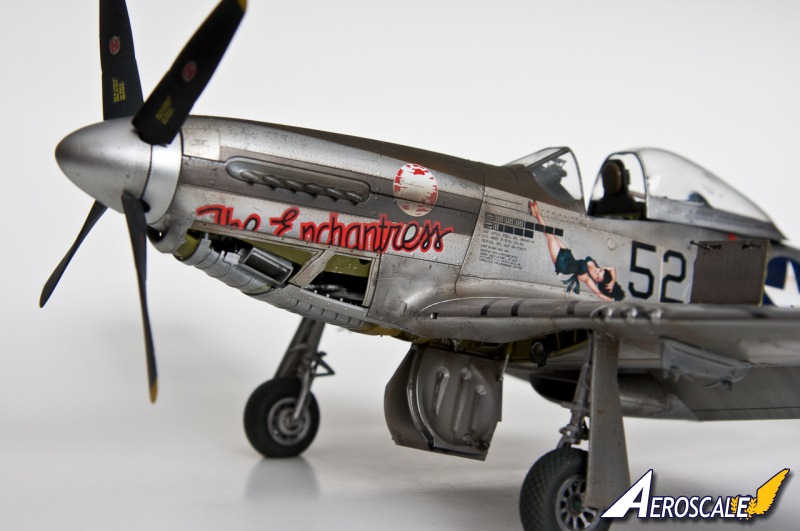
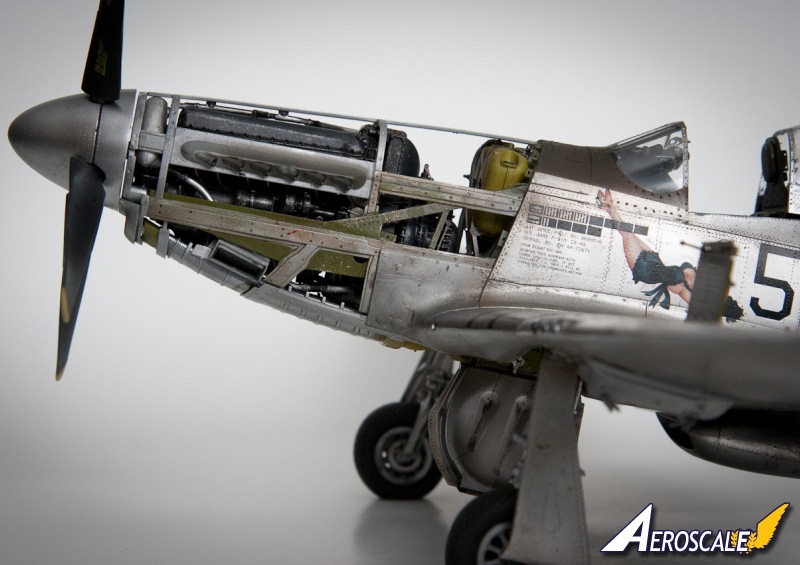
The assembly starts with the engine. One important note I know it has been mentioned in a few places now, but I fell into this trap so Ill mention it here as well be VERY careful when assembling the engine that you dont make the idiotic mistake that I did. We all fall into the habit of becoming complacent once we figure out which racks contain which parts, so take note of the fact that entire carburetor assembly from Tamiyas Spitfire is included in this boxing. This WILL fit the Merlin included in this kit (obviously because the engine was originally engineered for Tamiyas Spit), however the engine forms the backbone of the model and the carburetor is the attachment point if you use the wrong one like I did, youll have a heart attack when you discover the engine sits about half an inch too high when you go to close the fuselage up. By a sheer stroke of luck I had assembled this part using only superglue and not plastic cement, so careful use of my fix-all (pliers, hobby knife and some rude words) and a bit more paint and I had the engine assembled correctly.Here I used Eduards P-51D engine set (32-307). As always pick and choose which parts you want to use. I didnt use the photo etch hose clamps because I was quite happy with the Tamiya kit parts and figured the P/E replacements would look sloppy (I have meat hands). I also chose not to include the details on the back sides of all of the cowl panels because as best as I can tell, this would mean that you cannot attach them to the finished airframe properly and I enjoy the versatility of being able to have the engine displayed or the cowlings on. These parts make up a large majority of the fret, but I would argue that it is still money well spent when you consider the straps for the oil tank and the supercharger linkages alone. The oil tank straps consist of 16 pieces and are prominently visible. The supercharger linkages fit beautifully on the kits engine, and frankly Im surprised that Tamiya didnt make these themselves (there are two photo etched frets already included in the kit after all).
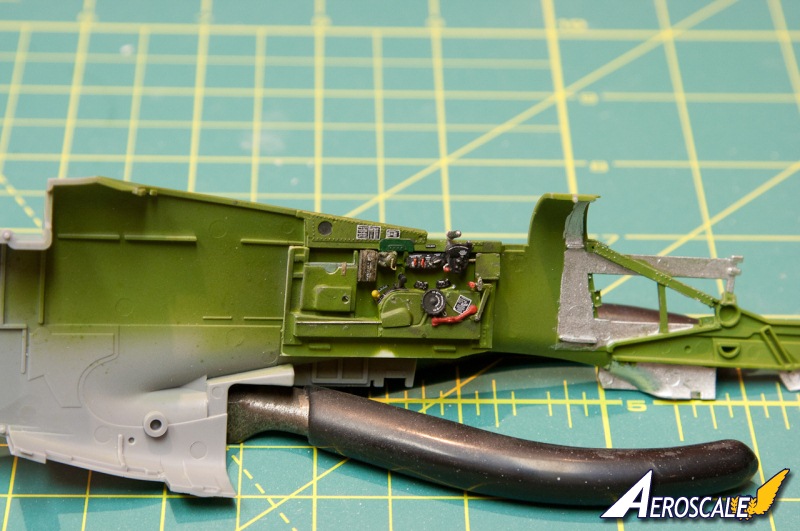
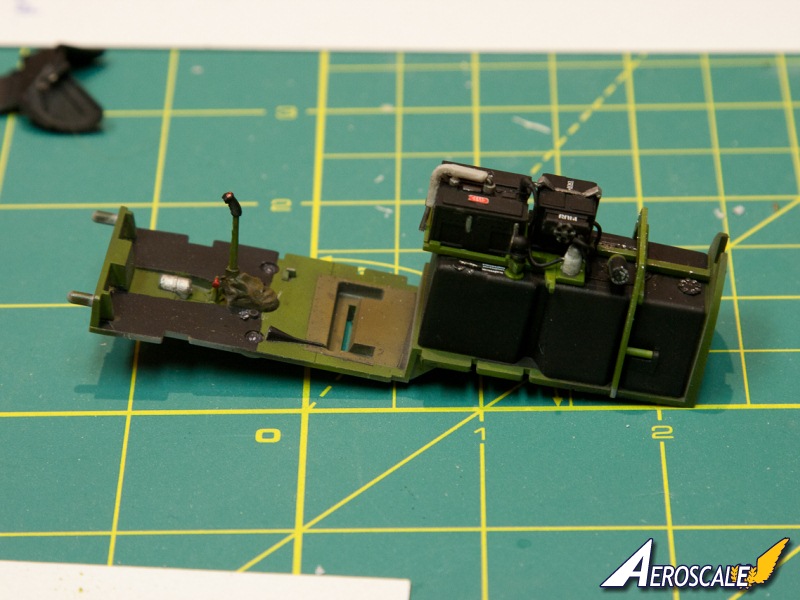
cockpit
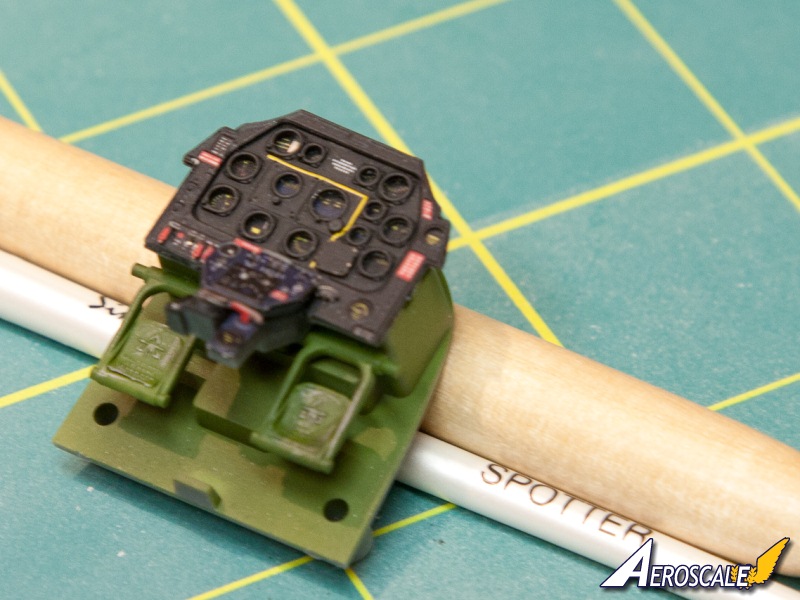
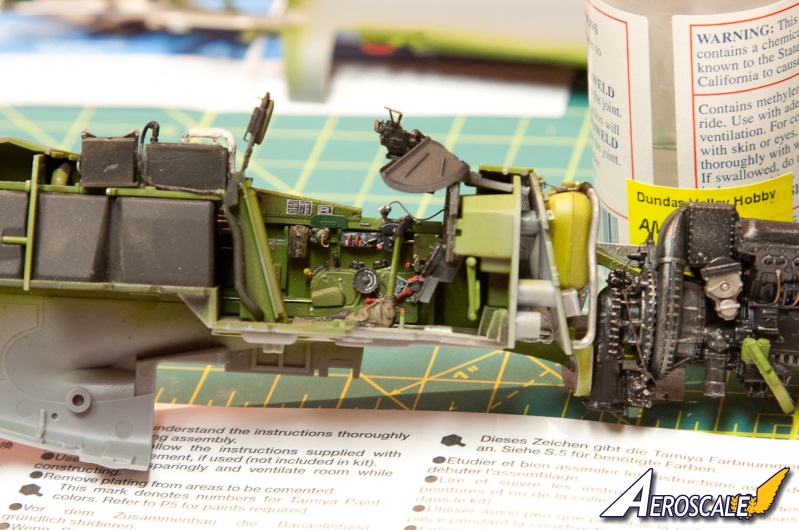
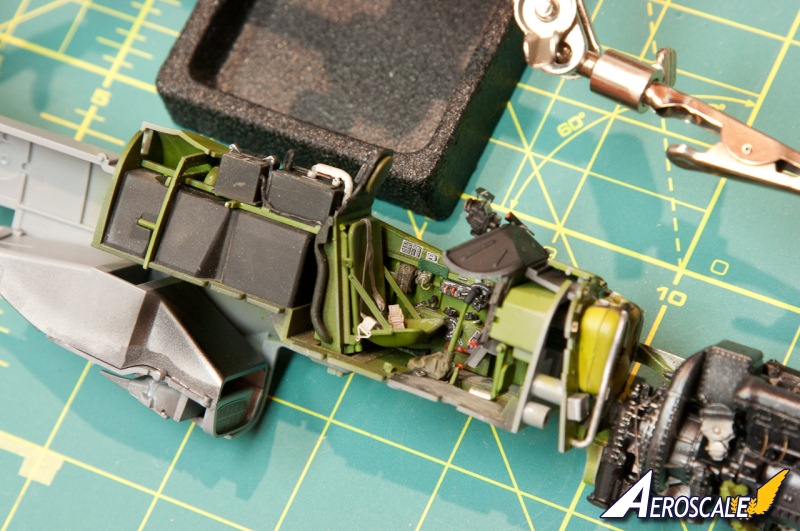
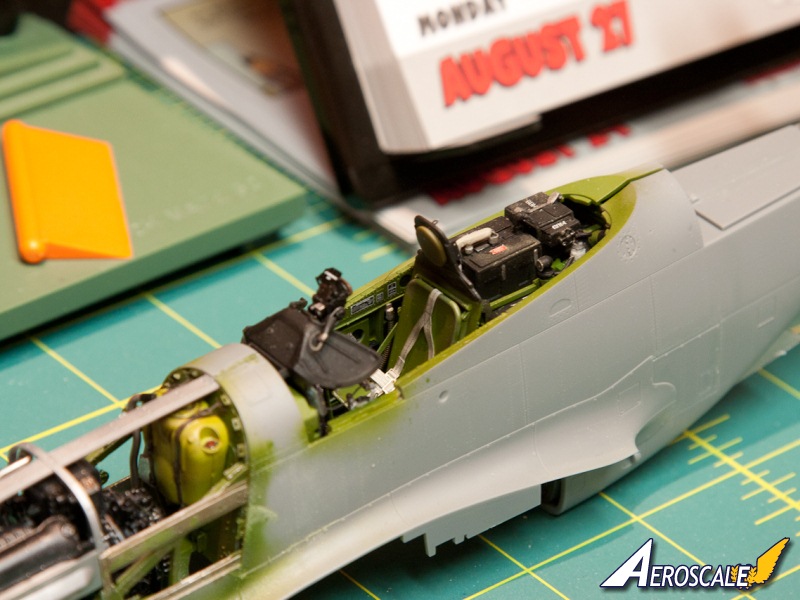
Careful planning and clever juggling of aftermarket details yielded what was for me, the highlight of this model. After reading Roy Sutherlands build article in the ADH book, I couldnt help but purchase his aftermarket goodies. I have only heard good things about Barracudacast but had never had an opportunity to use their products. I ordered two of the three offering from Roy I elected not to purchase his instrument panel, because I had the colour P/E set from Eduard, which I would be using for various bits and pieces around the cockpit anyway and would only end up being a nightmare to match the colour and finish of.The BarracudaCast Cockpit Sidewalls are some of the best fitting resin pieces I have ever used. The moulding is gorgeous and the colour instructions are a huge plus. Follow the written directions and you will not run into any problems. I do wish however that there was more direction on the use of the included P/E sheet specifically the landing gear uplocks. The photo on the instruction sheet is cut off and I cant see what the secondary uplock looks like (theres no part number) nor can I determine where it goes. The Cockpit Upgrade Set is incredible and I would recommend this set to anyone who is seriously thinking about doing a straight OOB build it includes the radio and battery behind the pilot, a new throttle quadrant, gunsight and control column. Again the colour instructions are helpful and the written directions easy to follow. No complaints here.
Eduards P-51D Interior set, which is the primary reason I missed Autumn, consists of two frets of photoetch. One colour and self-adhesive and the other is standard photoetch. I had ZERO luck with the self-adhesive sticking to anything, and I would recommend you just glue as you normally would. I carefully picked and chose what I used from this set comparing each individual piece to its resin counterpart. That said I used this set almost in its entirety. It adds a lot of depth and character to the Mustangs cockpit. Lastly I sealed the cockpit and went on a journey of decaling using BarracudaCals Cockpit Stencils and Placards. This wasnt nearly as time consuming as I expected another worthwhile investment.
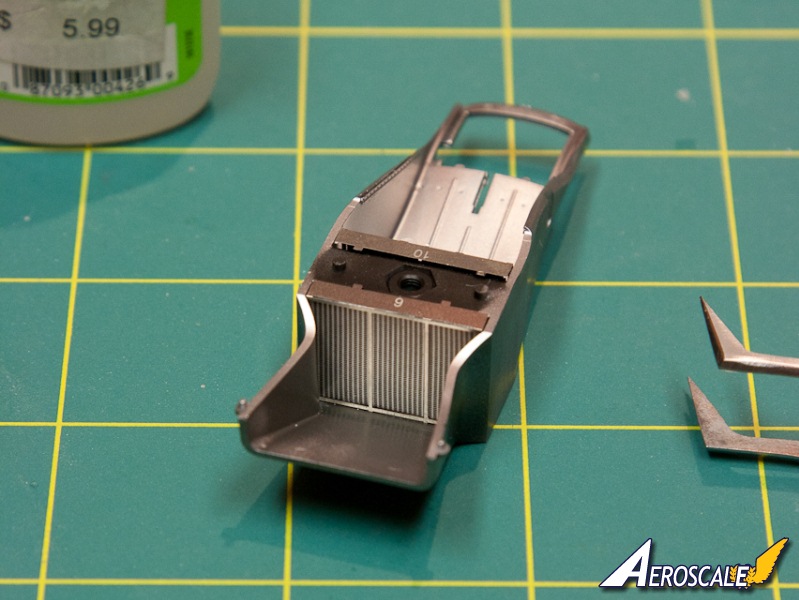
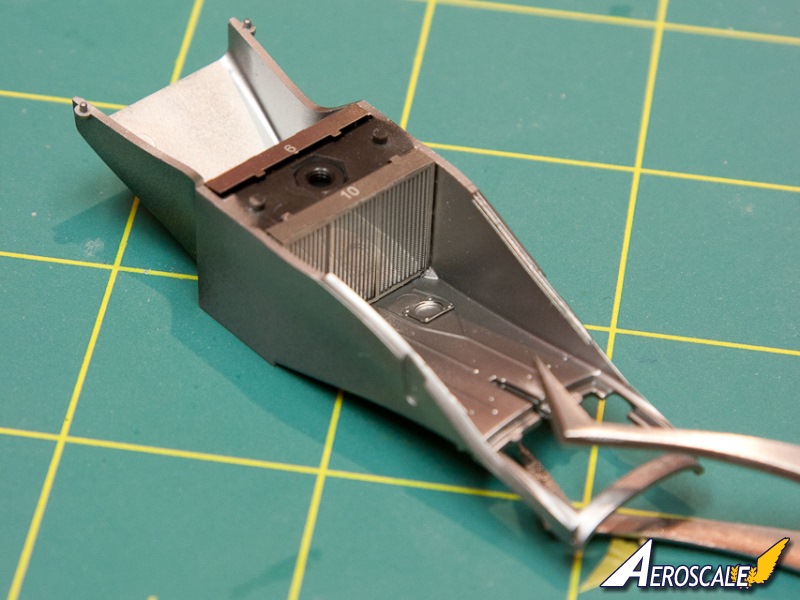
radiator/oil cooler duct
This was the topic of a lot of discussion around the web once the aftermarket sources started releasing their radiators for the Tamiya kit. I had in my possession the majority of them at the time of build and I will give you my two cents. I personally think that the kits offerings are fine as is. They are seriously so hidden that I probably wouldnt bother to replace them in future. The Eduard parts are uninspiring not to say theyre bad, I just found them to look flat and lifeless. The RB Production parts however, are as gorgeous as anything else that Radu has released. Follow his recommendation to back the radiators with a dark paper (theres even some included in the set) and youll get amazing results. I love the way they turned out, I just wish they were more visible but thats nothing new to us modellers. Of note; the RB set also comes with canopy rails, which again I will argue are nicer than the Eduard pieces. I chose them over the BarracudaCast canopy rails (included on the P/E sheet) simply because theyre already a nickel/silver as opposed to brass, and required no paint.main gear bays
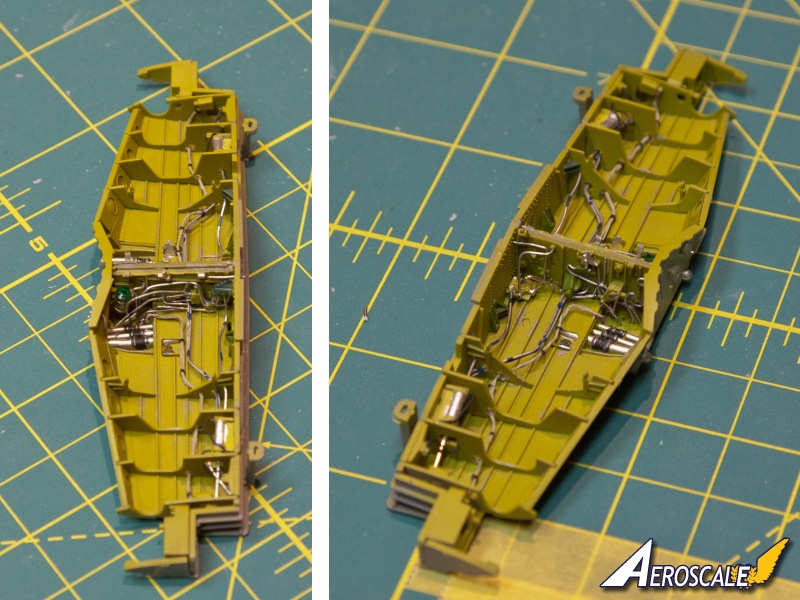
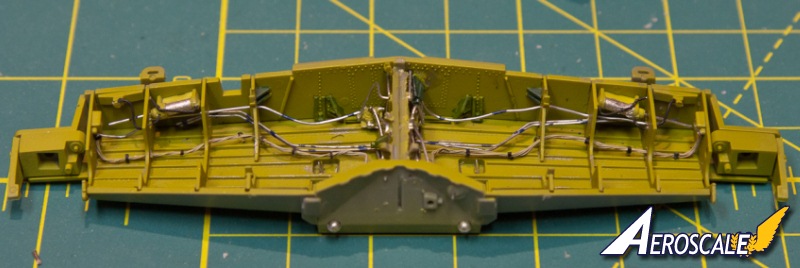
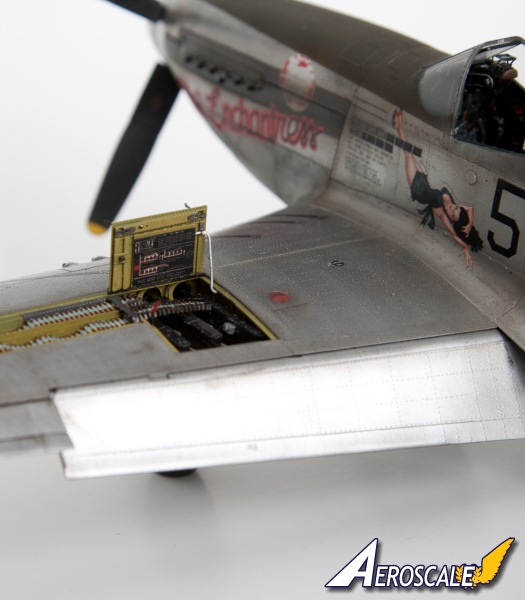
What can I say? I was sold as soon as I saw the photos of Roy Sutherland's build. I read in his article that he spent 20 hours or so plumbing the main gear bay, I figured I could half that time ..then proceeded to exceed it. I spent 25 hours or so shamelessly copying Roys fabulous work and as indicated by him, worth every second. My wheel wells still feel bare to me and so the thought of the stock wheel well seems appalling. Of course the stock wheel well allows you to swap the gear out, whereas mine are plumbed in for good.landing gear
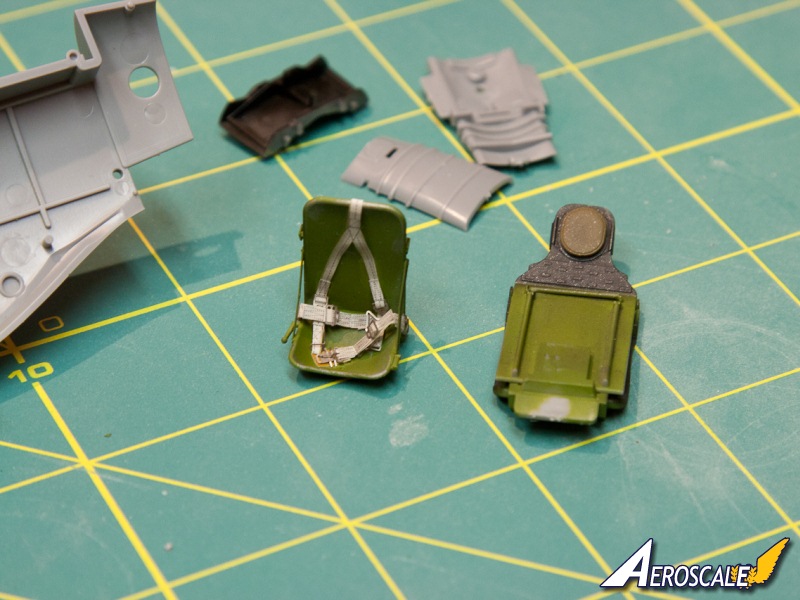
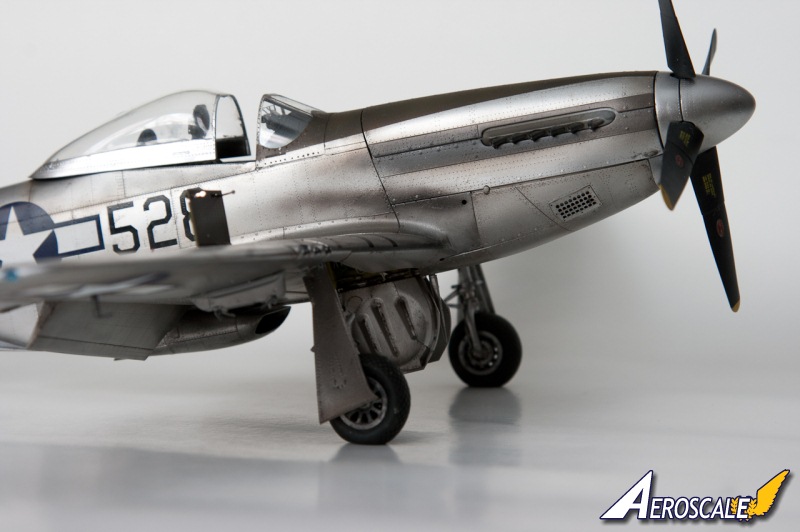
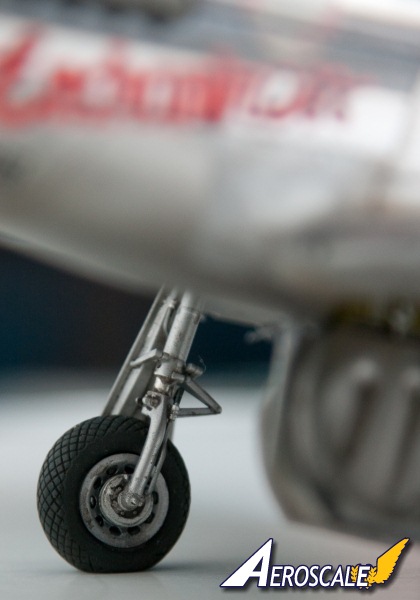
I opted to use metal landing gear for the first time. We all know the dreadful feeling of a tail-heavy tricycle landing gear model, but I have never built a model as front heavy as this. The Scale Aircraft Conversion bits are nice as always, and required minimal cleanup. I opted to use the plastic parts for the oleos and main gear door attachments and would do the same in the future. Ironically my metal tail gear is amazingly weak and I would probably use the kit part in future my tail wheel bends side to side and back and forth, there simply isnt enough strength in the tail wheel fork. The kit plastic tailwheel has a metal rod inside for strength anyway. I also purchased Jerry Rutmans direct replacement tire but didnt find it to fit the kit wheels as well as I would have liked. I would be curious to try one of BarracudaCast offerings in future. The Jerry Rutman production is still a great enhancement over the kits rubber tire, and the finished product very much looks the part.bringing it all together
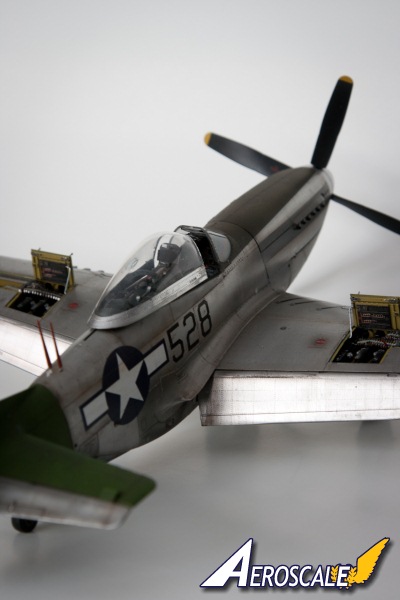
Fit is excellent as always with a Tamiya kit especially surprising considering the wealth of aftermarket I incorporated and the fact that I consider myself to be a fairly clumsy builder. Worth noting here if you used the Eduard engine set, part V15 will no longer fit I simply left mine off and Id actually forgotten about it until I went through the kit instructions in order to write this article. I drilled out the holes on the fuselage spine for the Uncle Dog Antenna and attached the piece you have to insert the canopy slide before doing so. I did this and attached the canopy later. I also added the access hatch for the Uncle Dog antenna and used my punch and die set to make the cover for the flare pistol port on the port fuselage. Tamiya indicates in step 21 that this should be filled, but photos I found seemed to show a small round cover instead. I assembled all the control surfaces at this point but didnt install them until much later. Theyre designed to be plugged into the aircraft after the wings/stabilizers are assembled anyway, and for me this made painting easier. The landing flaps are the only exception, they have to be attached when indicated so you can glue and fill the radiator housing as necessary before painting. The inserts for the top of the flaps gave me as many problems as everyone else filling and sanding was necessary. Not a horrible fit, its simply something to be wary of when going for a natural metal finish. The radiator ducting was a similar nightmare for me. Again it didnt fit poorly, it just didnt fit as well as I would like for something that needed such careful surface prep. Luckily the Eduard set includes a panel for the oil drain bubble on the bottom center of the fuselage allowing you to sand till your hearts content and then simply glue that little dome in place, leaving only the panel lines to rescribe.painting
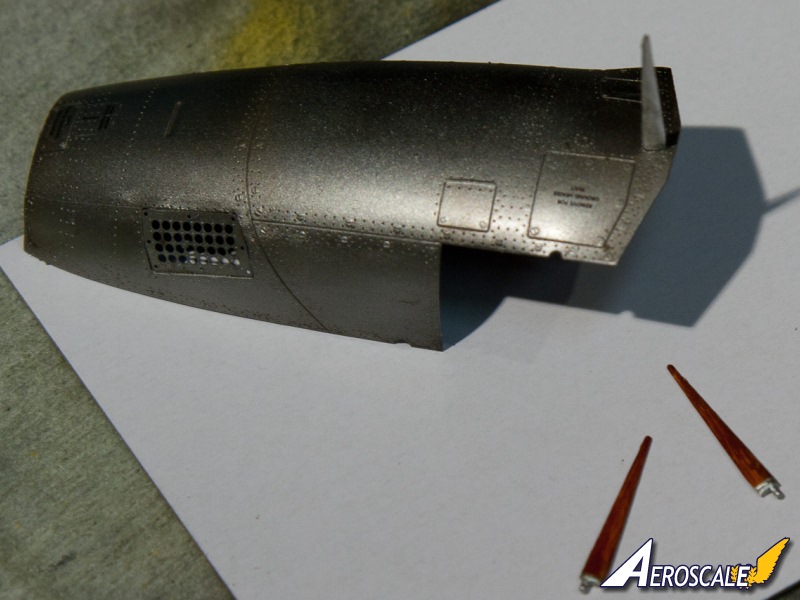
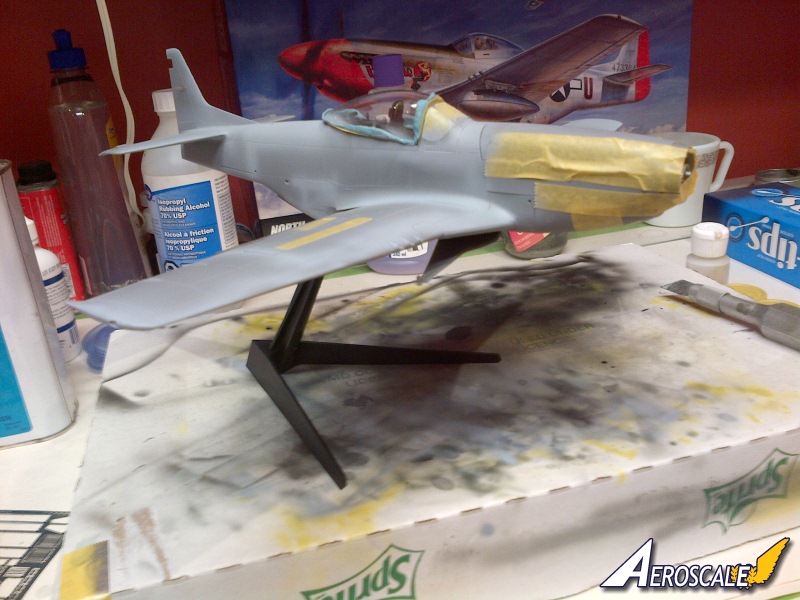
The step before painting oftentimes gives people problems masking. I always try and think out of the box, which in this case ironically led me back into the box. The cockpit, gun bays, the tail wheel recess and wheel wells were masked with parts from the kit. I used a spare canopy, the spare gun bay doors and the raised tail wheel parts to mask these recesses. The edges of these parts were painted with Maskol or a thin roll of blu-tak was used to stop paint from bleeding past these masks. I find this sort of approach more effective and significantly less time consuming than constructing little tent-like masks from tape.Natural metal finishes are always daunting, and it was with some trepidation that I purchased almost $100 worth of Alclad paints. I wont elaborate too much here because this has also been the subject of countless articles. I will note however that one of the more interesting ways I found to get a variation in shade from the Alclad paints, was to use a different base paint underneath I used Tamiyas gloss black and semi-gloss black, the difference between the two when you apply the same colour overtop yields interesting results. Its all trial and error, the biggest caution I can give you is just a friendly reminder that Alclad paints dont take well to being masked, but you can always touch up the areas where paint lifts. Its just time consuming, but as with everything in life, the more you do it, the better you get at it.
Ultimately the paint was sealed with Alclads gloss its about the same finish as Future, but requires a much more thorough clean of your airbrush.
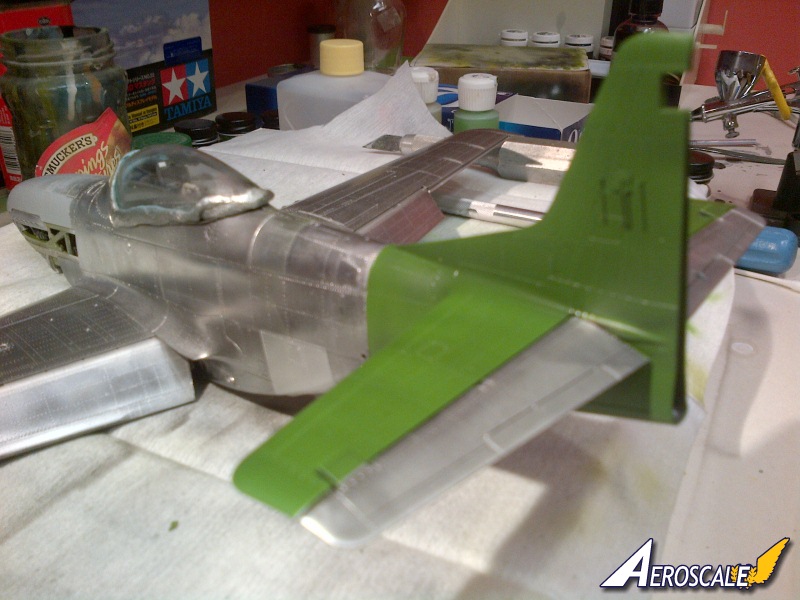
Next I sprayed the OD anti-glare panel and the tail. I did not like the colour call out on the Kagero sheet for the tail colour. While it might be entirely accurate, I preferred the colour depicted on the Kagero sheet and in the Osprey book. I ended up mixing my own from about 7 different colours, using a mix of four of them as a base colour and then an additional mix of three different paints to tint the green into the range I was looking for. Im extremely happy with the end result.
I then applied more clear coat, used the fantastic Kagero decals and then sealed them in with yet another coat of clear. Lastly I weathered the finish, keeping in mind that this mustang didnt have a lot of service time, but was left out in the harsh Pacific Sun its whole life. Panel lines were accentuated with my usual go-to wash from Pro-Modeller; dark dirt in this case. Im especially glad I discovered this product now I couldnt handle the stress of using a conventional wash with any form of spirit or thinner on top of the metal finish I spent so many hours laying down. The safety of the Promodeller wash-and-wipe system is one of the main reasons I employ its use.
After the weathering was completed and left to dry, the model was given a final clear coat. A semi-gloss was used for all the metal surfaces, and Alclad matte for the painted areas
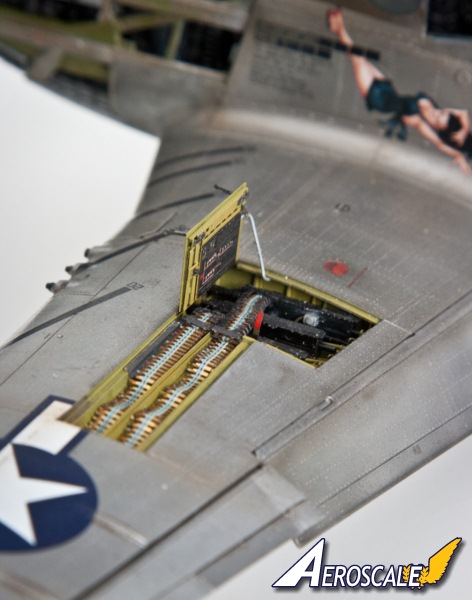
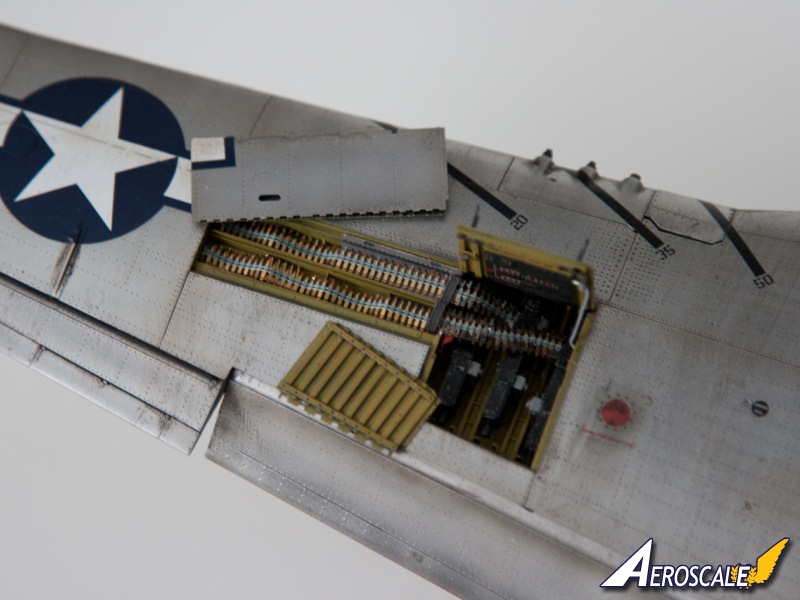
gun bays
Left until last in an effort to make their masking as easy as possible, the rest of the Gunbay detail set was installed at this point. I have to say it wasnt nearly as daunting as the photos on the Eduard website would lead you to believe, and the end results arent nearly as two dimensional as my photos would indicate. This set is probably my favourite out of all of the Eduard sheets. The access panels for the gunbays are replaced with metal items, which are intricate pieces of photoetch layered on top of each other in order to create a reasonable replication of the real items. Thoroughly more convincing than the Tamiya parts and the colour photoetch on the bottom of the access panels adds that small splash of colour and realism to the final product.final details and one big thank-you
Last to be completed as always, was the addition of all the fiddly bits which would have broken off ages ago if not left until now. Landing gear, canopy, all of the clear parts for lighting and lenses were all added at this stage. Lance Carroll, a WWI master modeller in his own right (lcarroll here on the forums) and a man whom I am proud to say is my Uncle, was kind enough to take time out of his busy modelling schedule to paint the two antenna on the spine for this project. Painting a woodgrain finish is as much of a dark art to me as rigging and lozenge camouflage. Lance took the pair of antenna I had dug up for the Uncle Dog antenna home with him after a visit, painted them and shipped them back to me in precisely no-time-flat. I am thrilled to have some of his work included on my Mustang, as his work was always one of my primary sources of inspiration as I have grown as a modeller. I love the extra texture and dimension it adds to the finished product. Gleaming natural metal, a screaming green tail and a pair of beautifully executed wooden antenna make this as different of a model for my collection as there is ever likely to be.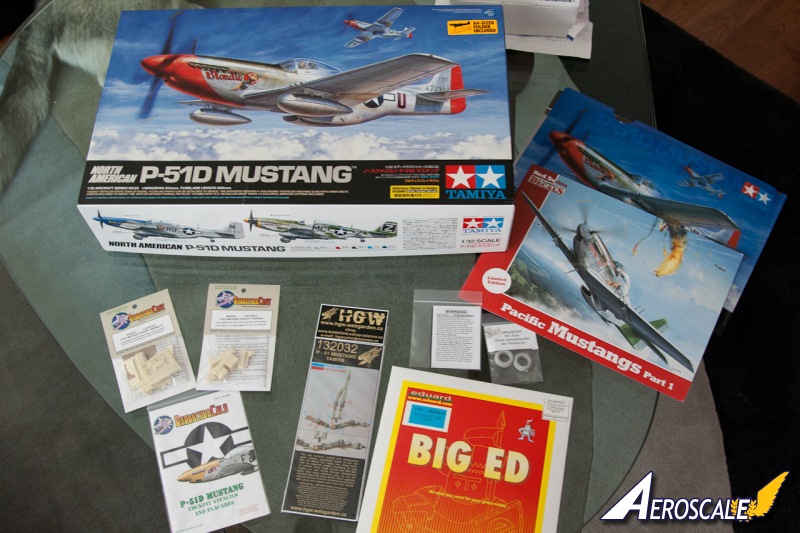
About the Author

Comments

Thanks guys, I'm truly happy with the outcome and I'm glad to have the article published here on Aeroscale. With your positive feeback for encouragement, I'll likely do a similar article for the F4U-1, I'd love to do an in box review - but I'm also open to doing an article like this summing up the majority of the aftermarket parts that will doubtlessly become available.
MAY 25, 2013 - 06:29 AM

Magnificent Build Matt, and a very well done article. Your work is most deserving of Feature Article presentation, she's truly an outstanding example of the modeler's art, and it's gratifying to see her completed after viewing the initial start phase some months back.
As for the tiny wood antennae, It's my honour to have contributed (in a very miniscule way!) to such a fine Model)
Last, you can't be looking at most of the other work on the Early Aviation Forum,I am hardly a "Master" but certainly enjoy trying to come close to many of the members!
Well done, and hope to see more!
Cheers,
(Your Uncle) Lance
MAY 25, 2013 - 10:33 AM

Thanks guys, I appreciate the feedback.
Uncle Lance - as always you're far too modest, but I'm told that not being an 'arrogant dick' is a good thing; which is likely MY downfall haha. Thanks again for you hard work - you'll have to see it in person come this November.
MAY 25, 2013 - 11:41 AM
Wow, Matt- that's a tremendous build- cheers! you're a better man than I to tackle that beautiful NMF finish- that stuff scares me. Those gears bays- ahhh, that's the stuff! All in all you've done justice to every manufacturer featured in this build- I hope every and every one send s you a cookie for your efforts. Oh, and a beautiful Vargas girl to boot? Icing on a marvelous cake.
MAY 26, 2013 - 07:06 AM
Thanks Chuk! A welcome compliment from the Master Modeller himself!
Lcarroll and I seem to live in your threads - often messaging each other when you've posted an update. Your work is always an inspiration and quite honestly between you and Lcarroll, just about the only way I found the determination for such a long build.
I'll keep you posted as far as any cookies go - I'll be sure to share and play well with others :-)
Cheers
Matt
MAY 27, 2013 - 06:42 AM
Matt, Just a tremendous feature article. Well written & edited, which made following your build an easy task.
Joel
JUN 14, 2013 - 10:13 AM
Thanks Joel - I was initially concerned about its length, but I figured that if I were considering a build of this kit, then I would read as much as this.
JUN 25, 2013 - 12:35 PM
This is hermit level commitment to modelling. Your bare metal is really convincing. The Packard wizard in there is a really great piece of painting too.
If you don't mind me asking, how long did this take?
JUN 25, 2013 - 02:39 PM
Hey Joel - sorry thought I replied earlier.
Thanks for the feedback, I'm very happy with the end result. The overall build took two to three hundred hours and spanned about a year - but a lot of that year had a fair amount of downtime as well so it's hard to say how long it realistically took. Probably only about a week....
JUN 26, 2013 - 08:21 AM
Copyright ©2021 by Matt Odom. Images also by copyright holder unless otherwise noted. The views and opinions expressed herein are solely the views and opinions of the authors and/or contributors to this Web site and do not necessarily represent the views and/or opinions of AeroScale, KitMaker Network, or Silver Star Enterrpises. Images also by copyright holder unless otherwise noted. Opinions expressed are those of the author(s) and not necessarily those of AeroScale. All rights reserved. Originally published on: 2013-05-25 01:47:09. Unique Reads: 11642

WEB HOSTING BY


Copyright ©2021 AeroScale and Kitmaker Network, a subsidiary of Silver Star Enterprises
All Rights Reserved. Please read our Conditions of Use and Privacy Policy.
All Rights Reserved. Please read our Conditions of Use and Privacy Policy.