

The Story of Miracle Paint Masks
8
Comments
I have been looking at painting markings on my models, rather than using decals, for quite some time now. Im not sure exactly when Montex Masks came on the market, but it was a few months before they did that I originally had the idea of producing masks for the modelling world to use, not just myself. I had tried several times to cut markings from masking tape and every time I had been defeated. Luftwaffe crosses are relatively easy, but trying to include the black edge, on some, is about impossible to do accurately as it is 17mm wide, on a 300mm cross, which is 0.35mm in 1/48 scale. RAF roundels and other national roundels are the most difficult, for me anyway. I could cut one, maybe two, of the concentric circles required, but always failed to complete the task. This was even more difficult if I tried C1 type roundels, the one with the thin white and yellow rings. Even if I could cut them there are 6 required, plus fin flashes and then Codes. What I needed was a machine that would cut masking tape.
I had all but given up when Harri (Jetprovost, of Harricatures fame) and Rob, at work started their own business, building electrically operated diesel engines in 16mm gauge. They needed to paint the buffer beams with black and yellow stripes and approached a local sign maker. The sign maker could do it but he didnt understand exactly what they wanted, so Harri sorted it instead. Harri told me about this and said that the sign maker had said that it would be pence to do what he thought that they wanted. I figured it was worth a try to see if a sign maker could make paint masks for me, from a scan of a decal sheet. After explaining what I was after the sign maker said, when asked the sort of cost involved, pence. I thought that I would be onto a winner so I took the decal sheet for the Revel re-boxing of Hasegawas 1/32 Fw 190D-9 to the sign maker. Again I asked how much? Pence says he, cool says I and went home to do some more work on the 190, secure in the knowledge that I would be painting the markings on in no time. After 2 weeks I still didn't have any masks, and then 3 weeks went by. 5 weeks after asking for them to be done I was finally able to collect them; I wasnt too bothered because it was only going to cost me pence. I also had great plans to have the sign maker cut paint masks for use by the modelling world. With thoughts of my new business in my head and what I would be able to achieve I left work to go and pick up the masks. With great anticipation I walked into the sign makers office, he went to collect my masks and returned with a bigger sheet than I expected. Thatll be £20 he said, eek said I, wondering what the statement pence actually meant. There were far more masks than I anticipated and the sheet was covered in transfer tape, plus the whole sheet had been weeded (removing the unwanted portions). I realised that the sign maker hadnt understood, at all, what I was after, much like when Harri and Rob had approached them. This was part of the learning curve so I paid what they asked and took the masks home. Dejected I took another look at the sheet, hoping that the professionals had got it right and it was I that need to look at this in a different way.
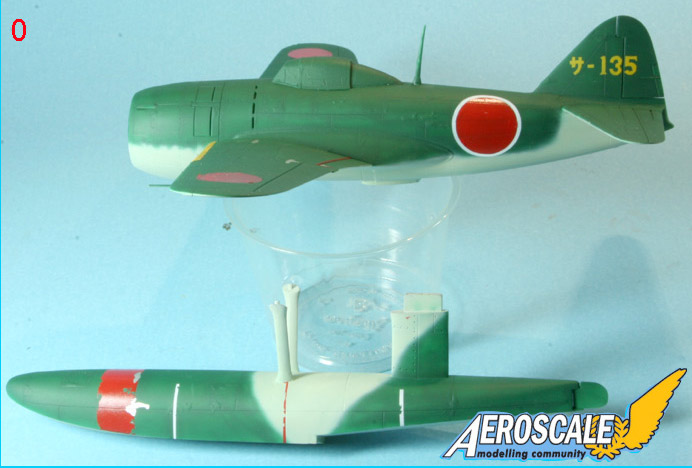
I tried to work with the masks; they were obviously designed to be layered, but lining them up was very difficult. I had had some Japanese Hinomaru included in the sheet, for a Rex float plane that I was building. These were the first masks that I tried. The red disks worked and, of course, were very easy to use, but adding the white surround to the fuselage markings took a great deal of effort to line up. I was pleased with the results though and this made me determined to crack the problem (picture 0). That was about 8 months ago.
Having learnt that sign makers do not understand what is required I realised that I would probably need to draw up the markings myself and submit them for cutting. I also realised that I need to ask that they were not weeded. I thought that by supplying the drawings and not having them weeded would mean that the cost would be dramatically reduced, how wrong I was. I approached a different sign maker and again I had to badger him to give me the answer to my request for a cost. With me doing all the work and him just setting up his machine, it was still stupid money. I realised that the only way to go was to buy the machinery for myself. The problem with that was that I didnt have the funds, so the search was on. I wont explain the whole story but suffice to say that I found something that, although still out of what I wanted to pay, it was at a price that I could live with. Well I can live with it if I can recover the cost by producing paint masks, but that is what any business has to do. That is what it had to become, a business.
One very good thing that came out of the initial purchase of the paint masks was that I found out about the material that I now use. I have used paint masks before but the material has never been quite up to it. For this reason I didnt begrudge, too much, paying £20. So I found a supplier and bought some of that material, it is very expensive but it is by far the best stuff for the job.
So if I was to become a business this now needed some serious thought. I have been in business before, a franchise, when I finished my career with the British Army. I was forced into bankruptcy when the parent company went down, so I was under no delusions of the possible outcome of what I was about to embark on. This had to be a business that funded itself; yes there would be initial outlay, but not a massive a mount. The real beauty about doing it as a business is that I could still keep my day job, until the thing takes off, with my wife working from home doing the packaging and posting. I would be able to do the technical stuff after work.
Reference to my secret project became the norm for me as an excuse for not being on line or missing posts. I was spending a lot of time ironing out the whys and wherefores of what I had set out to do. I realised early on that I would want to have the masks reviewed on Aeroscale first, that present a moral dilemma. The staff at Aeroscale know me so presenting something for review would provide them with the dilemma of not wanting to upset me (although I can take it) but more seriously they could be accused of being biased towards a friend. I required references and approached Rowan (Merlin) and discussed what I was doing with him. He provided me with references, for RAF and Luftwaffe stuff (thanks again Rowan), and agreed to keep my project secret. We agreed that I would send the review samples in under a pseudonym. I also let Jim know, of course. Nige (Lampie) also got to know because he came to my place for a couple of hours as we were going to a show for the week end. I couldnt not show him my model room, so he was going to see what I had been up to, but he was sworn to secrecy. Thanks for keeping the secret Nige
My initial intention was to have both RAF and Luftwaffe markings ready for review at the same time but that didnt happen. Other masks, Eduard and Montex are die cut, which must be an expensive way of doing it, but it does have certain advantages. I am cutting the masks, which present a whole series of problems, but has one great advantage, I can cut to order. If you want it and I can draw it, I can, within certain limitations, cut the mask for it. Some of the limitations I have actually overcome by the method in which the masks are used. This is the reason why I havent, yet, produced Luftwaffe markings. Although the machine will cut the thin black outline, required on some, the low tack of the material doesnt allow these very thin elements to adhere, to the backing sheet, while being cut. I have had to come up with a design to overcome this. I think that I have the solution so Luftwaffe markings wont be long. The one thing that must be got absolutely right, when using masks of any description, is replacing elements to mask previously painted areas. This is where much of my time has been taken up, working out how a complete novice to using paint mask such as these, can use them easily and with confidence. Because of this I went to town on the instructions. You are normally presented with a pictorial presentation or sketchy written instructions, neither of which actually tells you how to accomplish the finished article, so you are left with the tried and tested trial and error method. Suffice to say a great deal of head scratching and sole searching went into the method.
I actually nearly gave up because I couldnt find the ideal pressure at which to cut the material. It is only 80 microns thick but I was having limited success, although I did send samples to Rowan. Like all these things revelation comes from the strangest direction. At work we had produced an electric diesel loco, for the first time and it had sound. This meant it had a small speaker which was hidden inside the body work. Rob, the designer found that by having a baffle around the speaker the sound produced was better. Discussing it with him I reckoned that I would be able to cut the baffles out of plasticard. This I did and they were a success, but of course the blade, in my machine, was blunted. I changed it and had a go at cutting some masks. The difference was incredible, as the blade, easily, sliced through the backing sheet. This was a revelation; obviously the blade that came with the machine was not a new one! I cursed but it was also that eureka moment. Resetting the blade in the holder and dropping the cutting pressure produced the desired result and I was now able to cut the material cleanly. Although there were still other issues to resolve the light at the end of the tunnel had come back on.
I managed to get samples in for review a week before the big UK show at Telford, IPMS-UK Scale Modelworld, under the pseudonym of Mick Marshall (I wanted to keep my initials). I asked that they be reviewed before Telford, if possible, which they were. Now this put an awful lot of pressure on the reviewer, Andy (Betheyn), but he did it. It was going to be interesting as we were going to meet at Telford and I was going to have samples of Miracle Masks on display. However Andy sussed that it was me a couple of days after the review was aired. I handed out review samples to all the major aircraft modelling magazines and to Brett Green of Hyperscale, while at the show. I also got around and handed out leaflets to as many of the Club stands as I could. I was encouraged by the response and had requests from several different quarters, including Airliner, car and War hammer modellers, to name a few.
I have spent the week since Telford getting my web site ready to launch and it is now up and running. I am very interested in what you, the modeller, would like to see as far as paint masks go. If you are starting a project and would like to try out paint masks then take a look at the process here, and visit my web site where there is a forum that you can ask questions. Alternatively you can email me or ask me via PM here or in the forums here.
My web site Miracle Masks
My Miracle Masks email [email protected]
Miracle Masks, the masking and painting process, RAF roundels, fin flashes and codes.
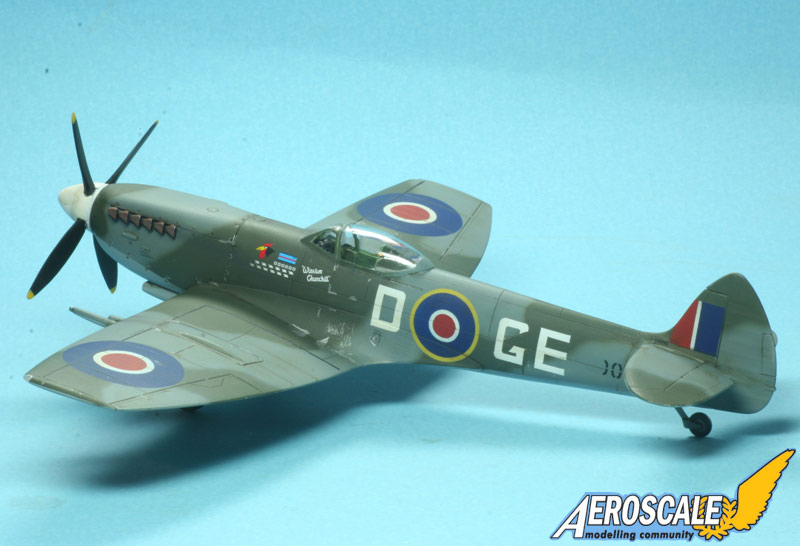
The model should be finished up to the point at which you would normally apply the decals, including the gloss coat. The masks are low tack and will adhere better to a gloss surface and this will also make it far less likely that paint will bleed under adjacent elements of the mask. If the gloss coat is also a protective coat, such as Johnsons Klear (Future in the US) then you will be able to remove any markings that you are not happy with. The masks can be re-positioned numerous times but it is not advisable to try and re-use them (although, in theory, it is entirely possible), this is one reason why as many as possible are included on a sheet. Each set of masks comes complete with instructions on how to use them, notes on how to paint and colour information.
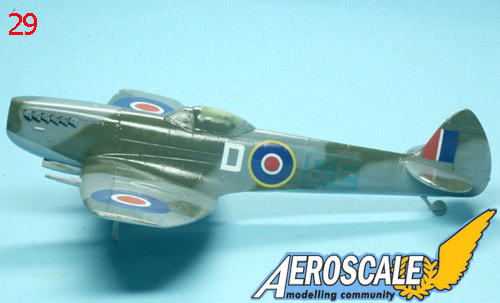
The masks used for this 1/48 Supermarine Spitfire Mk XVI e are: 35in type C under wing roundels (MM48C35) 56in type C upper wing roundels (MM48C56) 32in type C1 fuselage roundels (MM48C1-32) 11in x 2in x 11in x 24in type C fin flashes (MM48C-FIN) 21in broad stroke codes (made specifically for the project)
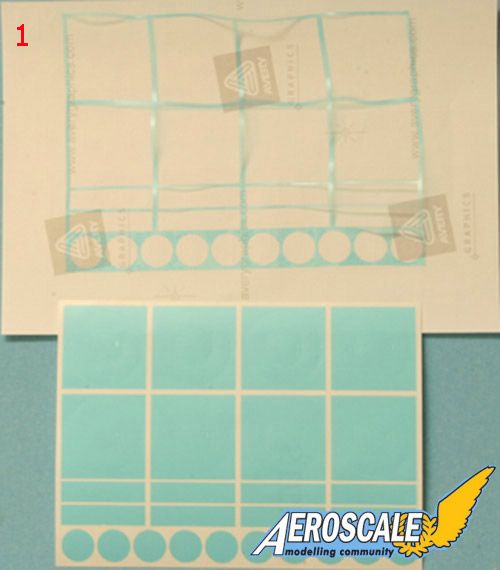
Picture 1 and 2. Weed the sheets of masks that you are going to use. That is to remove the material in between the actual masks themselves. To do this simply pick up the corner of the sheet and, carefully, pull it up and over and you will remove the medium, something like in picture one.
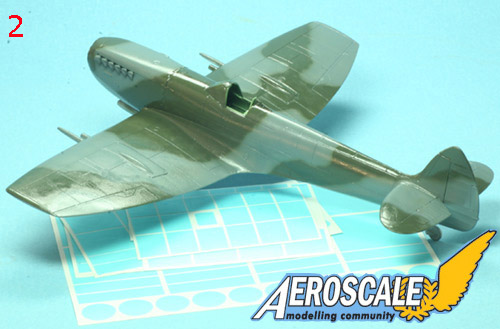
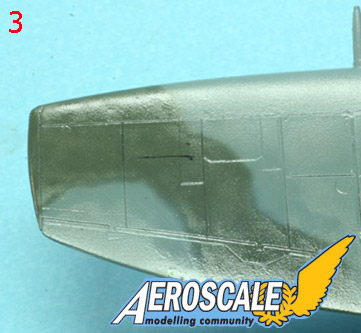
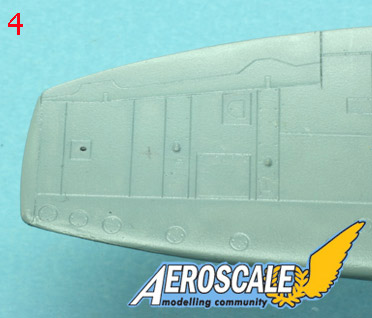
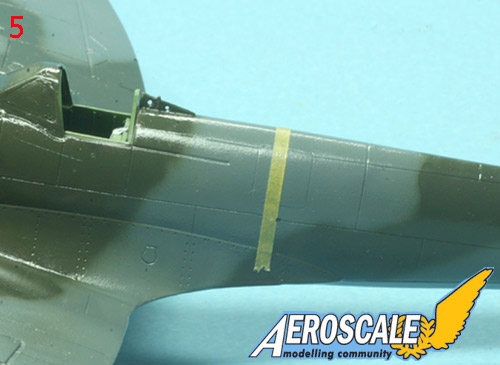
Picture 3, 4 and 5. Carefully mark the position of each of the markings on the model. A dot or a small cross is sufficient. If the fuselage roundels are in line then you can transfer the position over to the other side of the fuselage by means of a thin piece of masking tape.
Picture 6. Using permanent marker, draw a cross on each mask that you are going to use. This is to help when replacing elements of the mask. As this cross will not be 100% accurate add a further line from the centre to one of the sides. For the fin flashes draw 2 lines, one about a third from the top, the other about a third from the bottom. Make a mark to indicate which way is up.
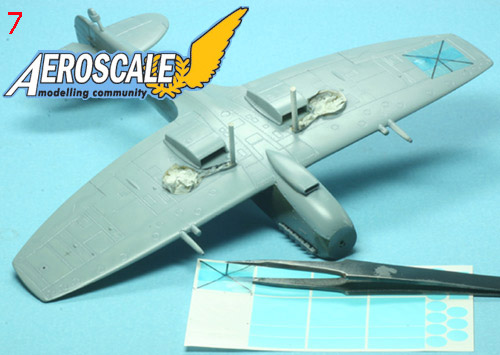
Picture 7. On the sheets you will see a number of rectangles, the same width as the masks. These are transfer tape which is used to keep all the elements of the masks together while they are moved to the model. They can be re-used many times so dont discard them after use. Apply 2 pieces of transfer tape across the masks so that all the elements will stay together. You dont have to worry about the centre red mask (see later) and leaving this out can aid in positioning.
Picture 7, 8 and 9. Carefully lift each of the masks in turn, by sliding a pair of tweezers under the mask. Position the tweezers above and below one of the pieces of transfer tape and, while making sure that all the masking elements remain in place, lift the mask gently off the backing sheet and transfer to the model.
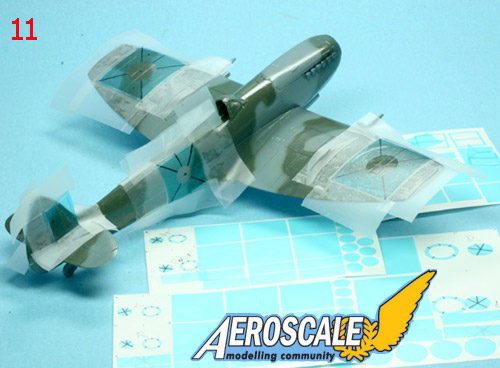
Picture 10. Masks around the Miracle Masks to prevent overspray, but if you are painting properly this will be minimal.
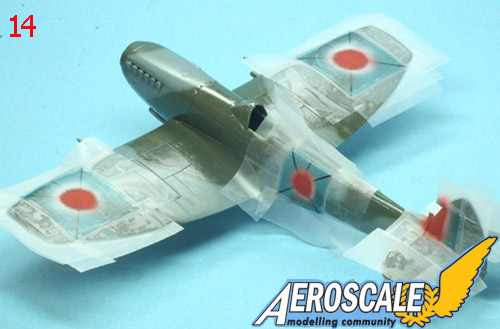
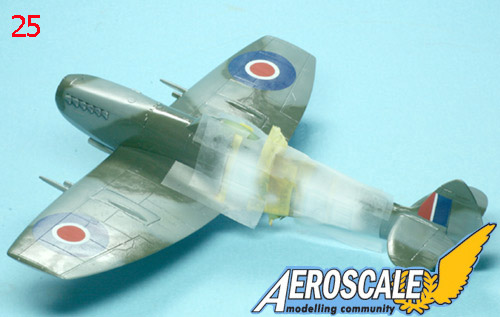
Picture 11. Now the fun starts. Carefully weed out the white mask elements, remove the red elements as well, if you didnt leave them behind when transferring the mask to the model. Save the white masks on the backing sheet, you can discard the red ones (see later).
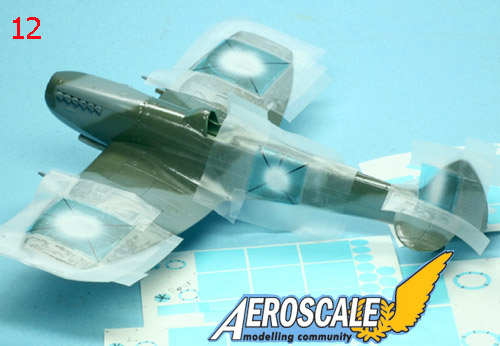
Picture 12. Paint the exposed areas, on all the masks, white and leave to dry.
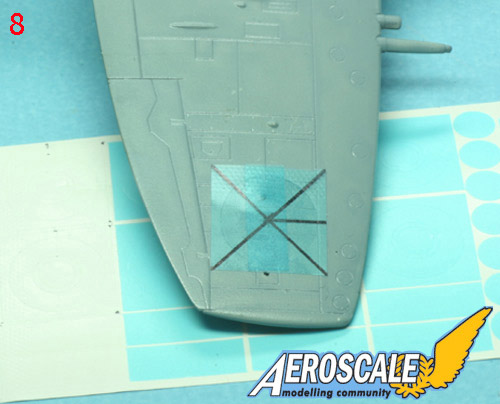
Picture 13. This is the crucial bit (for 3 ring roundels), get this right and you cant fail, replace the white mask elements. The lines drawn on earlier will make this very easy, if you make sure that the masking element goes back to its parent mask. Take your time but you will find this surprisingly easy, if you draw on the cross.
Picture 14. Replacing the white mask will leave the centre exposed, paint it red and let it dry.
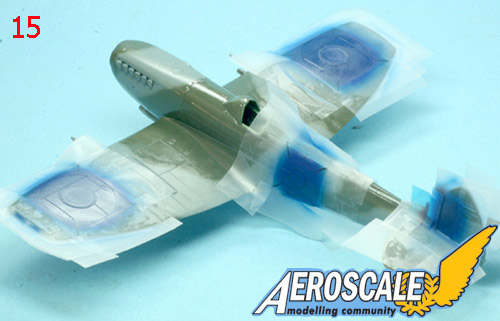
Picture 15. On the sheets you will find discs. These are the red centre masks and will save you the effort of trying to accurately re-locating the red centres. Position them so that they cover the red area, but dont overlap on to the blue. Now carefully weed out the blue mask element. These can be discarded except for the roundels with a yellow outer ring (the C1 type on the fuselage), save those on the backing sheet. Paint the exposed area blue and let dry.
Picture 16. You can remove the masking from the 3 colour roundels, if you like or wait until the fuselage ones are completed as well. You dont have to wait until the paint is completely dry, but if you dont take extra care when removing the masks. Replace the blue mask element on the fuselage roundel, take your time and use the lines drawn earlier to help. When satisfied that the blue mask is accurately replaced remove the yellow mask element.
Picture 17. Paint the exposed area yellow.
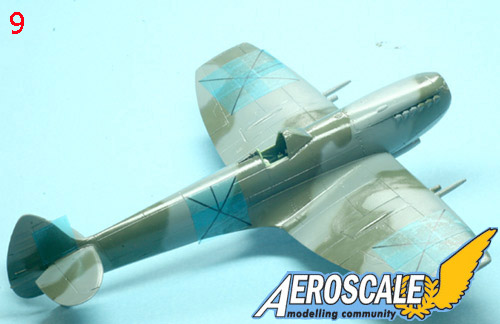
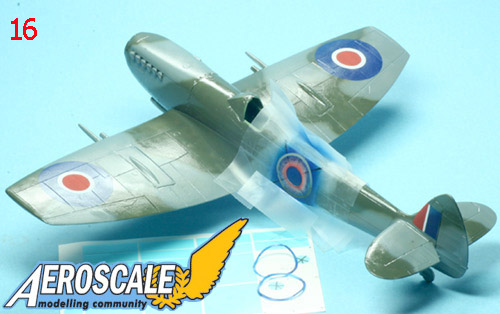
Picture 18. Remove the masking.
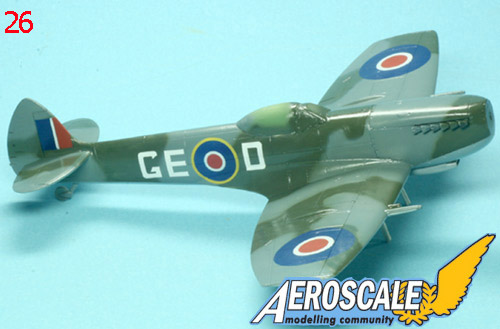
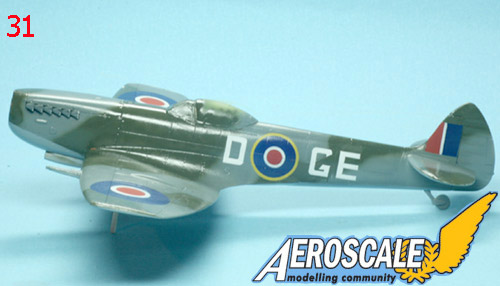
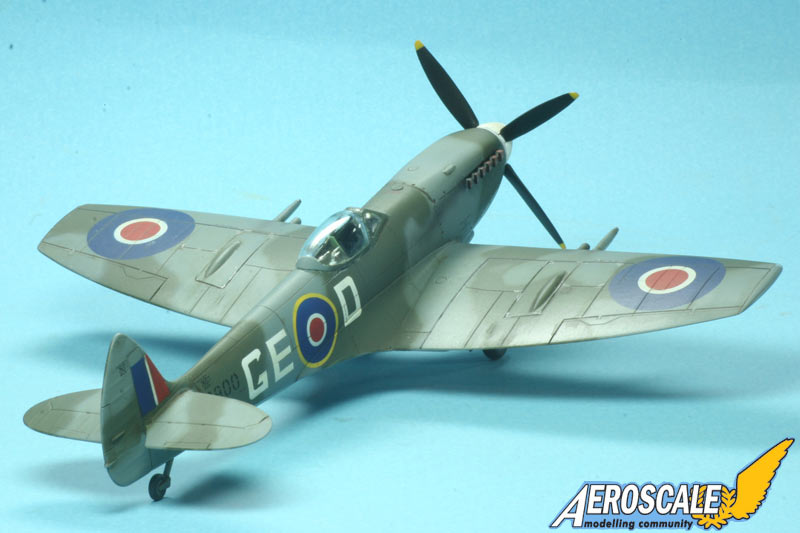
There you have the roundels and fin flashes painted on the model and I think that you will agree that they look pretty good. Using a little care the process is surprisingly easy; this was the first time that I had actually used the masks and did so with a little trepidation. I was sold when I saw the results, far better than any decal and actually easier to do than getting a decal to conform to detail, without silvering. The bonus is that the colours are correct, and they can be weathered in the same way that the rest of the model can be. We are not quite finished though as we have the codes to apply and these are a doddle, compared to the roundels.
Miracle Masks, the masking and painting process for RAF codes and numbers.
It is a good idea to give the recently applied markings a protective coat of varnish, Klear in my case. The last thing that you want to do is damage those markings with the masking tape. I use Tamiya tape so it shouldnt be a problem but better safe than sorry.
Picture 19. Weed the code sheet, in the same way that you weeded the other sheets.
Picture 20. The sheets of codes have off cuts of the material included for use as transfer tape, cut a couple of pieces each for the codes that you are going to use (remember that it can be re-used). Position the transfer tape so that it holds the letter together within the mask surround. Then, as before, transfer the code nearest to the roundel, of the pair, to the model. Take great care in positioning it correctly. It is not strictly necessary to keep the letter within the mask, but it does help them to keep their shape if you do. It is necessary, though, to keep letters with centres, A, B, D, O, P, Q and R, together, as their centres require positioning. Use a thin piece of masking tape to from a line across the top, or bottom of the mask, this will help position subsequent masks.
Picture 21. Position the second letter of the pair. It was RAF practice to position the code letters 6 inches apart. The rectangle of the mask, surrounding the letters is a scale 3 inches beyond the nearest part. Therefore it is a simple matter of placing codes adjacent to each other to get the correct spacing. If the codes that you are using were nearer then simply overlap them, if further apart space them out, and mask in between.
Picture 22, 23. Position the third code, both sides, and weed out the letters. Make sure that you leave behind any centres, as in the D in this case.
Picture 24. Masks around the Miracle Masks, adding a thin piece over the join of the 2 adjacent masks.
Picture 25. Paint the exposed area, white in this case.
Picture 26. Remove the masking, to reveal beautifully painted codes.
Picture 27. I had positioned the code pair on the port side slightly wrong; this is where the protective coat comes in handy.
Picture 28 and 29. I carefully removed the offending letters with a rag moistened with white spirit. Work slowly and carefully until the paint softens and starts to come off.
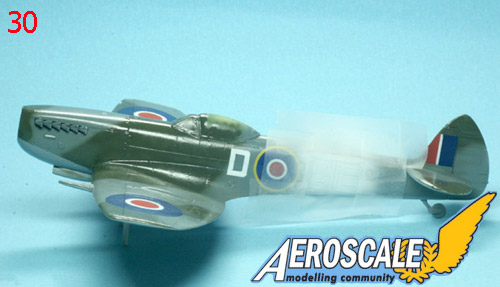
Picture 30. Reapply the code letters, in the correct place, mask around them and paint.
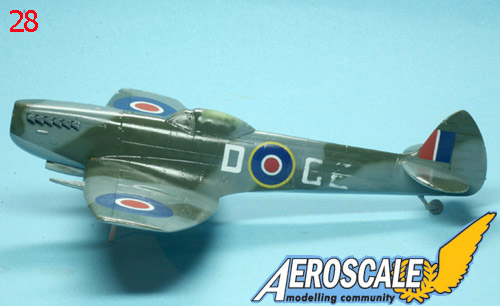
Picture 31. Thats better.
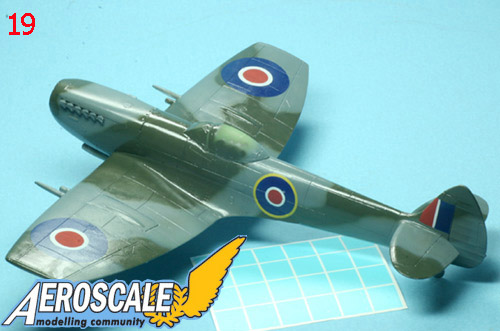
Apart from being very easy to apply you are in complete control of the colour and again the codes can be weathered with the rest of the model. Add any decals, apply another couple of coats of clear, weather the model, matt varnish it and add the final parts. Pictures 33, 34 and 35.
I had all but given up when Harri (Jetprovost, of Harricatures fame) and Rob, at work started their own business, building electrically operated diesel engines in 16mm gauge. They needed to paint the buffer beams with black and yellow stripes and approached a local sign maker. The sign maker could do it but he didnt understand exactly what they wanted, so Harri sorted it instead. Harri told me about this and said that the sign maker had said that it would be pence to do what he thought that they wanted. I figured it was worth a try to see if a sign maker could make paint masks for me, from a scan of a decal sheet. After explaining what I was after the sign maker said, when asked the sort of cost involved, pence. I thought that I would be onto a winner so I took the decal sheet for the Revel re-boxing of Hasegawas 1/32 Fw 190D-9 to the sign maker. Again I asked how much? Pence says he, cool says I and went home to do some more work on the 190, secure in the knowledge that I would be painting the markings on in no time. After 2 weeks I still didn't have any masks, and then 3 weeks went by. 5 weeks after asking for them to be done I was finally able to collect them; I wasnt too bothered because it was only going to cost me pence. I also had great plans to have the sign maker cut paint masks for use by the modelling world. With thoughts of my new business in my head and what I would be able to achieve I left work to go and pick up the masks. With great anticipation I walked into the sign makers office, he went to collect my masks and returned with a bigger sheet than I expected. Thatll be £20 he said, eek said I, wondering what the statement pence actually meant. There were far more masks than I anticipated and the sheet was covered in transfer tape, plus the whole sheet had been weeded (removing the unwanted portions). I realised that the sign maker hadnt understood, at all, what I was after, much like when Harri and Rob had approached them. This was part of the learning curve so I paid what they asked and took the masks home. Dejected I took another look at the sheet, hoping that the professionals had got it right and it was I that need to look at this in a different way.
I tried to work with the masks; they were obviously designed to be layered, but lining them up was very difficult. I had had some Japanese Hinomaru included in the sheet, for a Rex float plane that I was building. These were the first masks that I tried. The red disks worked and, of course, were very easy to use, but adding the white surround to the fuselage markings took a great deal of effort to line up. I was pleased with the results though and this made me determined to crack the problem (picture 0). That was about 8 months ago.
Having learnt that sign makers do not understand what is required I realised that I would probably need to draw up the markings myself and submit them for cutting. I also realised that I need to ask that they were not weeded. I thought that by supplying the drawings and not having them weeded would mean that the cost would be dramatically reduced, how wrong I was. I approached a different sign maker and again I had to badger him to give me the answer to my request for a cost. With me doing all the work and him just setting up his machine, it was still stupid money. I realised that the only way to go was to buy the machinery for myself. The problem with that was that I didnt have the funds, so the search was on. I wont explain the whole story but suffice to say that I found something that, although still out of what I wanted to pay, it was at a price that I could live with. Well I can live with it if I can recover the cost by producing paint masks, but that is what any business has to do. That is what it had to become, a business.
One very good thing that came out of the initial purchase of the paint masks was that I found out about the material that I now use. I have used paint masks before but the material has never been quite up to it. For this reason I didnt begrudge, too much, paying £20. So I found a supplier and bought some of that material, it is very expensive but it is by far the best stuff for the job.
So if I was to become a business this now needed some serious thought. I have been in business before, a franchise, when I finished my career with the British Army. I was forced into bankruptcy when the parent company went down, so I was under no delusions of the possible outcome of what I was about to embark on. This had to be a business that funded itself; yes there would be initial outlay, but not a massive a mount. The real beauty about doing it as a business is that I could still keep my day job, until the thing takes off, with my wife working from home doing the packaging and posting. I would be able to do the technical stuff after work.
Reference to my secret project became the norm for me as an excuse for not being on line or missing posts. I was spending a lot of time ironing out the whys and wherefores of what I had set out to do. I realised early on that I would want to have the masks reviewed on Aeroscale first, that present a moral dilemma. The staff at Aeroscale know me so presenting something for review would provide them with the dilemma of not wanting to upset me (although I can take it) but more seriously they could be accused of being biased towards a friend. I required references and approached Rowan (Merlin) and discussed what I was doing with him. He provided me with references, for RAF and Luftwaffe stuff (thanks again Rowan), and agreed to keep my project secret. We agreed that I would send the review samples in under a pseudonym. I also let Jim know, of course. Nige (Lampie) also got to know because he came to my place for a couple of hours as we were going to a show for the week end. I couldnt not show him my model room, so he was going to see what I had been up to, but he was sworn to secrecy. Thanks for keeping the secret Nige
My initial intention was to have both RAF and Luftwaffe markings ready for review at the same time but that didnt happen. Other masks, Eduard and Montex are die cut, which must be an expensive way of doing it, but it does have certain advantages. I am cutting the masks, which present a whole series of problems, but has one great advantage, I can cut to order. If you want it and I can draw it, I can, within certain limitations, cut the mask for it. Some of the limitations I have actually overcome by the method in which the masks are used. This is the reason why I havent, yet, produced Luftwaffe markings. Although the machine will cut the thin black outline, required on some, the low tack of the material doesnt allow these very thin elements to adhere, to the backing sheet, while being cut. I have had to come up with a design to overcome this. I think that I have the solution so Luftwaffe markings wont be long. The one thing that must be got absolutely right, when using masks of any description, is replacing elements to mask previously painted areas. This is where much of my time has been taken up, working out how a complete novice to using paint mask such as these, can use them easily and with confidence. Because of this I went to town on the instructions. You are normally presented with a pictorial presentation or sketchy written instructions, neither of which actually tells you how to accomplish the finished article, so you are left with the tried and tested trial and error method. Suffice to say a great deal of head scratching and sole searching went into the method.
I actually nearly gave up because I couldnt find the ideal pressure at which to cut the material. It is only 80 microns thick but I was having limited success, although I did send samples to Rowan. Like all these things revelation comes from the strangest direction. At work we had produced an electric diesel loco, for the first time and it had sound. This meant it had a small speaker which was hidden inside the body work. Rob, the designer found that by having a baffle around the speaker the sound produced was better. Discussing it with him I reckoned that I would be able to cut the baffles out of plasticard. This I did and they were a success, but of course the blade, in my machine, was blunted. I changed it and had a go at cutting some masks. The difference was incredible, as the blade, easily, sliced through the backing sheet. This was a revelation; obviously the blade that came with the machine was not a new one! I cursed but it was also that eureka moment. Resetting the blade in the holder and dropping the cutting pressure produced the desired result and I was now able to cut the material cleanly. Although there were still other issues to resolve the light at the end of the tunnel had come back on.
I managed to get samples in for review a week before the big UK show at Telford, IPMS-UK Scale Modelworld, under the pseudonym of Mick Marshall (I wanted to keep my initials). I asked that they be reviewed before Telford, if possible, which they were. Now this put an awful lot of pressure on the reviewer, Andy (Betheyn), but he did it. It was going to be interesting as we were going to meet at Telford and I was going to have samples of Miracle Masks on display. However Andy sussed that it was me a couple of days after the review was aired. I handed out review samples to all the major aircraft modelling magazines and to Brett Green of Hyperscale, while at the show. I also got around and handed out leaflets to as many of the Club stands as I could. I was encouraged by the response and had requests from several different quarters, including Airliner, car and War hammer modellers, to name a few.
I have spent the week since Telford getting my web site ready to launch and it is now up and running. I am very interested in what you, the modeller, would like to see as far as paint masks go. If you are starting a project and would like to try out paint masks then take a look at the process here, and visit my web site where there is a forum that you can ask questions. Alternatively you can email me or ask me via PM here or in the forums here.
My web site Miracle Masks
My Miracle Masks email [email protected]
Miracle Masks, the masking and painting process, RAF roundels, fin flashes and codes.
The model should be finished up to the point at which you would normally apply the decals, including the gloss coat. The masks are low tack and will adhere better to a gloss surface and this will also make it far less likely that paint will bleed under adjacent elements of the mask. If the gloss coat is also a protective coat, such as Johnsons Klear (Future in the US) then you will be able to remove any markings that you are not happy with. The masks can be re-positioned numerous times but it is not advisable to try and re-use them (although, in theory, it is entirely possible), this is one reason why as many as possible are included on a sheet. Each set of masks comes complete with instructions on how to use them, notes on how to paint and colour information.
The masks used for this 1/48 Supermarine Spitfire Mk XVI e are: 35in type C under wing roundels (MM48C35) 56in type C upper wing roundels (MM48C56) 32in type C1 fuselage roundels (MM48C1-32) 11in x 2in x 11in x 24in type C fin flashes (MM48C-FIN) 21in broad stroke codes (made specifically for the project)
Picture 1 and 2. Weed the sheets of masks that you are going to use. That is to remove the material in between the actual masks themselves. To do this simply pick up the corner of the sheet and, carefully, pull it up and over and you will remove the medium, something like in picture one.
Picture 3, 4 and 5. Carefully mark the position of each of the markings on the model. A dot or a small cross is sufficient. If the fuselage roundels are in line then you can transfer the position over to the other side of the fuselage by means of a thin piece of masking tape.
Picture 6. Using permanent marker, draw a cross on each mask that you are going to use. This is to help when replacing elements of the mask. As this cross will not be 100% accurate add a further line from the centre to one of the sides. For the fin flashes draw 2 lines, one about a third from the top, the other about a third from the bottom. Make a mark to indicate which way is up.
Picture 7. On the sheets you will see a number of rectangles, the same width as the masks. These are transfer tape which is used to keep all the elements of the masks together while they are moved to the model. They can be re-used many times so dont discard them after use. Apply 2 pieces of transfer tape across the masks so that all the elements will stay together. You dont have to worry about the centre red mask (see later) and leaving this out can aid in positioning.
Picture 7, 8 and 9. Carefully lift each of the masks in turn, by sliding a pair of tweezers under the mask. Position the tweezers above and below one of the pieces of transfer tape and, while making sure that all the masking elements remain in place, lift the mask gently off the backing sheet and transfer to the model.
Picture 10. Masks around the Miracle Masks to prevent overspray, but if you are painting properly this will be minimal.
Picture 11. Now the fun starts. Carefully weed out the white mask elements, remove the red elements as well, if you didnt leave them behind when transferring the mask to the model. Save the white masks on the backing sheet, you can discard the red ones (see later).
Picture 12. Paint the exposed areas, on all the masks, white and leave to dry.
Picture 13. This is the crucial bit (for 3 ring roundels), get this right and you cant fail, replace the white mask elements. The lines drawn on earlier will make this very easy, if you make sure that the masking element goes back to its parent mask. Take your time but you will find this surprisingly easy, if you draw on the cross.
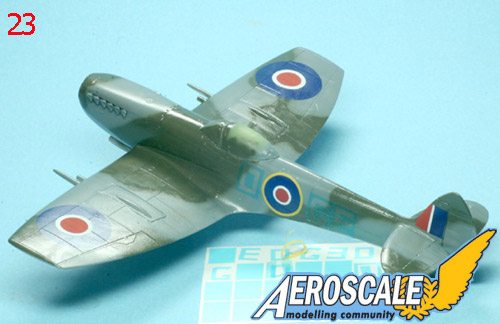
Picture 14. Replacing the white mask will leave the centre exposed, paint it red and let it dry.
Picture 15. On the sheets you will find discs. These are the red centre masks and will save you the effort of trying to accurately re-locating the red centres. Position them so that they cover the red area, but dont overlap on to the blue. Now carefully weed out the blue mask element. These can be discarded except for the roundels with a yellow outer ring (the C1 type on the fuselage), save those on the backing sheet. Paint the exposed area blue and let dry.
Picture 16. You can remove the masking from the 3 colour roundels, if you like or wait until the fuselage ones are completed as well. You dont have to wait until the paint is completely dry, but if you dont take extra care when removing the masks. Replace the blue mask element on the fuselage roundel, take your time and use the lines drawn earlier to help. When satisfied that the blue mask is accurately replaced remove the yellow mask element.
Picture 17. Paint the exposed area yellow.
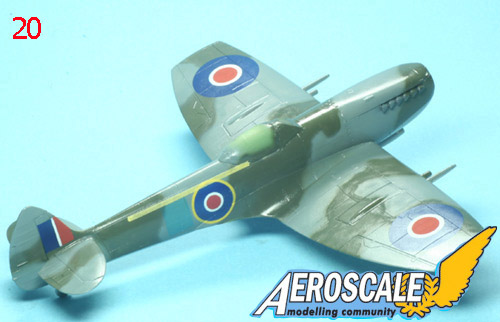
Picture 18. Remove the masking.
There you have the roundels and fin flashes painted on the model and I think that you will agree that they look pretty good. Using a little care the process is surprisingly easy; this was the first time that I had actually used the masks and did so with a little trepidation. I was sold when I saw the results, far better than any decal and actually easier to do than getting a decal to conform to detail, without silvering. The bonus is that the colours are correct, and they can be weathered in the same way that the rest of the model can be. We are not quite finished though as we have the codes to apply and these are a doddle, compared to the roundels.
Miracle Masks, the masking and painting process for RAF codes and numbers.
It is a good idea to give the recently applied markings a protective coat of varnish, Klear in my case. The last thing that you want to do is damage those markings with the masking tape. I use Tamiya tape so it shouldnt be a problem but better safe than sorry.
Picture 19. Weed the code sheet, in the same way that you weeded the other sheets.
Picture 20. The sheets of codes have off cuts of the material included for use as transfer tape, cut a couple of pieces each for the codes that you are going to use (remember that it can be re-used). Position the transfer tape so that it holds the letter together within the mask surround. Then, as before, transfer the code nearest to the roundel, of the pair, to the model. Take great care in positioning it correctly. It is not strictly necessary to keep the letter within the mask, but it does help them to keep their shape if you do. It is necessary, though, to keep letters with centres, A, B, D, O, P, Q and R, together, as their centres require positioning. Use a thin piece of masking tape to from a line across the top, or bottom of the mask, this will help position subsequent masks.
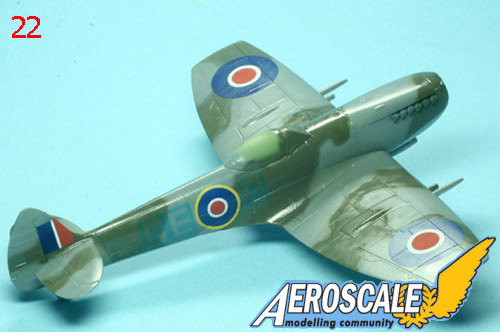
Picture 21. Position the second letter of the pair. It was RAF practice to position the code letters 6 inches apart. The rectangle of the mask, surrounding the letters is a scale 3 inches beyond the nearest part. Therefore it is a simple matter of placing codes adjacent to each other to get the correct spacing. If the codes that you are using were nearer then simply overlap them, if further apart space them out, and mask in between.
Picture 22, 23. Position the third code, both sides, and weed out the letters. Make sure that you leave behind any centres, as in the D in this case.
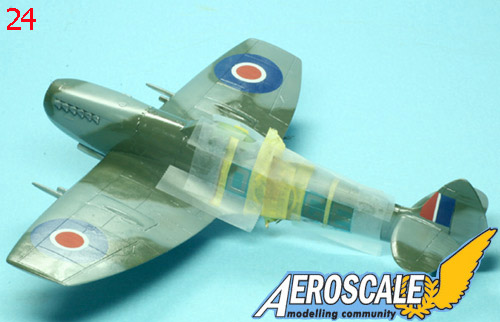
Picture 24. Masks around the Miracle Masks, adding a thin piece over the join of the 2 adjacent masks.
Picture 25. Paint the exposed area, white in this case.
Picture 26. Remove the masking, to reveal beautifully painted codes.
Picture 27. I had positioned the code pair on the port side slightly wrong; this is where the protective coat comes in handy.
Picture 28 and 29. I carefully removed the offending letters with a rag moistened with white spirit. Work slowly and carefully until the paint softens and starts to come off.
Picture 30. Reapply the code letters, in the correct place, mask around them and paint.
Picture 31. Thats better.
Apart from being very easy to apply you are in complete control of the colour and again the codes can be weathered with the rest of the model. Add any decals, apply another couple of coats of clear, weather the model, matt varnish it and add the final parts. Pictures 33, 34 and 35.


About the Author


FROM: ENGLAND - SOUTH WEST, UNITED KINGDOM
Hi, my name is Mal Mayfield and I have been modelling seriously for about 25 years. My main interest is 1/48 scale second world war. I build all types and all combatants. I have built 1/35 scale "targets" and 1/72 scale modern aircraft, plus a couple of cars. I have also dabbled with figure painting...
Comments

Hi Rowan!
Wow, great stuff, thanks for sharing!
Mal (alias Mick Marshall ), good luck for your business! I hope I can use one of your set of masks for a future project of mine. I also wanted to paint rather than decal the markings on my models since a long time.
All the best!
Jean-Luc
NOV 30, 2007 - 08:51 PM
Hi jean-Luc
Yes painting on markings has been a goal of mine for quite some time. I'm sure that there are clever modellers out there who can actually cut concentric circles from masking tape but it sure defeated me Frankly I was overjoyed at the results, particularly as the ones in the article are actually cut with the blunt blade that I mentioned. If they sell then I will be looking to buy a much more capable machine then who knows were this can go
I'm working on Luftwaffe markings at the moment and although I have cracked the basic cross, even with black outline, the swastika is proving troublesome. Well not troublesome to cut but at the moment but, to have a thin black outline, you will have to paint black, mask, paint white, mask then black again. This works well but would, I imagine, but many potential buyers off trying it. I do think however that, once tried, there's no going back to decals I am looking at producing rub down transfers, for stencilling and those markings that are just too small for this system and I'm looking at how I can produce nose art That's for the future though. I have some very interesting trials in the pipeline as well. One which will be of particular interest to Jackflash is masks for lozenge fabric (I was speaking to one of the guys from "Cross and Cockade" at Telford). This is not as easy as it first sounds but I have got up to 3 colours. Another area is, believe it or not, zimmerite, (anti magnetic mine paste for German AFVs in WWII). More of that, on Armorama, if my trials are a success.
I have just had an e-mail from Garry Hatcher, editor of SAMI, and he likes the masks a lot. They will be reviewed in the January mag I also handed sample to Brett Green (Hyperthingy) and they will be reviewed there within the next few weeks. I handed out eight other samples for review at Telford, and there are no reviews, yet, in the 2 mags that I take (1 is SAMI and when Garry saw my masks he did say that he would like to have time to give them a proper review). I'm hoping that all the review samples will be treated the same way and will be out sometime after Christmas Getting the word out is proving to be the hardest part, but I'm confident that when it's out there the masks will start to sell
Anyway, Jean-Luc, let me know what you require and, the first lot anyway are free to you. (I do owe you and I'm sure that the results will get an airing here, on Aeroscale )
I'm actually beginning to think that the way forward is to offer a bespoke sevice rather than individual items or sets. I will do that anyway but I'm not sure that punters are picking that up.
Anyway, let me know what you require and thanks for fixing the link.
Mal
DEC 02, 2007 - 01:13 AM

Looks good Mal-Mick.
Good luck in your new venture into the business world.
DEC 02, 2007 - 10:37 AM

Excellent stuff. I was only looking into Luftwaffe masks of this type last week, however now I will wait until yours are finished and ready to go.
Congratulations and good luck on your venture.
H
DEC 03, 2007 - 12:45 AM
Thanks Dave, it is indeed scary, particularly as I have been there and crashed and burned I am now flying a Spitfire so no enemy (read Solicitor ) will be able to shoot me down
Howard.
If you have a particular aircraft in mind then I should be able to do the markings for you. The wing (upper and lower) are no problem and the same for the fuselage cross, as I have sussed the method for these. The Swastika is a different story but if your scheme has a simple black or black and white, no outer black line, then that would be easy too. I have just started on the numbers, but if you can let me know the number you want and any particular style that shouldn't be a problem.
What really takes the time, after drawing everything that is required is sorting out the pricing and getting everything onto the web site. I have worked out a method of pricing, using a spreadsheet, but I still have to input the data. Of course I could just make a wild stab at the pricing but then it would either be too expensive or cost me money
Like I said in my previous post I'm thinking that a bespoke service is the way to go. The problem with that though may be that I'm constantly drawing stuff on my PC. At least by drwaing up as much as I can, for each nation, I will have good start. Anyone fancy the snake on a desert Stuka in 1/24 scale that's one I'm working on.
Anyway Howard if you do want to take me up on providing a set of masks, for a particular scheme could I ask if you would drop into my website and ask on the forum please
I'm not trying to move any members from here the forum is just for quetions about Miracle Masks, I just want to see how it might work and to generate some interest.
Mal
DEC 03, 2007 - 08:26 AM
Sounds good, thanks Mal.
I will drag out the sheet tonight and join the forum tomorrow if thats ok.
Thanks once again
H
DEC 03, 2007 - 11:47 PM
Yep, cool I'm just looking at building a couple of easy kits to try out the Luftwaffe stuff, a Tamiya Fw 190A-3 and a bf 109E-3.
Mal
DEC 04, 2007 - 06:51 AM
Just to let you all know that I have effectively drawn up Luftwaffe crosses and swastikas. I need to really test them out and I have just started building some models for this. I have finished Howards request for markings for the Promodeller Dornier Do 215E-5 and that is on the web site. I still have to finish the instructions though.
If you take a look at my web site you will also see that I have also been busy working on USAF Stars and Bars I have managed to crack P-47 Thunderbolt checkered cowling masks, which I thought would be very difficult because of the compound curature of the cowl. I actually wanted thes for the Hasegawa 1/32 scale kit, which I've yet to trial them on, but they work wonderfully well on Tamiya's 1/48 kit. They will work on the Hasegawa 1/48 kit but the cowling is shorter, I don't think that you will notice One thing that I did realise when checking out the Tamiya kits checkered nose decals is that, virtually, all the checks are different sizes I have also drawn and test cut the Skull and Cross Bones nose art of Maj T Eaglestons P-47. When I trial cut the smallest Star and Bar it cut very nicely and, although I have yet to trial them an a model, a dry run showed that they should be very easy to use.
If there is any markings that you would like to see as a masking set then please let me know. My web site is http://www.freewebs.com/miraclemasks
Mal
DEC 28, 2007 - 08:51 AM
Copyright ©2021 by Mal Mayfield. Images also by copyright holder unless otherwise noted. The views and opinions expressed herein are solely the views and opinions of the authors and/or contributors to this Web site and do not necessarily represent the views and/or opinions of AeroScale, KitMaker Network, or Silver Star Enterrpises. Images also by copyright holder unless otherwise noted. Opinions expressed are those of the author(s) and not necessarily those of AeroScale. All rights reserved. Originally published on: 2007-11-30 00:00:00. Unique Reads: 25641

WEB HOSTING BY


Copyright ©2021 AeroScale and Kitmaker Network, a subsidiary of Silver Star Enterprises
All Rights Reserved. Please read our Conditions of Use and Privacy Policy.
All Rights Reserved. Please read our Conditions of Use and Privacy Policy.