

1⁄35Razzle Dazzle' em
9
Comments
This article is based on my recent build of the Revell Sopwith Camel in 1:72. In it I will explain how I went about masking and spraying the complex Anti Dazzle Scheme.
Painting and decaling is my favourite part of an aircraft build. Its the time for me personally when everything comes together and that a collection of sprue and parts acquires an identity of its own. The first view of how the finished project is going to look and hopefully adorn your shelf of display cabinet for years to come.
Why An Anti Dazzle Scheme?
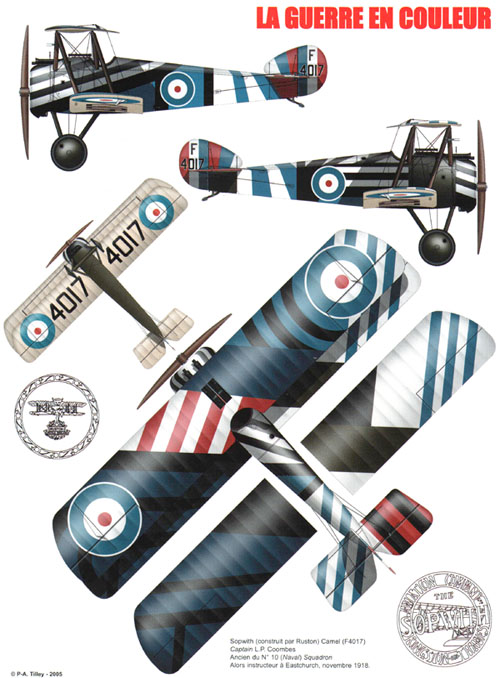
Recently I completed my first WW1 subject, the Revell Sopwith Camel in 1:72.This was mainly built as an exercise to see if I could get to grips with the techniques involved in rigging a biplane. The plan being to learn the skills on this before moving onto other more expensive models in my stash. I figured that £2.99 was a good price to pay for a model to practice on, and I wouldnt be too disappointed if it all went horribly wrong along the way. To my surprise, everything went well and I ended up being very pleased with the finished project, and as usual I posted a few finished photos on the Aeroscale website inviting constructive critique from the sites members. I got a bit more than I bargained for!One of the Staff Members of the site (TedMamere) posted a picture of a striking anti dazzle scheme for a Sopwith Camel of 10 (Naval) Squadron, based at Eastchurch in November 1918, with the comment. Now you are ready for this one! Something snapped in my admittedly pretty unstable brain,,I just had to build this! There was no way I could let a challenge like this go unattempted!
Where to begin?
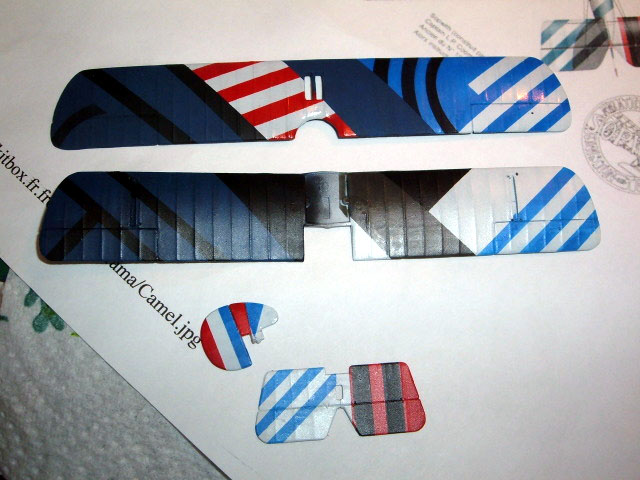
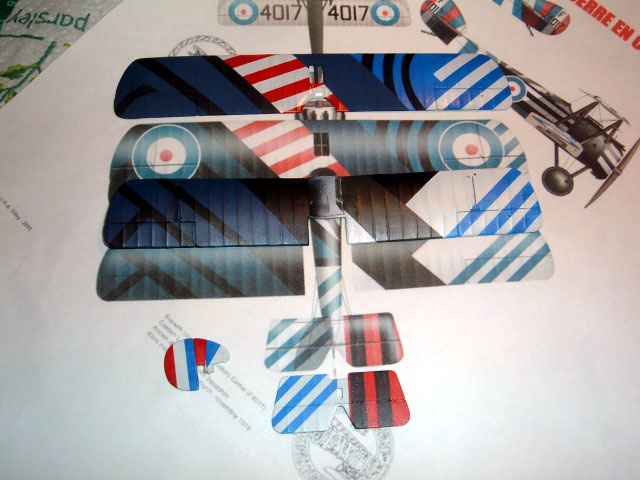
Prior to starting this project the only masking of markings of this type I had done was the odd fuselage stripe, so I already had a good idea of the basic techniques involved. (Have patience reader, all will be revealed). All that was needed was to refine these further and put together a plan of action.By shear good fortune, when I printed off the scheme that had been posted it was as close as doesnt matter to 1:72 scale. A good start! I decided initially to divide the aircraft up into sections, and then tackle the masking and spraying of these individually. After these were done they could be assembled to produce an almost complete Camel, leaving only the attachment of the undercarriage and propeller, and the previously dreaded rigging. I split the airframe into six sections. Bottom wing, top wing, fuselage, tail plane, rudder and engine cowling.
Bottom Wing
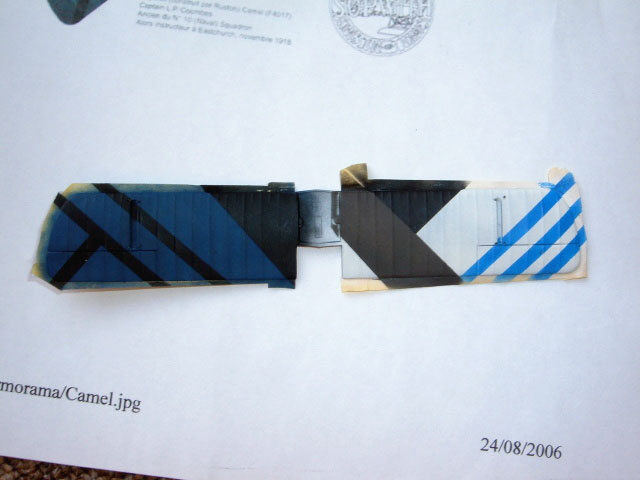
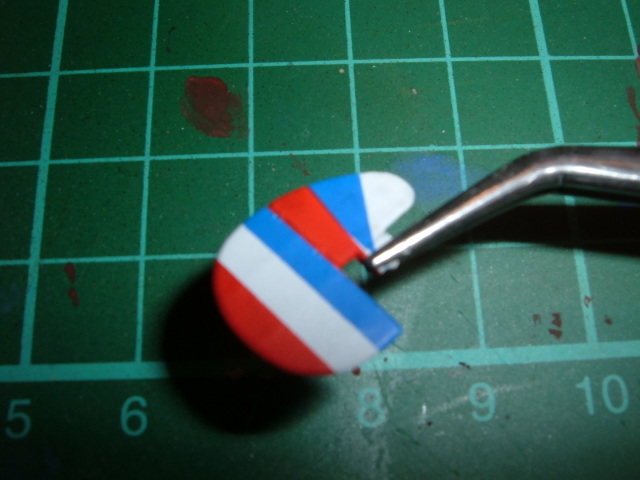
First on the list, and chosen purely because it looked easiest to do was the bottom wing. First step was to decide on which order to tackle the different colours. Logic dictates that darker colours cover lighter ones, and this was utilised on every section of the Camel, as with any other aircraft build.The bottom wing dazzle is made up of five colours. White, light blue, a darker blue, then olive drab and finally black. The underneath of both wings and the tail plane, thankfully, was a buff colour. This was painted first and then masked over.
Work commenced firstly on the starboard wing. The whole upper surface was sprayed white and while I was waiting for it to dry I made a start on figuring out exactly how I was going to mask the stripes. Tamiya masking tape in my opinion is the only way to go when attempting any kind of fine demarcation line. It moulds itself well to raised detail such as the ribbing on the wings of a biplane, and cuts cleanly without any fraying. Also, it lends itself to being taken up and repositioned a few times before it starts to loose its adhesive qualities.
Although Tamiya tape sticks well and cleanly Ive found that no matter how hard you press and smooth it down to prevent any paint getting underneath when you spray, it comes away cleanly without leaving any residue behind or pulling up the paint underneath. So that was the choice of masking medium decided upon. The next step was to cut thin strips of tape while keeping it the same width. Fortunately Mal Mayfield had revealed the method for this to me previously. To obtain a thin strip of tape first lay a strip of Tamiya tape onto a suitable cutting surface. I use a self-healing cutting mat.
Before we go any further please bear in mind that youre going to be using brand new scalpel blades from now on. Handle them with the respect they deserve and be very careful. No model is worth loosing the tips of your fingers to! Take two brand new #11 scalpel blades and tape them together. Lay a steel ruler on top of the strip of Tamiya tape and keeping one of blades against the ruler cut down the tape. You will be left with a strip of Tamiya tape approximately 1mm wide. This is fine for an edge on a fuselage stripe or something of similar size, but for the Camel I needed something a bit wider. After a rummage around the workbench and spares box and comparing various bits and pieces to the plan, I found that the central, thicker part of a cocktail stick gave me the correct width. Three of these small pieces were taped together and sandwiched between the two scalpel blades. Hey Presto!, guaranteed parallel lines every time.
Using the plan to judge the correct placing of the light blue stripes these were masked off with thin strips of tape and sprayed. After a further wait for this to dry the olive drab and black sections were sprayed. No cutting of thin strips required here, just careful placement of Tamiya tape on the edges and the areas around this filled in with cheaper Scotch Tape. The port wing was painted in a similar fashion. Firstly the whole wing was sprayed in the dark blue before masking and spraying the black sections. After a couple of days, mostly taken up with thinking time and waiting for paint to dry the bottom wing was complete.
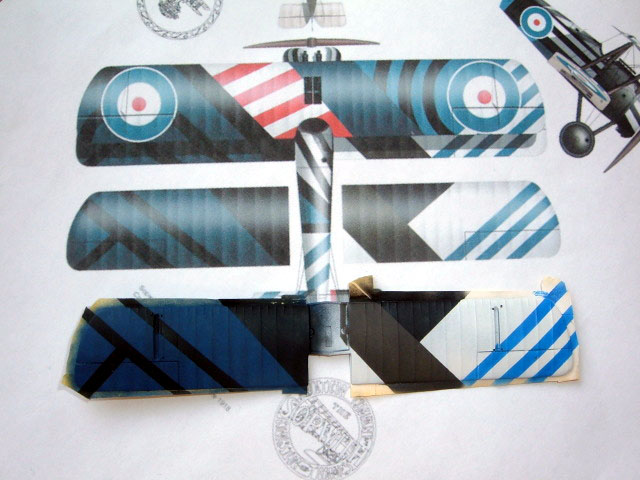
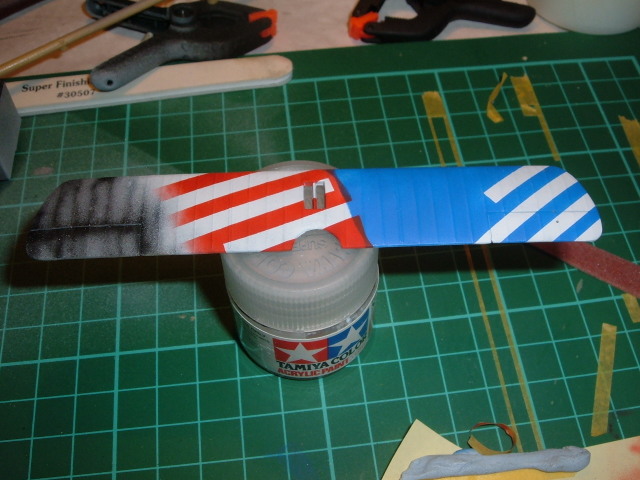
The Top Wing . Curves!
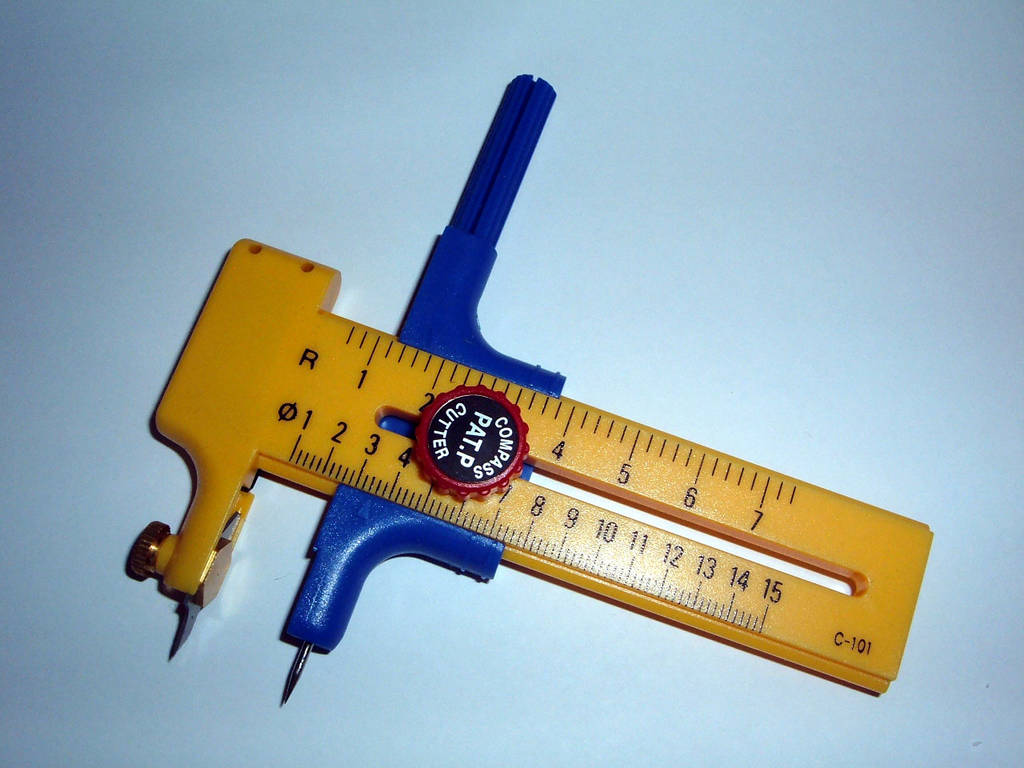
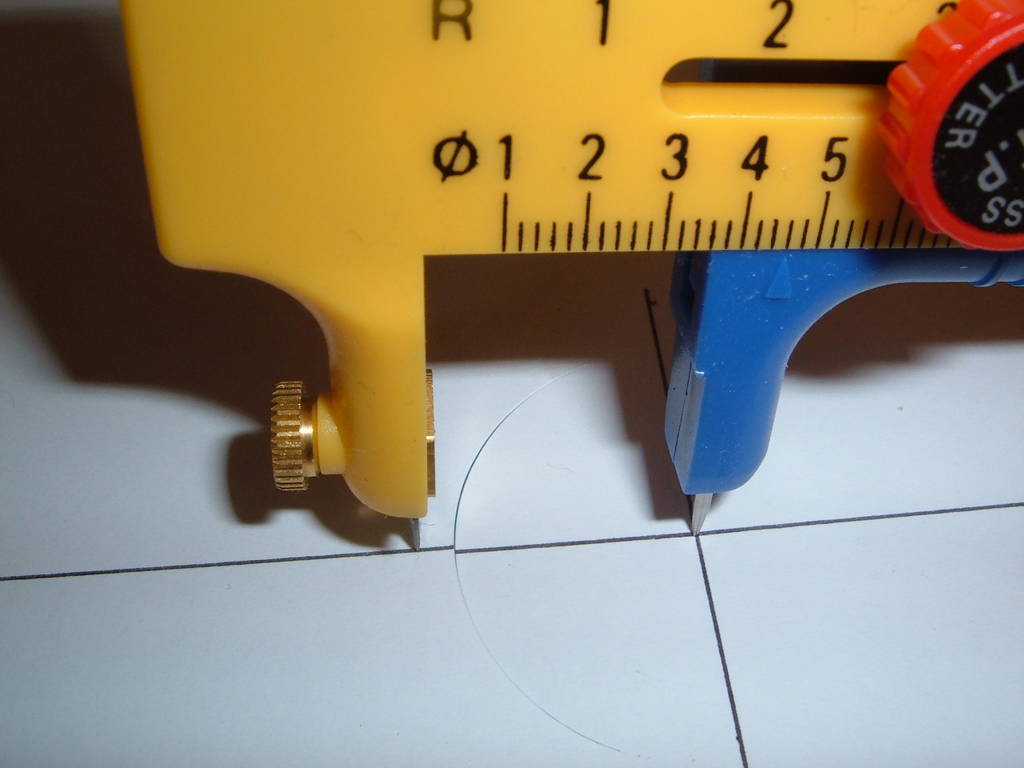
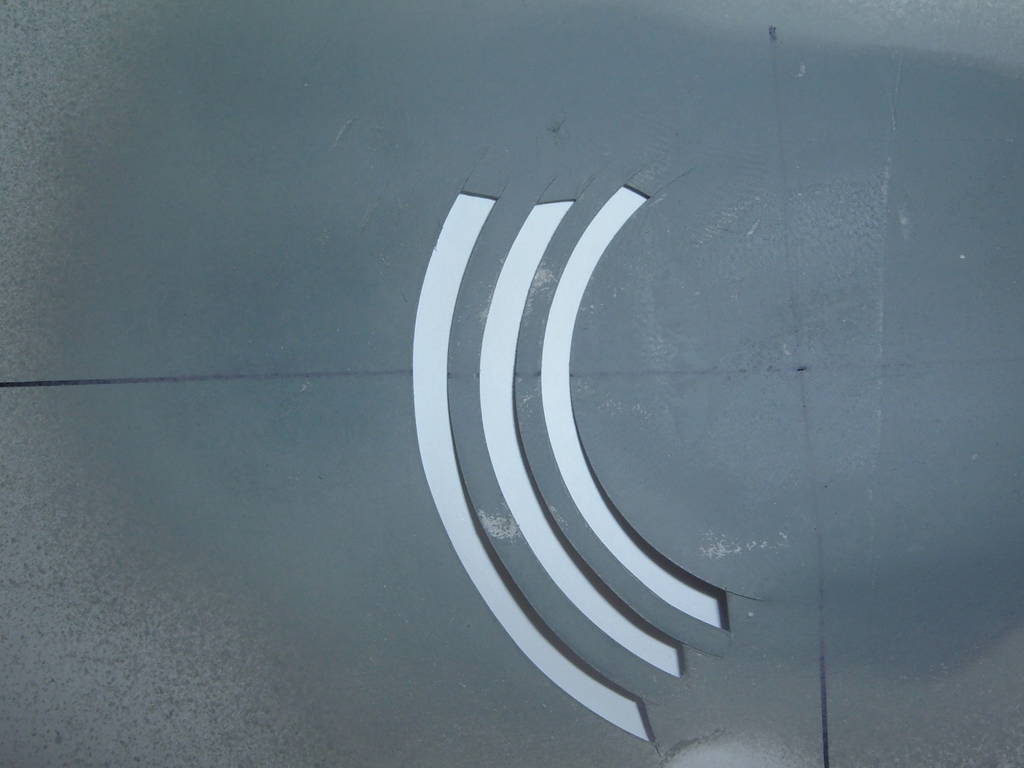
The top wing is again a five colour scheme. Similar to the bottom wing in many respects but with the addition of some parallel curves which required more contemplation and making a paper mask. As with the bottom wing, the white areas were painted first. Small strips of tape were cut using the method previously detailed and the light blue and red stripes were sprayed.The curves called for a different approach. Masking tape wasnt an option for this, as I had to produce perfect curves running parallel to each other. To obtain these fine cuts I used a Circle Cutter to fabricate a paper mask. The first step was to mark out two lines crossing each other at 90 degrees. Using the blade built into the circle cutter I cut out the circles on a piece of standard A4 computer paper, taking care to make sure the circles overlapped the width of the wing comfortably. Because I used acrylics throughout I first gave the wing a couple of coats of Future/Klear to protect the paint already applied. This served the double purpose of enabling me to wipe the black paint off without taking up the paint underneath if it all went wrong. I lined the centre line of the mask up over the wing using a MK1 Eyeball and then used a standard indoor plant mister to dampen the paper and make it stick long enough to spray the black stripes. A deep breath and I peeled the mask off and to my relief it had worked perfectly first time.
The dark blue areas were then sprayed over the top and the black stripes were added. All these were straightforward edges apart from the small curved line on the edge of the port wing. This was painted in the same way as the three lines on the starboard wing. Unfortunately, due to the fact that I havent got three hands, I wasnt able to take any photos while painting the curves on the wing. The photos show the method of making the mask and I sprayed it with grey primer for definition purposes. The curves have become distorted by the primer drying but I hope the method I used on the actual model is clear from these poor pictures.

About the Author


FROM: ENGLAND - EAST MIDLANDS, UNITED KINGDOM
Restarted modelling in late 2005 after a break of over 20 years.Built a lot of armour as a teenager but now concentrating on WW2 aircraft. Some skills are coming straight back to me and Im learning new ones everytime I log on to this site it seems.
Comments

Nigel Very impressive. Thanks for taking the time (which can amount to many hours of compiling) to write this down. I am itching as it were to do one in 1/48...Again nicely done, impressive build!
OCT 06, 2006 - 05:18 PM


As an alternative to cutting your fingers I recommend Aizu Micron masking tape. Similar to Tamiya's kabuki tape it comes in various narrow widths from 0.4 mm to 2,5 mm. It can also be easily bent around curves and so is useful for the smooth curves of camouflage. About £1 ($1.60) for a 5m roll. You can get from Hoobylink Japan.
LINK
Just search for masking tape - should bring back something like this
LINK
OCT 07, 2006 - 12:49 AM


Hello Nigel:
Razzle Dazzle indeed. . . I really enjoyed reading your article on dealing
with all the masking aspect of painting your Camel. Well done, and
great pictures as well. The tip about the spray bottle of water on the paper
masks for the curved lines was a new one for me. Ah yes, there is always
something to learn from others.
OCT 07, 2006 - 05:18 PM

Nice one Nige. You make it sound so easy the way you have written this.
But you forgot to put in all the swearing, bad dreams involving masking tape, muttering "lines" every other word and the fact you have no hair left on the back of your hands :-) .
Andy
OCT 07, 2006 - 05:27 PM


Thanks everyone for the comments and a special "merci beaucoup" to Jean Luc for giving me the inspiration to build this and also for making a fabulous job of presenting the article.
It really was a lot of fun building this and the MoM win was the icing on the cake.
Im hoping to have both the Camel and its Harricature displayed together on the IPMS British Bulldogs stand at Scale Model World Telford next month.
Oops,,did I forget to write that chapter? :-)
Nige
OCT 07, 2006 - 11:15 PM

Wow, now that took practice and patience!, Great model paint job
OCT 09, 2006 - 06:40 PM
Copyright ©2021 by Nigel Julian. Images also by copyright holder unless otherwise noted. The views and opinions expressed herein are solely the views and opinions of the authors and/or contributors to this Web site and do not necessarily represent the views and/or opinions of AeroScale, KitMaker Network, or Silver Star Enterrpises. Images also by copyright holder unless otherwise noted. Opinions expressed are those of the author(s) and not necessarily those of AeroScale. All rights reserved. Originally published on: 2006-10-07 00:00:00. Unique Reads: 14111

WEB HOSTING BY


Copyright ©2021 AeroScale and Kitmaker Network, a subsidiary of Silver Star Enterprises
All Rights Reserved. Please read our Conditions of Use and Privacy Policy.
All Rights Reserved. Please read our Conditions of Use and Privacy Policy.