_GOTOBOTTOM
World War II
Discuss WWII and the era directly before and after the war from 1935-1949.
Hosted by Rowan Baylis
REVIEW
P-51 D Mustang
TedMamere
_VISITCOMMUNITY
Moselle, France
Joined: May 15, 2005
KitMaker: 5,653 posts
AeroScale: 4,347 posts
Posted: Wednesday, January 03, 2007 - 03:41 PM UTC


Not being a big fan of 1/32 models, I didn't payed much attention last year to the fact that Dragon was about to release a new tool P-51D in that scale. However, the new kit became the most critized model on the web in the past months and curiosity started to seize me to a point that I really wanted to take a closer look inside the box. Fortunately, I received a review sample and now I''m able to make myself my own opinion on the subject.

Link to Item

If you have comments or questions please post them here.

Thanks!
DAK66
_VISITCOMMUNITY
Tennessee, United States
Joined: April 28, 2006
KitMaker: 286 posts
AeroScale: 45 posts
Posted: Wednesday, January 03, 2007 - 09:11 PM UTC
The box art rocks !!
TedMamere
_VISITCOMMUNITY
Moselle, France
Joined: May 15, 2005
KitMaker: 5,653 posts
AeroScale: 4,347 posts
Posted: Thursday, January 04, 2007 - 08:12 PM UTC
Hi Doug!

Yes, the artwork is really nice.

I test fitted the main parts of the kit today...


I don't think a lot of filler will be needed, except maybe on the underside (see red arrow below)


I had to sand the windscreen a little to get it properly in place. I especially sanded in the places marked with the arrows. You don't have to sand a lot, so regular test fitting is necessary.


Below is a picture from the inside of the beast. I hope the cockpit and the engine won't take too much place.


I will start to build the engine and the cockpit and paint the detail parts. I will use the instructions of the 1/48 Tamiya kit for the colors as I only work with acrylic paints from this manufacturer.

By the way, is interior green for the cockpit and the wheel bays the correct color for the plane of the boxart? That's what is written in the instructions I have...

Jean-Luc
DAK66
_VISITCOMMUNITY
Tennessee, United States
Joined: April 28, 2006
KitMaker: 286 posts
AeroScale: 45 posts
Posted: Friday, January 05, 2007 - 05:36 AM UTC
Jean -Luc i picked this up in another forum hope this helps
P-51D wheelwells were aluminum in color (bare metal, IIRC) except for the rear spar, which was painted with yellow zinc chromate.
TedMamere
_VISITCOMMUNITY
Moselle, France
Joined: May 15, 2005
KitMaker: 5,653 posts
AeroScale: 4,347 posts
Posted: Friday, January 05, 2007 - 02:57 PM UTC
Hi Doug!

Thanks for the info. I've checked in the web and found two picture... on Aeroscale! :-)


I also saw pictures with Interior Green wheel bays and Bare Metal gear doors. I suppose one could even find Bare Metal wheel bays and Interior Green gear doors.

I don't know the exact colors and saw many variations on various scale models of "Petie 2nd". Below are two pictures of the real plane I found on the web:


Difficult to see something... I think I'll go for Interior Green wheel bays and Bare Metal gear doors.

Jean-Luc
TedMamere
_VISITCOMMUNITY
Moselle, France
Joined: May 15, 2005
KitMaker: 5,653 posts
AeroScale: 4,347 posts
Posted: Saturday, January 06, 2007 - 12:11 AM UTC
Hi all!

I started the kit as per instructions with the engine...


below is a picture with all sub-assemblies before painting. The red arrows shows the areas were I used some filler to get a cleaner finish...


Finally I painted the sub-assemblies in their respective colors: Interior green, Black and silver...


I still have to drybrush, wash and weather all these parts before gluing them together. So far there was no real problem. The only thing I added are the holes in the silver structure (see red arrow) for more realism...

Next update tomorrow!

Jean-Luc
Repainted
_VISITCOMMUNITY
Östergötland, Sweden
Joined: April 04, 2006
KitMaker: 1,058 posts
AeroScale: 1,004 posts
Posted: Saturday, January 06, 2007 - 05:00 PM UTC
can´t wait for this one any more, has the postman delivered anything Phantom 2(Stefan).
This one is a must have, yes I have the olg Hasegawa and have read all about this kit on the net.Just seeing your build makes me want to see more. Hurry Jean-Luc, get out of the bed and keep building.
I´ll going for an Mustang in the Swedish airforce.

Lars
Phantom2
_VISITCOMMUNITY
Östergötland, Sweden
Joined: April 18, 2006
KitMaker: 708 posts
AeroScale: 678 posts
Posted: Saturday, January 06, 2007 - 05:10 PM UTC

Hi Jean Luc!

I agree with Lasse, this kit is a real "must have" for me too!

I know this kit has been trashed and mauled to pieces in diverse forums, but I want to make my own opinion when I can see, touch and build the kit by myself!

It doesn´t look too bad on your pics, and I will follow this build very close!
...so Please, get up and build!

Sorry, Lasse no kits so far!

Cheers!

Stefan E
slodder
_VISITCOMMUNITY
North Carolina, United States
Joined: February 22, 2002
KitMaker: 11,718 posts
AeroScale: 305 posts
Posted: Saturday, January 06, 2007 - 05:21 PM UTC
Looks like a classic Dragon kit for sure.

The build writeup is great too, very informational.

Nice job Jean-Luc.
TedMamere
_VISITCOMMUNITY
Moselle, France
Joined: May 15, 2005
KitMaker: 5,653 posts
AeroScale: 4,347 posts
Posted: Saturday, January 06, 2007 - 11:41 PM UTC
Hi Lars, Stefan and Scott!

Thanks for your comments!

I finished the engine assembly today. I weathered this aera of the aircraft with pastels and washes (future mixed with Tamiya acrylic paints). I also printed some placards to add more realism.


I painted the exhausts with pastels and finished them with powder to give a burnt iron look...


I didn't hollowed the exhausts, they are molded like that in the kit. You can see the placards on this picture. I know the engine would look better with additional wires but since this is a review build I will leave it like that...


Next episode is the cockpit!

Jean-Luc
Lucky13
_VISITCOMMUNITY
Scotland, United Kingdom
Joined: June 01, 2006
KitMaker: 1,707 posts
AeroScale: 1,119 posts
Posted: Saturday, January 06, 2007 - 11:46 PM UTC
Goody.......I've got my popcorn right here......awesome work Jean-Luc!
Merlin
Staff MemberSenior Editor
AEROSCALE
#017
_VISITCOMMUNITY
United Kingdom
Joined: June 11, 2003
KitMaker: 17,582 posts
AeroScale: 12,795 posts
Posted: Saturday, January 06, 2007 - 11:53 PM UTC
Hi Jean-Luc

Incredible work - and incredibly quick too! I was half-tempted to start the second sample that Dragon sent us, but you'll be finished before I finish examining the sprues! :-)

All the best

Rowan
Repainted
_VISITCOMMUNITY
Östergötland, Sweden
Joined: April 04, 2006
KitMaker: 1,058 posts
AeroScale: 1,004 posts
Posted: Sunday, January 07, 2007 - 12:03 AM UTC
Lovley, keep it going Jean -Luc.These placards was a nice touch. Did you do them self, please tell me more. I want to have
Lars
TedMamere
_VISITCOMMUNITY
Moselle, France
Joined: May 15, 2005
KitMaker: 5,653 posts
AeroScale: 4,347 posts
Posted: Sunday, January 07, 2007 - 03:35 PM UTC
Hi all!

Lars, I simply designed the placards with a computer drawing program and printed them on glossy paper with the highest possible quality settings. I think in this big scale you could even print your own instrument dials with a good printer. I used the smallest placards on my sheet and the text is illegible.

I test fitted the engine assembly in the fuselage halves and noticed quite a big gap were the firewall should meet the fuselage...


That's a little annoying if you want to display the model with the cowlings removed. But if you put them on the engine, it won't be noticable anymore... like most of the details unfortunately!


You can note the fit is good as the engine assembly is probably a little undersized in the kit. I don't think the engineers would have left that much space on the real thing.

Conclusion for the engine assembly:
Out of the box it's a nice representation of the Rolls Royce Merlin. If you choose to display it without the cowlings, I would suggest you to add some more details (wires) and scratchbuild a more convincing firewall. However, if build as per instructions with the "half-transparent" cowlings, it will do the part. I must say I don't like the latter solution (but its' a personnal opinion) and I will probably glue the cowlings in place and overpaint them.

Jean-Luc
slodder
_VISITCOMMUNITY
North Carolina, United States
Joined: February 22, 2002
KitMaker: 11,718 posts
AeroScale: 305 posts
Posted: Sunday, January 07, 2007 - 04:17 PM UTC
Nice work love it.

What's the plan for the skin? BMF, Buffable rattle can paint, straight acrylics, kitchen foil?

I am working on 're-chroming' parts and can toss out a few early opinions - if you want?
_H_Dori
_VISITCOMMUNITY
England - East Anglia, United Kingdom
Joined: November 09, 2006
KitMaker: 295 posts
AeroScale: 276 posts
Posted: Sunday, January 07, 2007 - 05:18 PM UTC
Wow Jean-Luc you work fast!!
Looks like that could build into a really nice kit in the right hands. Not mine sadly

Just slightly off topic, I guess I'm going to have to repaint the u/c bay in my ICM mustang III as I did it by the paint chart and it's all that chromate colour

Poo, I did a wash and everything on it and was really happy until I saw those pics.

Ha ha

H
Repainted
_VISITCOMMUNITY
Östergötland, Sweden
Joined: April 04, 2006
KitMaker: 1,058 posts
AeroScale: 1,004 posts
Posted: Sunday, January 07, 2007 - 07:06 PM UTC
yaayaa, you MAC-man :-)
The placards is a gem, I love them. Keep up the good work mate.I´ll have the P-38 all over the workbench, so there isn´t much space left for the moment.I wish I could squize in an eraly bird on the bench too but there is no space.
Seen your build here makes me want the P-51 more and more.

Lars
TedMamere
_VISITCOMMUNITY
Moselle, France
Joined: May 15, 2005
KitMaker: 5,653 posts
AeroScale: 4,347 posts
Posted: Sunday, January 07, 2007 - 11:49 PM UTC
Hi all!

Here I am with my daily Mustang update...

I started to work on the cockpit. Below are some pictures of the instrument panel (sandwich assembly), the gunsight (wonderful little "kit in the kit"), the seat (nice) and the rudder pedals (with small pin marks, doh!)...


Below is a picture with all the parts for the interior. I decided to paint alll the tiny pieces separately because they are mainly black over the green cockpit sidewalls. The cockpit floor is made of four pieces...


I also completed the big radiator. If you want to use the PE parts (looks better!) just cut the corners of the two grills (see red arrow) and fold them around the plastic part...


Tomorrow I will start to paint the cockpit area...

Jean-Luc
lampie
#029
_VISITCOMMUNITY
England - East Midlands, United Kingdom
Joined: December 23, 2005
KitMaker: 6,249 posts
AeroScale: 3,270 posts
Posted: Monday, January 08, 2007 - 05:26 AM UTC
Looking fabulous Jean Luc
Could you explain a bit more about how you apply the pastel chalks?
You building so fast it reminds me of your speed build on the P40 last year!
Nige
Mahross
_VISITCOMMUNITY
Queensland, Australia
Joined: March 12, 2002
KitMaker: 837 posts
AeroScale: 89 posts
Posted: Monday, January 08, 2007 - 06:44 PM UTC
Jean - Luc

This is looking good. Here is a figure to go with it, which is just about to be released by Eagle Editions.


It is Major John Preddy and is sculpted by John Rosengrant. Would look nice in the cockpit.

Ross
Repainted
_VISITCOMMUNITY
Östergötland, Sweden
Joined: April 04, 2006
KitMaker: 1,058 posts
AeroScale: 1,004 posts
Posted: Monday, January 08, 2007 - 08:08 PM UTC
Whats the hardest?
Building a real nice P-51, or paint the figure?

The figure is real nice, and would like to se it in Mustang yeah
Lars Q
newtothegame
_VISITCOMMUNITY
Washington, United States
Joined: October 05, 2003
KitMaker: 588 posts
AeroScale: 468 posts
Posted: Monday, January 08, 2007 - 08:16 PM UTC
Jean-Luc,
You are doing a really nice job. I have to admit, I would love to sit in a room with you and watch you build - I guess this is a nice substitute . Thanks for sharing your skills...
Leon
TedMamere
_VISITCOMMUNITY
Moselle, France
Joined: May 15, 2005
KitMaker: 5,653 posts
AeroScale: 4,347 posts
Posted: Monday, January 08, 2007 - 11:29 PM UTC
Hi all!

Thanks again for your kind comments!

Wow Ross! That figure looks indeed terrific! Is it 1/32 scale? The mustang below looks pretty good too! Do you have more pictures?

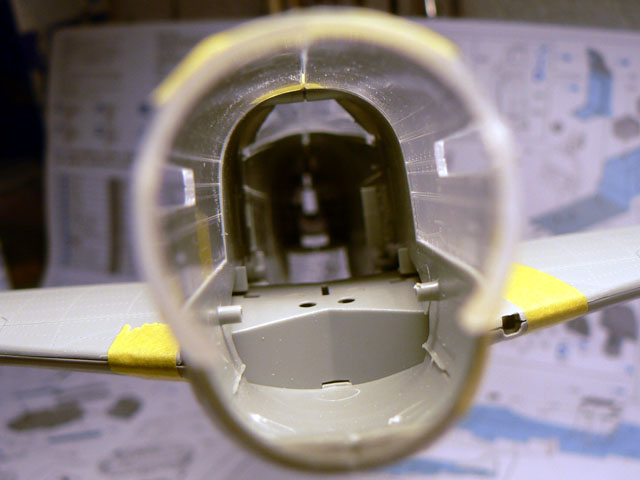
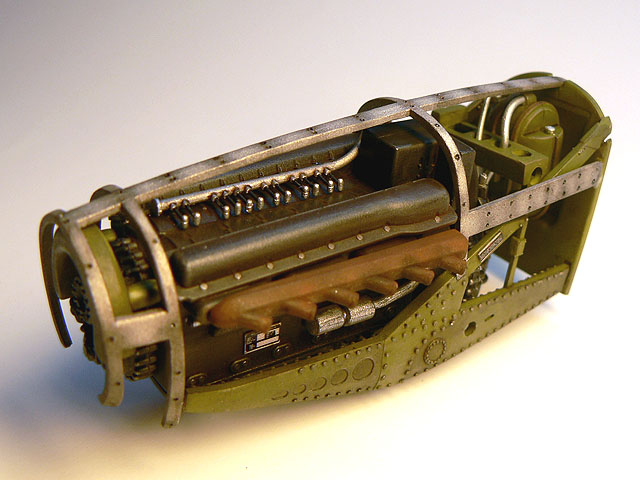
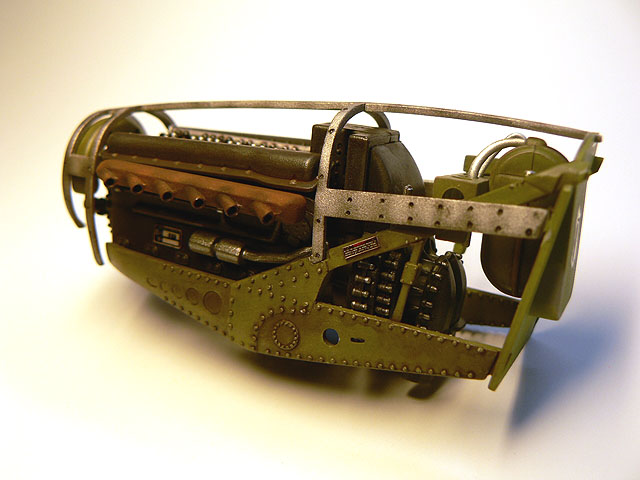
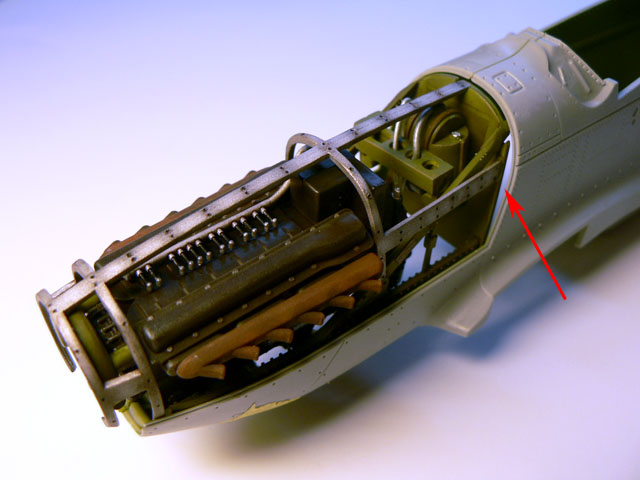
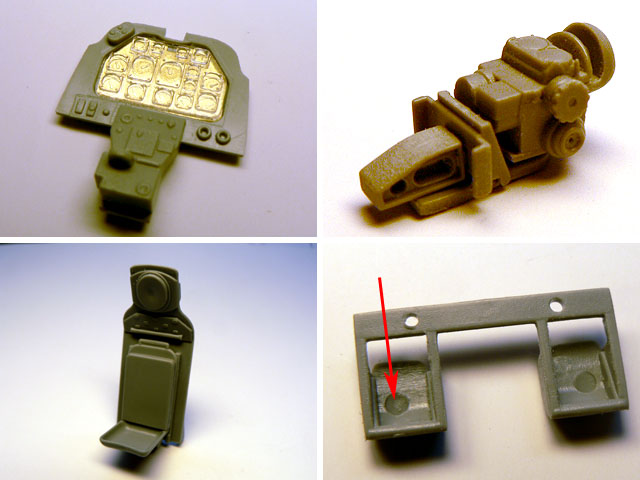
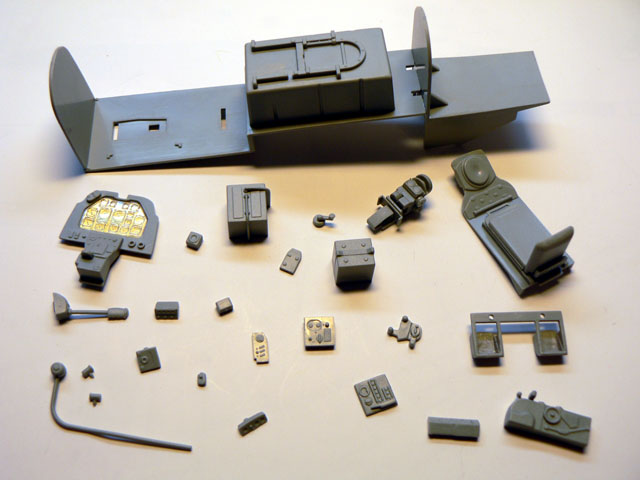
I didn't managed to do much today (holidays are over and I have to go to work again... doh!). I only painted the various cockpit parts in their basic colors: Interior Green, Black, Wood and Silver. I also decaled the instrument panel wich was painted Gloss Black...


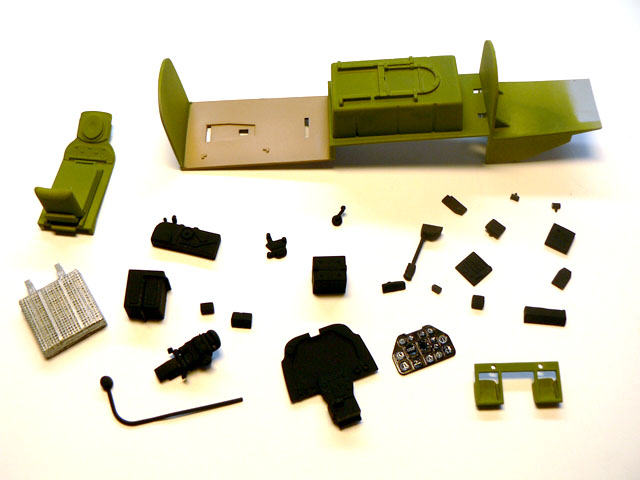
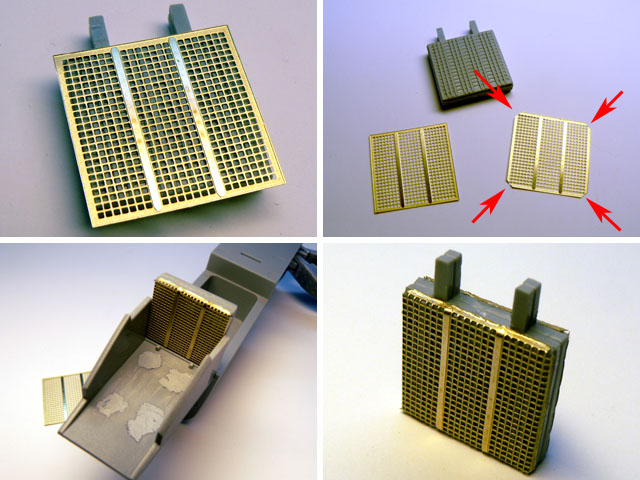
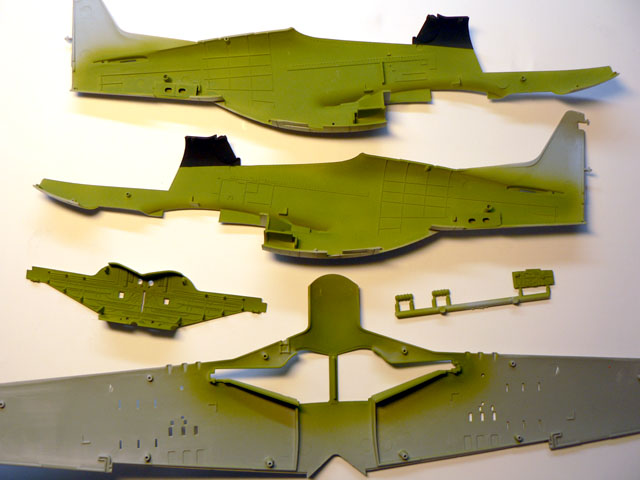
I also painted the interior of the fuselage and the wheel bay...


Quoted Text

What's the plan for the skin? BMF, Buffable rattle can paint, straight acrylics, kitchen foil?


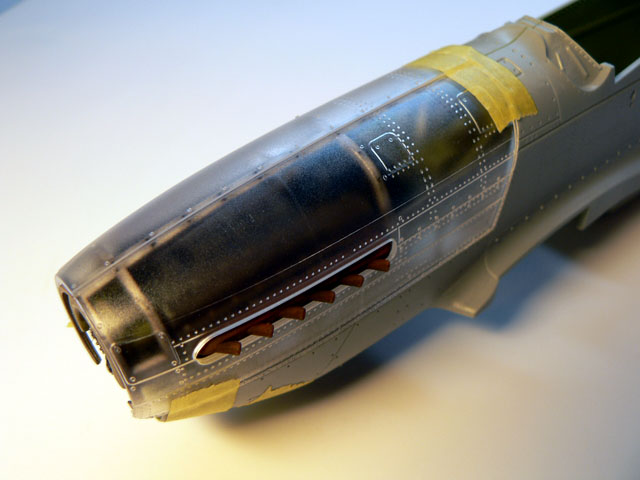
Scott, I too thought about the kitchen foil. Since the surface detail is a little heavy, it could well be an option for those who know how to work with that technique. However, since this is a review build, I will use simple painting techniques and simple Tamiya acrylic paints (XF-16 Flat Aluminium, X-11 Chrome Silver, X-31 Titanium Gold, X-32 Titanium Silver etc...) and maybe Humbrol Metal Cote for a little variation in the shades of the panels. I won't use Alcad or Metalizer.


Quoted Text

Could you explain a bit more about how you apply the pastel chalks?


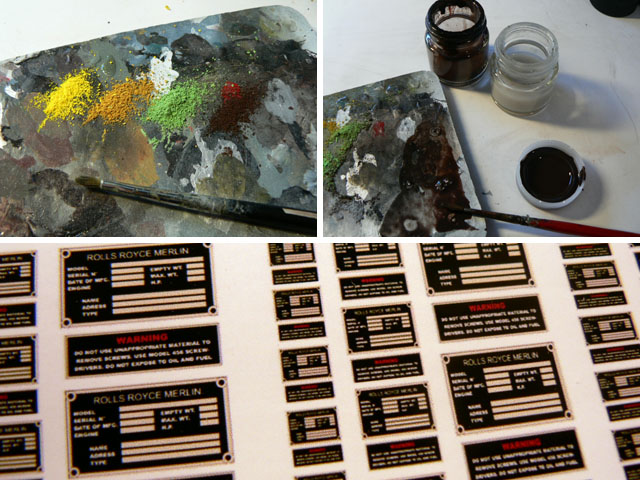
Nigel, it's the first time I use pastel chalks with other colors than the brown and black I use for weathering. I'm still experimenting but as soon as I get something interesting I'll write a feature about it.

I hope I can work on the cockpit tomorrow...

Jean-Luc
Lucky13
_VISITCOMMUNITY
Scotland, United Kingdom
Joined: June 01, 2006
KitMaker: 1,707 posts
AeroScale: 1,119 posts
Posted: Tuesday, January 09, 2007 - 12:03 AM UTC

Quoted Text

Jean - Luc

This is looking good. Here is a figure to go with it, which is just about to be released by Eagle Editions.


It is Major John Preddy and is sculpted by John Rosengrant. Would look nice in the cockpit.

Ross


HOT DAMN!!! And other expressions too.... Looking great Jean-Luc!
Mahross
_VISITCOMMUNITY
Queensland, Australia
Joined: March 12, 2002
KitMaker: 837 posts
AeroScale: 89 posts
Posted: Tuesday, January 09, 2007 - 02:07 PM UTC
Jean - Luc

It is indeed 1/32. John originally sculpted it 1/24 for the Trumpeter P - 51, which was a one off, and then was asked to re - sculpt it in 1/32 for the Dragon kit.

Ross
 _GOTOTOP