

Hello,
Could use some advice on painting laminated props.
Trying to get a WnW Rumpler finished and run into a major stumbling block with the propeller. The marking option I've chosen uses the Heine prop and a little research turned up some photos showing a total of 8 laminated planks. 4 dark and 4 light.
Had a practice on one of the kits spare props and it just didn't go well. From the front it's ok, but from the side the lines are wonky and the rear doesn't match up. This despite my best efforts and drawing with a pencil first.
Any help and advice is appreciated.
Thanks
Stephen
Early Aviation
Discuss World War I and the early years of aviation thru 1934.
Discuss World War I and the early years of aviation thru 1934.
Hosted by Jim Starkweather
HELP Painting laminated props

phantom_phanatic309

#372

Joined: March 10, 2010
KitMaker: 2,568 posts
AeroScale: 1,619 posts

Posted: Thursday, August 15, 2019 - 09:24 AM UTC


c4willy
#305

Joined: February 01, 2006
KitMaker: 1,673 posts
AeroScale: 1,517 posts

Posted: Thursday, August 15, 2019 - 09:58 AM UTC
Hi Stephen I know Radu Brinzan produces a tool to paint the divisions on a laminated prop RBPT-036 have a look at this link to have a look at it. I think it's likely to be the easiest and most replicable method of producing a laminated prop. Other than that Proper Plane produce an actual 1/32 scale laminated wood prop although I'm not sure if they produce what you need. Take a look here.

krow113

Joined: March 16, 2010
KitMaker: 473 posts
AeroScale: 101 posts
Posted: Thursday, August 15, 2019 - 10:54 AM UTC
phantom_phanatic309
#372
Joined: March 10, 2010
KitMaker: 2,568 posts
AeroScale: 1,619 posts
Posted: Friday, August 16, 2019 - 02:20 AM UTC
Thanks guys, that's a big help.
Chris, the etch mask looks interesting but I can't for the life of me work out how it works! Will have to research that. The real wood props look amazing, may have to try one of those at some point.
Steve, the pencil method looks interesting. I do have a set of watercolour pencils I used a while ago to do a wood grain, so will give it a try.
Thanks again.

southpier
Joined: December 11, 2009
KitMaker: 546 posts
AeroScale: 16 posts
Posted: Friday, August 16, 2019 - 06:18 AM UTC
here's my file on inspirational wood graining. maybe something will strike your fancy:
https://www.britmodeller.com/forums/index.php?/topic/234989236-wingnut-wings-132-sopwith-snipe-late-version/&/topic/234989236-wingnut-wings-132-sopwith-snipe-late-version/?hl=%2Bwood%2B%2Bgrain
https://www.britmodeller.com/forums/index.php?/topic/234984105-albatros-dva-ltn-hans-bohning/page/2/
https://www.britmodeller.com/forums/index.php?/topic/59368-wnw-albatros-dv/&/topic/59368-wnw-albatros-dv/?hl=%2Bwood%2B%2Bgraining
https://forum.largescalemodeller.com/topic/20-wood-grain-a-how-too/
https://www.uschivdr.com/tutorials/
http://www.ipmsstockholm.org/magazine/2003/03/stuff_eng_tech_wood_grain.htm
https://forum.ww1aircraftmodels.com/index.php?PHPSESSID=1053858be2158e388c879b023fff342c&topic=178.0
https://www.britmodeller.com/forums/index.php?/topic/234979887-making-a-plywood-fuselage-on-plastic-finished-30052015/
http://www.radubstore.com/index.php?main_page=product_info&cPath=77_117&products_id=369
c4willy
#305
Joined: February 01, 2006
KitMaker: 1,673 posts
AeroScale: 1,517 posts
Posted: Friday, August 16, 2019 - 08:26 AM UTC
Hi Stephen yeah sorry I've seen how it works but the website I sent you too doesn't show it in use check out Radu's website for an in depth look at it's use.
phantom_phanatic309
#372
Joined: March 10, 2010
KitMaker: 2,568 posts
AeroScale: 1,619 posts
Posted: Friday, August 16, 2019 - 10:08 AM UTC
Chris, thanks now I get it. An oil wash and gloss and that would make a great job.
Southpier, thanks for the links. They'll be really helpful for a number of other builds I have.
Now, about the watercolour pencil technique. What's a good paint to use as a base? I'm using Vallejo acrylic but they don't seem to want to work.
Thanks
Southpier, thanks for the links. They'll be really helpful for a number of other builds I have.
Now, about the watercolour pencil technique. What's a good paint to use as a base? I'm using Vallejo acrylic but they don't seem to want to work.
Thanks
c4willy
#305
Joined: February 01, 2006
KitMaker: 1,673 posts
AeroScale: 1,517 posts
Posted: Friday, August 16, 2019 - 02:52 PM UTC
Stephen Tamiya acrylics thinned with Tamiya's lacquer thinner make a robust canvas to work pencils's with. They're nicely "flat" and this provides an excellent surface for the pencils to key into. I use buff as a base coat to do a simulated wood effect.

JackFlash

Joined: January 25, 2004
KitMaker: 11,669 posts
AeroScale: 11,011 posts
Posted: Friday, August 16, 2019 - 04:03 PM UTC
Here is a bit of fun.
phantom_phanatic309
#372
Joined: March 10, 2010
KitMaker: 2,568 posts
AeroScale: 1,619 posts
Posted: Saturday, August 17, 2019 - 03:17 AM UTC
Quoted Text
Stephen Tamiya acrylics thinned with Tamiya's lacquer thinner make a robust canvas to work pencils's with. They're nicely "flat" and this provides an excellent surface for the pencils to key into. I use buff as a base coat to do a simulated wood effect.
Aha! That should do the trick. The only real problem with Vallejo I've found so far, is that they do dry to a semi-gloss finish. That's why the pencil wouldn't work.
I'll give Tamiya a go.
Thanks for the link Stephen. Some useful tips. Do you have any photos showing how the rear of a pros laminates should look? Nearly every photo I've looked at only shows the front.
phantom_phanatic309
#372
Joined: March 10, 2010
KitMaker: 2,568 posts
AeroScale: 1,619 posts
Posted: Saturday, August 17, 2019 - 06:05 AM UTC
My attempt at the Wolff prop based on a photo I found online. Not looking too bad for a first attempt.
Still have the reverse side to do.
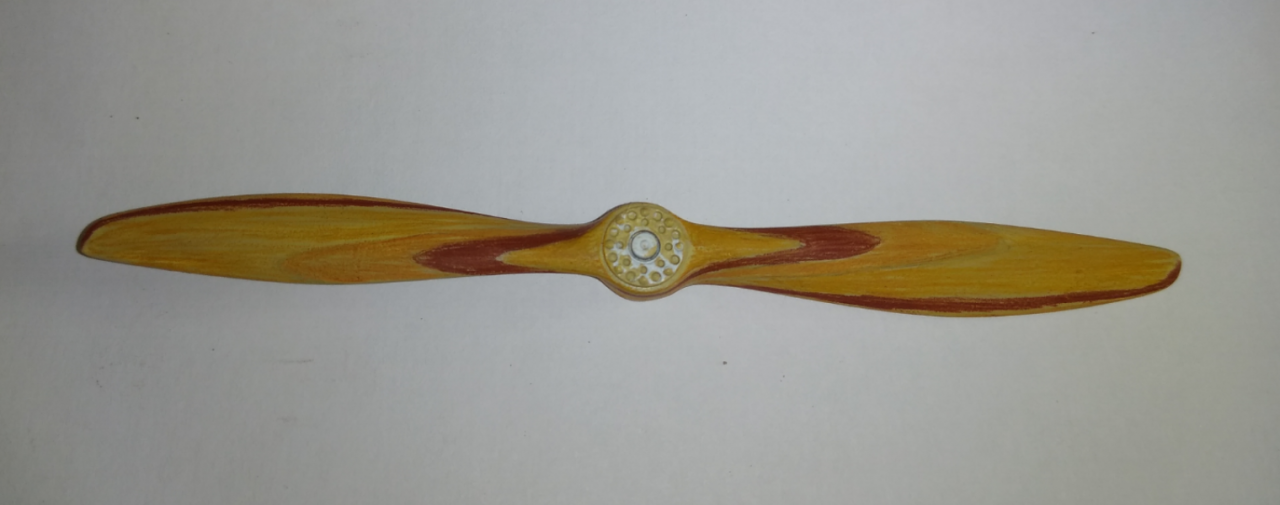
I think I would probably still do an oil wash after glossing to make the colours a little richer.
Still have the reverse side to do.
I think I would probably still do an oil wash after glossing to make the colours a little richer.
krow113
Joined: March 16, 2010
KitMaker: 473 posts
AeroScale: 101 posts
Posted: Saturday, August 17, 2019 - 12:50 PM UTC
The rear should look just like the front , no mystery. Follow the lamination line down the prop and around the back.
JackFlash
Joined: January 25, 2004
KitMaker: 11,669 posts
AeroScale: 11,011 posts
Posted: Tuesday, August 20, 2019 - 07:06 AM UTC
Quoted Text
". . .Thanks for the link Stephen. Some useful tips. Do you have any photos showing how the rear of a pros laminates should look? Nearly every photo I've looked at only shows the front."


This represents a machine from the third production series ( D.750/17 - 799/17.) If it was already with him when he transferred to Jasta 5 it had not been given these personal markings yet. There are a series of photos with this machine in a tails up position ( The radiator is seen offset to the right of center and so the plumbing was now not directly centered in front of the pilot.) and Ltn. Voss standing on a ladder painting the white of the Haken Kreuz and heart border on the pilots left side. The spinner (and later the wheel covers) on this machine were probably red in colour as this was the Jasta 5 unit marking at the time. The upper surface camouflage was two colour. The cowling ring had five small intake vents behind the propeller. This was typical for aircraft in this series. The pilots step was square. The radiator was offset to the right of center and so the plumbing was now not directly centered in front of the pilot. This later machine may also possibly with him when he transferred to temporary commands of Jasta 14 & 29 during the spring and early summer months of 1917.
JackFlash
Joined: January 25, 2004
KitMaker: 11,669 posts
AeroScale: 11,011 posts
Posted: Tuesday, August 20, 2019 - 07:47 AM UTC
Quoted Text
The rear should look just like the front , no mystery. Follow the lamination line down the prop and around the back.
Actually it would appear in a mirrored effect In most cases the cut of the laminations begin at the leading edge of the fininished prop paddle.

phantom_phanatic309
#372
Joined: March 10, 2010
KitMaker: 2,568 posts
AeroScale: 1,619 posts
Posted: Wednesday, August 21, 2019 - 10:46 PM UTC
Cool.
Thanks. Will see what I can do on the practice prop.
Bought a couple more pencils to to try some other shades of brown.
Thanks. Will see what I can do on the practice prop.
Bought a couple more pencils to to try some other shades of brown.
southpier
Joined: December 11, 2009
KitMaker: 546 posts
AeroScale: 16 posts
Posted: Friday, August 23, 2019 - 09:14 AM UTC
Quoted Text
Quoted TextThe rear should look just like the front , no mystery. Follow the lamination line down the prop and around the back.
Actually it would appear in a mirrored effect In most cases the cut of the laminations begin at the leading edge of the fininished prop paddle.
I know I should do some research how the 1:1 props were made before commenting, but I think a mirror of the layers gone to the edges is more likely. this is an interesting page: http://www.woodenpropeller.com/Basic_Propeller_Construction_-_Techniques.html (see figure #3- I don't think the upper layers would wrap to the backside)

Vicious

Joined: September 04, 2015
KitMaker: 1,517 posts
AeroScale: 75 posts
Posted: Friday, August 23, 2019 - 10:57 AM UTC
have a check here http://thevintageaviator.co.nz/ for the 1:1 scale
southpier
Joined: December 11, 2009
KitMaker: 546 posts
AeroScale: 16 posts
Posted: Friday, August 23, 2019 - 12:48 PM UTC
that's a great site to spend a rainy afternoon.
there was a time, and I only have a passing interest in WWI planes, that I thought it would be a good idea to festoon my toolbox with prop decals: http://www.wingnutwings.com/ww/product?productid=3069
there was a time, and I only have a passing interest in WWI planes, that I thought it would be a good idea to festoon my toolbox with prop decals: http://www.wingnutwings.com/ww/product?productid=3069
phantom_phanatic309
#372
Joined: March 10, 2010
KitMaker: 2,568 posts
AeroScale: 1,619 posts
Posted: Saturday, August 24, 2019 - 07:41 AM UTC
Thanks a lot.
Some interesting stuff to look through.
Will continue with my practice piece and post the finished result.
Often thought of getting some of those prop decals. But where would I put them?
Some interesting stuff to look through.
Will continue with my practice piece and post the finished result.
Often thought of getting some of those prop decals. But where would I put them?
 |

WEB HOSTING BY


Copyright ©2021 AeroScale and Kitmaker Network, a subsidiary of Silver Star Enterprises
All Rights Reserved. Please read our Conditions of Use and Privacy Policy.
All Rights Reserved. Please read our Conditions of Use and Privacy Policy.