

Hosted by Rowan Baylis
Advice requested on the Matchbox 1/32Lysander
Removed by original poster on 02/10/18 - 22:00:13 (GMT).

Jessie_C


Joined: September 03, 2009
KitMaker: 6,965 posts
AeroScale: 6,247 posts

Posted: Saturday, February 10, 2018 - 06:17 AM UTC
Quoted Text
Also I am up to my old Lysander acquired tricks in adding the internal ribs that support the aircraft's cloth skin. It is an easy way, I feel, to add more complexity of detail that will be visible down thru the cockpit openings.
Discovered just tonight that HpH has come out with a resin Arado in 1/32nd scale and they included the cloth ribs on the interior of their fuselage. Makes me feel like I am on the right track when I find a major manufacture making the same detailing choices as myself.

You might want to spray a blotchy red-brown on the inside of the fabric areas and then go over the frames with your paintbrush with interior green. The first coat of dope to go on was tinted red to allow the Erks to see where they sprayed it, and that was visible through the inside of the fabric.

165thspc

#521

Joined: April 13, 2011
KitMaker: 9,465 posts
AeroScale: 375 posts
Posted: Saturday, February 10, 2018 - 06:34 AM UTC
Makes perfect sense. I will have to think on that one for awhile.

165thspc
#521
Joined: April 13, 2011
KitMaker: 9,465 posts
AeroScale: 375 posts
Posted: Saturday, February 10, 2018 - 07:34 AM UTC
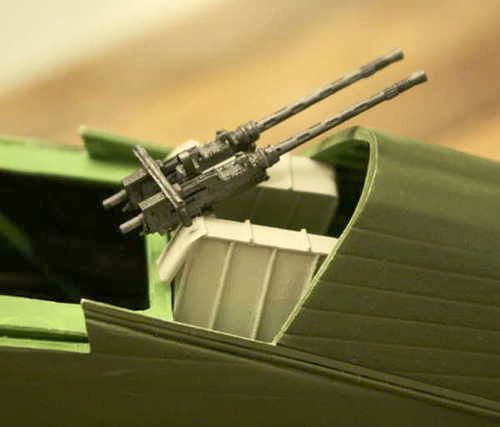
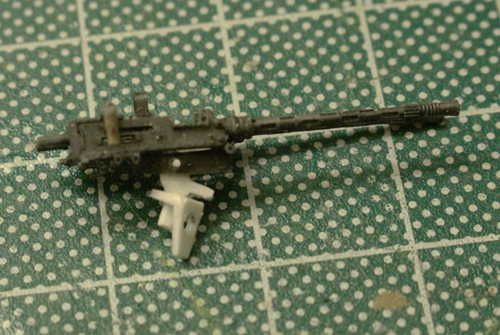
Work'n on giving the Lizzie some teeth!
You can just see one of those big .303 mags above the twin muzzles.
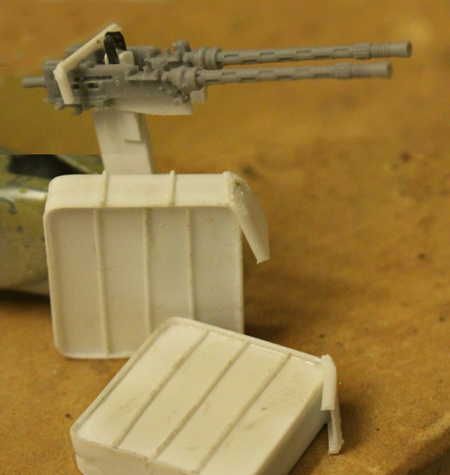
My work today includes the beginnings of the two high capacity .303 magazines for the install.
Better shot of those huge .303 magazines: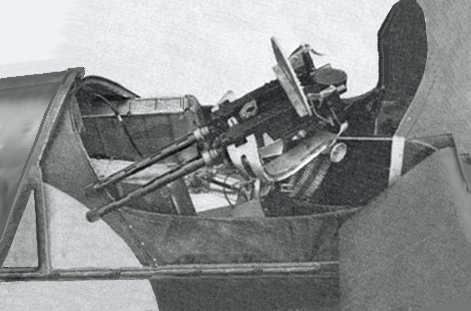

You can just see one of those big .303 mags above the twin muzzles.


My work today includes the beginnings of the two high capacity .303 magazines for the install.
Better shot of those huge .303 magazines:

165thspc
#521
Joined: April 13, 2011
KitMaker: 9,465 posts
AeroScale: 375 posts
Posted: Saturday, February 10, 2018 - 07:35 AM UTC
The Barr & Stroud Optical Gunsight:


165thspc
#521
Joined: April 13, 2011
KitMaker: 9,465 posts
AeroScale: 375 posts
Posted: Saturday, February 10, 2018 - 08:54 PM UTC
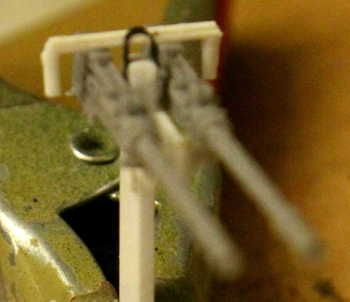
Progress on the twin Brownings:
This photo shows only a temporary mount. The actual mount will be somewhat more forward in the aircraft.
Here the twin guns are mounted on a painting stalk for construction handling. The actual gun mount appears in the lower right corner of the photo.
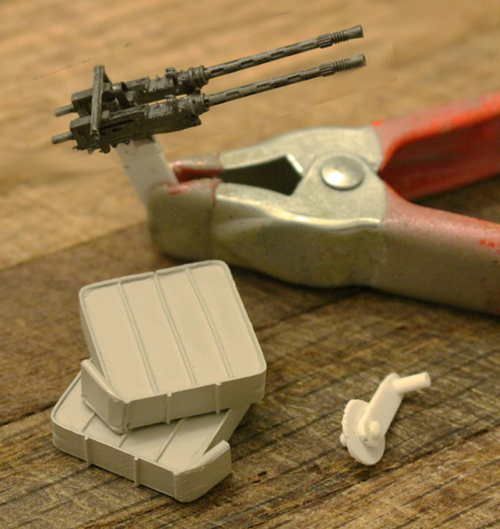
Still have many problems to solve on the issue of belt feeds for the guns.
This photo shows only a temporary mount. The actual mount will be somewhat more forward in the aircraft.

Here the twin guns are mounted on a painting stalk for construction handling. The actual gun mount appears in the lower right corner of the photo.

Still have many problems to solve on the issue of belt feeds for the guns.
165thspc
#521
Joined: April 13, 2011
KitMaker: 9,465 posts
AeroScale: 375 posts
Posted: Saturday, February 10, 2018 - 10:31 PM UTC
Cleaning up some other small jobs before closing up the fuselage:
The Tail Wheel
I wanted something more substantial than the plastic structure that came with the kit for the tail wheel. So I got some heavy brass rod, drilled through the wheel center hole and shaped the yolk for the wheel using the heavy metal rod. Finished up the assembly with a wrap of thread mixed with super glue. (Not pretty but it certainly is structural and gets the job done.)
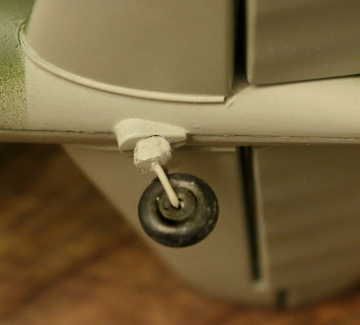
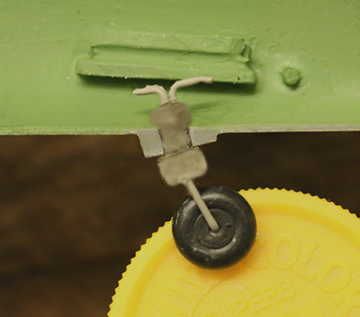
The brass will definitely be stronger than the plastic.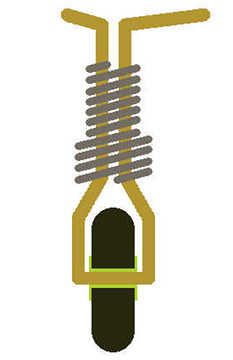
This metal yolk will no doubt survive more accidental abuse than the lightweight plastic piece ever would.
The Tail Wheel
I wanted something more substantial than the plastic structure that came with the kit for the tail wheel. So I got some heavy brass rod, drilled through the wheel center hole and shaped the yolk for the wheel using the heavy metal rod. Finished up the assembly with a wrap of thread mixed with super glue. (Not pretty but it certainly is structural and gets the job done.)


The brass will definitely be stronger than the plastic.

This metal yolk will no doubt survive more accidental abuse than the lightweight plastic piece ever would.
165thspc
#521
Joined: April 13, 2011
KitMaker: 9,465 posts
AeroScale: 375 posts
Posted: Sunday, February 11, 2018 - 12:52 AM UTC

165thspc
#521
Joined: April 13, 2011
KitMaker: 9,465 posts
AeroScale: 375 posts
Posted: Sunday, February 11, 2018 - 01:16 AM UTC
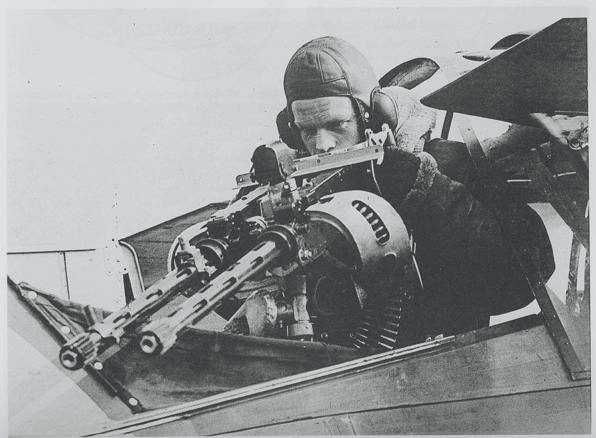
This post is in reference to a comment made a few weeks ago regarding the question of lap seat belts only or lap plus shoulder harness being common in the late war Lysander:
This photo was published in a 1943 issue of "Flight Magazine". It clearly shows the pilot of a Lysander as wearing a shoulder harness style seat belt.
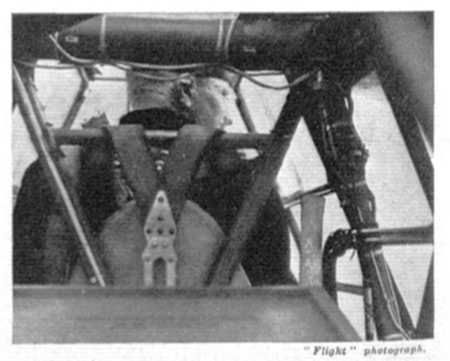
This photo was published in a 1943 issue of "Flight Magazine". It clearly shows the pilot of a Lysander as wearing a shoulder harness style seat belt.

165thspc
#521
Joined: April 13, 2011
KitMaker: 9,465 posts
AeroScale: 375 posts
Posted: Sunday, February 11, 2018 - 02:01 AM UTC
Another fuselage internal housekeeping item:
I built up and installed the front profile plate of the engine oil reservoir (see red arrow) just in case it could be seen around the edge of the instrument panel.
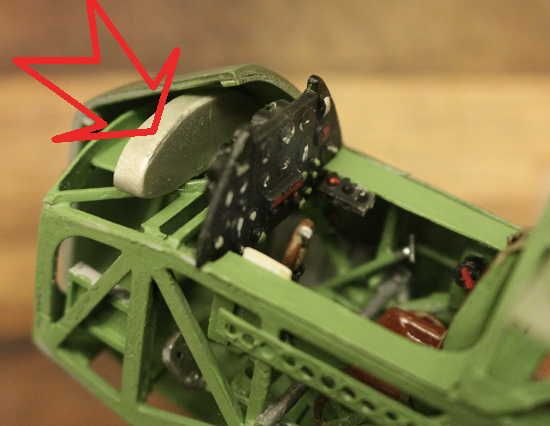
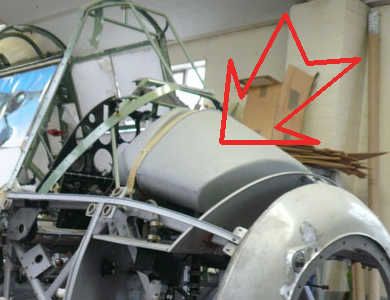
Above photo from the Aircraft Restoration Company used here for research and discussion only.
I built up and installed the front profile plate of the engine oil reservoir (see red arrow) just in case it could be seen around the edge of the instrument panel.


Above photo from the Aircraft Restoration Company used here for research and discussion only.
Robbd01

#323
Joined: February 13, 2013
KitMaker: 791 posts
AeroScale: 213 posts

Posted: Sunday, February 11, 2018 - 02:18 AM UTC
Here are some motivational links about the Lysander at Vintage Wings Canada. If you are a pilot (I am not) you might even find it more interesting.
http://www.vintagewings.ca/VintageNews/Stories/tabid/116/articleType/ArticleView/articleId/486/Lysander-Pilot-Report.aspx
http://www.vintagewings.ca/VintageNews/Stories/tabid/116/articleType/ArticleView/articleId/605/Big-Silver-Kite.aspx
Cheers


http://www.vintagewings.ca/VintageNews/Stories/tabid/116/articleType/ArticleView/articleId/486/Lysander-Pilot-Report.aspx
http://www.vintagewings.ca/VintageNews/Stories/tabid/116/articleType/ArticleView/articleId/605/Big-Silver-Kite.aspx
Cheers

165thspc
#521
Joined: April 13, 2011
KitMaker: 9,465 posts
AeroScale: 375 posts
Posted: Sunday, February 11, 2018 - 03:32 AM UTC
Thanks Robbie. I had seen the first article but the second was new to me and very entertaining! Every such article I read says the Lizzie had definite special talents but all seem to agree it was a handful to fly.
Have wondered why they never modified the aircraft to allow for manual control of flaps and slats just to take some of the buck out of the mare?
Have wondered why they never modified the aircraft to allow for manual control of flaps and slats just to take some of the buck out of the mare?
165thspc
#521
Joined: April 13, 2011
KitMaker: 9,465 posts
AeroScale: 375 posts
Posted: Monday, February 12, 2018 - 03:41 AM UTC
Note the caption below the photograph. This is true for any radial engine even radial engined Shermans.
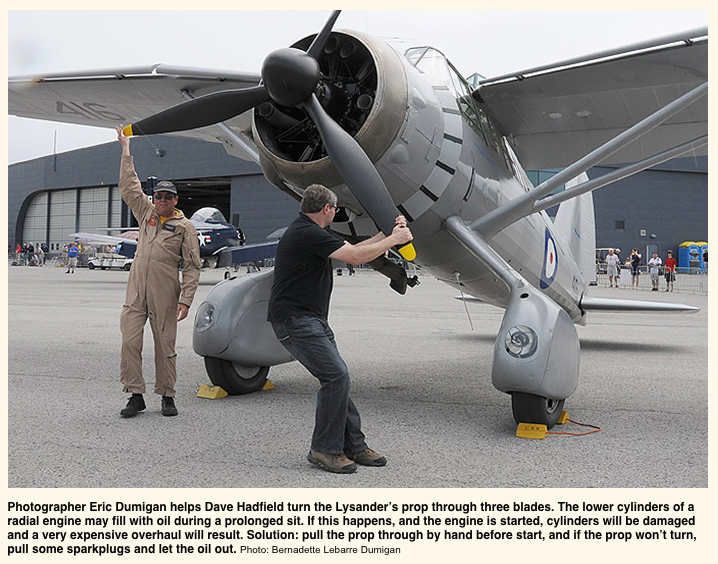
(Photo is used here for research and discussion purposes only.)

(Photo is used here for research and discussion purposes only.)
Robbd01
#323
Joined: February 13, 2013
KitMaker: 791 posts
AeroScale: 213 posts
Posted: Monday, February 12, 2018 - 04:07 AM UTC
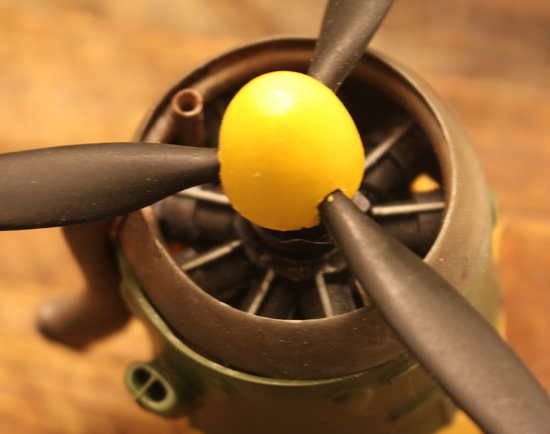
So one begs the question, how does one 'turn a prop' on a radial Sherman ?  (queue pics from Frenchy)
Cheers
(queue pics from Frenchy) Cheers
165thspc
#521
Joined: April 13, 2011
KitMaker: 9,465 posts
AeroScale: 375 posts
Posted: Monday, February 12, 2018 - 04:50 AM UTC
On the radial Sherman, there is a hole, center rear; you insert the engine crank there and you can turn the engine over with the ignition switch in the off position.

Photo comes from Matt Hall's thread.

Photo comes from Matt Hall's thread.
165thspc
#521
Joined: April 13, 2011
KitMaker: 9,465 posts
AeroScale: 375 posts
Posted: Monday, February 12, 2018 - 09:53 AM UTC
Never actually had to do the cranking but I have witnessed this operation being done at the Patton Museum on Shermans that have sat for some time.
Of course the GAA and multi-bank engined Shermans do not have this concern.
Of course the GAA and multi-bank engined Shermans do not have this concern.
165thspc
#521
Joined: April 13, 2011
KitMaker: 9,465 posts
AeroScale: 375 posts
Posted: Monday, February 12, 2018 - 12:50 PM UTC
Another fuselage housekeeping item: (Last item before closing up the fuselage halves.)
The rear storage and ballast compartment. This area is accessed by opening one of the two small window/doors near the tail. The compartment contains the engine starter crank and the adjustable flight load balance weights.
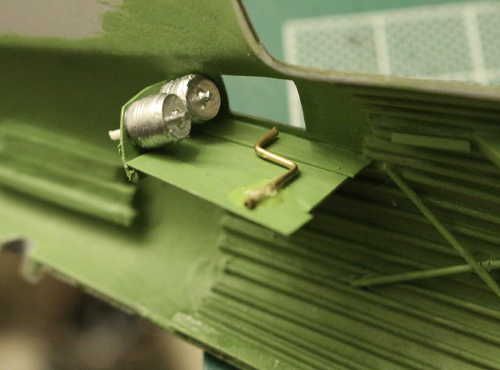
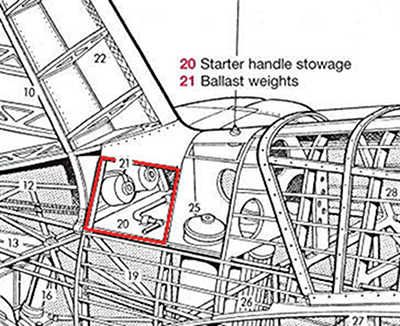
The rear storage and ballast compartment. This area is accessed by opening one of the two small window/doors near the tail. The compartment contains the engine starter crank and the adjustable flight load balance weights.


165thspc
#521
Joined: April 13, 2011
KitMaker: 9,465 posts
AeroScale: 375 posts
Posted: Tuesday, February 13, 2018 - 10:15 PM UTC
Swivel pintle built for the twin Brownings. A little crude but parts so small that should not matter. The sad part is I have so much work left to do on the Lysander I don't dare mount the weapons. They would no doubt get broken while finishing up the rest of the aircraft.
Still need to work out the belt feed issues between the magazines and the guns.

Still need to work out the belt feed issues between the magazines and the guns.
165thspc
#521
Joined: April 13, 2011
KitMaker: 9,465 posts
AeroScale: 375 posts
Posted: Monday, March 26, 2018 - 11:10 PM UTC
Just a quick comment from someone new to the aircraft modeling side of the hobby regarding the painting of canopies:
I have always feared this aspect of the hobby after trying to hand paint the canopies on a B-25 so many, many years ago in high school. (I am now 68)
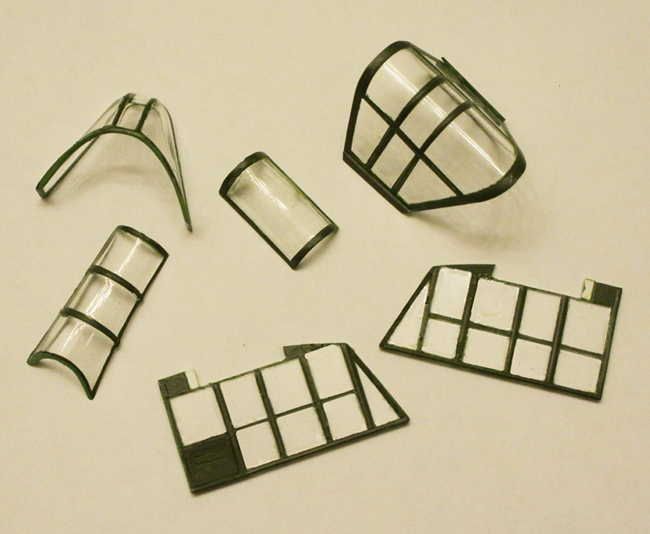
Well I think I have now over come my 51 year canopy-fobia. For the Lysander I tried die-cut, pre-cut after market masks. Now I am on to building a Revell Arado 196 and using a different process.
The pre-cut masks are just a tad smaller than I would like relative to the size of the windowpane. They don't quite fill the space and can be put on slightly crooked because of this.
Saw this next process on a YouTube video: For the Arado I used Tamiya masking tape. Placing the tape on the glass, I first went around the edges of the windowpane with a technical pencil. This pushes the tape tightly into the edges and corners of the pane. Using a brand new #11 Hobby blade I went over the pencil line lightly to cut out the mask. Removing the excess tape I how had a perfectly sized widow mask ready for painting.
One more item of possible advice: After masking the entire canopy I first spray it with a coating of Matte Clear (the Tamiya stuff is better than the Model Masters - in MHO.) The clear seals the tape edges and makes the final coat of paint less likely to creep under the taped edges and go where it is not wanted.
(I use Matte clear rather than Gloss Clear as it is less runny than gloss so it is also less likely to go where it is not wanted. AND I think the top coat of finish paint adheres better to the matte than the glossy.
My habit then is to first spray the interior frame color and then the exterior. I have yet to try the trick of masking the INSIDE AS WELL and painting both the inside and outside of the canopy separately.
Remember to cover the inside of the canopy in some way so that any possible over spray from doing the outside does not get on the inside surface of the glass and ruin all your fun.
Maybe not prefect but WAY BETTER than the B-25!
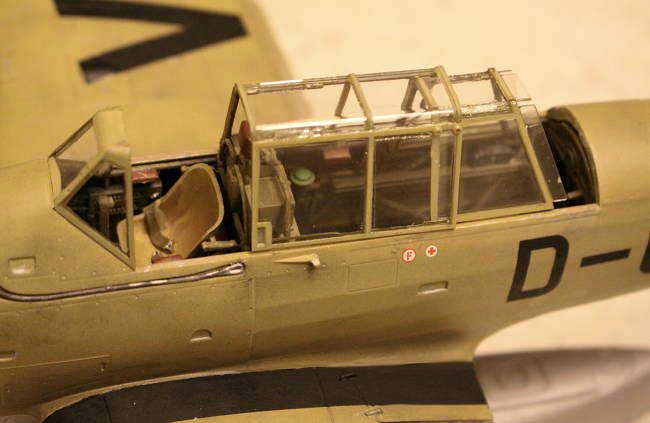
Lysander canopy using after market die-cut masks. Results OK but more "fuzzy". Not as clean and sharp as the hand cut masking on the Arado:
I have always feared this aspect of the hobby after trying to hand paint the canopies on a B-25 so many, many years ago in high school. (I am now 68)
Well I think I have now over come my 51 year canopy-fobia. For the Lysander I tried die-cut, pre-cut after market masks. Now I am on to building a Revell Arado 196 and using a different process.
The pre-cut masks are just a tad smaller than I would like relative to the size of the windowpane. They don't quite fill the space and can be put on slightly crooked because of this.
Saw this next process on a YouTube video: For the Arado I used Tamiya masking tape. Placing the tape on the glass, I first went around the edges of the windowpane with a technical pencil. This pushes the tape tightly into the edges and corners of the pane. Using a brand new #11 Hobby blade I went over the pencil line lightly to cut out the mask. Removing the excess tape I how had a perfectly sized widow mask ready for painting.
One more item of possible advice: After masking the entire canopy I first spray it with a coating of Matte Clear (the Tamiya stuff is better than the Model Masters - in MHO.) The clear seals the tape edges and makes the final coat of paint less likely to creep under the taped edges and go where it is not wanted.
(I use Matte clear rather than Gloss Clear as it is less runny than gloss so it is also less likely to go where it is not wanted. AND I think the top coat of finish paint adheres better to the matte than the glossy.
My habit then is to first spray the interior frame color and then the exterior. I have yet to try the trick of masking the INSIDE AS WELL and painting both the inside and outside of the canopy separately.
Remember to cover the inside of the canopy in some way so that any possible over spray from doing the outside does not get on the inside surface of the glass and ruin all your fun.
Maybe not prefect but WAY BETTER than the B-25!

Lysander canopy using after market die-cut masks. Results OK but more "fuzzy". Not as clean and sharp as the hand cut masking on the Arado:

165thspc
#521
Joined: April 13, 2011
KitMaker: 9,465 posts
AeroScale: 375 posts
Posted: Saturday, March 31, 2018 - 05:08 AM UTC
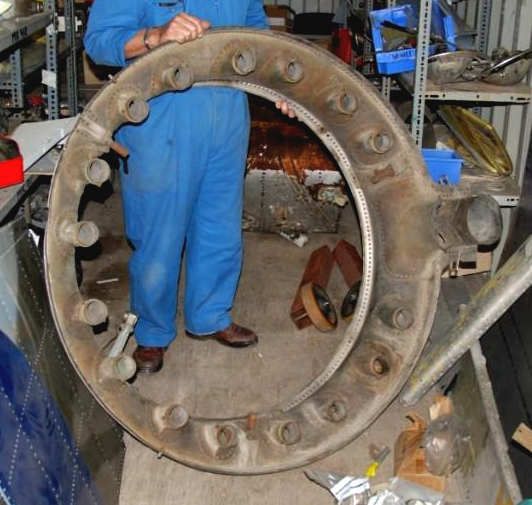
Rare photo: Back side of exhaust collector ring of Lysander.


rdt1953
Joined: February 06, 2015
KitMaker: 1,098 posts
AeroScale: 900 posts
Posted: Saturday, March 31, 2018 - 05:24 AM UTC
Wow ! IIRC this was a bronze casting - impressive !
Thanks for sharing- Richard
Thanks for sharing- Richard
165thspc
#521
Joined: April 13, 2011
KitMaker: 9,465 posts
AeroScale: 375 posts
Posted: Sunday, April 01, 2018 - 01:18 AM UTC
Yes, due to the extreme heat the entire ring was made of bronze and left unpainted. This explains the different body color for this part as spec'd on the Matchbox/Revell model.
Was it cast or built up of riveted bronze sheet? In the photo I see many, MANY rivets around each cylinder exhaust intake and around the output plenum.

Was it cast or built up of riveted bronze sheet? In the photo I see many, MANY rivets around each cylinder exhaust intake and around the output plenum.

greif8

Joined: January 17, 2006
KitMaker: 673 posts
AeroScale: 492 posts

Posted: Sunday, April 01, 2018 - 11:20 AM UTC
Those .303's look ready to rock Michael!
Ernest
Ernest
rdt1953
Joined: February 06, 2015
KitMaker: 1,098 posts
AeroScale: 900 posts
Posted: Sunday, April 01, 2018 - 02:51 PM UTC
Quoted Text
Yes, due to the extreme heat the entire ring was made of bronze and left unpainted. This explains the different body color for this part as spec'd on the Matchbox/Revell model.Was it cast or built up of riveted bronze sheet? In the photo I see many, MANY rivets around each cylinder exhaust intake and around the output plenum.
You may be right - a riveted bronze sheet stamping would likely weigh less - important when building aircraft ! I think the Fairy Swordfish used a similar arrangement.
Keep up the nice work ! Richard
 |

WEB HOSTING BY


Copyright ©2021 AeroScale and Kitmaker Network, a subsidiary of Silver Star Enterprises
All Rights Reserved. Please read our Conditions of Use and Privacy Policy.
All Rights Reserved. Please read our Conditions of Use and Privacy Policy.