Building The Revell 1/48 Dakota
Nordrhein-Westfalen, Germany
Joined: March 22, 2015
KitMaker: 671 posts
AeroScale: 614 posts
Posted: Wednesday, January 31, 2018 - 04:02 PM UTC
Paul: Those details really look amazing. Great work!
Oliver

On the desk: Probably a Panzer III.
Scotland, United Kingdom
Joined: May 11, 2015
KitMaker: 768 posts
AeroScale: 656 posts
Posted: Wednesday, January 31, 2018 - 05:52 PM UTC
Thank you Oliver, I'm going to try and get paint on it this afternoon

Pax & Pallets: Revell 1/48 Dakota
Terrible Teens : Revell 1/48 F15E Strike Eagle
Airfix IV : Airfix 1.72 Vulcan
Scotland, United Kingdom
Joined: May 11, 2015
KitMaker: 768 posts
AeroScale: 656 posts
Posted: Thursday, February 01, 2018 - 04:23 PM UTC
Managed to get the airbrush powered up and after a bit of a touch up with brushes this led to the centre crew section being finished enough to move on for the time being.
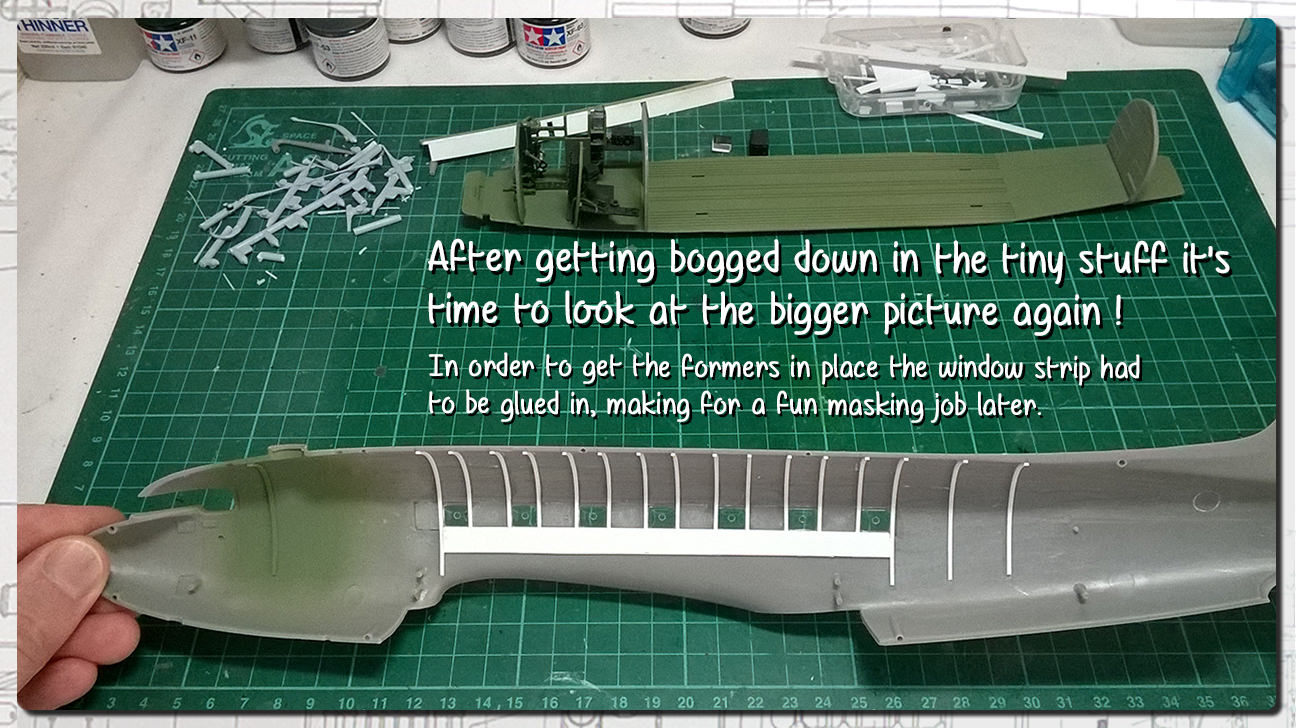
You can see my pile of used-up stretched sprue and the lid of a box I use to throw all my cut-offs in for future re-purposing.
I'm glad to say that each of the the formers didn't need drilled out like the ones in the old Lancaster so this job was relatively pain free !
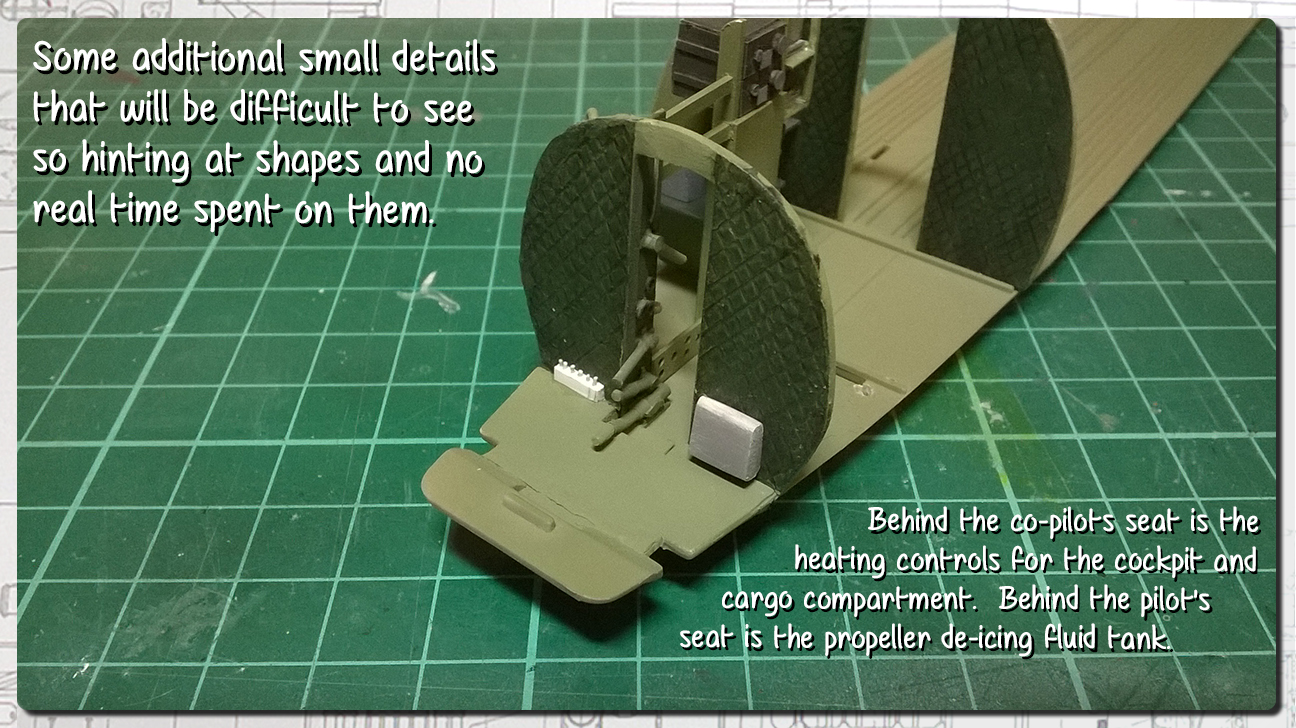
On a side note, I haven't decided whether to open up the section at the back of the aircraft which houses the toilet. I'm leaning towards a no on that one... ?
Pax & Pallets: Revell 1/48 Dakota
Terrible Teens : Revell 1/48 F15E Strike Eagle
Airfix IV : Airfix 1.72 Vulcan
Stockholm, Sweden
Joined: May 02, 2006
KitMaker: 1,953 posts
AeroScale: 1,902 posts
Posted: Thursday, February 01, 2018 - 05:34 PM UTC
I won't advice you on the subject of cutting open but your detailing work is first-class, love the radio operator/navigator's compartment!
Magnus
Press banner to the right to follow my trail to the new forums!
Scotland, United Kingdom
Joined: May 11, 2015
KitMaker: 768 posts
AeroScale: 656 posts
Posted: Sunday, February 11, 2018 - 09:26 PM UTC
Thanks Magnus, some of the detail is lacking in a crisp finish but when it gets hard to hold and manipulate such small parts you have to say "good enough !"
I've been doing a small bit most days just to keep the internal structure moving along:
Pax & Pallets: Revell 1/48 Dakota
Terrible Teens : Revell 1/48 F15E Strike Eagle
Airfix IV : Airfix 1.72 Vulcan
Wellington, New Zealand
Joined: June 01, 2014
KitMaker: 189 posts
AeroScale: 179 posts
Posted: Sunday, February 11, 2018 - 11:45 PM UTC
I missed this build when it started, but now found, I'm buckled up and enjoying the show.
Regards.
Joel_W
 Associate Editor
New York, United States
Joined: December 04, 2010
KitMaker: 11,666 posts
AeroScale: 7,410 posts
Posted: Tuesday, February 13, 2018 - 01:50 AM UTC
Paul,
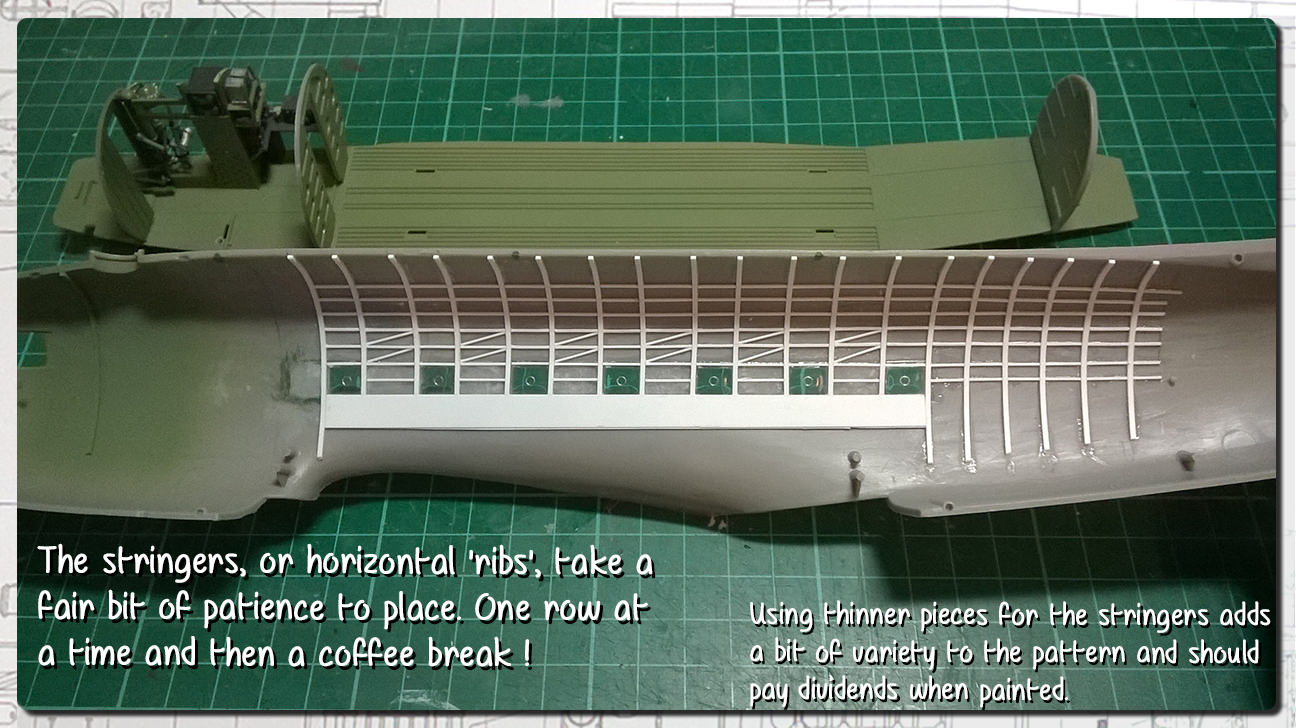
Great work on the radio compartment. The stringers & ribs really do look quite good. As much as I do like seeing extra detail, I vote "No" on the toilet compartment, as some aspects of the interior are better left to one's imagination.

Joel
On my Workbench:
Monogram 1/24 scale 427 Shelby Cobra
Just Completed:
Beemax 1/24 scale BMW M3 E30 1992 Evolution II
Scotland, United Kingdom
Joined: May 11, 2015
KitMaker: 768 posts
AeroScale: 656 posts
Posted: Tuesday, February 13, 2018 - 07:25 PM UTC
Quoted Text
I missed this build when it started, but now found, I'm buckled up and enjoying the show.
Thanks Spud, I'm advancing my skills all the time so it's a lot of fun to share the journey.
Pax & Pallets: Revell 1/48 Dakota
Terrible Teens : Revell 1/48 F15E Strike Eagle
Airfix IV : Airfix 1.72 Vulcan
Scotland, United Kingdom
Joined: May 11, 2015
KitMaker: 768 posts
AeroScale: 656 posts
Posted: Tuesday, February 13, 2018 - 07:35 PM UTC
Quoted Text
Great work on the radio compartment. The stringers & ribs really do look quite good. As much as I do like seeing extra detail, I vote "No" on the toilet compartment, as some aspects of the interior are better left to one's imagination.
Haha, thanks Joel. I'm a little tempted to open up the doorway and invite the viewer to peek inside but I won't extend the cutaway to that section.

Speaking of which, I'm fairly certain of the area I will open up now - A small section from the middle of the cockpit windows back to behind the crew entry door, broadening into a long rectangular area all the way back to just in front of the cargo doors on the port side.
Pax & Pallets: Revell 1/48 Dakota
Terrible Teens : Revell 1/48 F15E Strike Eagle
Airfix IV : Airfix 1.72 Vulcan
European Union
Joined: September 28, 2004
KitMaker: 2,186 posts
AeroScale: 1,587 posts
Posted: Tuesday, February 13, 2018 - 08:42 PM UTC
well, my ac-47 will be a bit simpler ....
This is very interesting work, I am following it very closely.
I intend to use the eduard open landing flpas set, and am still contemplating whetehr I will upgrade the engines.
what are your plans?
The mission: Beat the stash.
Almost conquered: MIG-29, Blackhawk, Skyray, Skyraider, fouga
Main battle:Demon, Skyhawk, F-14, CH-53
Stash reserve:Blackhawk, CH-46, 47 en 53; SU-7, Eurofighter, mohawk, hellcat, F-16D, 6x Fouga Magister, Voodoo
Scotland, United Kingdom
Joined: May 11, 2015
KitMaker: 768 posts
AeroScale: 656 posts
Posted: Wednesday, February 14, 2018 - 05:17 PM UTC
Thanks Drabslab, I'm looking forward to seeing yours too.
I've never detailed an engine yet but I may give it a try and add some wiring that would be visible from the front of the cowling.
The flaps on the other hand are something I've considered scratchbuilding and will probably attempt if time allows.
Pax & Pallets: Revell 1/48 Dakota
Terrible Teens : Revell 1/48 F15E Strike Eagle
Airfix IV : Airfix 1.72 Vulcan
Scotland, United Kingdom
Joined: May 11, 2015
KitMaker: 768 posts
AeroScale: 656 posts
Posted: Wednesday, February 14, 2018 - 05:21 PM UTC
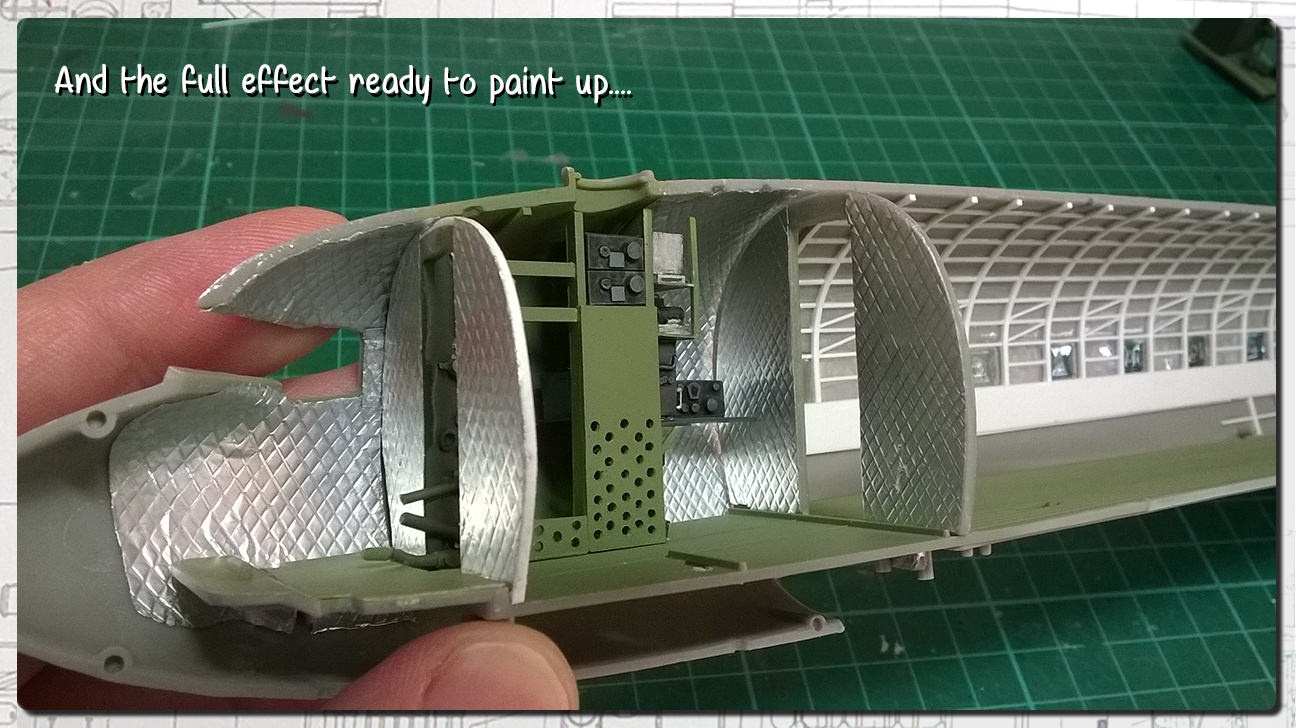
Moving on to another technique I've seen used to great effect - foil cockpit padding !
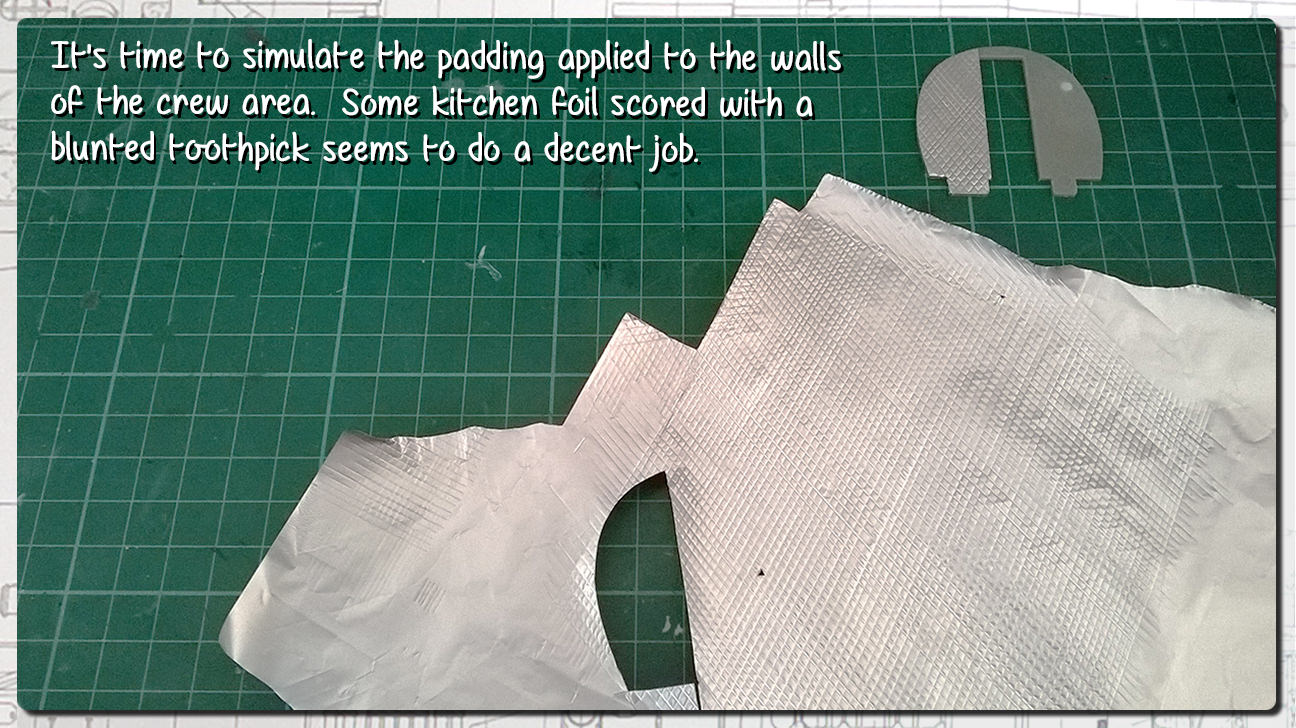
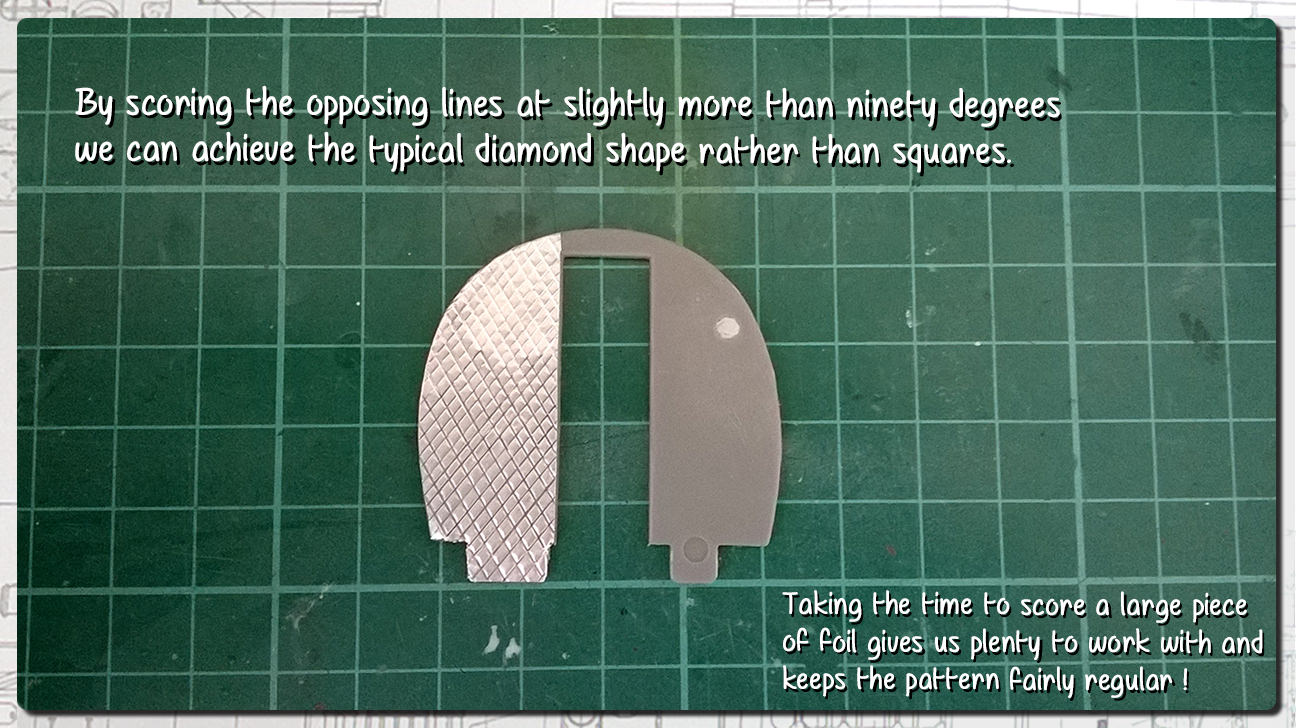
This is a deceptively easy method to achieve a detailed surface effect and I'll store this one away in my bank of tricks for future builds !
Pax & Pallets: Revell 1/48 Dakota
Terrible Teens : Revell 1/48 F15E Strike Eagle
Airfix IV : Airfix 1.72 Vulcan
Scotland, United Kingdom
Joined: May 11, 2015
KitMaker: 768 posts
AeroScale: 656 posts
Posted: Monday, February 19, 2018 - 05:15 PM UTC
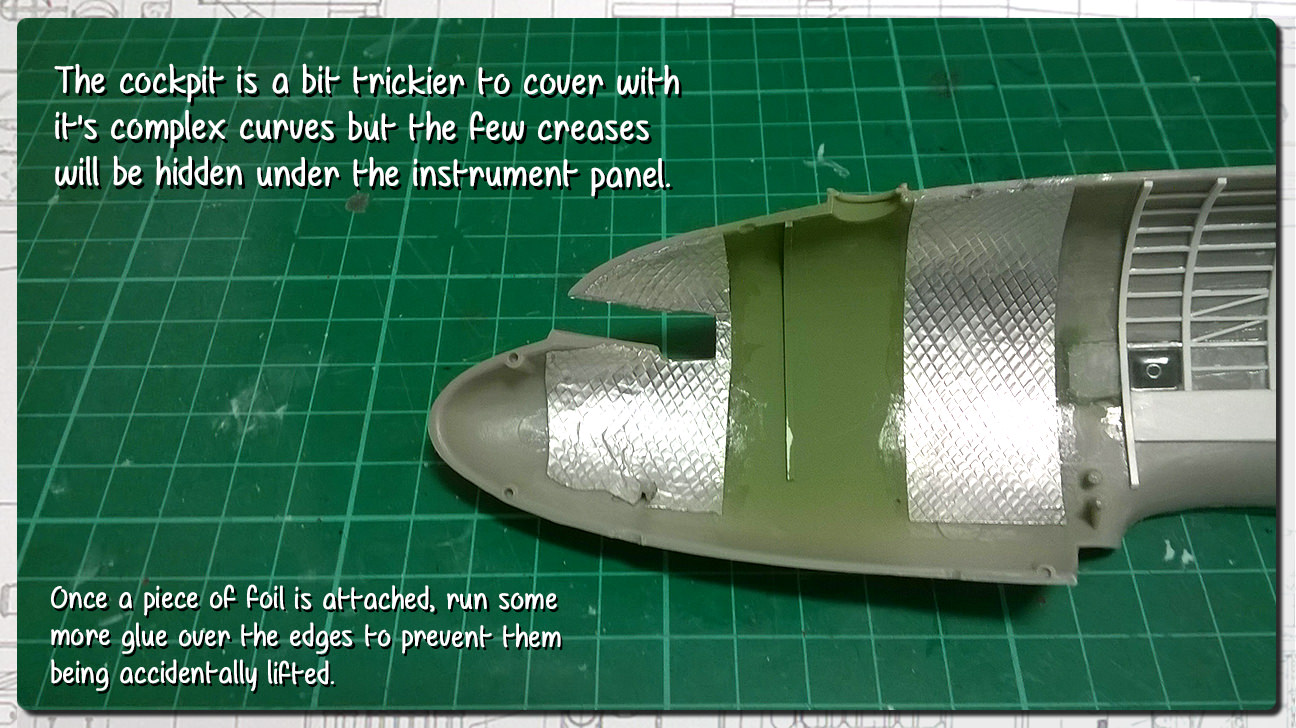
More progress on the insulation/padding :
Pax & Pallets: Revell 1/48 Dakota
Terrible Teens : Revell 1/48 F15E Strike Eagle
Airfix IV : Airfix 1.72 Vulcan
Joel_W
Associate Editor New York, United States
Joined: December 04, 2010
KitMaker: 11,666 posts
AeroScale: 7,410 posts
Posted: Monday, February 19, 2018 - 08:22 PM UTC
Paul,
The foil padding looks fantastic.
Joel
On my Workbench:
Monogram 1/24 scale 427 Shelby Cobra
Just Completed:
Beemax 1/24 scale BMW M3 E30 1992 Evolution II

#306
Victoria, Australia
Joined: June 27, 2010
KitMaker: 3,959 posts
AeroScale: 598 posts
Posted: Tuesday, February 20, 2018 - 01:57 AM UTC
amazing work with the foil, Paul

for some reason though I'm not getting notifications that you've posted an update.

I think you need to ask admin to remove the apostrophe from "Revell's" in your title as I found that it stopped notifications from my blogs being sent out to subscribers

Stay home and build models!
In 1/72
Gloster Gladiator MkII for the Bi-planes Campaign
In 1/350
Airfix 1:350 Type 45 Destroyer
Noord-Holland, Netherlands
Joined: January 28, 2007
KitMaker: 1,945 posts
AeroScale: 388 posts
Posted: Tuesday, February 20, 2018 - 02:04 PM UTC
That padding made out of foil is indeed amazing. I like the detailing involved in this project!
Jelger
On the workbench:
- Tamiya P-47D 1/48
- Eduard Mig21 1/144
Scotland, United Kingdom
Joined: May 11, 2015
KitMaker: 768 posts
AeroScale: 656 posts
Posted: Tuesday, February 20, 2018 - 04:02 PM UTC
Thanks a lot guys, Im pleased how the effect has turned out.
Its something that is quite simple and gives a lot of bang for your buck!
Pax & Pallets: Revell 1/48 Dakota
Terrible Teens : Revell 1/48 F15E Strike Eagle
Airfix IV : Airfix 1.72 Vulcan
European Union
Joined: September 28, 2004
KitMaker: 2,186 posts
AeroScale: 1,587 posts
Posted: Tuesday, February 20, 2018 - 06:06 PM UTC
Really nice work, yuo have an impressive creativity in using common things for achieving nice results. That kitchen foil looks like the real thing.
The mission: Beat the stash.
Almost conquered: MIG-29, Blackhawk, Skyray, Skyraider, fouga
Main battle:Demon, Skyhawk, F-14, CH-53
Stash reserve:Blackhawk, CH-46, 47 en 53; SU-7, Eurofighter, mohawk, hellcat, F-16D, 6x Fouga Magister, Voodoo
Scotland, United Kingdom
Joined: May 11, 2015
KitMaker: 768 posts
AeroScale: 656 posts
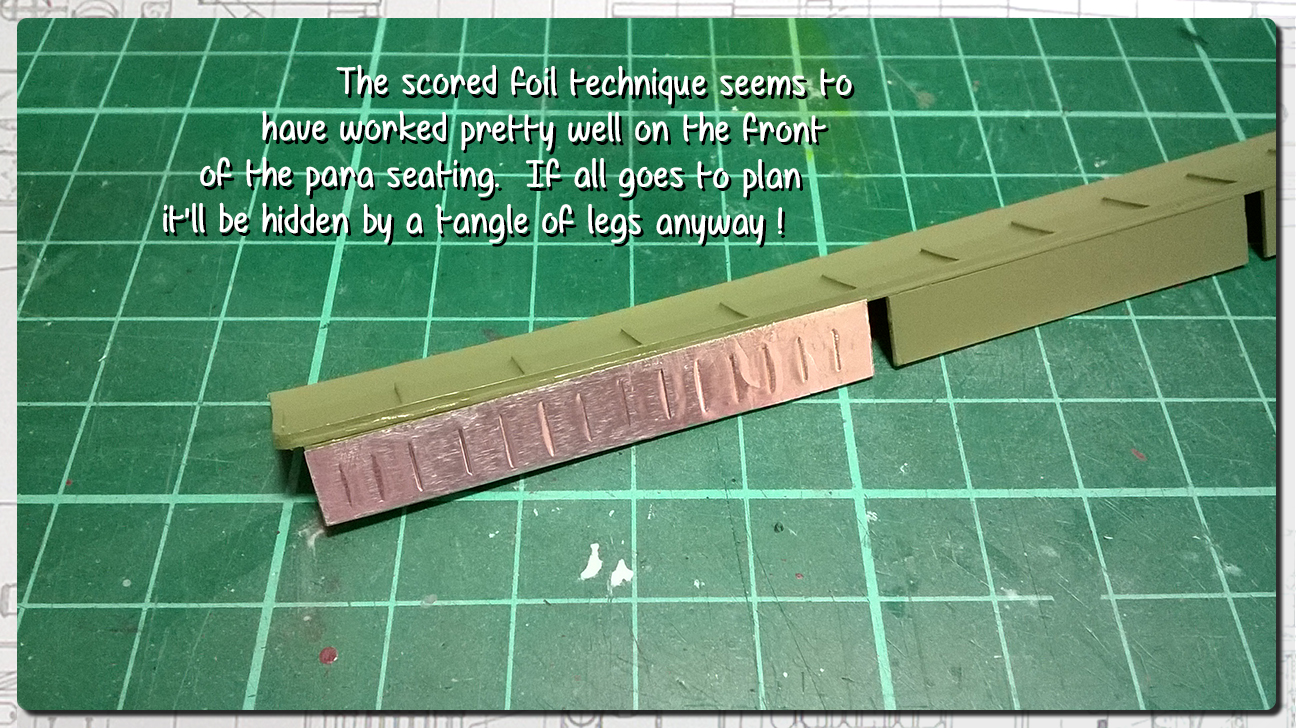
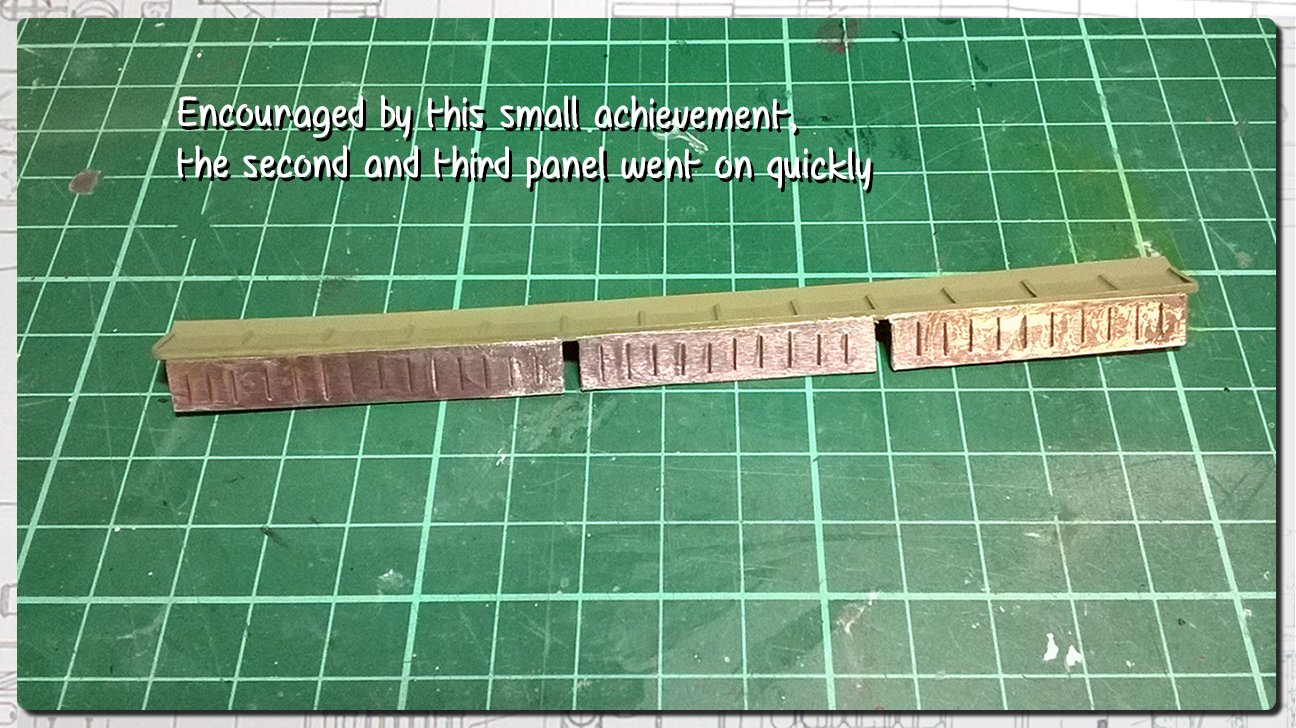
Posted: Tuesday, February 20, 2018 - 09:43 PM UTC
Thanks again, I'm already turning my brain towards other ways of using this technique for anything which requires repeated patterns.
The 'front' of the folding paratroop seats has a regular slit pattern and I'd had trouble in trying to think of a way to replicate it. I'm beginning to think that this method could prove to be quite effective. It's certainly worth a try !
Pax & Pallets: Revell 1/48 Dakota
Terrible Teens : Revell 1/48 F15E Strike Eagle
Airfix IV : Airfix 1.72 Vulcan
Berlin, Germany
Joined: October 12, 2008
KitMaker: 709 posts
AeroScale: 651 posts
Posted: Tuesday, February 20, 2018 - 10:21 PM UTC
Indeed great work with your material-mix, Paul!
Awaiting to see more.
Thomas
Sometimes you need to distance yourself to see things clearly - Lao Tzu -
... in scale and in real life -T.
Scotland, United Kingdom
Joined: May 11, 2015
KitMaker: 768 posts
AeroScale: 656 posts
Posted: Saturday, February 24, 2018 - 02:18 AM UTC
Pax & Pallets: Revell 1/48 Dakota
Terrible Teens : Revell 1/48 F15E Strike Eagle
Airfix IV : Airfix 1.72 Vulcan
Alberta, Canada
Joined: January 19, 2008
KitMaker: 6,743 posts
AeroScale: 6,151 posts
Posted: Saturday, February 24, 2018 - 08:47 PM UTC
Nice detail work Paul
Terri
Scotland, United Kingdom
Joined: May 11, 2015
KitMaker: 768 posts
AeroScale: 656 posts
Posted: Saturday, February 24, 2018 - 08:52 PM UTC
Thanks Terri !
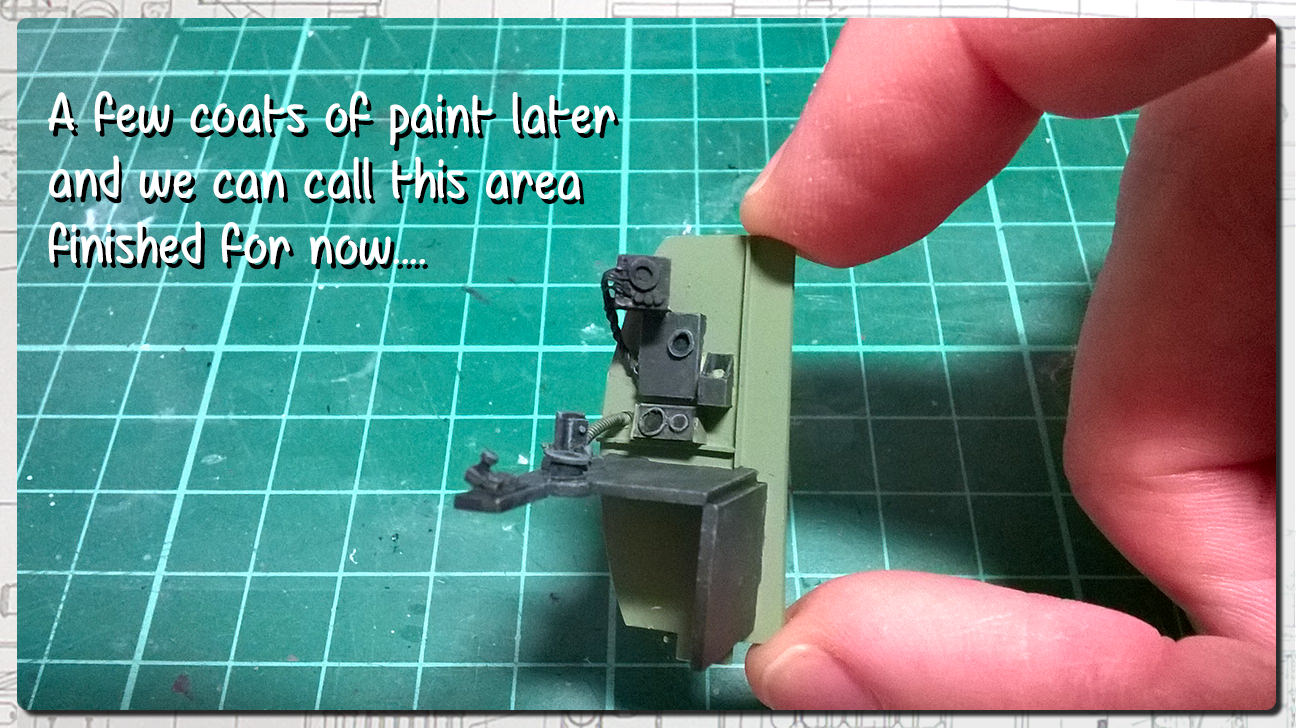
Here's another small update this weekend which keeps things moving in the right direction.
Pax & Pallets: Revell 1/48 Dakota
Terrible Teens : Revell 1/48 F15E Strike Eagle
Airfix IV : Airfix 1.72 Vulcan
Joel_W
Associate Editor New York, United States
Joined: December 04, 2010
KitMaker: 11,666 posts
AeroScale: 7,410 posts
Posted: Sunday, February 25, 2018 - 12:51 AM UTC
Paul,
You're really kicking this build up more then a few notches for sure.
Joel
On my Workbench:
Monogram 1/24 scale 427 Shelby Cobra
Just Completed:
Beemax 1/24 scale BMW M3 E30 1992 Evolution II
Scotland, United Kingdom
Joined: May 11, 2015
KitMaker: 768 posts
AeroScale: 656 posts
Posted: Sunday, February 25, 2018 - 04:05 AM UTC
I've reposted that last photo as the exposure was terrible!
And thanks Joel, I'm just aiming to add in as many interesting details as I can.
Pax & Pallets: Revell 1/48 Dakota
Terrible Teens : Revell 1/48 F15E Strike Eagle
Airfix IV : Airfix 1.72 Vulcan