Hasegawa 1/48 Nakajima C6N1-S Saiun (Myrt)

#305
Christchurch, New Zealand
Joined: February 01, 2006
KitMaker: 1,673 posts
AeroScale: 1,517 posts
Posted: Friday, November 17, 2017 - 01:54 PM UTC
I've joined the Night-fighters campaign and thought this would be an interesting subject for the campaign. Japan didn't seem to produce many dedicated night-fighters during the war and very few of those were single engined. Most were existing designs modified to suit. They only produced one of these aircraft with the 30mm oblique canon and 5 others with a twin schrage musik installations of two 20mm canon.
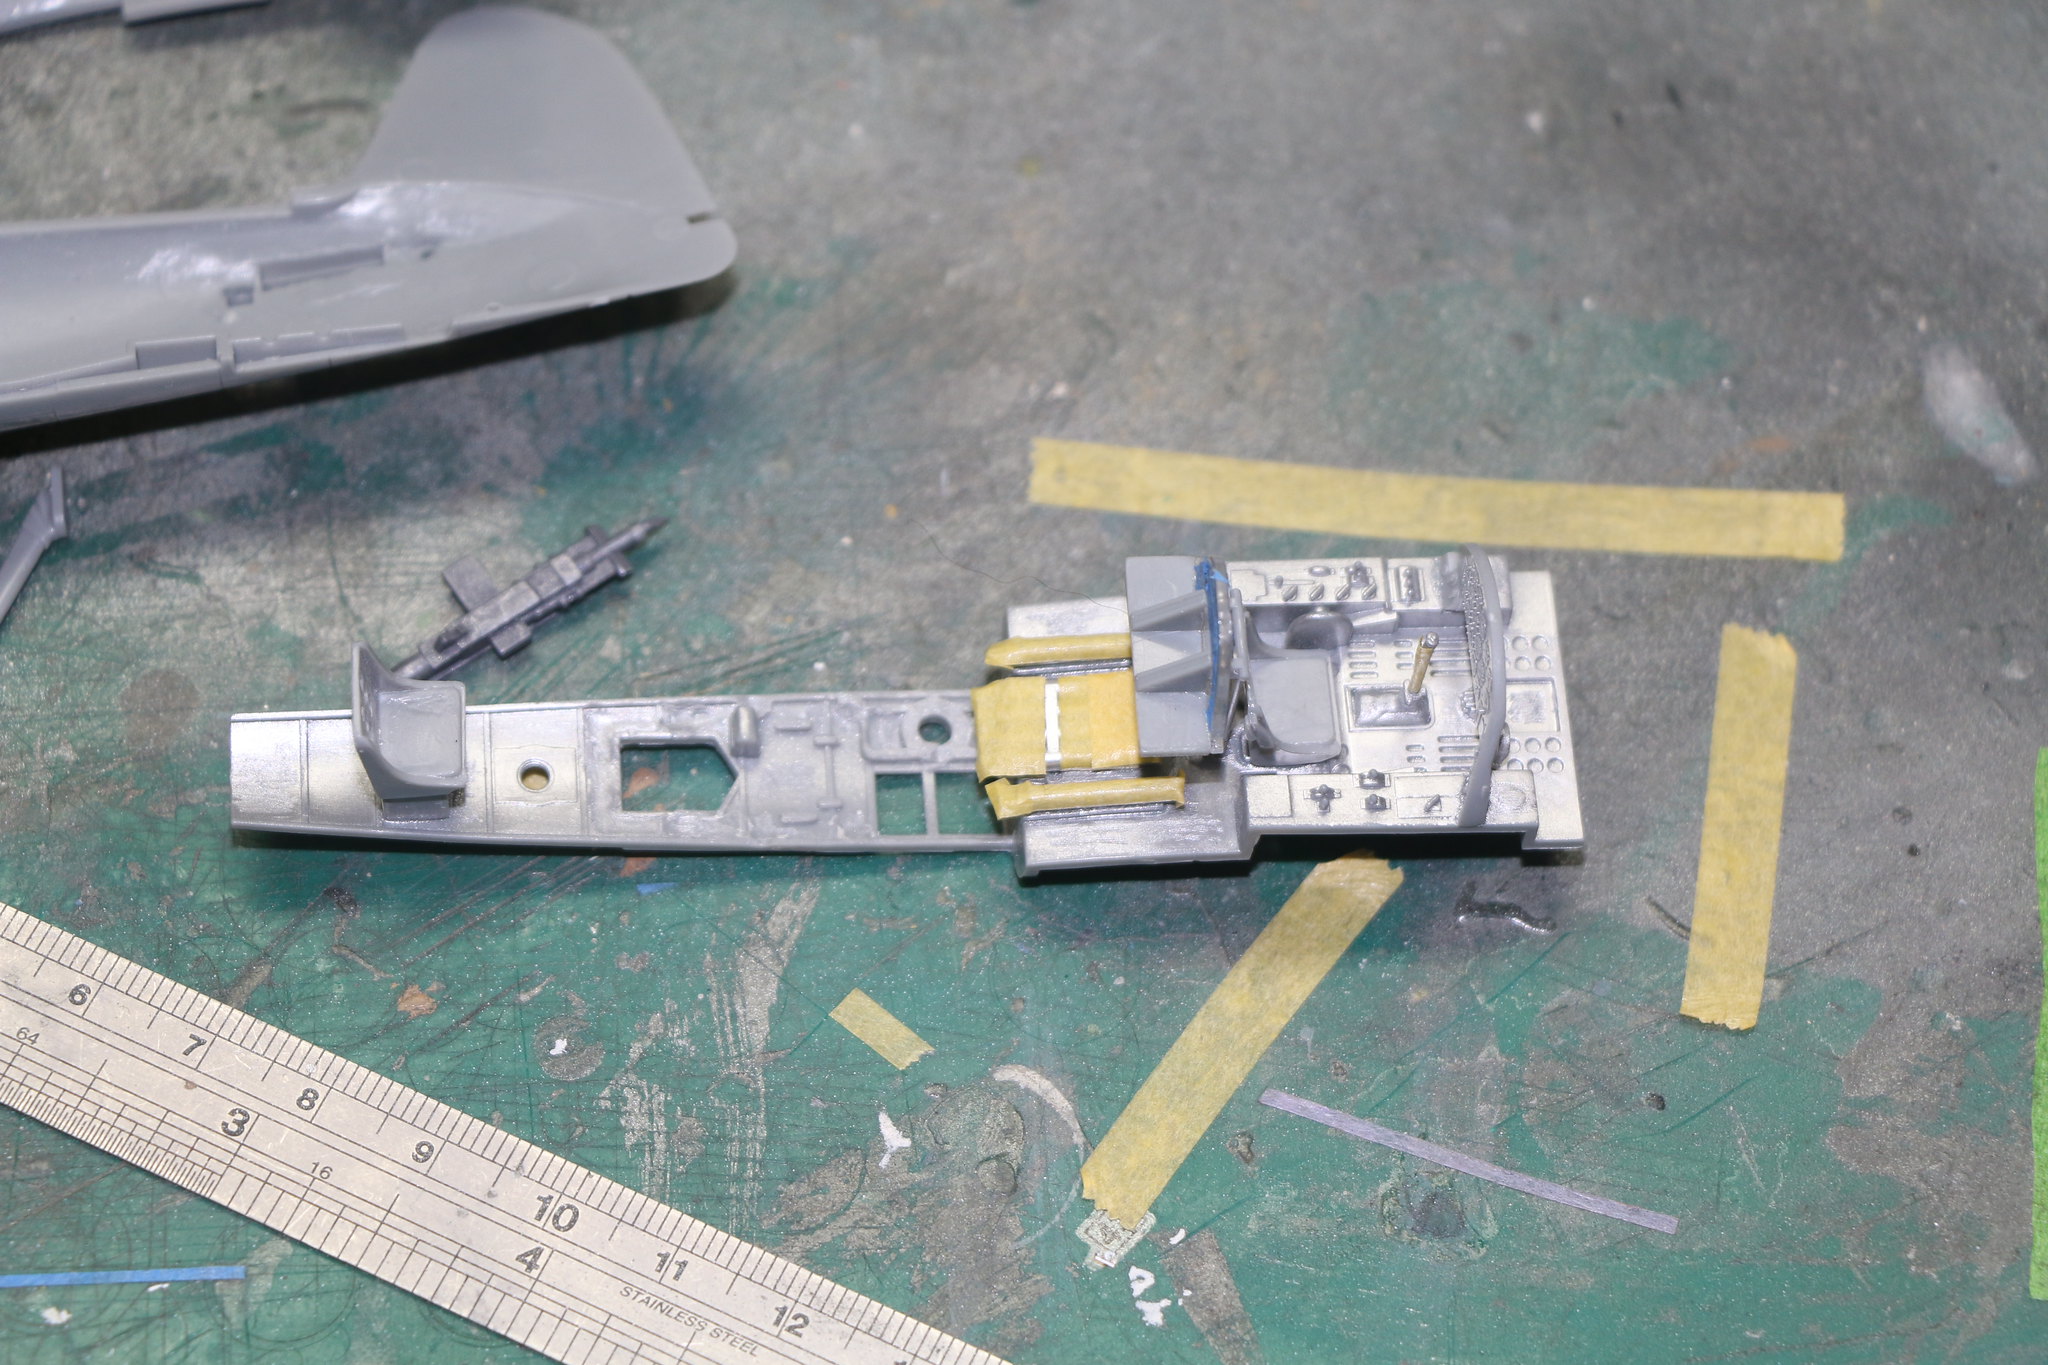
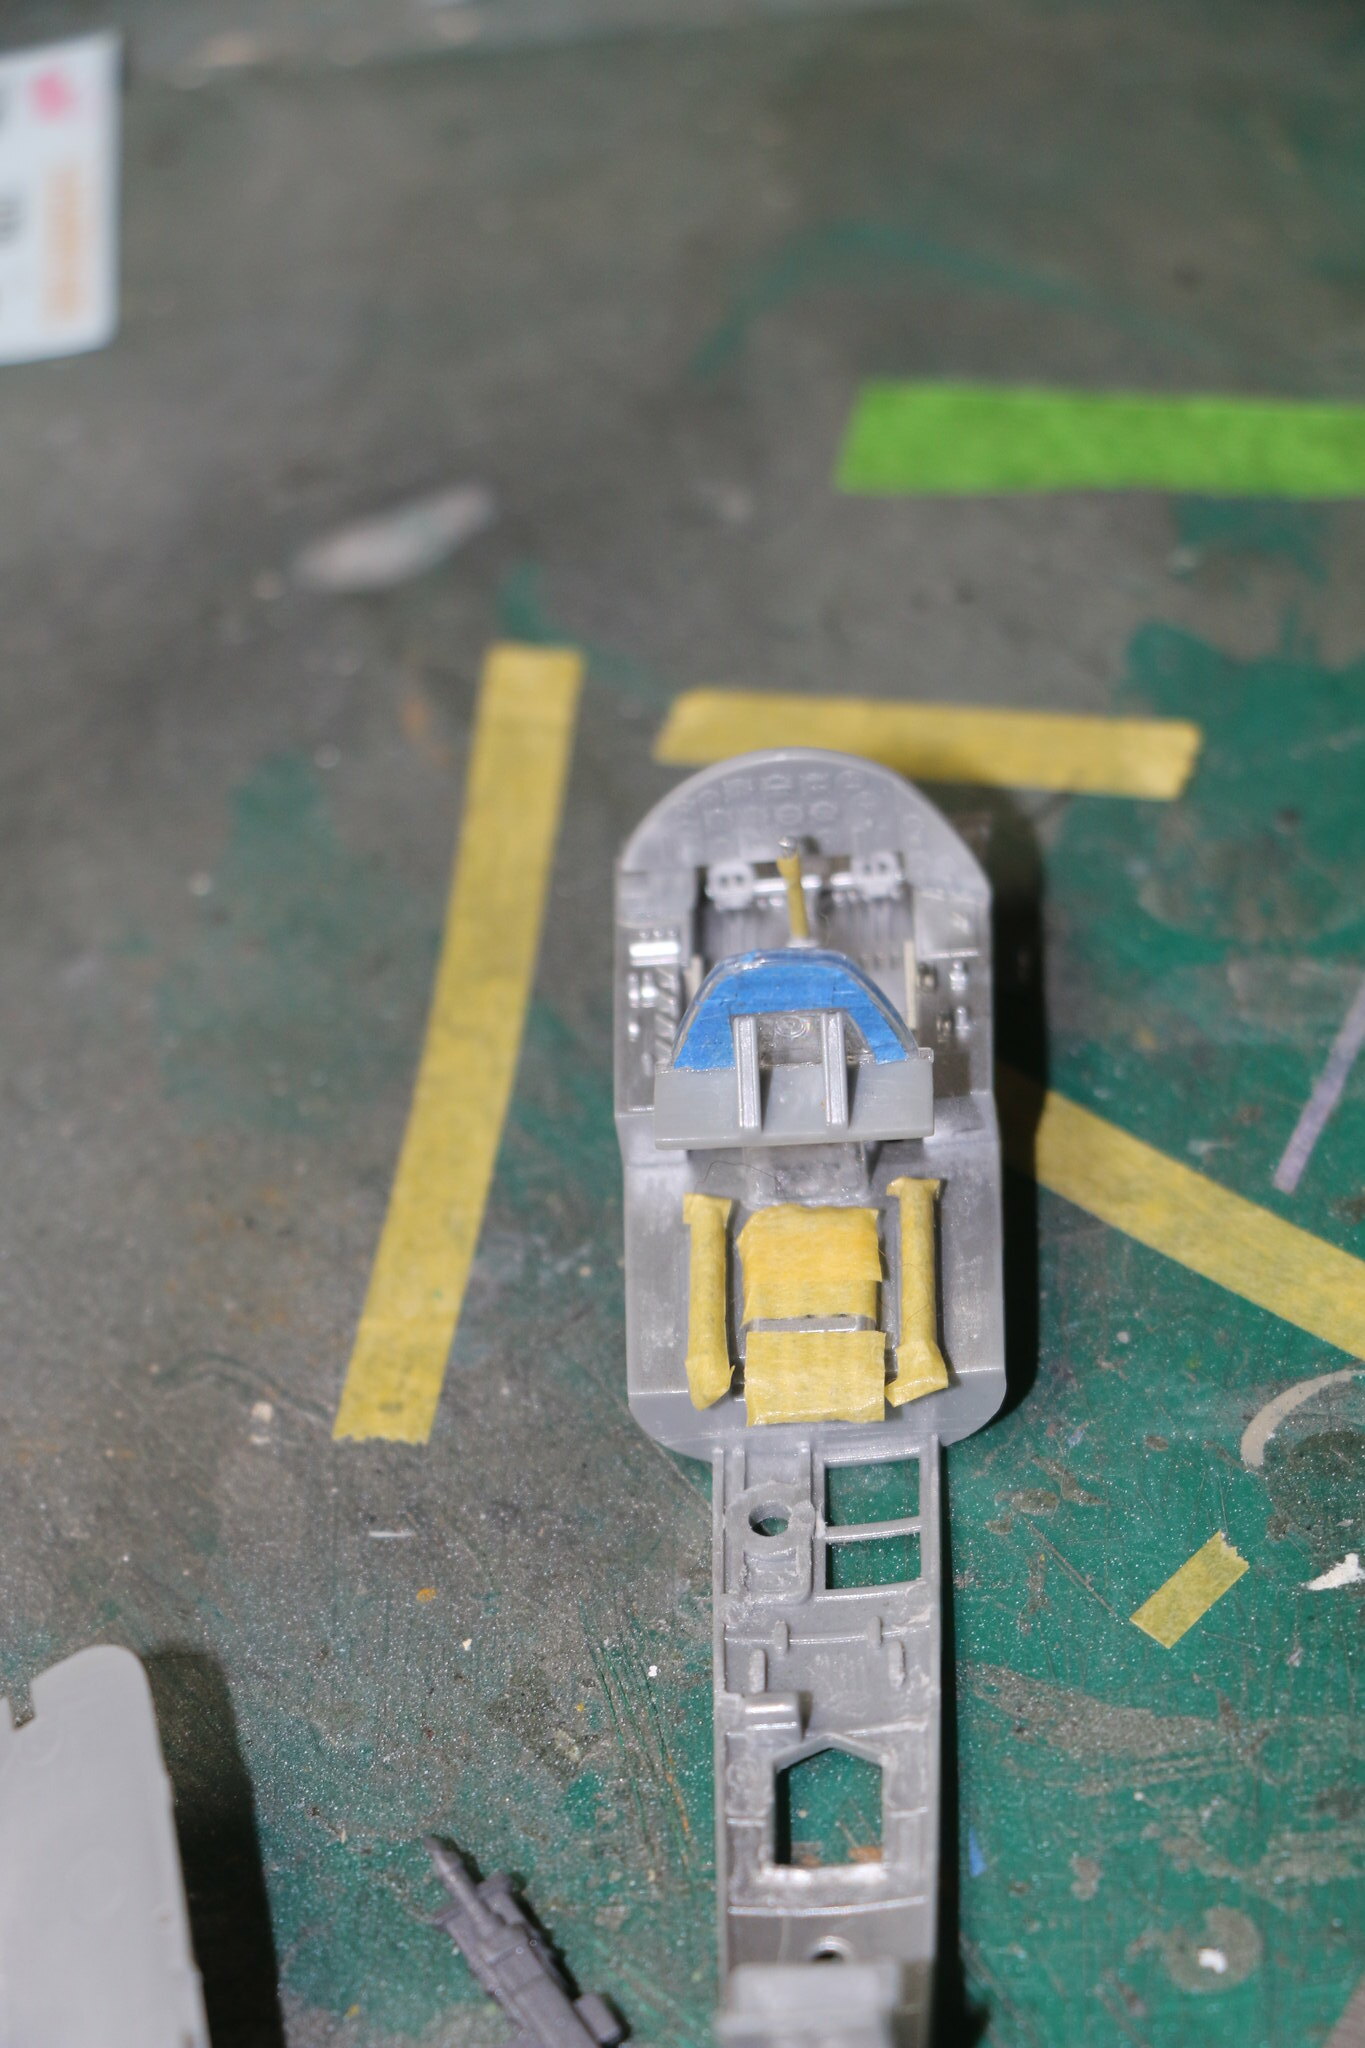
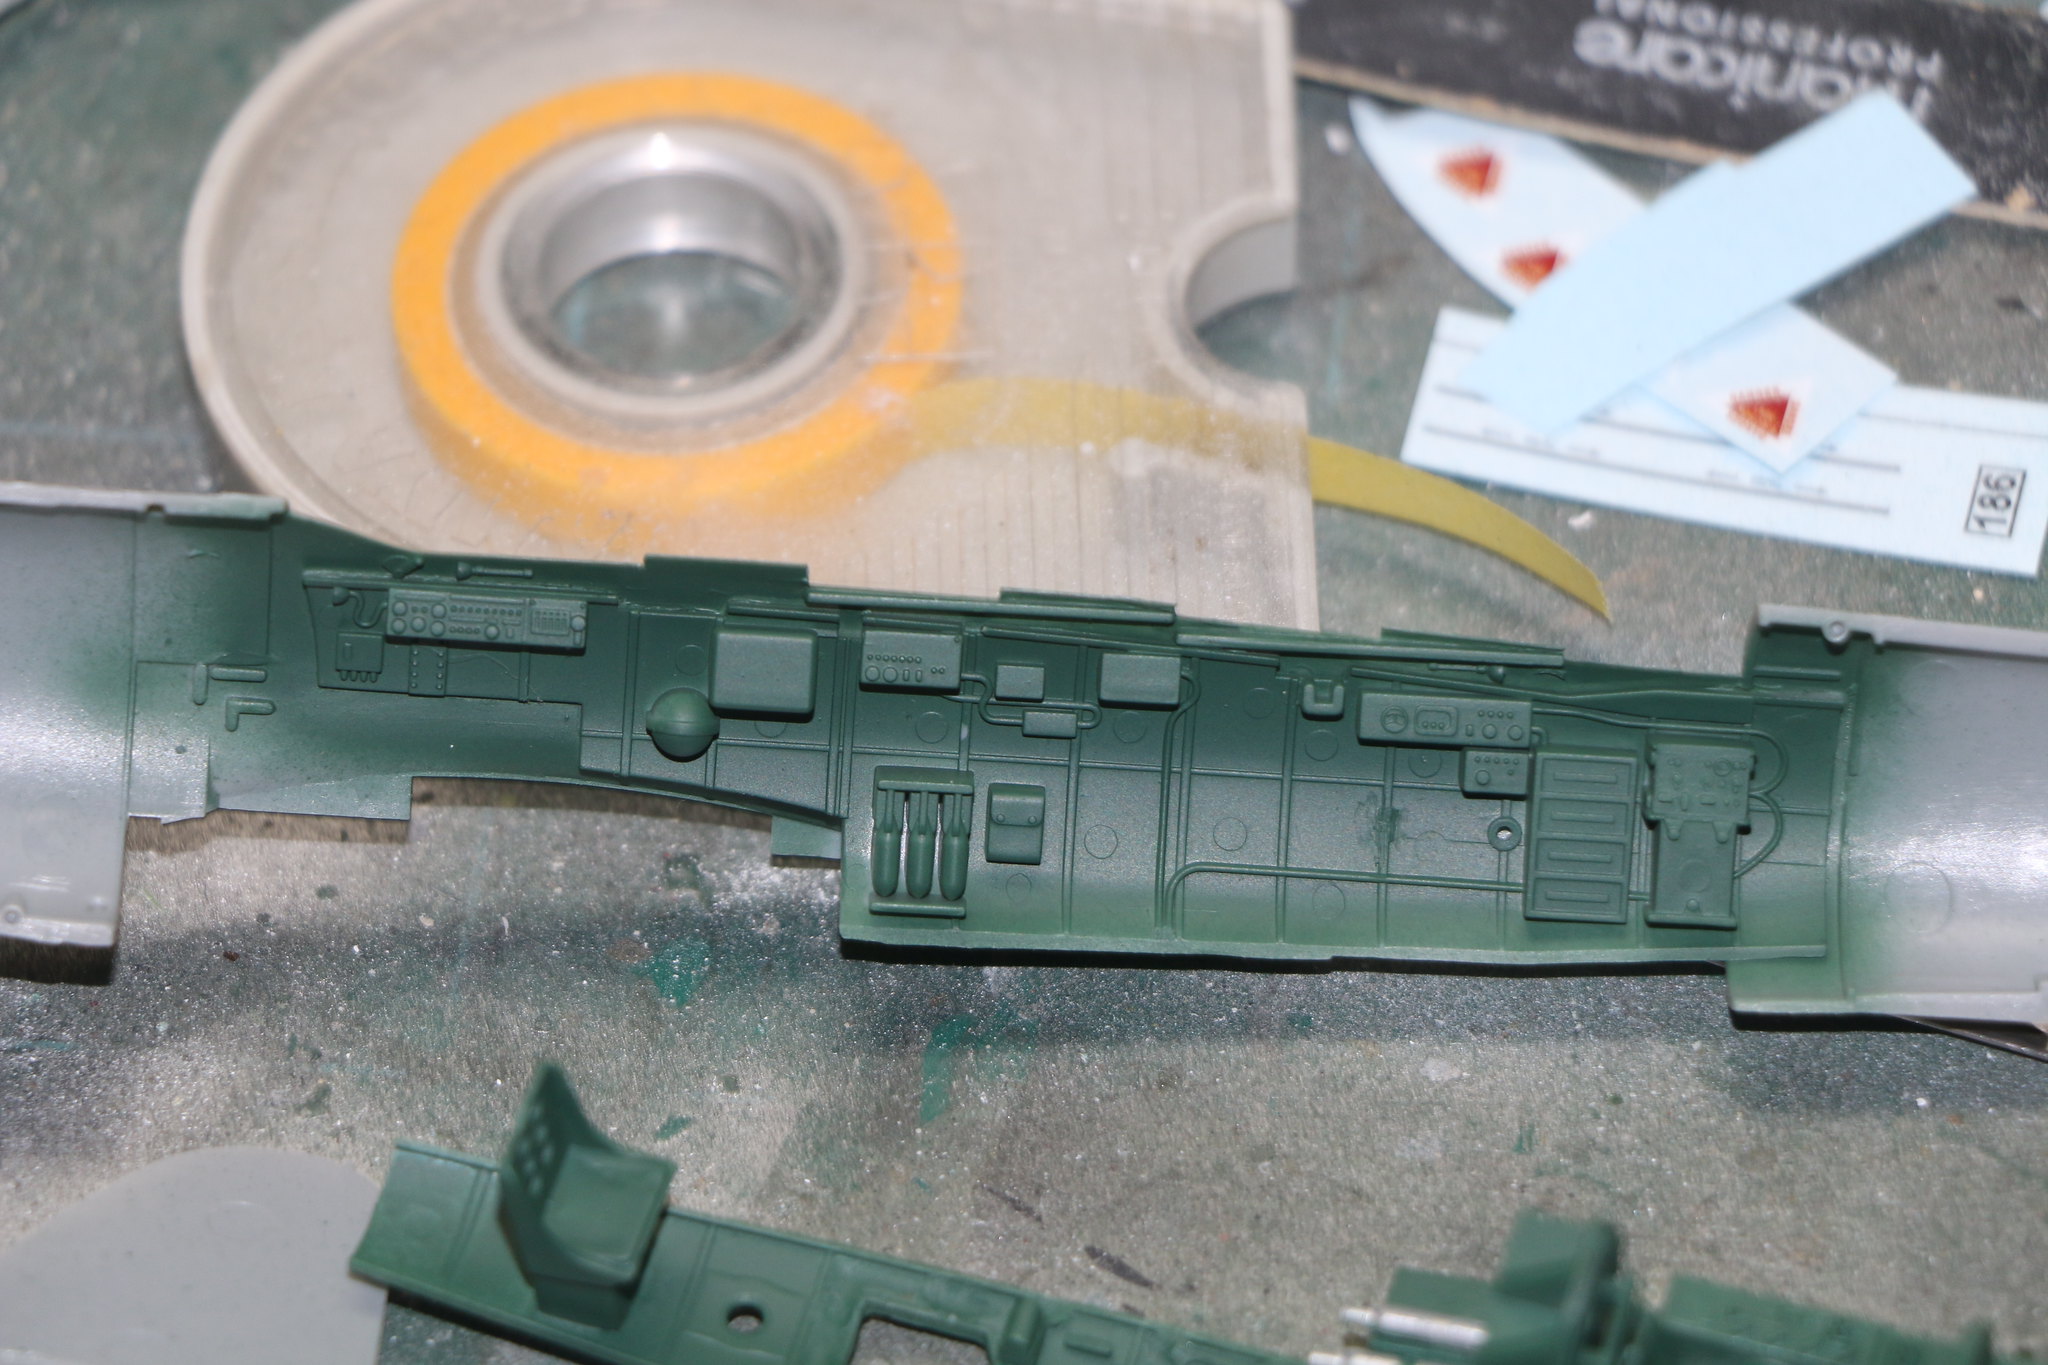
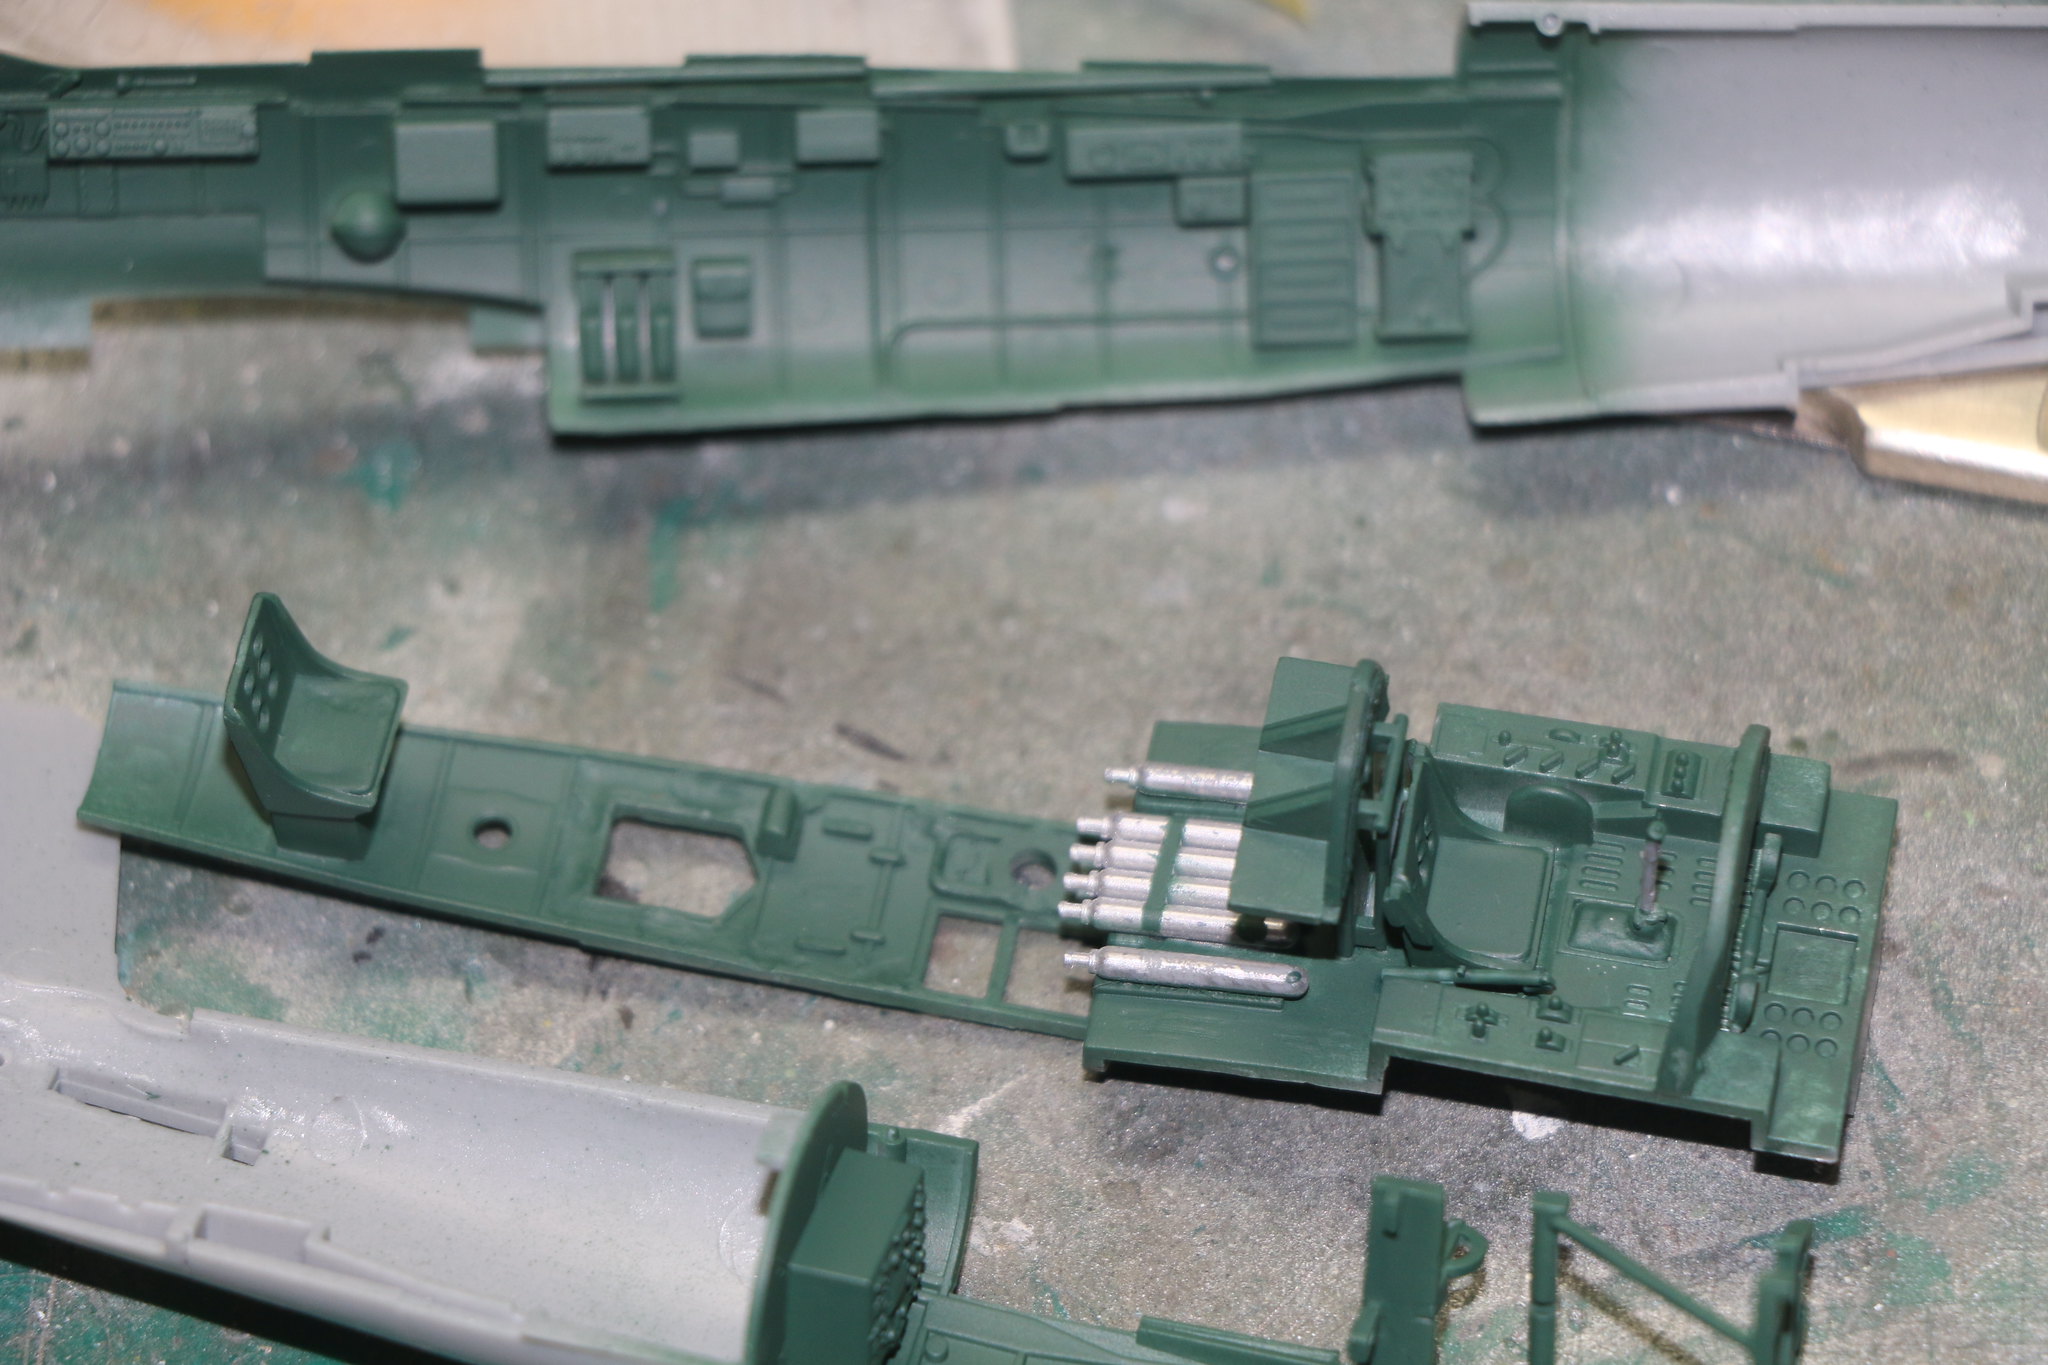
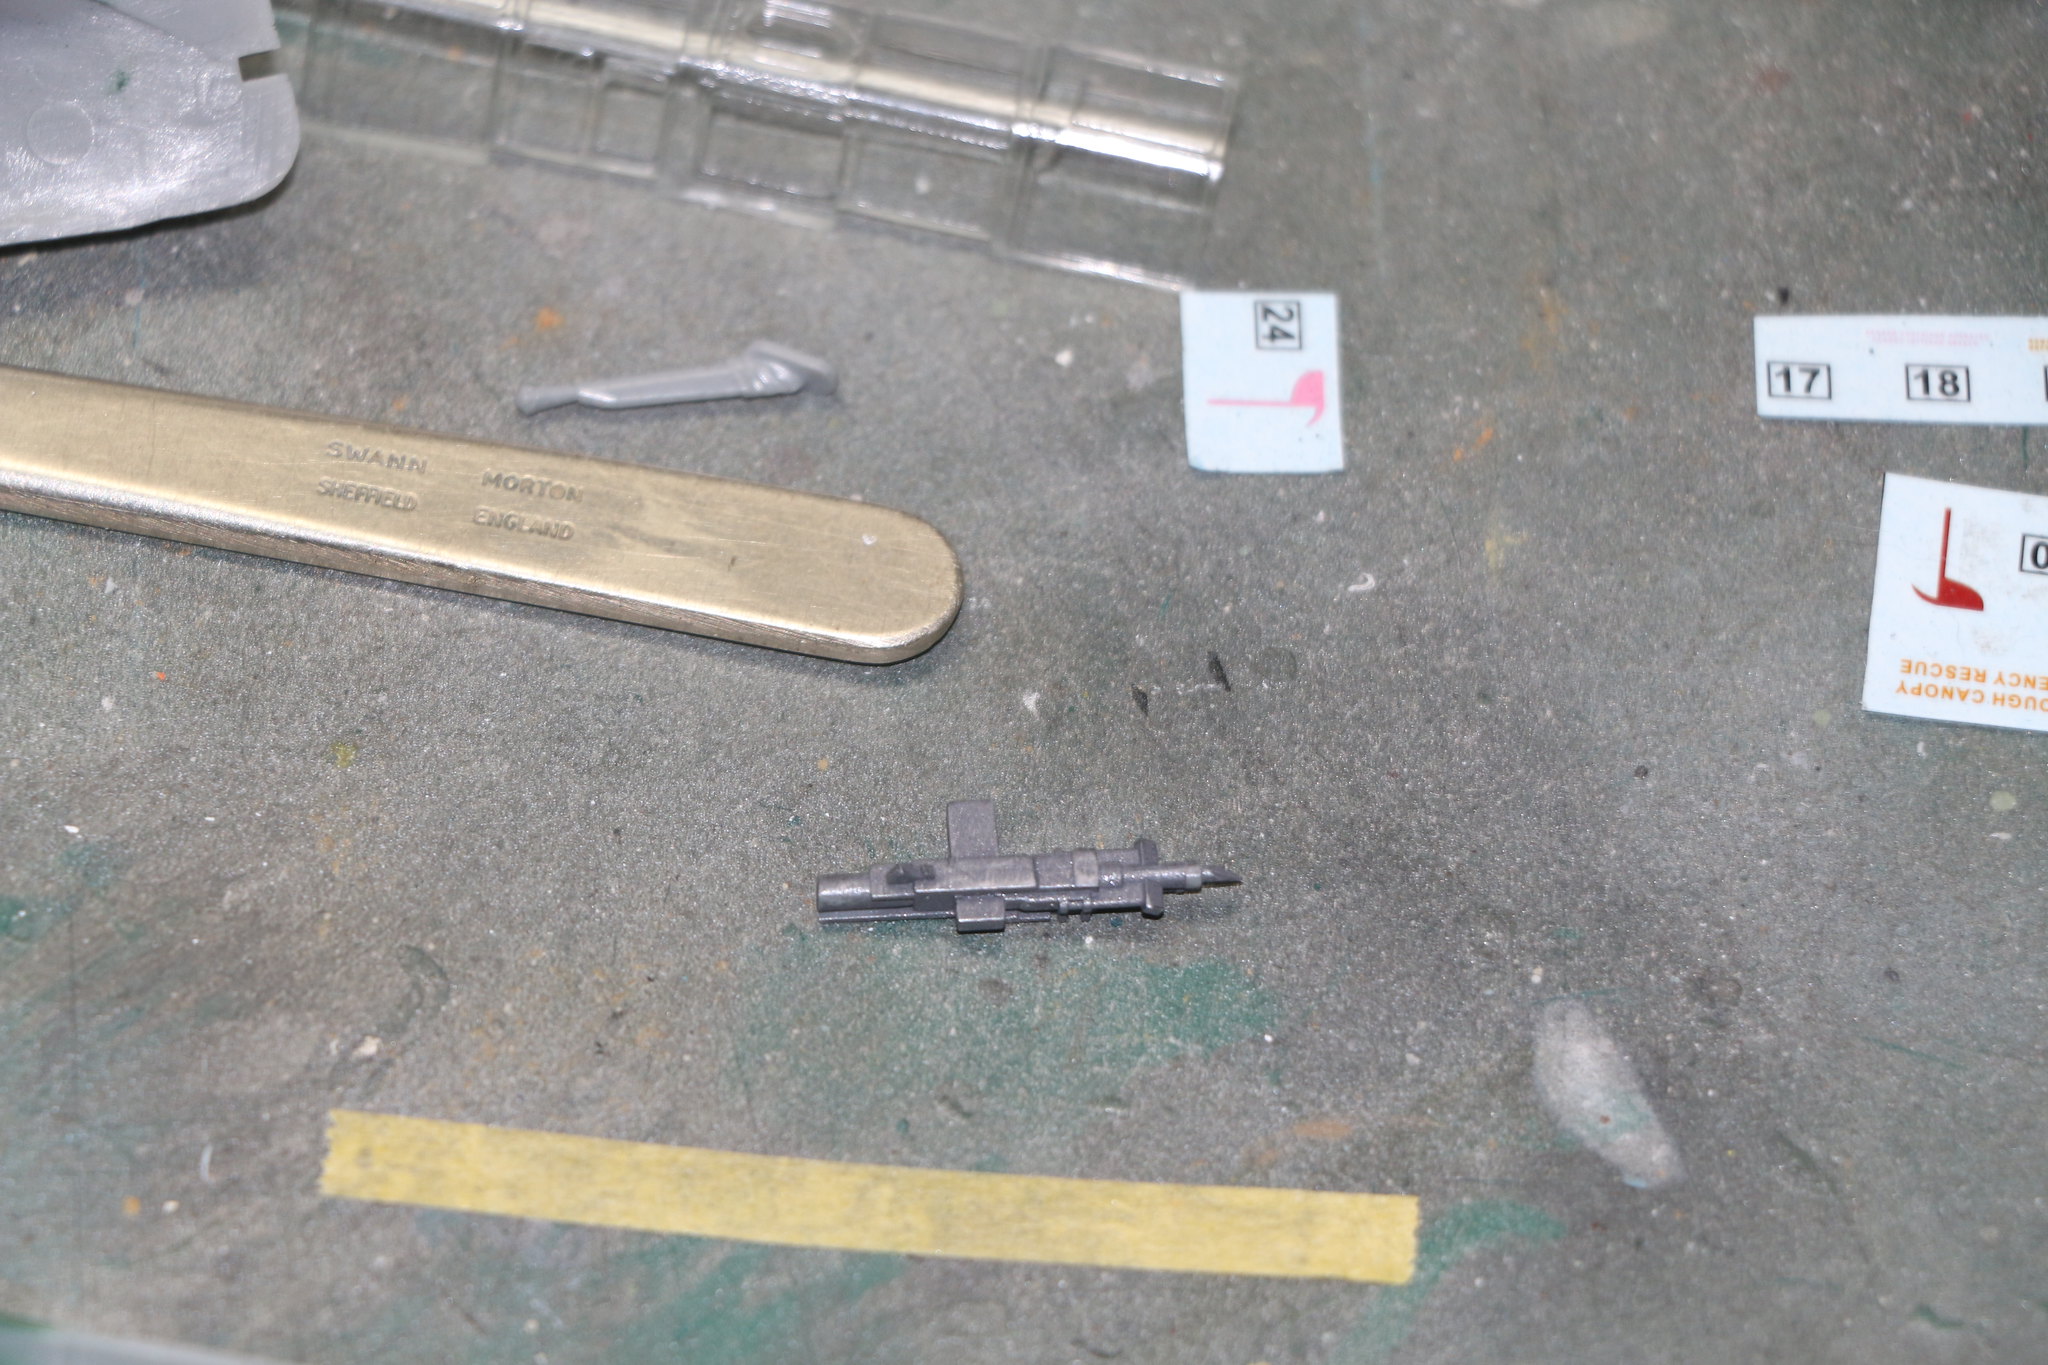
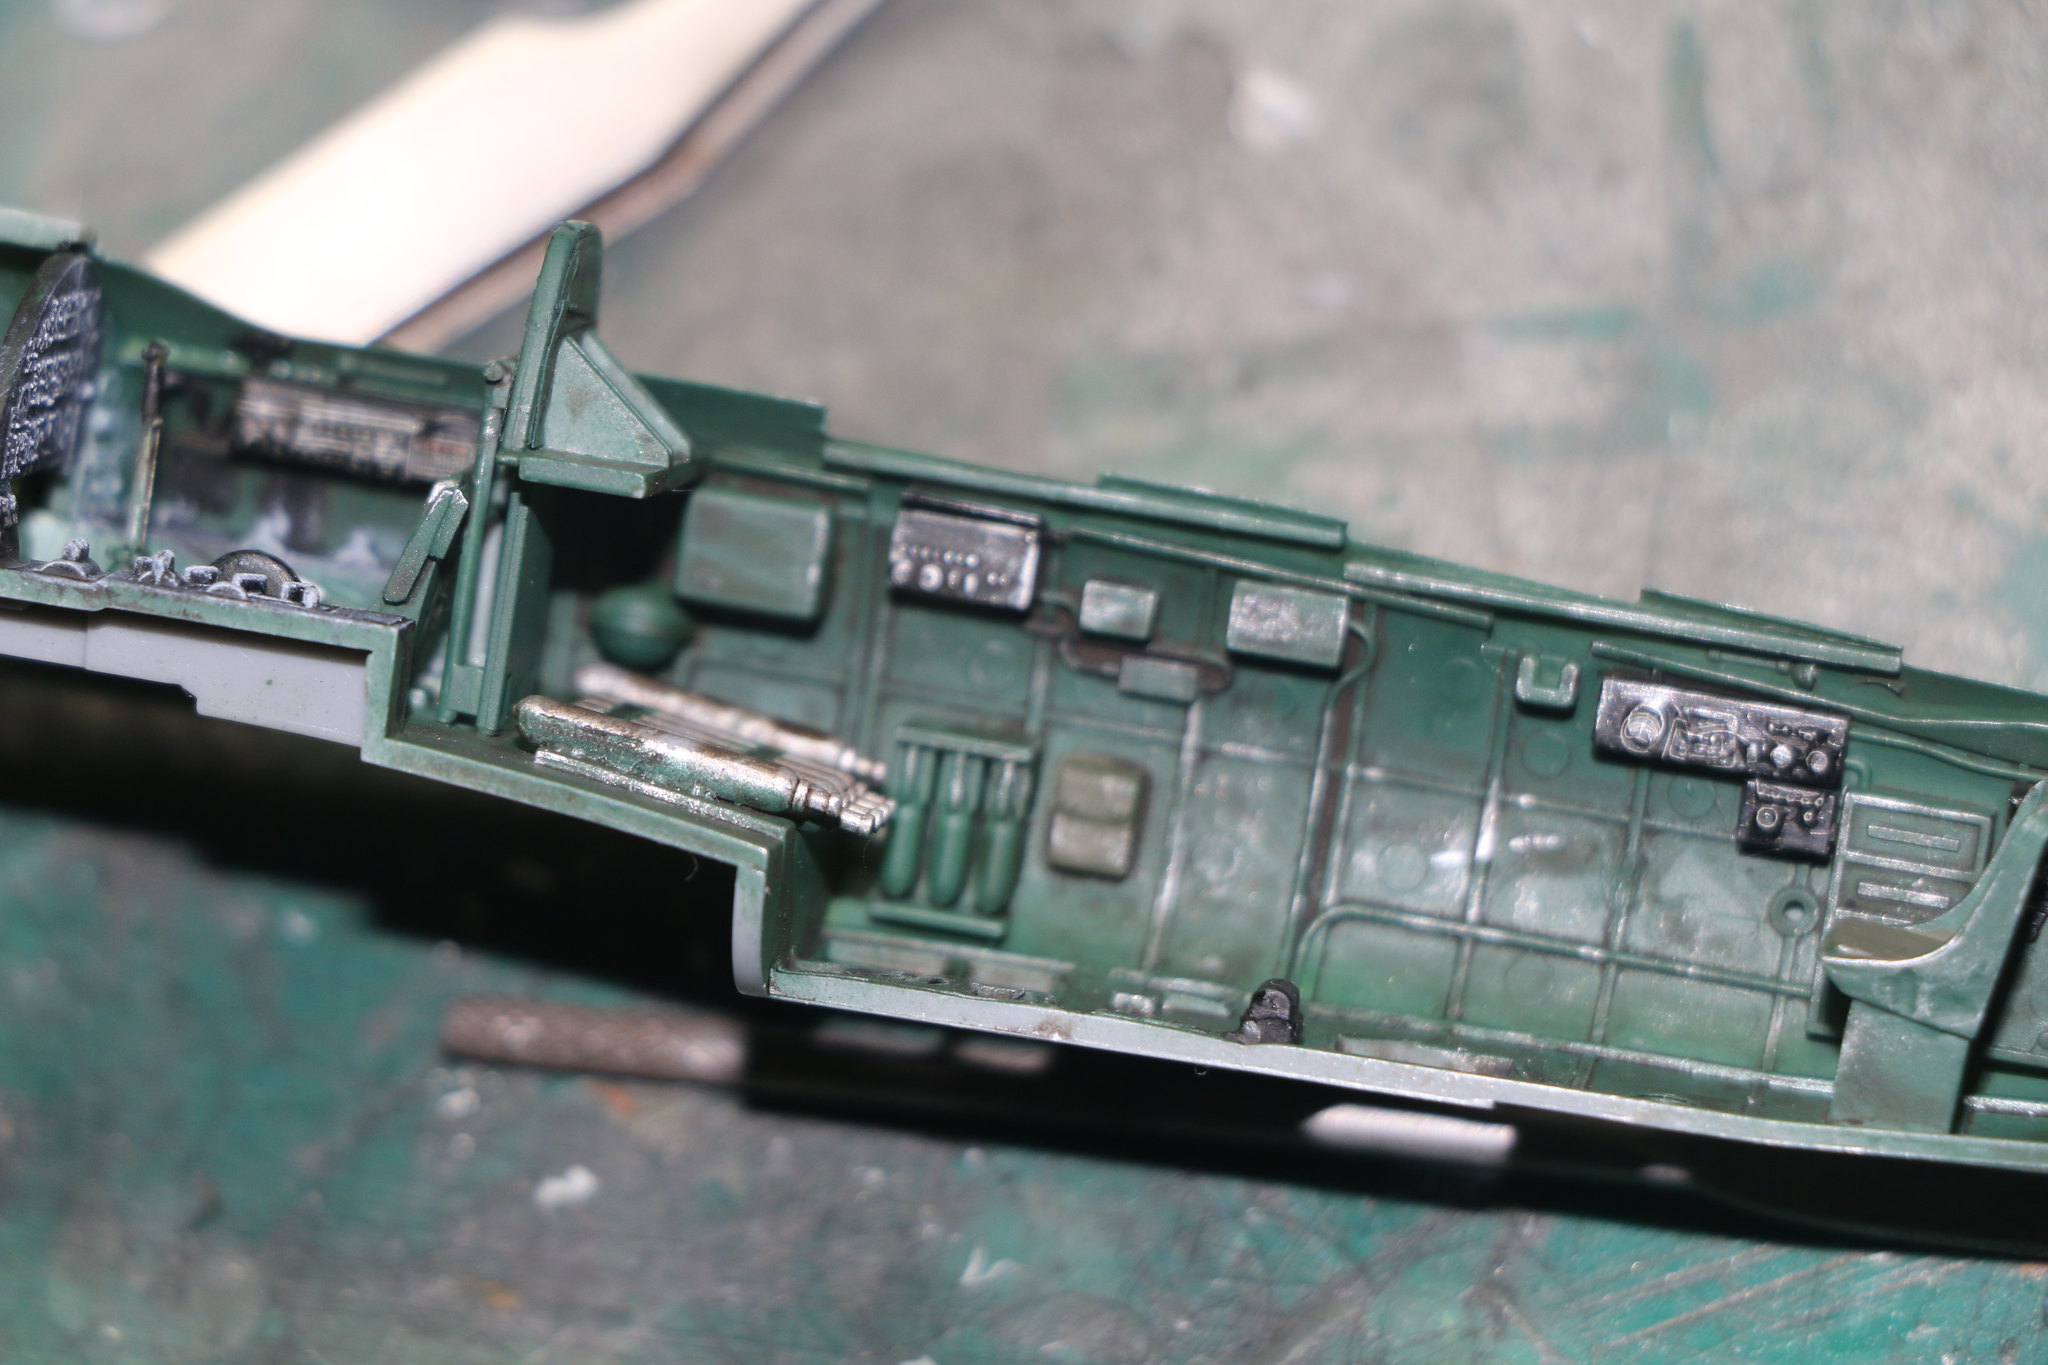
The kit has a significant amount of detail in the cockpit and the instructions for the installation of the canon supports is vague at best! So to help with that I glued the left and right sides of the cockpit to the corresponding fuselage halves and glued the pilots armoured bulkhead to the cockpit floor. I then simply trapped it all inside the fuselage and taped the halves together installed the rear console and glued it to the left hand side. I left it to dry overnight and the following morning I settled down to the task of fitting the canon mount.
I removed the tape on the fuselage and pulled out the floor trapped the canon mount between the fuselage halves and re-taped everything. With the floor removed it was an easy task to shift the mount to a position that seemed correct and then apply glue to the left hand side. Once situated and glued I placed the canon in it's mount and placed the canopy over it to check the fit and was pleasantly surprised to see it all line up and fit nicely.
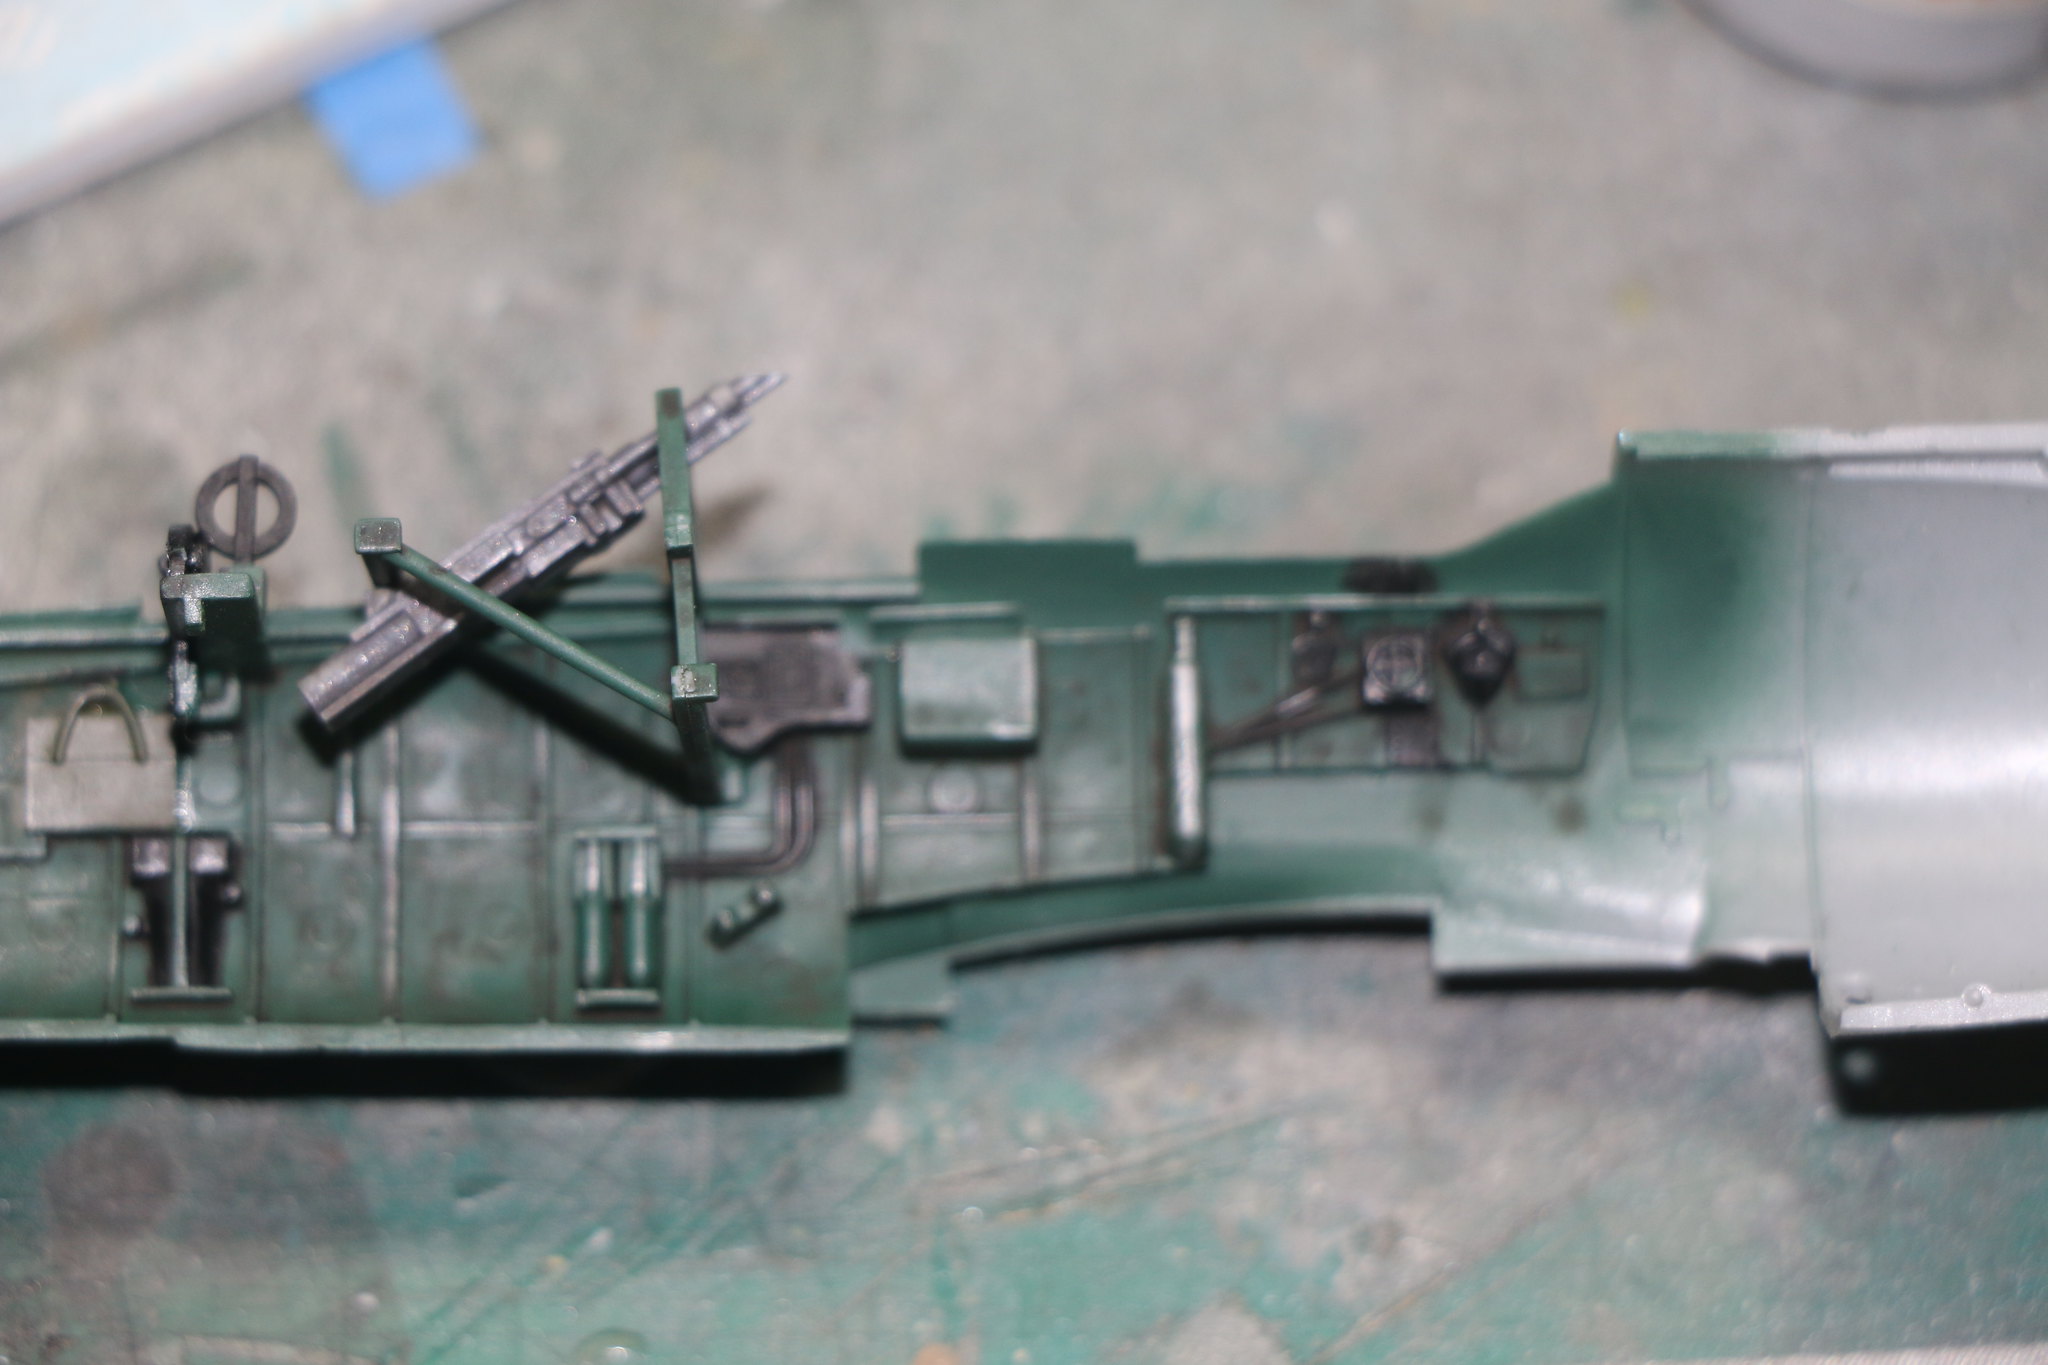
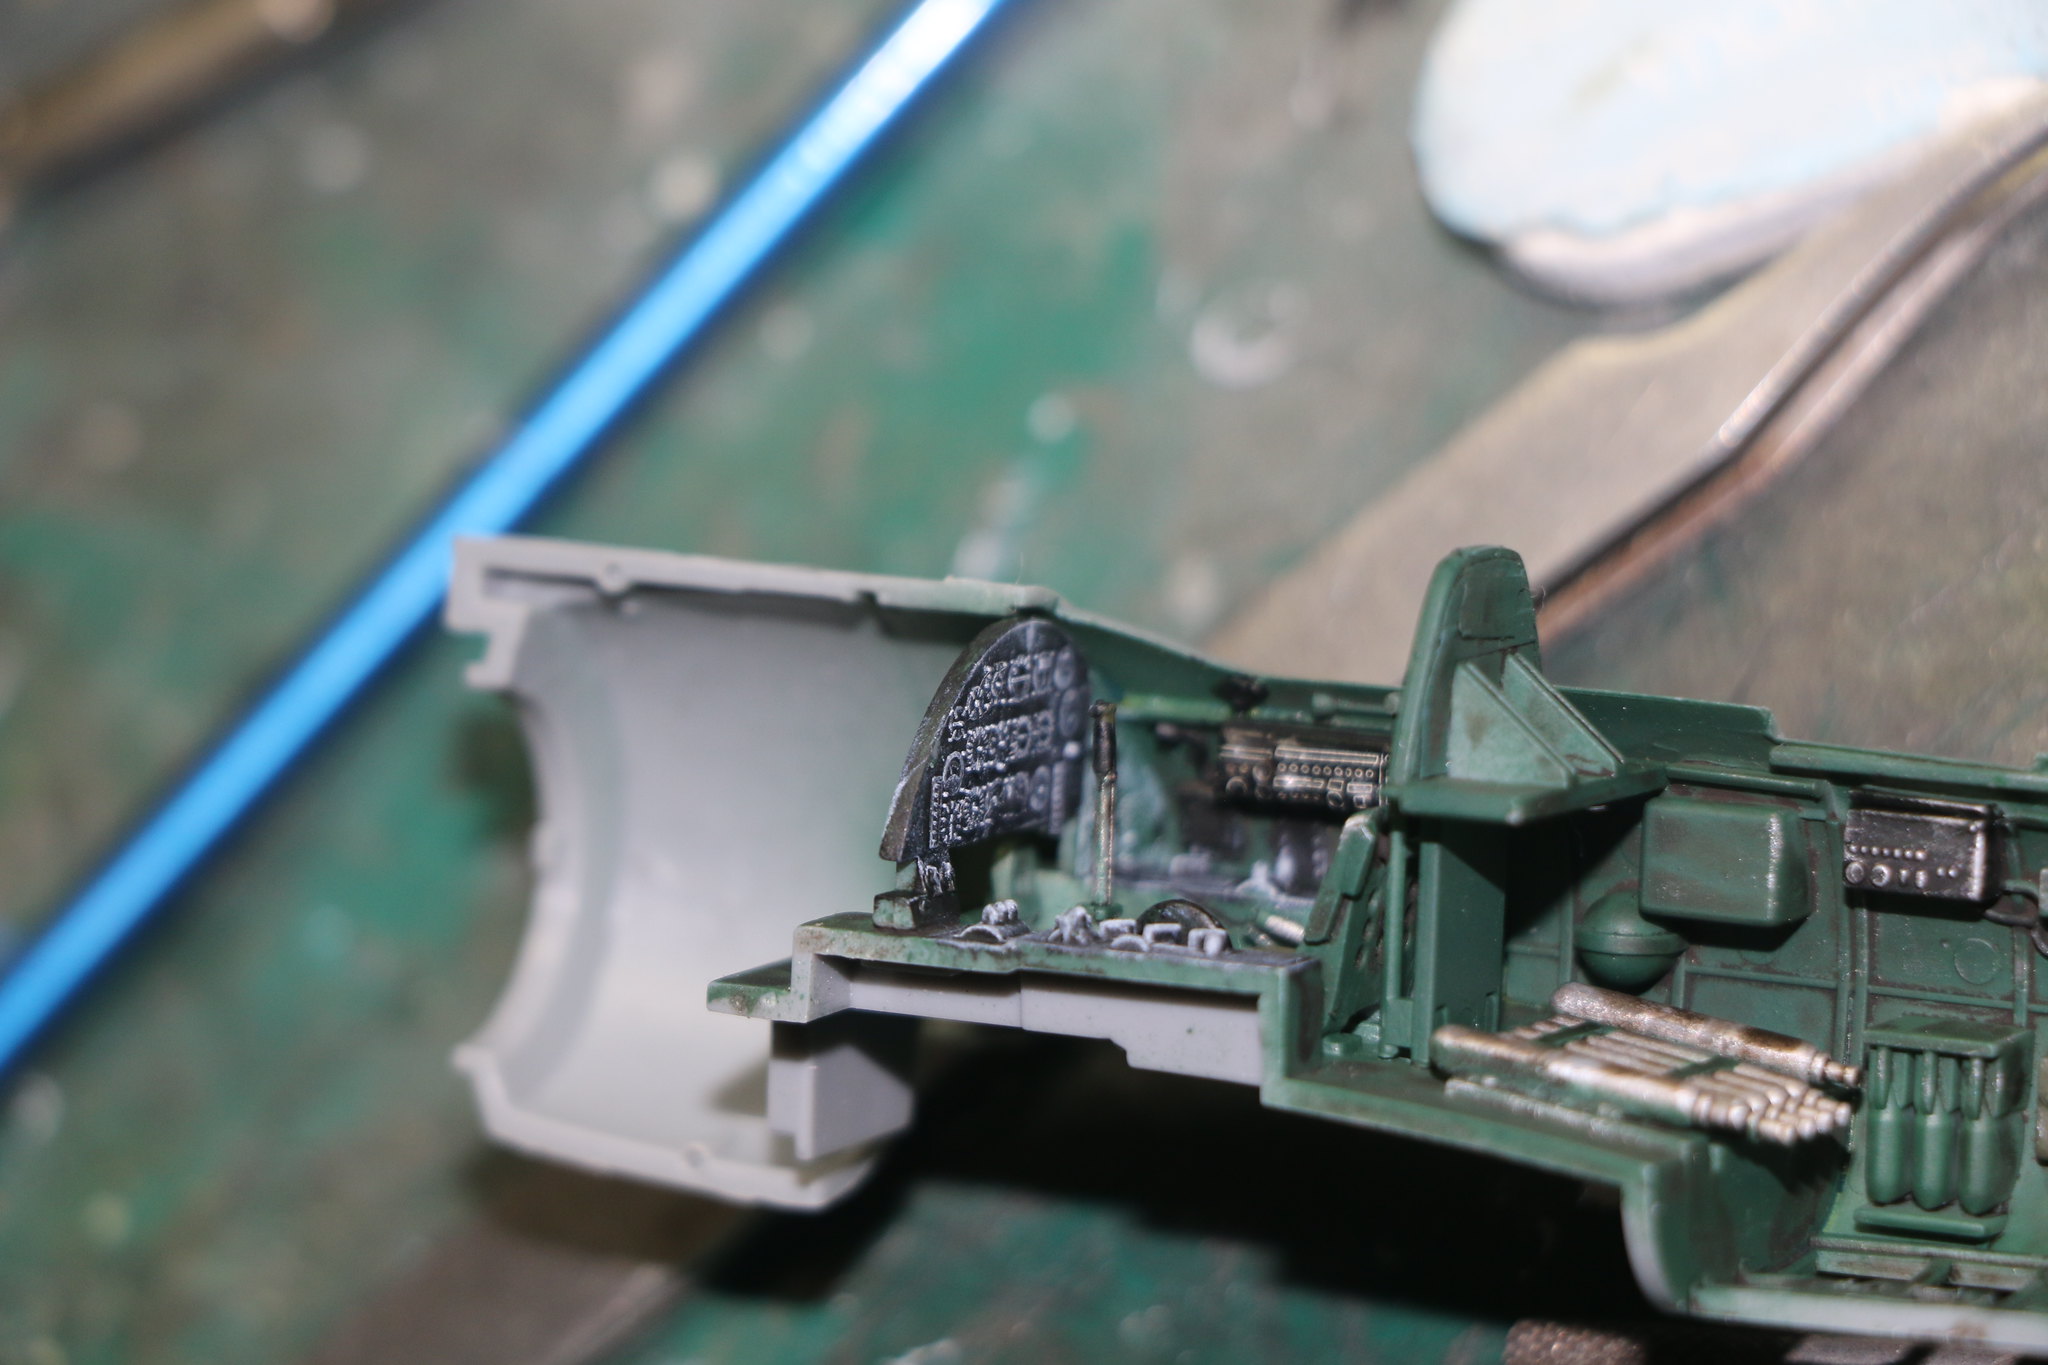
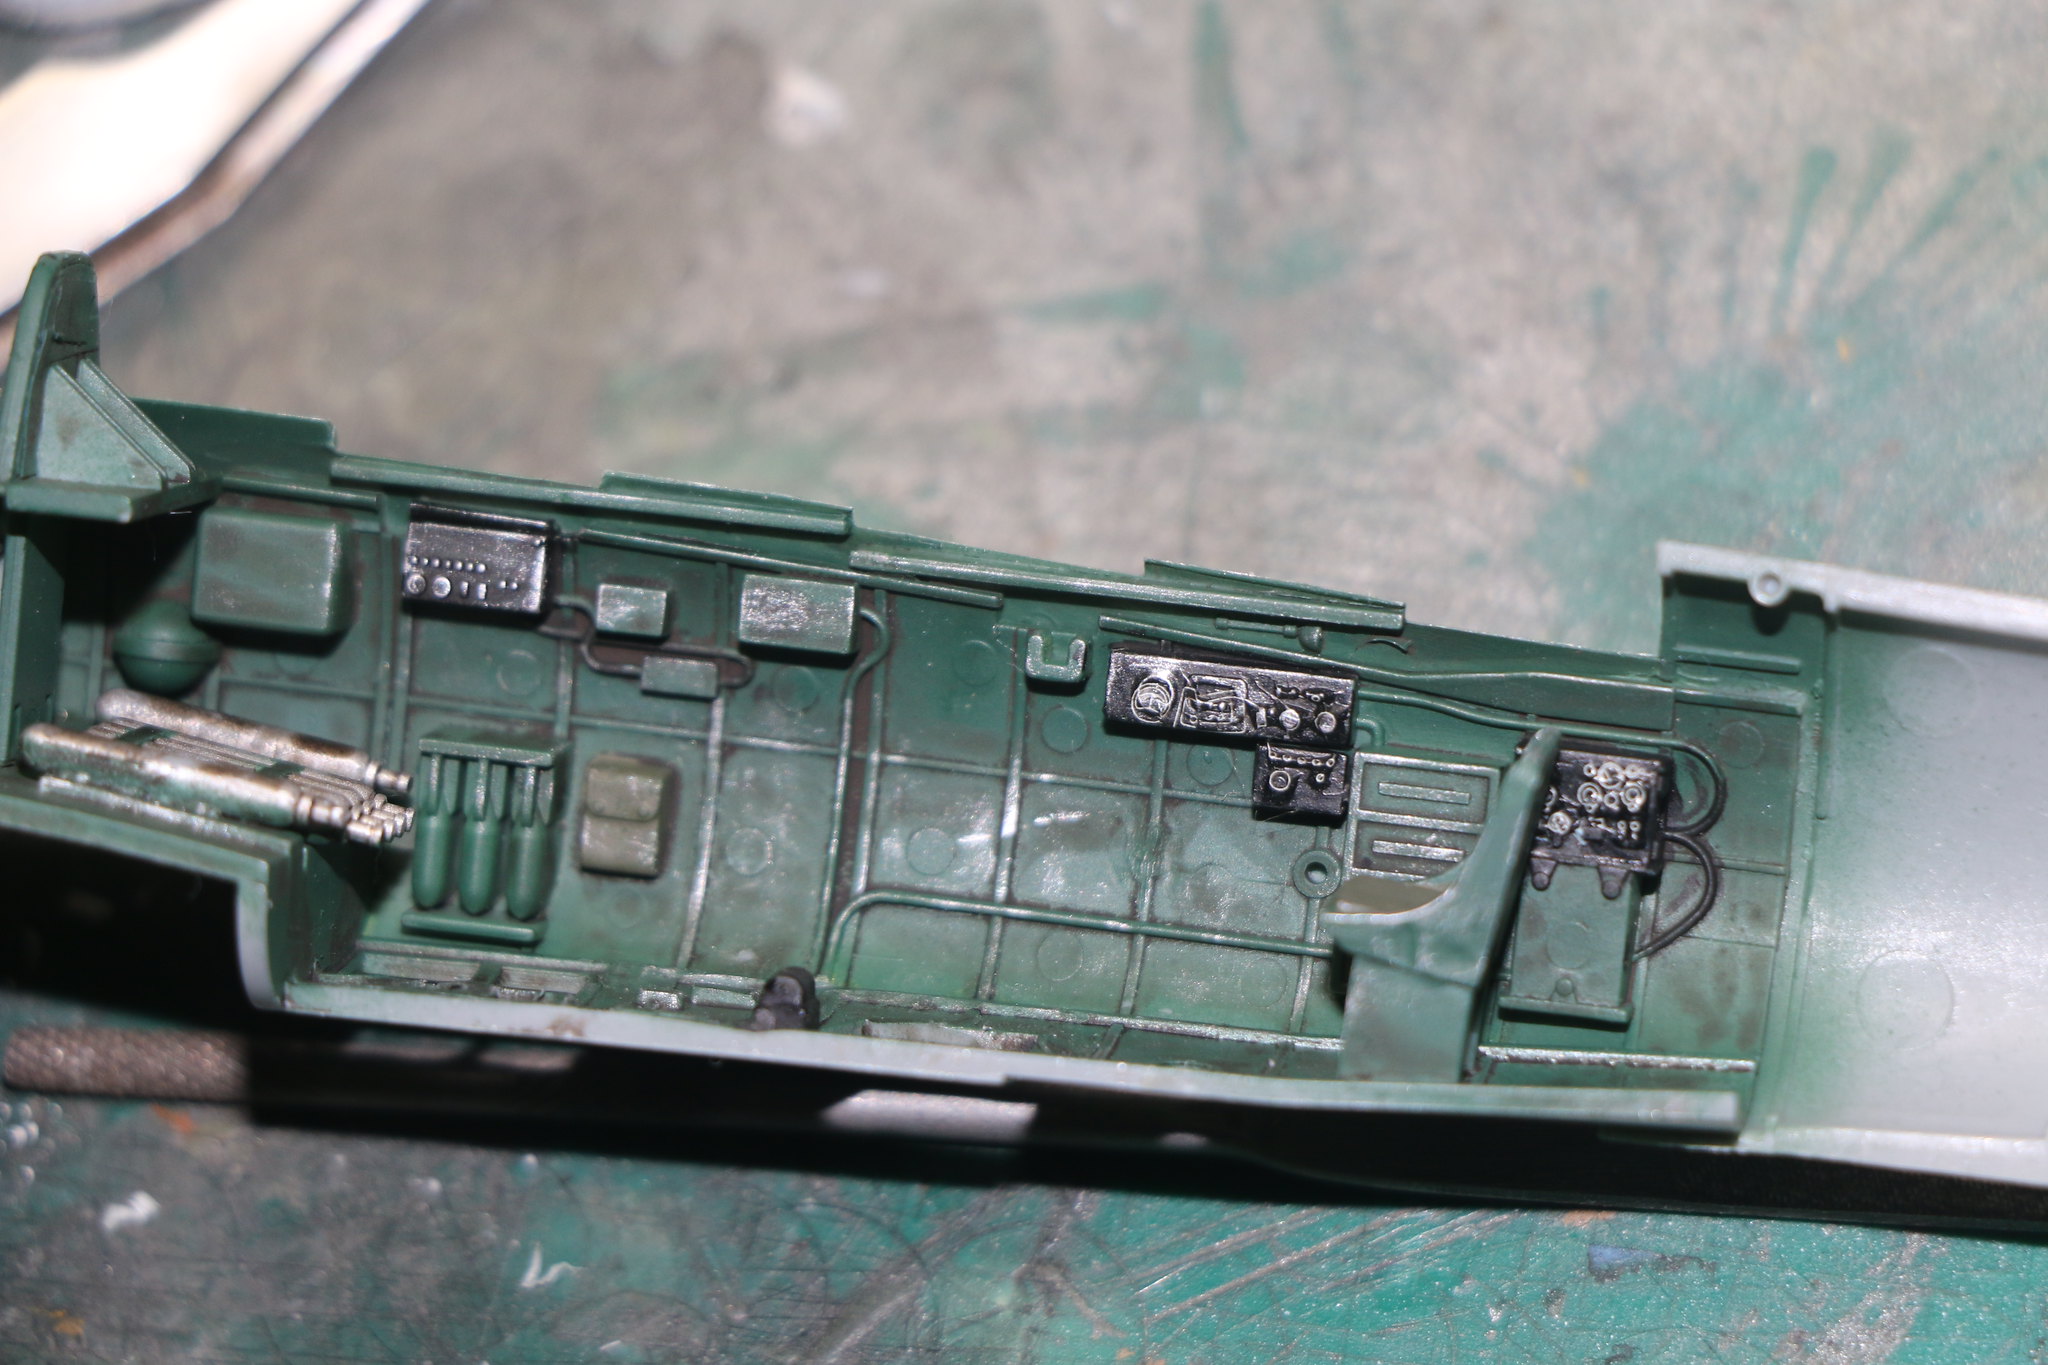
I left it to dry till the afternoon and then un-taped it all and sprayed paint on the cockpit. The instructions call out for a dark green and reference materials suggest that FS34092 is a good fit. I have an Aeromaster paint called Imperial Navy green that seemed to fit the bill and went with that. Being an acrylic it'll stand up to oil washes very well. There are quite a few details to paint in the cockpit so that'll take up my time tonight.
Here are some pics to illustrate just where I'm at.
 IMG_1715
 by
Chris WIlson, on Flickr
 IMG_1716
 by
Chris WIlson, on Flickr
 IMG_1717
 by
Chris WIlson, on Flickr
 IMG_1718
 by
Chris WIlson, on Flickr
 IMG_1719
 by
Chris WIlson, on Flickr
 IMG_1720
 by
Chris WIlson, on Flickr
 IMG_1721
 by
Chris WIlson, on Flickr
 IMG_1722
 by
Chris WIlson, on Flickr
 IMG_1724
 by
Chris WIlson, on Flickr
New Jersey, United States
Joined: February 06, 2015
KitMaker: 1,098 posts
AeroScale: 900 posts
Posted: Saturday, November 18, 2017 - 03:02 AM UTC
Hi Chris ! I'll be watching this with great interest - nice to see another Japanese subject being built. .
Cheers ! Richard
Merlin
 Senior Editor
#017
United Kingdom
Joined: June 11, 2003
KitMaker: 17,582 posts
AeroScale: 12,795 posts
Posted: Saturday, November 18, 2017 - 03:26 AM UTC
Hi Chris
Sorry - I missed your introductory post on this build. You've made a great start and it looks set to be a cracker!

All the best
Rowan
BEWARE OF THE FEW...
As I grow older, I regret to say that a detestable habit of thinking seems to be getting a hold of me. - H. Rider Haggard
Ontario, Canada
Joined: July 22, 2012
KitMaker: 771 posts
AeroScale: 763 posts
Posted: Saturday, November 18, 2017 - 06:52 AM UTC
Cool! Good start. I wish more people would built Japanese subjects!
Matt Odom
I've been known to build a few things
Joel_W
Associate Editor New York, United States
Joined: December 04, 2010
KitMaker: 11,666 posts
AeroScale: 7,410 posts
Posted: Saturday, November 18, 2017 - 08:54 AM UTC
Chris,
Just an excellent start to that pit. From following other builds, that color really looks pretty good to me.
I've yet to build an Japanese aircraft, but with Tamiya's Ki-61 I just might do one sooner then later. In any event, I'm pulling up my chair and following your build to conclusion.
Sure do wish that other modelers doing campaigns would also post in the open forums so we can share their work and accomplishments with them.
Joel
On my Workbench:
Monogram 1/24 scale 427 Shelby Cobra
Just Completed:
Beemax 1/24 scale BMW M3 E30 1992 Evolution II
#305
Christchurch, New Zealand
Joined: February 01, 2006
KitMaker: 1,673 posts
AeroScale: 1,517 posts
Posted: Saturday, November 18, 2017 - 09:26 AM UTC
Richard great to see you here, I agree Japanese subjects seem to take a back seat to the usual European, Mediterranean and allied pacific builds.
Rowan fantastic to see you pop along! Don't worry about missing the first post I'm just pleased to have you pop by for a look.
Matt as always a pleasure to see you frequent one of my blogs. I must agree Japanese subjects are the poor cousin so to speak.
Joel buddy! Really happy to see you here. You sir have been missed and I for one are dead chuffed (really pleased for our American friends) to see you back. While I agree Joel that it'd be nice to see more build logs I know not everyone feels comfortable to put digital pen to digital paper. I find I really appreciate those of us that do.
Nordrhein-Westfalen, Germany
Joined: March 22, 2015
KitMaker: 671 posts
AeroScale: 614 posts
Posted: Saturday, November 18, 2017 - 09:30 PM UTC
Hi Chris,
very nice build. I will follow with interest, too!
Oliver

On the desk: Probably a Panzer III.
#305
Christchurch, New Zealand
Joined: February 01, 2006
KitMaker: 1,673 posts
AeroScale: 1,517 posts
Posted: Tuesday, November 21, 2017 - 03:40 PM UTC
Oliver welcome always a pleasure to see you wander through one of my builds.
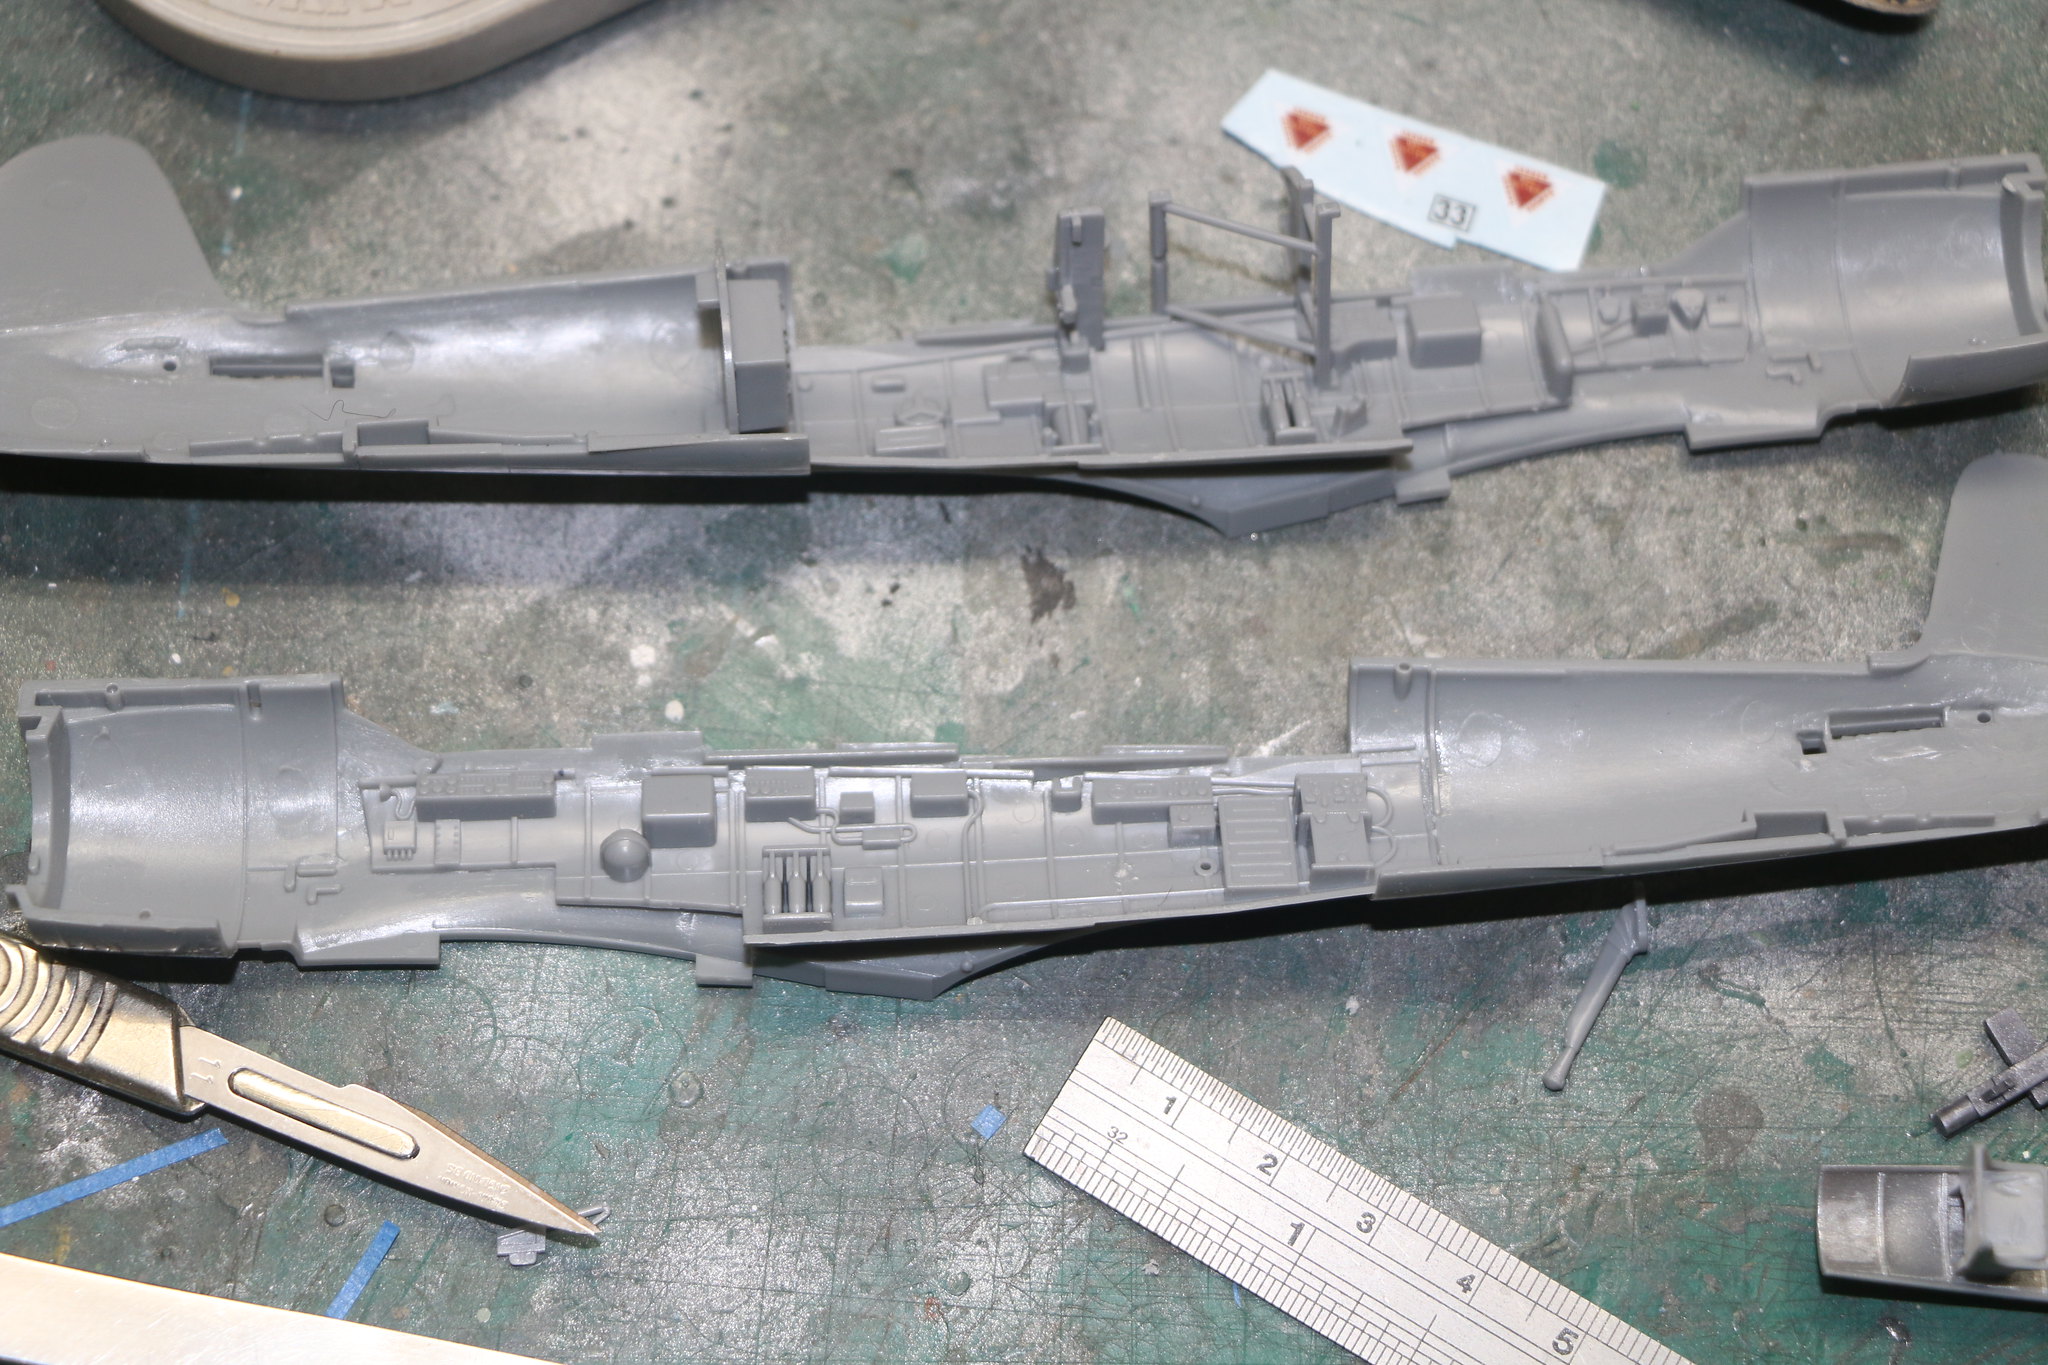
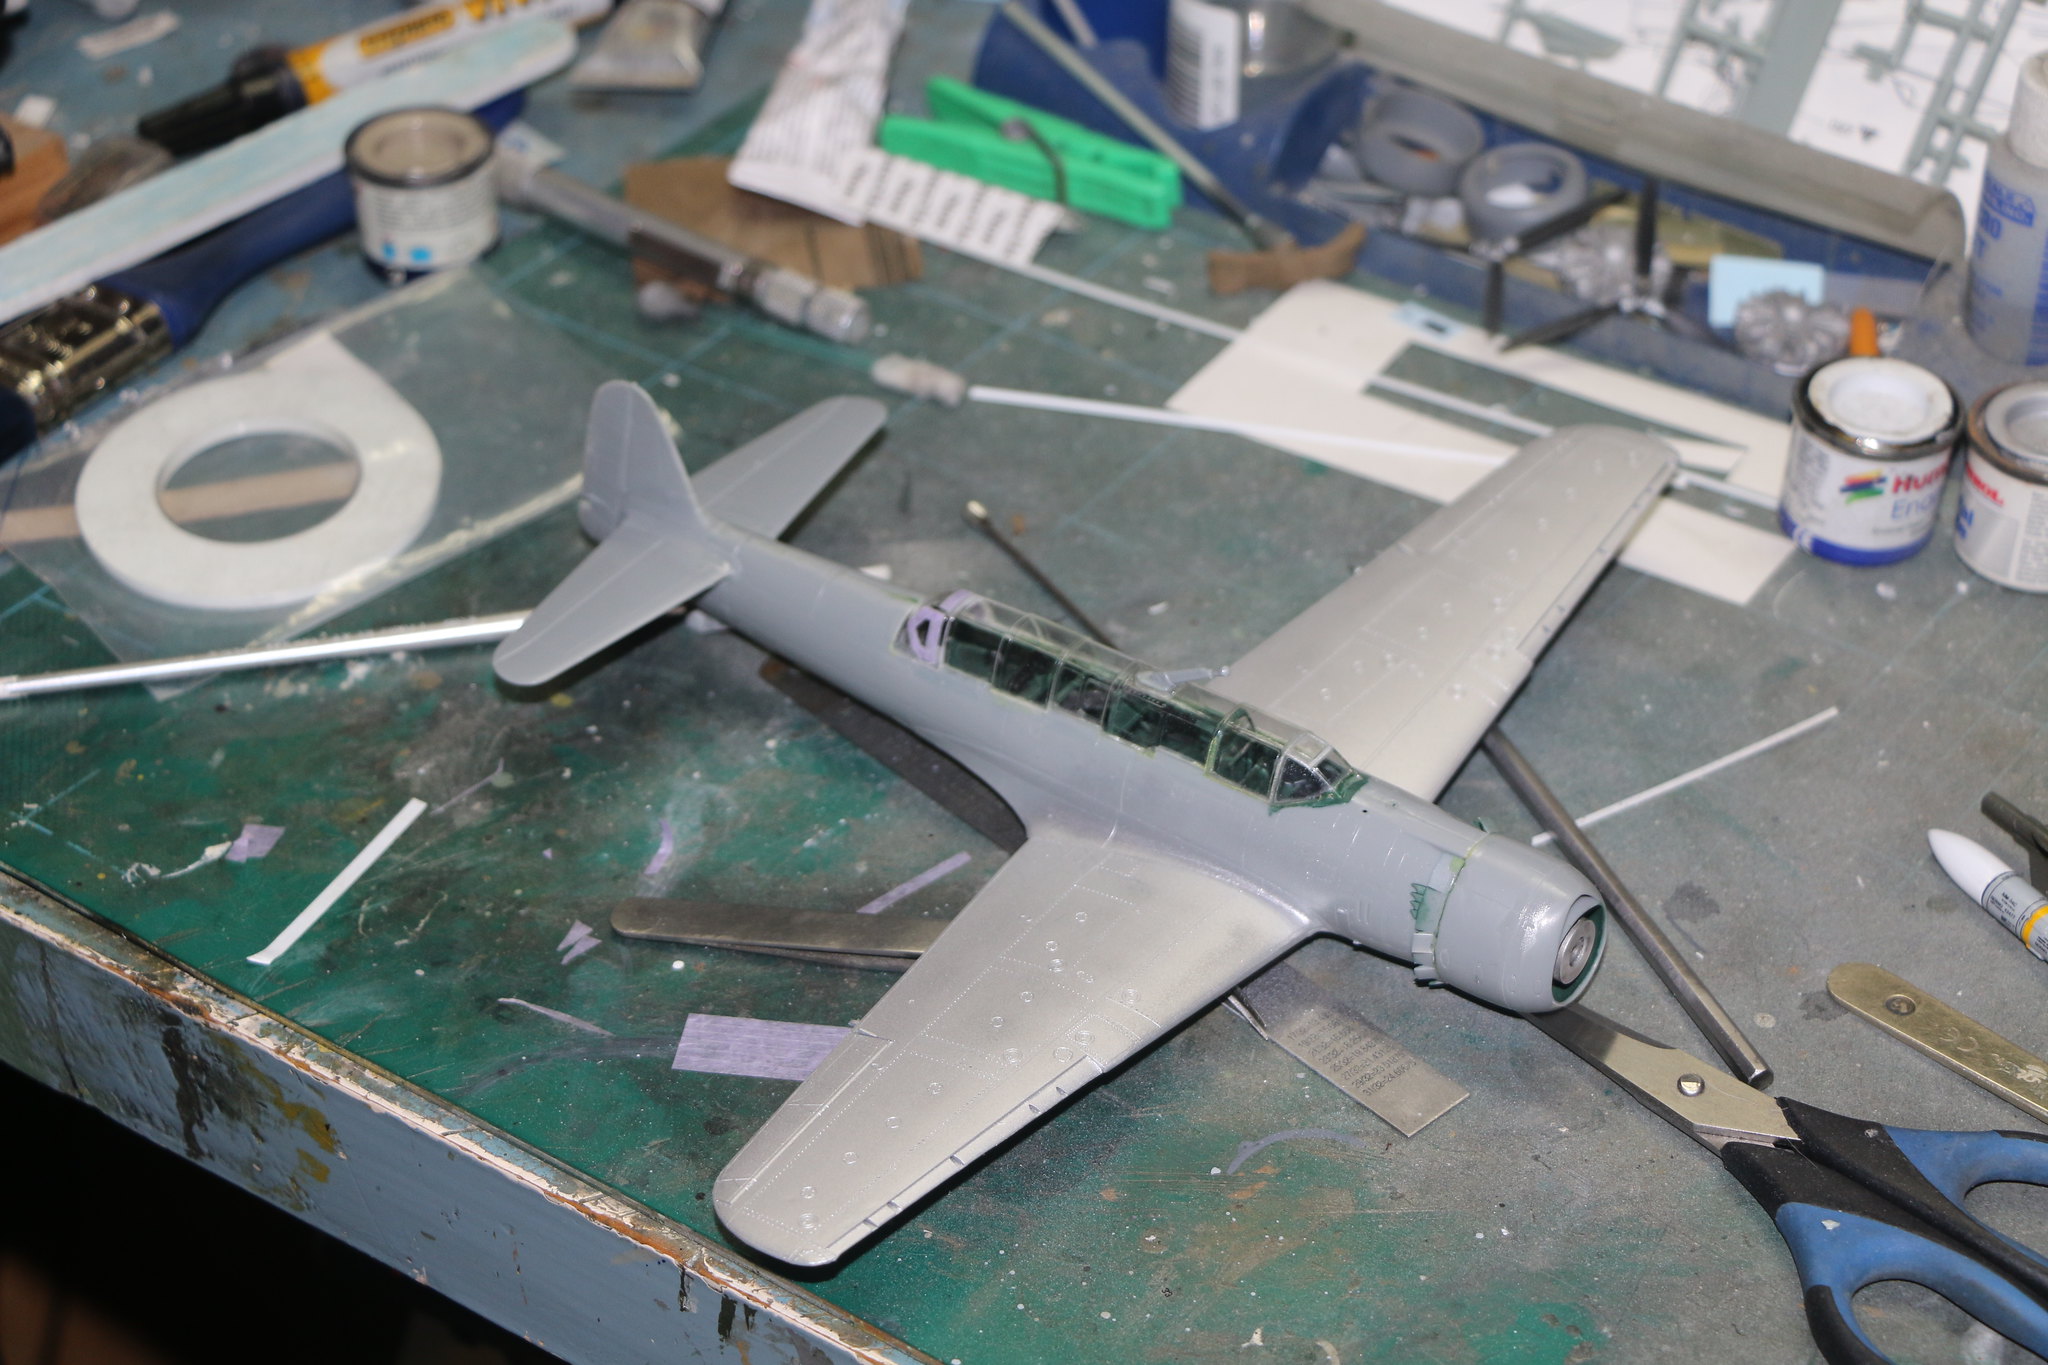
Well some further progress working on this, the Canberra and the F-14A remind me of just how small and simple WW2 aircraft are compared to their modern counterparts. The speed at which the Saiun is coming together versus the F-14 is remarkable. Plus too jets aren't something I do a lot of so I'm kinda finding my way and therefore slower.
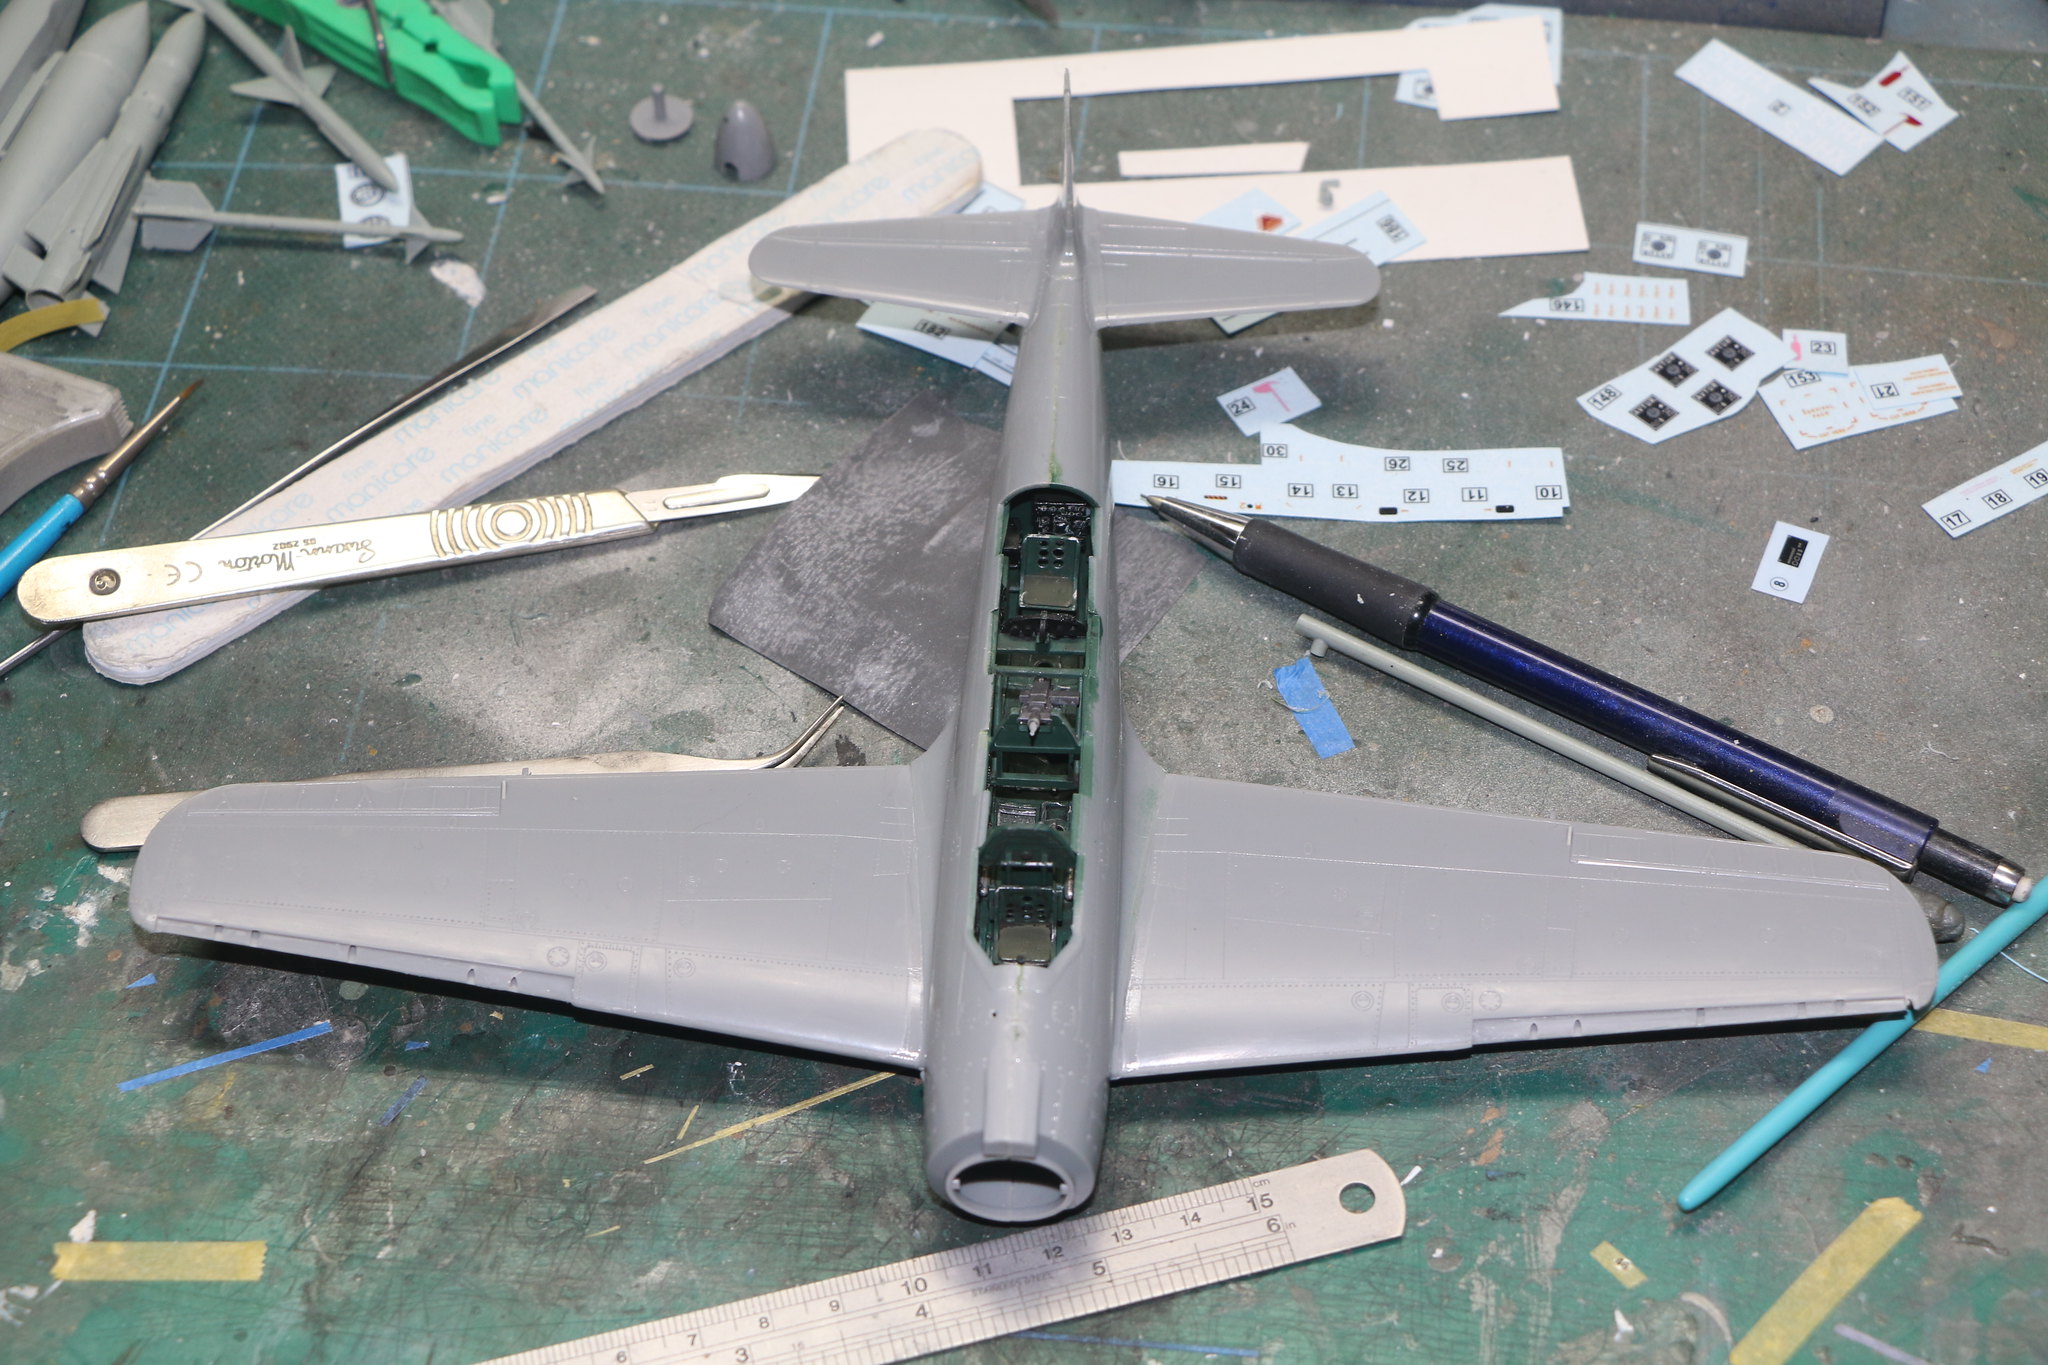
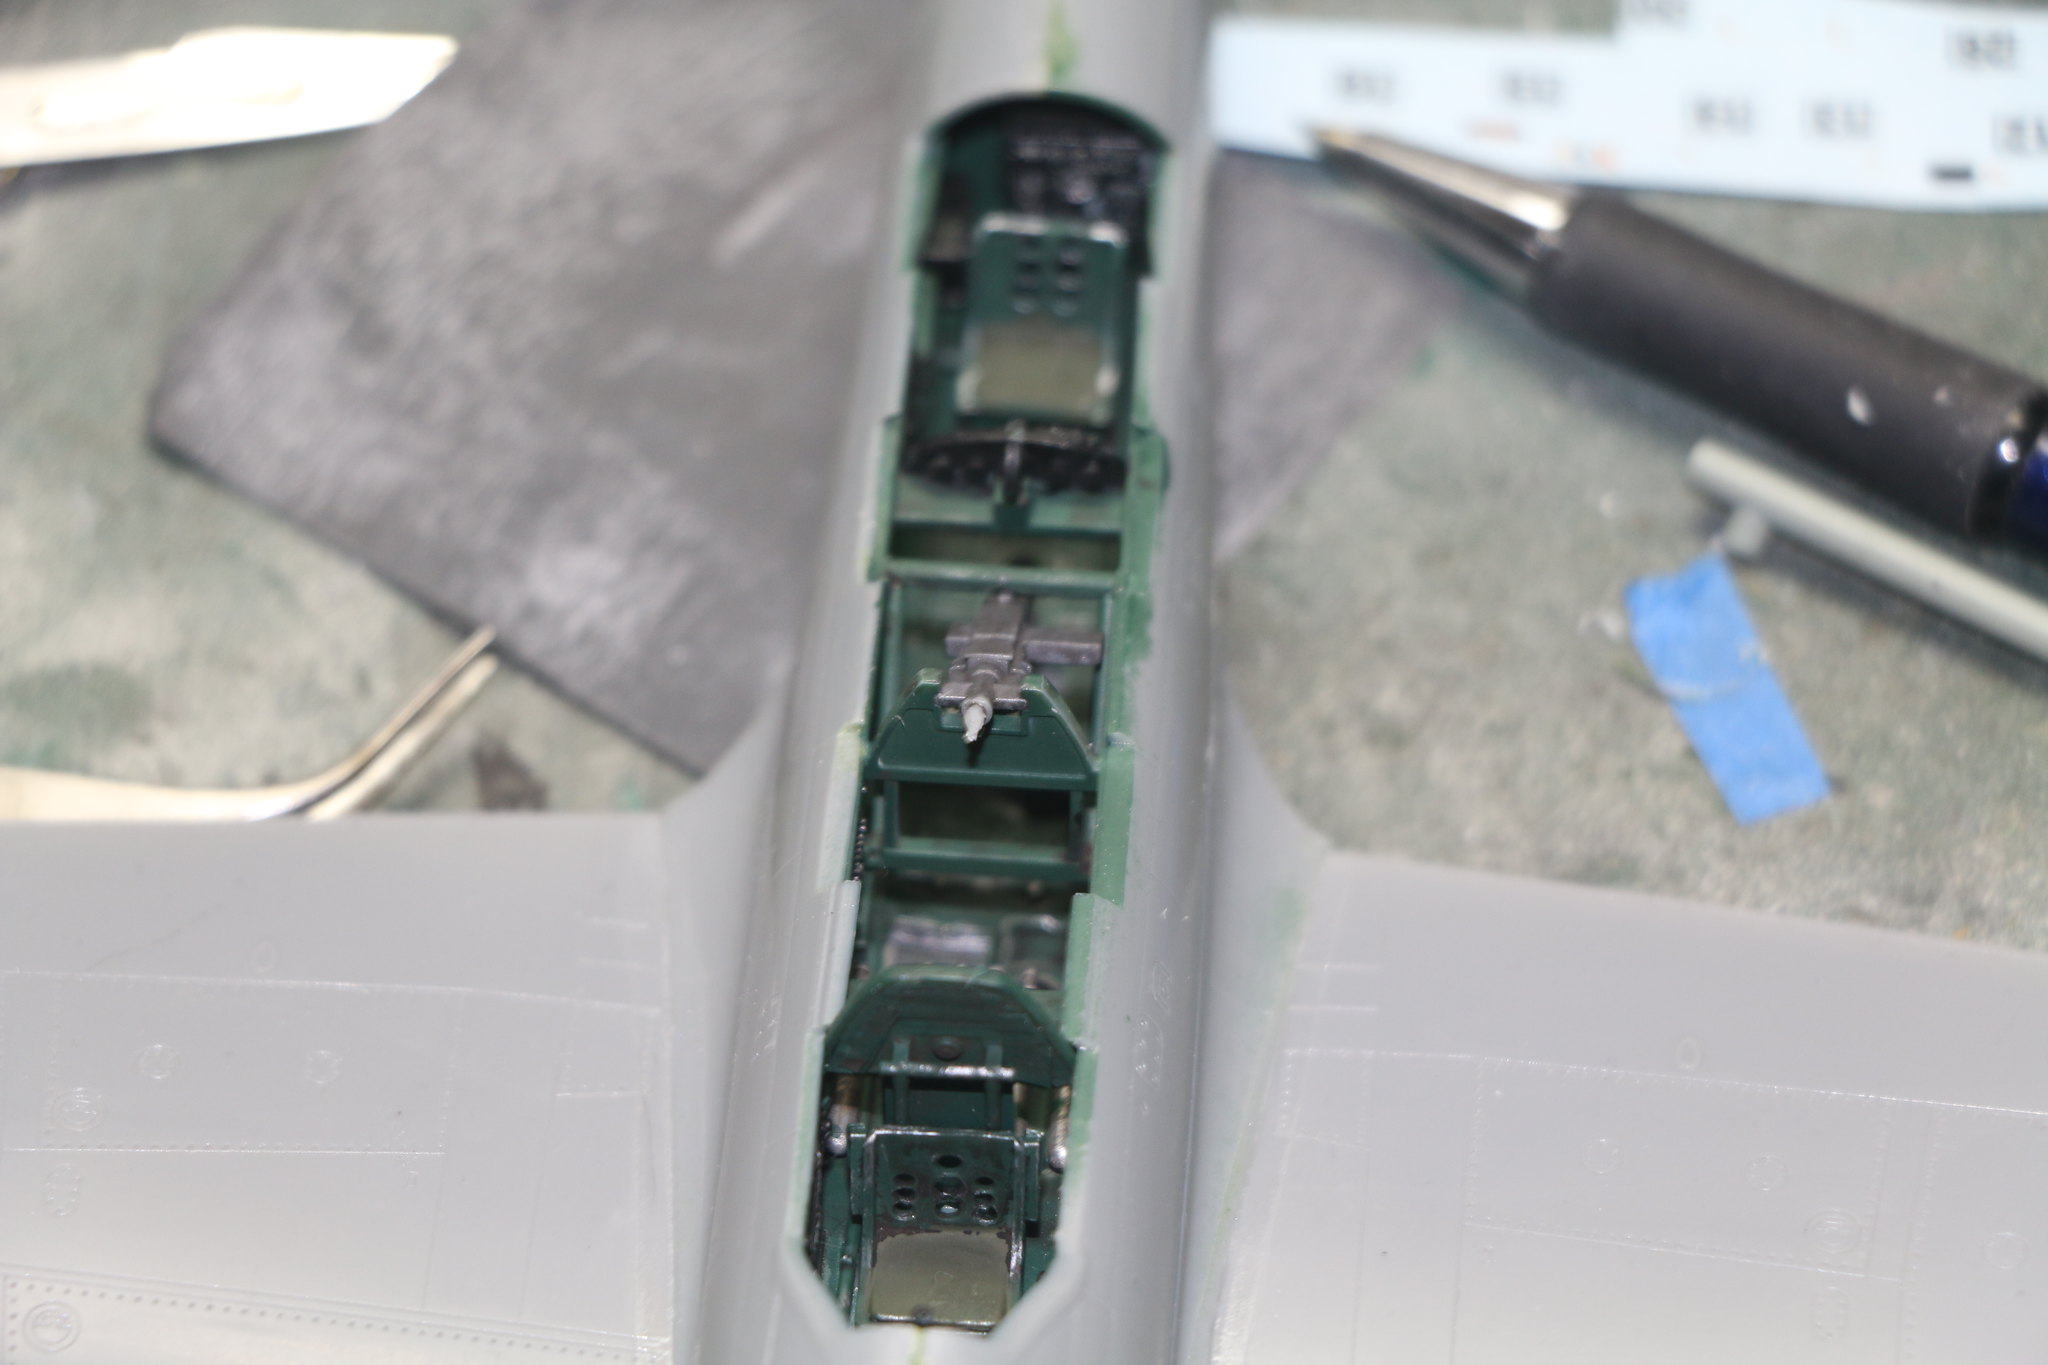
Any who this is about the Saiun, I've got the fuselage buttoned up, the wings and stabilizers on and it's looking more like an aircraft now. There was a bit of a gap at the rear of the wing fuselage join that was easily filled with plasticard. One down side to putting the cockpit sides in first was that it narrowed the fuselage where the wings joined and required a little judicious work with a wide scalpel blade to pop them back out. Wasn't perfect but it did the trick.
Here are some pics to show what progress has been made. I applied an oil wash and then some aluminium paint for wear and chipping. Painted the seat cushions a different colour for a little variety in an otherwise monochrome cockpit.
 IMG_1743
 by
Chris WIlson, on Flickr
 IMG_1744
 by
Chris WIlson, on Flickr
 IMG_1745
 by
Chris WIlson, on Flickr
 IMG_1746
 by
Chris WIlson, on Flickr
 IMG_1764
 by
Chris WIlson, on Flickr
 IMG_1765
 by
Chris WIlson, on Flickr
Joel_W
Associate Editor New York, United States
Joined: December 04, 2010
KitMaker: 11,666 posts
AeroScale: 7,410 posts
Posted: Tuesday, November 21, 2017 - 11:08 PM UTC
Chris,
Nice progress and your Saiun is really looking good. Always a major highlight when the fuselage is closed up, and the wings attached.
Joel
On my Workbench:
Monogram 1/24 scale 427 Shelby Cobra
Just Completed:
Beemax 1/24 scale BMW M3 E30 1992 Evolution II
Bayern, Germany
Joined: January 17, 2006
KitMaker: 673 posts
AeroScale: 492 posts
Posted: Saturday, November 25, 2017 - 03:18 PM UTC
Hi Chris nice progress thus far. I did not know the Japanese had a version of Schrage Musik in any of their night fighters, very neat indeed!
Ernest
Pennsylvania, United States
Joined: June 17, 2009
KitMaker: 566 posts
AeroScale: 507 posts
Posted: Saturday, November 25, 2017 - 09:09 PM UTC
Great work! I've been patiently waiting to come across a hasegawa saiun kit for my stash, its really nice to see one built up and get a look at the details. Ill definitely be looking in on this.
"...Fat, drunk, and stupid is no way to go through life son"
#305
Christchurch, New Zealand
Joined: February 01, 2006
KitMaker: 1,673 posts
AeroScale: 1,517 posts
Posted: Monday, December 11, 2017 - 02:40 PM UTC
Hi Joel yes it begins to actually look like the aircraft your building. This kit is rather well detailed and a joy to build so far.
Ernest there was a great exchange of technology and information between Germany and Japan. Japan seriously needed the technical expertise the Germans could provide. Their only inline engine fighter the Ki-61 Hein used a licensed copy of the DB601. They lightened the design but in doing so created problems with reliability. Their 20mm canon was a licensed copy of the MG151 and the tightly cowled Ki-100 (the Hein with a radial engine) used the Fw190's cowl as blueprint. The Japanese also test flew as I think I mentioned elsewhere the Me-109E and the Fw190A-4.
Mike great to see you here. There are a couple on
THAT auction site Mike for a pretty attractive price but it is ex Japan. Not that I'm trying to help you spend your hard earned cash ..... honest!
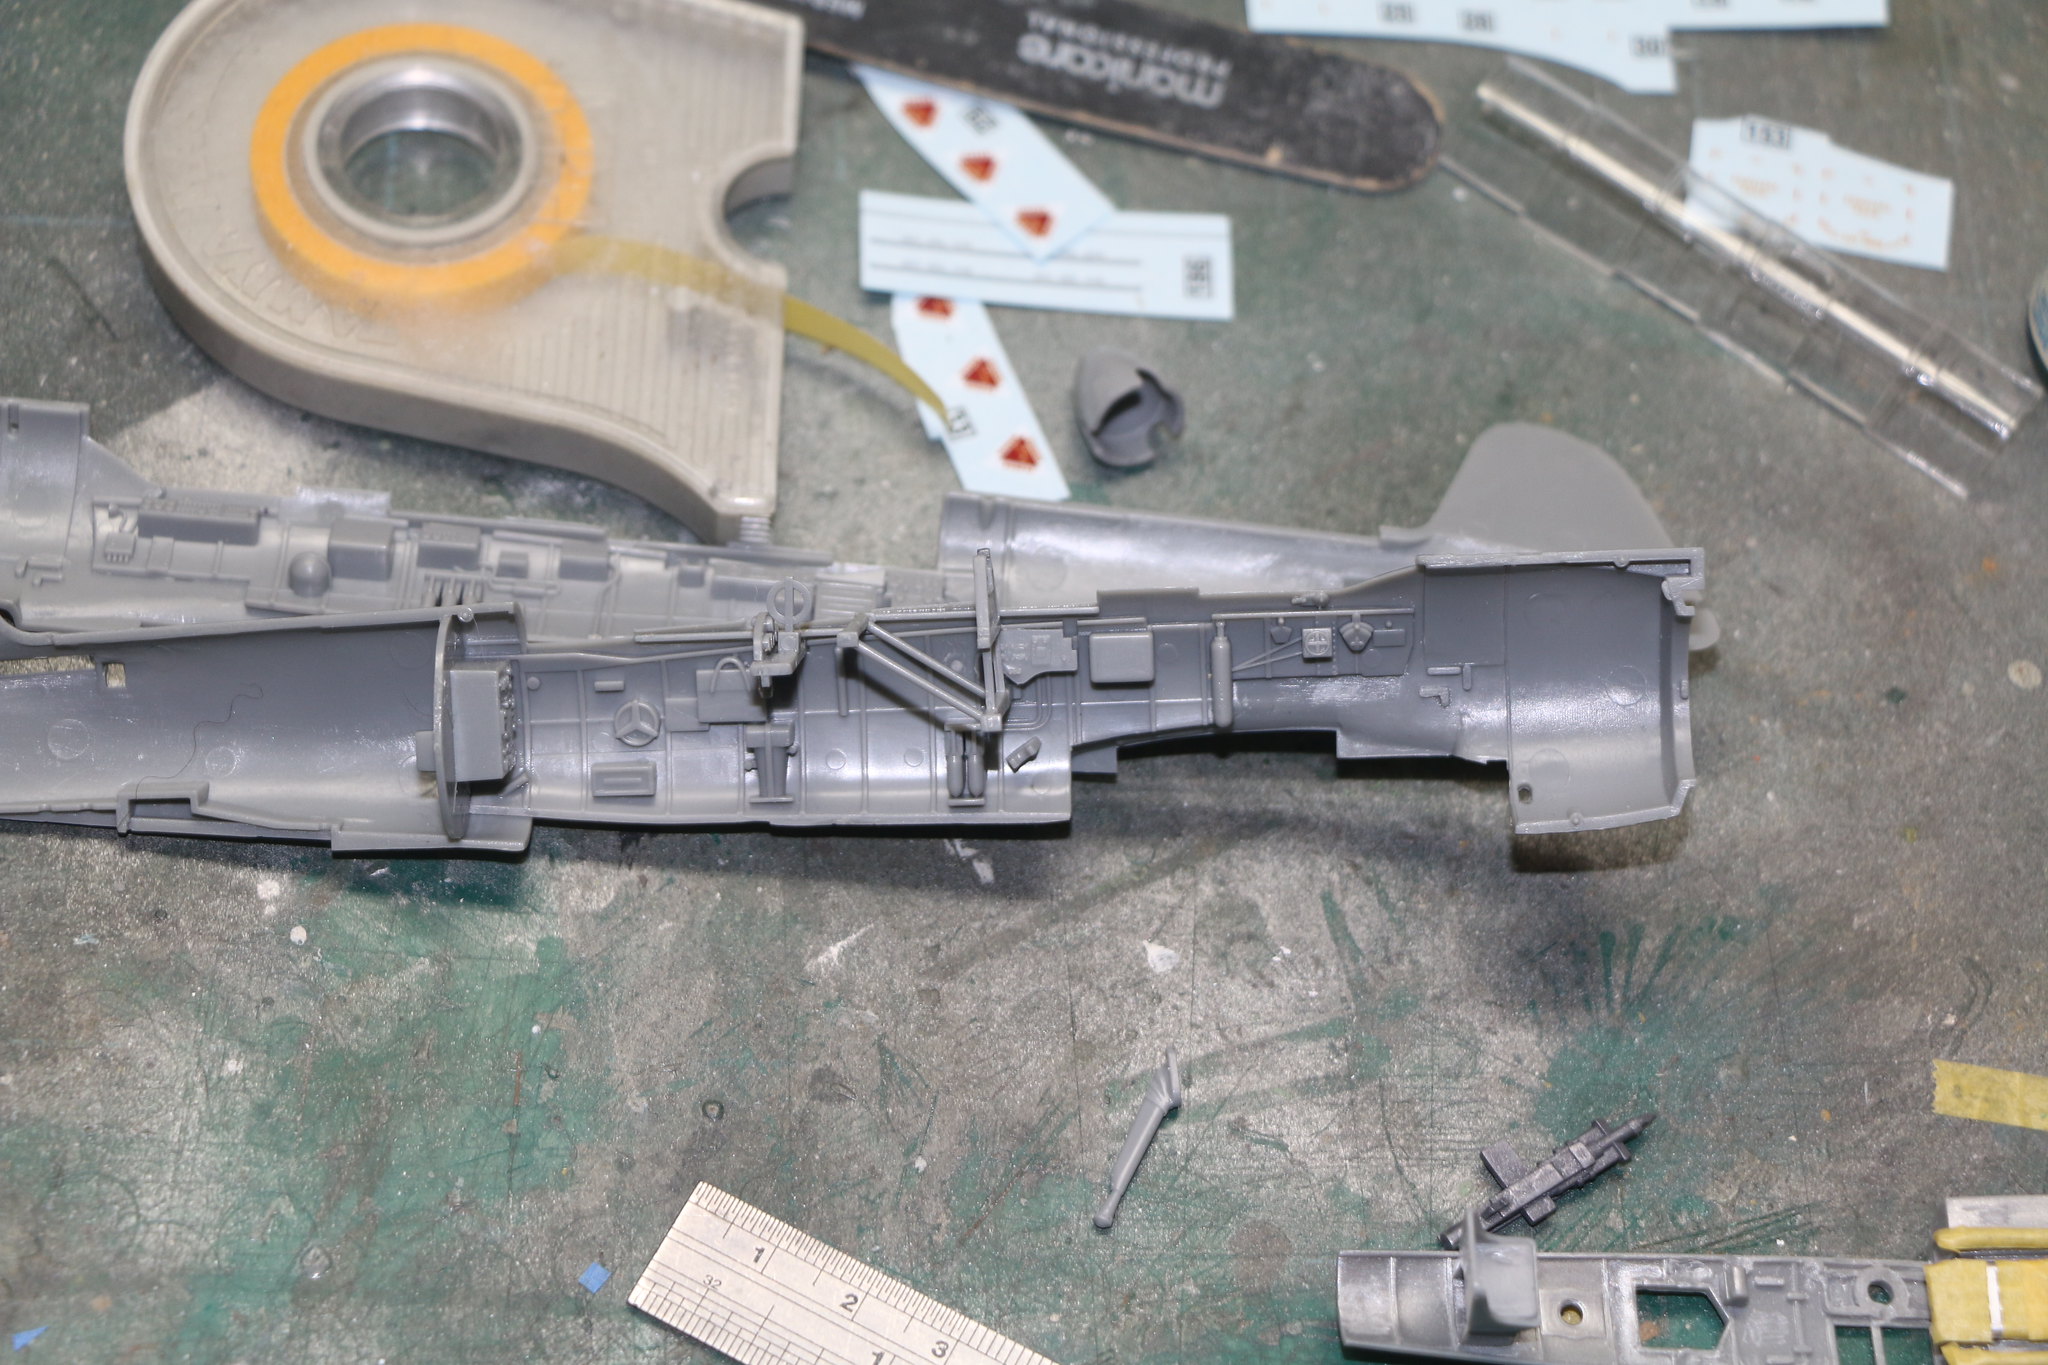
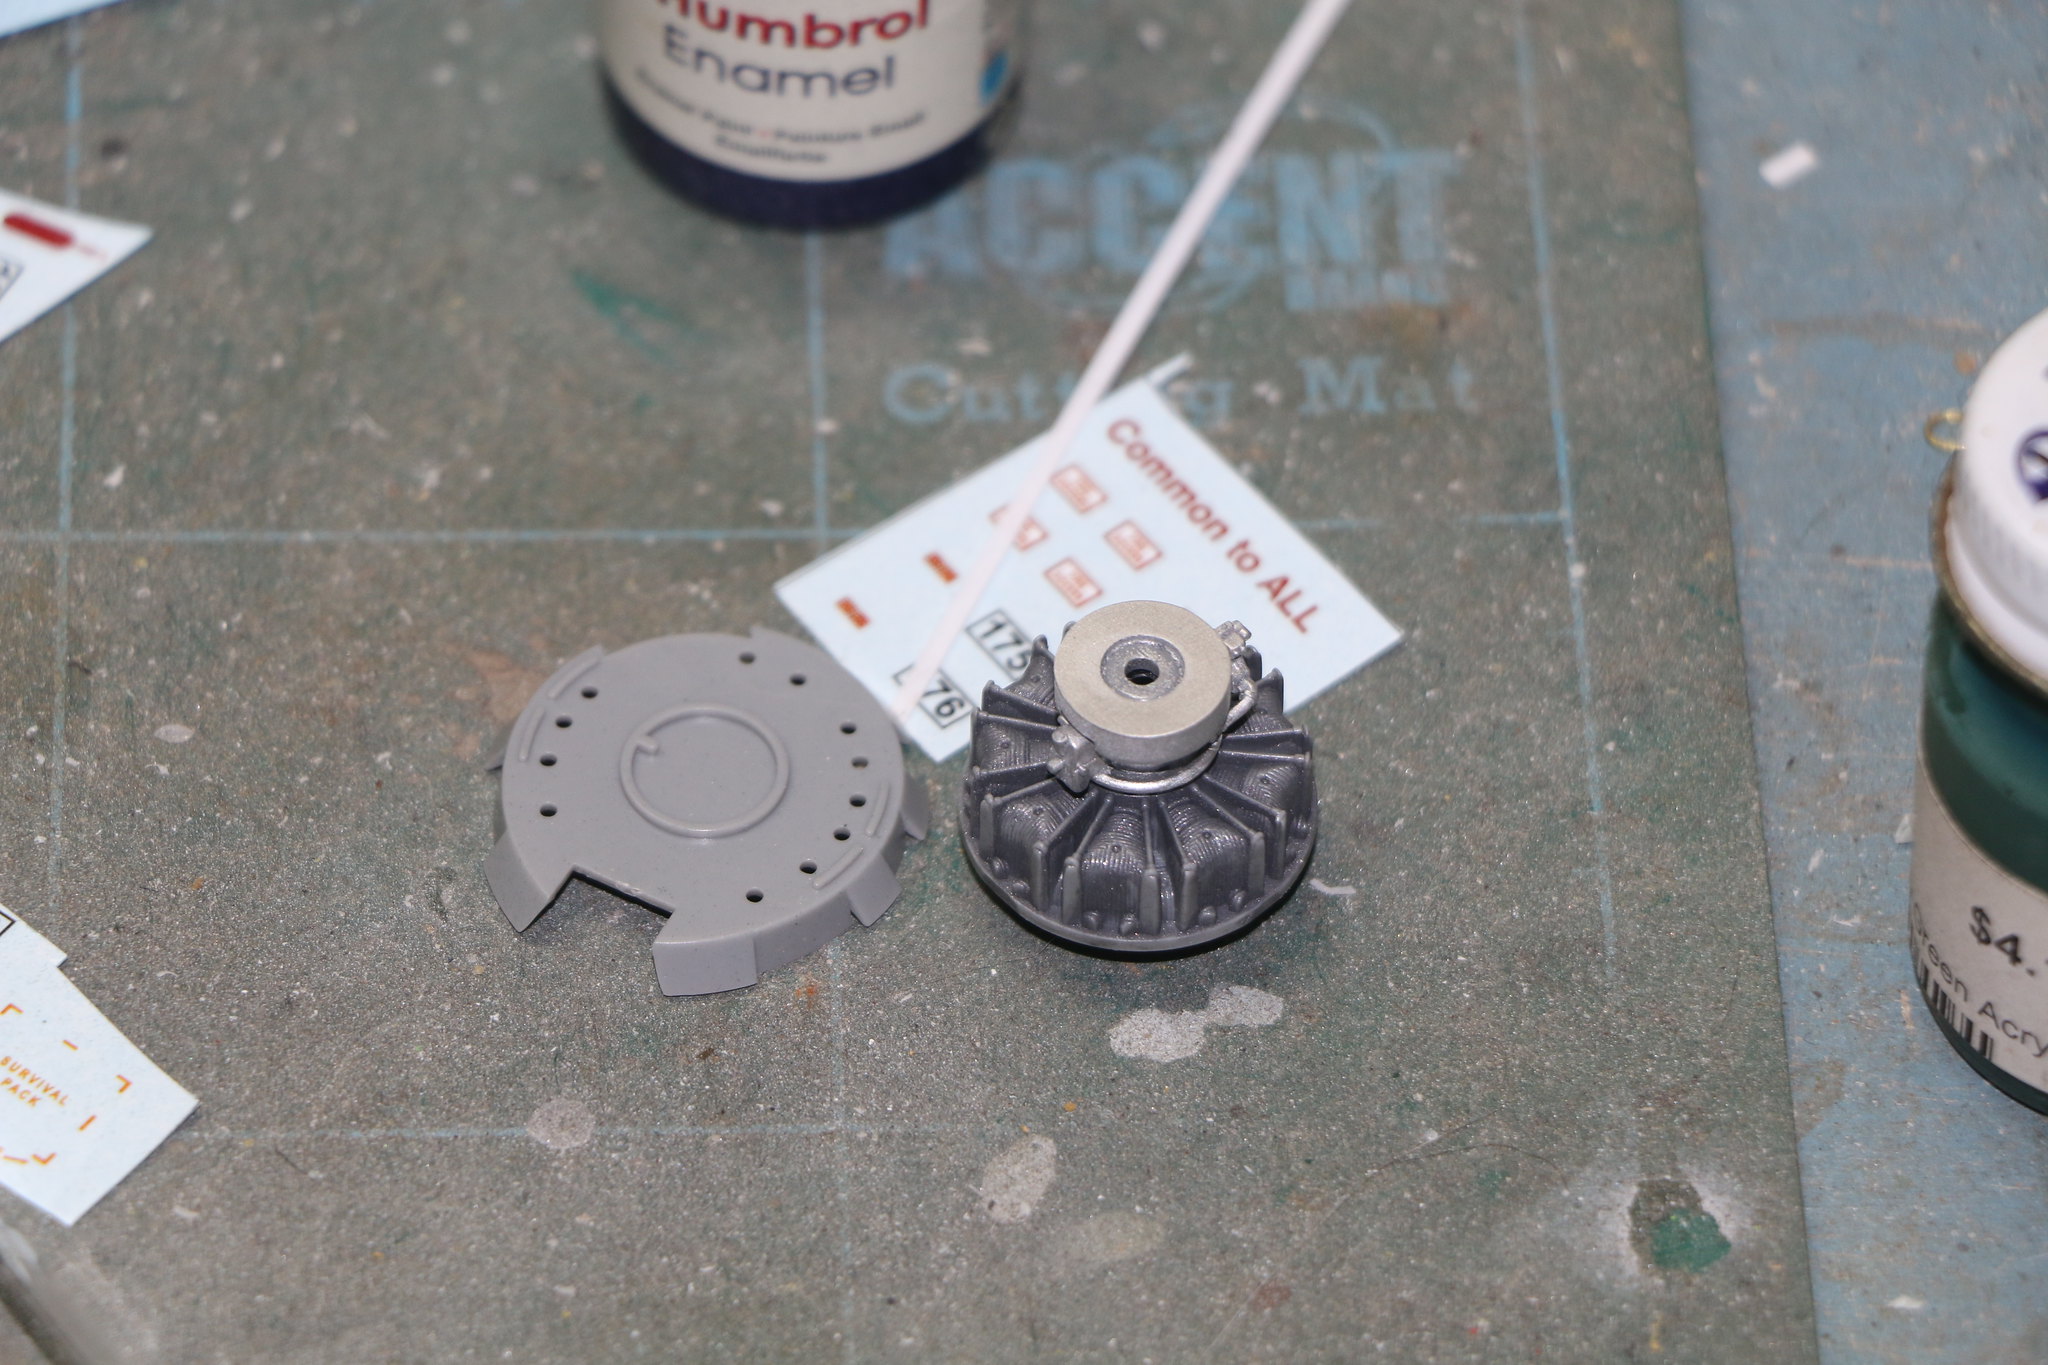
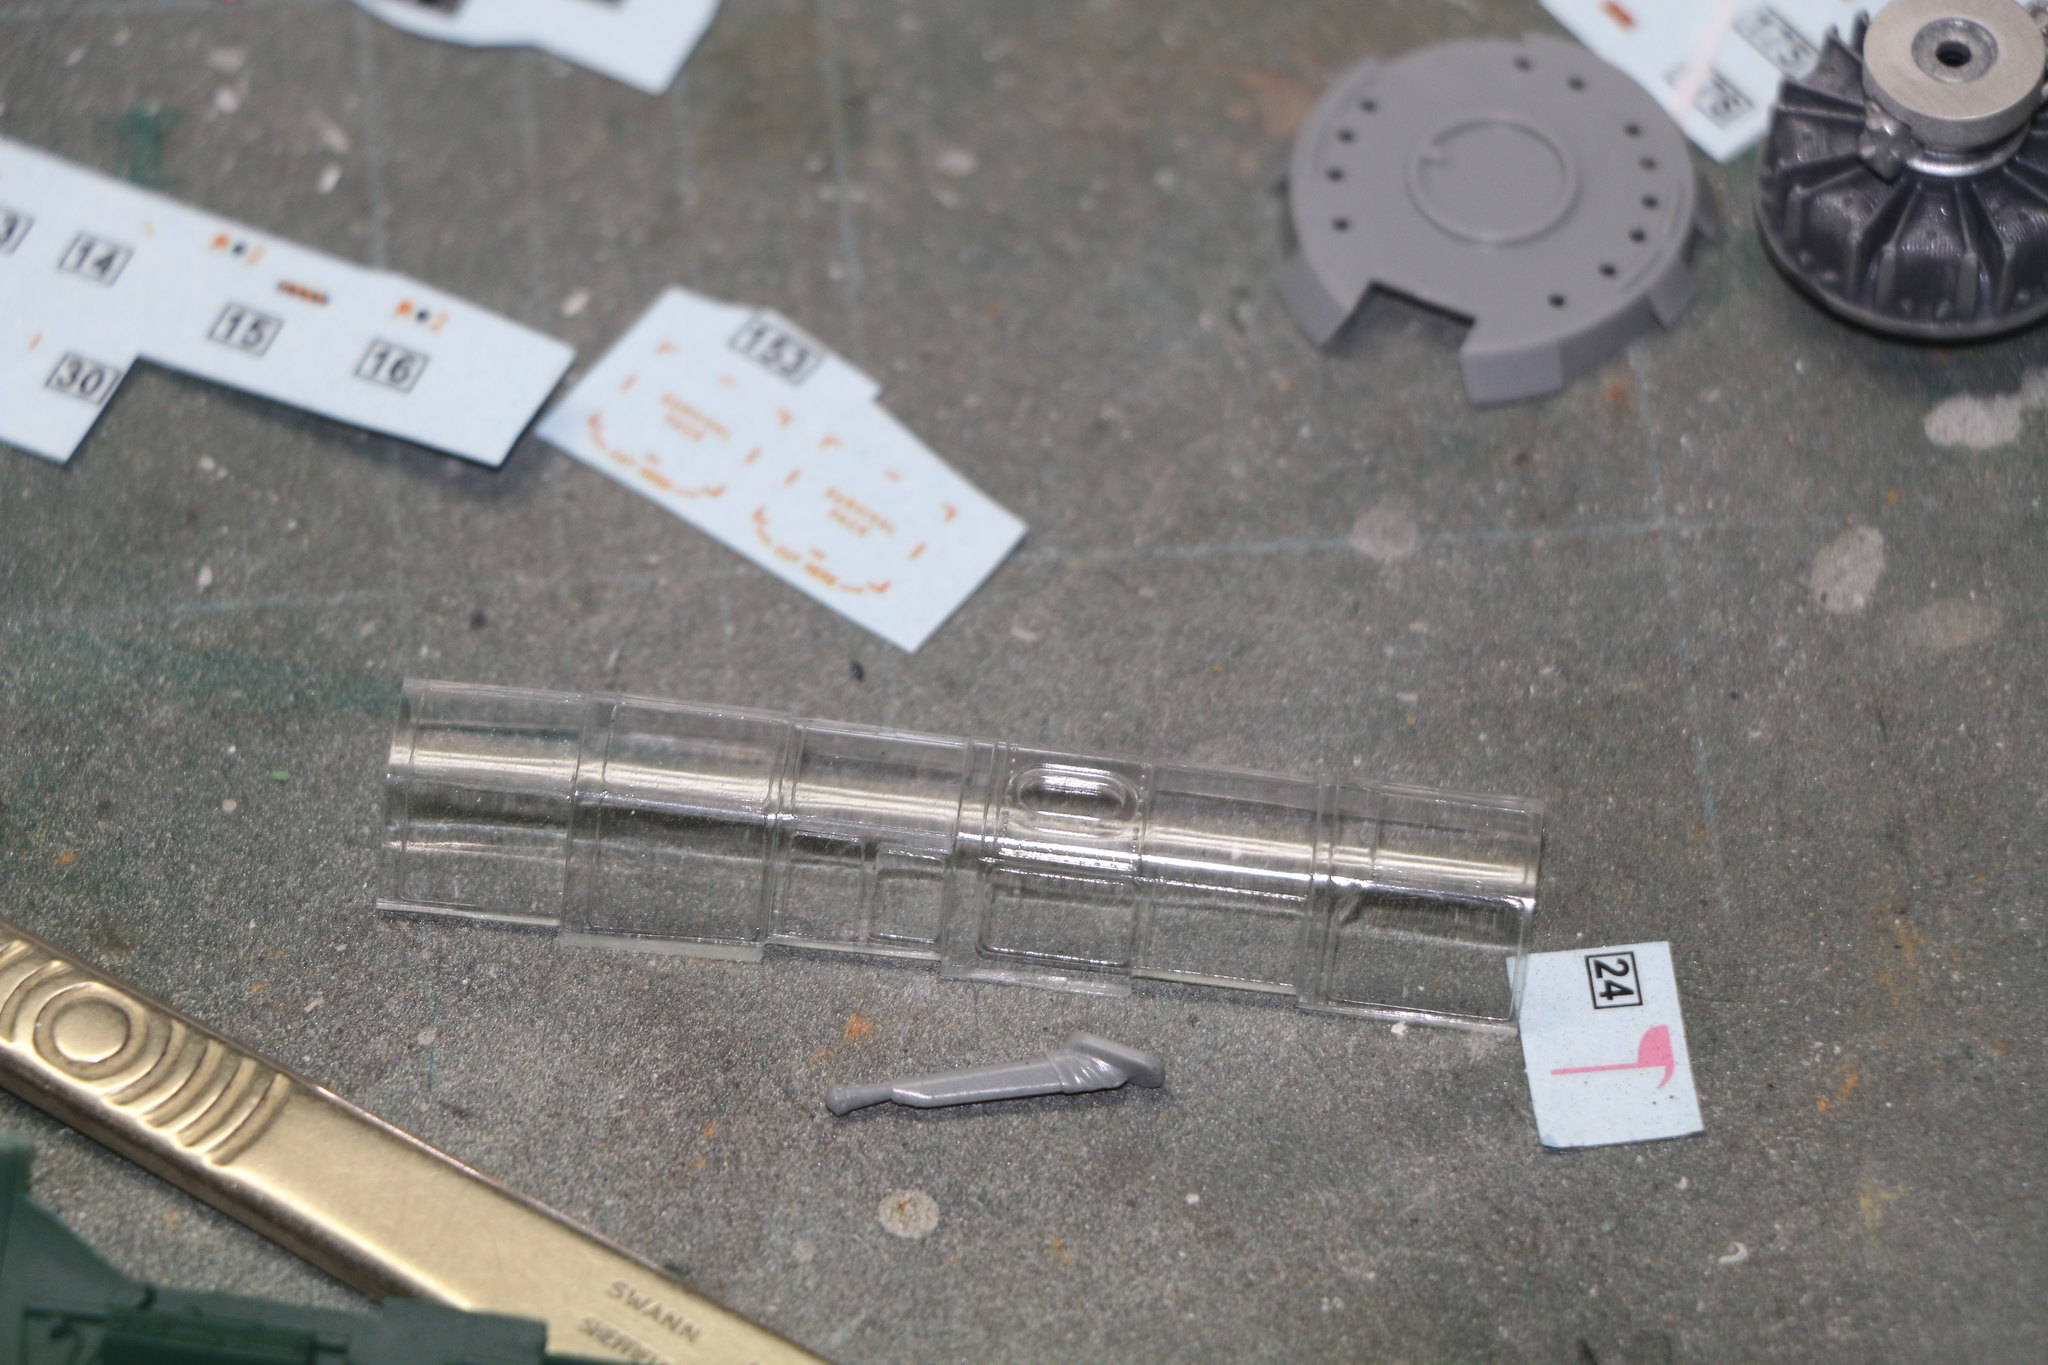
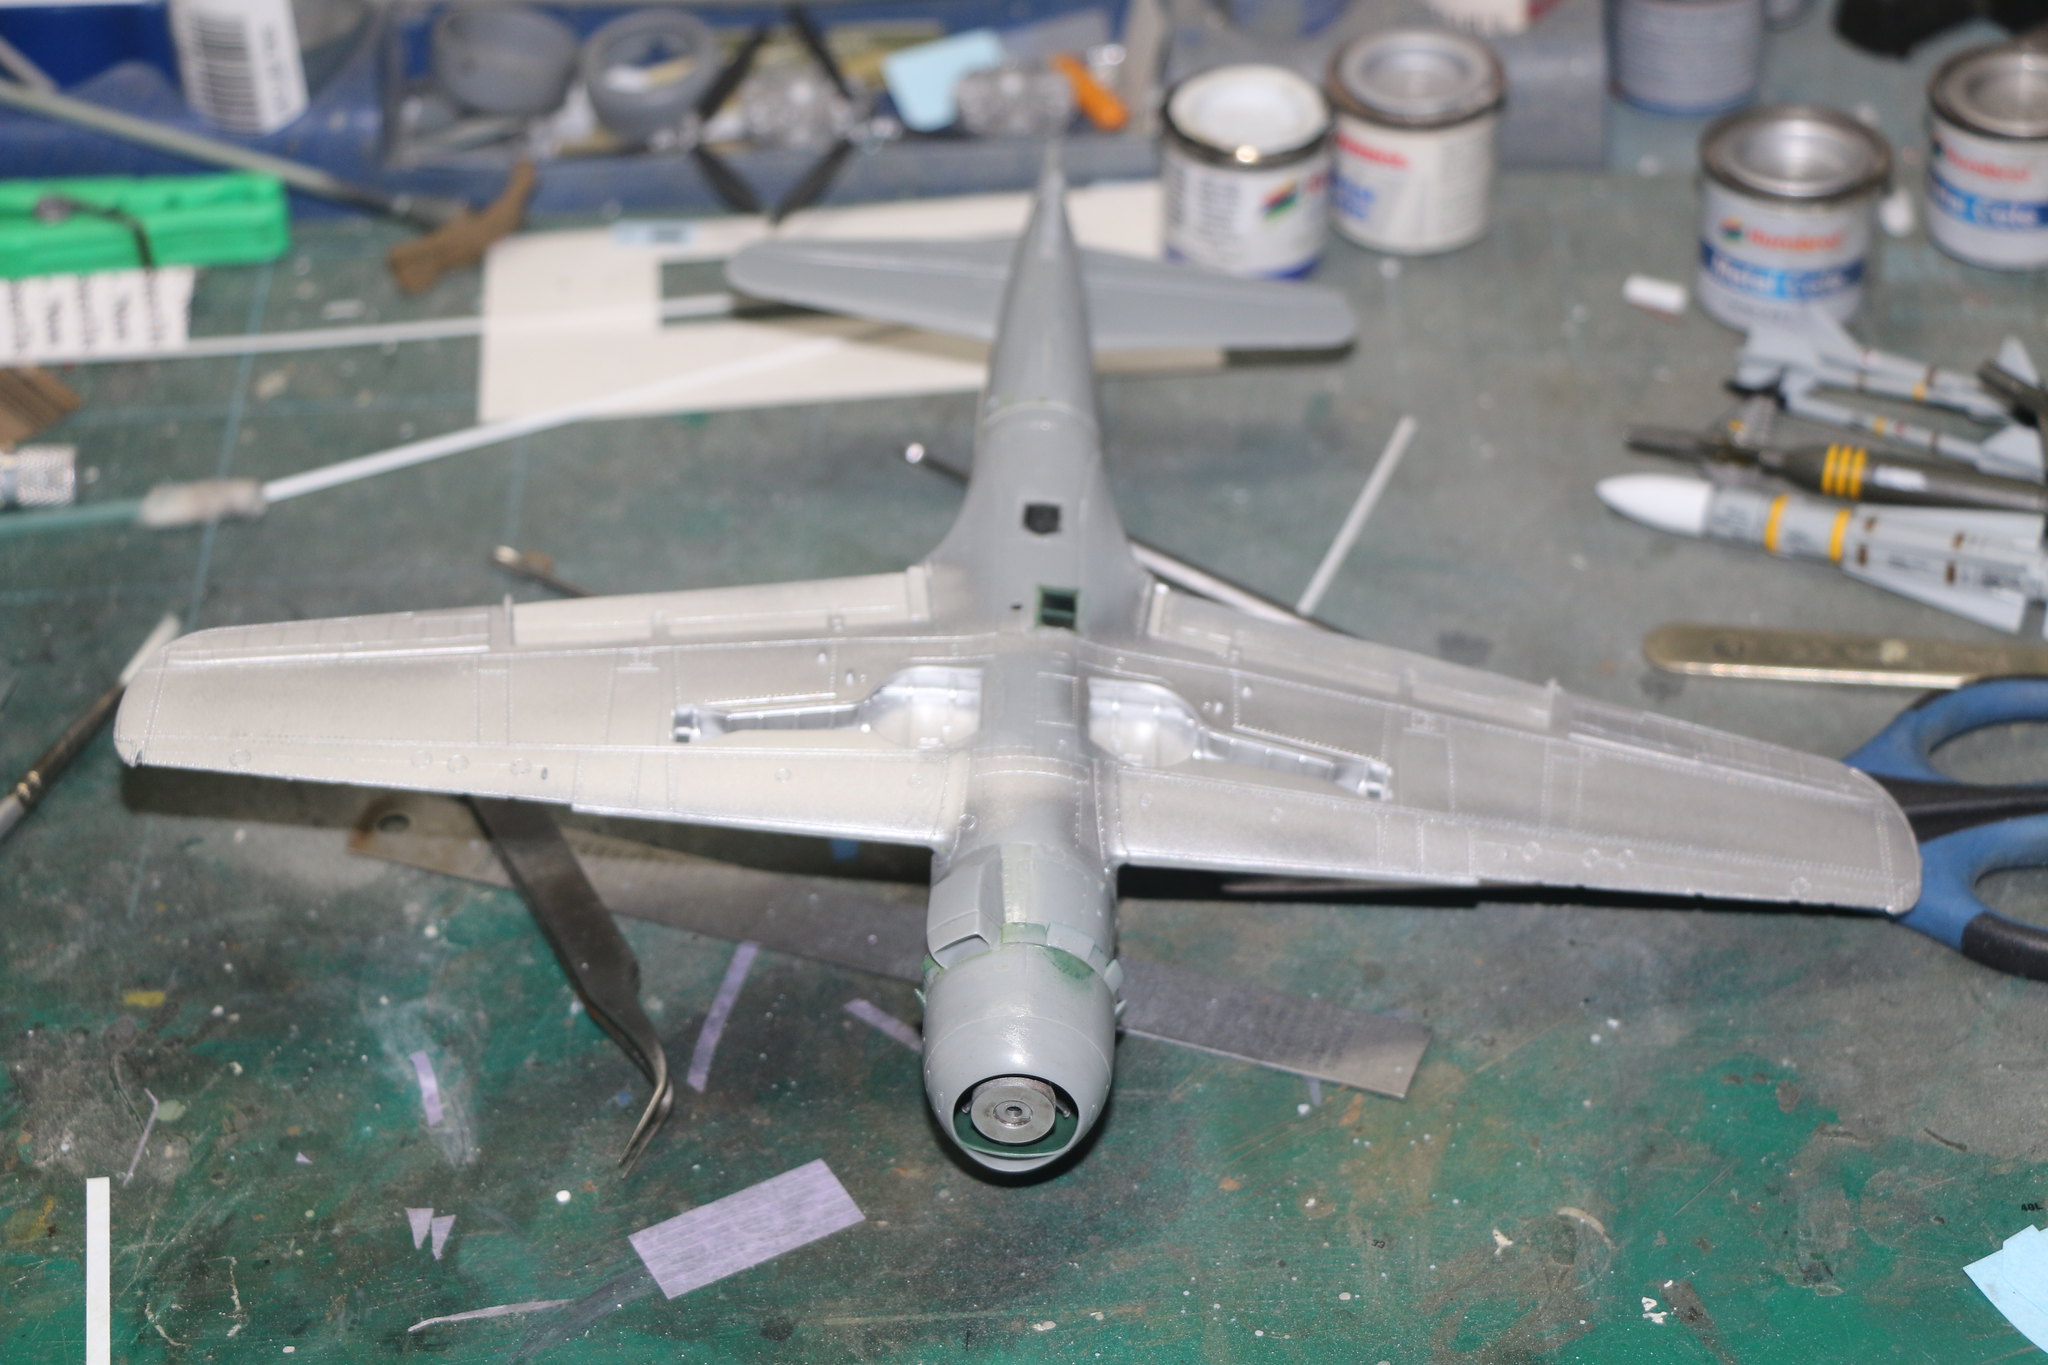
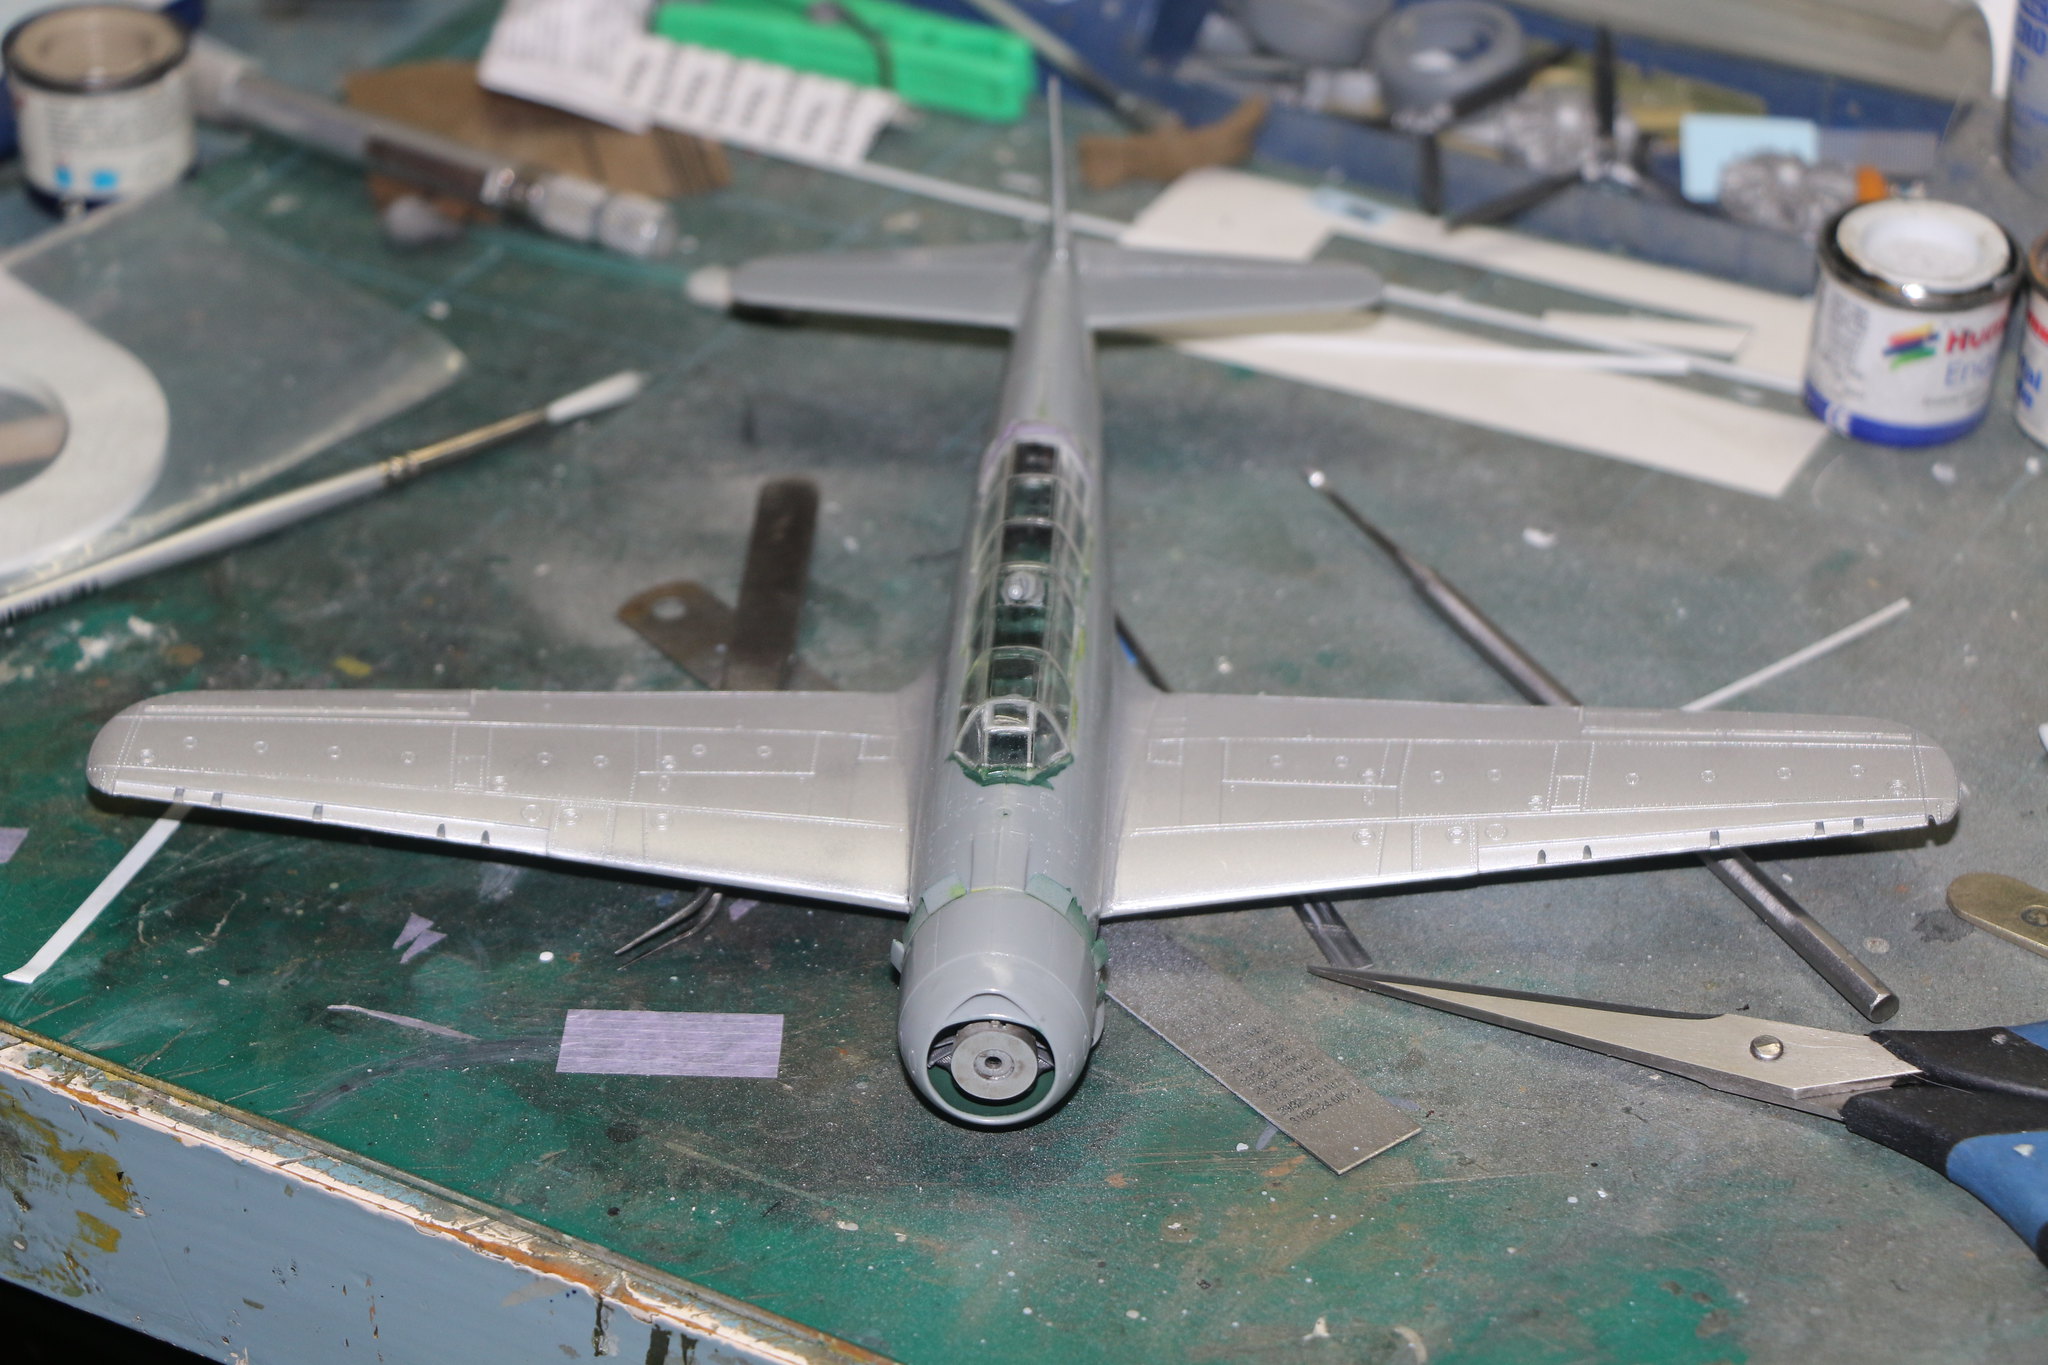
Well a small amount of progress! I've got the canopy on and the glazing installed on the underside. The engine and intake attached and a spray of Humbrol Aluminium metalliser on the wings and underside. It's looking pretty good so far, I'm now stuck with the job of masking the canopy and Hasegawa don't make it easy. The canopy is marked with recessed panel lines making the task all the more difficult.
Here are some pics for your edification.
 IMG_1881
 by
Chris WIlson, on Flickr
 IMG_1880
 by
Chris WIlson, on Flickr
 IMG_1878
 by
Chris WIlson, on Flickr
New Jersey, United States
Joined: February 06, 2015
KitMaker: 1,098 posts
AeroScale: 900 posts
Posted: Monday, December 11, 2017 - 04:12 PM UTC
Chris - Nice progress ! Looks like you will be ready for paint once the canopy is masked . Have you ever used Bare Metal Foil for canopy masking ? I use it pretty much exclusively.
Richard
New Jersey, United States
Joined: February 02, 2015
KitMaker: 330 posts
AeroScale: 286 posts
Posted: Monday, December 11, 2017 - 06:47 PM UTC
Chris nice work so far on the cockpit. the kit seems to have a lot of detail to it. i see also your desk is just as messy as mine when i am working on a project-lol
Richard- i use BMF for canopy masking too. do you have a problem of residue left behind after removal? if you do how do you remove it? i tried buffing it off with novus and goo gone but nothing works well enough to restore the crystal clear effect.
p.s. where are you in nj? you can pm me
joe
New Jersey, United States
Joined: February 06, 2015
KitMaker: 1,098 posts
AeroScale: 900 posts
Posted: Monday, December 11, 2017 - 08:47 PM UTC
Hi joe - I use oderless mineral spirits on q tip - if you are concerned about scratches use the type of lint free cloth for cleaning eyeglasses and optics .
I'll pm you with my location
Cheers - Richard
Joel_W
Associate Editor New York, United States
Joined: December 04, 2010
KitMaker: 11,666 posts
AeroScale: 7,410 posts
Posted: Tuesday, December 12, 2017 - 12:07 AM UTC
Richard & Joe,
I've become a almost exclusive user of Eduard Masks. For those times when a mask doesn't work, or there isn't one made, I've been using Tamiya tape in strips precutting any rounded corners.
Way back in the 70s we used Scotch Tape and I always managed to scratch up the canopy in a few places. How do you both avoid scratches?
BTW, Joe, we're all going to be meeting at the NJ Mosquitocon this year. Your local, so please join us.
Chris, sorry by hi-jacking your thread.
Joel
On my Workbench:
Monogram 1/24 scale 427 Shelby Cobra
Just Completed:
Beemax 1/24 scale BMW M3 E30 1992 Evolution II
#305
Christchurch, New Zealand
Joined: February 01, 2006
KitMaker: 1,673 posts
AeroScale: 1,517 posts
Posted: Tuesday, December 12, 2017 - 12:36 AM UTC
Richard no can't say I have. Bare metal foil commands a premium price out here in the boondocks. So it's not something I've wanted to use. I usually slice up thinly some very low tack masking tape to work around the framing then fill in.
Joe the kit is very nicely detailed throughout and builds beautifully. It should look a million bucks when done. My bench is messy? And here's me thinking I'd tidied up. Yes Joe my bench is always messy if it's tidy I'm dead and the wife is cleaning up!
Can't hijack what is freely given Joel! Hijack away buddy!
#305
Christchurch, New Zealand
Joined: February 01, 2006
KitMaker: 1,673 posts
AeroScale: 1,517 posts
Posted: Monday, December 18, 2017 - 12:42 PM UTC
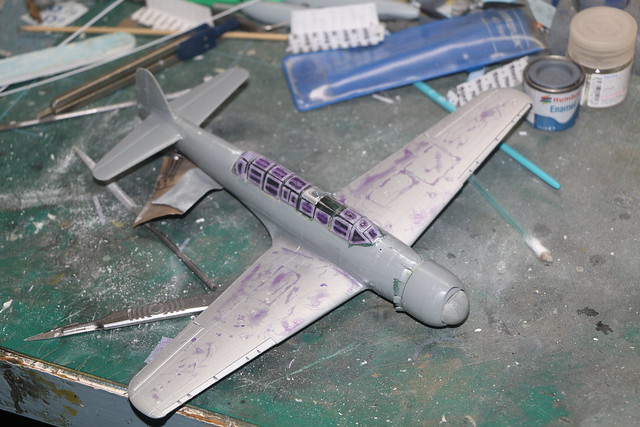
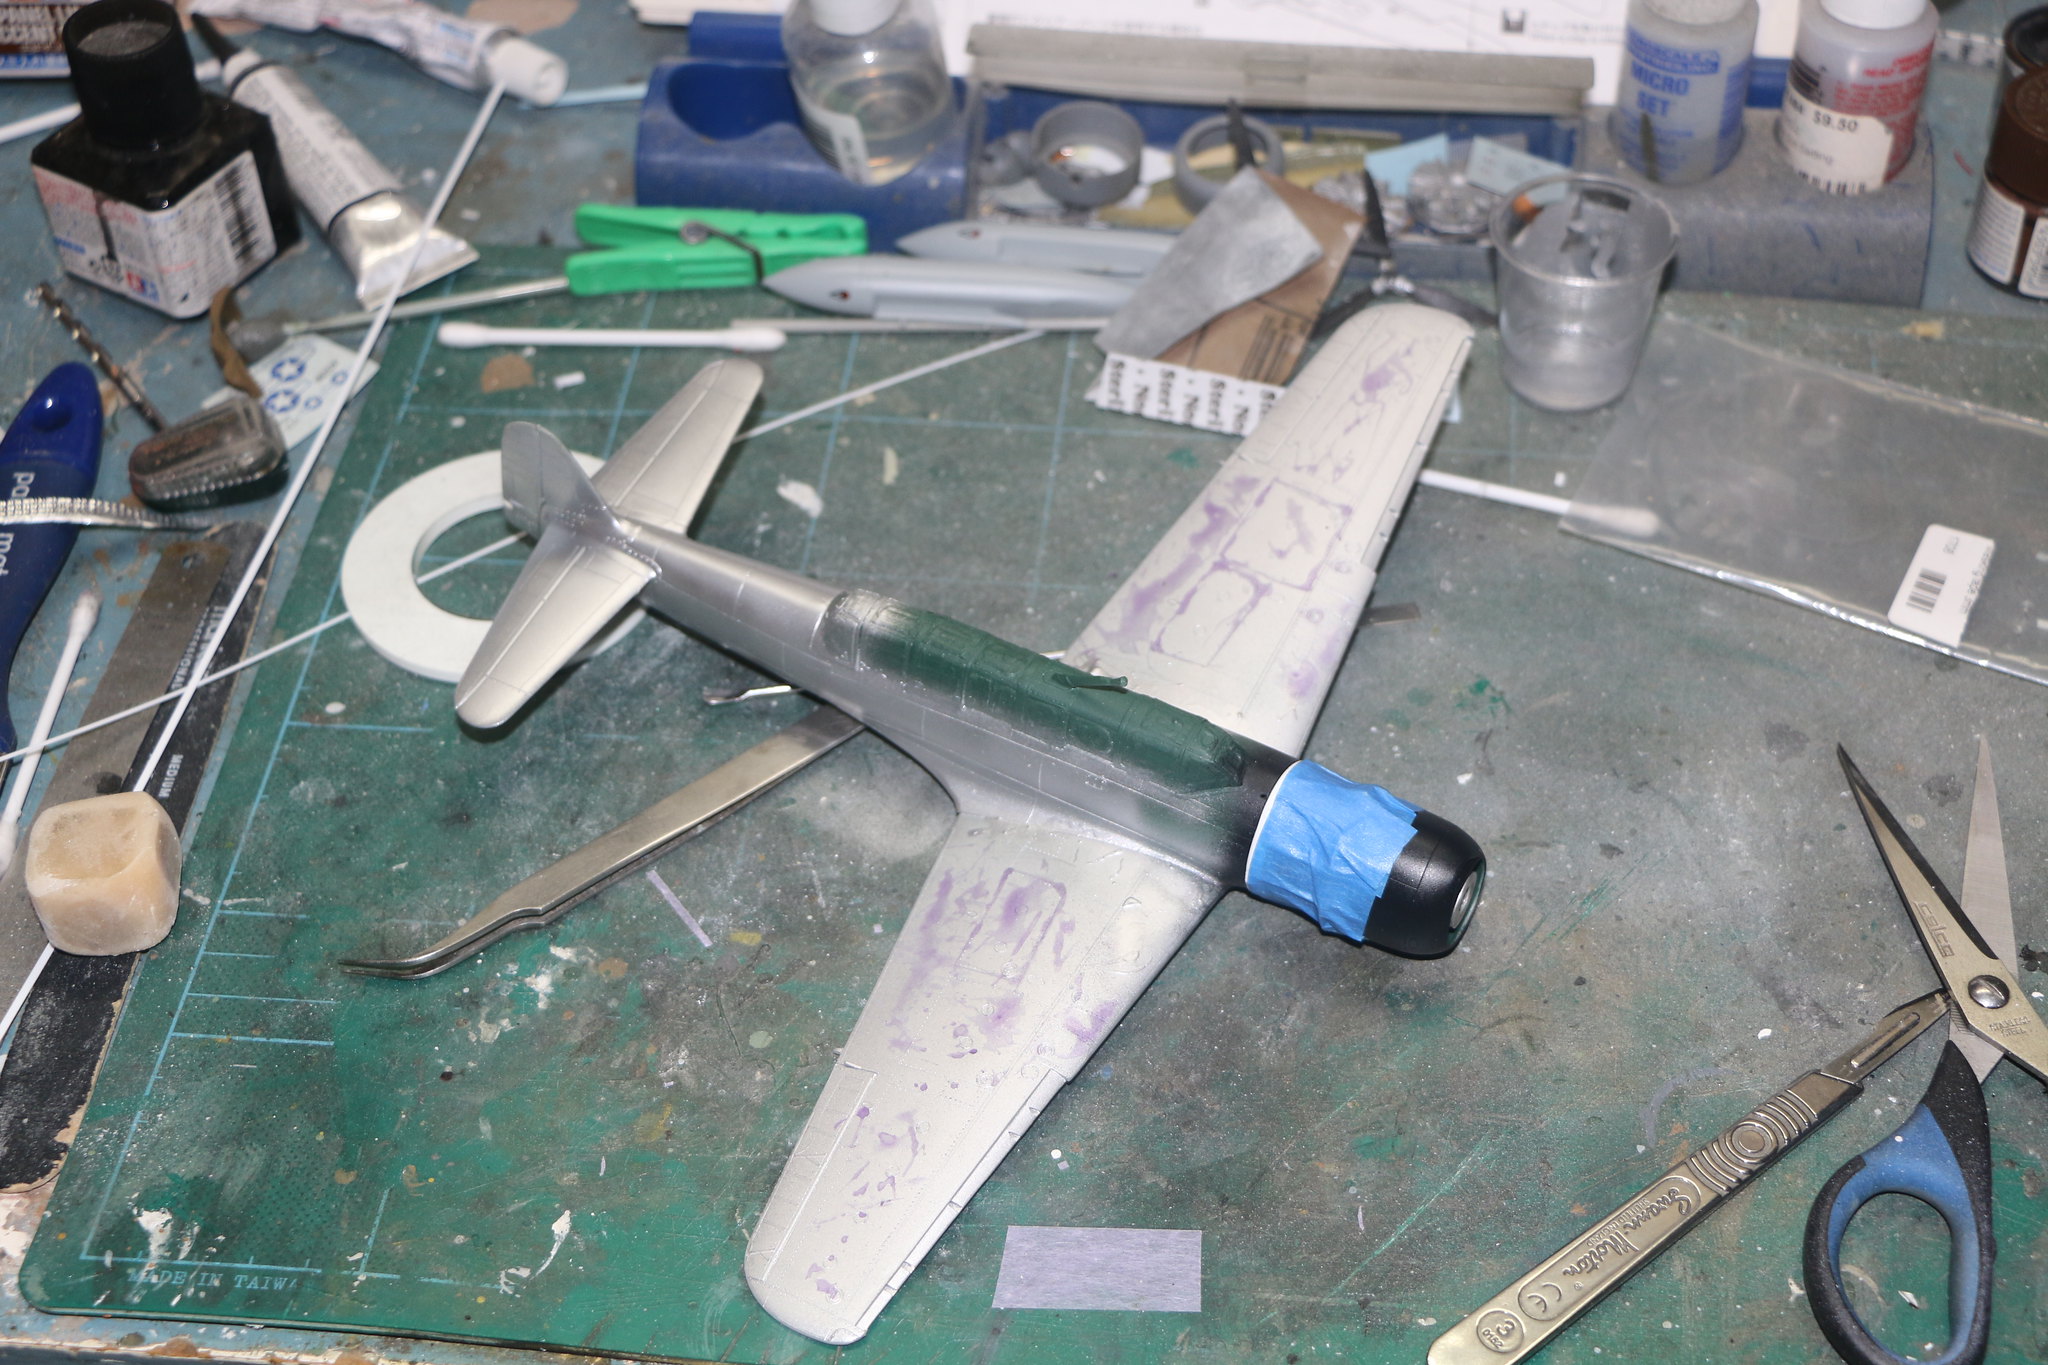
Okay a little further on I've got the canopy masked and the bare aluminium panel painted. I'm also trying something a little different I've covered the wings in random areas of masking fluid which I applied with a thin ,around .75mm in diameter, length of plastic rod. this allowed me to do dots and to roll it across the wing to create larger areas. We'll see how it goes since this is a first some refining will likely be necessary. I still need to mask of the bottom transparencies.
 IMG_1915
 by
Chris WIlson, on Flickr
 IMG_1914
 by
Chris WIlson, on Flickr
 IMG_1913
 by
Chris WIlson, on Flickr
 IMG_1912
 by
Chris WIlson, on Flickr
Joel_W
Associate Editor New York, United States
Joined: December 04, 2010
KitMaker: 11,666 posts
AeroScale: 7,410 posts
Posted: Tuesday, December 19, 2017 - 01:04 AM UTC
Chris,
Looking forward to how that liquid masking works on the wings.
Joel
On my Workbench:
Monogram 1/24 scale 427 Shelby Cobra
Just Completed:
Beemax 1/24 scale BMW M3 E30 1992 Evolution II
Ontario, Canada
Joined: July 22, 2012
KitMaker: 771 posts
AeroScale: 763 posts
Posted: Tuesday, December 19, 2017 - 07:16 AM UTC
Quoted Text
Chris,
Looking forward to how that liquid masking works on the wings.
Joel
Yeah same here. I was surprised with how stark it was when I tried it with the Raiden I built.
Matt Odom
I've been known to build a few things
Merlin
Senior Editor #017
United Kingdom
Joined: June 11, 2003
KitMaker: 17,582 posts
AeroScale: 12,795 posts
Posted: Wednesday, December 20, 2017 - 01:47 AM UTC
Hi Matt
Excellent progress so far. I'm looking forward to seeing the result of the masking too. Depicting the heavy weathering on many Japanese aircraft is something I'm always keen to see pointers on.
All the best
Rowan
BEWARE OF THE FEW...
As I grow older, I regret to say that a detestable habit of thinking seems to be getting a hold of me. - H. Rider Haggard
#305
Christchurch, New Zealand
Joined: February 01, 2006
KitMaker: 1,673 posts
AeroScale: 1,517 posts
Posted: Wednesday, December 20, 2017 - 02:58 PM UTC
Well after a little research I came across a gentleman by the name of Nick Millman on another forum site whom is reputedly an expert on Mitsubishi zero camouflage paint and it's application. He consulted with AK interactive on their formulation of the new Japanese paints range.
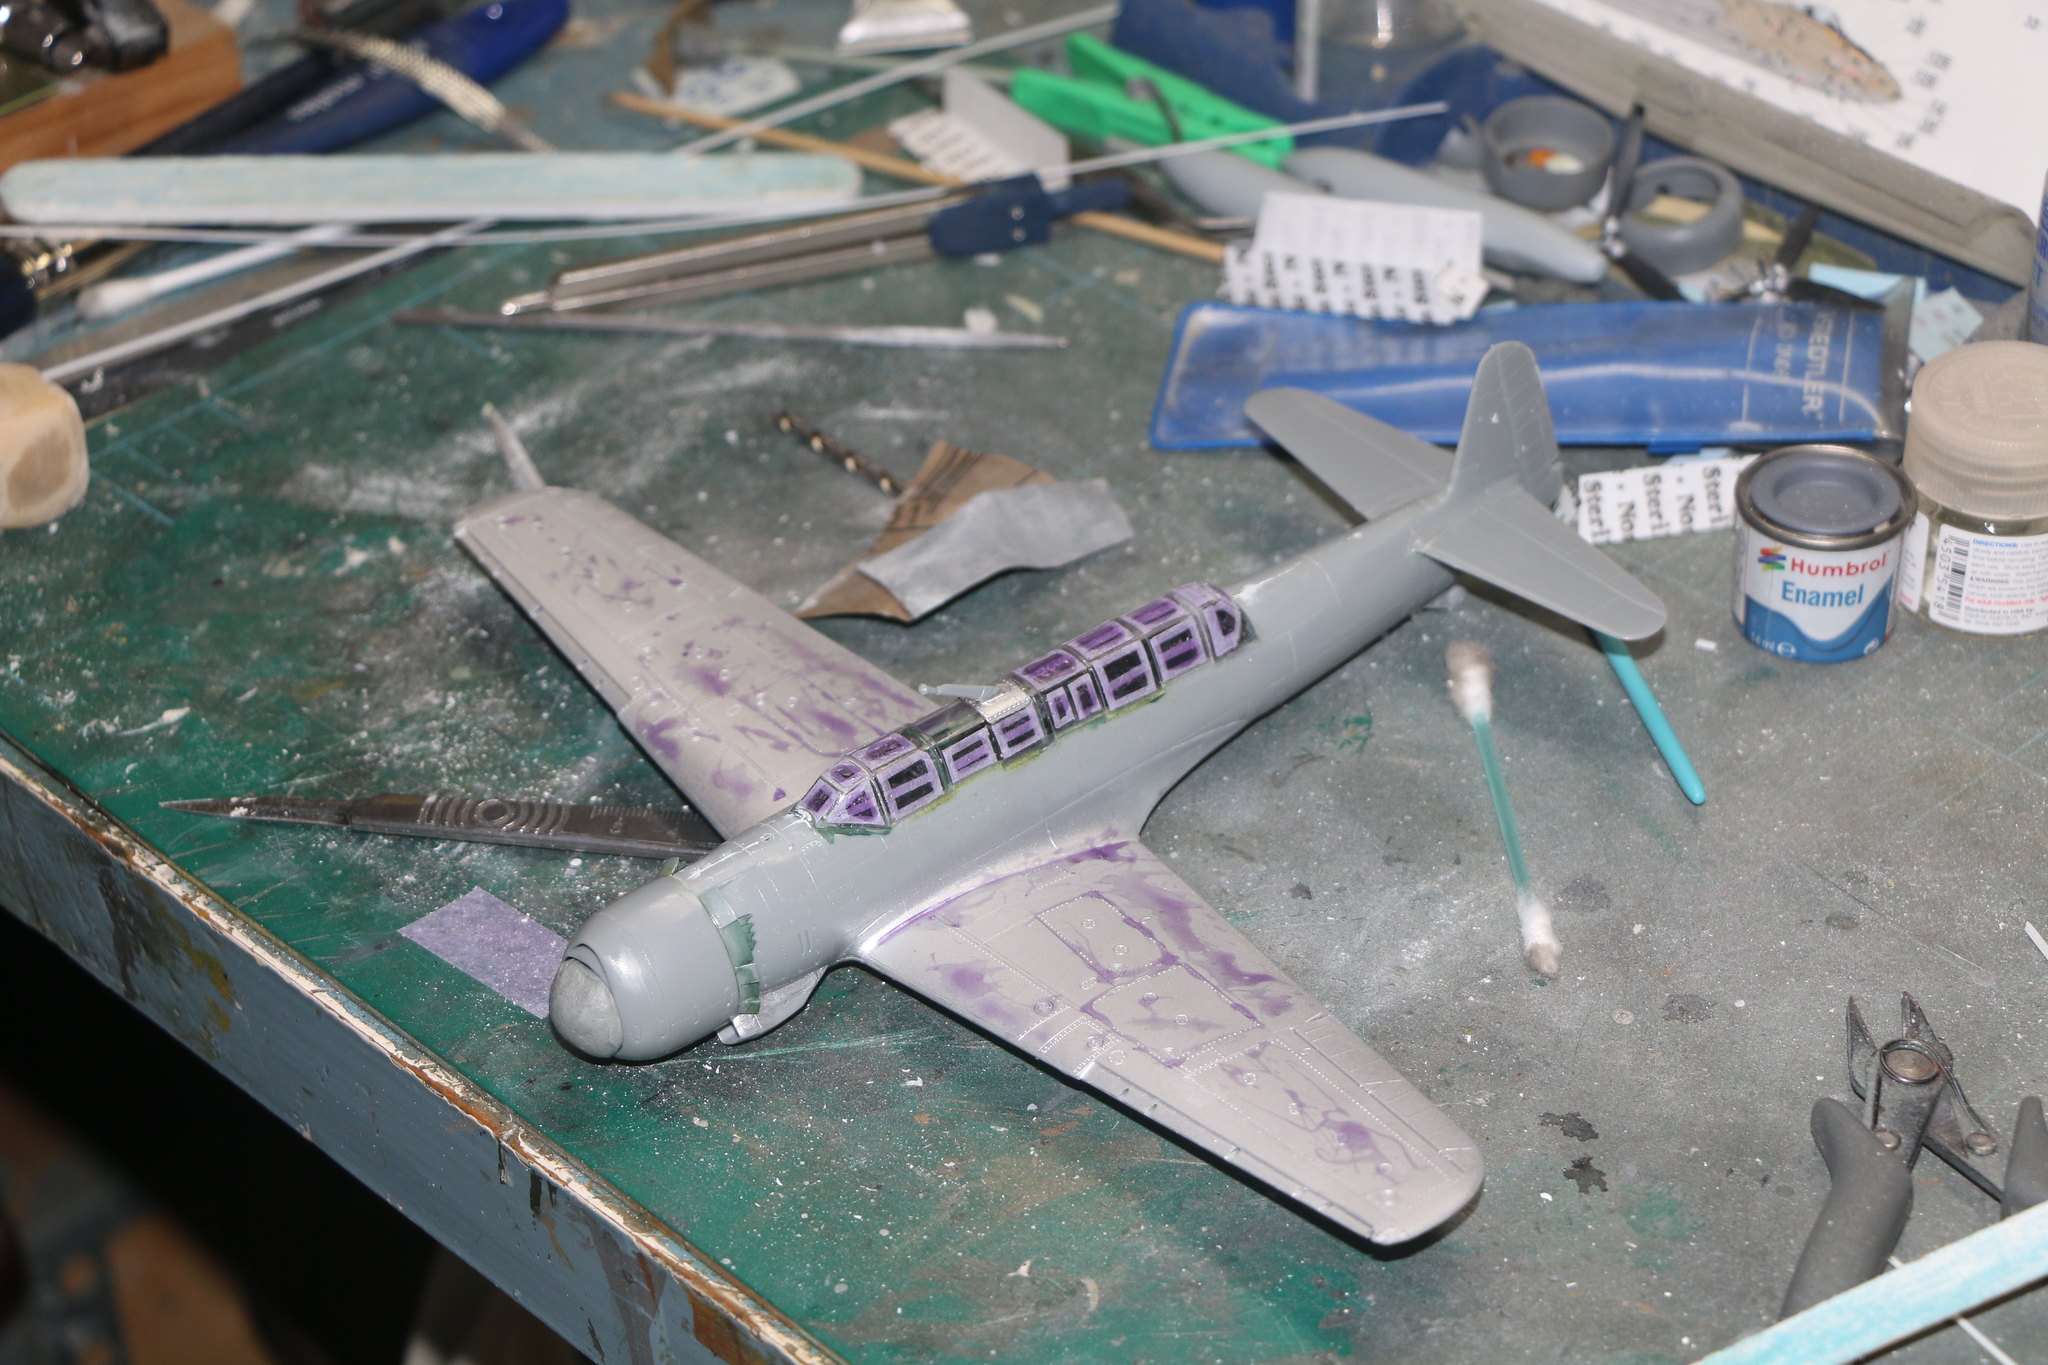
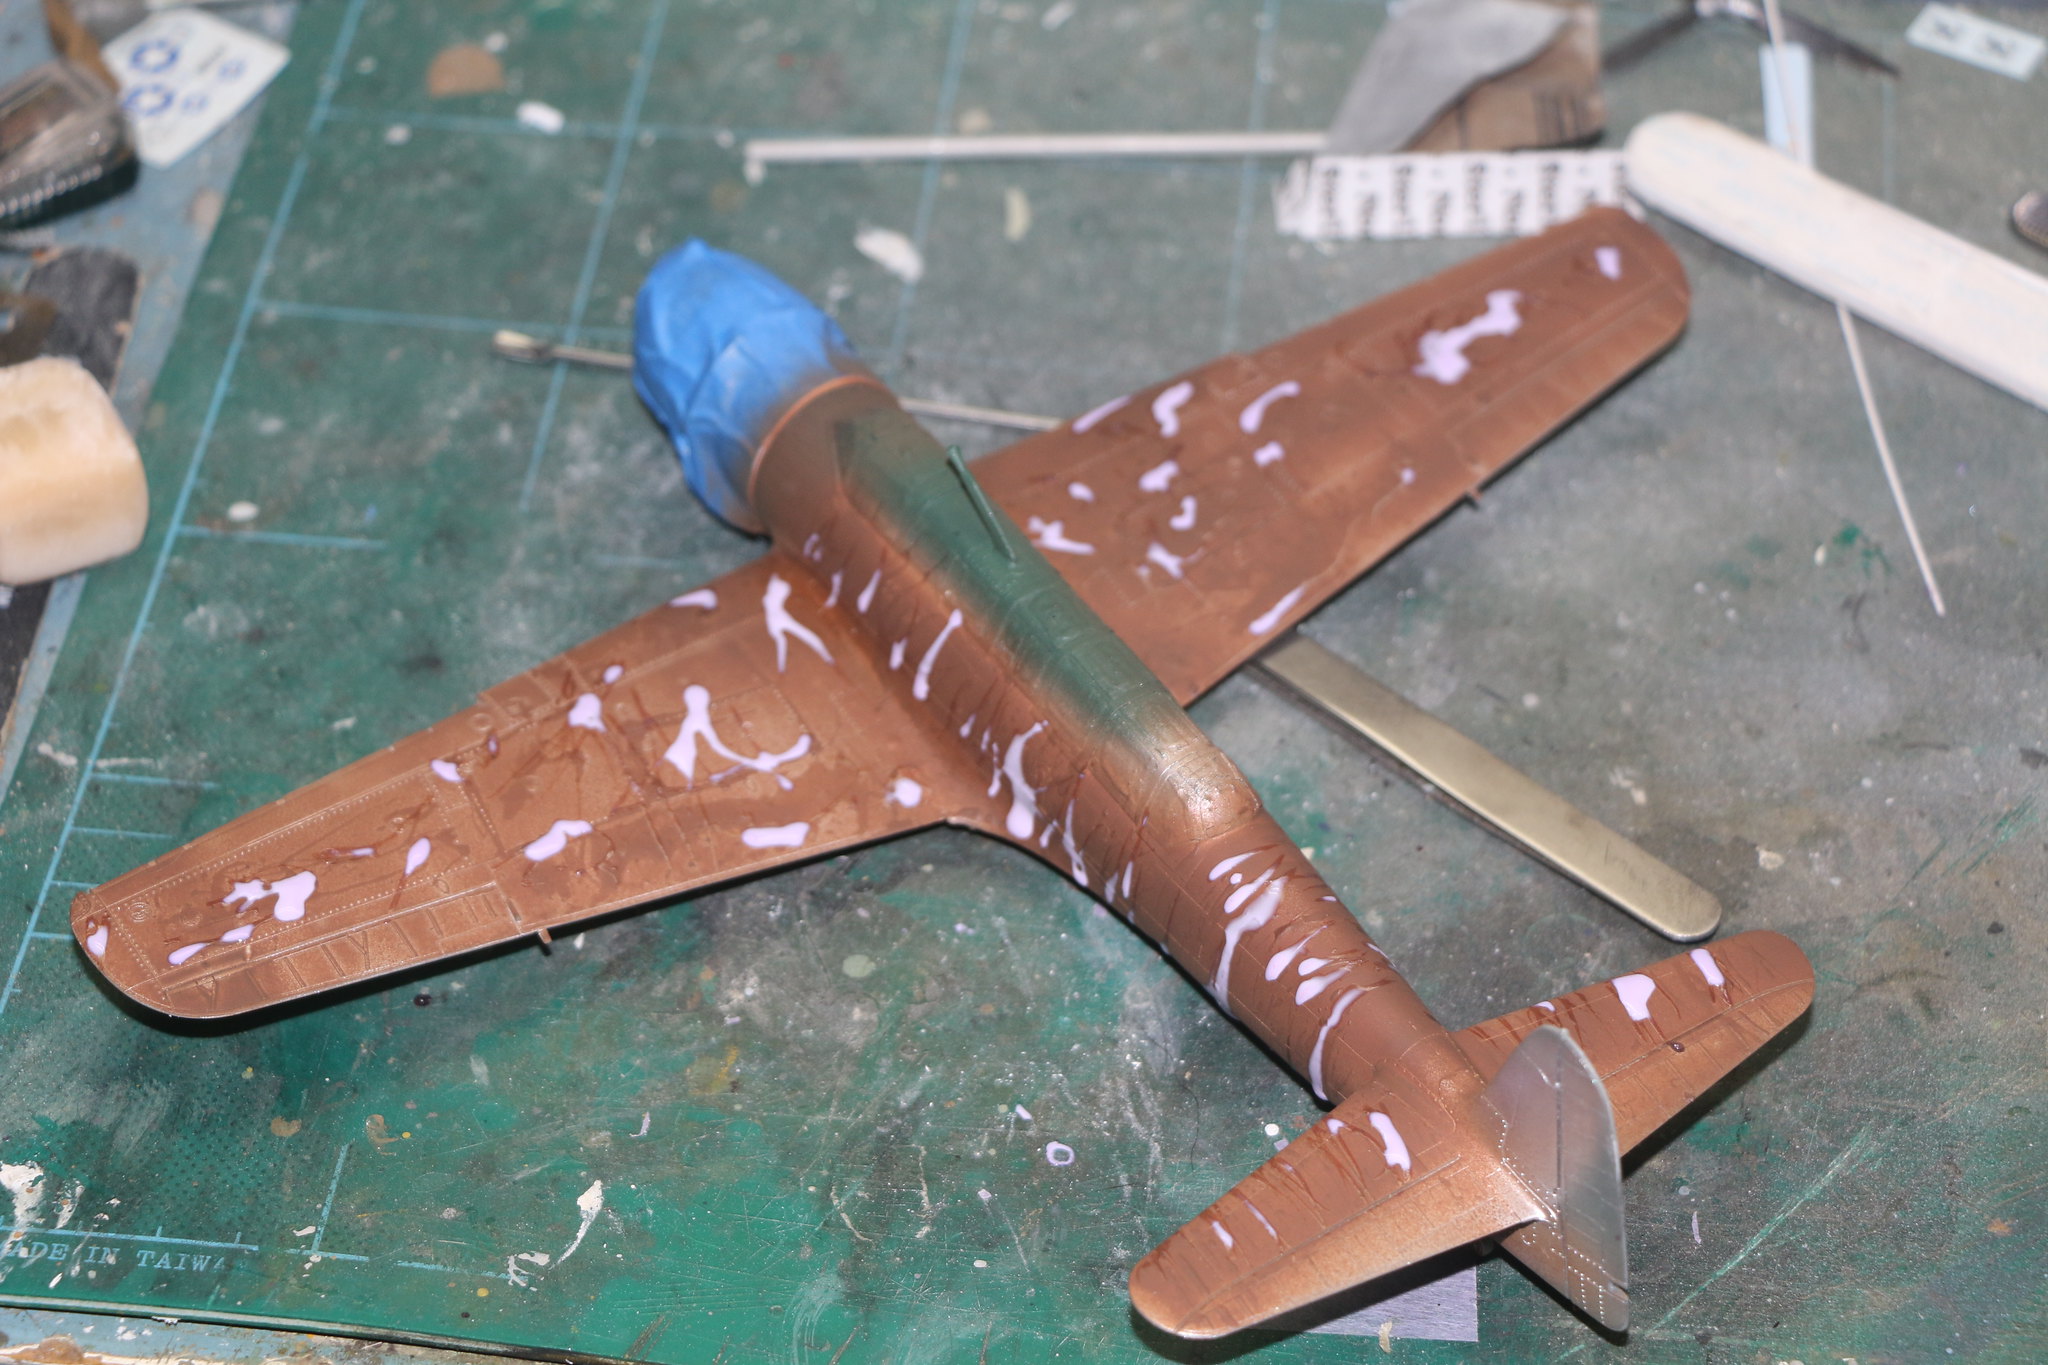
He goes on to say that the Japanese used a red brown primer under their paint in the early stages of the war and as the war progressed started using a grey primer. So that when weathering a Japanese aircraft there should be primer showing where the paint is wearing. So in an effort to simulate this I'm going to spray the airframe with Tamiya's red brown which according to Nick is a good match for the colour. I've already added streaks of masking fluid to the fuselage as I realised I hadn't applied any wear to those surfaces. Once it's dry I'll give the airframe a light coating of red brown and then go over the already applied streaks of masking fluid with more of the same, the end result being (I hope) brown primer showing in a few places.
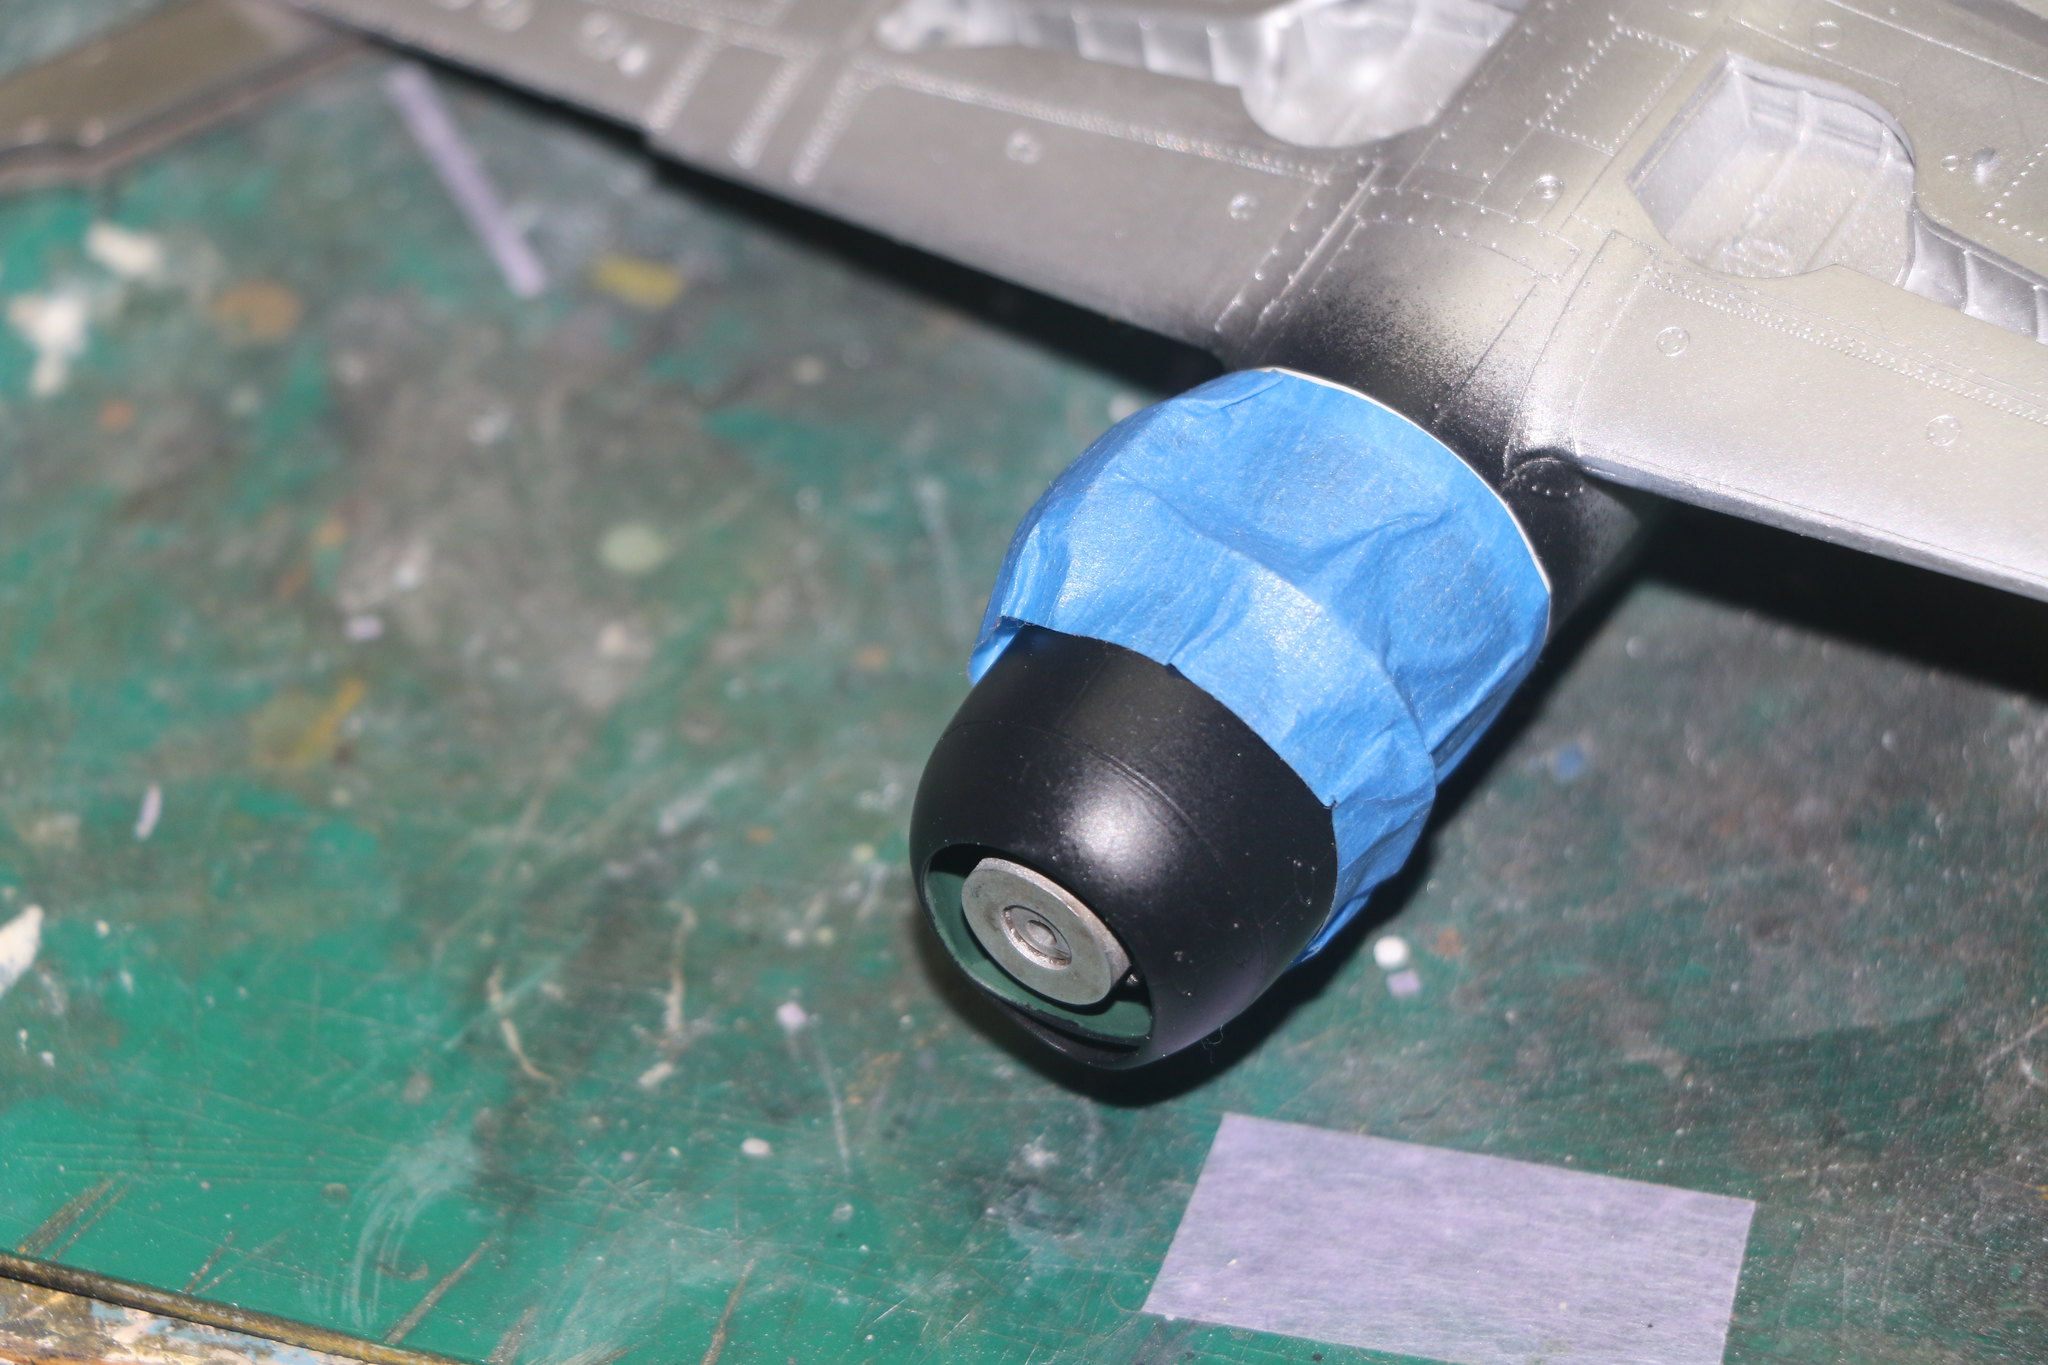
I've got the cowling painted and masked off which was another journey of discovery regarding the colour to use. Nick gives a paint mix to use that closely matches it, I therefore ignored it and made my own as I didn't have the colours specified.
Here are a few pics for you to see where I'm at as of this moment.
 IMG_1921
 by
Chris WIlson, on Flickr
 IMG_1920
 by
Chris WIlson, on Flickr
 IMG_1918
 by
Chris WIlson, on Flickr
 IMG_1917
 by
Chris WIlson, on Flickr
 IMG_1916
 by
Chris WIlson, on Flickr
#305
Christchurch, New Zealand
Joined: February 01, 2006
KitMaker: 1,673 posts
AeroScale: 1,517 posts
Posted: Thursday, December 21, 2017 - 01:08 PM UTC
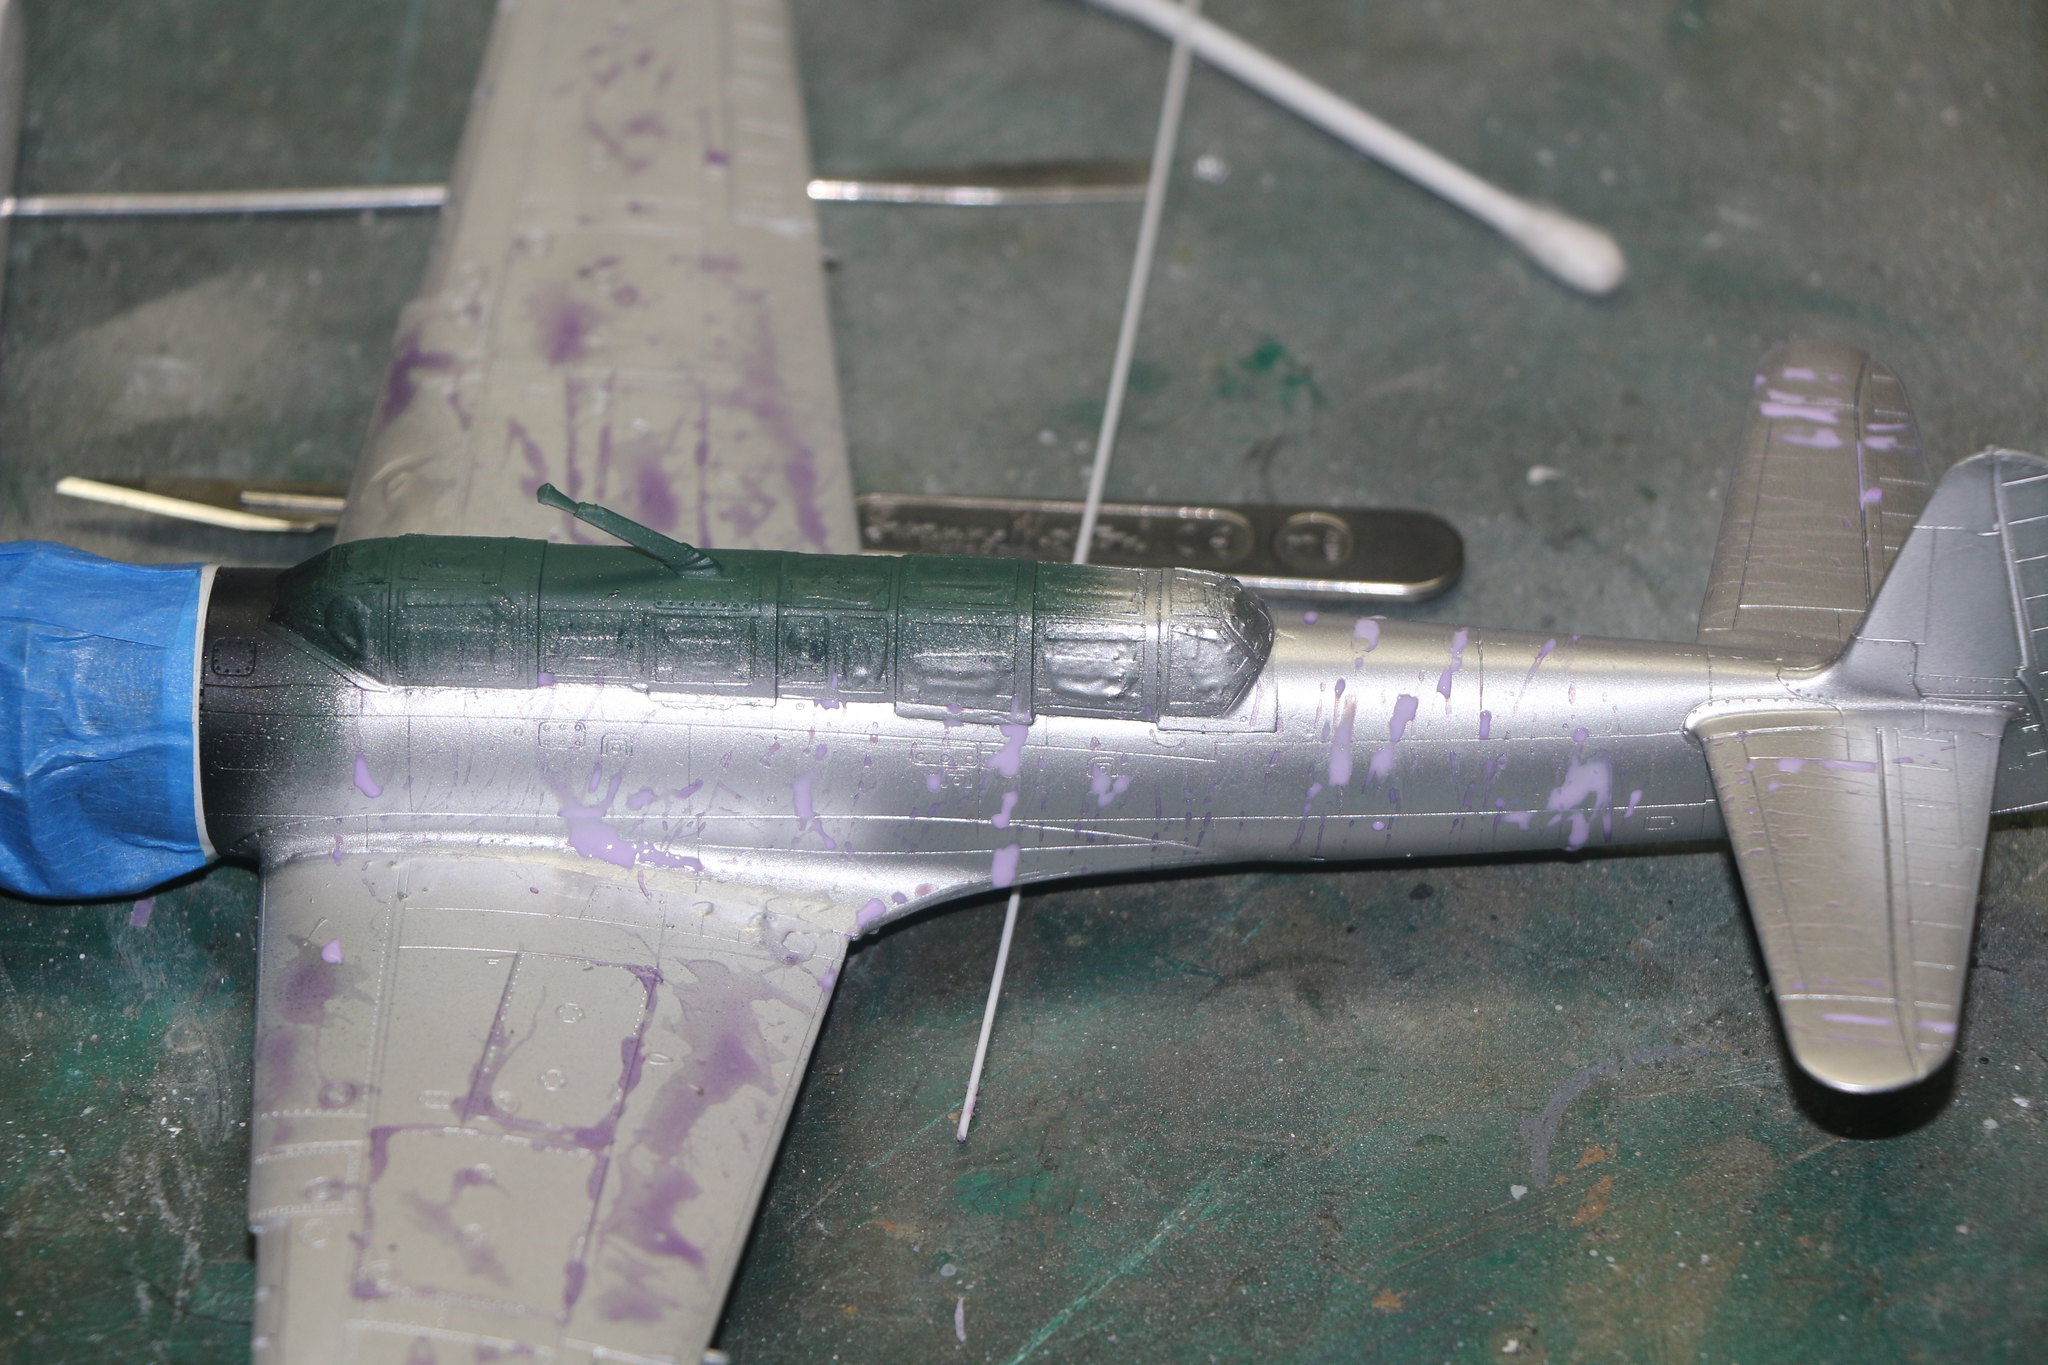
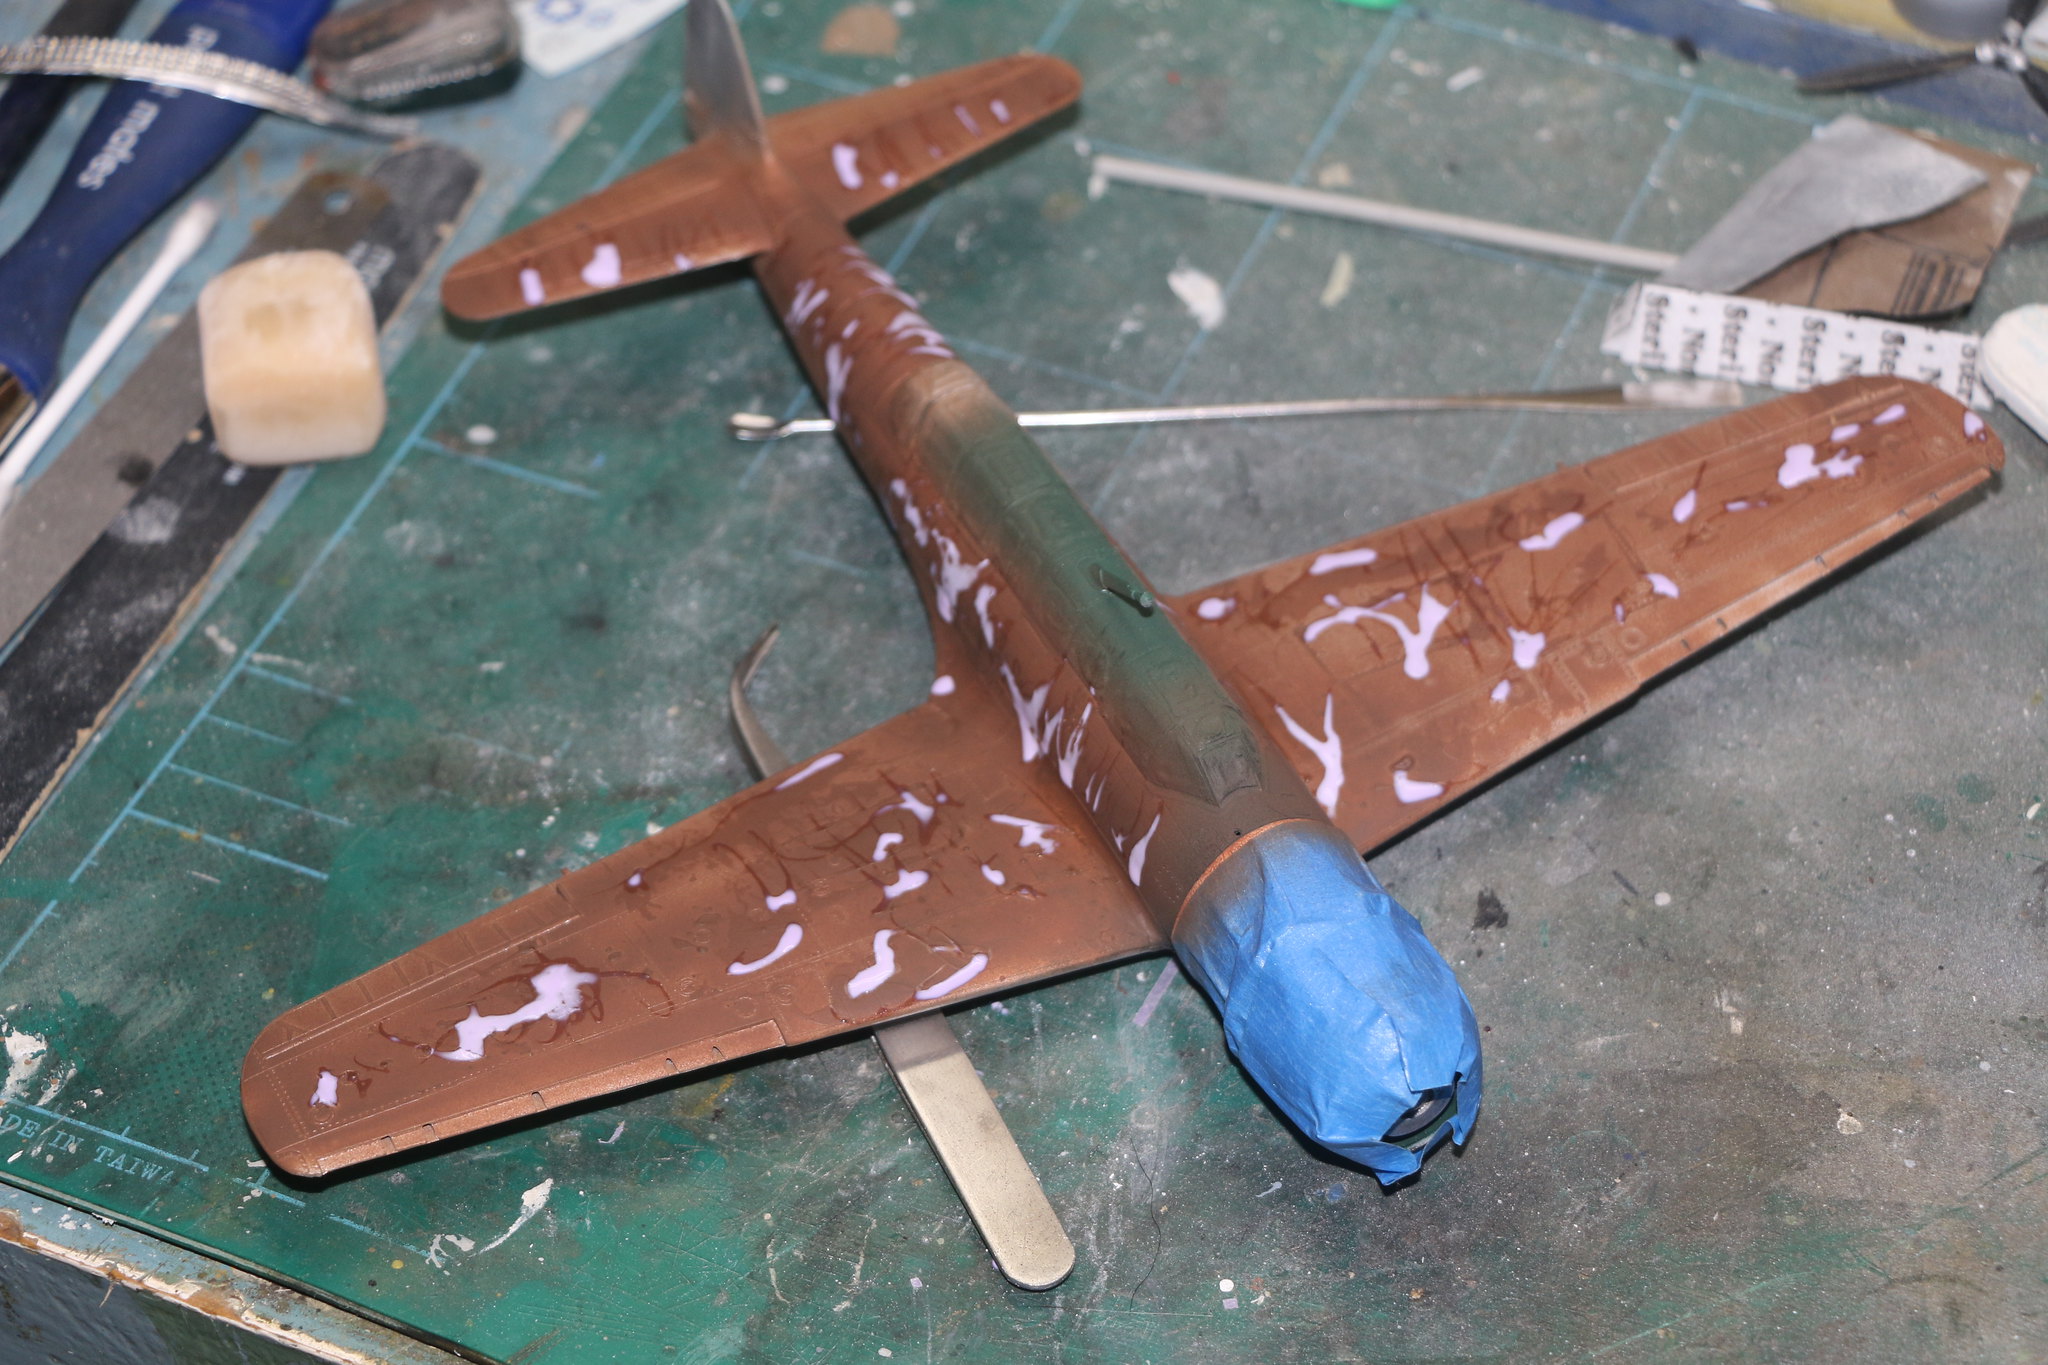
Okay so I've sprayed the red brown deliberately patchy as I don't want a solid layer of it to show through. Then I've applied more masking fluid over the stuff that's already applied and in random patterns on the rest of the airframe. I'm hoping it'll give the impression of a weathered finish where there's primer as well as aluminium skin showing.
Pics as per usual!
 IMG_1923
 by
Chris WIlson, on Flickr
 IMG_1922
 by
Chris WIlson, on Flickr
Which leaves me with the burning question how do I remove it effectively? I was thinking of literally just rubbing it off but I wonder if it will be that simple?
Bayern, Germany
Joined: January 17, 2006
KitMaker: 673 posts
AeroScale: 492 posts
Posted: Thursday, December 21, 2017 - 01:52 PM UTC
Hi Chris, very innovative use of masking fluid and kudos for doing some indepth research to get the colors rights.
Ernest
#305
Christchurch, New Zealand
Joined: February 01, 2006
KitMaker: 1,673 posts
AeroScale: 1,517 posts
Posted: Friday, December 22, 2017 - 03:26 AM UTC
Hi Ernest and welcome! Thanks for the praise regarding my work so far I appreciate it greatly.
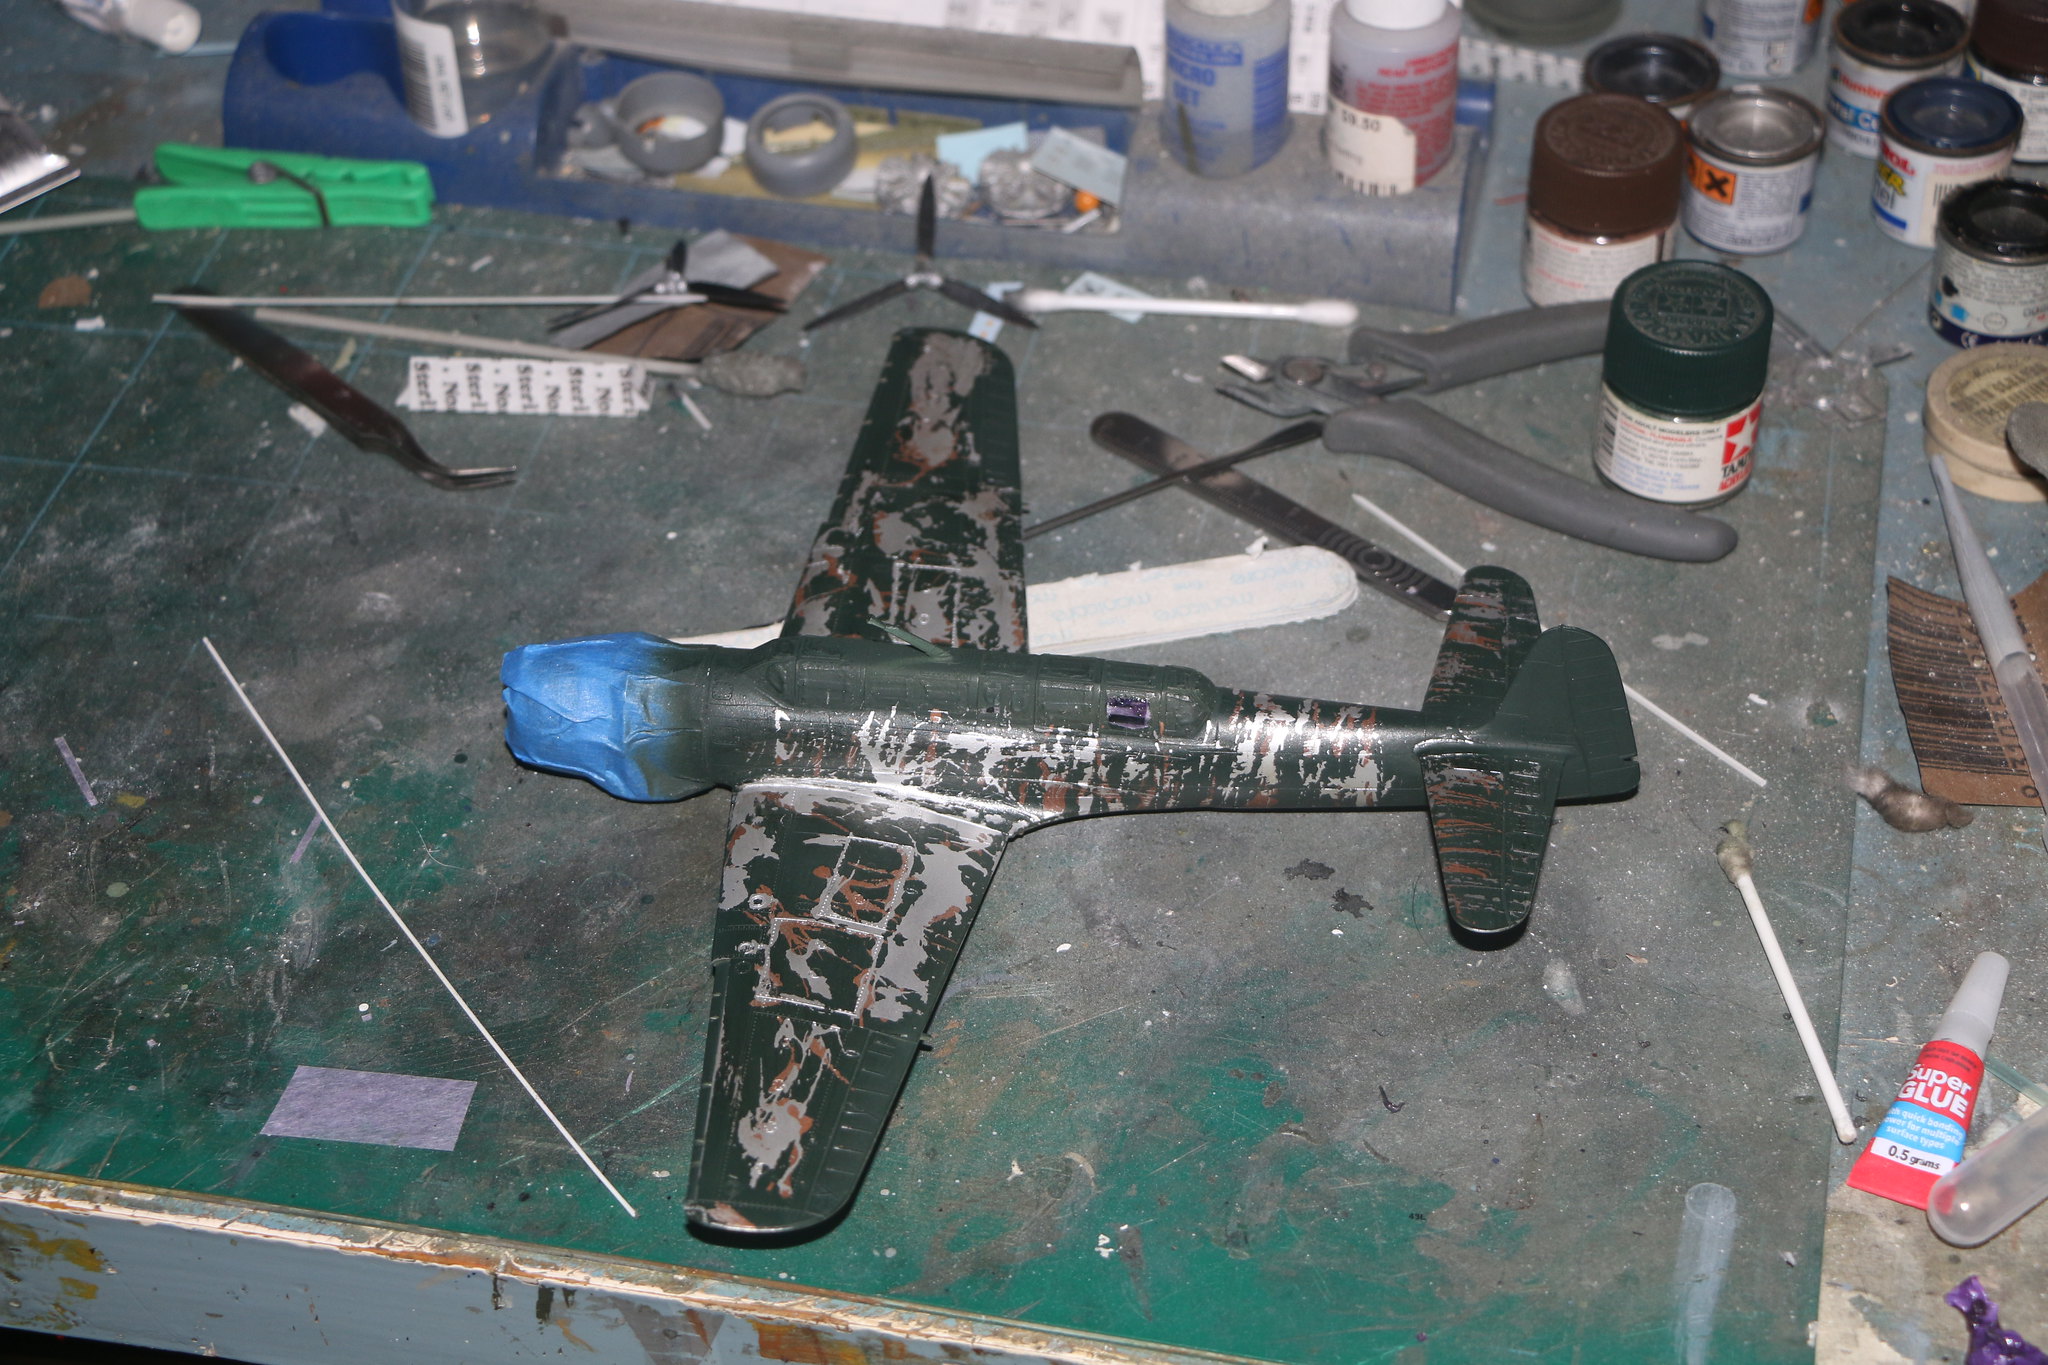
Well I think the process will work but it will require refinement.
Firstly the application of masking fluid will need to be quite thick to make it easy to remove.
Secondly and most important let the top coat DRY sufficiently before removing the masking fluid, I didn't and removed more of the top coat than i wanted as can be seen.
Third the use of acrylic paint over a hard enamel or similar is important. The dissimilar paint doesn't bond to the bottom layer and aids in the removal of the masking medium.
Fourth painting the model a colour to represent the primer and the second application of masking fluid works rather well. But again the masking medium require a reasonably thick application to aid in removal.
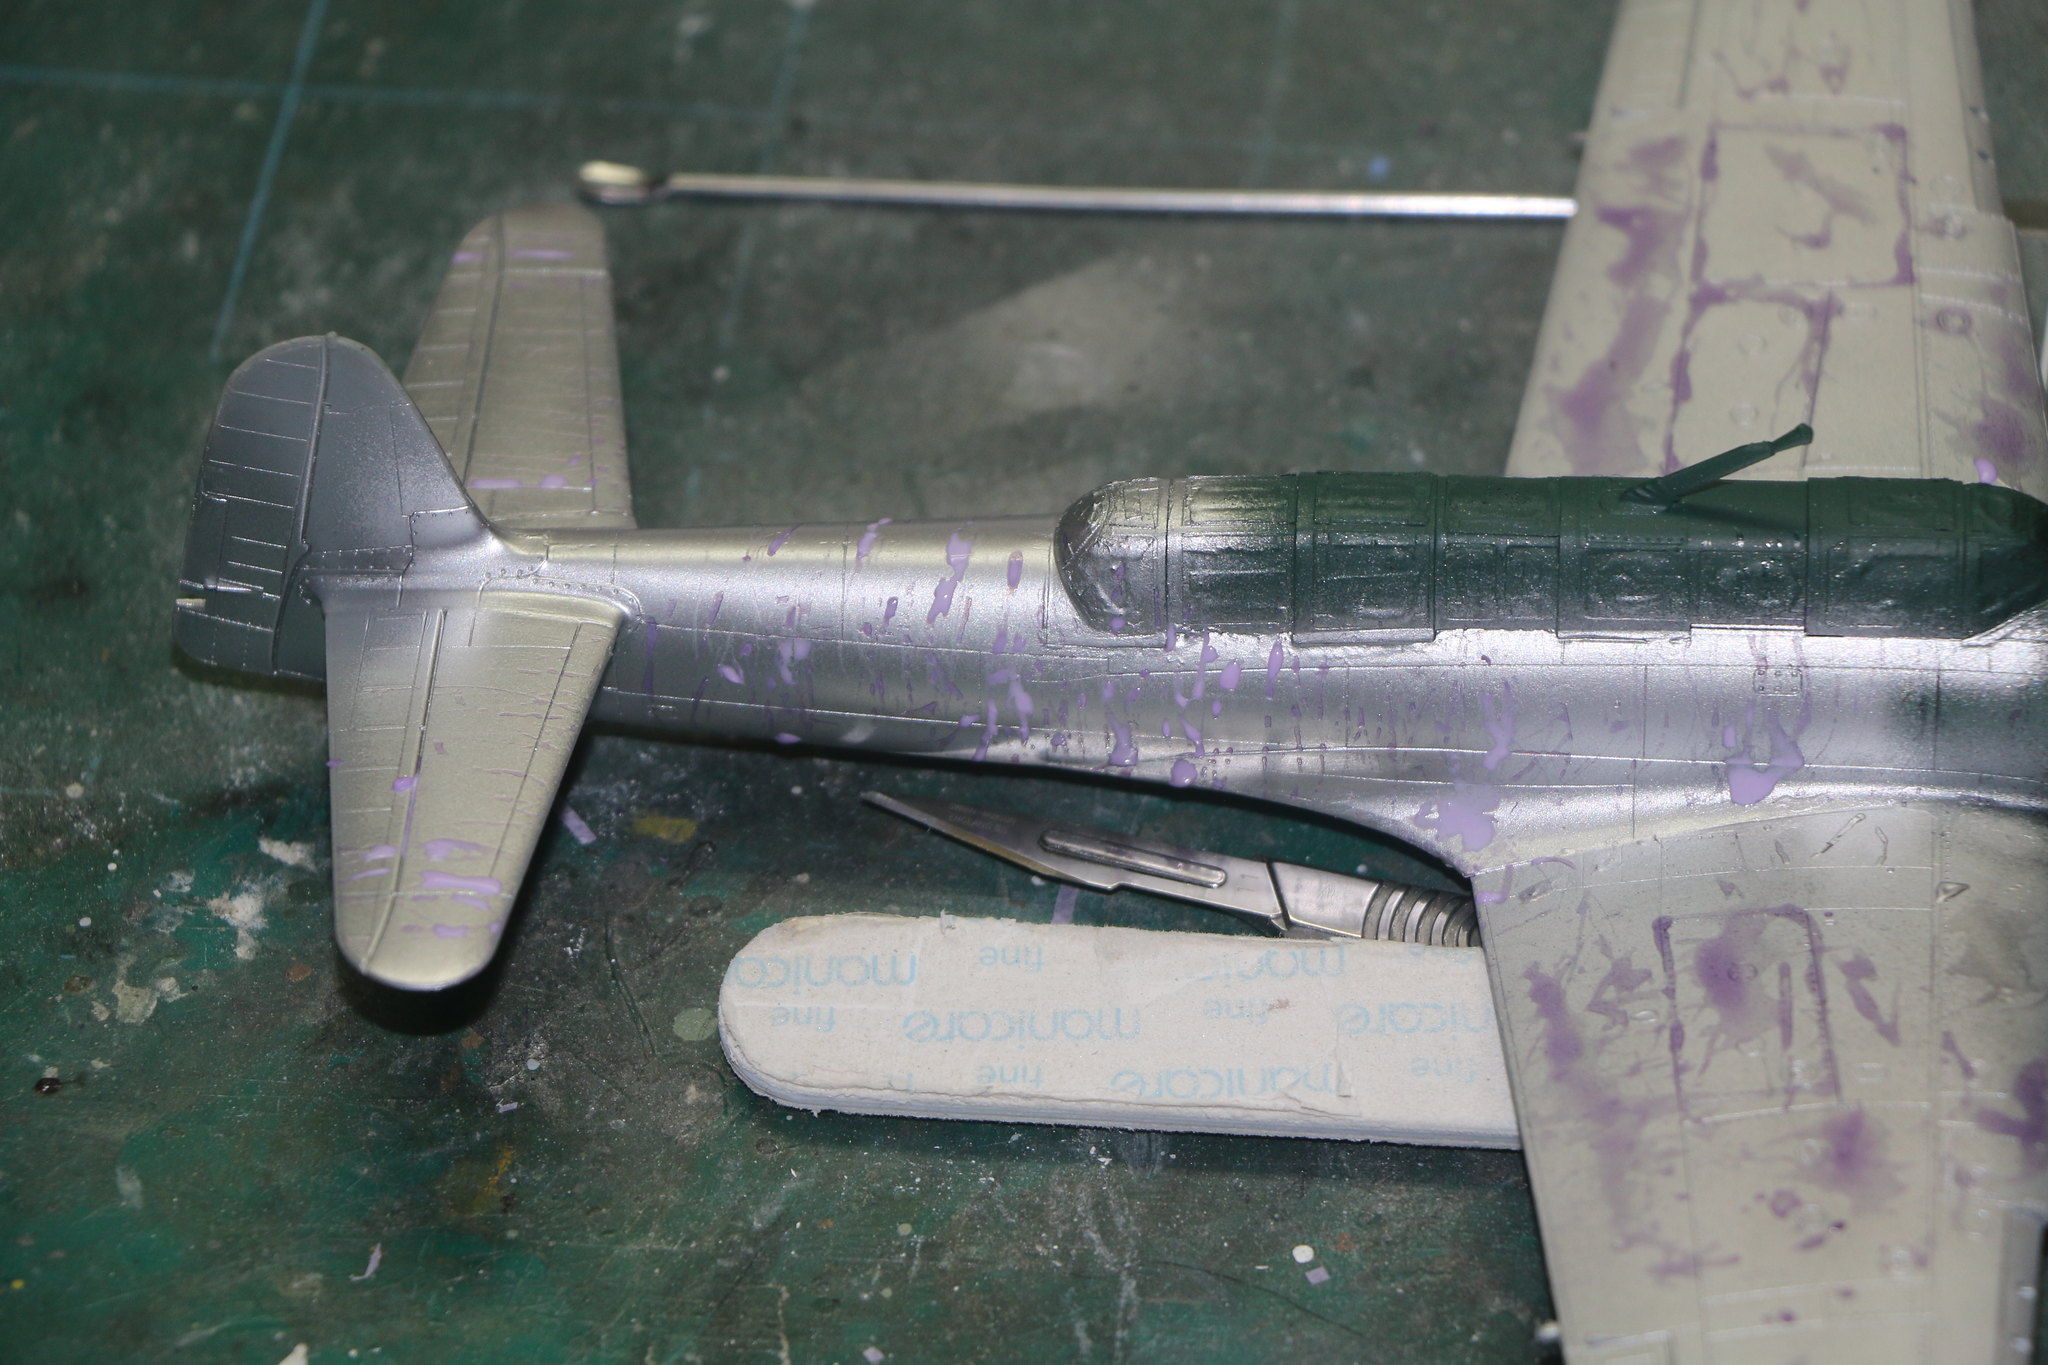
Okay here are the results, I didn't wait for the paint to harden sufficiently and removing the masking medium also removed paint from areas I didn't want it too. The result is an airframe heavily weathered in some areas and not in others. But hey live and learn and I'm sorting this out as I go.
 IMG_1930
 by
Chris WIlson, on Flickr
 IMG_1929
 by
Chris WIlson, on Flickr
 IMG_1928
 by
Chris WIlson, on Flickr


