

Steve,
Have you tried the Archer rivet sets? They make a series of rivets in various sizes that are on decal paper, and you can cut them into strips. The carrier film is so thin and fine it almost disappears under a coat of primer or paint. They are really useful for em-placing lines of rivets, and come in various spacing's and sizes, but must be applied over a painted finish. Much easier to use than a rivet wheel tool or individually embedding rivets. They are pricey though-- about $16 USD for a sheet.
VR, Russ
Cold War (1950-1974)
Discuss the aircraft modeling subjects during the Cold War period.
Discuss the aircraft modeling subjects during the Cold War period.
Hosted by Tim Hatton
Best Starfighter Ever?

Kevlar06

Joined: March 15, 2009
KitMaker: 3,670 posts
AeroScale: 833 posts
Posted: Thursday, December 28, 2017 - 06:20 AM UTC

md72

#439
Joined: November 05, 2005
KitMaker: 4,950 posts
AeroScale: 3,192 posts

Posted: Thursday, December 28, 2017 - 09:54 AM UTC
Thanks Steve, I've signed up so now you have to make more 


SteveAndrews

Joined: August 16, 2010
KitMaker: 693 posts
AeroScale: 551 posts
Posted: Thursday, December 28, 2017 - 05:08 PM UTC
Hey Russ
I must admit that I haven't tried the Archer sets. Come to think of it, I seem to remember seeing a video on them ages ago. Im going to check them out and splash some cash. Even if I don't use them on this build it will be fun to experiment.
And Mark
Thanks so much for the vote of confidence. I'm not sure what the next subject will be yet, but there will be one. Watch this space for more news.
Have a great day guys.
Steve
SteveAndrews
Joined: August 16, 2010
KitMaker: 693 posts
AeroScale: 551 posts
Posted: Friday, December 29, 2017 - 06:33 PM UTC
These days I usually build kits in sub assemblies before I paint anything. I say usually because I tend to do what seems best at the time and sometimes that means taking a different approach. I also try to build, fill and sand big parts before fitting details. That way I avoid damaging small parts during construction or obscuring places I need to work on. Oh, I test fit a lot too; a few stages ahead if taping parts together allows it. Hmmm, yes, you might say I err on the side of caution.
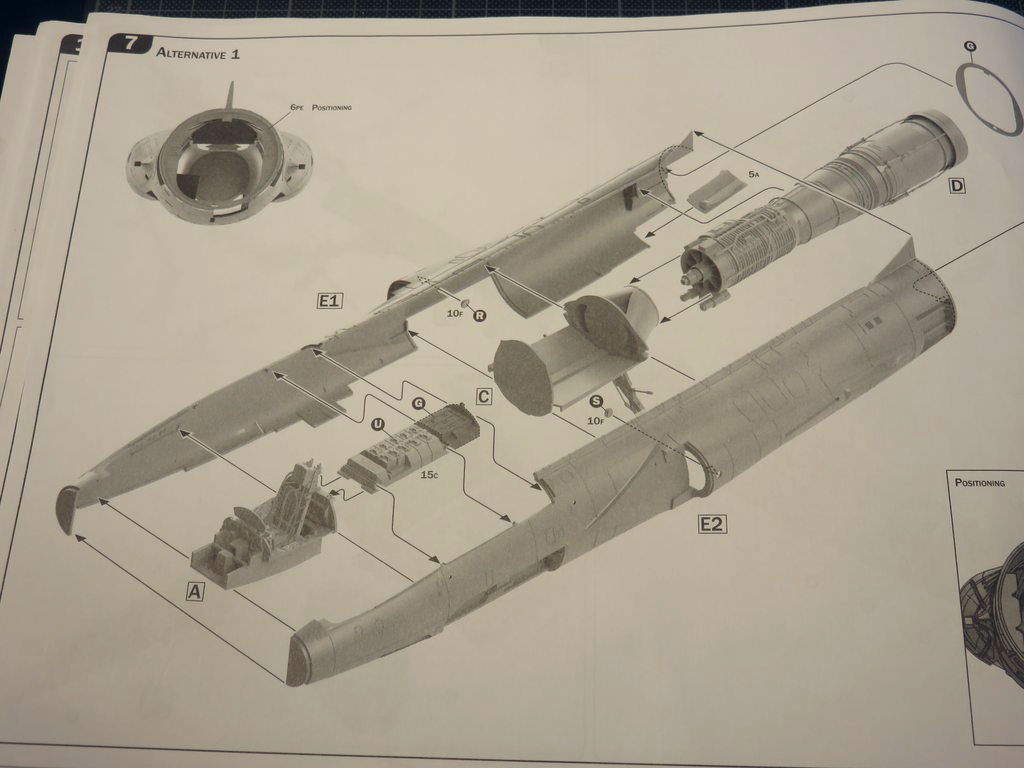
It was during a test fit of the main landing gear bay into the fuselage that I realised this kit offers an interesting option for the general assembly and painting sequence. It would be possible to work on the details of the bay, and paint it fully, after its attached to the fuselage. Whats more there are only four sub assemblies that must go onto the fuselage before its closed: the cockpit, the engine, the electronics bay and the sides of the main landing gear bay. Heres what the instructions show.
So, I have a new plan. Work on the main landing gear is suspended for a bit while I return to the cockpit. Ill finish that, then build the basics of the electronics bay, make the engine and paint the inside, then join the fuselage halves and do any sanding a filling needed. Finally I'll go back and detail the exposed parts. I cant remember which general said No plan survives contact with enemy or something like that, so Im staying flexible, but thats the plan.
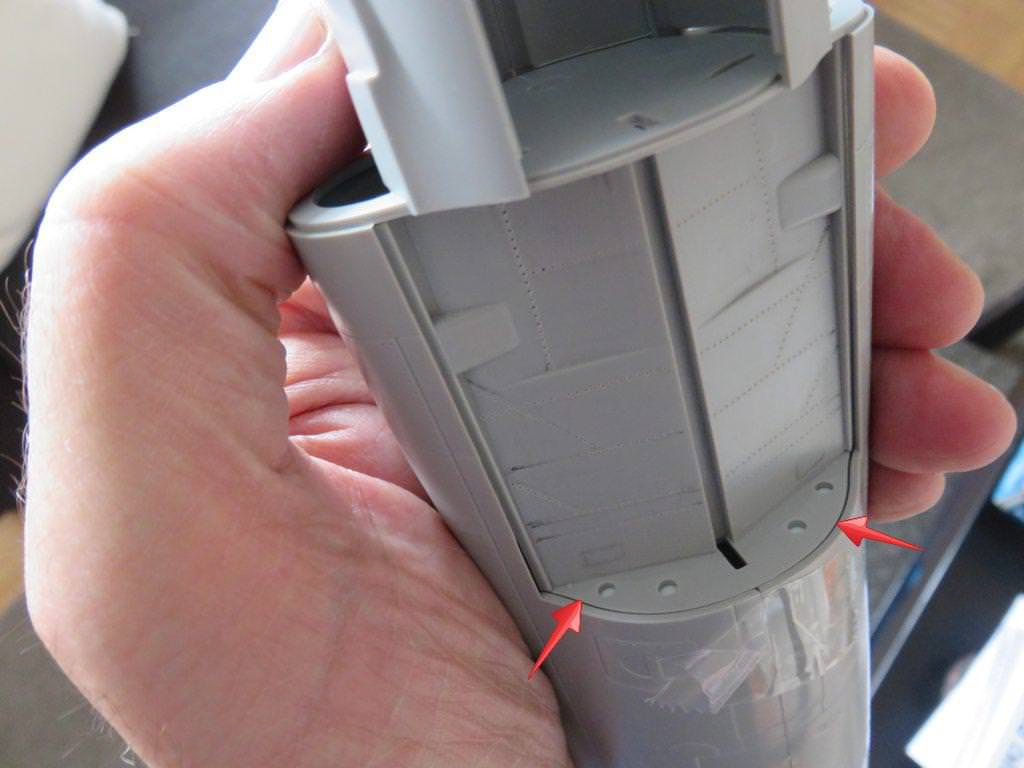
Heres an example of why I like to test fit do the big work first. That gap between the fuselage and wheel bay bulkhead will be very difficult to fill once the space is crammed with pipes and cables.
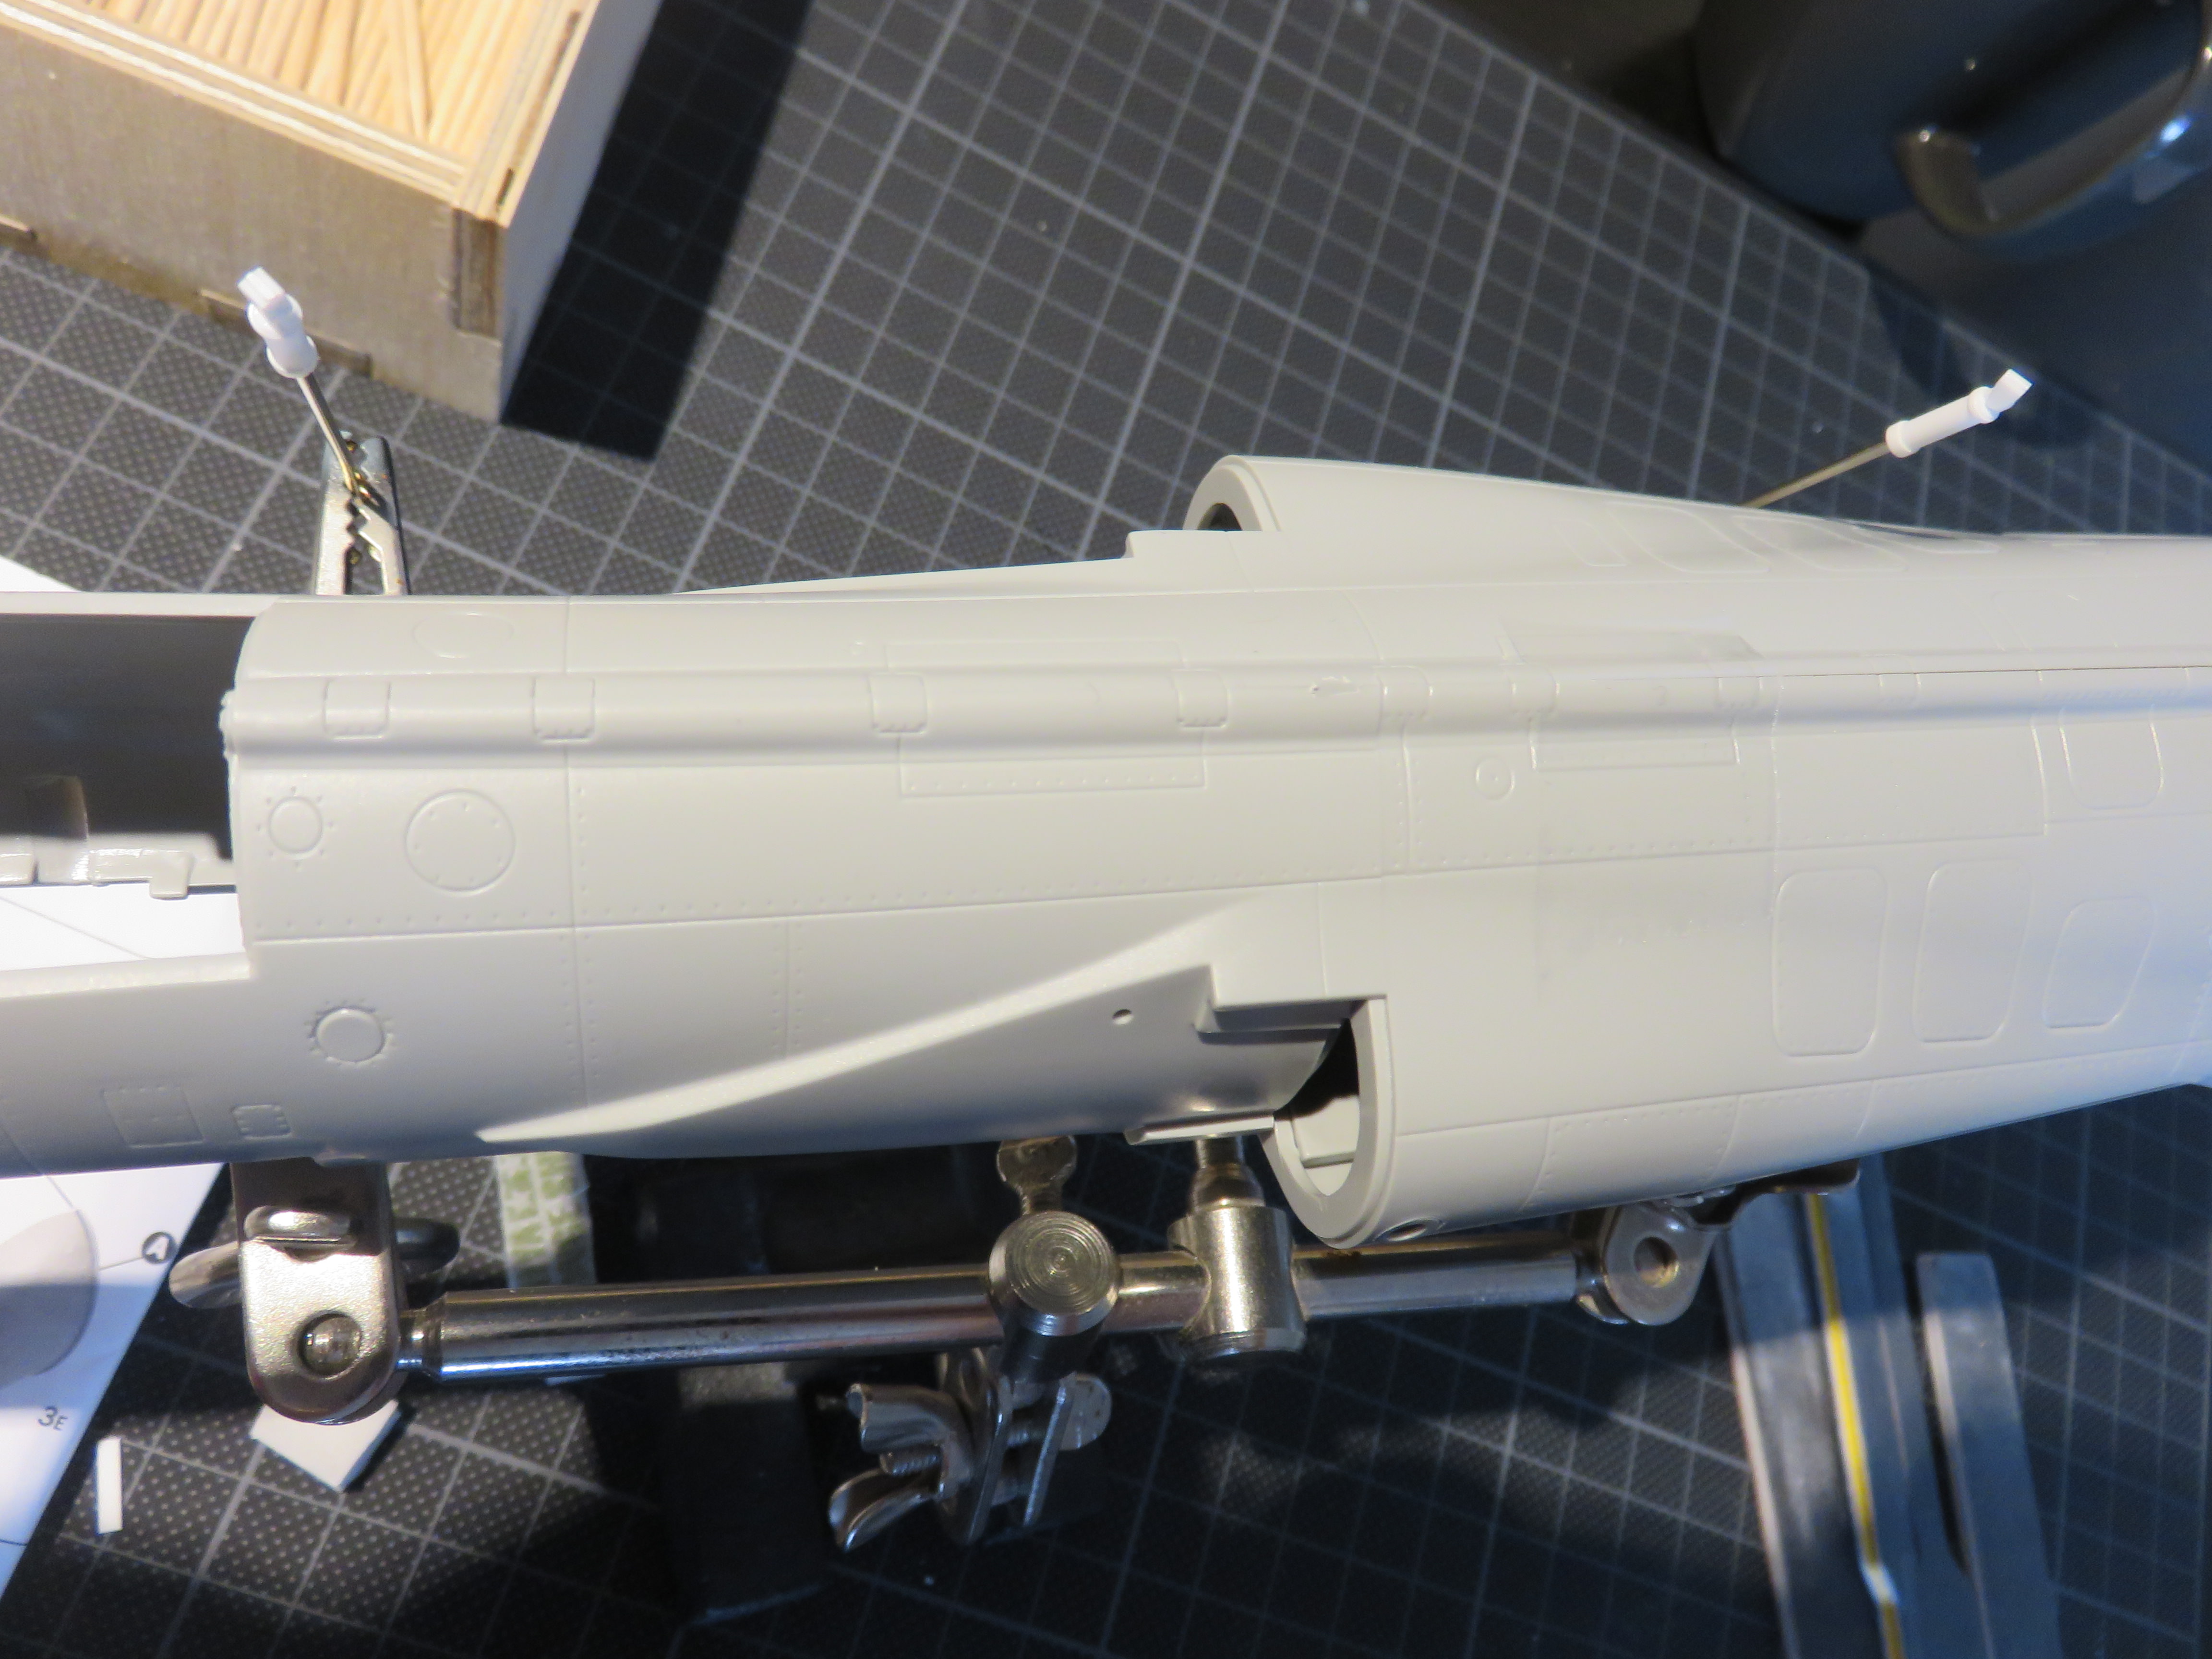
And a sneak peak into the future. The fuselage looks like it will go together well as long as none of the interior parts cause problems.
If you need some zen music while you do tedious tasks like revetting or building tracks try this.
https://www.youtube.com/watch?v=nBQivMKS5rc
Happy modelling folks.
Steve
It was during a test fit of the main landing gear bay into the fuselage that I realised this kit offers an interesting option for the general assembly and painting sequence. It would be possible to work on the details of the bay, and paint it fully, after its attached to the fuselage. Whats more there are only four sub assemblies that must go onto the fuselage before its closed: the cockpit, the engine, the electronics bay and the sides of the main landing gear bay. Heres what the instructions show.
So, I have a new plan. Work on the main landing gear is suspended for a bit while I return to the cockpit. Ill finish that, then build the basics of the electronics bay, make the engine and paint the inside, then join the fuselage halves and do any sanding a filling needed. Finally I'll go back and detail the exposed parts. I cant remember which general said No plan survives contact with enemy or something like that, so Im staying flexible, but thats the plan.
Heres an example of why I like to test fit do the big work first. That gap between the fuselage and wheel bay bulkhead will be very difficult to fill once the space is crammed with pipes and cables.
And a sneak peak into the future. The fuselage looks like it will go together well as long as none of the interior parts cause problems.
If you need some zen music while you do tedious tasks like revetting or building tracks try this.
https://www.youtube.com/watch?v=nBQivMKS5rc
Happy modelling folks.
Steve
Joel_W
Joined: December 04, 2010
KitMaker: 11,666 posts
AeroScale: 7,410 posts
Posted: Friday, December 29, 2017 - 10:13 PM UTC
Steve,
I've learned the hard way that most sub assemblies don't fit like a glove, especially on kits that have been around for a while, so I do what you're doing, and dry fit the assemblies needed to close up the fuselage halves, and leave off as much detail and or parts that I can till the halves are glued together. Sometimes it works, some times it doesn't.
One thing I've found mighty useful for tight areas where filling and then sanding will be difficult at best, is to use a putty like Vallejo White Acrylic Putty. I apply it, let it set up, then whipe off the excess at any kind of angle rather then straight down the seam with a damp Qtip. The stuff really shrinks, so several applications are always the case.
BTW, watched your latest Video, and it's really outstanding.
Joel

SteveAndrews
Joined: August 16, 2010
KitMaker: 693 posts
AeroScale: 551 posts
Posted: Monday, January 01, 2018 - 03:16 PM UTC
Joel, I reckon yours is the best approach - get the big stuff done and then add details. Sometimes of course we have to do a complete sub-assembly, like an engine or cockpit before the fuselage is joined together, and I hear what you're saying about fit. I almost always make my own construction plan these days because kit supplied instructions would often have us add delicate details before big assembly jobs are done. That seems like a recipe for breaking and losing parts to me, but I've seen guys on line quite happily go about it that way.
I use a similar technique to you when it comes to filling, except my favourite filler is Milliput. I like the consistency, and it can be thinned with water too. For thin gaps I use CA glue and for the very thinnest Mr Surfacer 500.
Maybe there's a short video on sanding and filling techniques in my future?
Thanks again for the constant enthusiasm and encouragement.
Steve
SteveAndrews
Joined: August 16, 2010
KitMaker: 693 posts
AeroScale: 551 posts
Posted: Friday, January 05, 2018 - 03:48 PM UTC
With Christmas and the New Year celebrations fading fast theres time to properly return to the F-104. I hope you had a great time yourself if youve been celebrating.
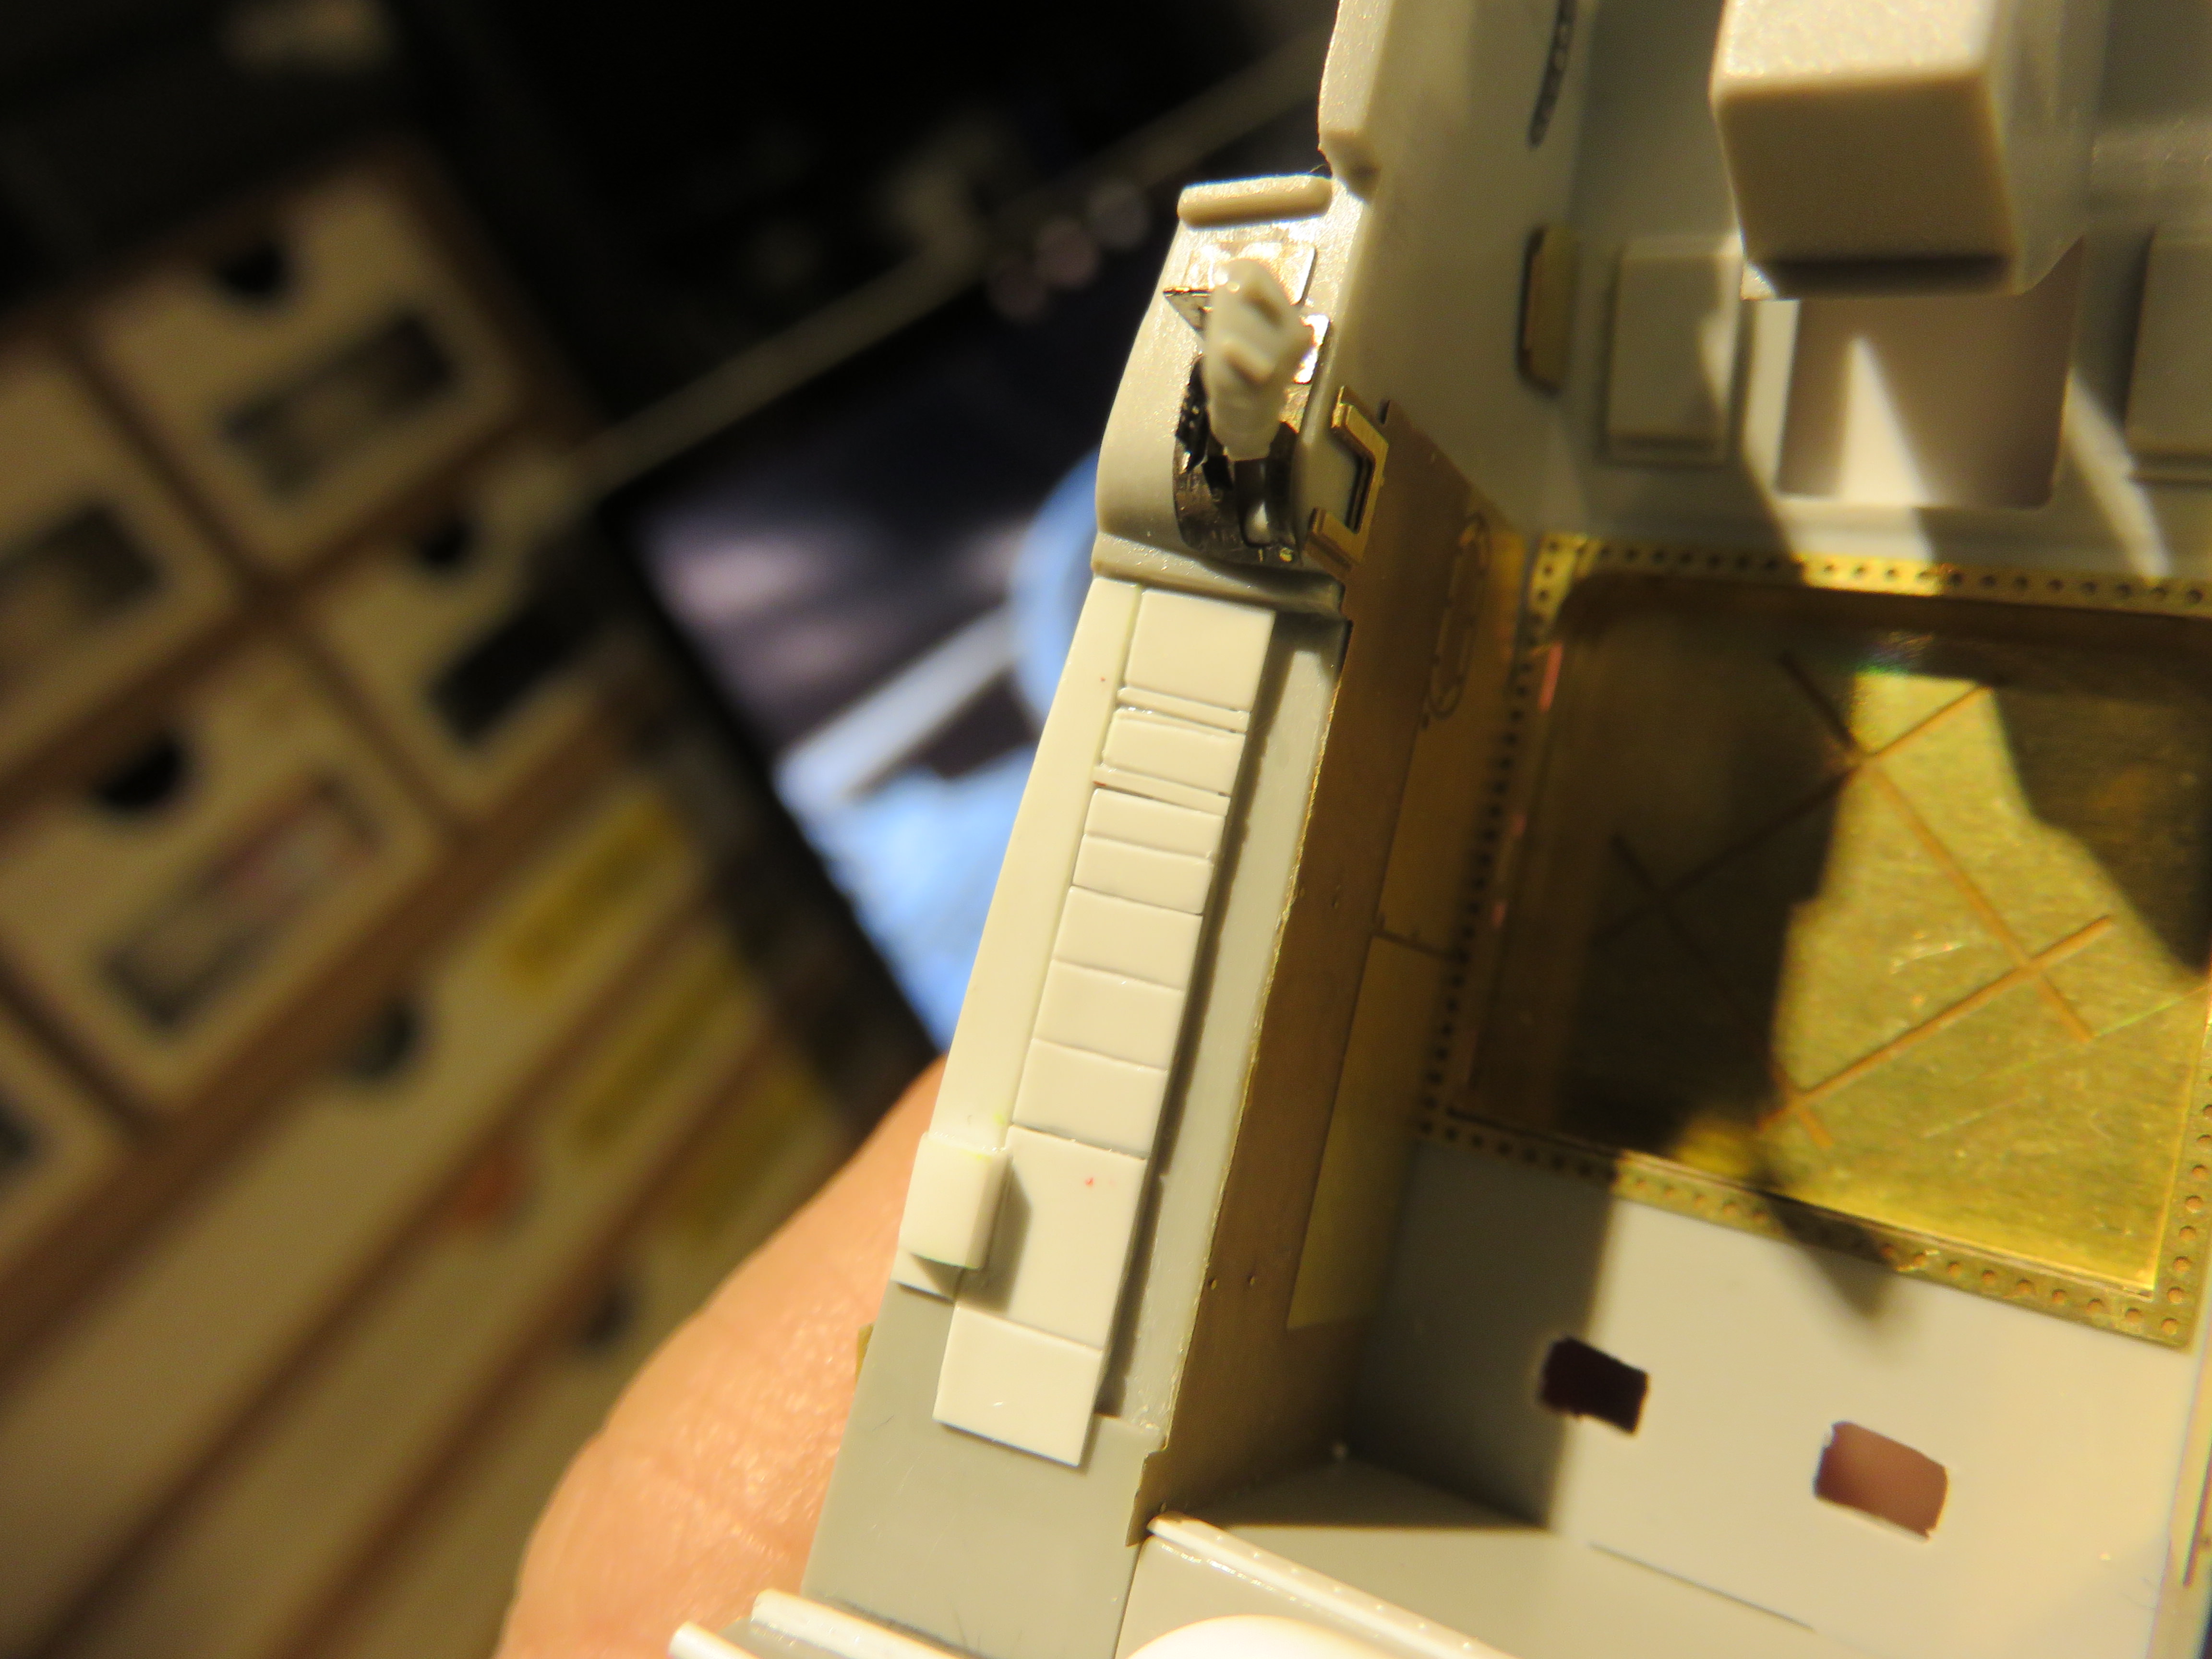
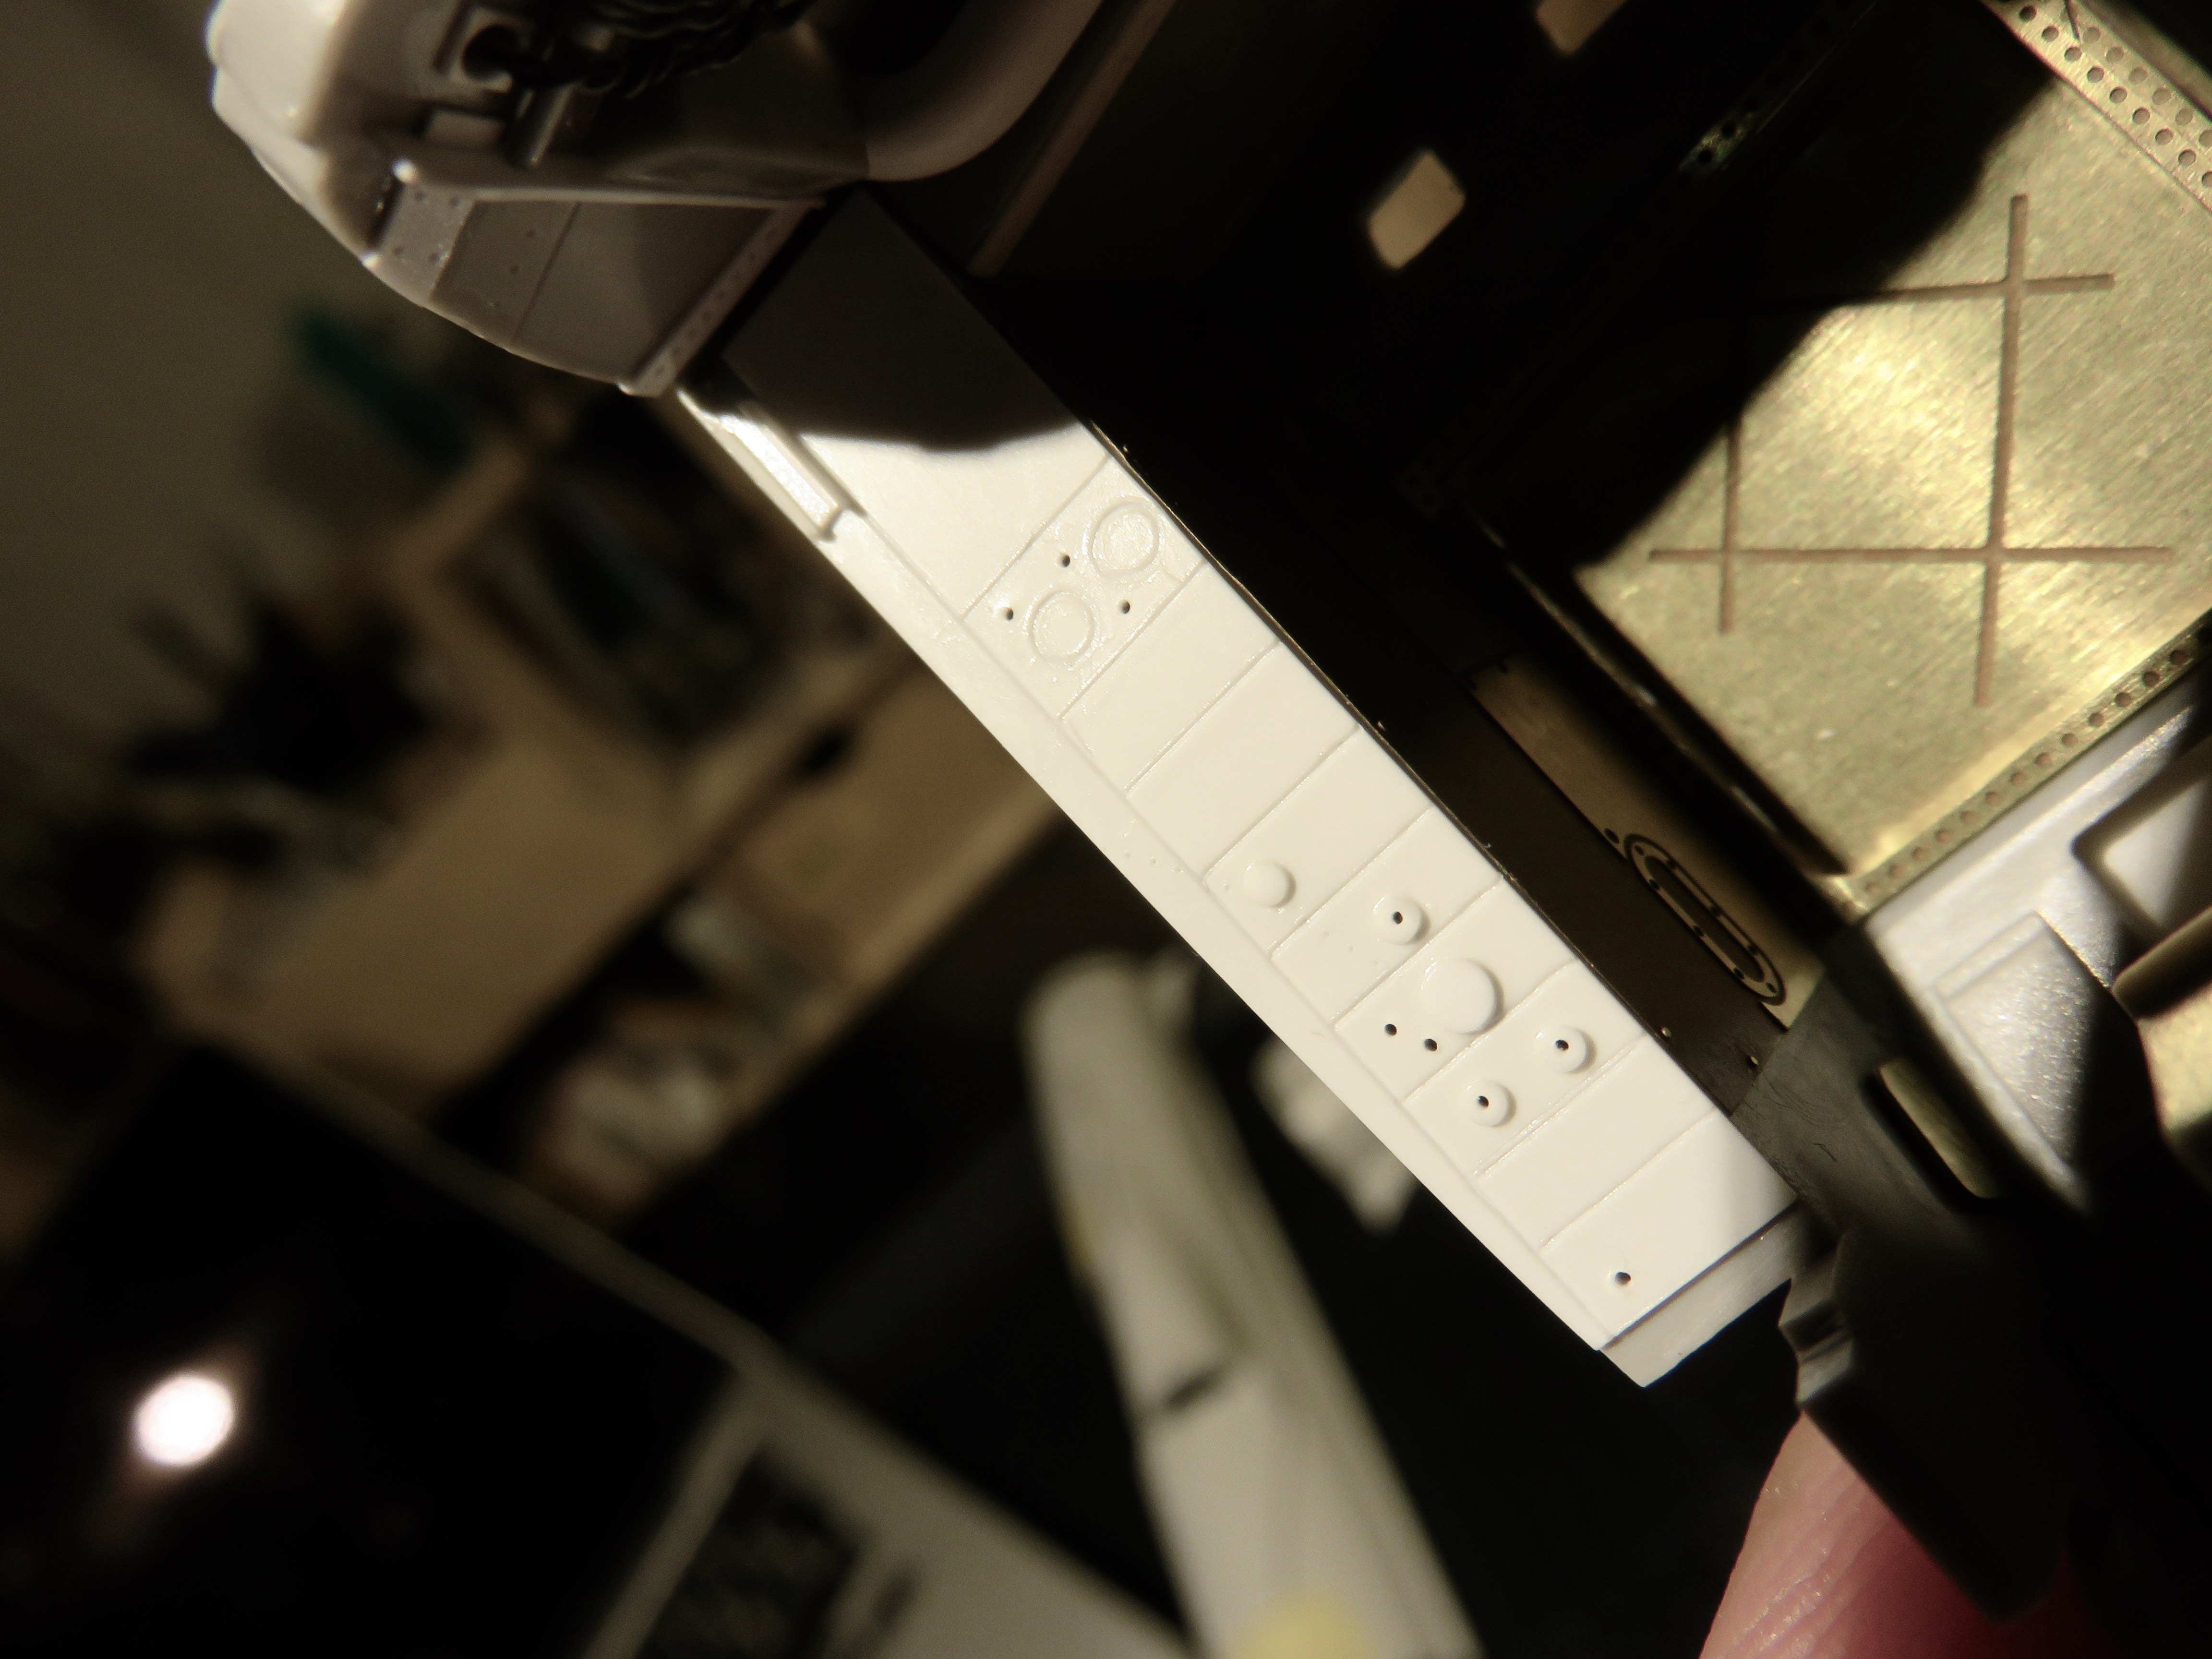
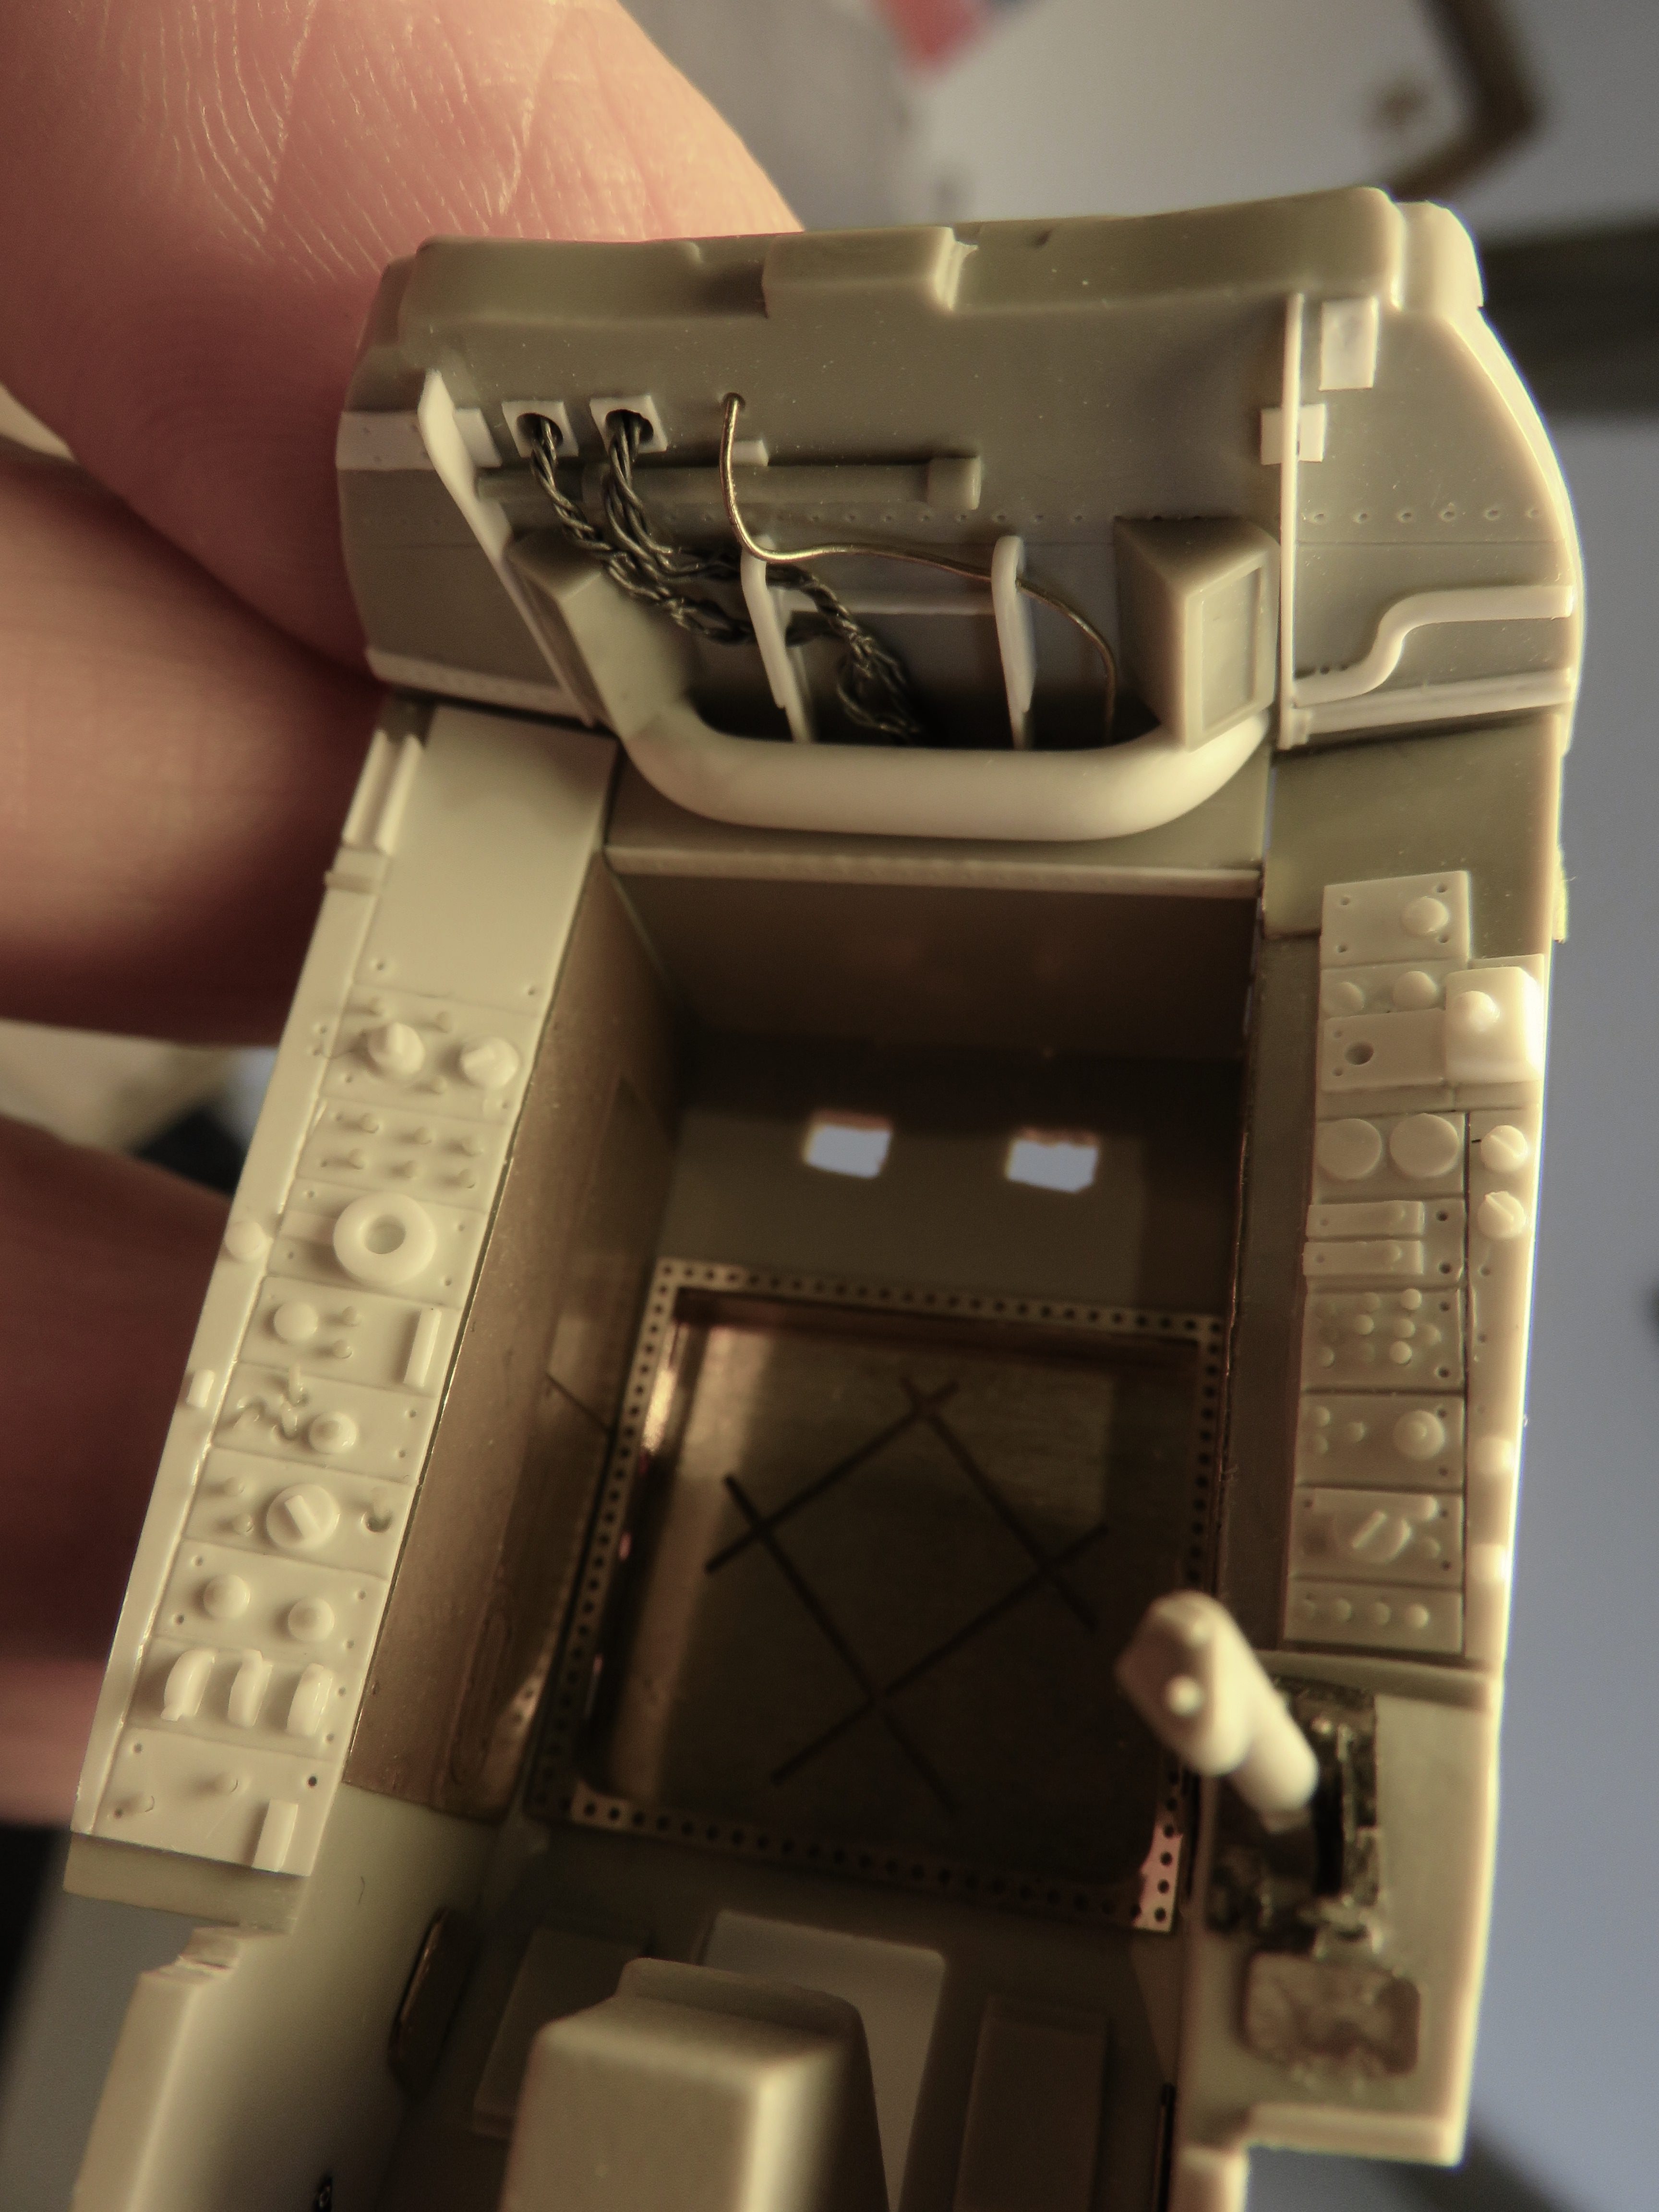
Looking again at the Eduard coloured photo etch that I was going to use for the cockpit side panels left me feeling bothered. Despite the nicely printed dials they are very flat. Eduard gives us the option to add detail but it is so tiny that manipulating it requires the dexterity of a watch maker, and possibly some similar tools. Really though my problem is that the flat printed PE doesnt fit with the rest of the style of the cockpit. I want surface detail to paint. The only way then is to restore the moulded detail I removed. To do that I decided to replicate the panels using plastic card. At first I cut out individual panels and glued them in, but this didnt give a neat finish so I cut those off and switched to scribing lines into the card. Heres the first attempt,
And take 2
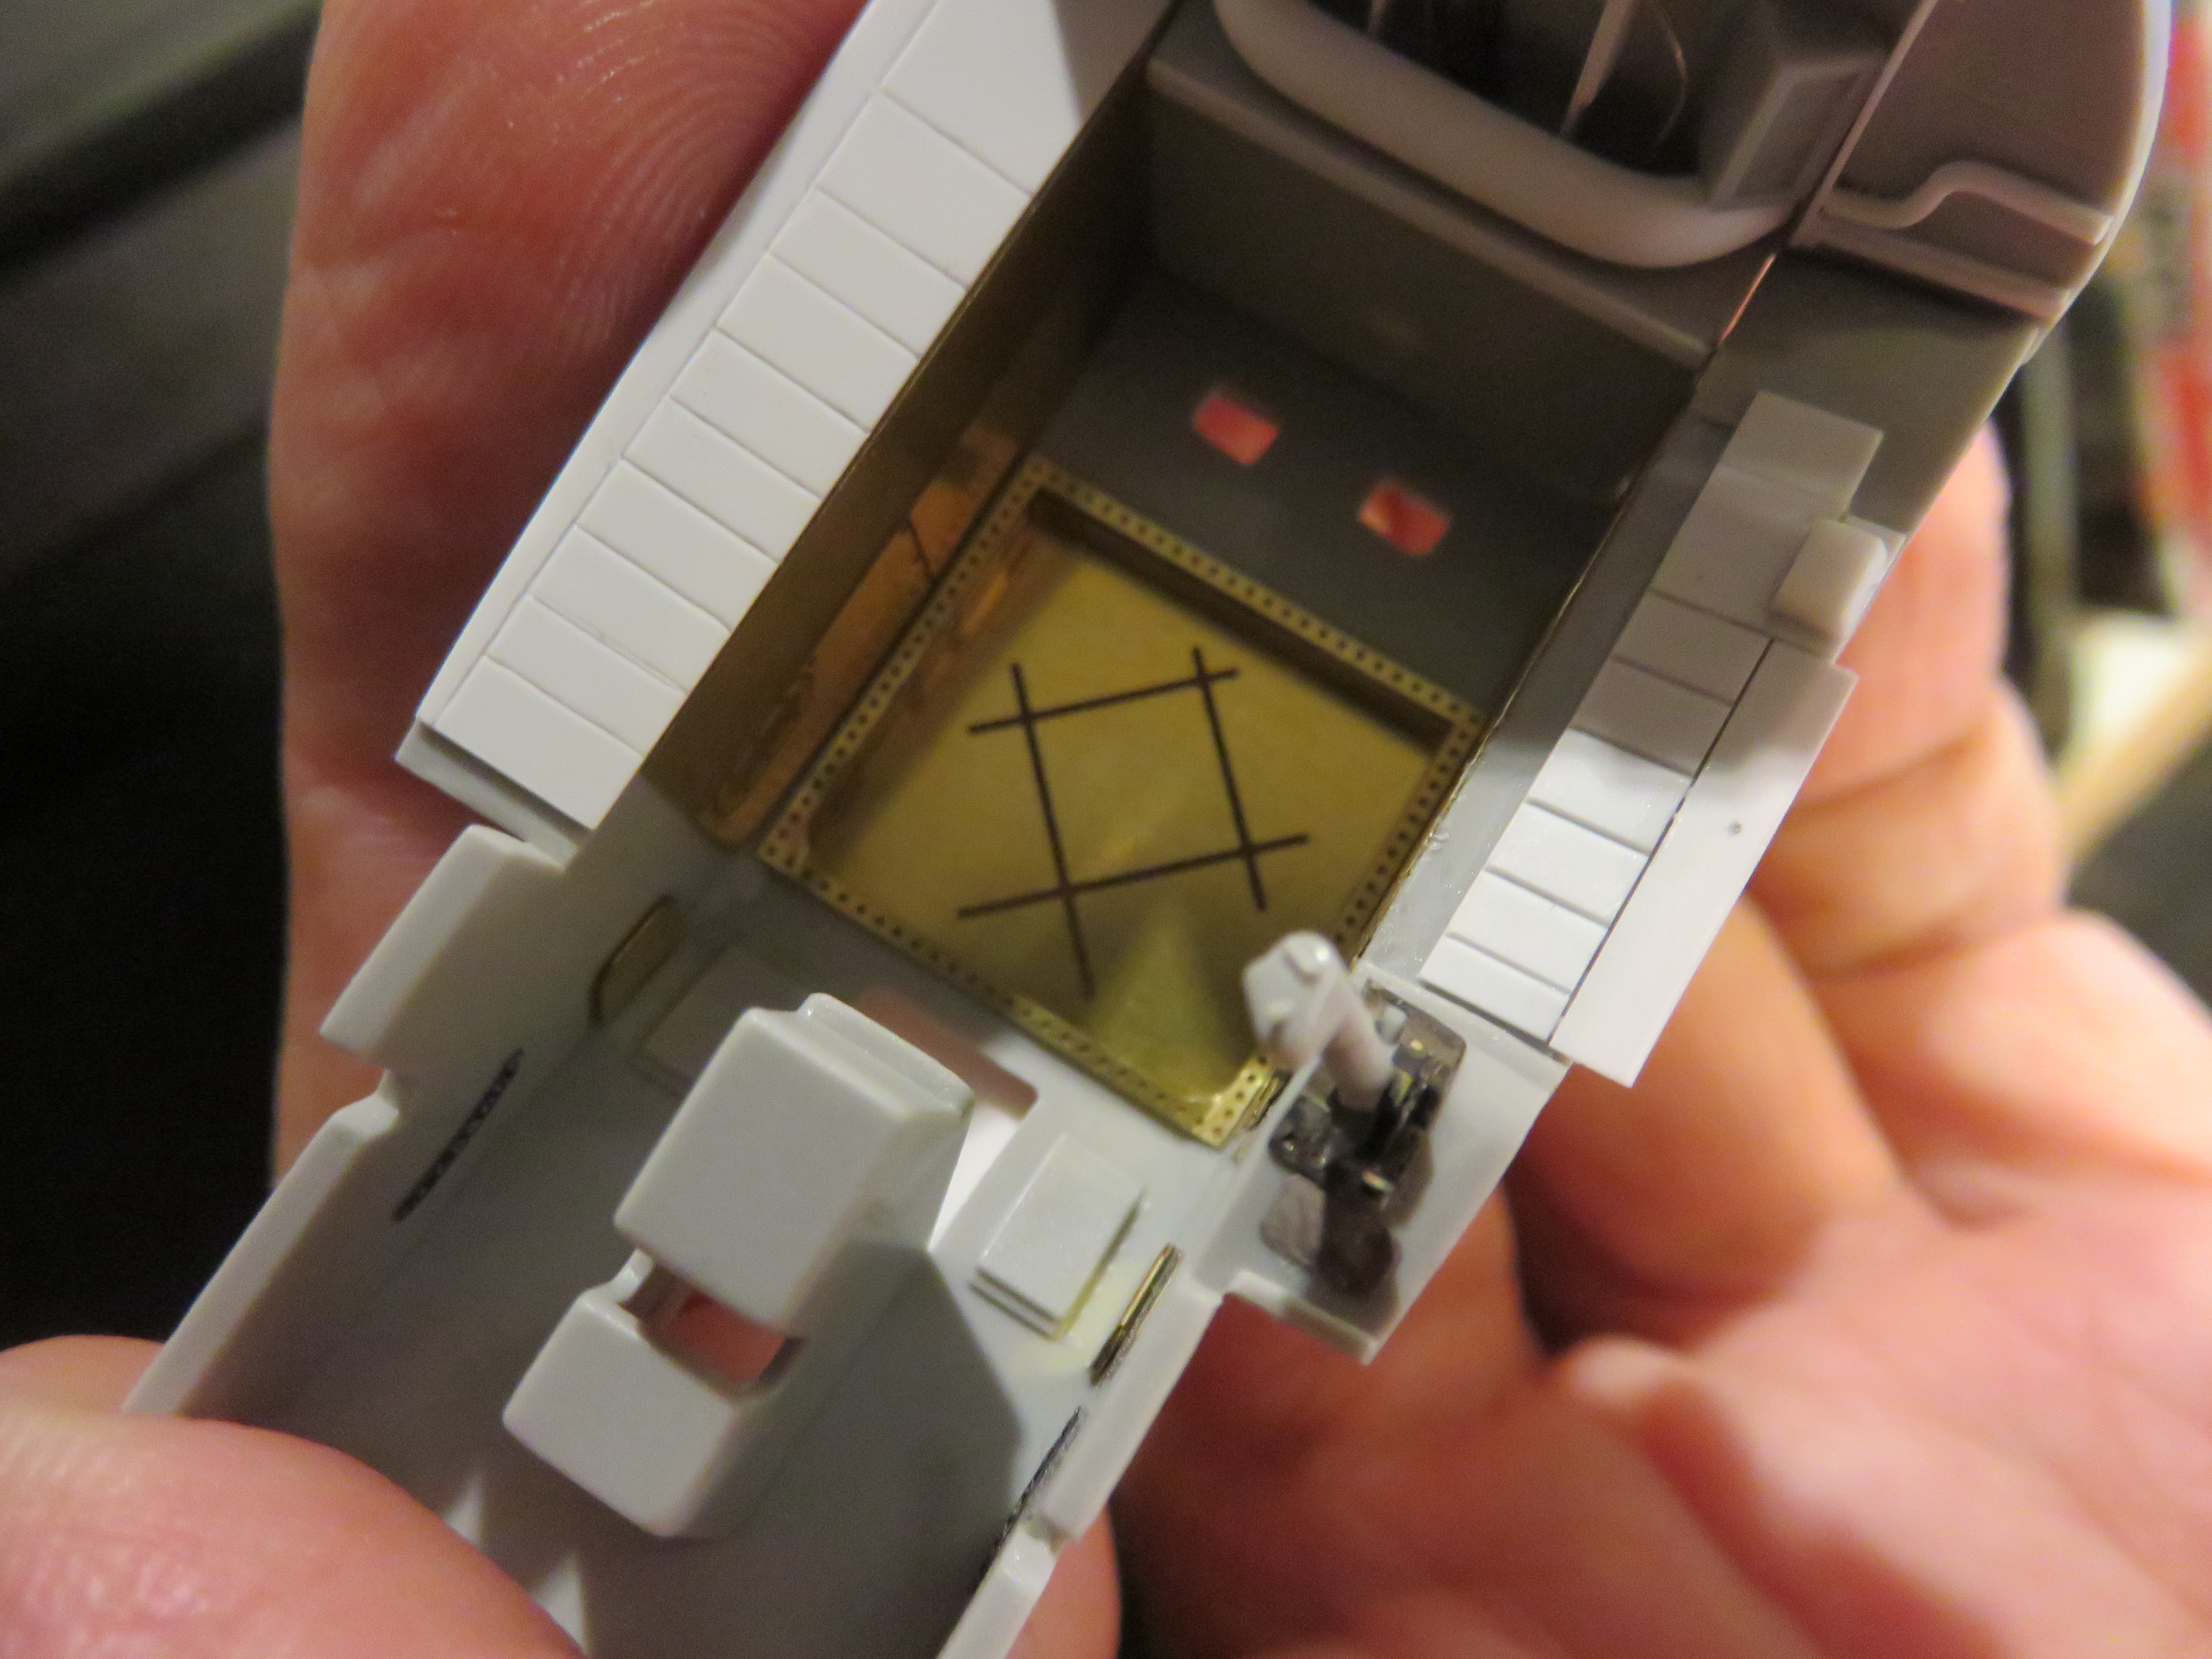
By the way the edges of the cockpit are curved and the plastic card simulating the panels needs to follow the same line. I dealt with this by taping the card in place and then cutting and sanding the edge using the side of the cockpit tub as a guide. I didnt glue the card in place because I wanted to shape it first and then add the scribing. Only one side was done this way because I took a different approach with the side I needed to repair after my botched attempt at the panels.
I thought getting the scribing right would be the trickiest bit. I mucked it up a couple of times and was glad I had the flexibility to start again. Oh, and one last thing. The lines I scribed are out of scale and deliberately so. Their main function is to emphasise the panel lines and provide a channel for washes later. With the area inevitably in shadow once the cockpit is in the fuselage Im exaggerating detail so it stands some chance of being seen.
Next up Ill be adding switches, and I have a plan for those too. It might not be a good plan, but its a plan.
Happy modelling guys.
Looking again at the Eduard coloured photo etch that I was going to use for the cockpit side panels left me feeling bothered. Despite the nicely printed dials they are very flat. Eduard gives us the option to add detail but it is so tiny that manipulating it requires the dexterity of a watch maker, and possibly some similar tools. Really though my problem is that the flat printed PE doesnt fit with the rest of the style of the cockpit. I want surface detail to paint. The only way then is to restore the moulded detail I removed. To do that I decided to replicate the panels using plastic card. At first I cut out individual panels and glued them in, but this didnt give a neat finish so I cut those off and switched to scribing lines into the card. Heres the first attempt,
And take 2
By the way the edges of the cockpit are curved and the plastic card simulating the panels needs to follow the same line. I dealt with this by taping the card in place and then cutting and sanding the edge using the side of the cockpit tub as a guide. I didnt glue the card in place because I wanted to shape it first and then add the scribing. Only one side was done this way because I took a different approach with the side I needed to repair after my botched attempt at the panels.
I thought getting the scribing right would be the trickiest bit. I mucked it up a couple of times and was glad I had the flexibility to start again. Oh, and one last thing. The lines I scribed are out of scale and deliberately so. Their main function is to emphasise the panel lines and provide a channel for washes later. With the area inevitably in shadow once the cockpit is in the fuselage Im exaggerating detail so it stands some chance of being seen.
Next up Ill be adding switches, and I have a plan for those too. It might not be a good plan, but its a plan.
Happy modelling guys.
SteveAndrews
Joined: August 16, 2010
KitMaker: 693 posts
AeroScale: 551 posts
Posted: Friday, January 05, 2018 - 03:51 PM UTC
P.S. If you ever want to remove the coloured printing on Eduard PE, just burn it off with a quick flash from a match or lighter. Then you're left with a standard PE part.
SteveAndrews
Joined: August 16, 2010
KitMaker: 693 posts
AeroScale: 551 posts
Posted: Saturday, January 13, 2018 - 08:30 PM UTC
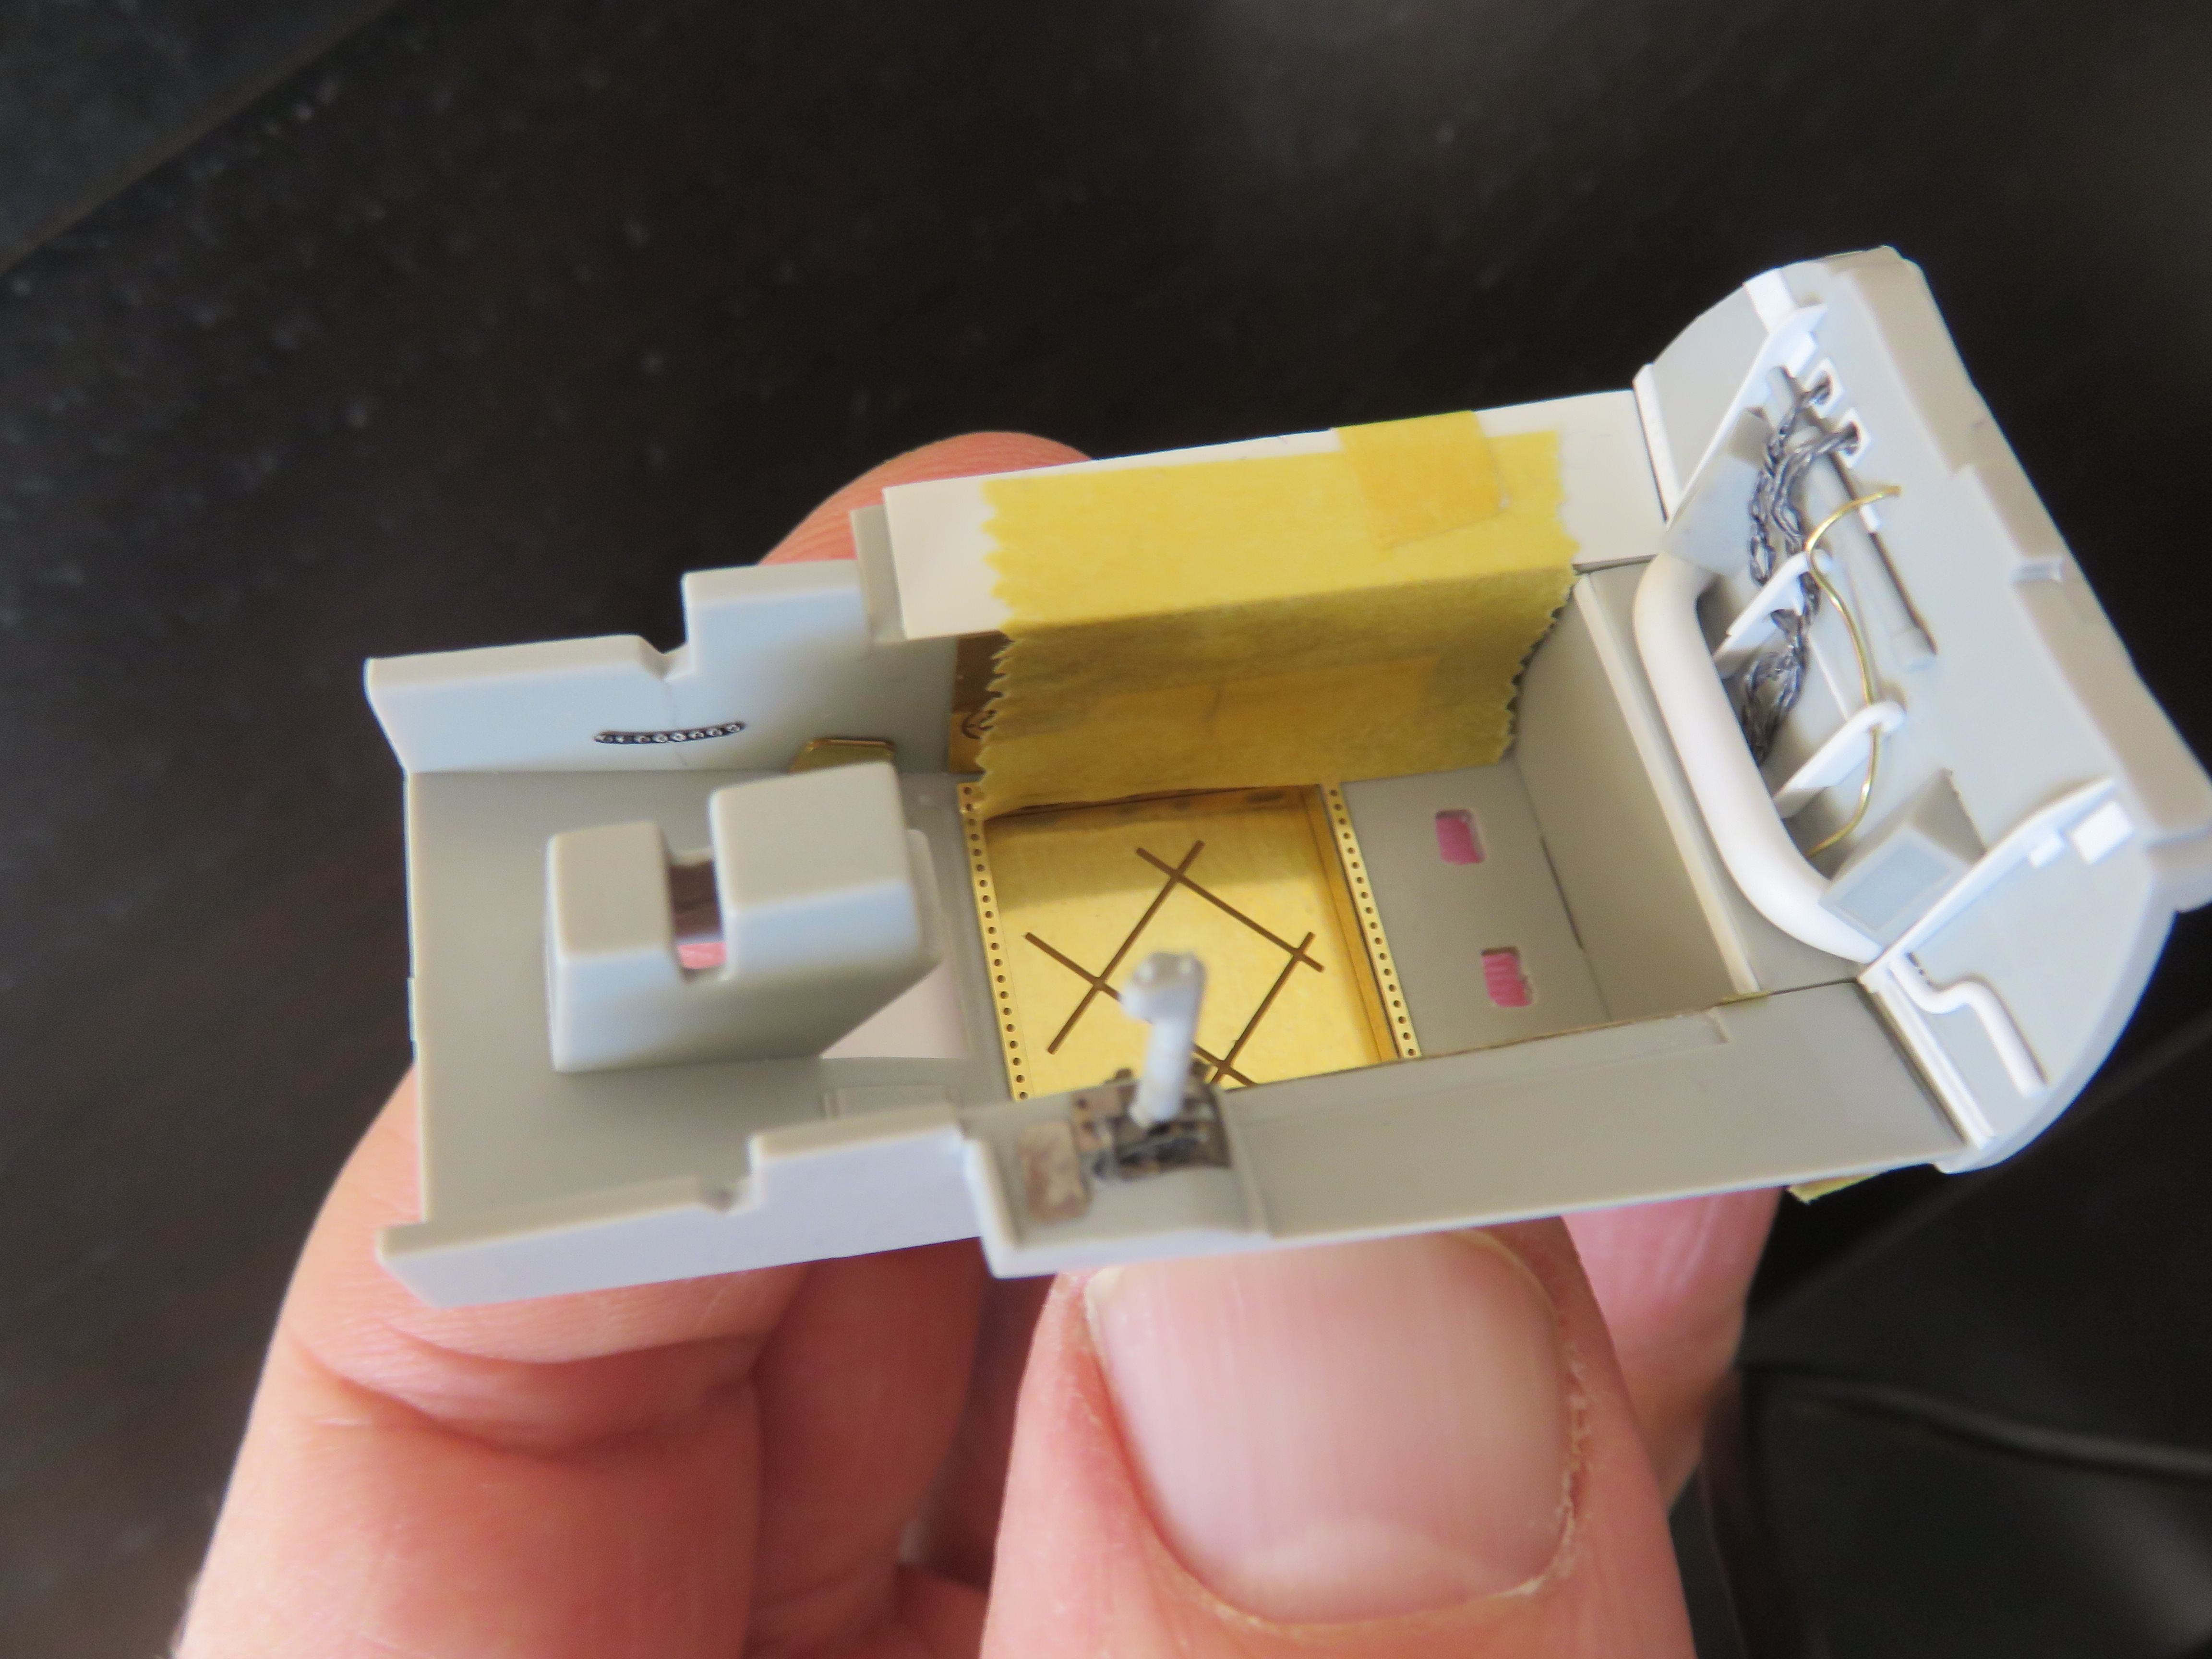
After a week or so working with stretched sprue, tiny sections of plastic rod and using Masterclub rivets as ersatz switches, Ive ended up with a replica of the side panels that I can eventually paint. Its not an exact replica but it is close enough for me, and I have to say thanks again to Walter for the link to the virtual cockpit tour. Without that I really would have had to guess. I tried filming all this but the work is just too fiddly and small so instead I thought Id briefly describe some of the techniques I used.
First those switches. Most of them are made by drilling a hole in the right place in the cockpit tub and then supergluing a Masterclub rivet in the hole. I leave the top standing a bit proud a so later washes have something work with. The tail end of the rivet protrudes beneath. Ive seen other guys put a version of this technique to good effect by using stretched sprue too. I like the rivets because the top is perfectly round and they are made of resin so don't melt away when glue is applied.
The larger round dials were made by gluing a small piece of plastic rod in the right place, letting it dry and then carefully sanding it down. I find it so much easier to sand these small pieces once they are in place. I just have to take care not to sand other parts. Finally, a small piece of stretched sprue or plastic card is glued on top to simulate the nob.
Other details are made in the same way by building up prices cut from plastic card. Oh, and the holes that simulate the screws or rivets holding panels in place are made with that sharpish clay modelling tool I used for the riveting details in the under carriage bay.
There are two other essentials for this work. The first is a good amount of patience. I reckon for every one item that I was successful with theres another one discarded. A pair of magnifying glasses are a must too.
Et voila!
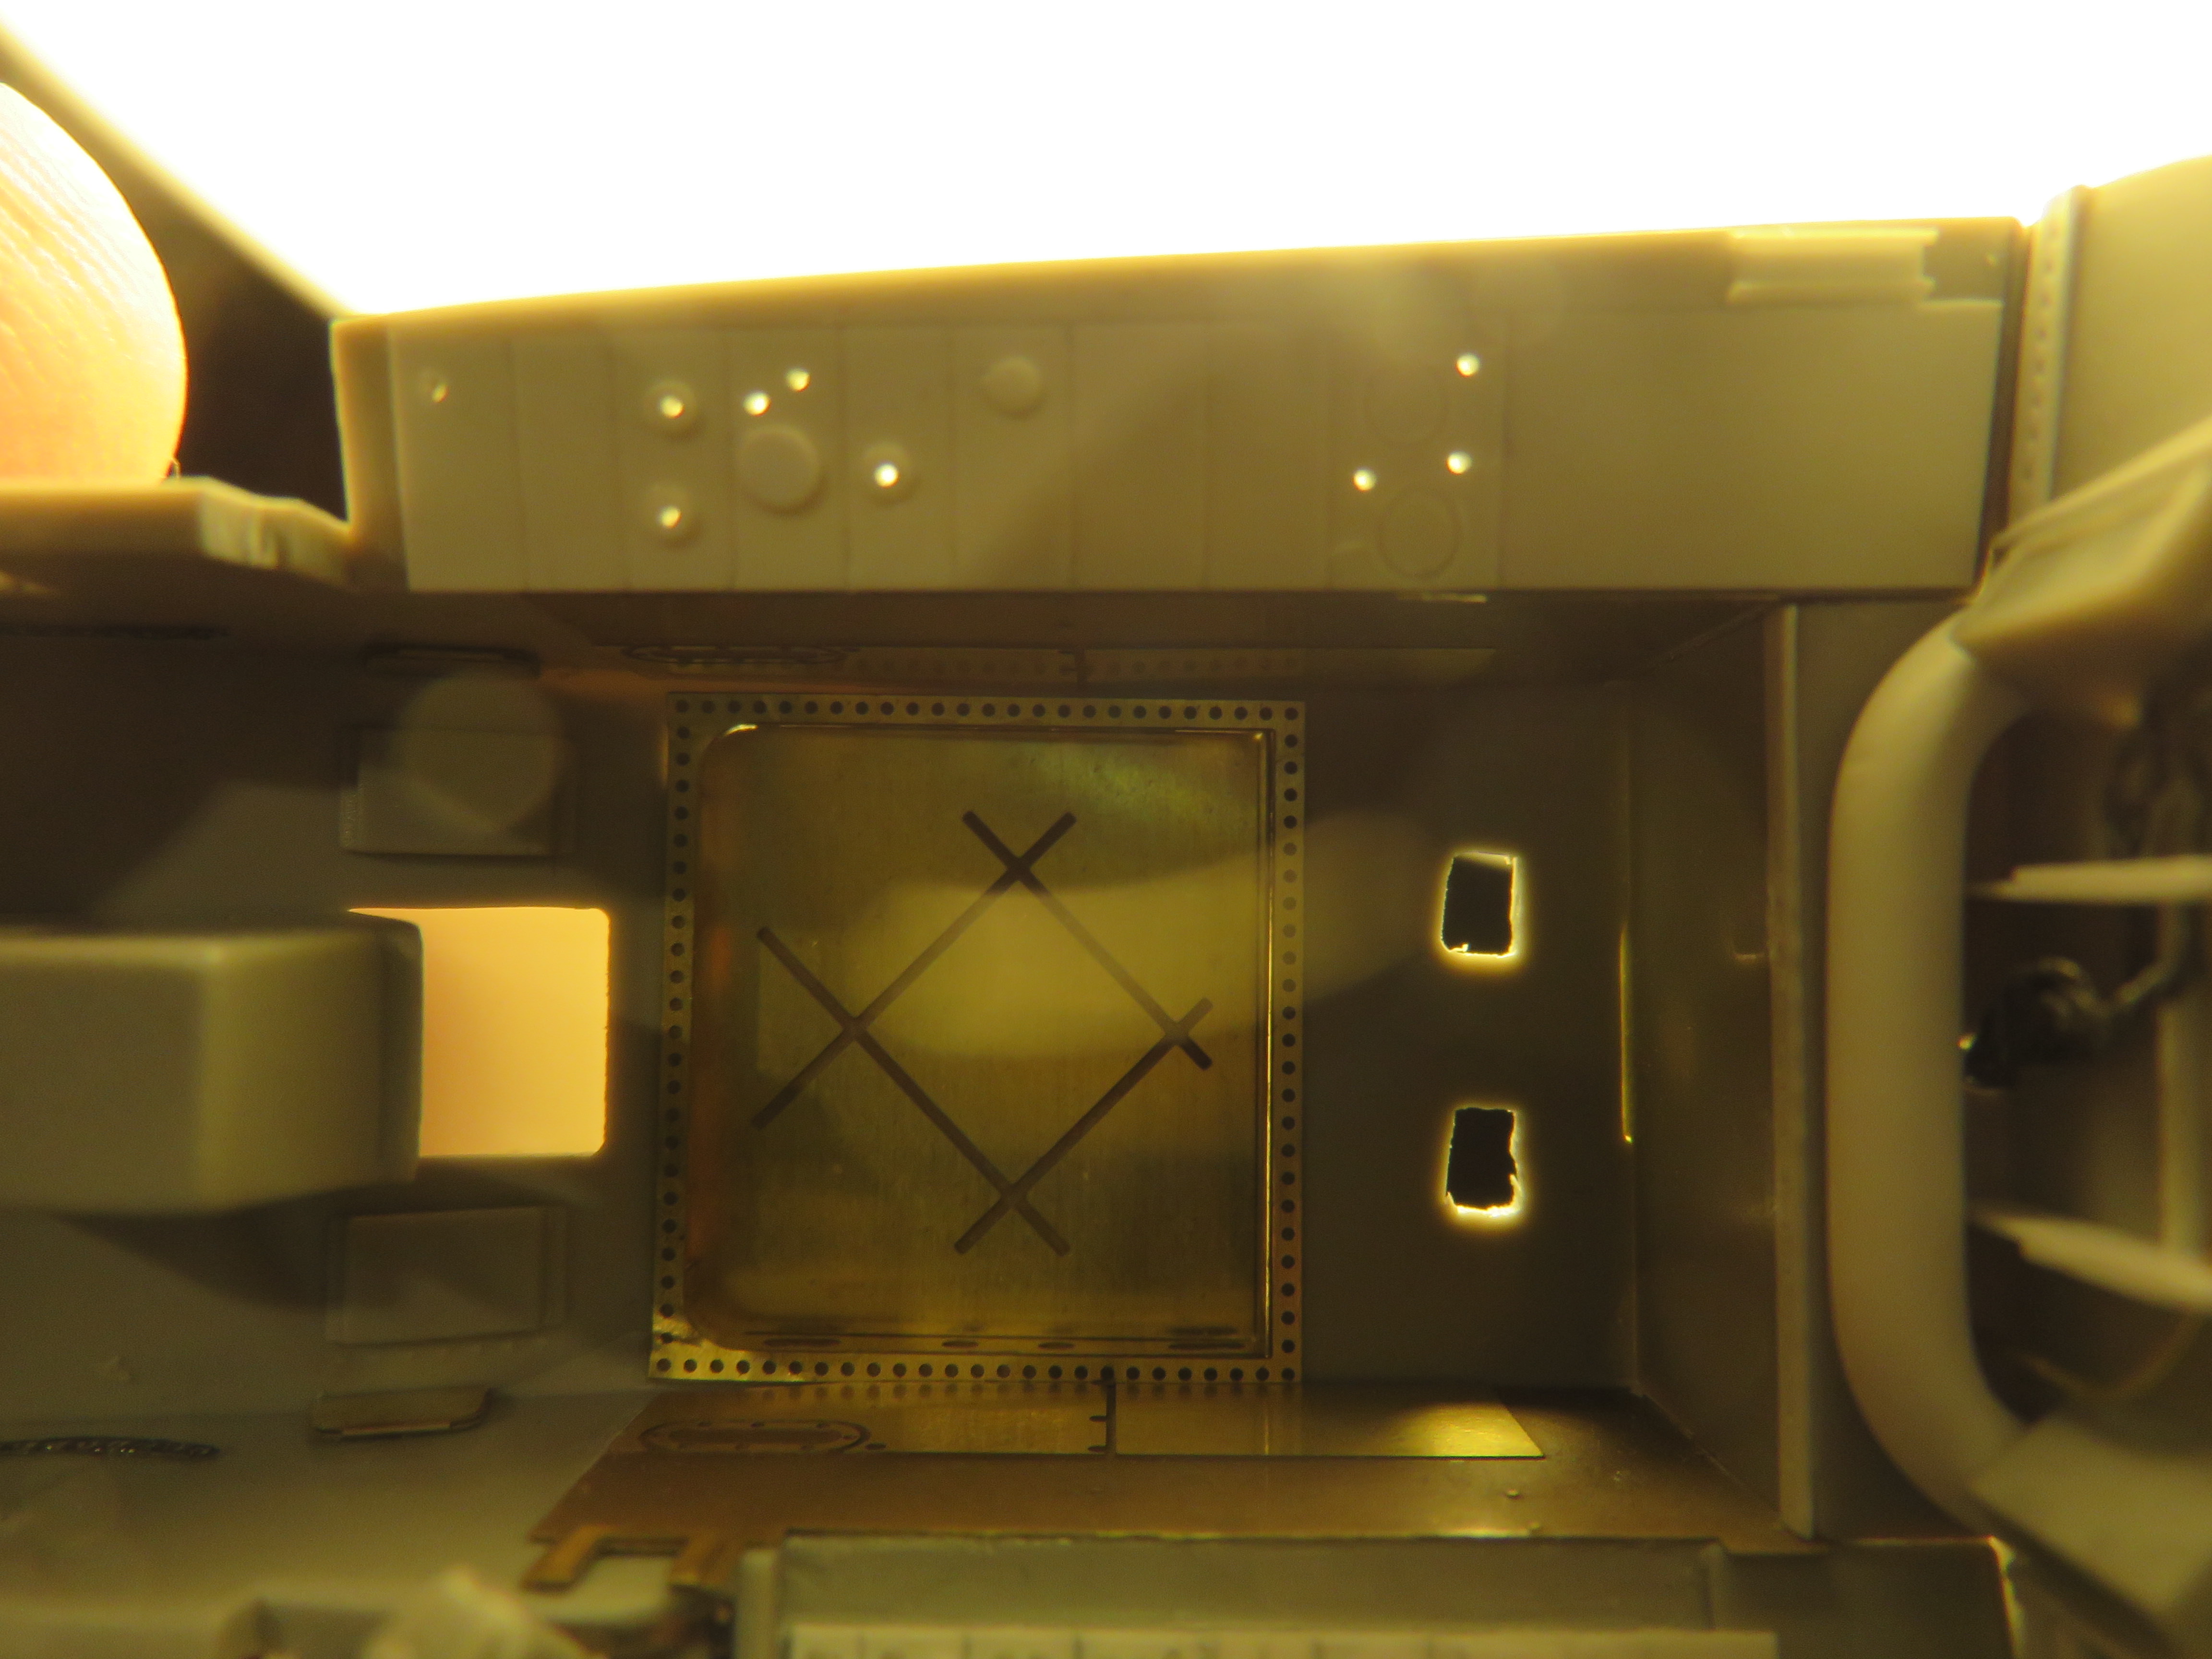
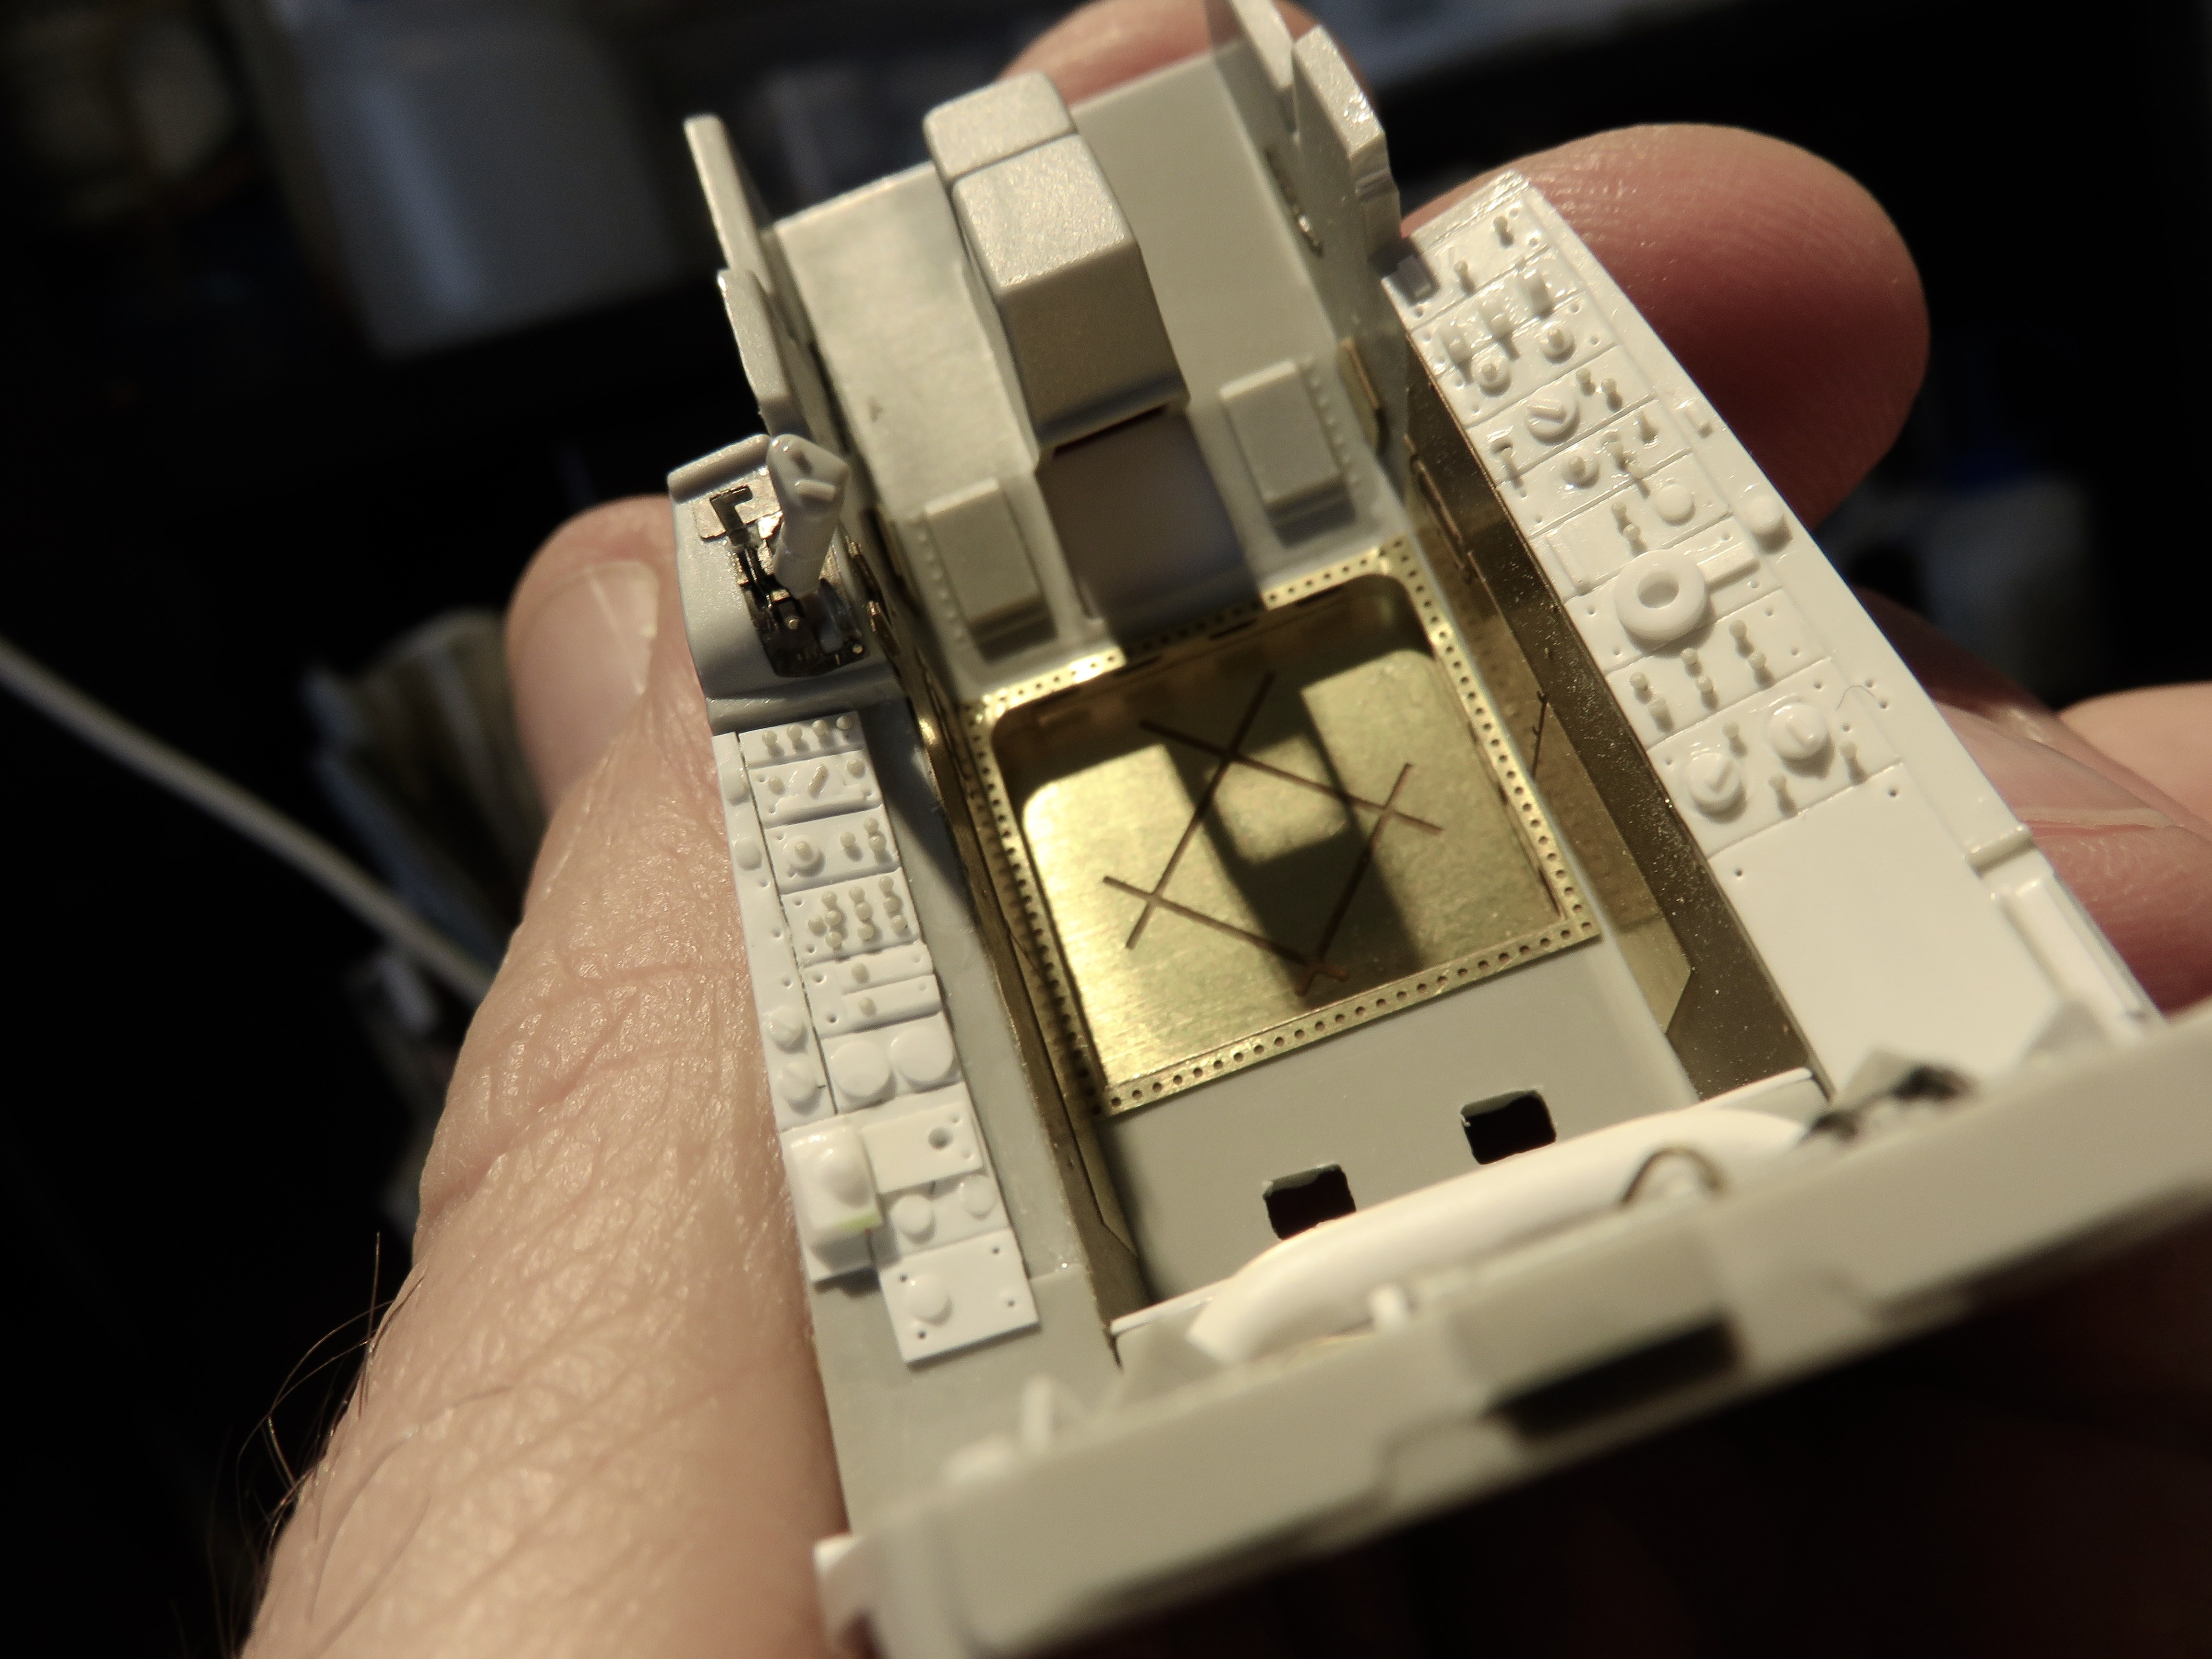
P.S. I adjusted the contrast and colour balance in thee shots in an attempt to make the detail more visible.
First those switches. Most of them are made by drilling a hole in the right place in the cockpit tub and then supergluing a Masterclub rivet in the hole. I leave the top standing a bit proud a so later washes have something work with. The tail end of the rivet protrudes beneath. Ive seen other guys put a version of this technique to good effect by using stretched sprue too. I like the rivets because the top is perfectly round and they are made of resin so don't melt away when glue is applied.
The larger round dials were made by gluing a small piece of plastic rod in the right place, letting it dry and then carefully sanding it down. I find it so much easier to sand these small pieces once they are in place. I just have to take care not to sand other parts. Finally, a small piece of stretched sprue or plastic card is glued on top to simulate the nob.
Other details are made in the same way by building up prices cut from plastic card. Oh, and the holes that simulate the screws or rivets holding panels in place are made with that sharpish clay modelling tool I used for the riveting details in the under carriage bay.
There are two other essentials for this work. The first is a good amount of patience. I reckon for every one item that I was successful with theres another one discarded. A pair of magnifying glasses are a must too.
Et voila!
P.S. I adjusted the contrast and colour balance in thee shots in an attempt to make the detail more visible.

GazzaS
#424

Joined: April 23, 2015
KitMaker: 4,648 posts
AeroScale: 1,938 posts

Posted: Saturday, January 13, 2018 - 10:59 PM UTC
Steve,
Those detail panels really look great!
Gaz
Those detail panels really look great!
Gaz
SteveAndrews
Joined: August 16, 2010
KitMaker: 693 posts
AeroScale: 551 posts
Posted: Sunday, January 14, 2018 - 12:40 AM UTC
Thanks a million Gaz. I have to say it was quite job getting them done, but now the work is finished I think I have some good and real(ish) details. I'm keen to get painting but there's a bit more work to do around the cockpit and I need to build and paint the engine too. As a diversion from all the super-small stuff I think I'll take a look at the fuselage details along the way. It might save my eyesight :-)
Happy modelling.
Steve
Happy modelling.
Steve
Joel_W
Joined: December 04, 2010
KitMaker: 11,666 posts
AeroScale: 7,410 posts
Posted: Sunday, January 14, 2018 - 03:14 AM UTC
Steve,
I've more then impressed with your super detailing. The art of it is making it look as though us mere mortals can accomplish it as well. Well my friend for most of us that just ain't happening.
Joel
I've more then impressed with your super detailing. The art of it is making it look as though us mere mortals can accomplish it as well. Well my friend for most of us that just ain't happening.
Joel
Kevlar06
Joined: March 15, 2009
KitMaker: 3,670 posts
AeroScale: 833 posts
Posted: Sunday, January 14, 2018 - 06:12 AM UTC
Steve, yep-- I have to agree with everyone else-- your super detailing is well...Super! Can't wait to see what you come up with next!
VR, Russ
VR, Russ
kevinekstrom
Joined: December 08, 2017
KitMaker: 82 posts
AeroScale: 27 posts
Posted: Sunday, January 14, 2018 - 03:15 PM UTC
The kit is coming along nicely. I watched your video and gave it it a thumbs up. thanks for sharing that clip.

KelticKnot

Joined: May 11, 2015
KitMaker: 768 posts
AeroScale: 656 posts
Posted: Monday, January 15, 2018 - 04:12 AM UTC
Looking great Steve!
I've been doing something along the same lines with stretched sprue and styrene rods and tubes. I have to agree with your point of glueing the piece in place and then sanding it down to size.... it's a much easier process that I too discovered in the last few weeks.
I've been doing something along the same lines with stretched sprue and styrene rods and tubes. I have to agree with your point of glueing the piece in place and then sanding it down to size.... it's a much easier process that I too discovered in the last few weeks.

SteveAndrews
Joined: August 16, 2010
KitMaker: 693 posts
AeroScale: 551 posts
Posted: Monday, January 15, 2018 - 10:02 PM UTC
Guys, thanks so much for the support. I have to say that having finished those panels I wouldn't do it for every kit, but given my aim to make this a sort of showpiece of my collection, well it fits the brief - (my) best Starfighter ever. Encouraged by you I've bought a new web cam and I'll be making another short film soon. Now see what you've done :-)
Happy modelling folks.
Steve
Happy modelling folks.
Steve

lodni_k
Joined: October 09, 2004
KitMaker: 65 posts
AeroScale: 45 posts
Posted: Thursday, January 18, 2018 - 11:31 AM UTC
Excellent work on those consoles Steve! 
SteveAndrews
Joined: August 16, 2010
KitMaker: 693 posts
AeroScale: 551 posts
Posted: Tuesday, January 23, 2018 - 03:02 AM UTC
Hi Calvin
Thanks very much. It definitely falls into the category of 'labour of love'.
Happy modelling
Steve
Thanks very much. It definitely falls into the category of 'labour of love'.
Happy modelling
Steve
SteveAndrews
Joined: August 16, 2010
KitMaker: 693 posts
AeroScale: 551 posts
Posted: Tuesday, January 23, 2018 - 03:05 AM UTC
Hey guys
Just a quick post to say that over the next few weeks I'm moving apartments so things might be slow here on the Starfighter blog. I'll try and do some work because I get withdrawal symptoms if I don't but it might not be much.
Happy modelling.
Steve
Just a quick post to say that over the next few weeks I'm moving apartments so things might be slow here on the Starfighter blog. I'll try and do some work because I get withdrawal symptoms if I don't but it might not be much.
Happy modelling.
Steve
KelticKnot
Joined: May 11, 2015
KitMaker: 768 posts
AeroScale: 656 posts
Posted: Tuesday, January 23, 2018 - 03:51 AM UTC
Good luck with the move Steve, and don't forget/lose any parts !
Joel_W
Joined: December 04, 2010
KitMaker: 11,666 posts
AeroScale: 7,410 posts
Posted: Tuesday, January 23, 2018 - 04:05 AM UTC
Steve,
Hope the move goes well.
Joel
Hope the move goes well.
Joel
SteveAndrews
Joined: August 16, 2010
KitMaker: 693 posts
AeroScale: 551 posts
Posted: Tuesday, January 23, 2018 - 07:06 PM UTC
Thanks guys. And I was wondering do you have any tips for packaging up and moving models? I'm worried mine will arrive in bits.
With thanks
Steve
With thanks
Steve
Kevlar06
Joined: March 15, 2009
KitMaker: 3,670 posts
AeroScale: 833 posts
Posted: Tuesday, January 23, 2018 - 09:44 PM UTC
Quoted Text
Thanks guys. And I was wondering do you have any tips for packaging up and moving models? I'm worried mine will arrive in bits.
With thanks
Steve
Are you moving the models yourself or having movers do it? If you are moving them yourself, I recommend buying some of those plastic boxes with foldable lids, then placing the models inside on towels. I have about twenty of them, and when not used for moving, I use them for storing unbuilt kits in my garage. If you are having movers do it, I use stout cardboard boxes, sectioned off with additional cardboard securely taped to the inside, and then back filled with shredded paper from my office shredder. If possible, the boxes can be placed in wooden foot lockers or trunks, or larger kitchen "dish packs". I moved a few models and many 1/16 scale lead miniatures all over the world (over 30 moves) that way when I was in the military. Never had a problem with breakage. Just blow off the shredded paper with your airbrush when you arrive.
VR, Russ
SteveAndrews
Joined: August 16, 2010
KitMaker: 693 posts
AeroScale: 551 posts
Posted: Tuesday, January 23, 2018 - 10:47 PM UTC
Hi Russ
Its a DIY move, and those tips are great. Thanks a million.
Steve
Its a DIY move, and those tips are great. Thanks a million.
Steve
md72
#439
Joined: November 05, 2005
KitMaker: 4,950 posts
AeroScale: 3,192 posts
Posted: Tuesday, January 23, 2018 - 10:50 PM UTC
I build 1/72 airplanes. In the past, I've placed the plane in a twist tie plastic bag, blow in a little air and tie it closed. I stack it with packing peanuts in a stout box. The peanuts provide some protection, and the bag captures any bits that break or fall off. after a couple of moves I've only lost a few antennas and pitot tubes. It helps if you can remove the propellers too.
 |

WEB HOSTING BY


Copyright ©2021 AeroScale and Kitmaker Network, a subsidiary of Silver Star Enterprises
All Rights Reserved. Please read our Conditions of Use and Privacy Policy.
All Rights Reserved. Please read our Conditions of Use and Privacy Policy.