


Air Campaigns
Want to start or join a group build? This is where to start.
Want to start or join a group build? This is where to start.
Hosted by Frederick Boucher, Michael Satin
OFFICIAL: 2nd Gen. Jet Fighters Campaign

md72

#439

Joined: November 05, 2005
KitMaker: 4,950 posts
AeroScale: 3,192 posts

Posted: Friday, September 15, 2017 - 08:33 AM UTC
Down to the last of the fiddly bits. Decided to pitch the kit landing gear doors. Too thick, like 6" in real life. And noticeably shorter than the wheel well. Just going to go with strips of Evergreen plastic.


RadekZ

Joined: March 12, 2013
KitMaker: 125 posts
AeroScale: 85 posts
Posted: Friday, September 15, 2017 - 01:51 PM UTC
Quoted Text
Radoslaw, I started the campaign with an 1/72 F8, but changed over to a 1/48 F100 which is ready for painting.
Oops
My bad ... seems I didn't read whole thread history carefully 

goodn8

Joined: October 12, 2008
KitMaker: 709 posts
AeroScale: 651 posts
Posted: Friday, September 15, 2017 - 06:27 PM UTC
Great work here, guys!
Radek and Primo, you are really doing well with your builds!
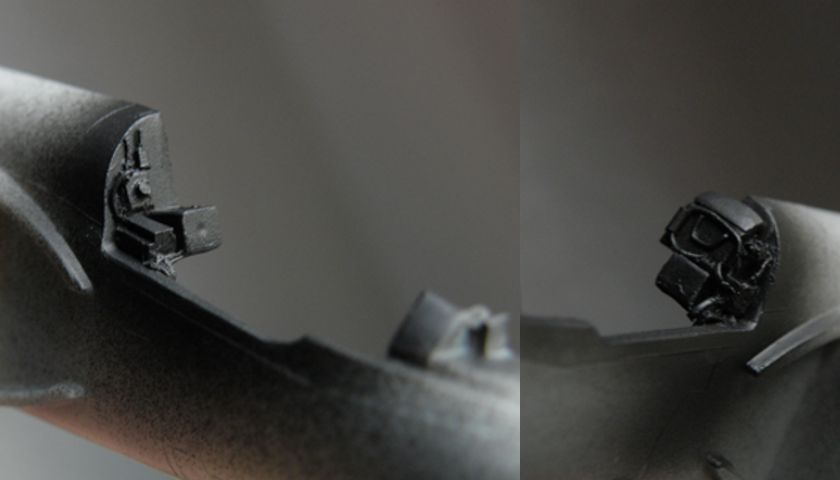
Looks like it's time to show the pits
Great scratching work on all the parts, Primo!
Thomas
Radek and Primo, you are really doing well with your builds!
Looks like it's time to show the pits
Great scratching work on all the parts, Primo!
Thomas

goodn8
Joined: October 12, 2008
KitMaker: 709 posts
AeroScale: 651 posts
Posted: Friday, September 15, 2017 - 09:54 PM UTC
md72
#439
Joined: November 05, 2005
KitMaker: 4,950 posts
AeroScale: 3,192 posts
Posted: Saturday, September 16, 2017 - 06:23 AM UTC
Stick a fork in this one.  I'm calling it done. Some day I might want to go back and weather it. But for this campaign it's done.
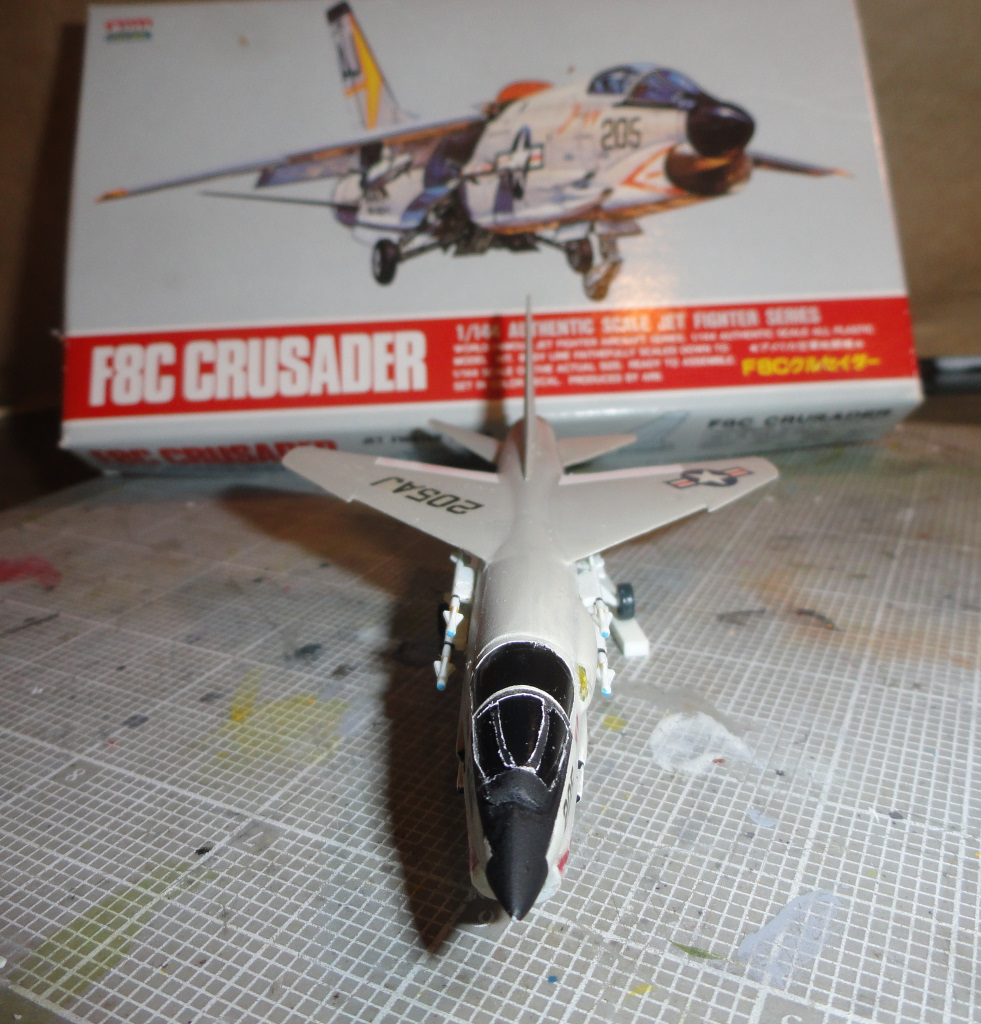
Is there a campaign gallery I should load these to?

I'm calling it done. Some day I might want to go back and weather it. But for this campaign it's done. Is there a campaign gallery I should load these to?

Bigrip74
Joined: February 22, 2008
KitMaker: 5,026 posts
AeroScale: 2,811 posts

Posted: Monday, September 18, 2017 - 05:12 AM UTC
While everyone has been producing really outstanding builds, Ive only manged to prime my F100.


Lakota
#123
Joined: November 17, 2008
KitMaker: 1,202 posts
AeroScale: 292 posts
Posted: Thursday, September 21, 2017 - 06:34 AM UTC
Bob-Don't feel too bad, mine is still in the box...

Take care,
Don "Lakota"
Take care,
Don "Lakota"
Bigrip74
Joined: February 22, 2008
KitMaker: 5,026 posts
AeroScale: 2,811 posts
Posted: Thursday, September 21, 2017 - 11:46 PM UTC
Quoted Text
Bob-Don't feel too bad, mine is still in the box...
Take care,
Don "Lakota"
The XF19 arrived today, so I will be able to continue with an SEAC camo on my F100.
Bob
Removed by original poster on 09/22/17 - 22:37:42 (GMT).

pkrasna

Joined: April 20, 2013
KitMaker: 31 posts
AeroScale: 31 posts
Posted: Friday, September 22, 2017 - 03:51 AM UTC
Thank you RadekZ, Bigrip74 and goodn8 for your kind words. Great work from you also. Glad to be a part of this GB.
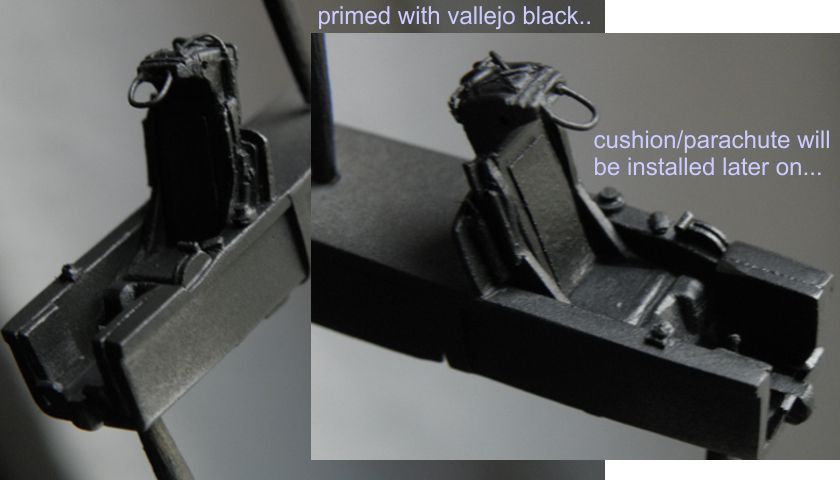
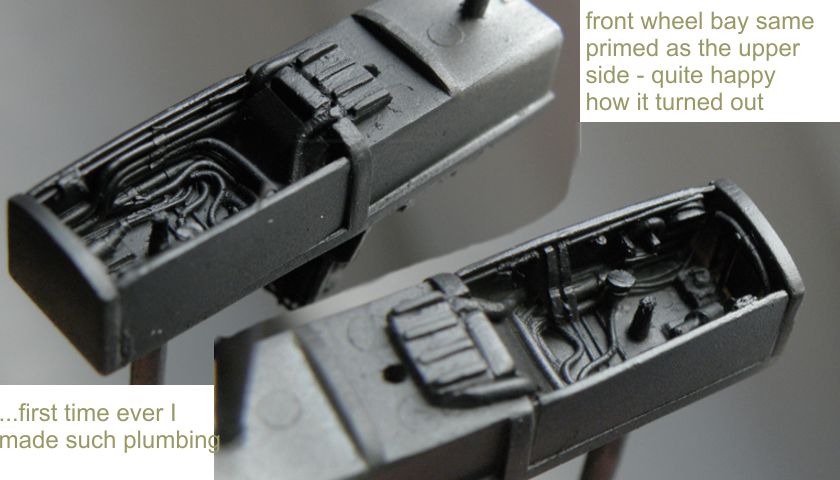
Soo some progres... whell bay covers were made...
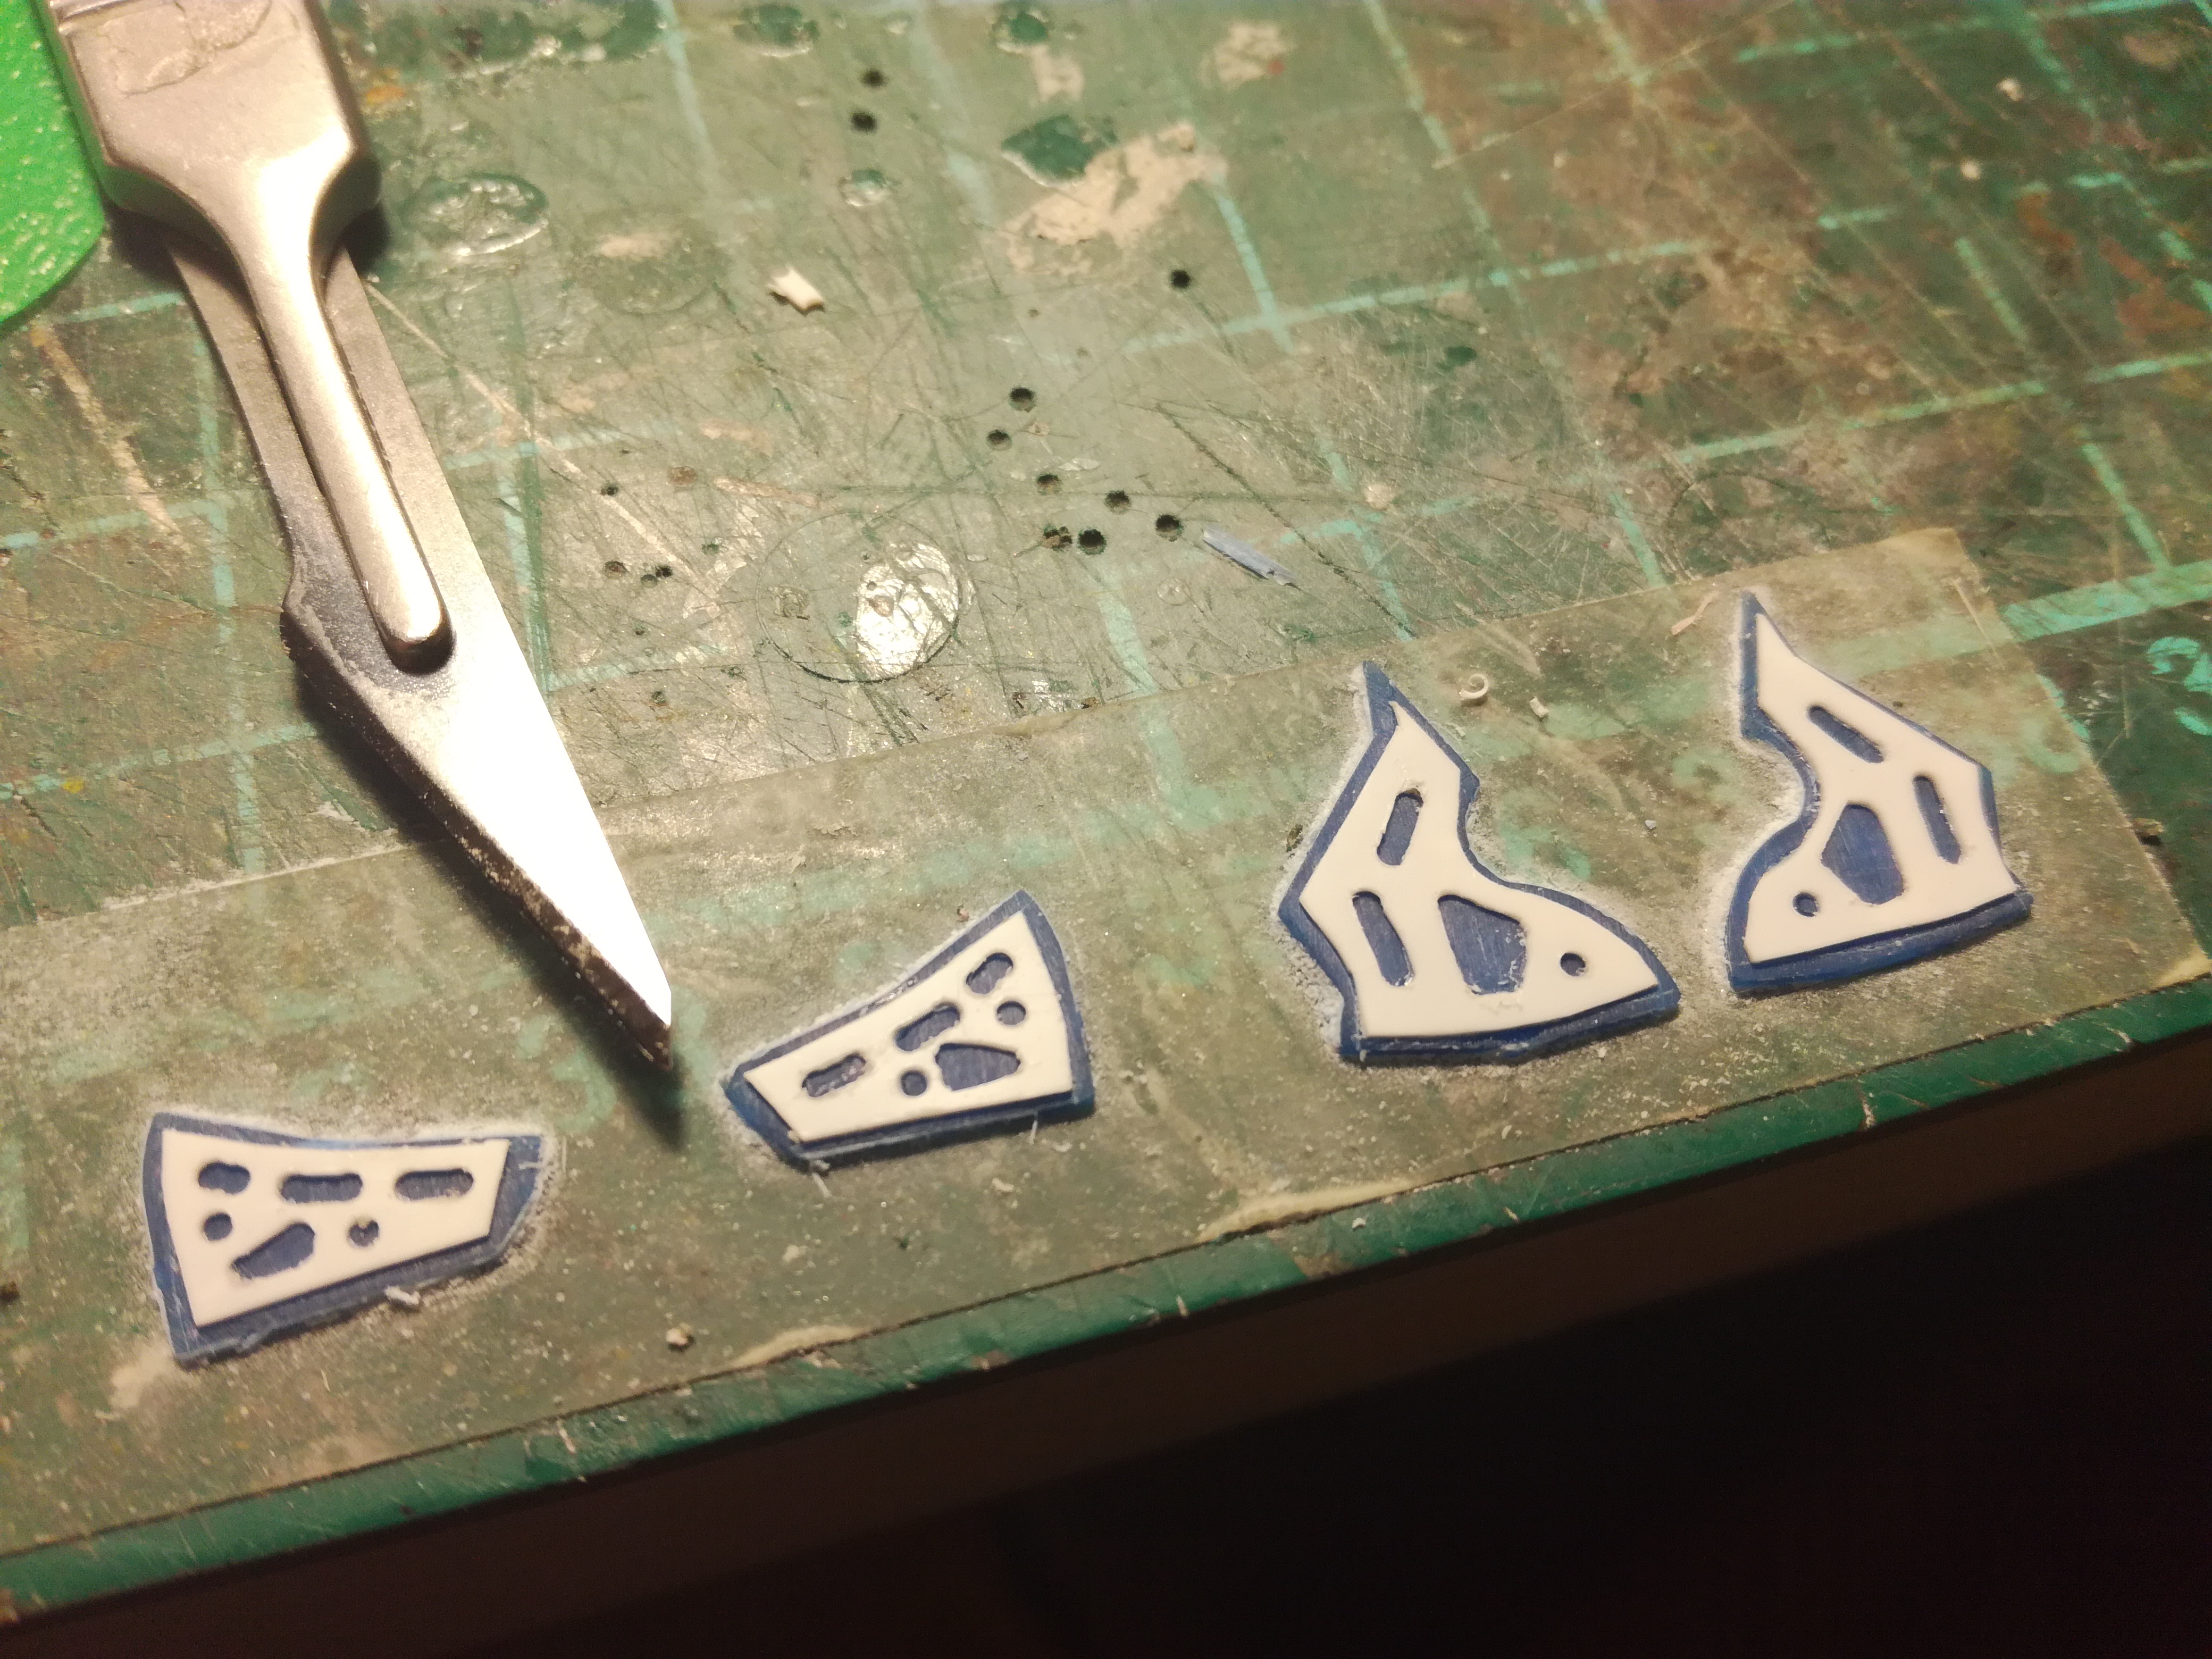
and front leg compartment detailed up.
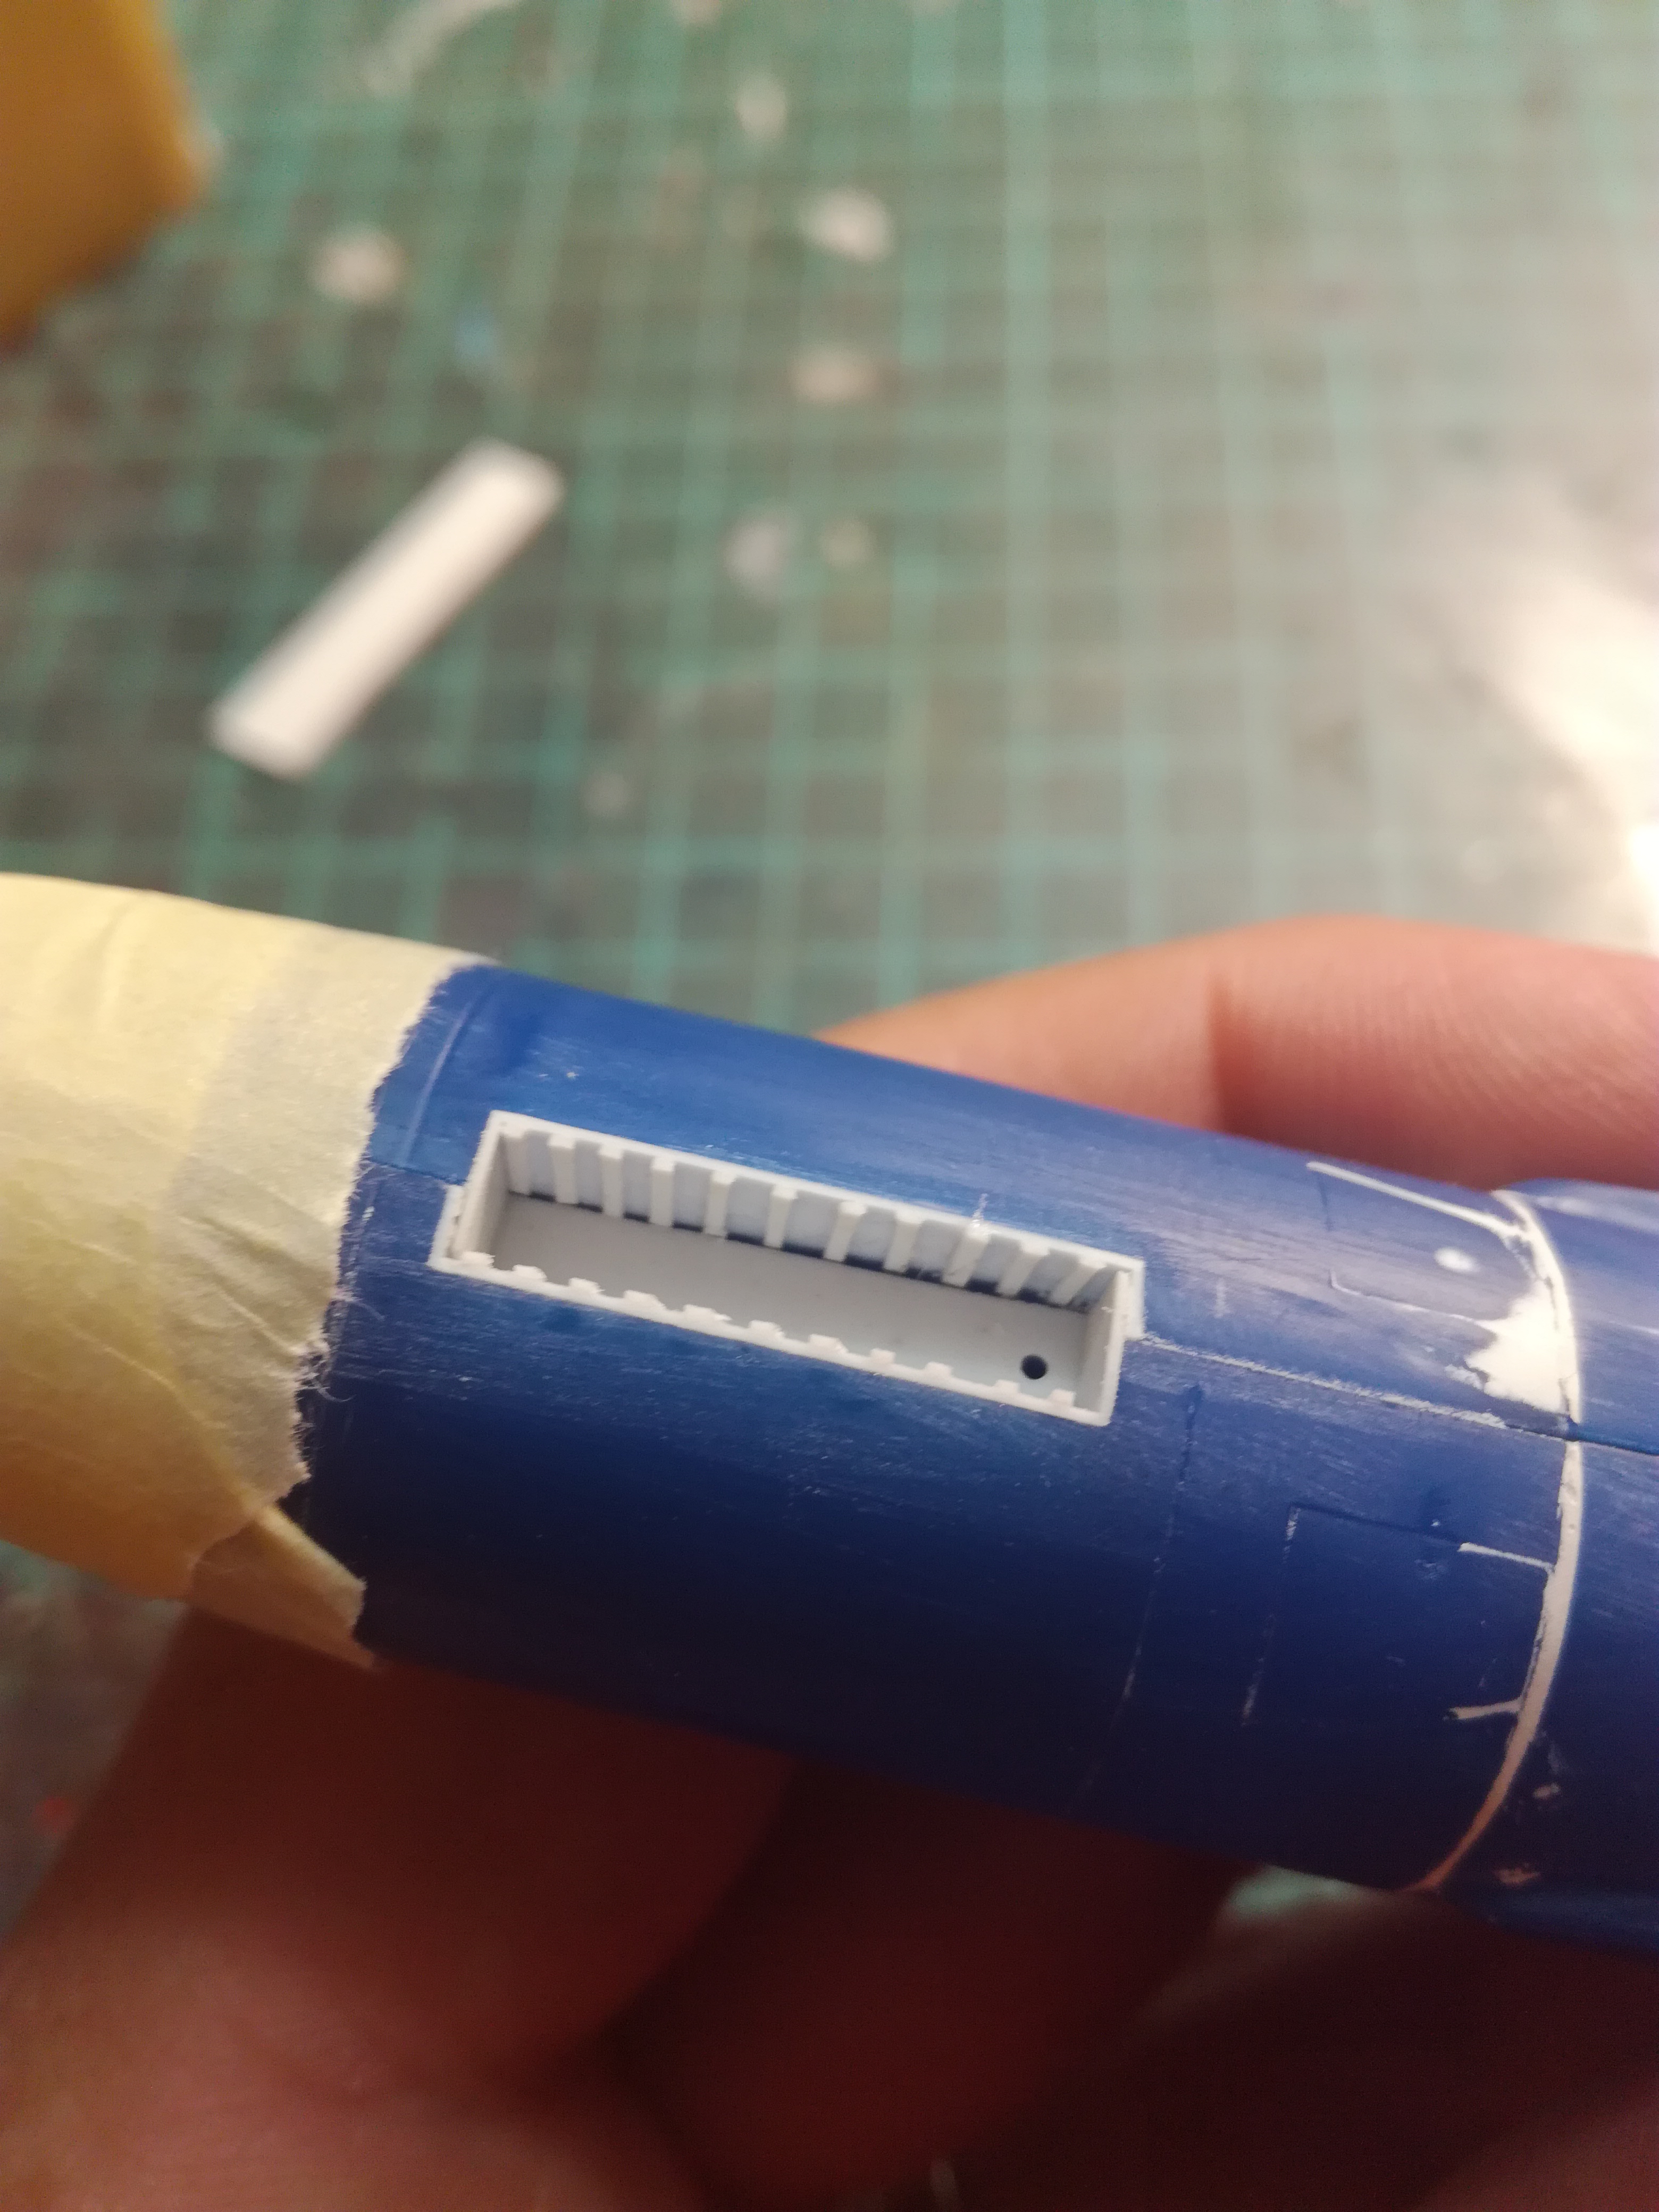
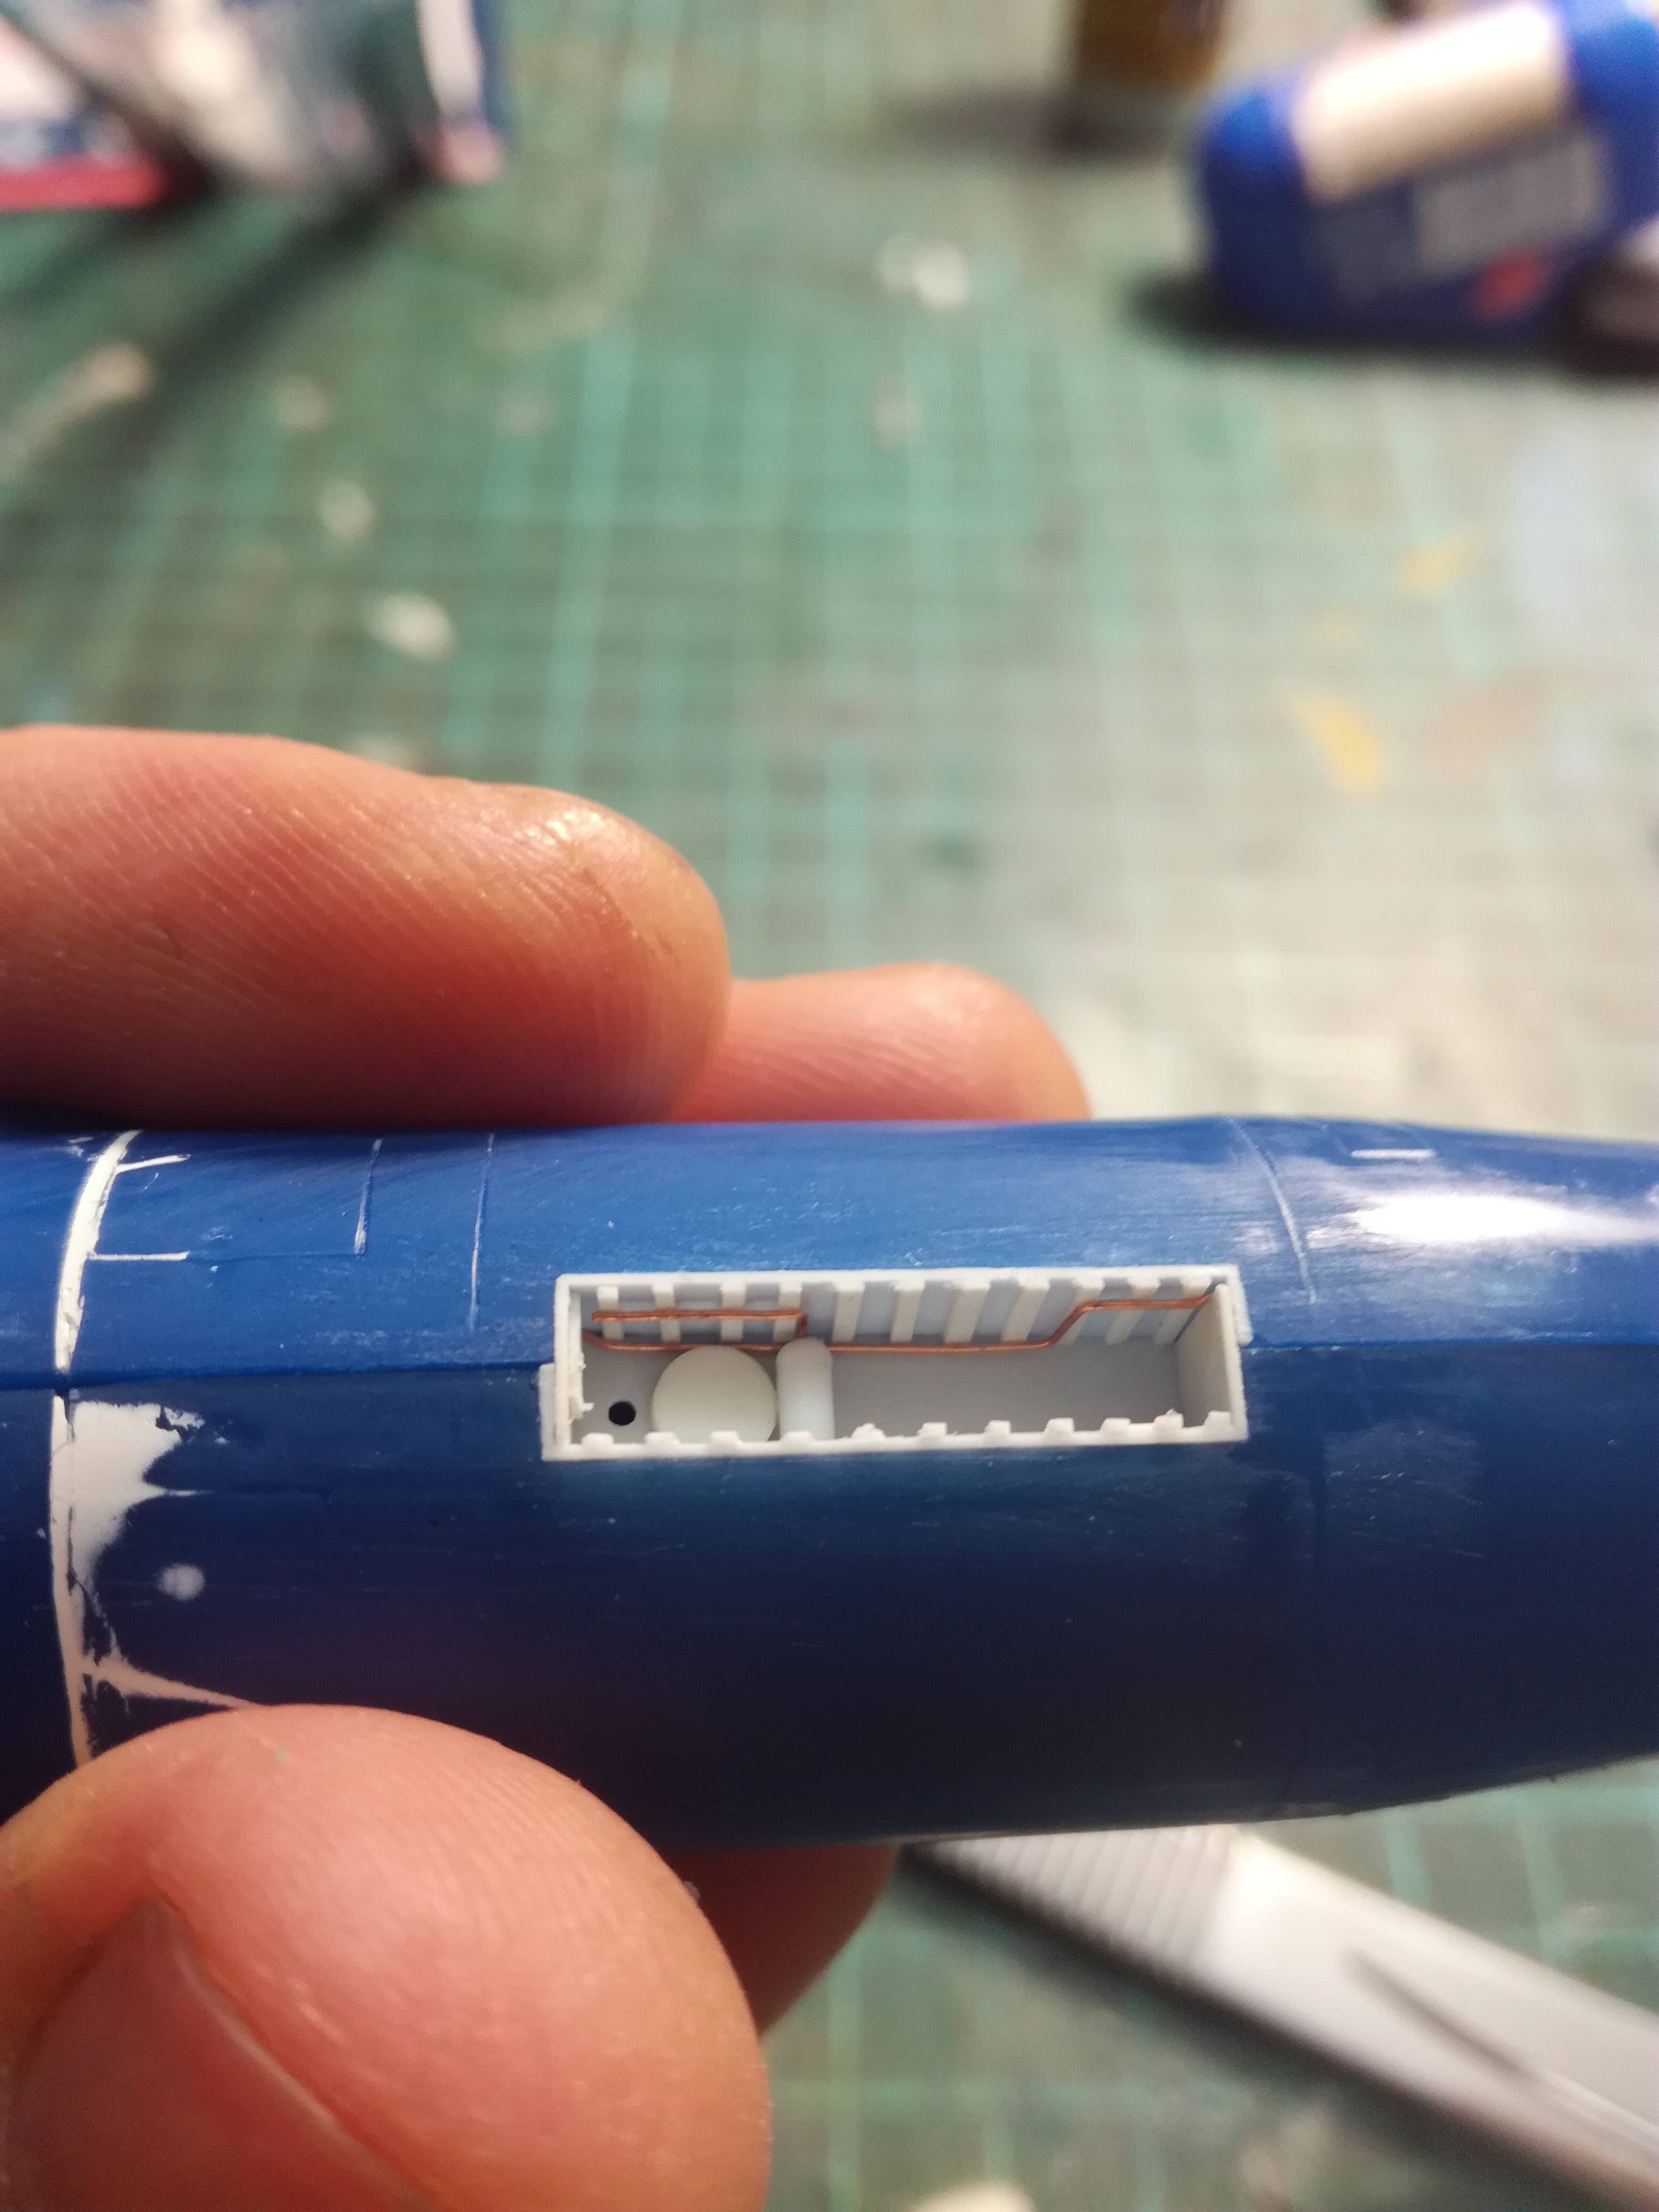
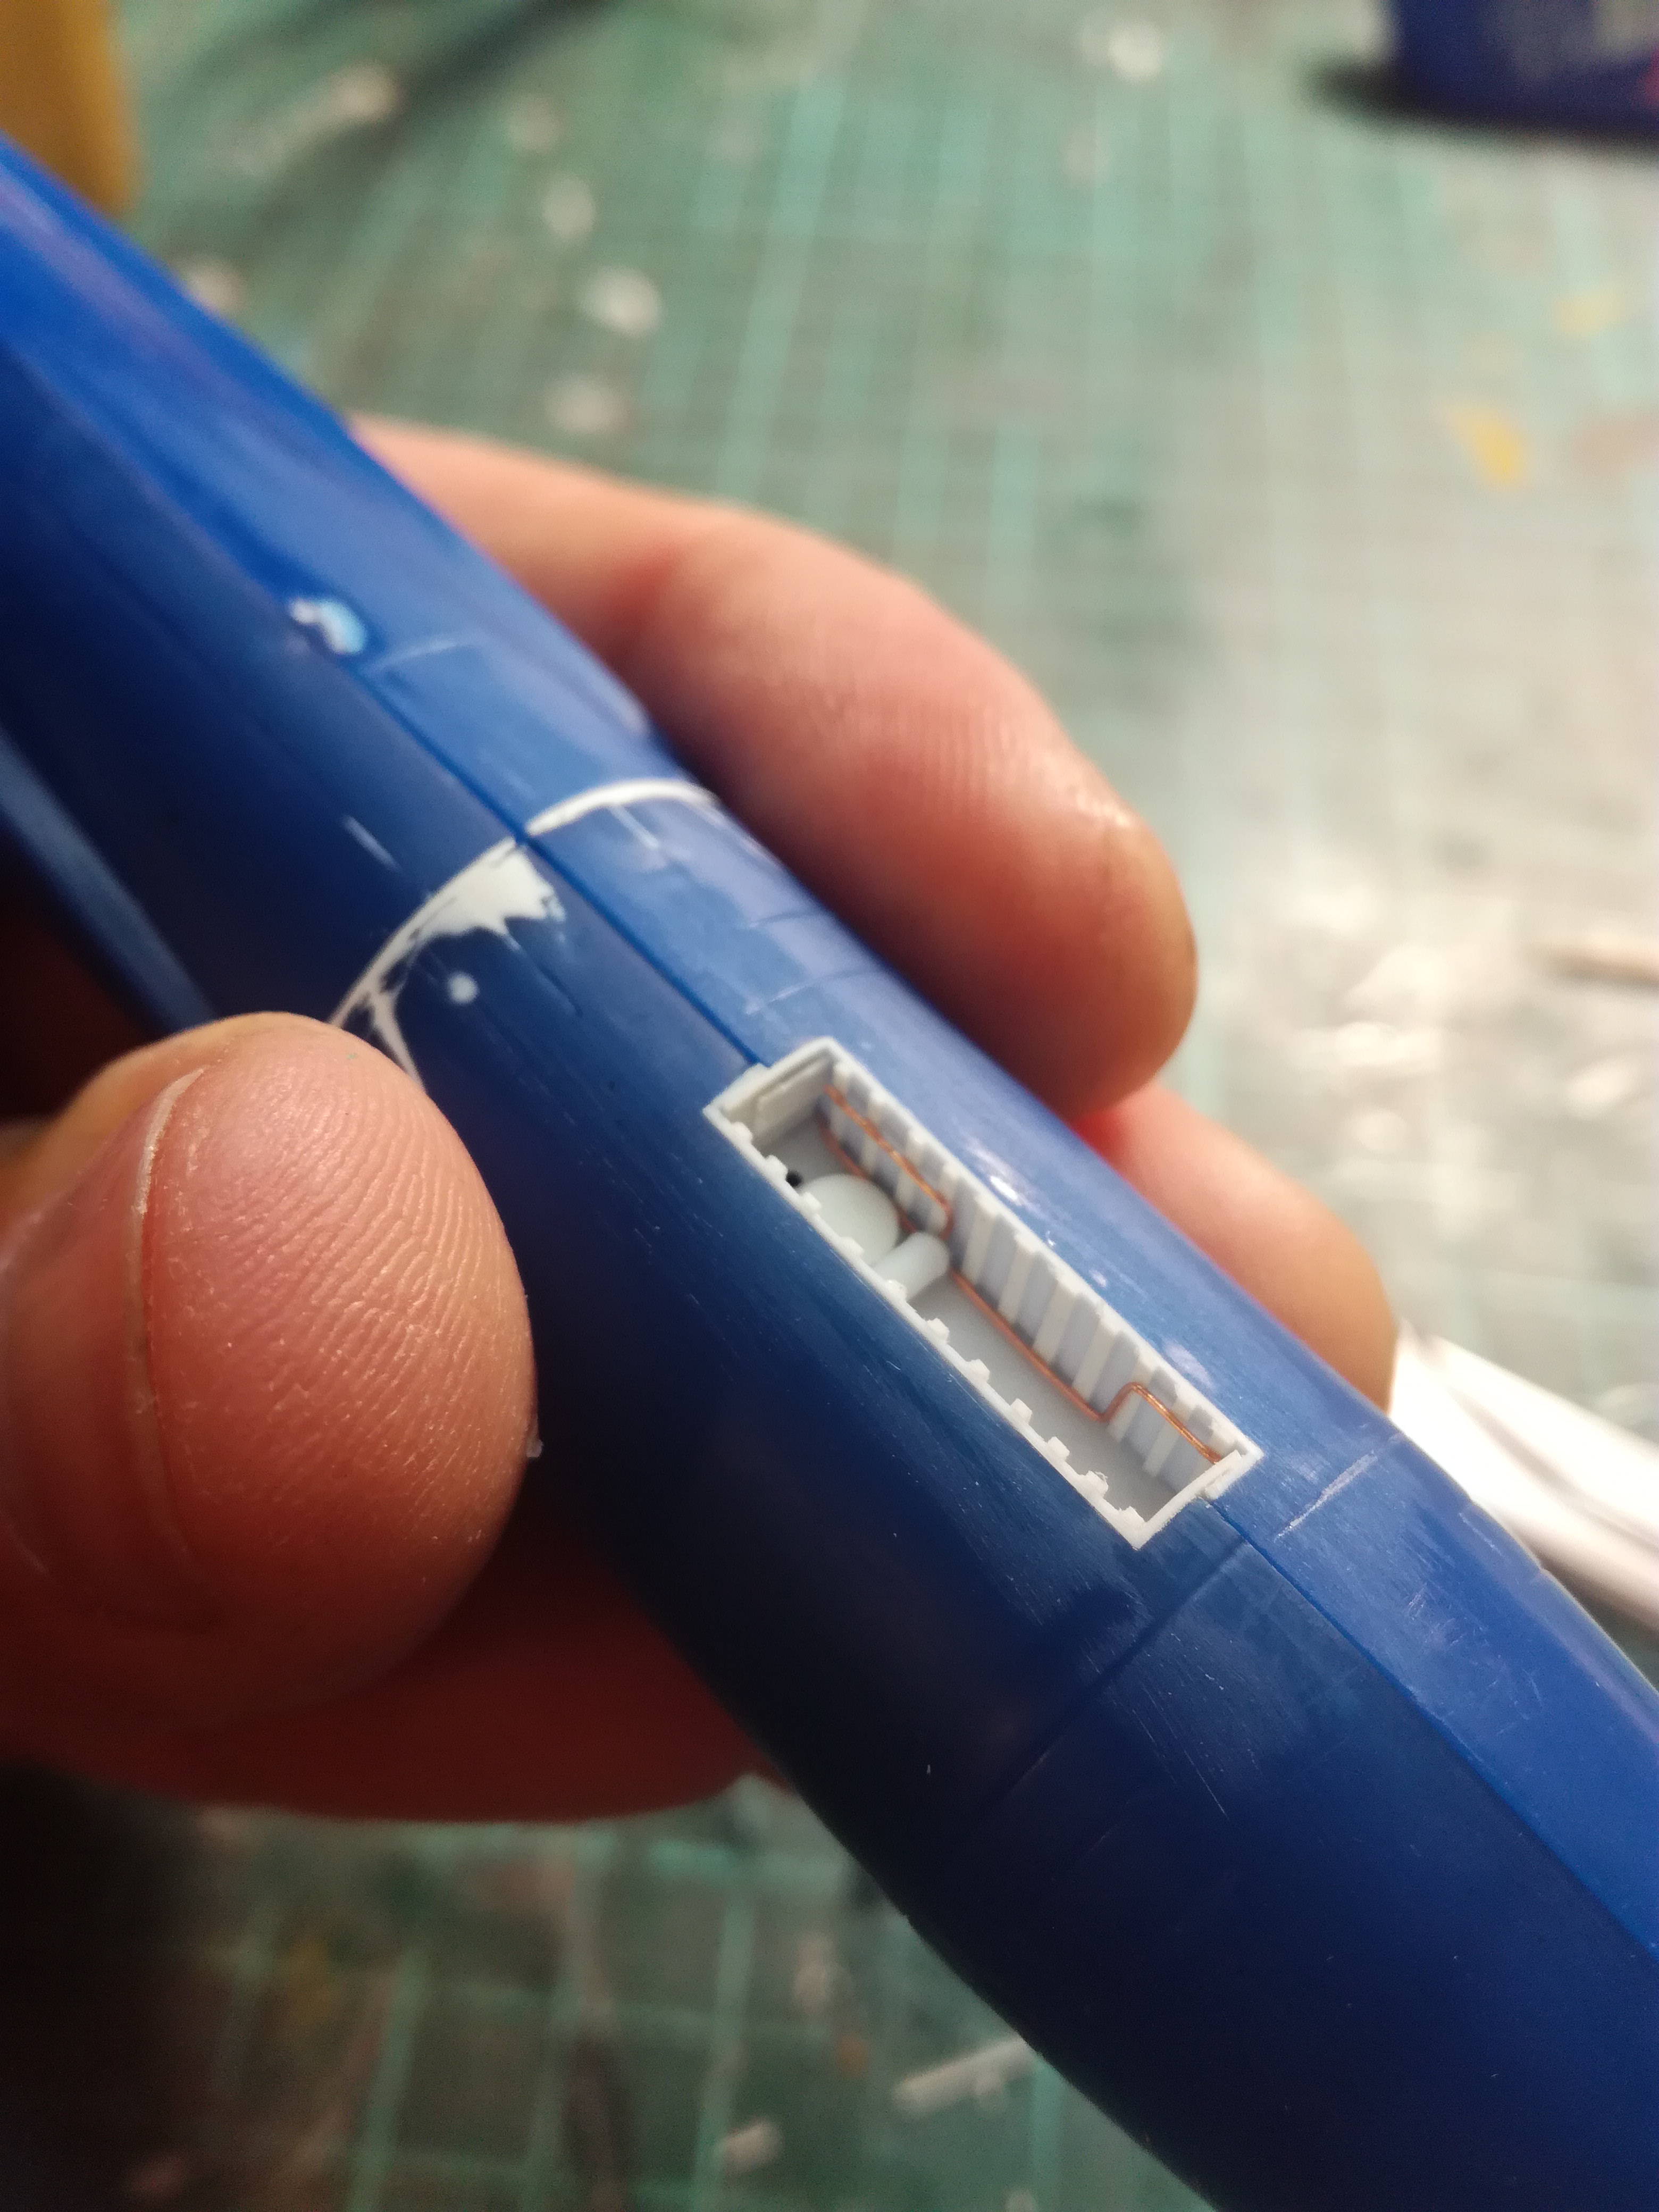
and at last the nose cone needed to be shaped from skratch.
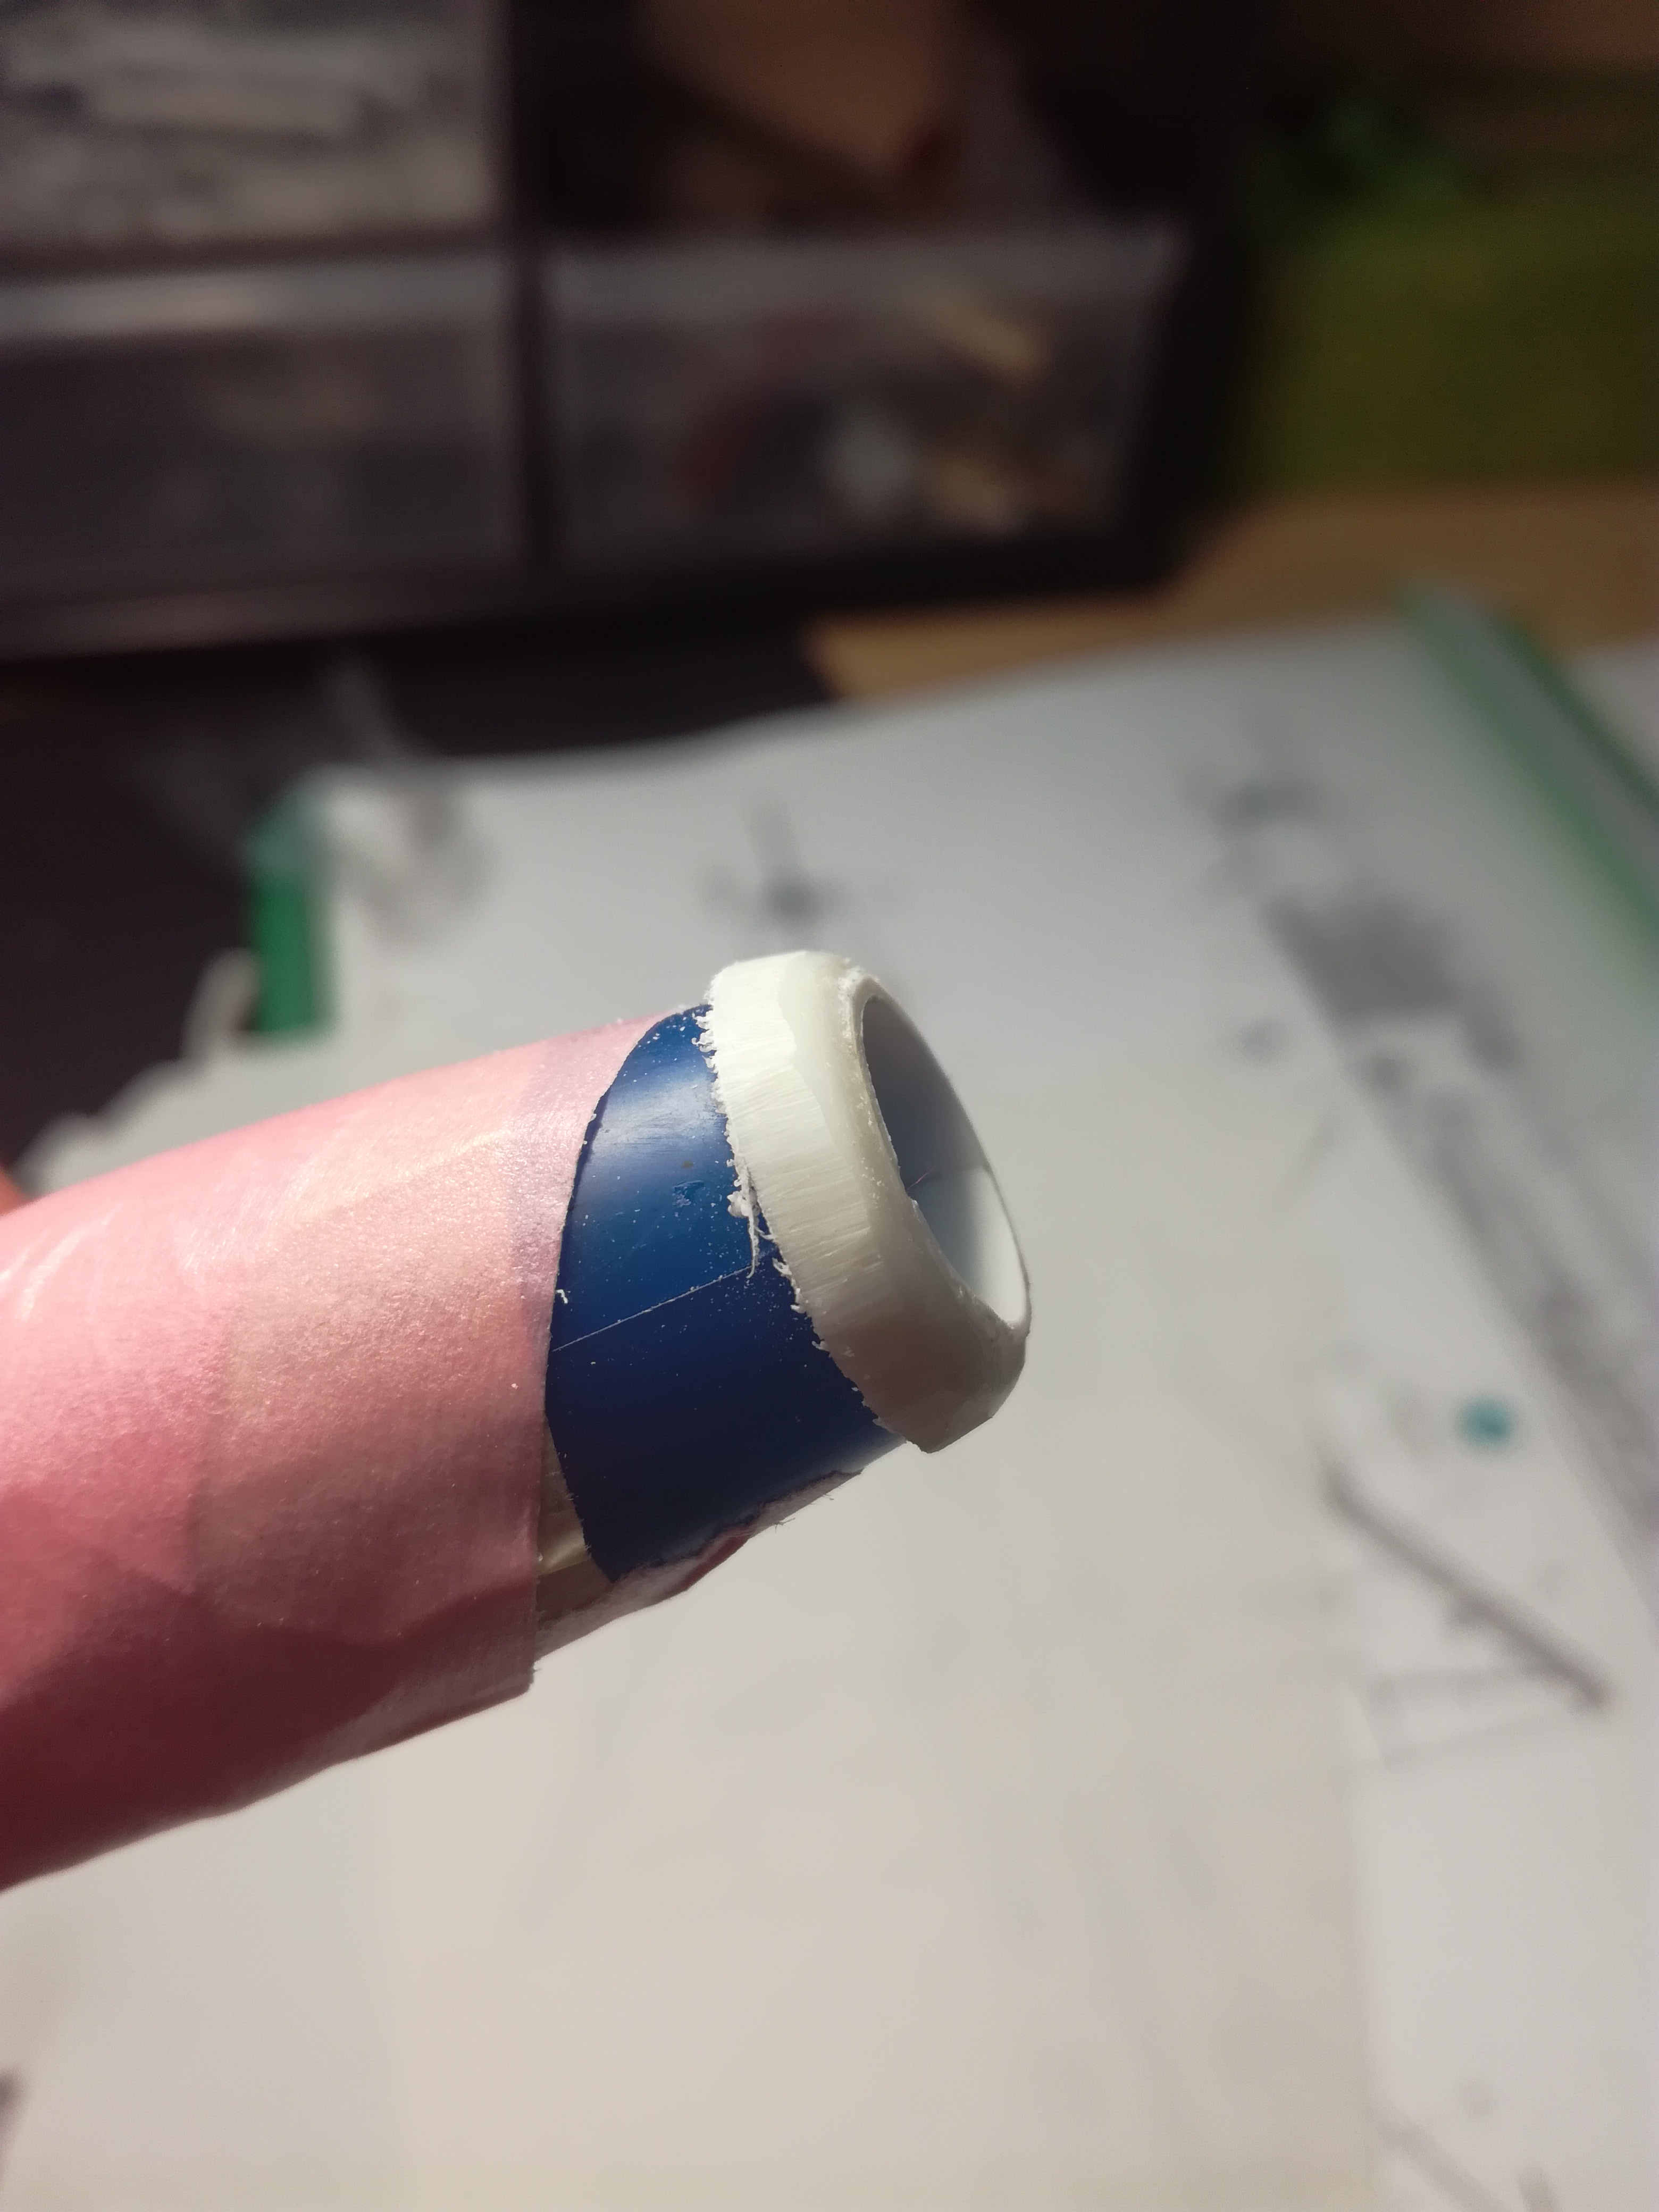
that's all.
Soo some progres... whell bay covers were made...
and front leg compartment detailed up.
and at last the nose cone needed to be shaped from skratch.
that's all.
md72
#439
Joined: November 05, 2005
KitMaker: 4,950 posts
AeroScale: 3,192 posts
Posted: Saturday, September 23, 2017 - 09:37 PM UTC
Hey, I finally found the campaign gallery 2nd Generation Jet Fighters
And got my pics posted. Thanks, it was a great campaign, and I actually FINISHED one!!!! 

And got my pics posted. Thanks, it was a great campaign, and I actually FINISHED one!!!!
Bigrip74
Joined: February 22, 2008
KitMaker: 5,026 posts
AeroScale: 2,811 posts
Posted: Sunday, September 24, 2017 - 05:12 AM UTC
I let my airbrush set for 30 days and WOW! It bit me when I tried to use it this morning for (6) airplanes that I thought I would paint. Not only did the airbrush fight, the pump and the quick release attachments were all angry.
Cleaned the airbrush again and found some rust on the needle. After a couple of hours I removed the quick release adapters and reinstalled Teflon tape to the fittings on the pump after a leak was detected.
Was finally able to paint (5) a/c in phases such as upper or lower surfaces.
I will use the photo cube for the first time tomorrow to post photos.
goodn8
Joined: October 12, 2008
KitMaker: 709 posts
AeroScale: 651 posts
Posted: Sunday, September 24, 2017 - 10:48 PM UTC
Great work Radek, nice detailing - move on! 
Bob, sorry for your mess wit the AB - those incidents can really s*** . Glad that you overcome the issue and did 5!! paint jobs - cudos!
Following up all your shown builds - great work on all!
Thomas
Bob, sorry for your mess wit the AB - those incidents can really s*** . Glad that you overcome the issue and did 5!! paint jobs - cudos!
Following up all your shown builds - great work on all!
Thomas
Bigrip74
Joined: February 22, 2008
KitMaker: 5,026 posts
AeroScale: 2,811 posts
Posted: Tuesday, September 26, 2017 - 07:14 AM UTC
Thomas, thanks for the condolences. Its all my fault for not taking the a/b apart the last time it was used.
Well! Ive finally started the paint process on the F100. The under surfaces are gray and I have penciled in the top for the 3 colors for the SEA camo. You may not be able to see, but its there.

Well! Ive finally started the paint process on the F100. The under surfaces are gray and I have penciled in the top for the 3 colors for the SEA camo. You may not be able to see, but its there.

oraora

Joined: June 19, 2002
KitMaker: 216 posts
AeroScale: 128 posts

Posted: Tuesday, September 26, 2017 - 07:14 AM UTC
Hi, i just joined this campaign. I am going to build an old hasegawa harrier gr.1, will be using aftermarket decals as the kit decals looks way beyond help.

Bigrip74
Joined: February 22, 2008
KitMaker: 5,026 posts
AeroScale: 2,811 posts
Posted: Tuesday, September 26, 2017 - 08:02 AM UTC
Ken, welcome to the campaign and looks like you have a good build there.
Bob
Bob
oraora
Joined: June 19, 2002
KitMaker: 216 posts
AeroScale: 128 posts
Posted: Tuesday, September 26, 2017 - 10:30 AM UTC
Thank you, bob
Bigrip74
Joined: February 22, 2008
KitMaker: 5,026 posts
AeroScale: 2,811 posts
Posted: Friday, September 29, 2017 - 10:02 AM UTC
I normally use 2 different a/b for painting out of the 12 I own. To my shame only 2 of those are beyond repair, I spent most of the day taking all apart and first soaking them in Lysol all purpose cleaner to remove the caked paint then alcohol to remove any residue. All of the a/b have needed this for some time now and my fear of taking apart an a/b had overcame me with the thought of all of those tiny parts (which Ive either lost or installed incorrectly in the past). So I took the plunge and took each apart completely (one at a time)and actually gave them all a tune up. When I tested each on the compressor they sang like a kitten. I guess I should have rid myself of that fear of destroying much earlier.
While soaking I set up the photo booth I had received a while back. The F100 is ready for the 3rd color to be applied.


While soaking I set up the photo booth I had received a while back. The F100 is ready for the 3rd color to be applied.

doubtingthomas
Joined: March 17, 2009
KitMaker: 156 posts
AeroScale: 153 posts
Posted: Friday, September 29, 2017 - 08:10 PM UTC
Wow - There is some great modeling going on in this thread.
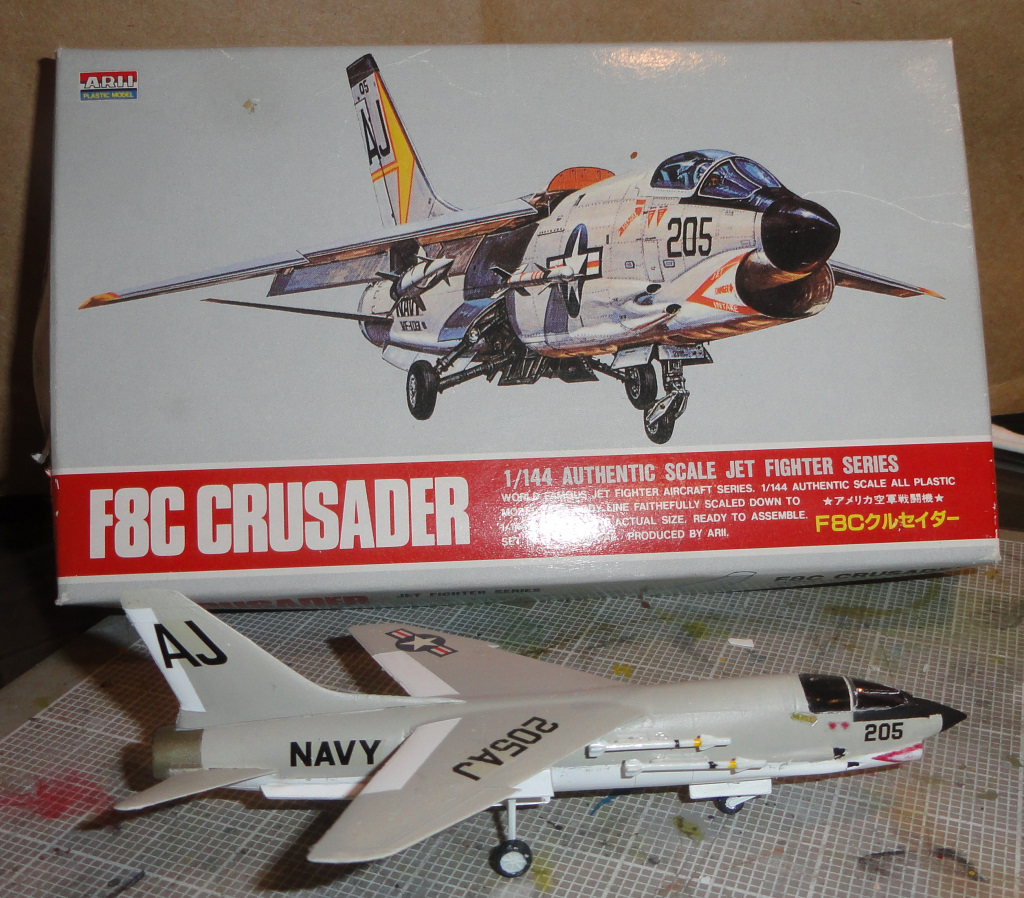
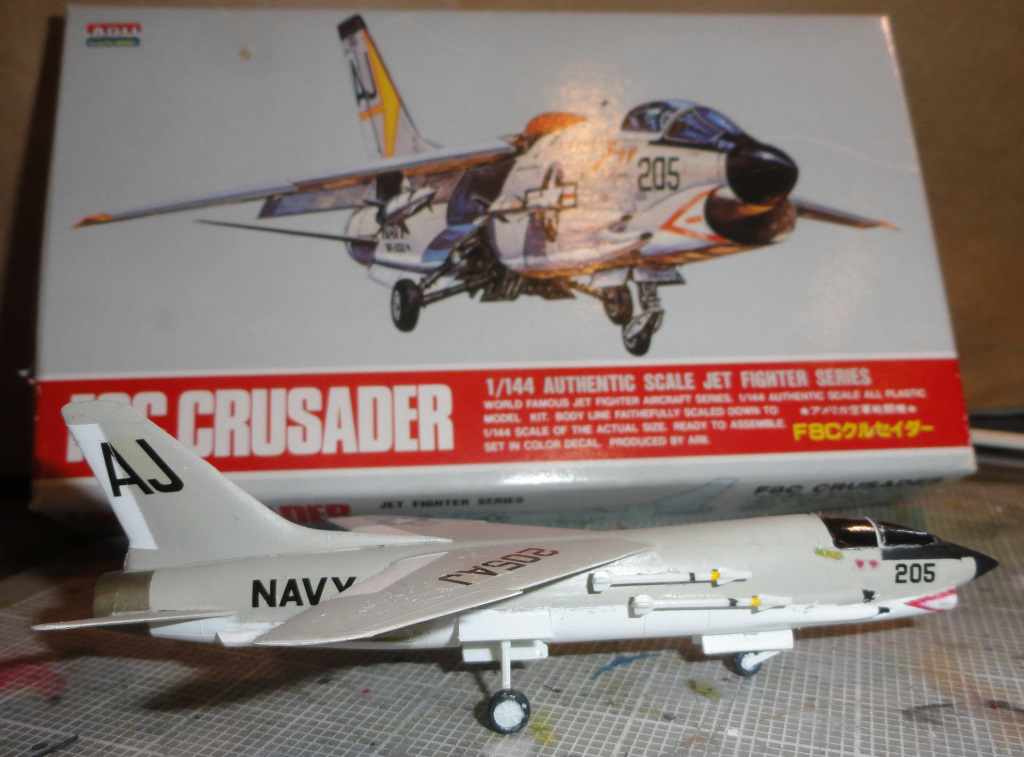
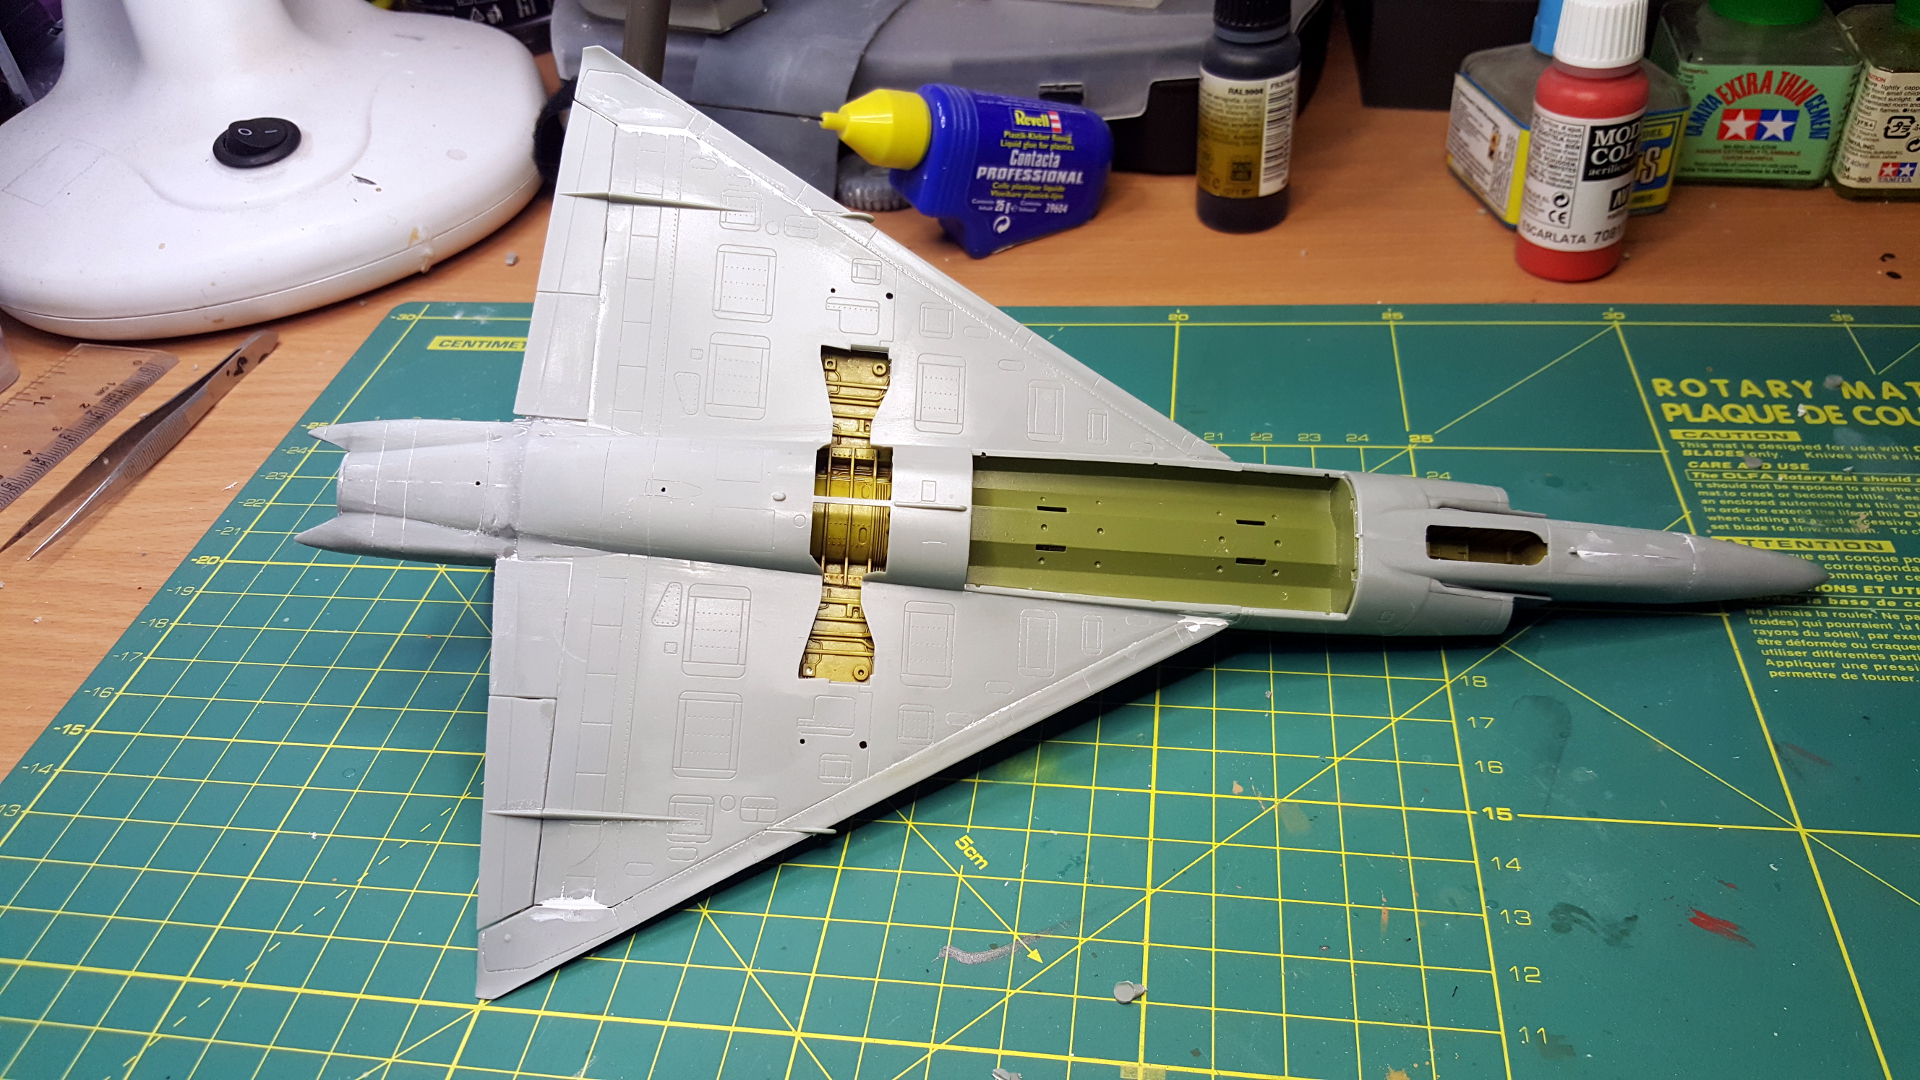
I'm a late starter, but have begun the Trumpeter 1/32 MiG-21F-13. Actually, this was started back on August 11 (I think), but am just now getting to post pictures of progress up to date.
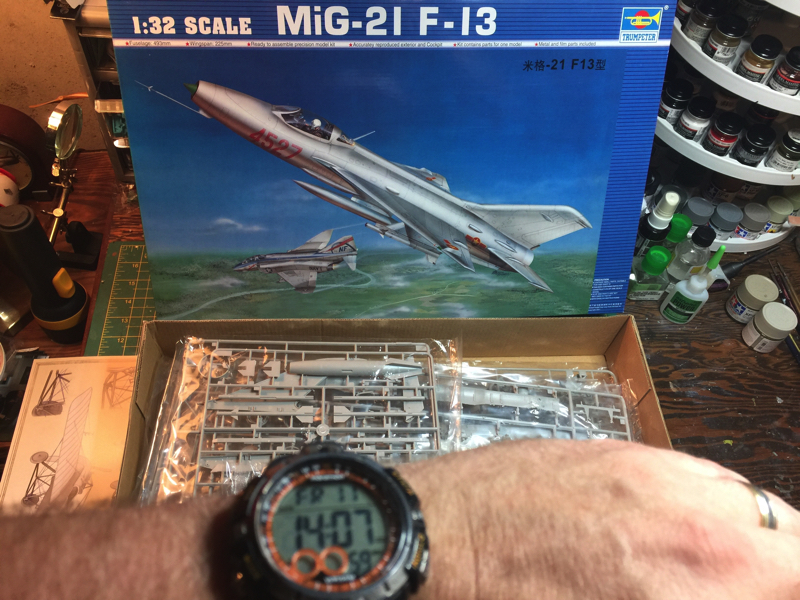
I'm using a Pavla resin ejection seat, Kuovailainen (sp?) colored PE, and adding some plumbing details to the wheel wells. I'm not doing anything to the engine, as that - and all the other Trumpeter open panels...grrrr....- will be closed.
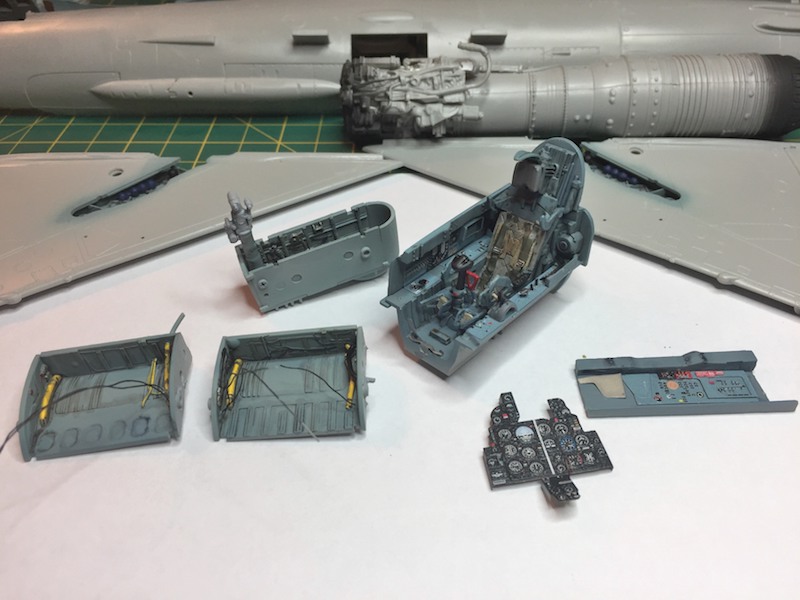
I'm not sure what color and markings I'm going to do. I have conflicting thoughts on Finnish Ilamvoimat (a) I would need to scratch some decals, and b) I don't see any pictures of service aircraft with weapons loads and I WANT WEAPONS), Vietnam (not finding much in the way of pictures for this either), or classic Soviet.
Enjoy!
-Tom
I'm a late starter, but have begun the Trumpeter 1/32 MiG-21F-13. Actually, this was started back on August 11 (I think), but am just now getting to post pictures of progress up to date.
I'm using a Pavla resin ejection seat, Kuovailainen (sp?) colored PE, and adding some plumbing details to the wheel wells. I'm not doing anything to the engine, as that - and all the other Trumpeter open panels...grrrr....- will be closed.
I'm not sure what color and markings I'm going to do. I have conflicting thoughts on Finnish Ilamvoimat (a) I would need to scratch some decals, and b) I don't see any pictures of service aircraft with weapons loads and I WANT WEAPONS), Vietnam (not finding much in the way of pictures for this either), or classic Soviet.
Enjoy!
-Tom
Bigrip74
Joined: February 22, 2008
KitMaker: 5,026 posts
AeroScale: 2,811 posts
Posted: Saturday, September 30, 2017 - 06:55 AM UTC
Tom, really nice job on the office.
Bob
Bob
RadekZ
Joined: March 12, 2013
KitMaker: 125 posts
AeroScale: 85 posts
Posted: Wednesday, October 04, 2017 - 01:24 AM UTC
Hi guys,
great to see you guys moving forward with your builds! All those are state-of-art.
As for mine F-102 I hope I will stop making some stupid mistakes at some point of time...
The kit is a real charm and puts together almost like Lego blocks, but I wouldn't be me if I didn't screw something up.
So I made it up to joining fuselage with wings section (which includes undercarriage section and bomb bay). All joints were seamless, but after I glued it I probably bumped it too hard on desk before glue settled enough. In result the rear joint displaced a fraction of milimeter making a huge bump between parts... I didn't notice it until next day when it was already too late for easy fix.
I softened the gap with some melted plastic and sanded it like madman . Doesnt' look bad, but it will be visible for sure after finish...
Well, enough of this TLDR stuff
Two pics of current state:

On the last pic you can see sanded bump as darker plastic spot on fuselage just where the wings end.
Cheers,
Radek
great to see you guys moving forward with your builds! All those are state-of-art.
As for mine F-102 I hope I will stop making some stupid mistakes at some point of time...
The kit is a real charm and puts together almost like Lego blocks, but I wouldn't be me if I didn't screw something up.
So I made it up to joining fuselage with wings section (which includes undercarriage section and bomb bay). All joints were seamless, but after I glued it I probably bumped it too hard on desk before glue settled enough. In result the rear joint displaced a fraction of milimeter making a huge bump between parts... I didn't notice it until next day when it was already too late for easy fix.
I softened the gap with some melted plastic and sanded it like madman
. Doesnt' look bad, but it will be visible for sure after finish...Well, enough of this TLDR stuff
Two pics of current state:
On the last pic you can see sanded bump as darker plastic spot on fuselage just where the wings end.
Cheers,
Radek
goodn8
Joined: October 12, 2008
KitMaker: 709 posts
AeroScale: 651 posts
Posted: Monday, October 16, 2017 - 11:30 PM UTC
Still great work on your kits, guys!
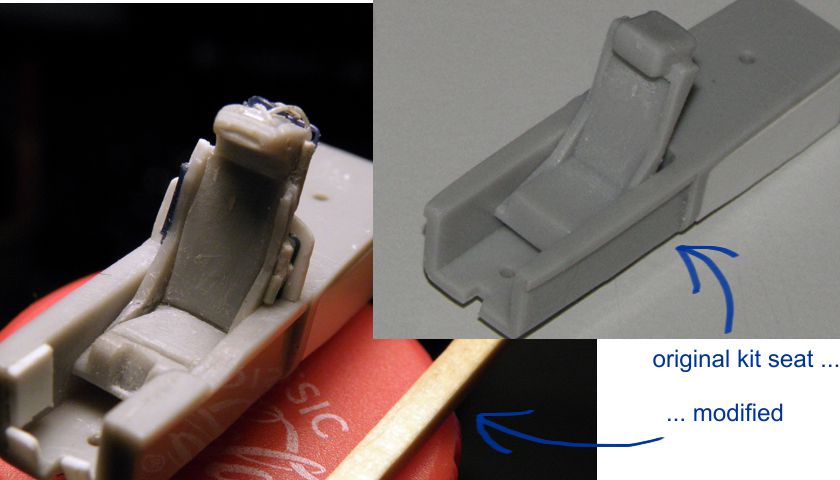
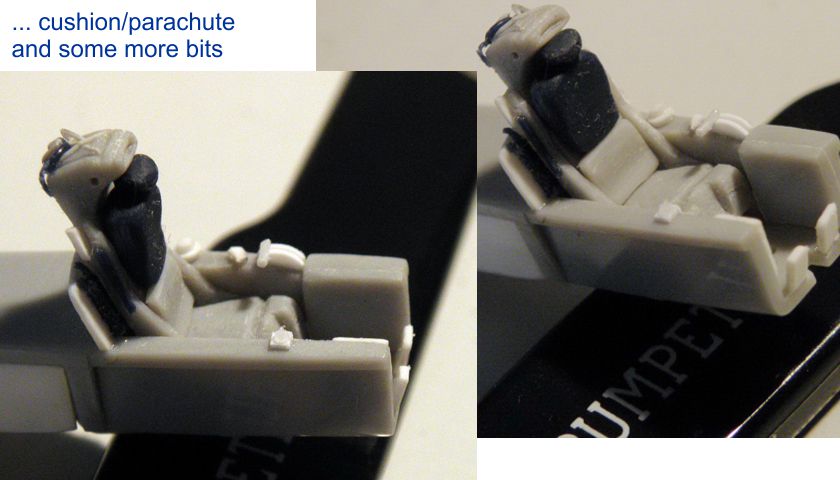
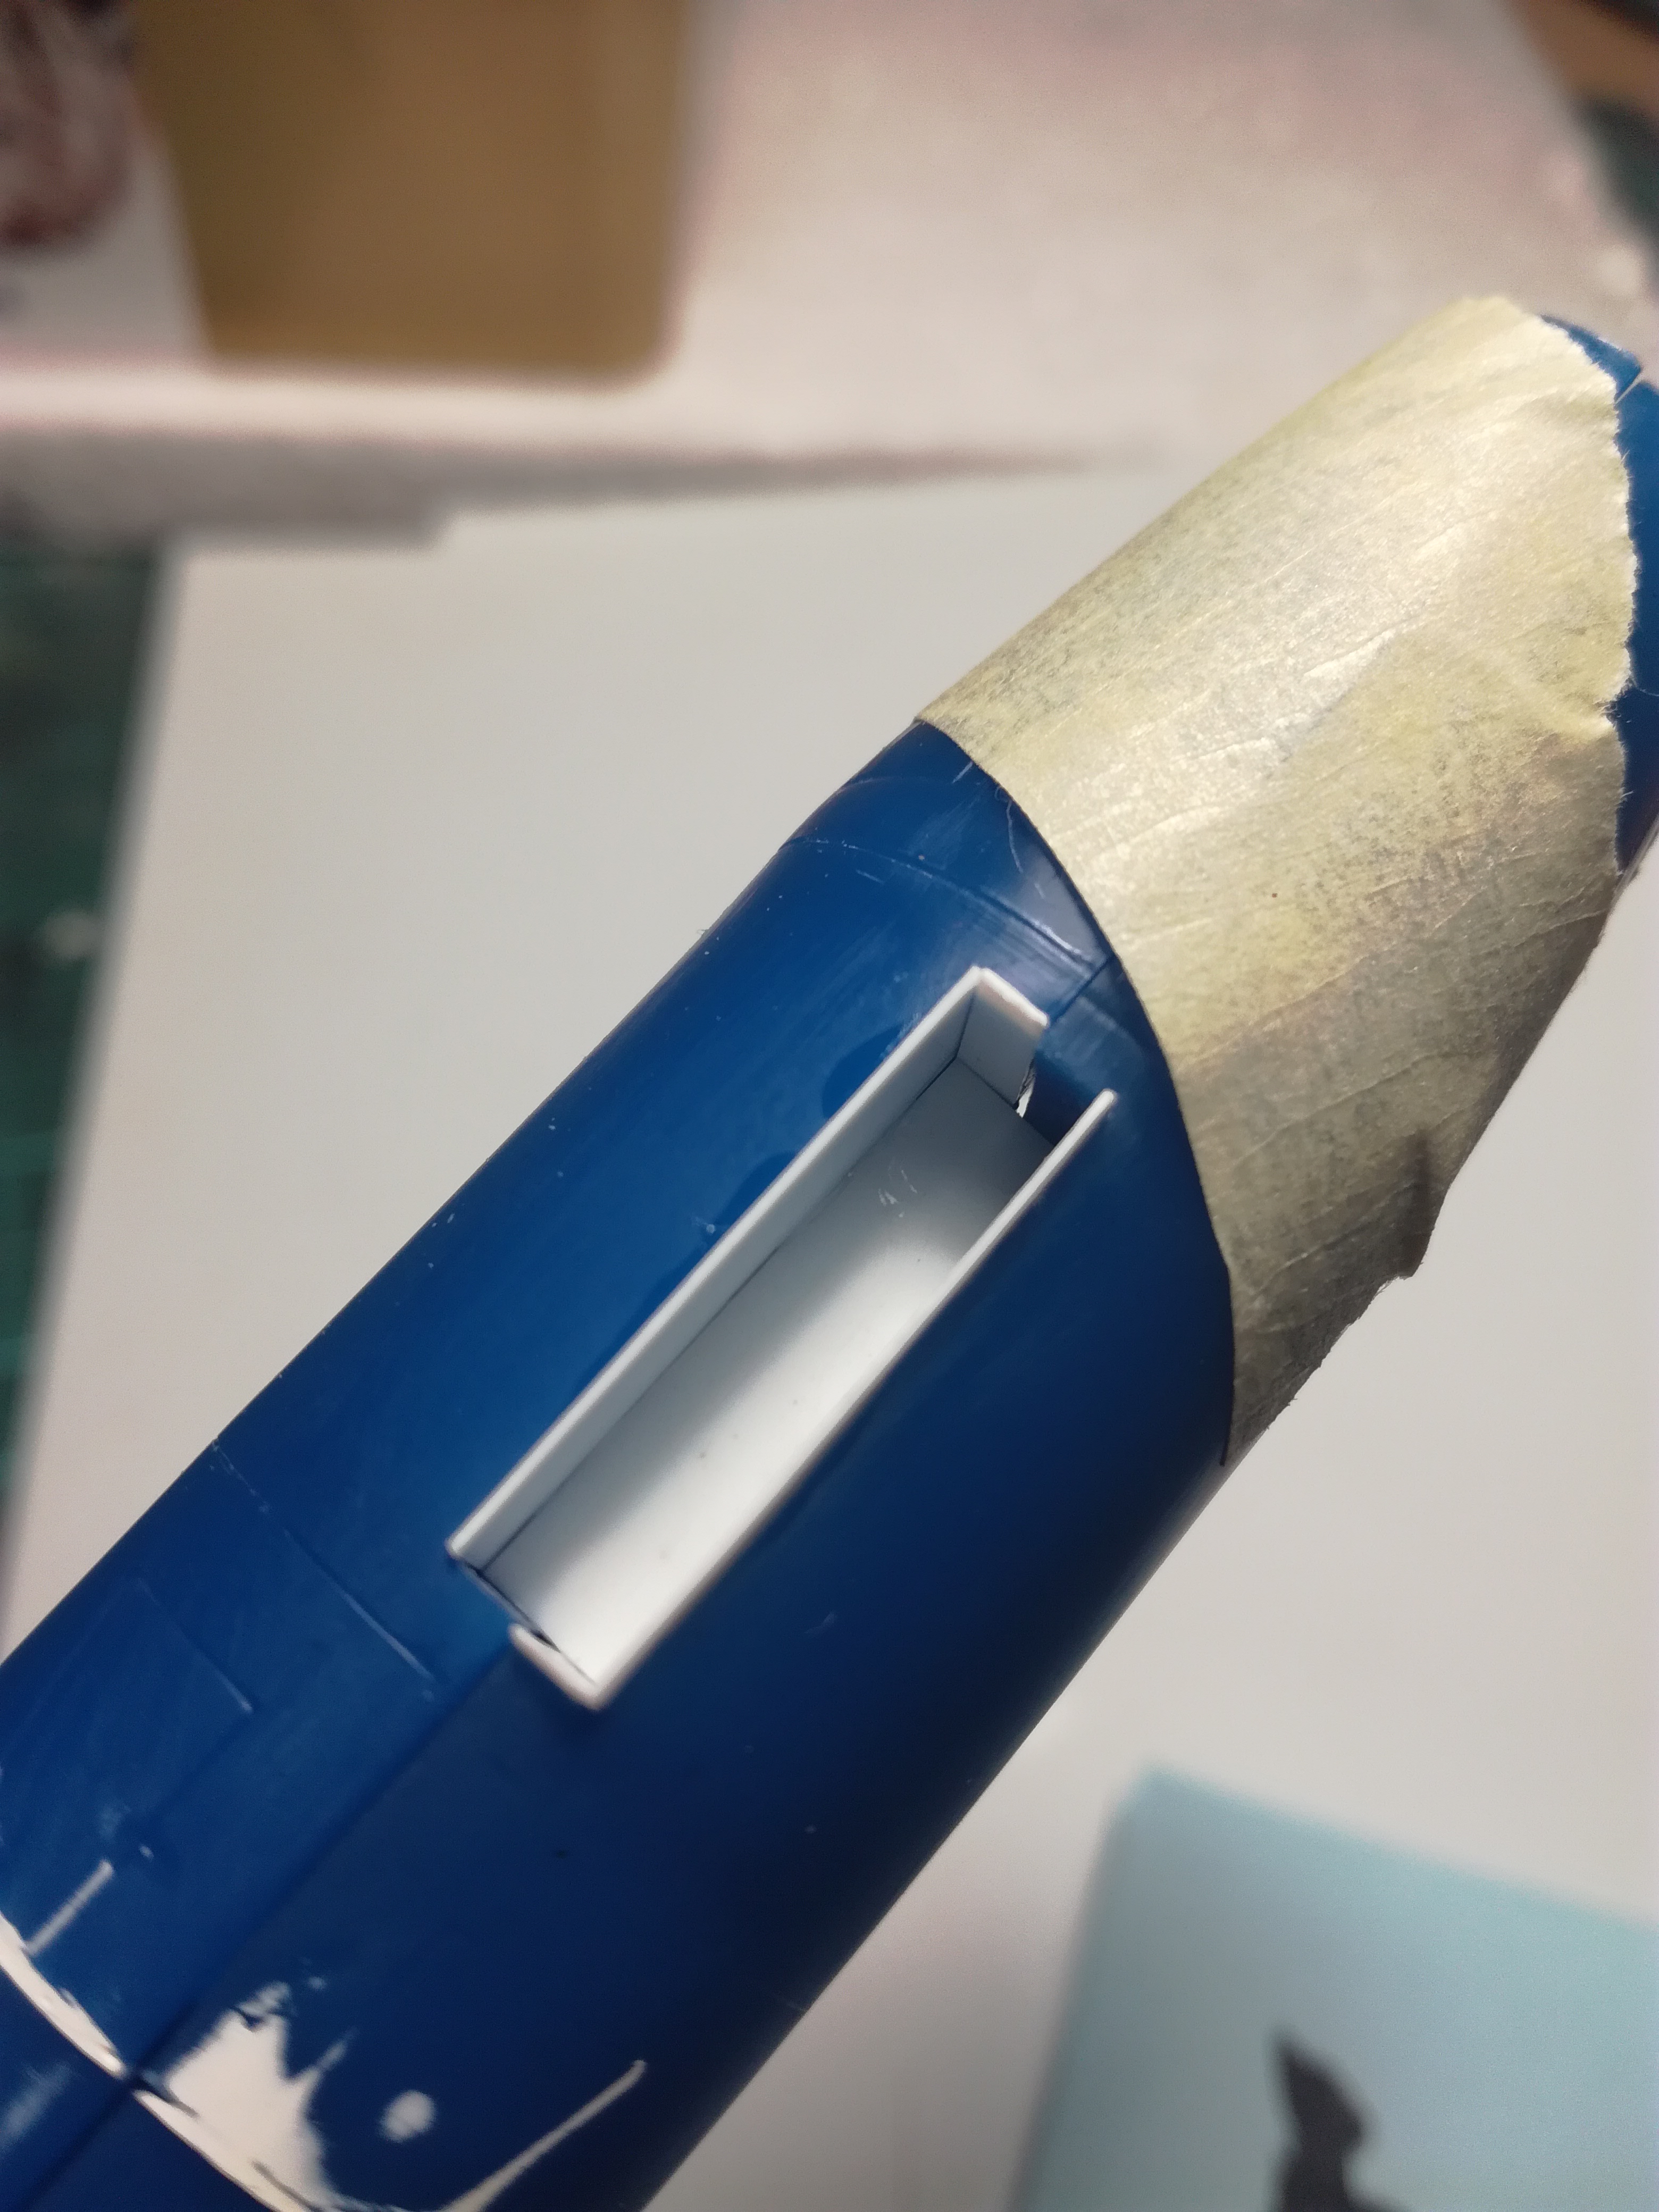
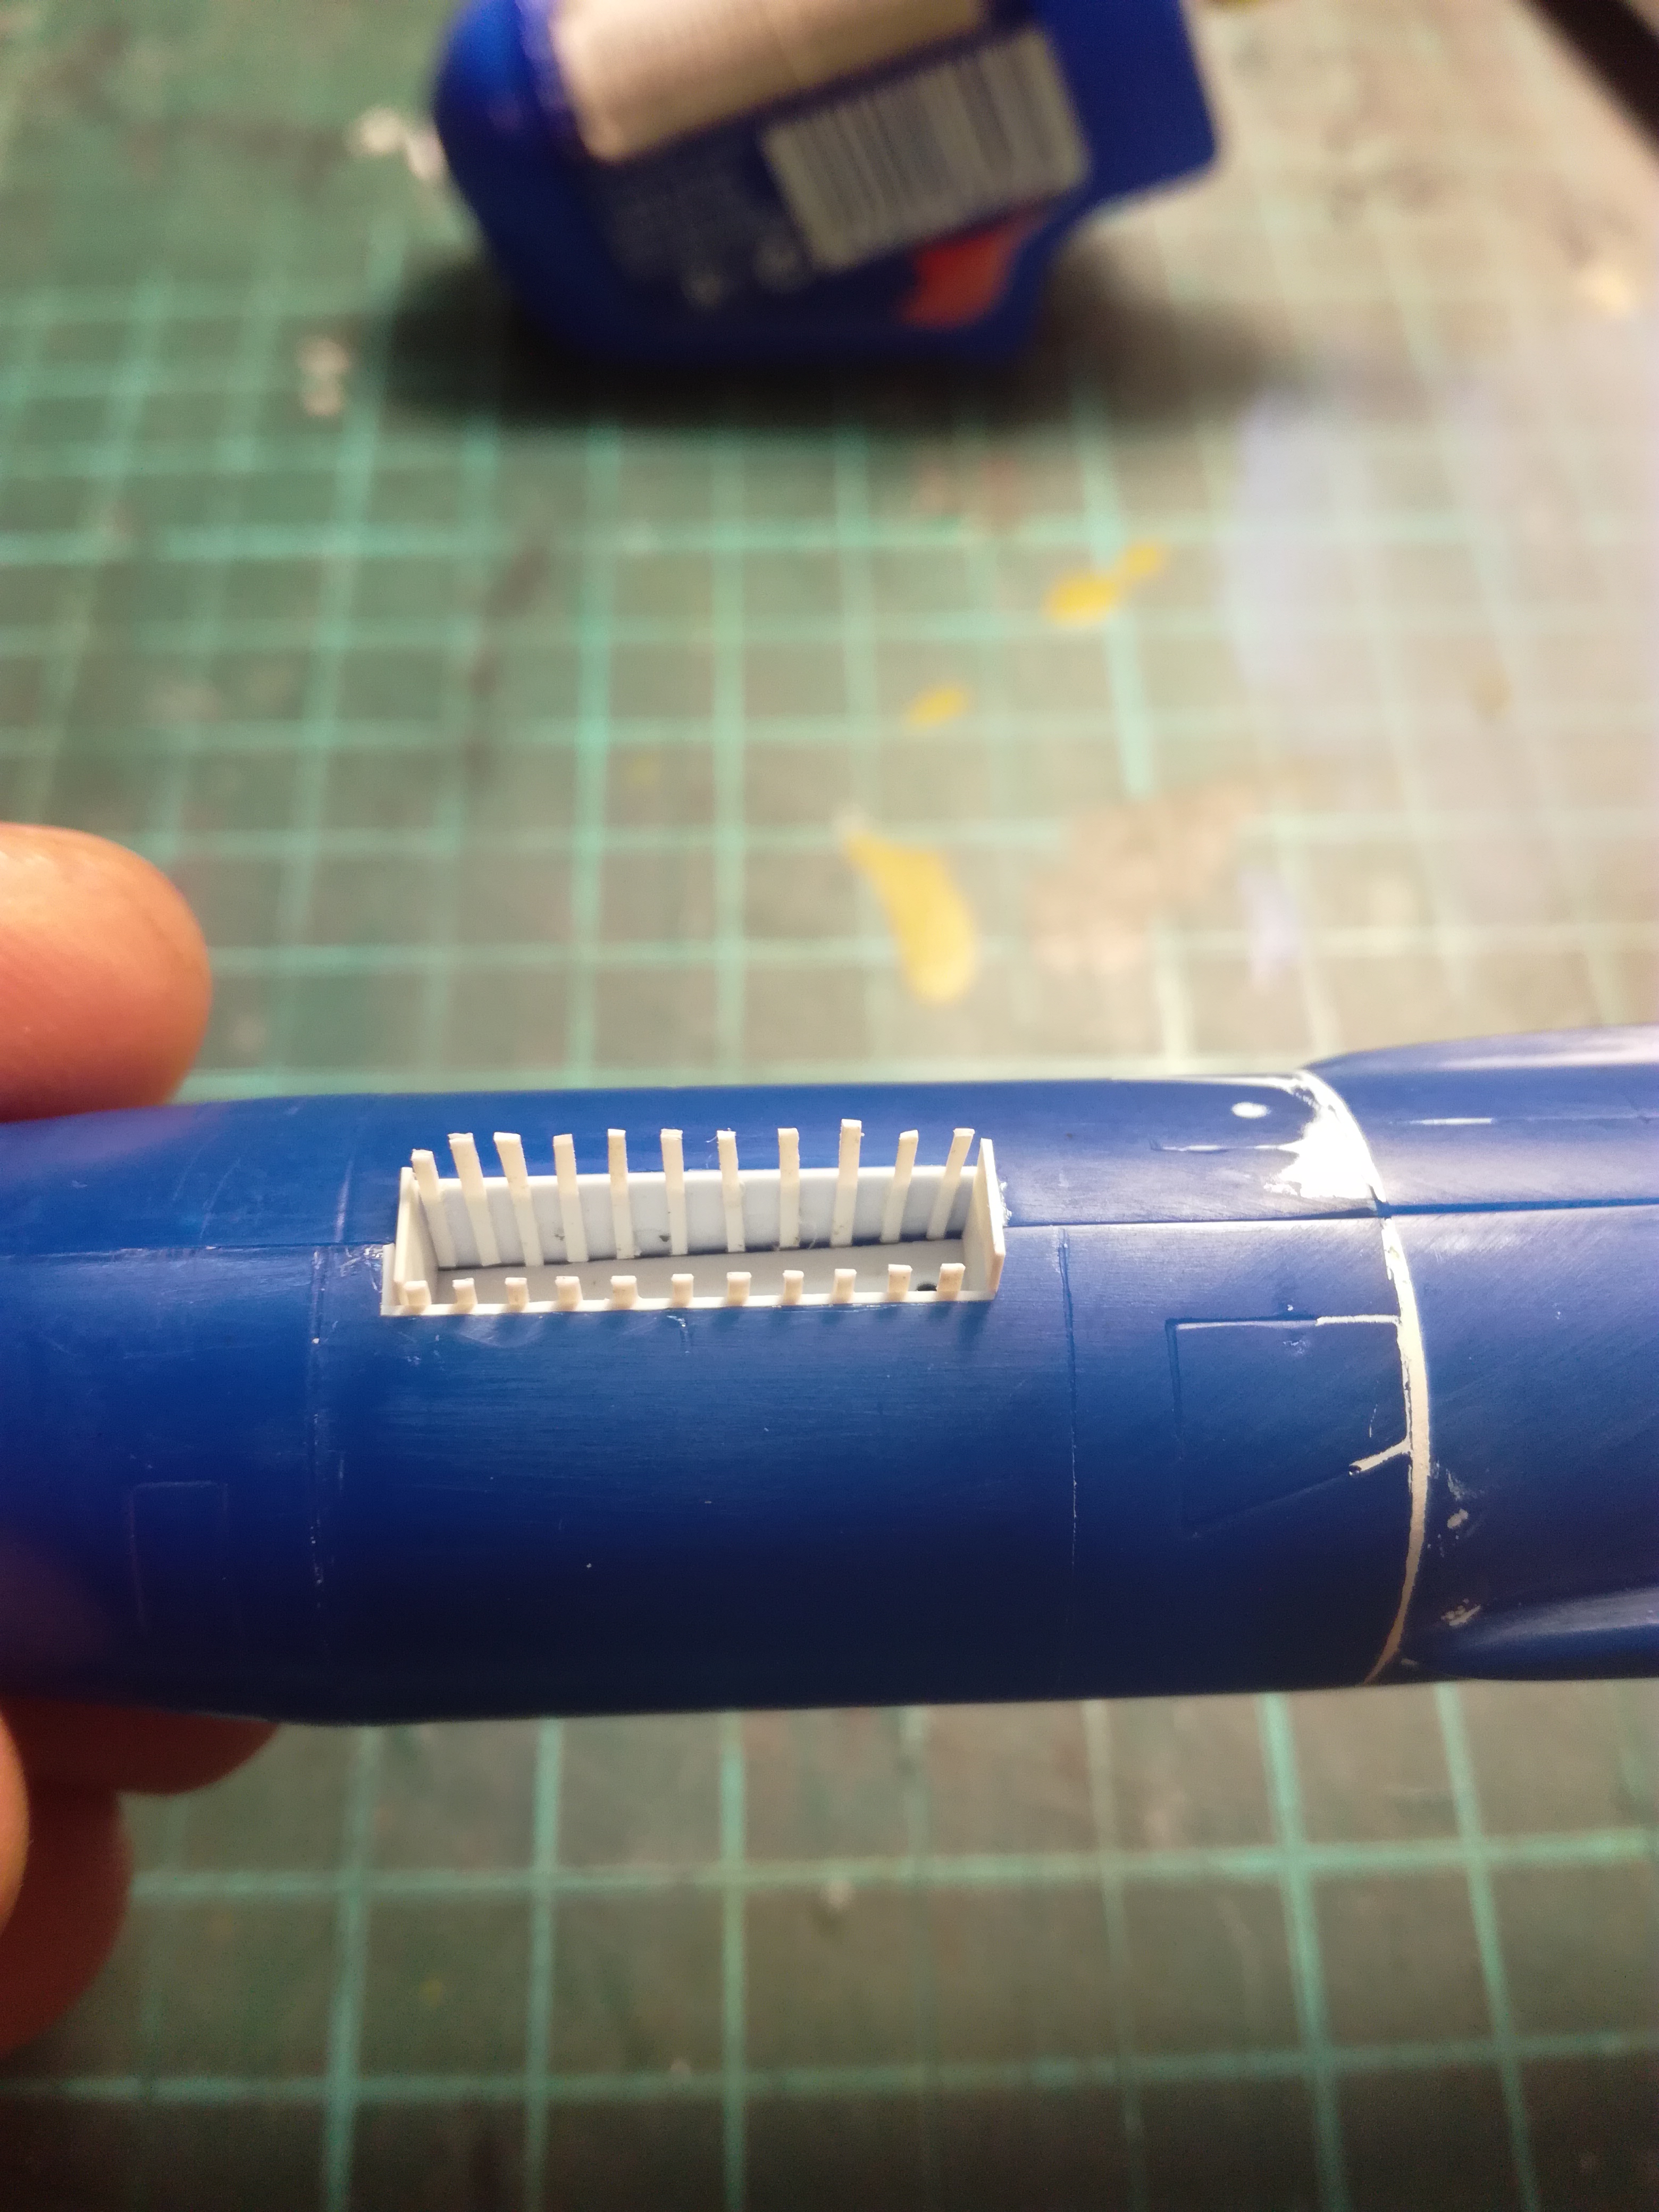
Meanwhile I managed to go a step ahead with my scratched parts...
More details here.
Thomas
Meanwhile I managed to go a step ahead with my scratched parts...
More details here.
Thomas
2002hummer
#257

Joined: October 11, 2011
KitMaker: 812 posts
AeroScale: 458 posts

Posted: Tuesday, October 17, 2017 - 09:06 AM UTC
Bob R(Bigrip74) Great looking build. You are braver than me to clean all your a/b's at once. Question, Where did you get the mounting system for your camera?.
RadekZ
Joined: March 12, 2013
KitMaker: 125 posts
AeroScale: 85 posts
Posted: Monday, November 20, 2017 - 02:20 AM UTC
Hi guys,
after a while I've managed to get some progress on F-102.
It's now all painted in 3-tonal camo.
Paints used:
Gunze H315 - Gray FS16440
Gunze H310 - Brown FS 30219
Gunze H309 - Green FS 34079
Gunze H303 - Green FS 34102
In addition White & Black from Tamiya to make some tonal variation.
Still need to make some retouches as the coverage isn't good in some places (you can see primer here and there).
Here are some pics:
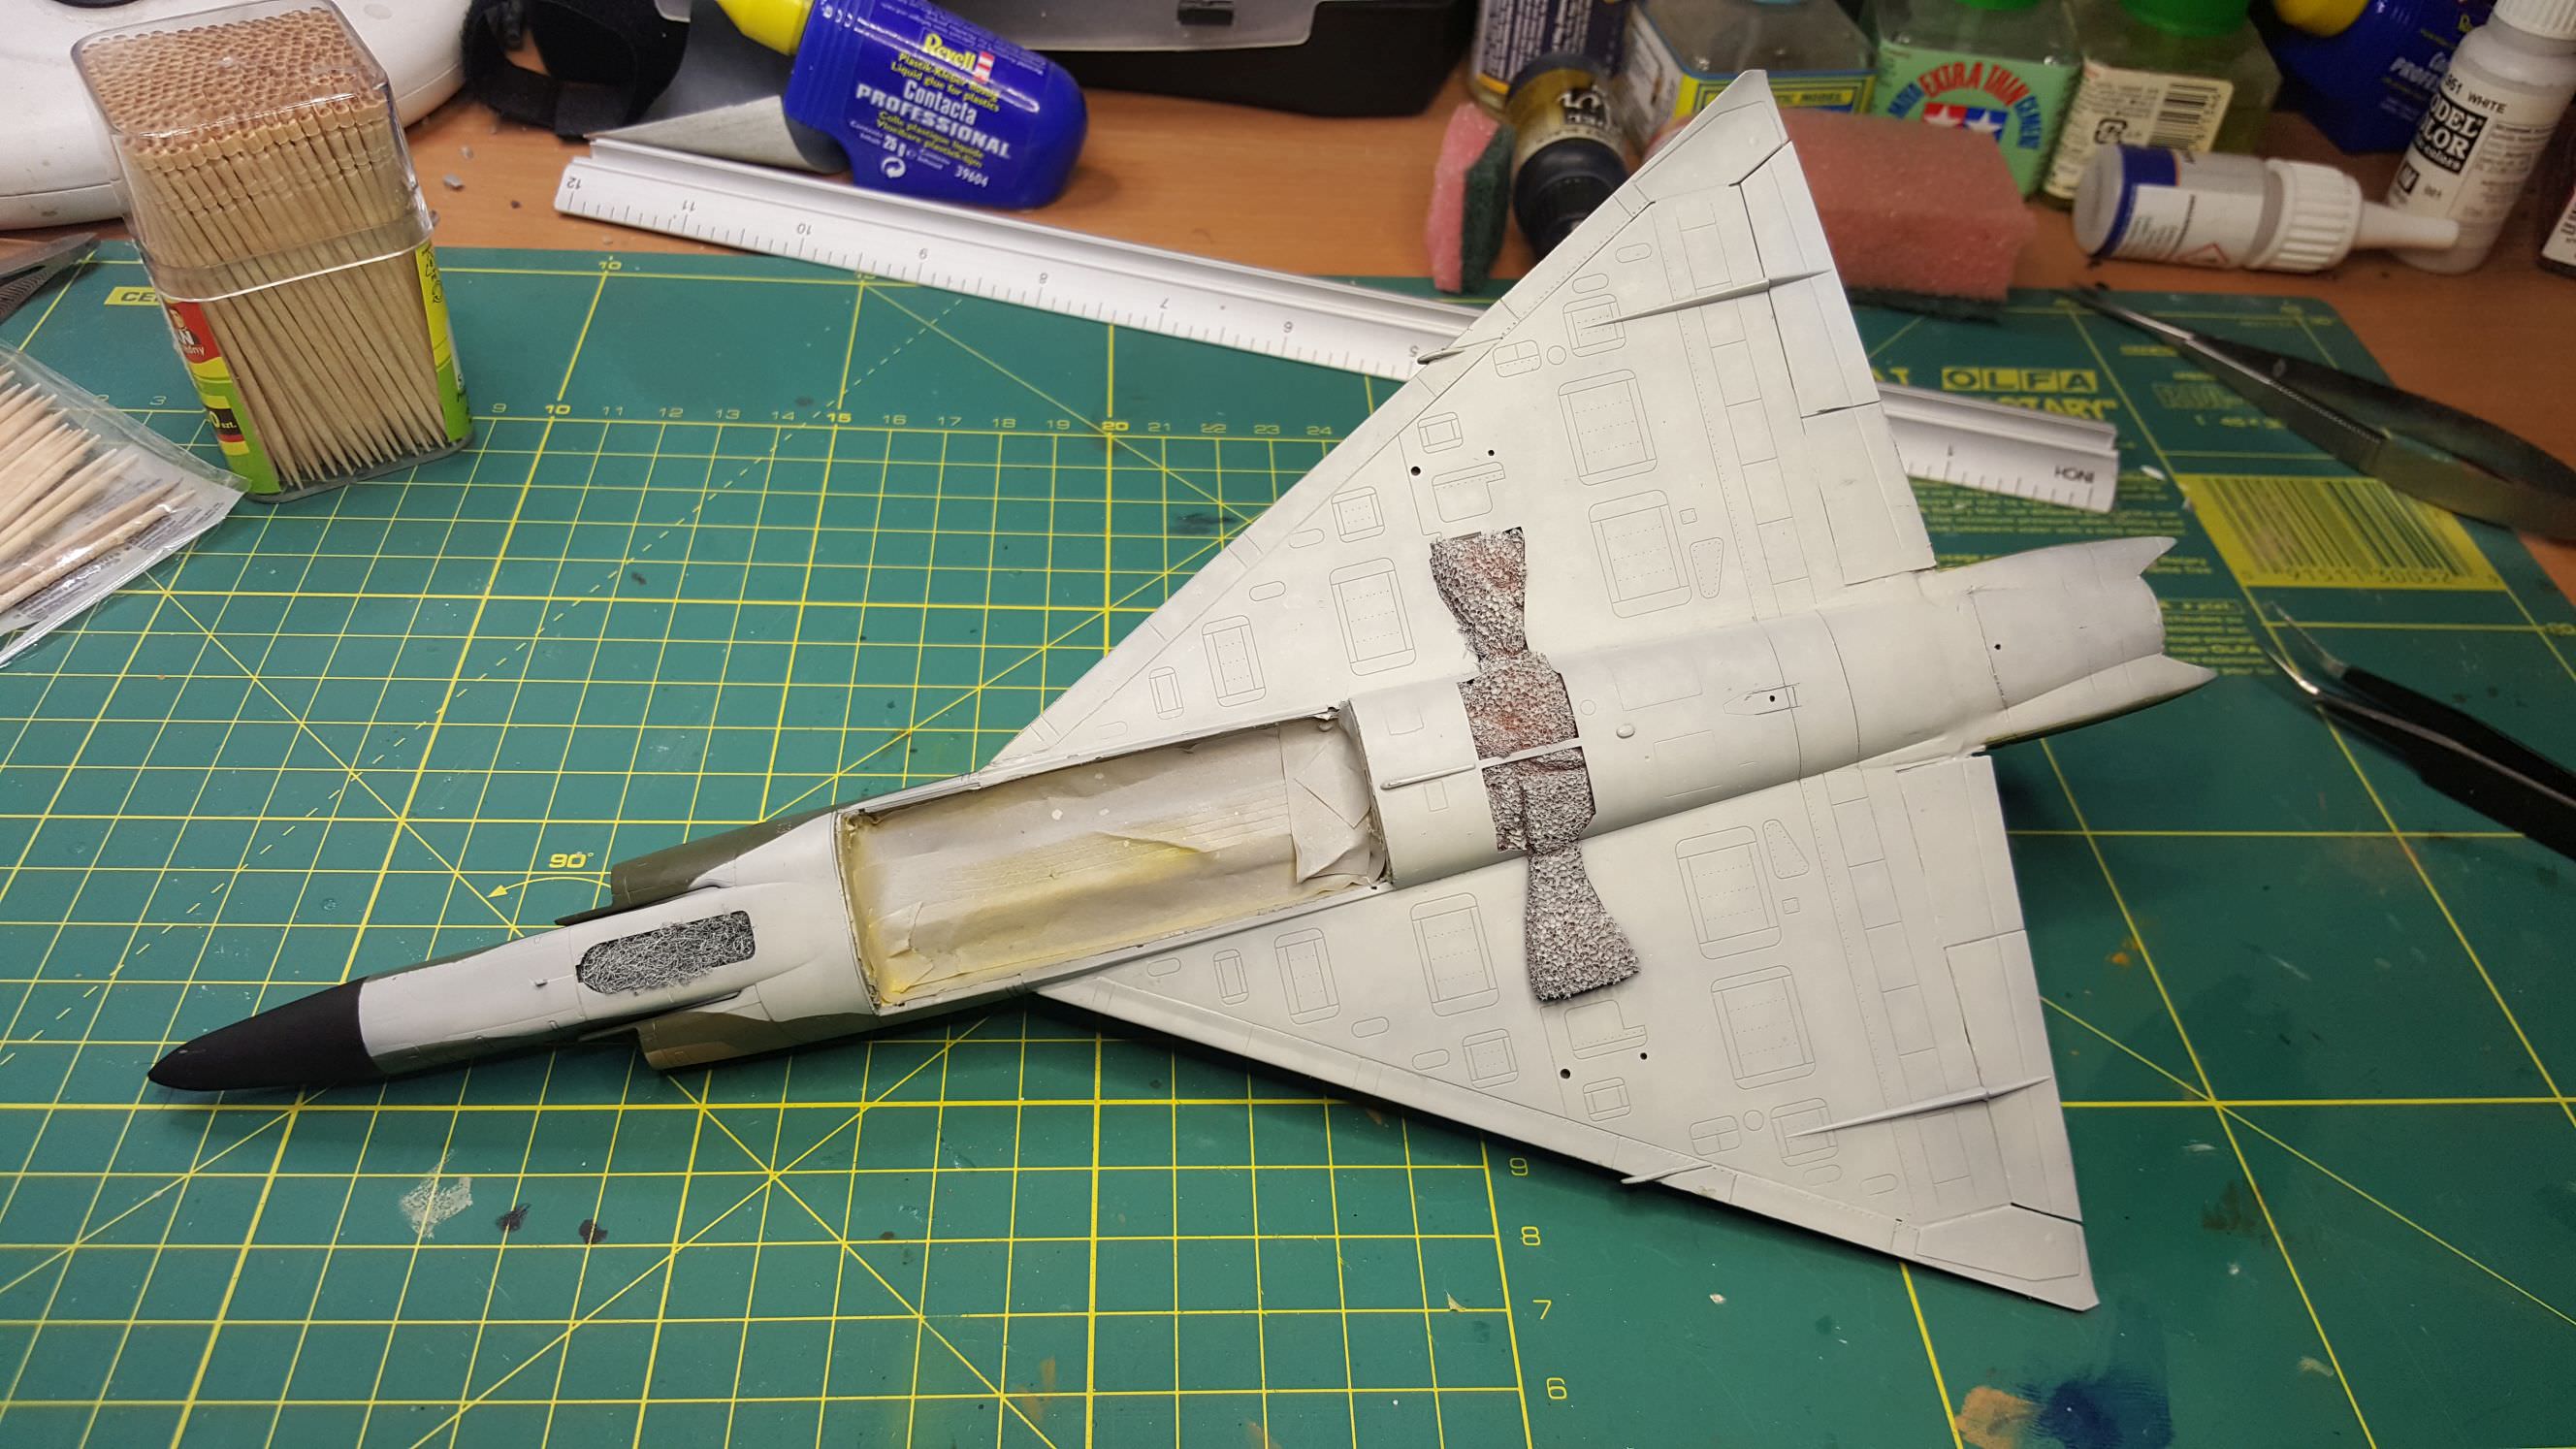
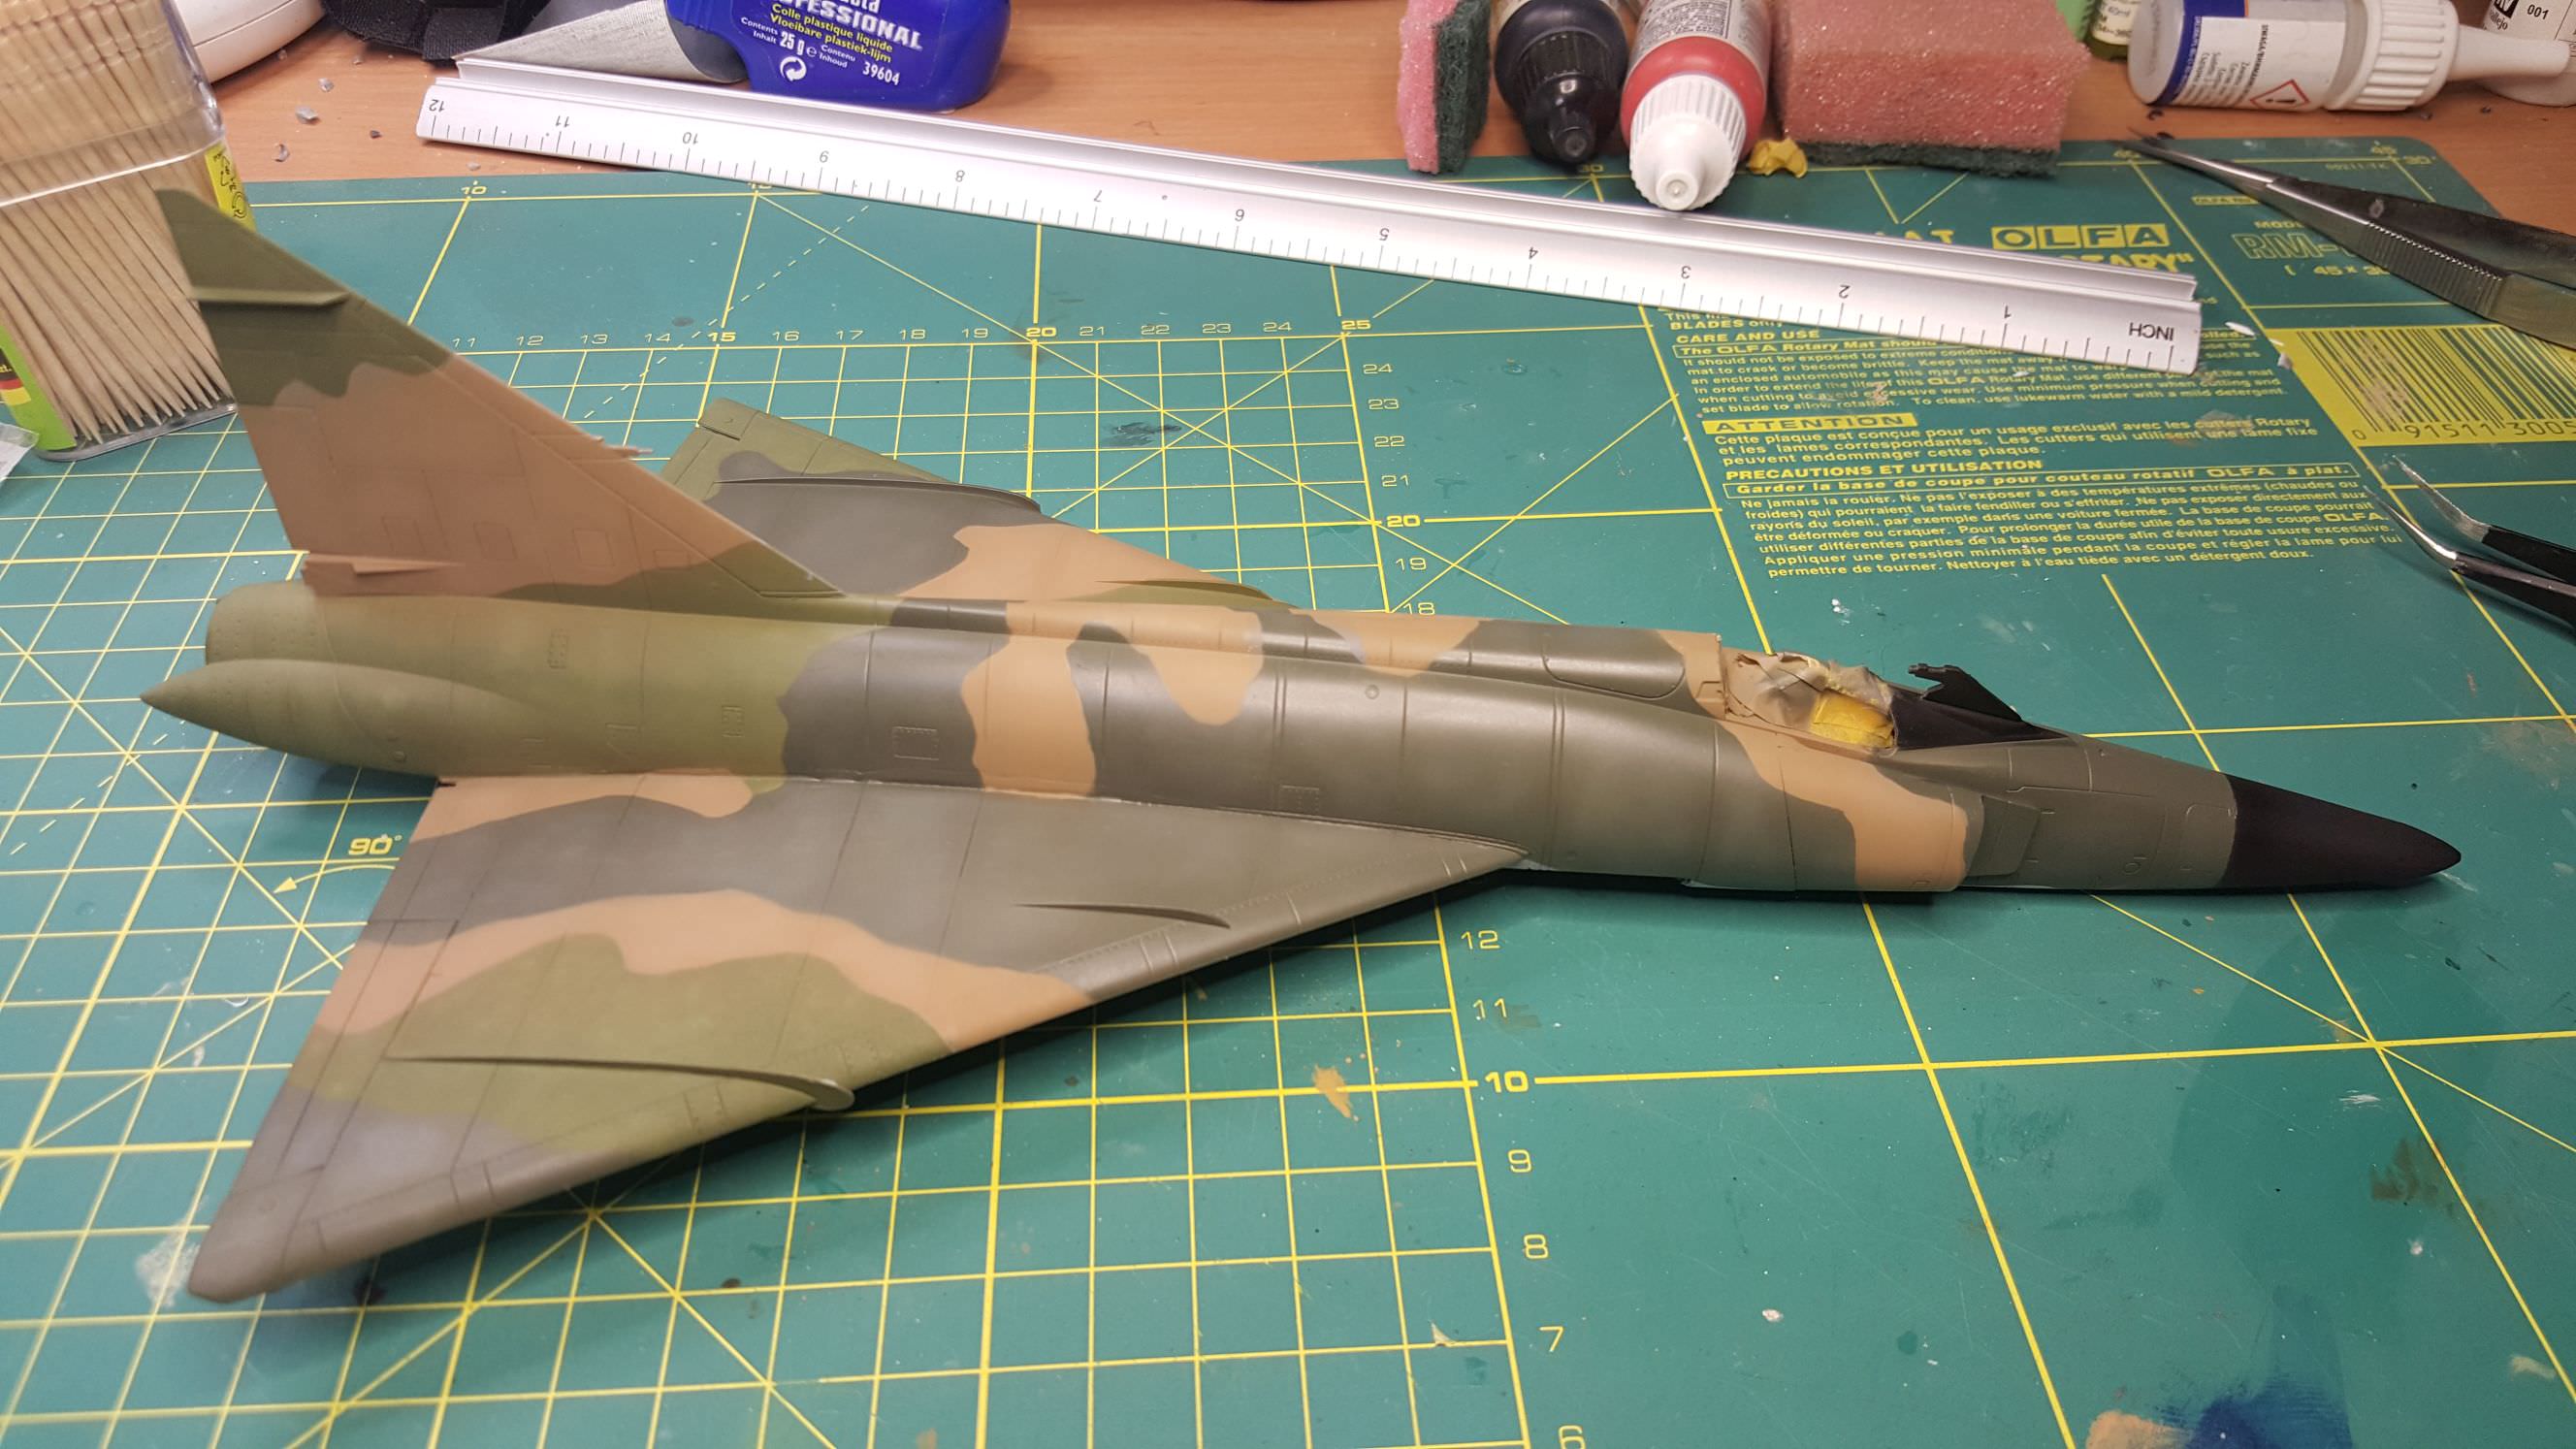
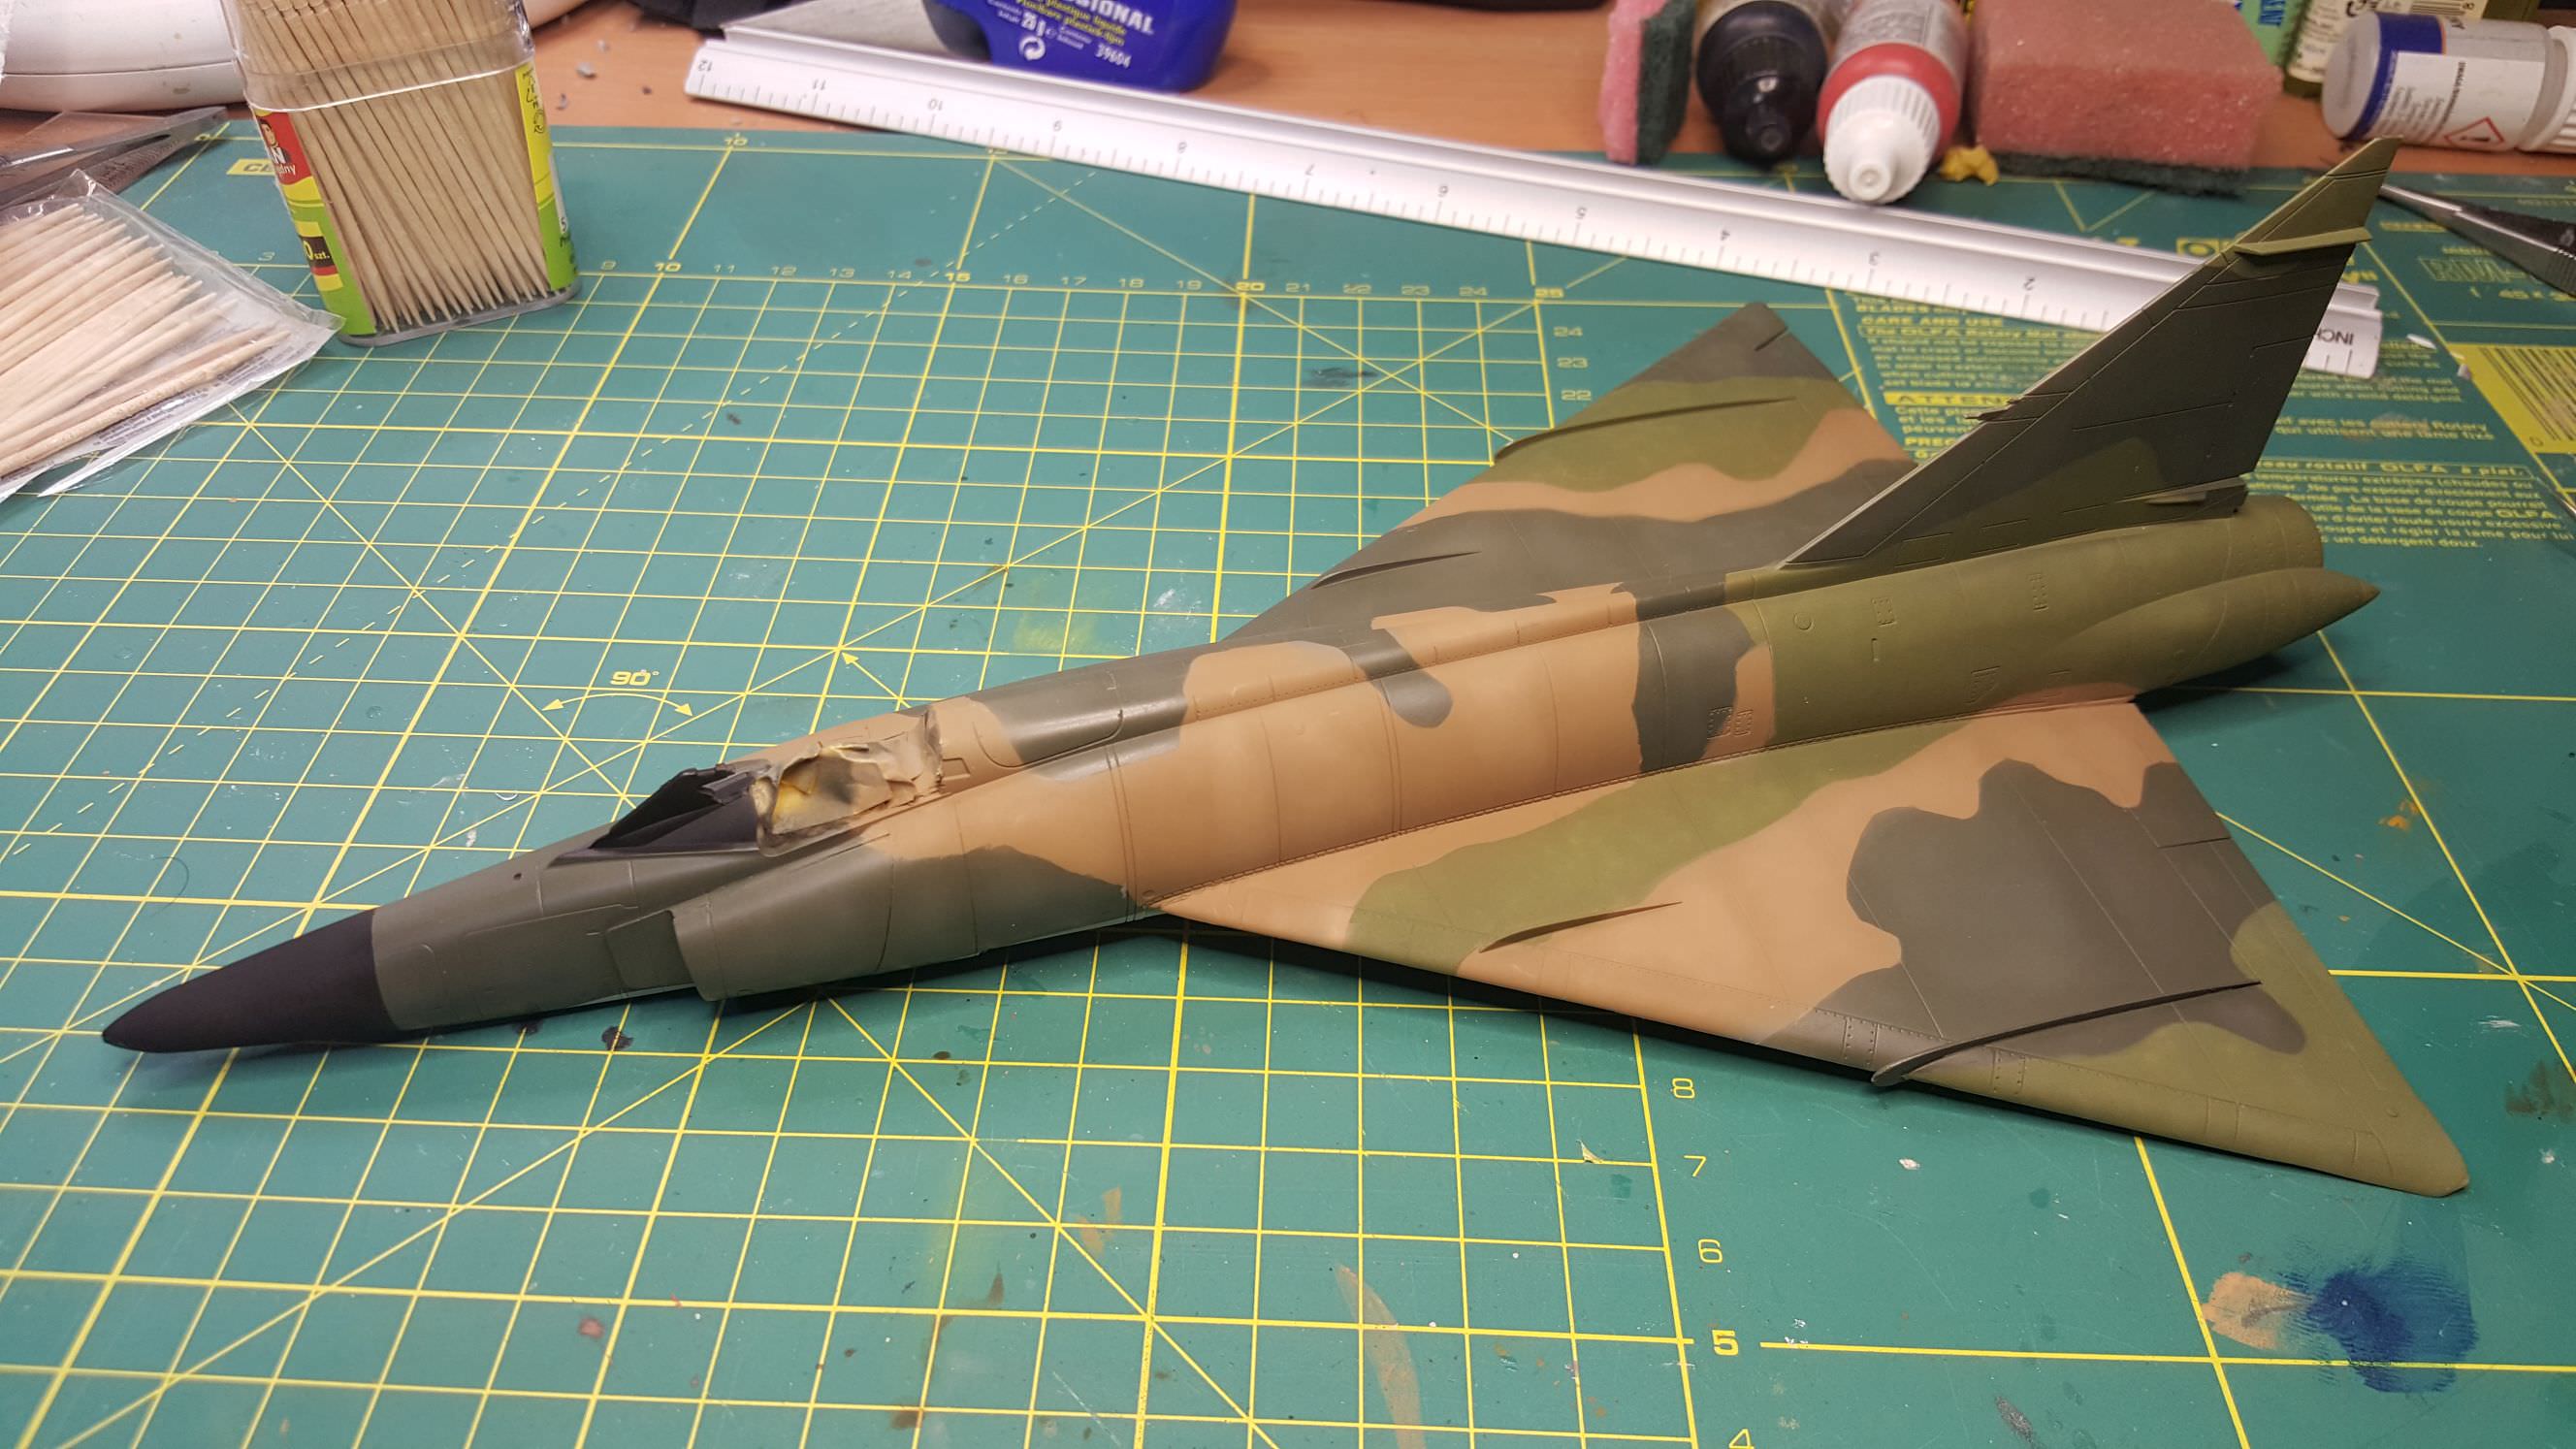
Next I will correct remaining flaws in camo and then varnish seal for decals
CHeers,
Radek
after a while I've managed to get some progress on F-102.
It's now all painted in 3-tonal camo.
Paints used:
Gunze H315 - Gray FS16440
Gunze H310 - Brown FS 30219
Gunze H309 - Green FS 34079
Gunze H303 - Green FS 34102
In addition White & Black from Tamiya to make some tonal variation.
Still need to make some retouches as the coverage isn't good in some places (you can see primer here and there).
Here are some pics:
Next I will correct remaining flaws in camo and then varnish seal for decals
CHeers,
Radek

JClapp
#259
Joined: October 23, 2011
KitMaker: 2,265 posts
AeroScale: 1,715 posts

Posted: Monday, November 20, 2017 - 02:31 AM UTC
Quoted Text
Stick a fork in this one.
Is there a campaign gallery I should load these to?
knowing what you had to work with I'd say that came out splendid!

 |

WEB HOSTING BY


Copyright ©2021 AeroScale and Kitmaker Network, a subsidiary of Silver Star Enterprises
All Rights Reserved. Please read our Conditions of Use and Privacy Policy.
All Rights Reserved. Please read our Conditions of Use and Privacy Policy.