_GOTOBOTTOM
World War II: Great Britain
Aircraft of Great Britain in WWII.
Hosted by Rowan Baylis
De Havilland Mosquito Fb. Mk VI - 1/32 by Tam
elmarriachi
_VISITCOMMUNITY
Baden-Württemberg, Germany
Joined: December 26, 2009
KitMaker: 813 posts
AeroScale: 98 posts
Posted: Monday, February 27, 2017 - 07:42 PM UTC

Hello,

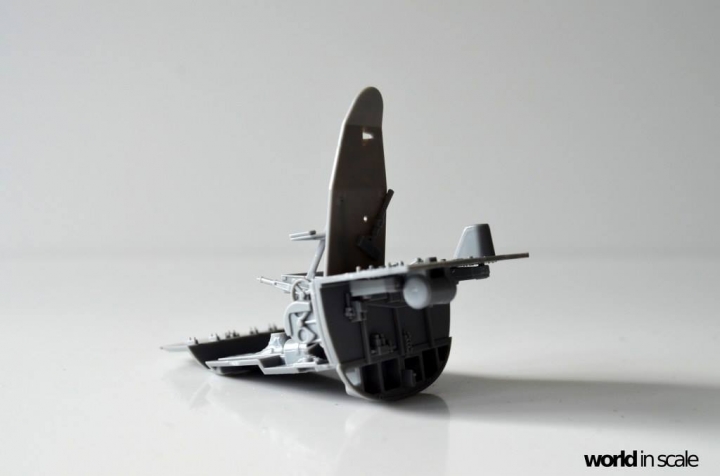
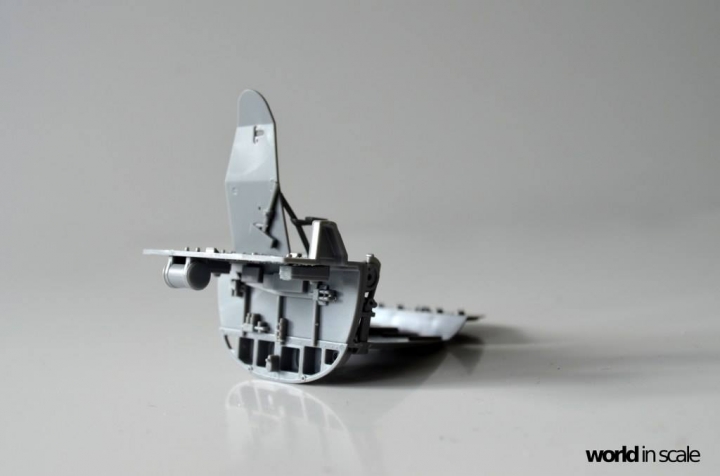
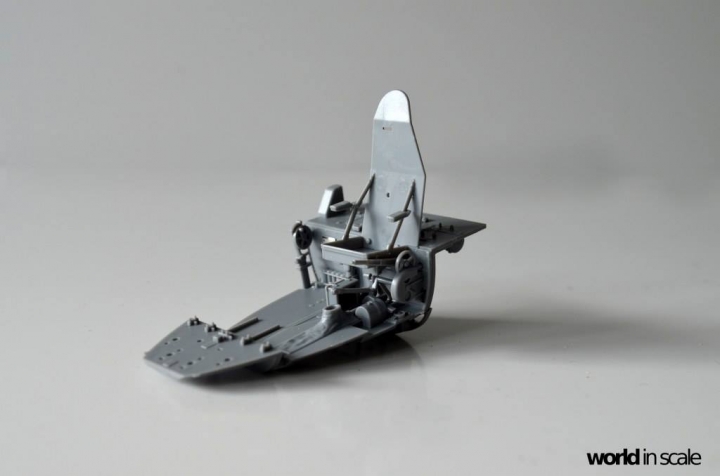
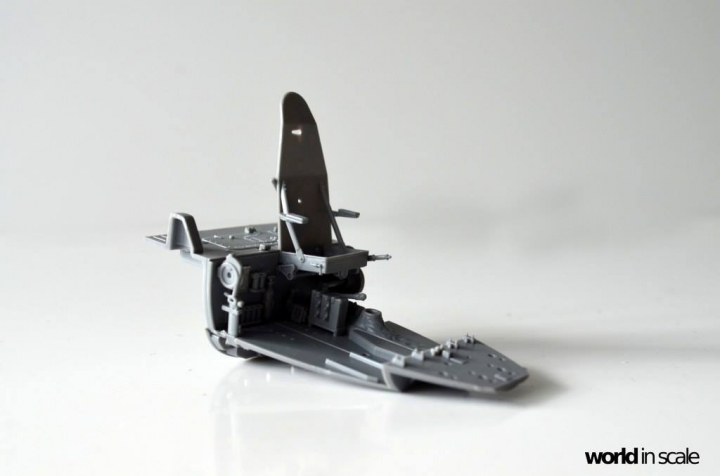
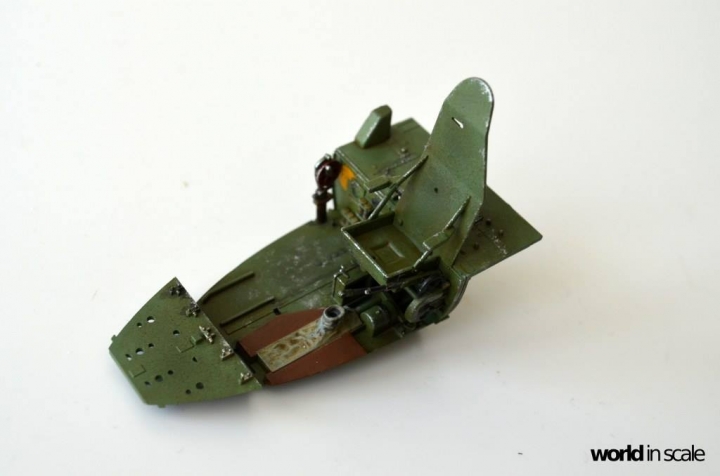
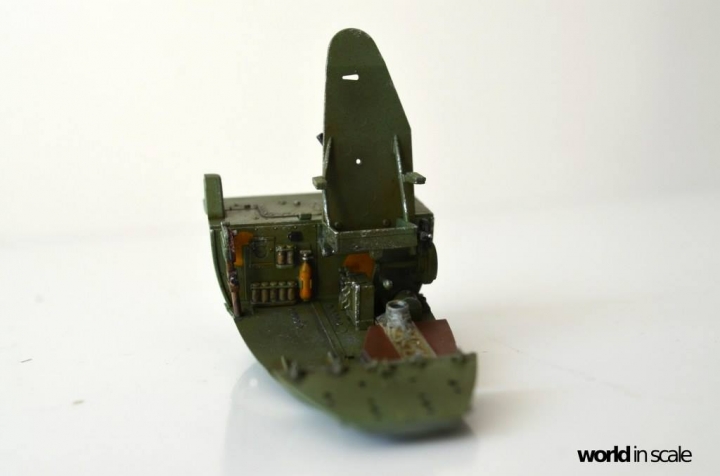
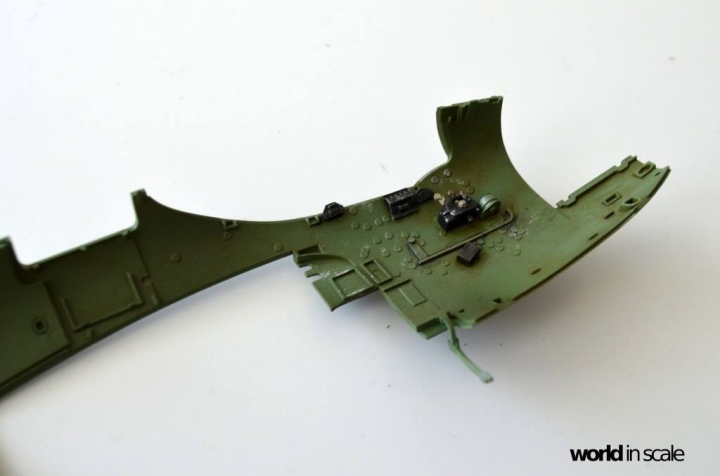
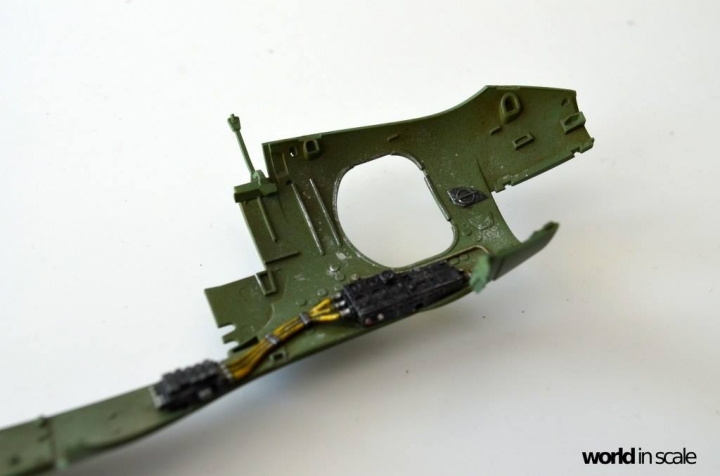
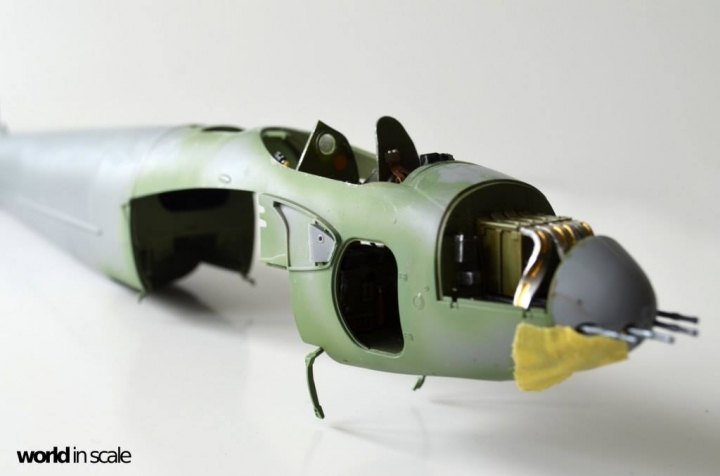
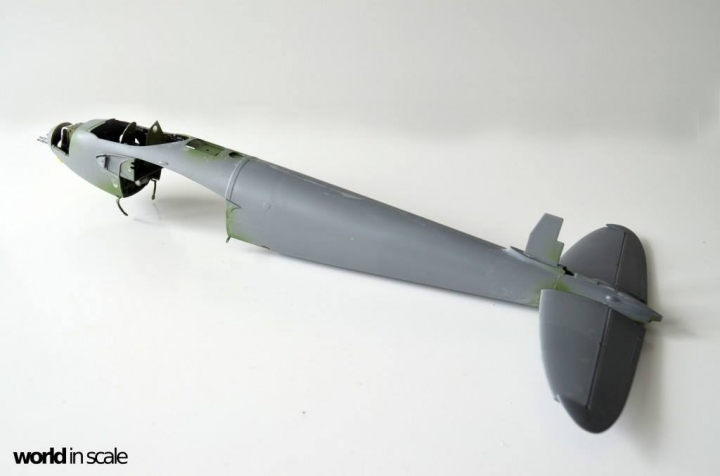
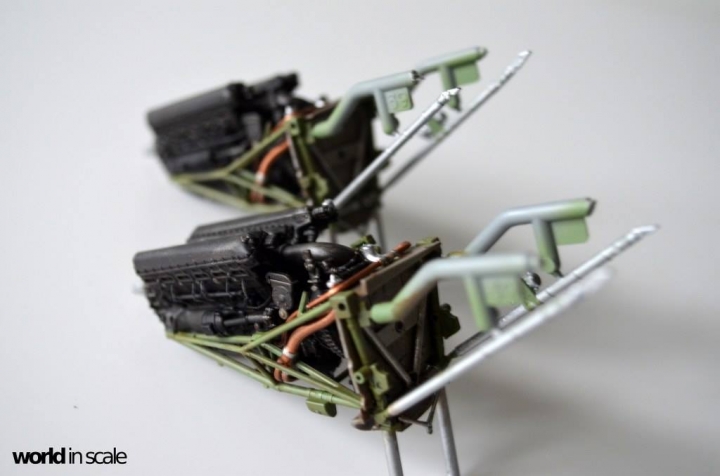
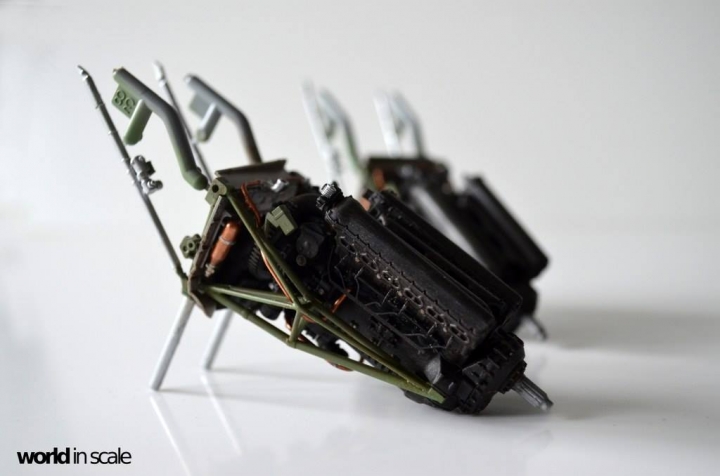
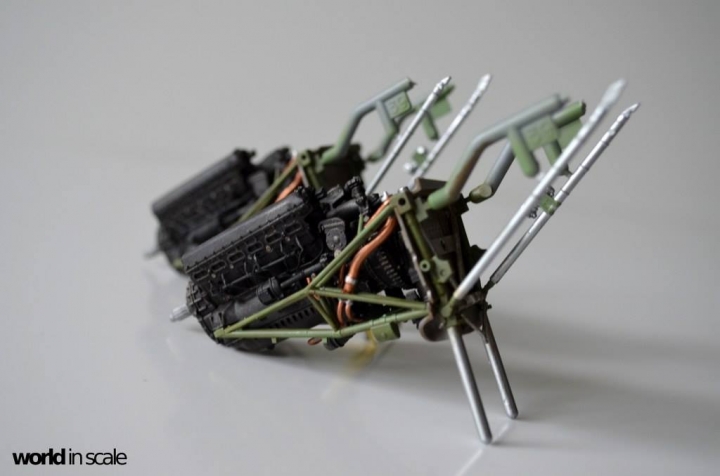
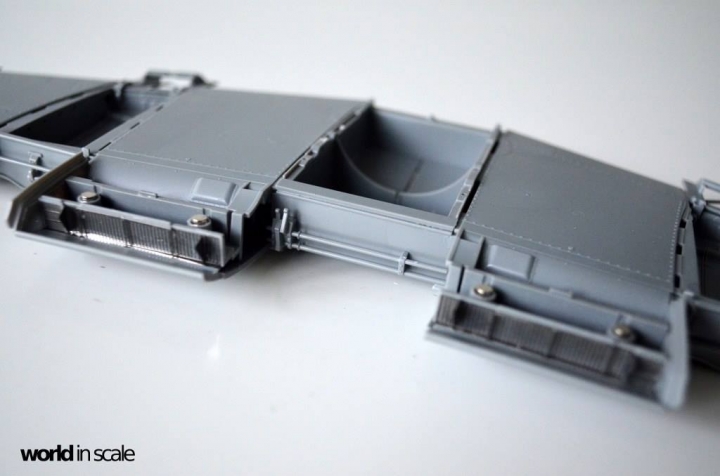
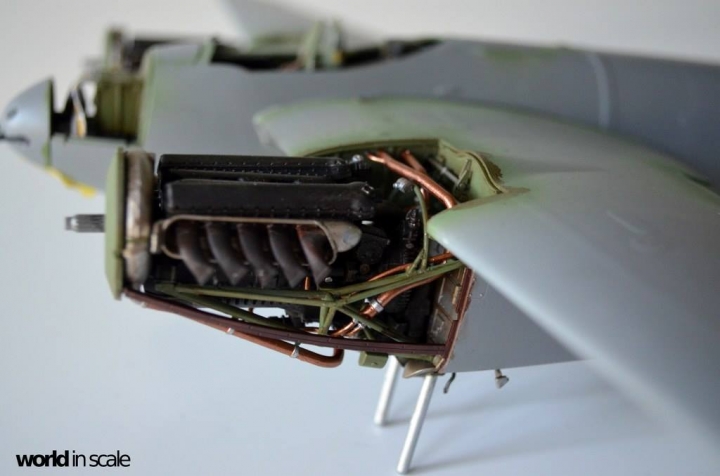
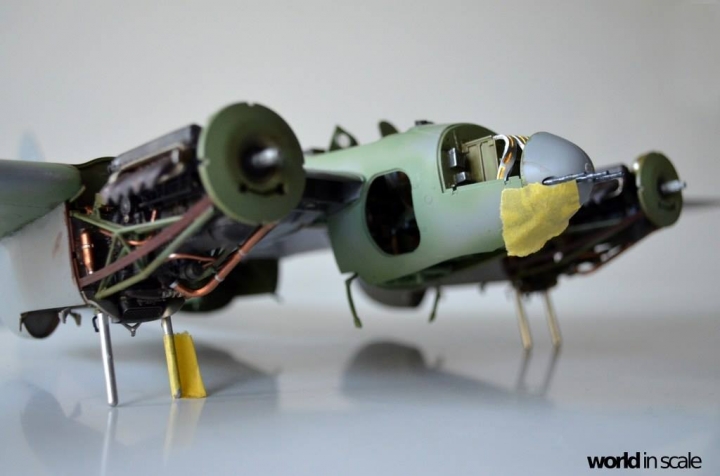
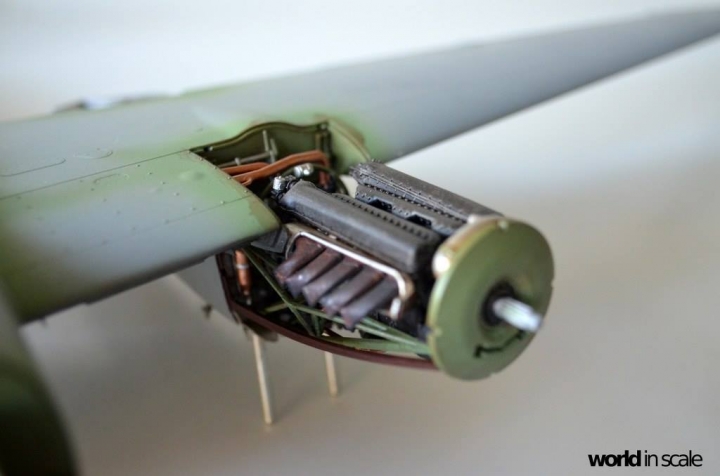
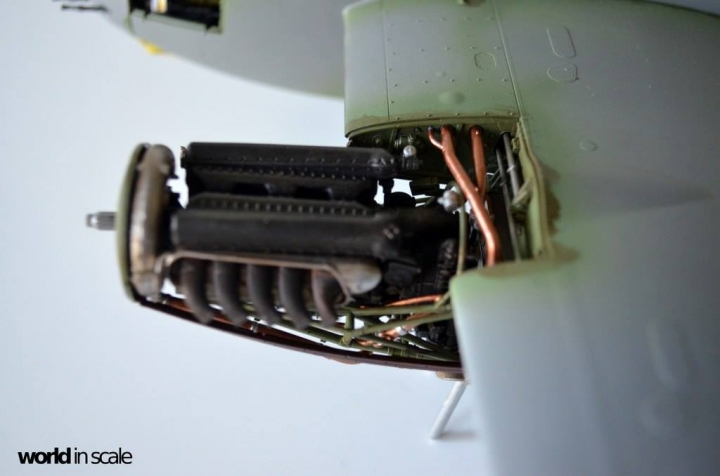
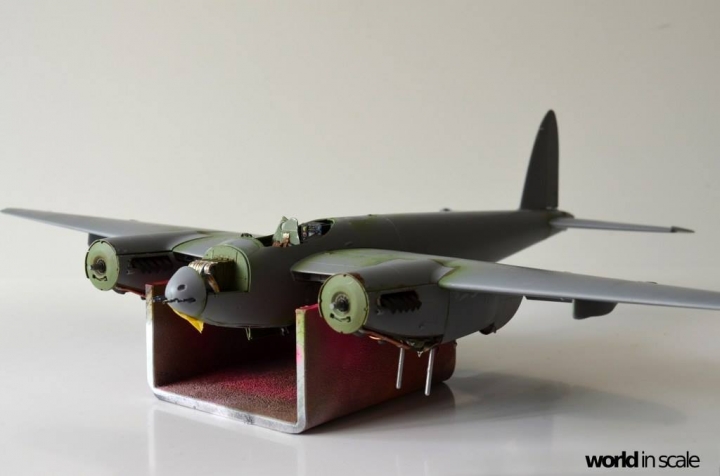
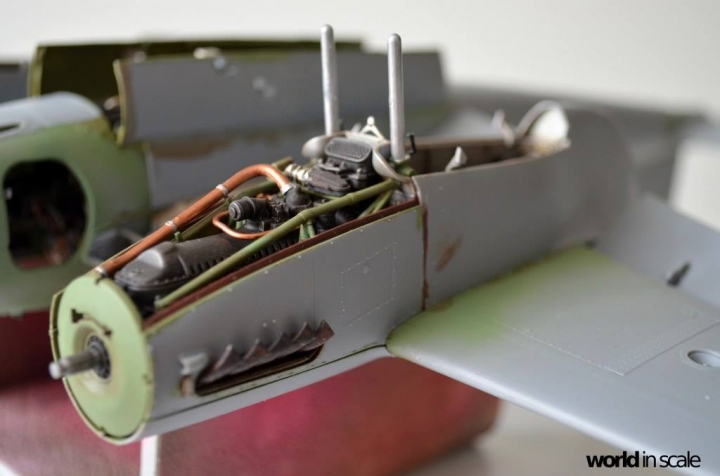
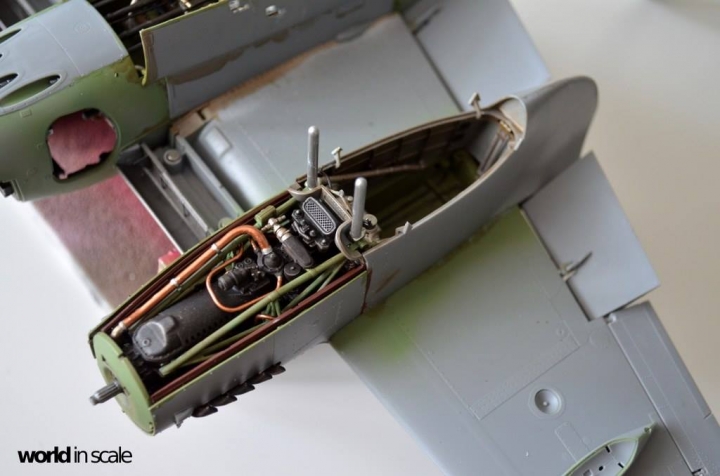
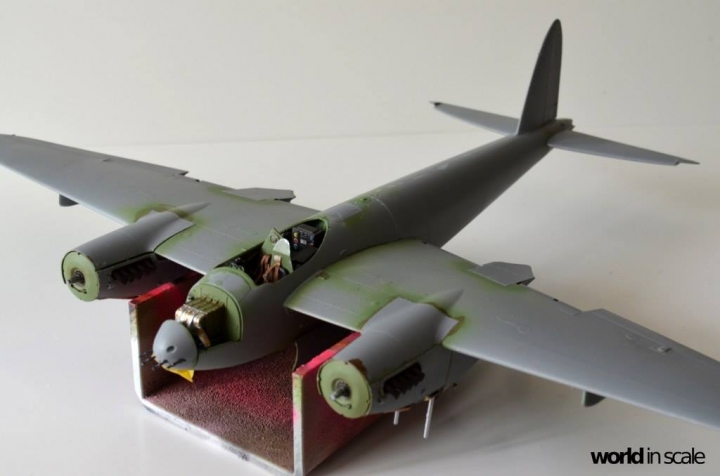
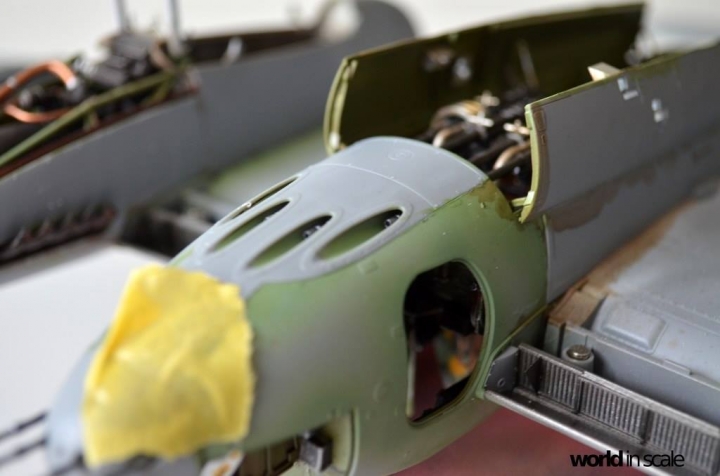
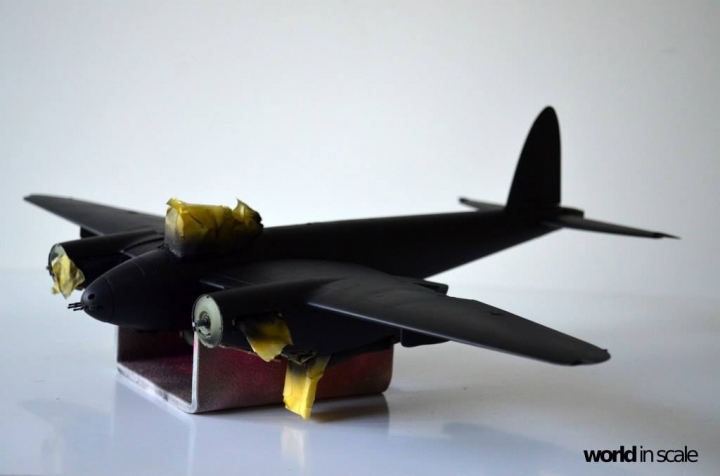
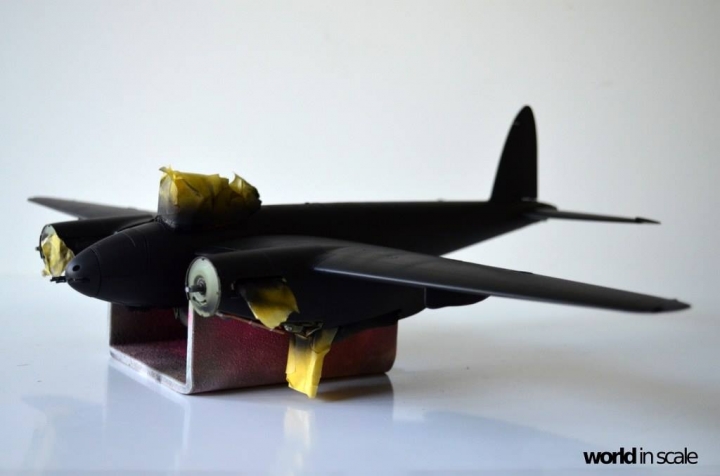
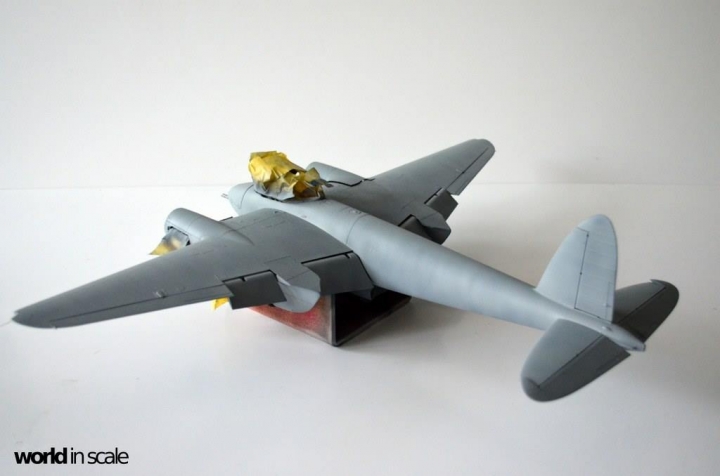
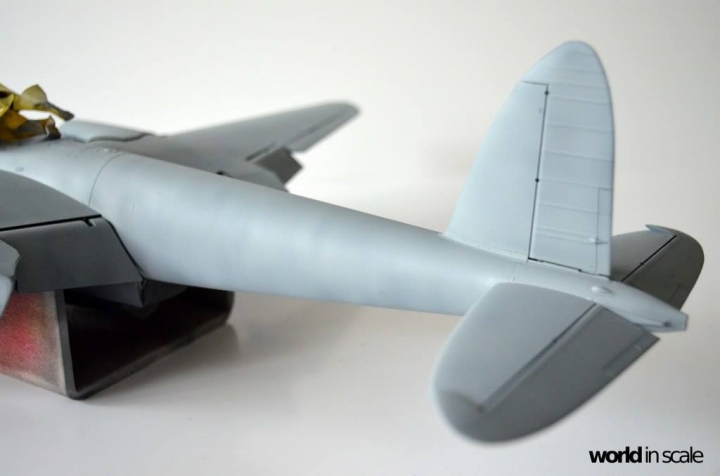
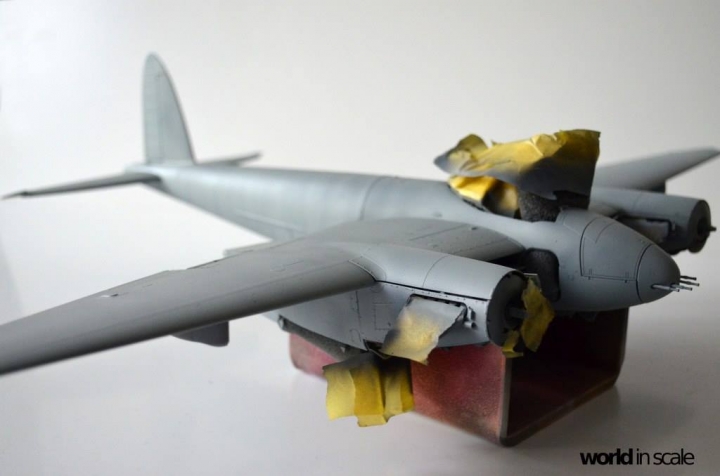
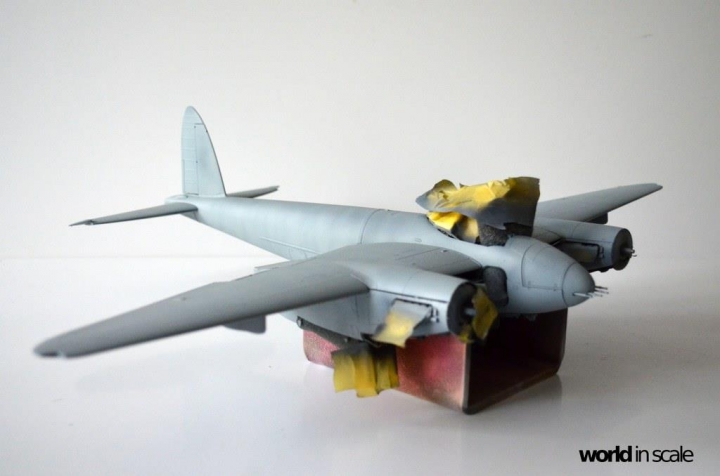
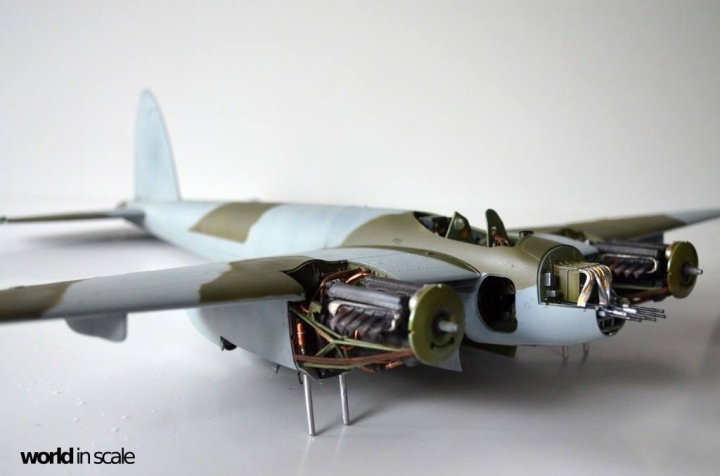
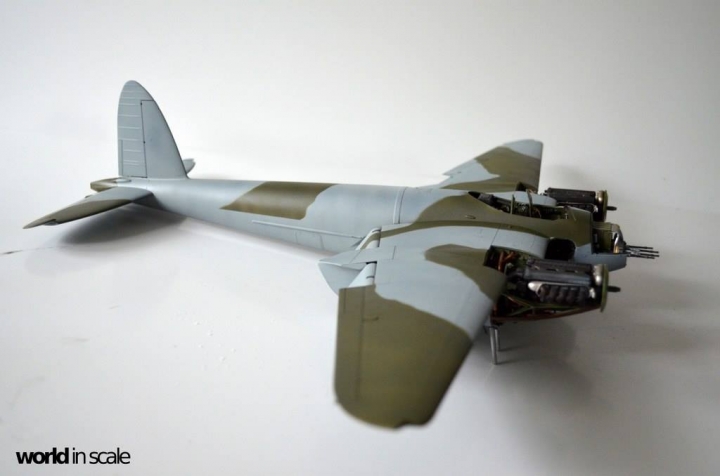
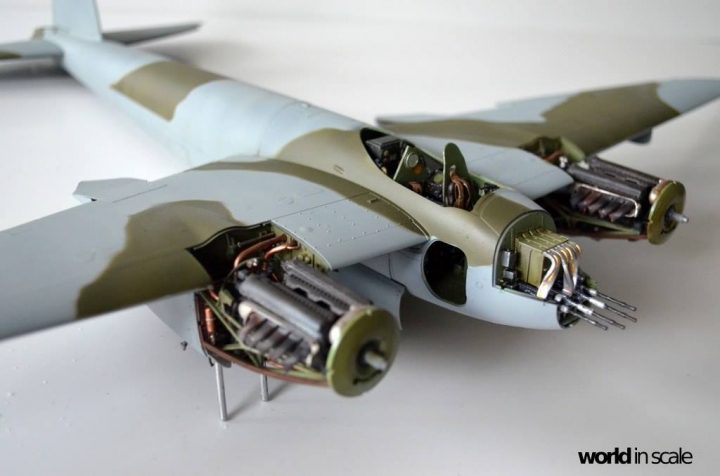
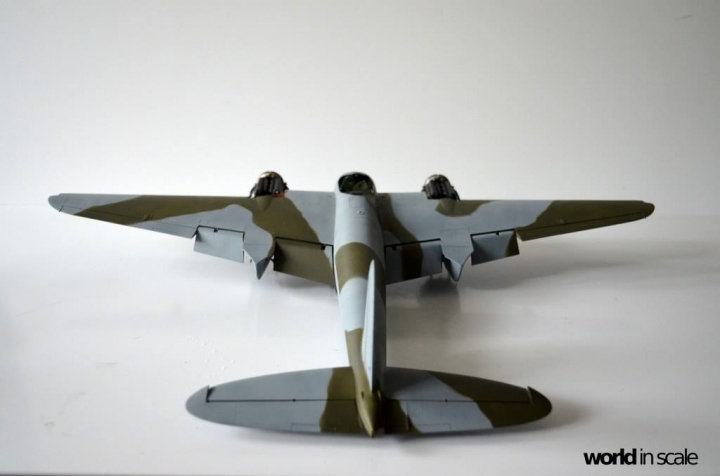
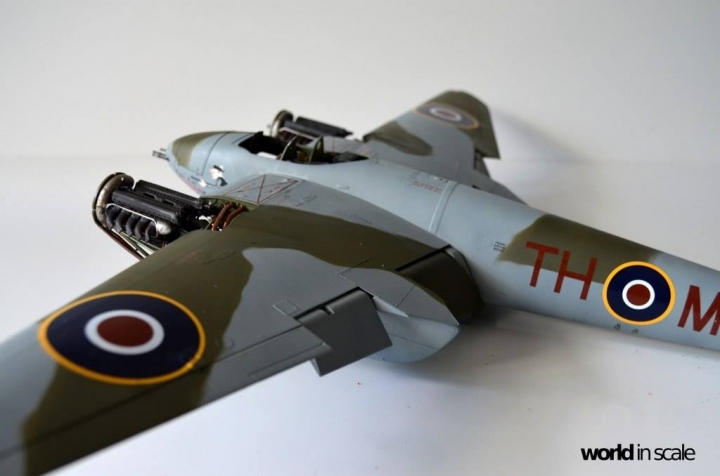
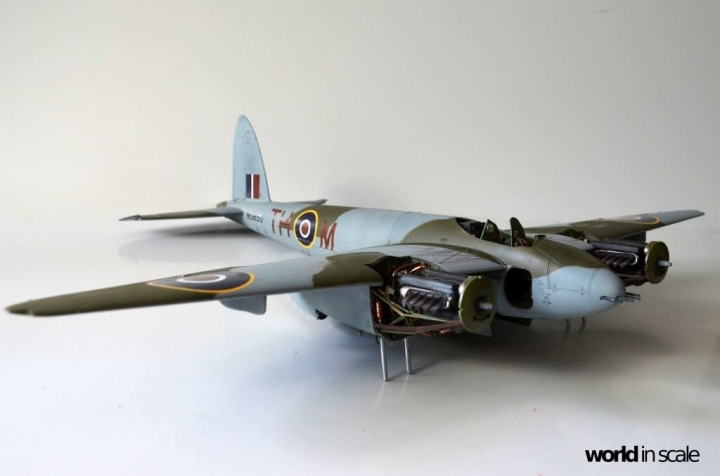
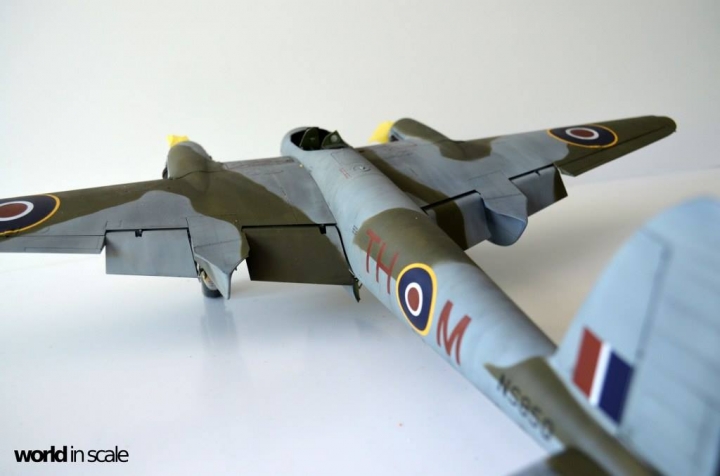
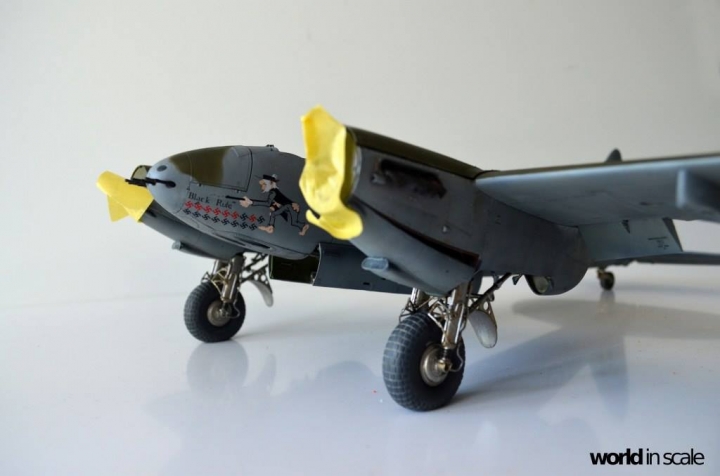
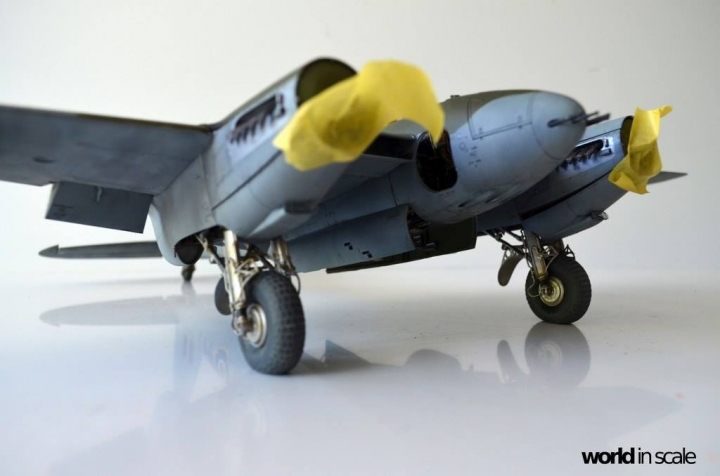
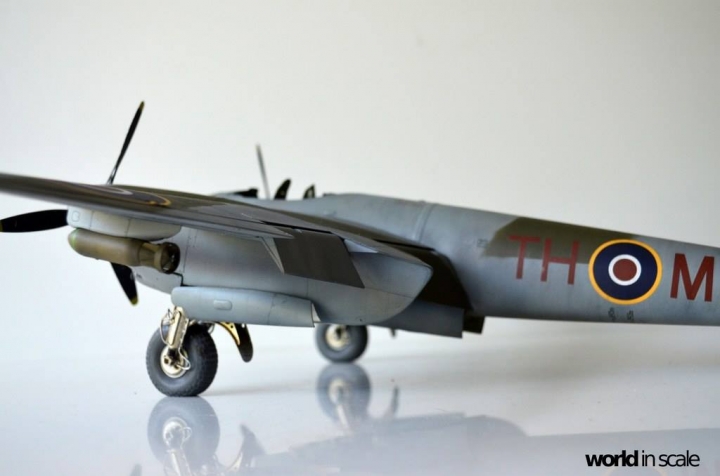
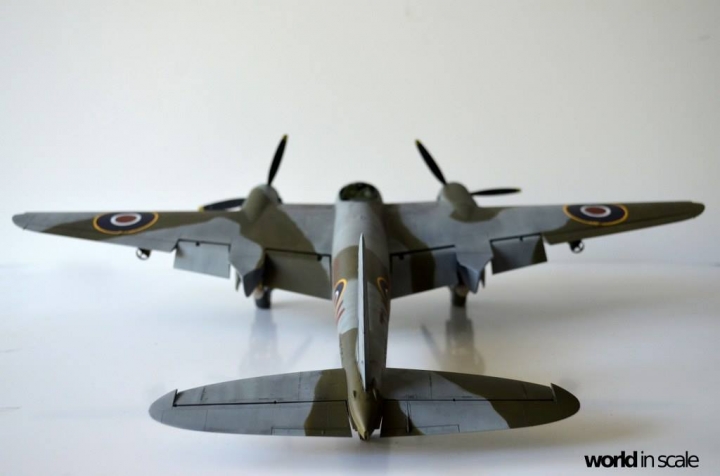
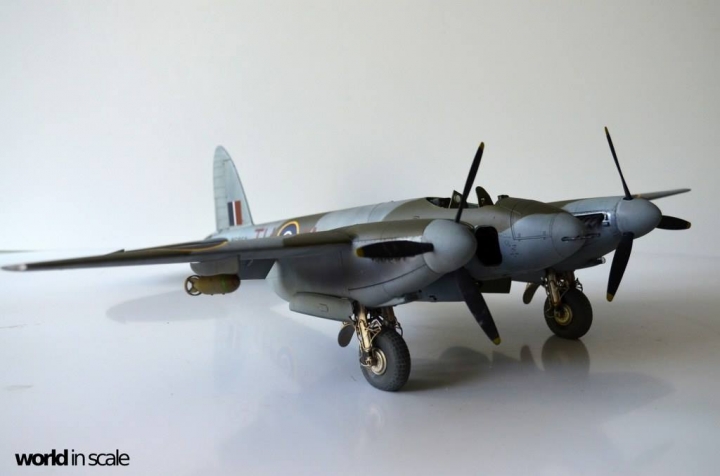
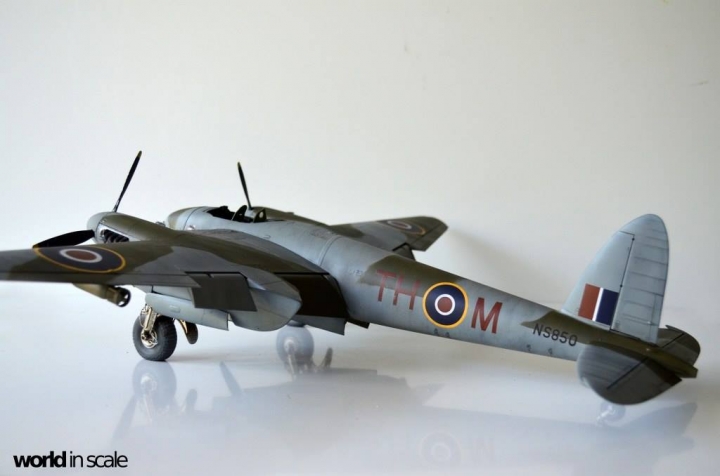
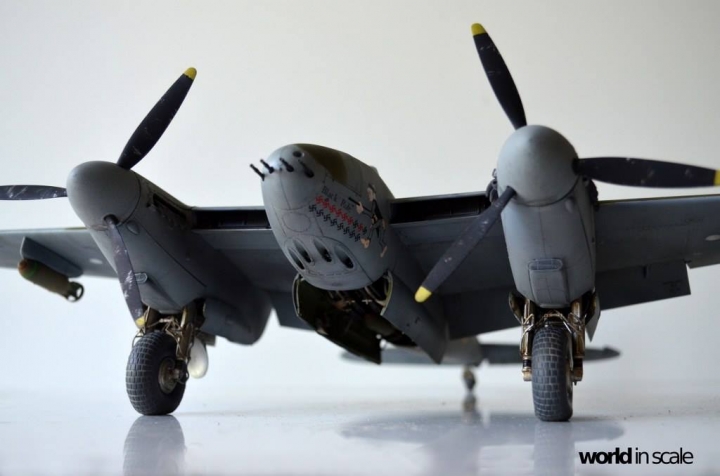
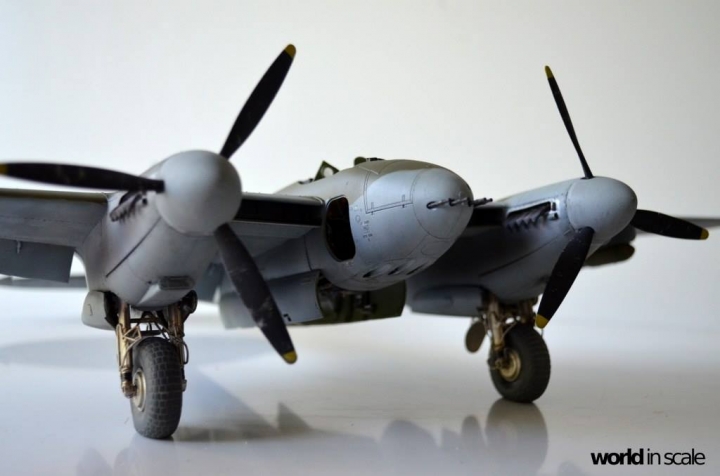
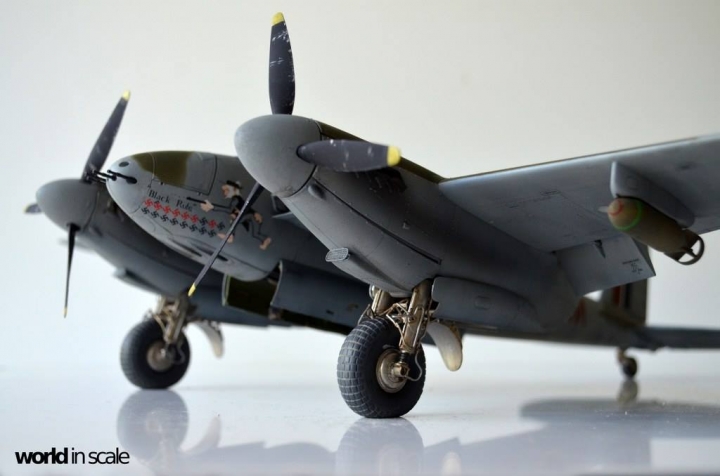
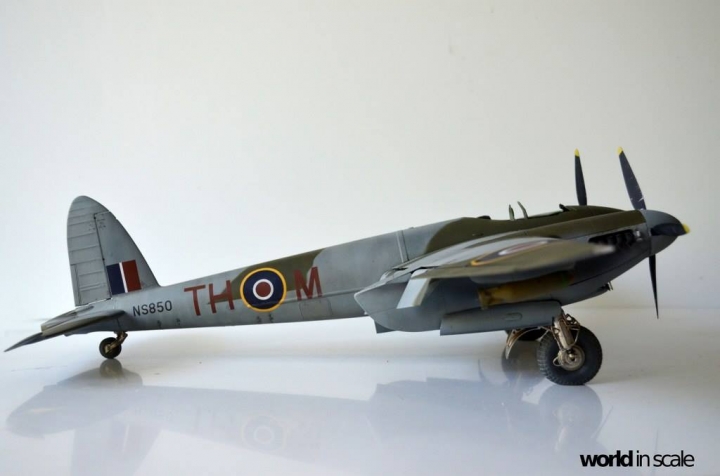
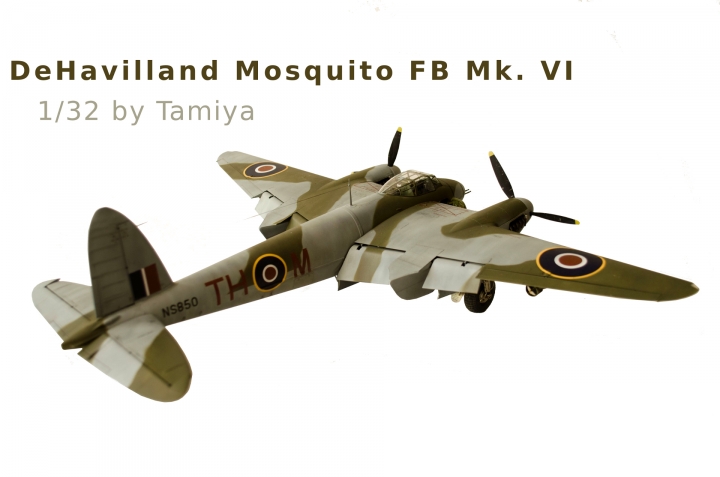
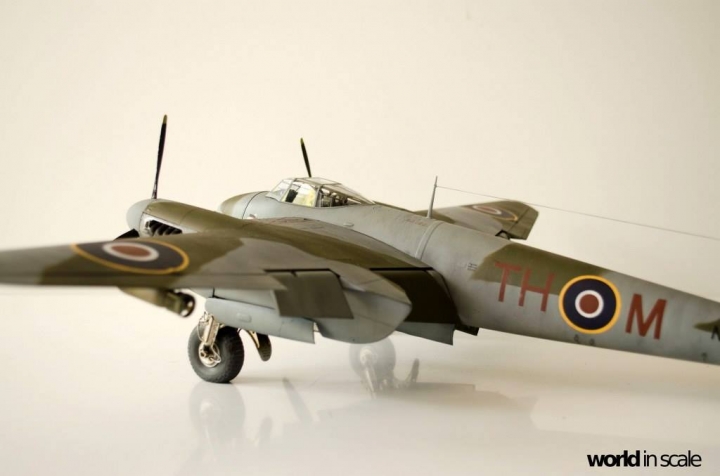
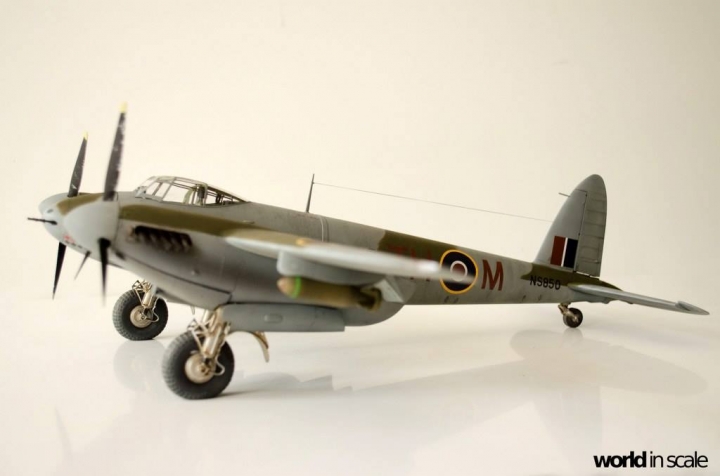
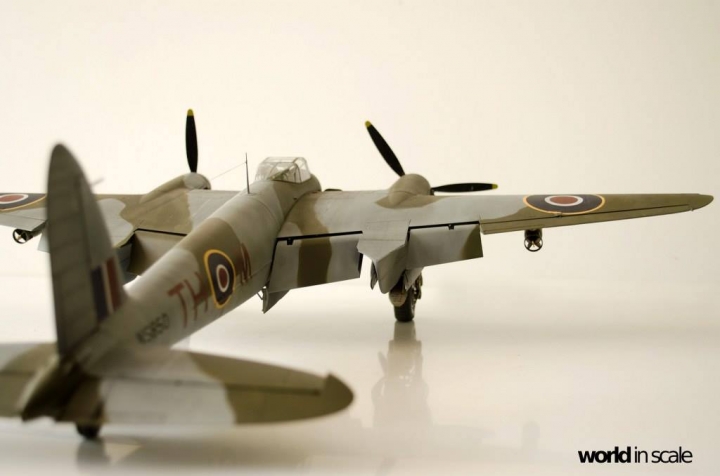
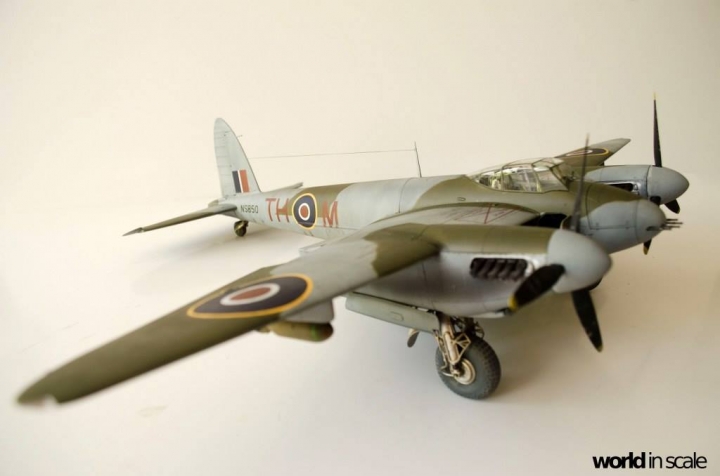
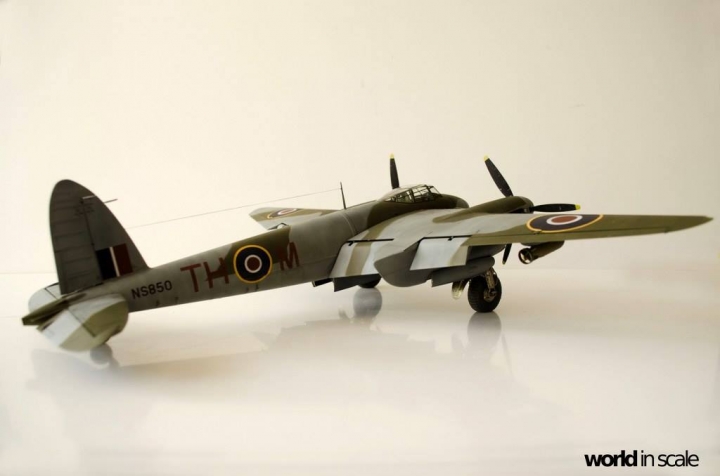
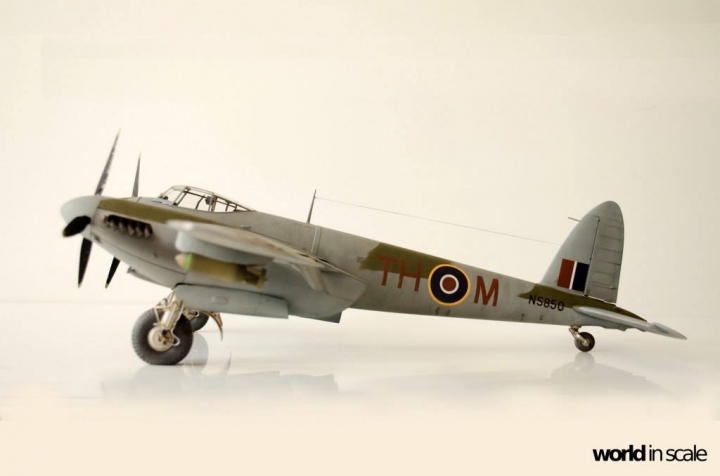
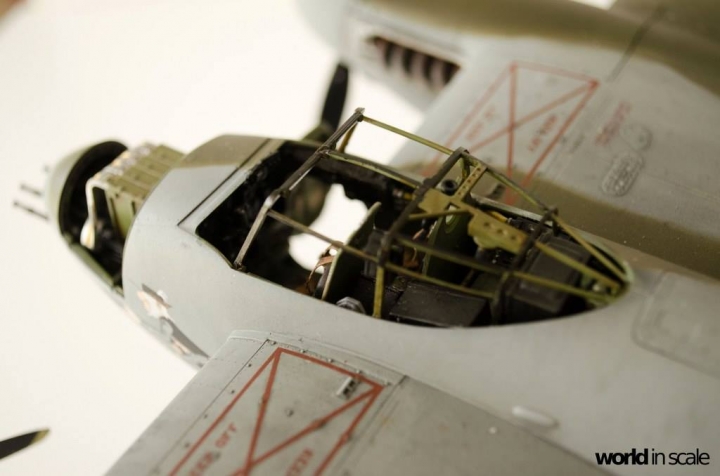
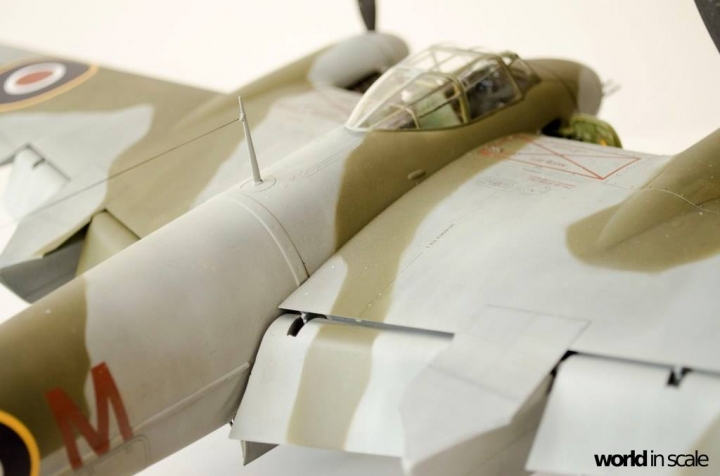
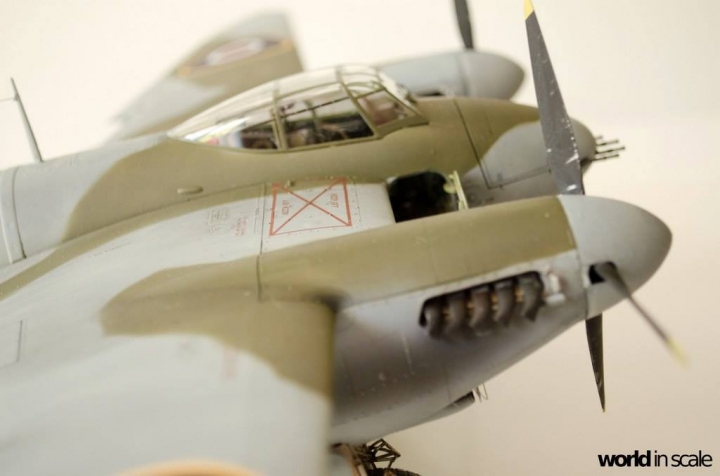
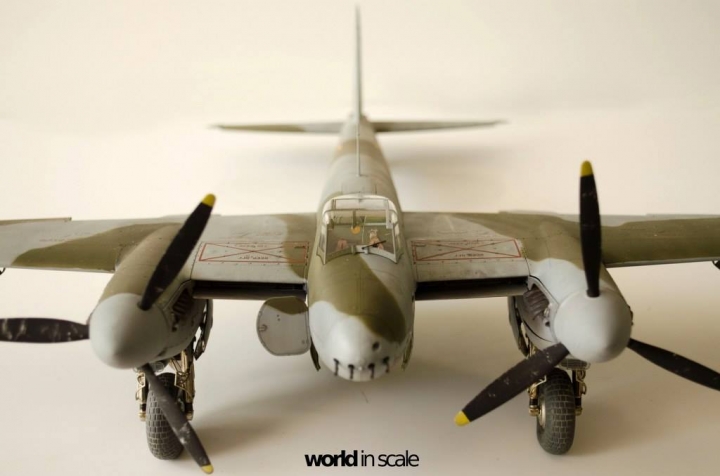
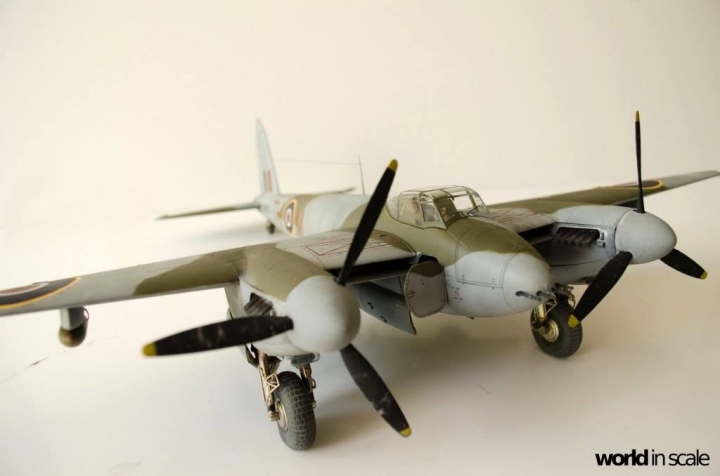
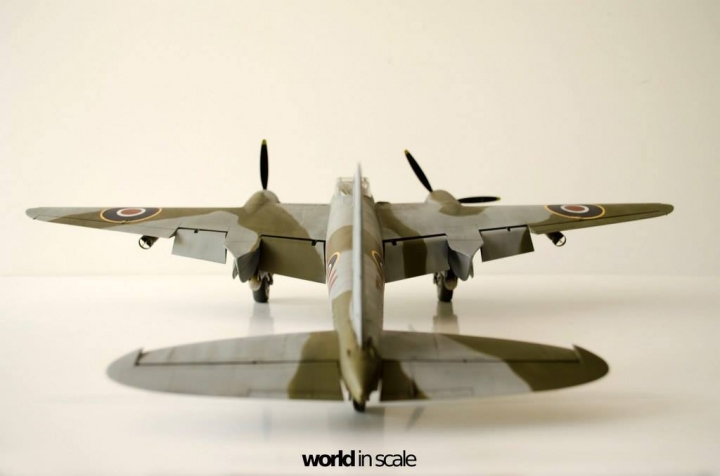
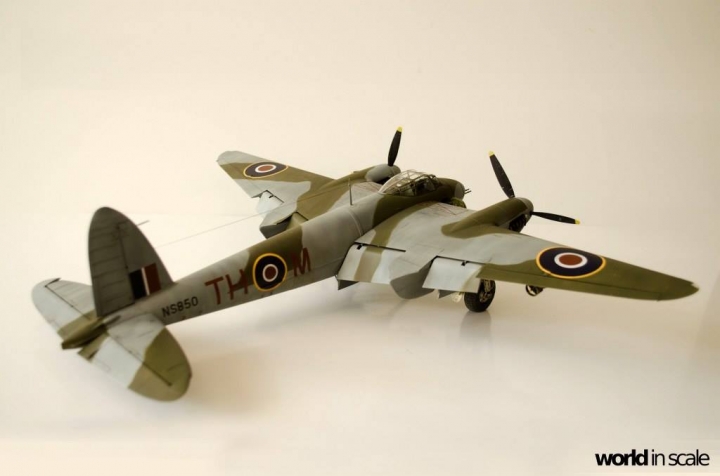
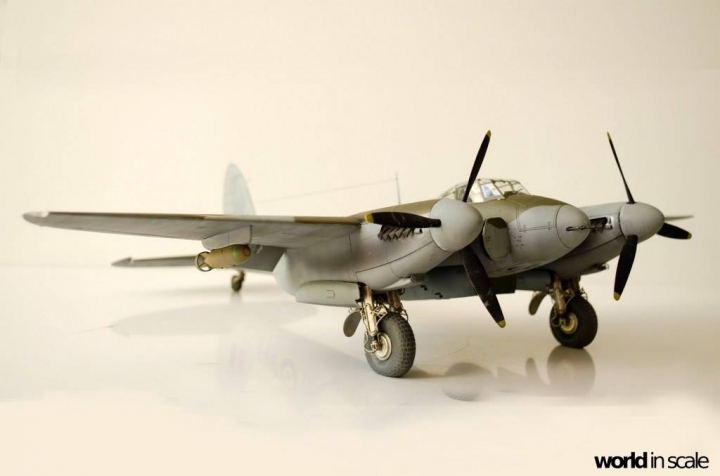
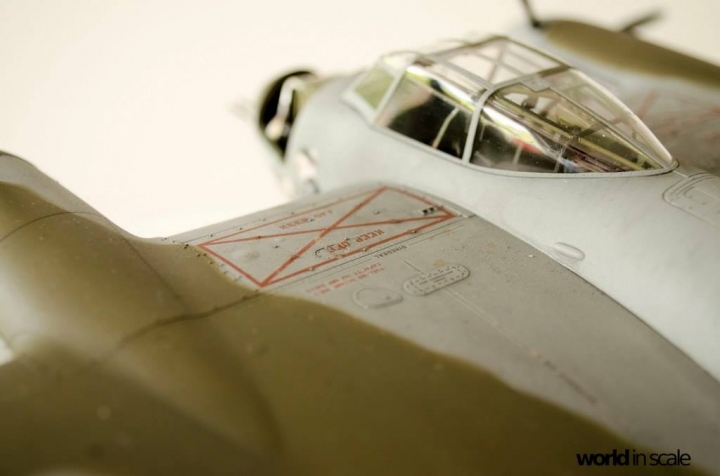
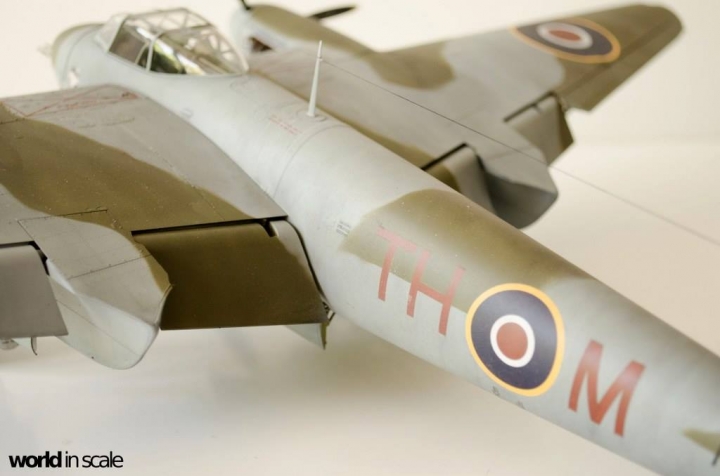
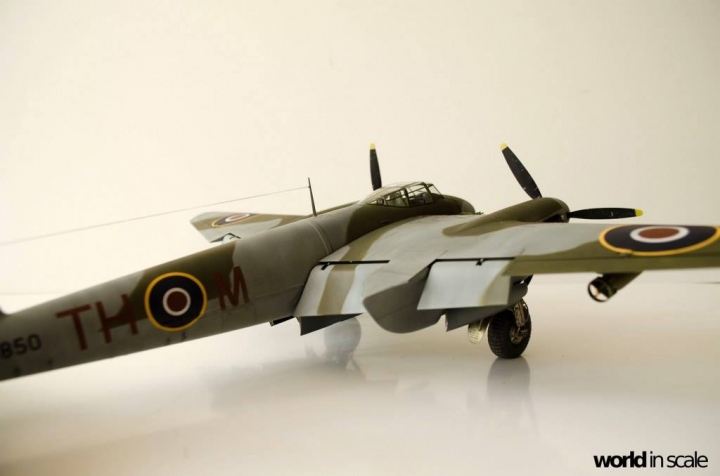
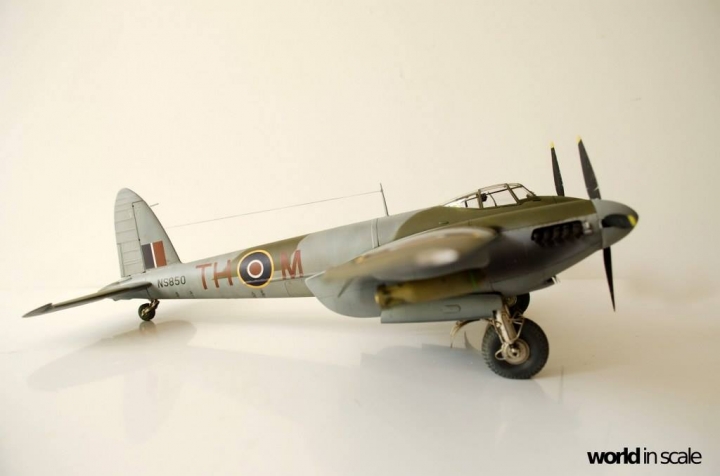
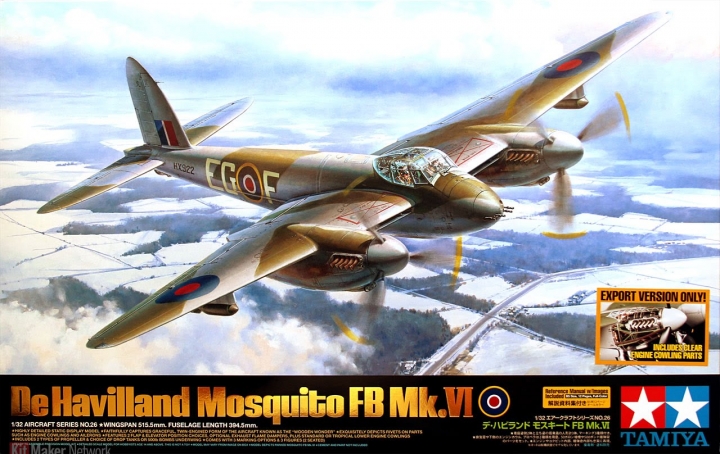
this is my new project: Tamiya's wonderful kit of the De Havilland Mosquito Fb. MK VI in big scale 1/32.

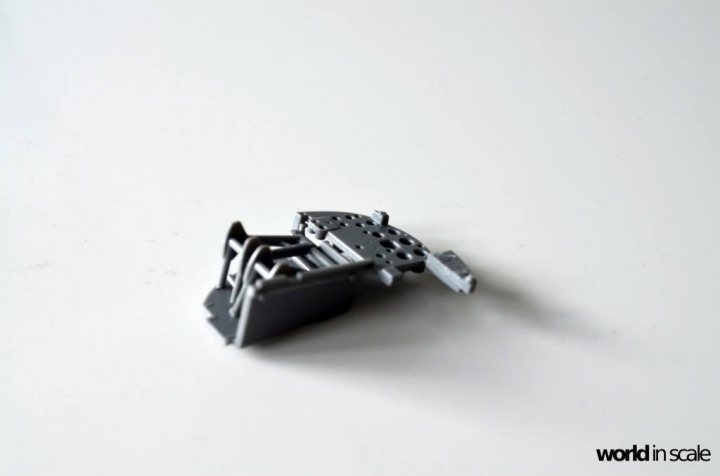
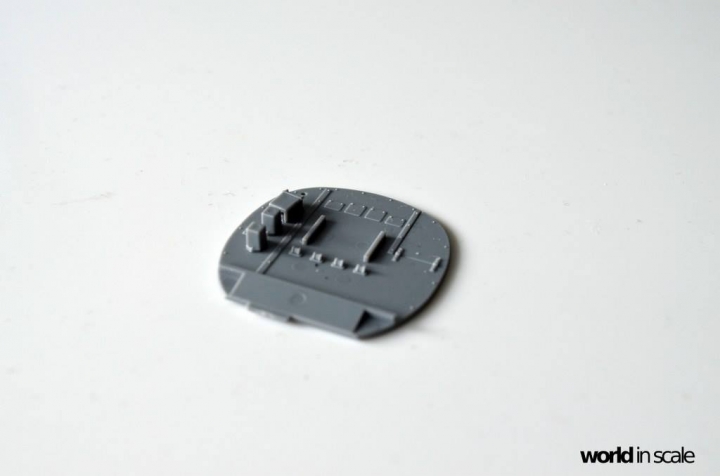
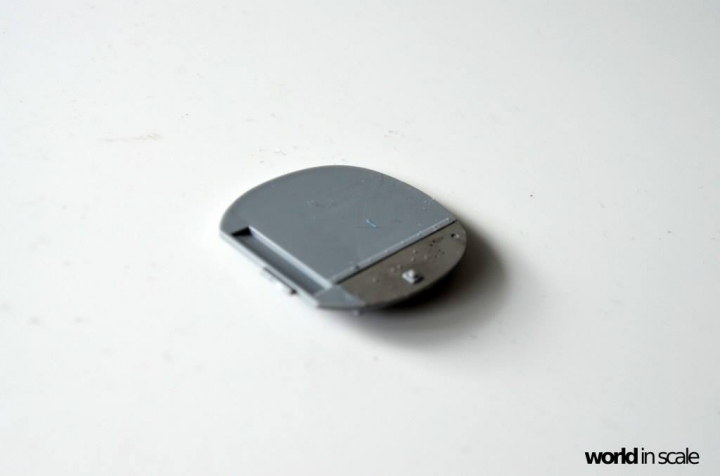
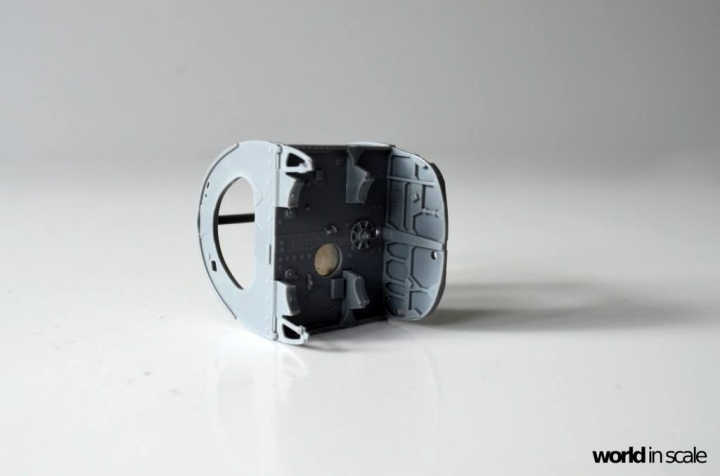
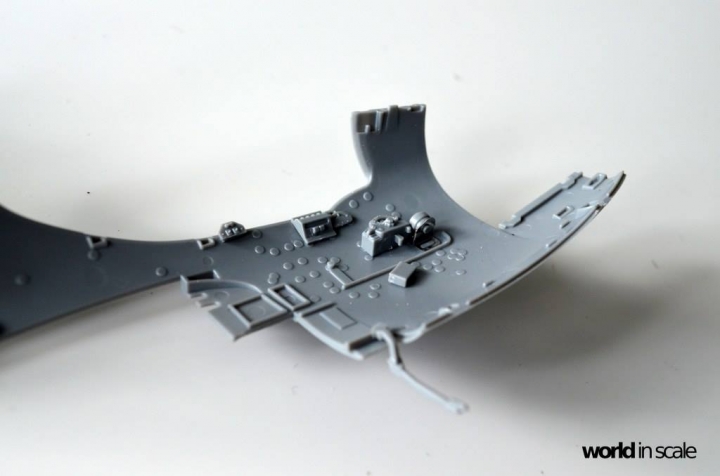
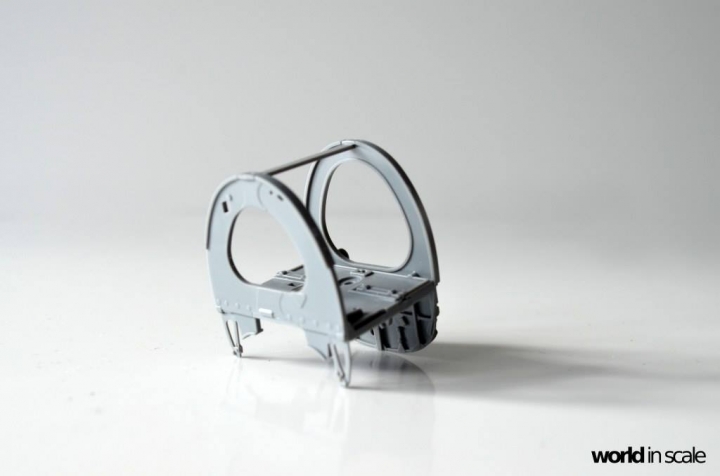
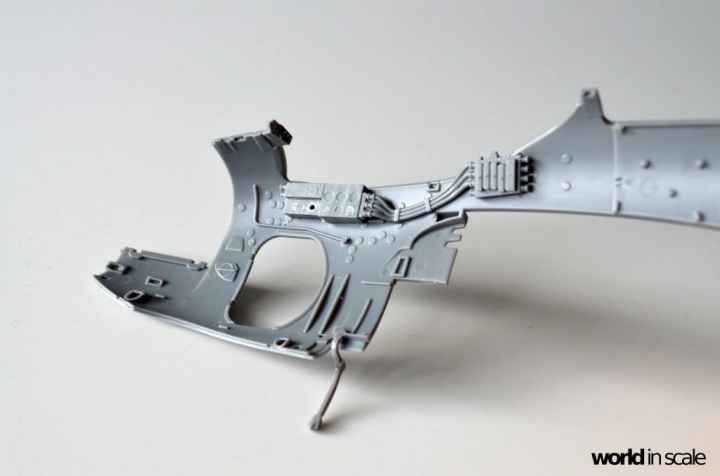
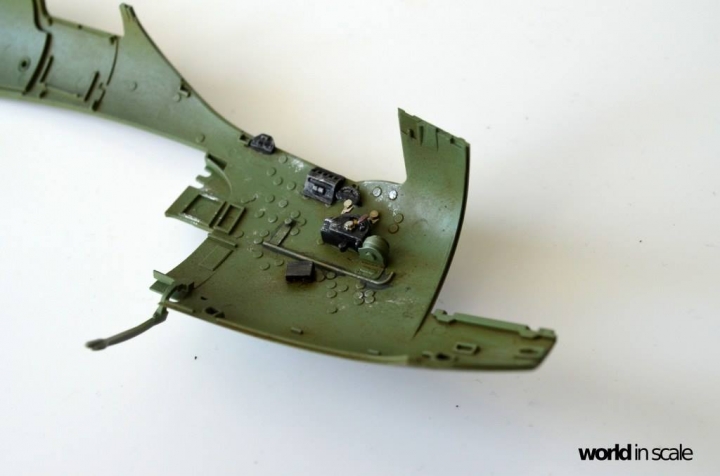
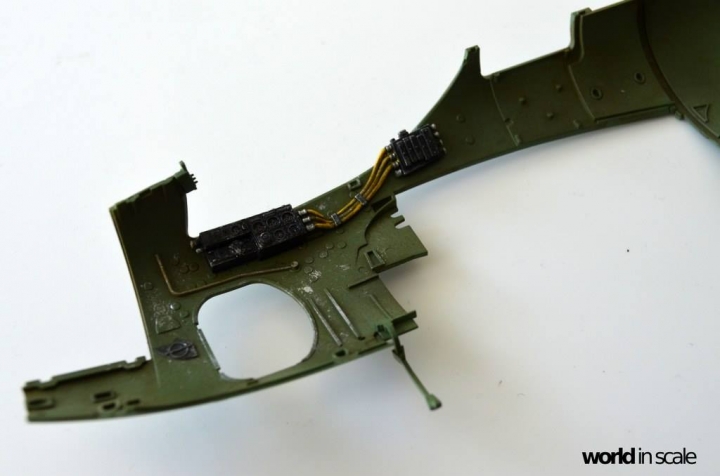
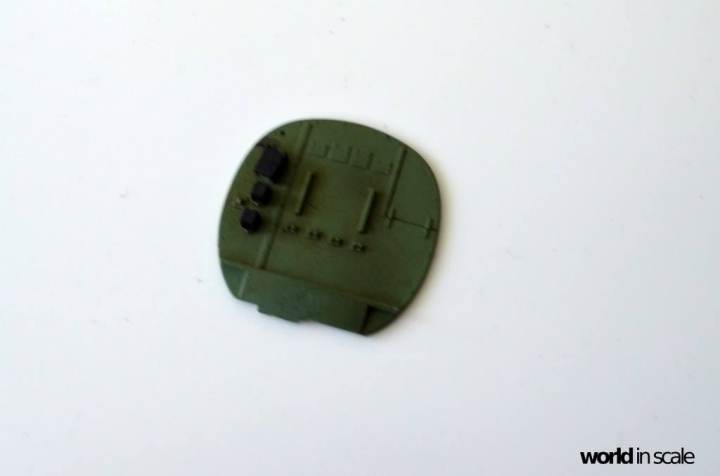
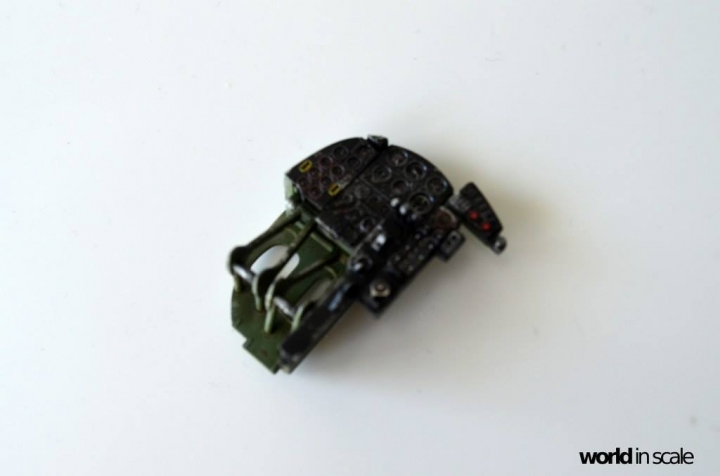
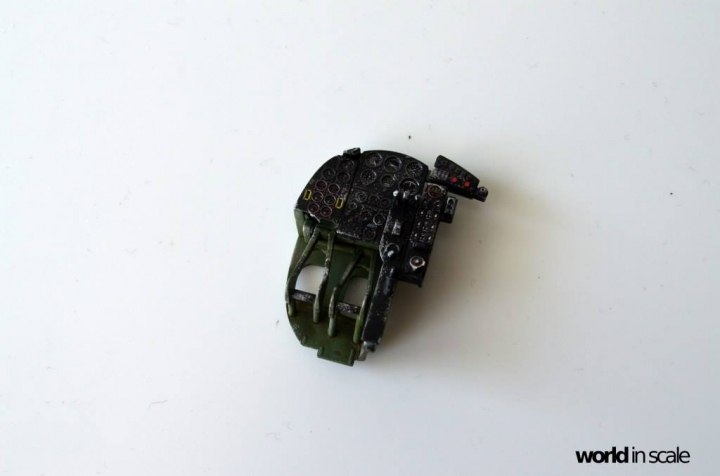
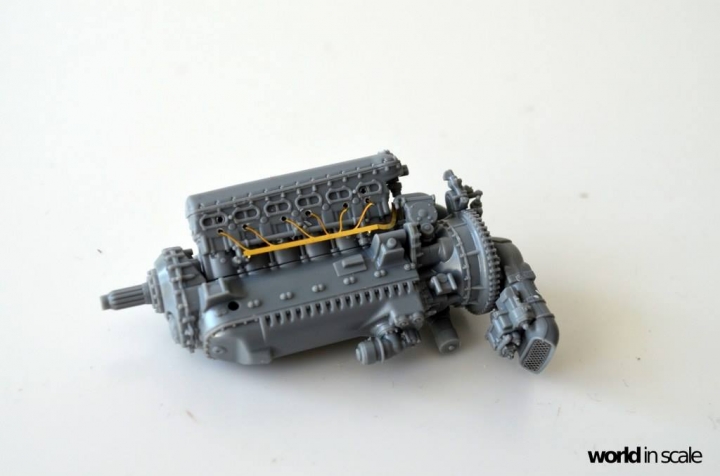
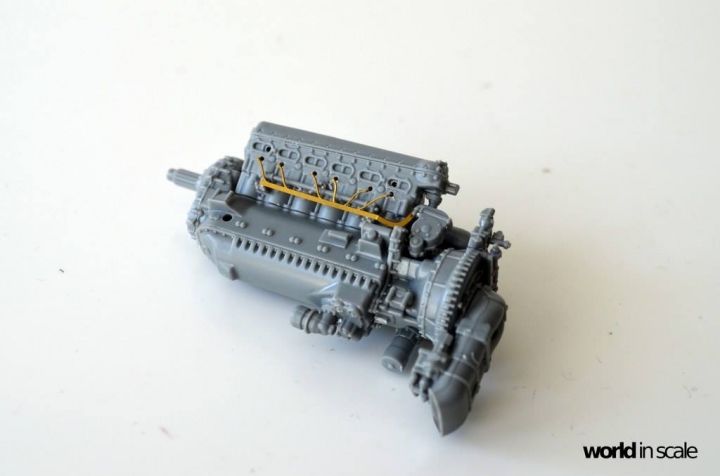
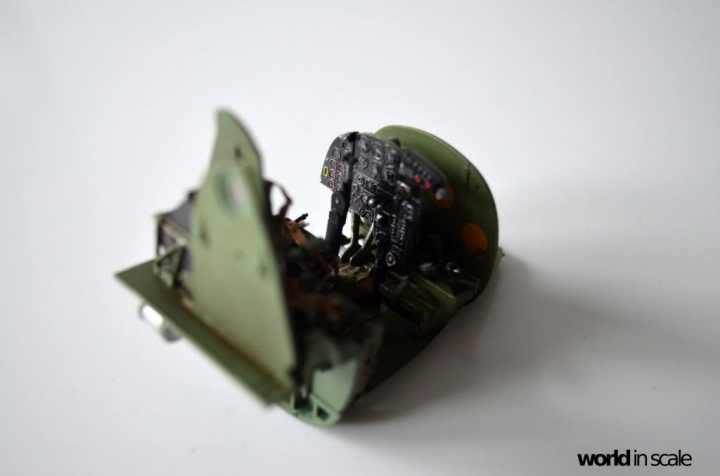
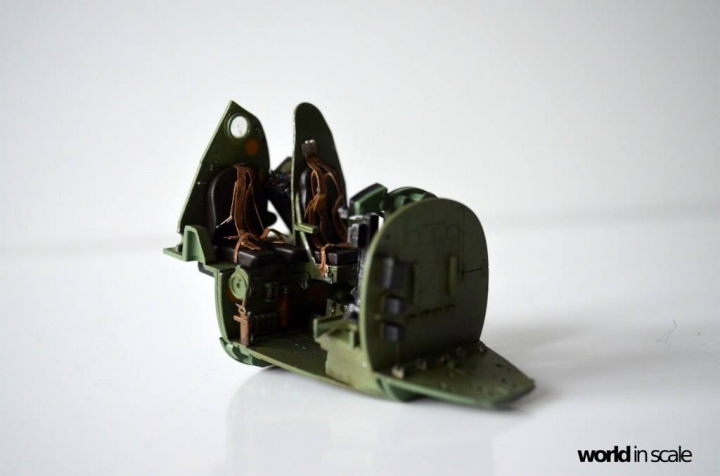
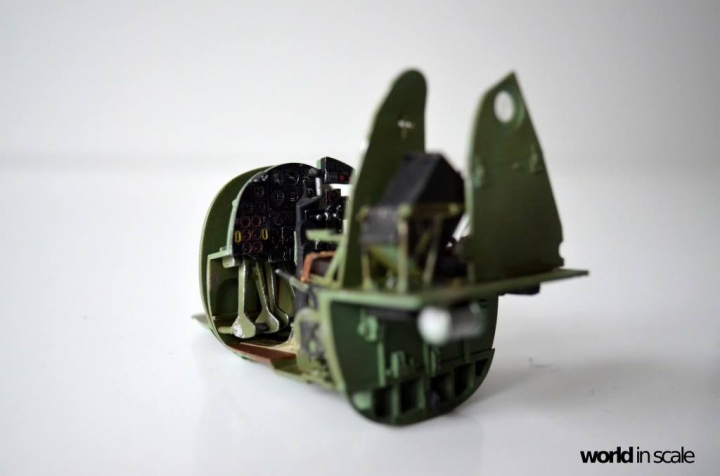
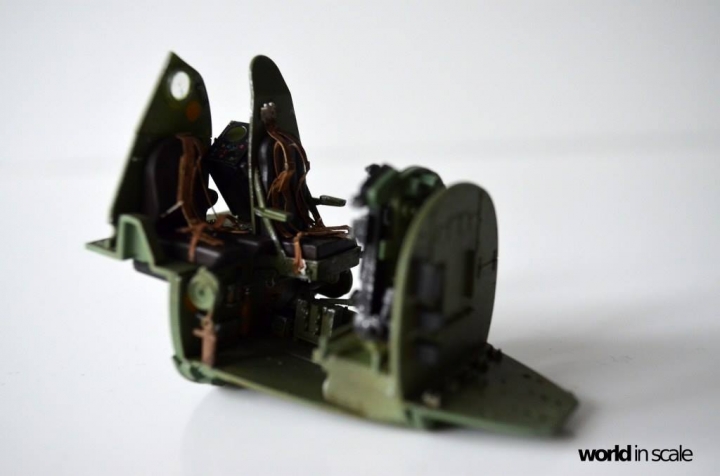
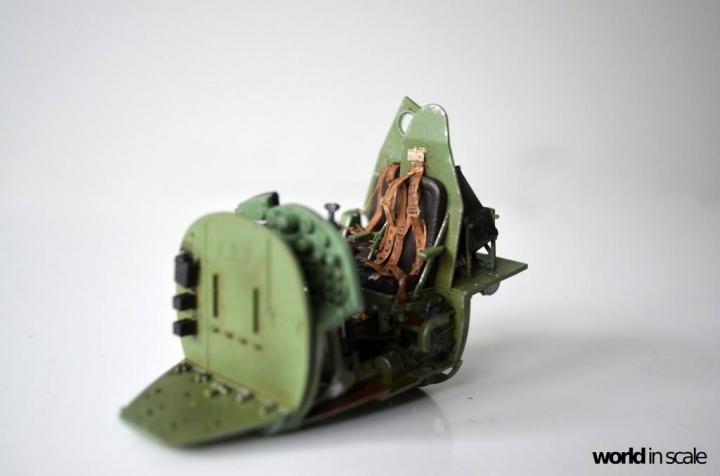
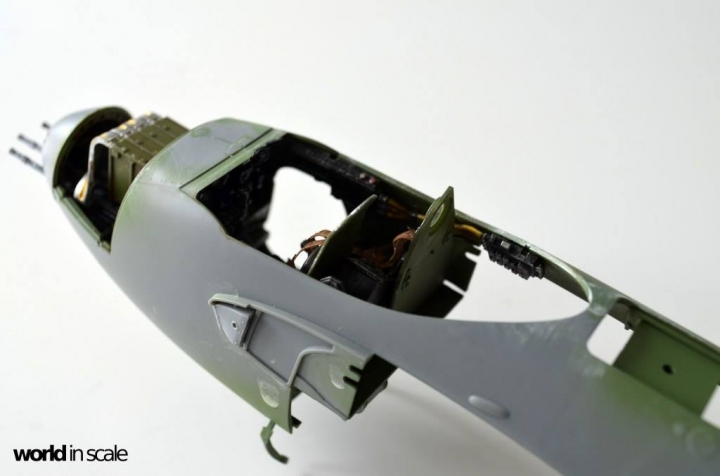
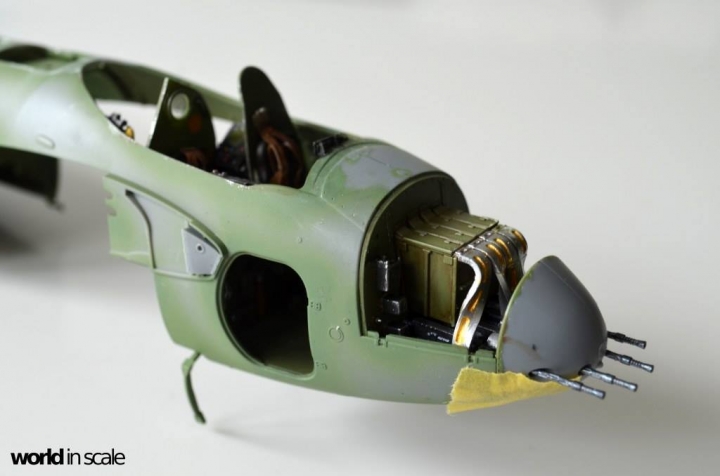
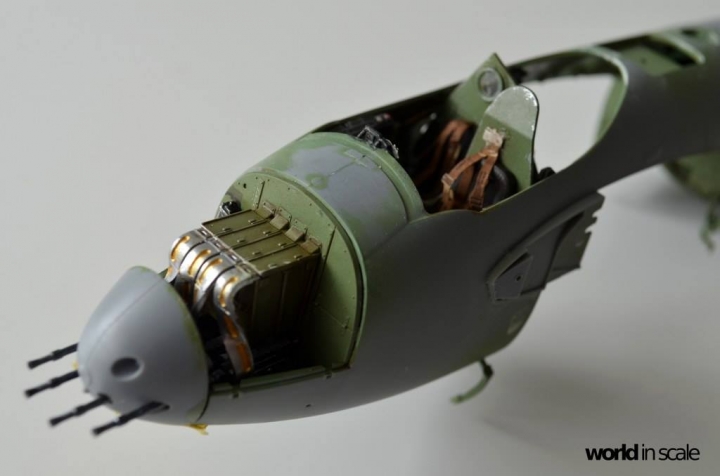
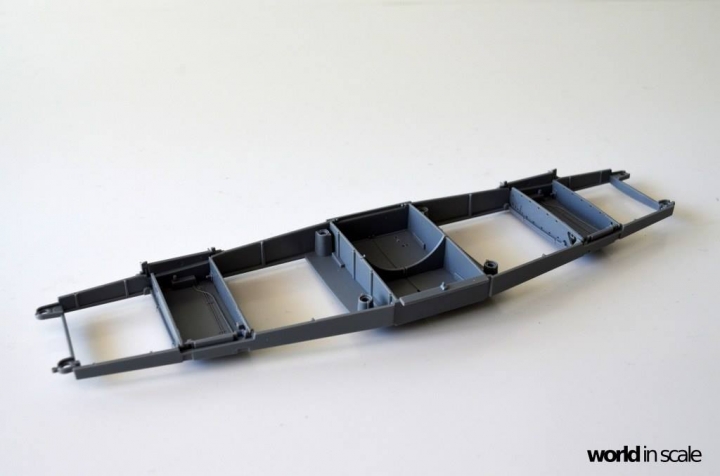
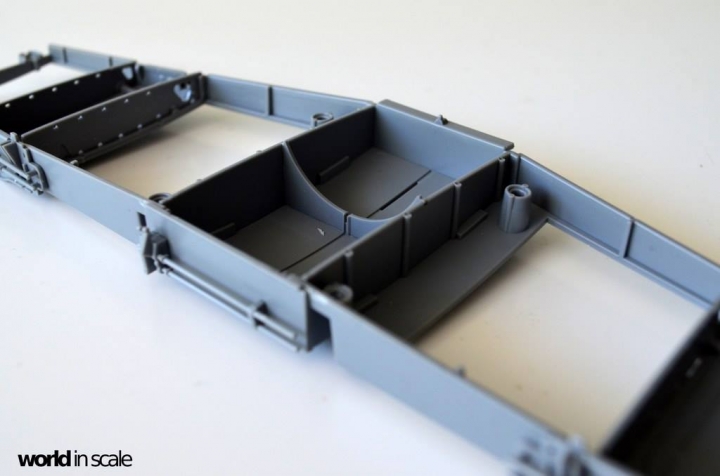
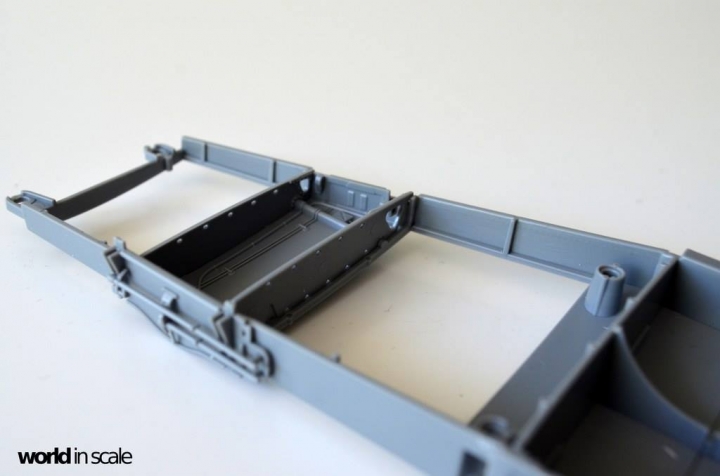
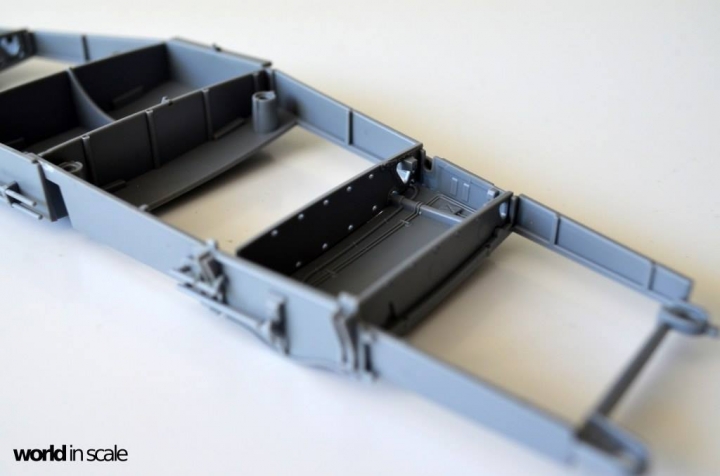
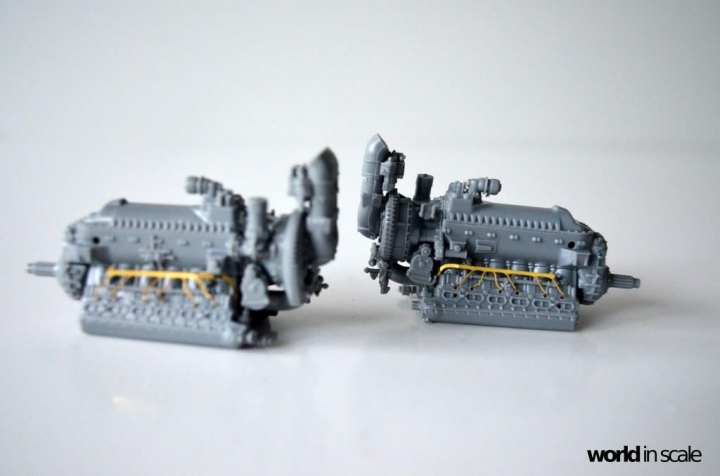
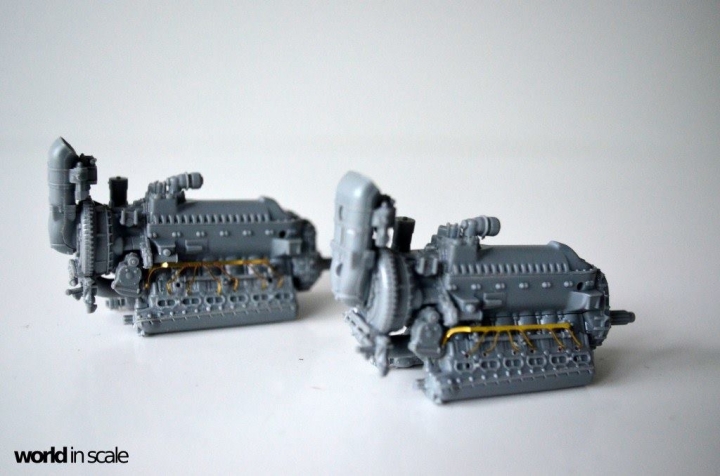
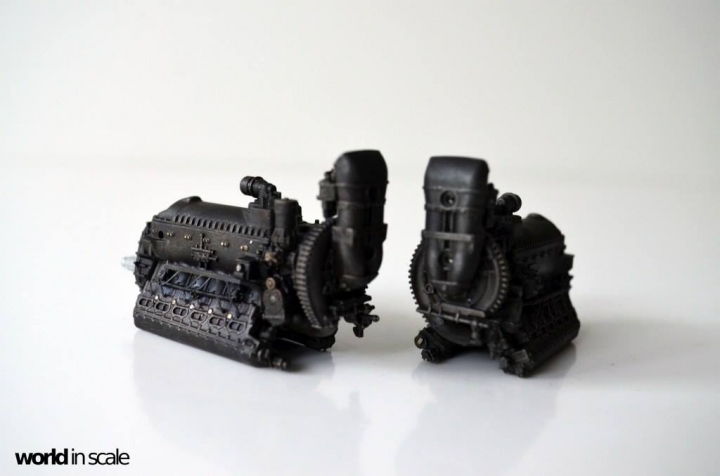
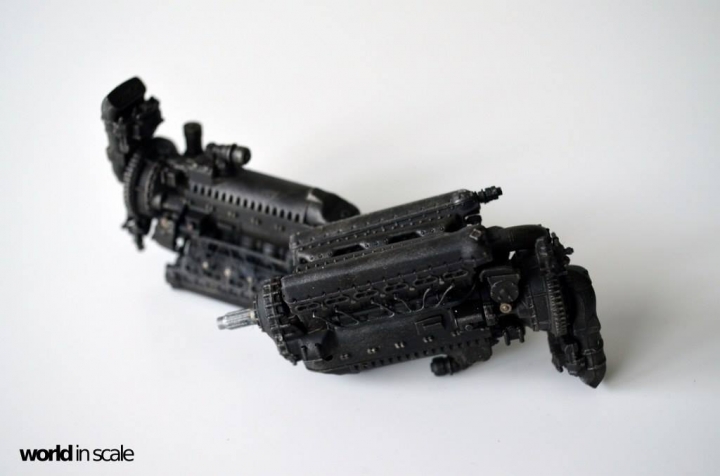
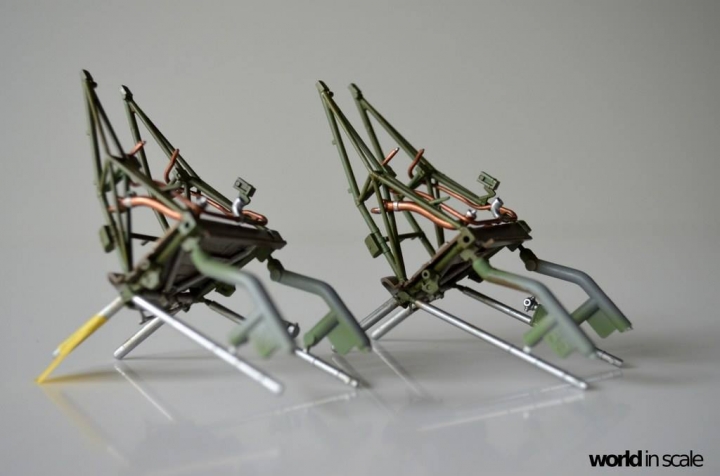
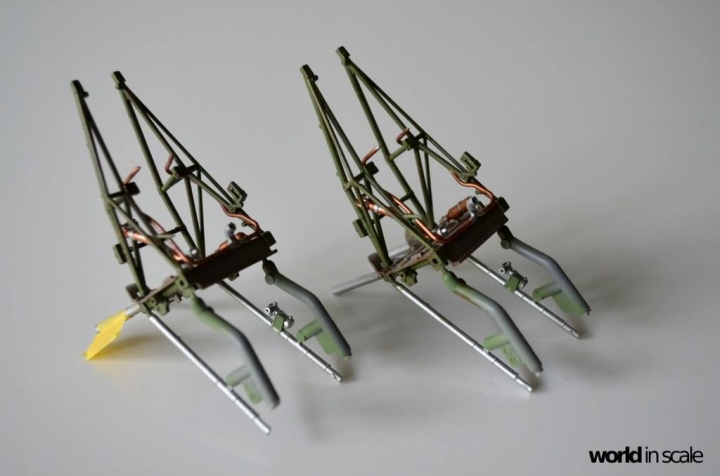
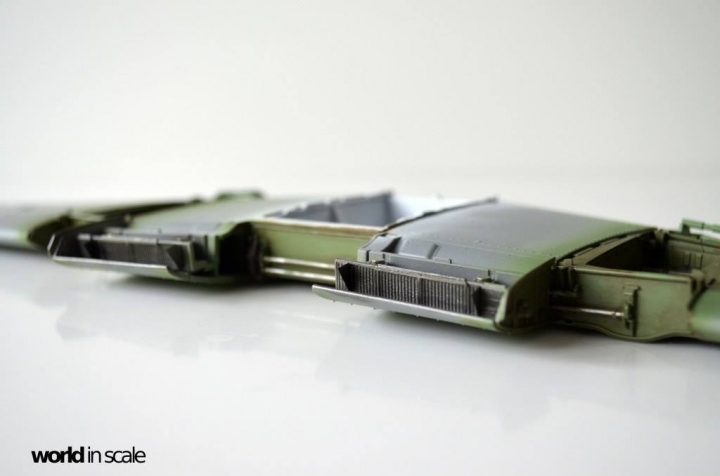
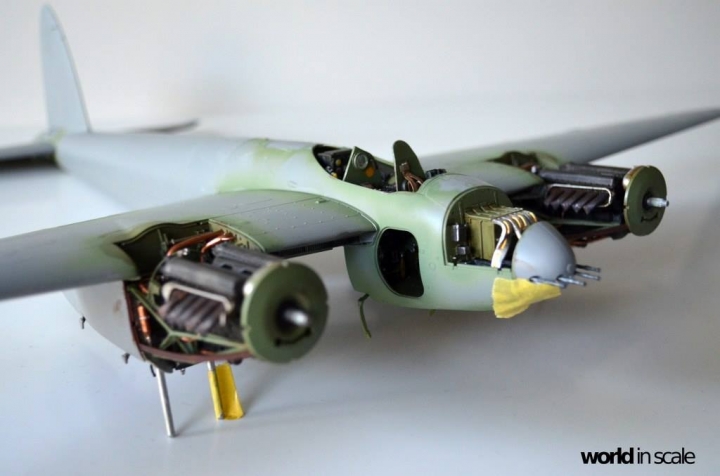
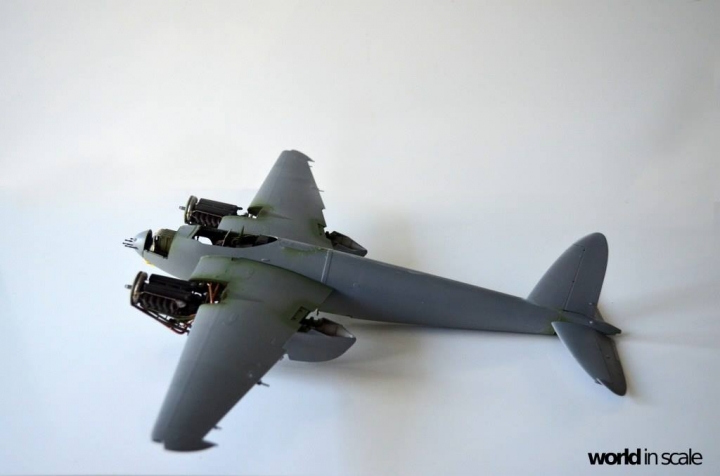
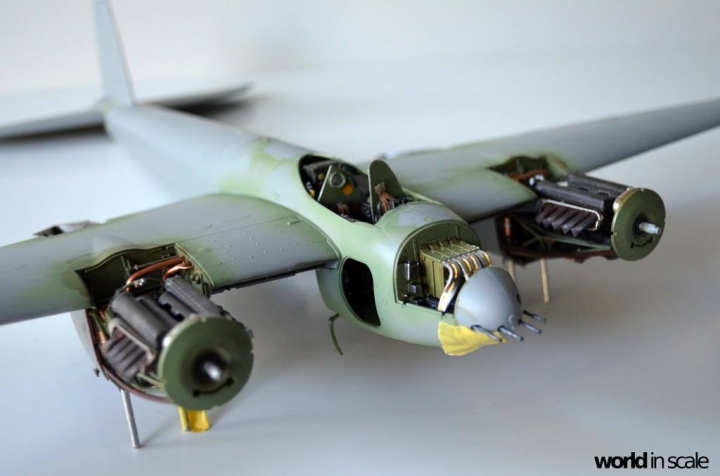
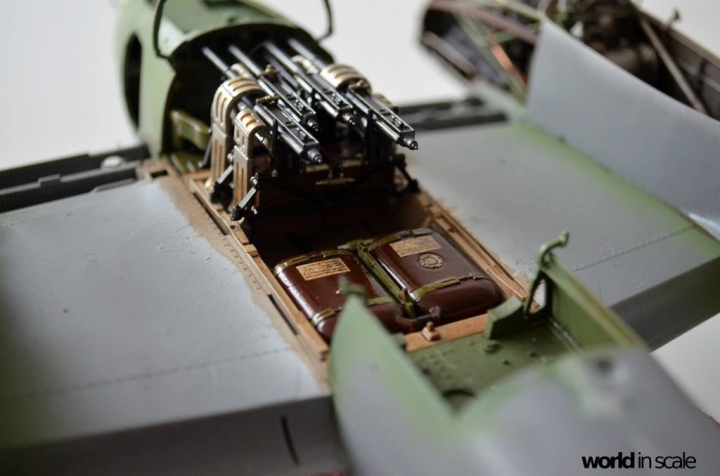
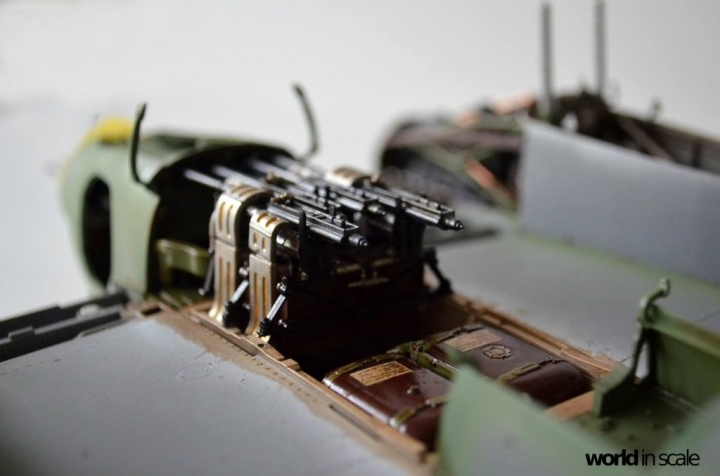
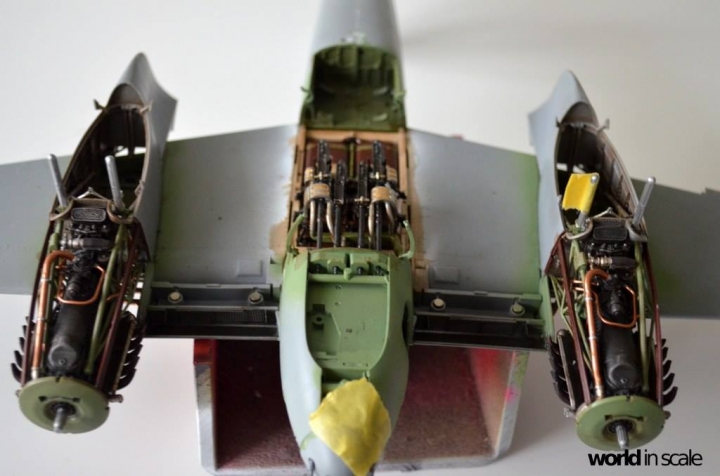
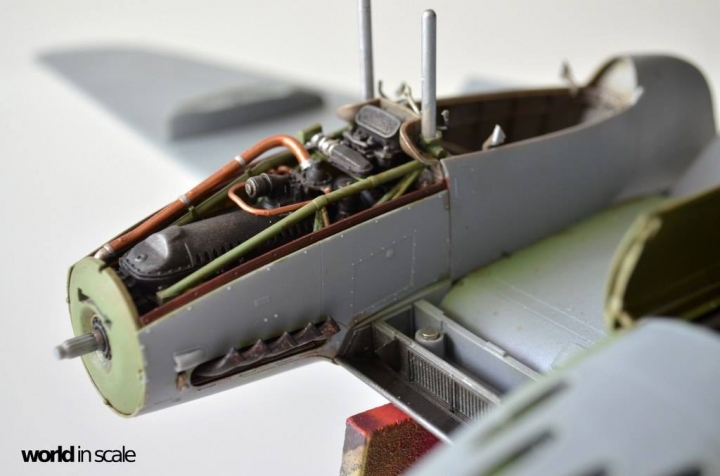
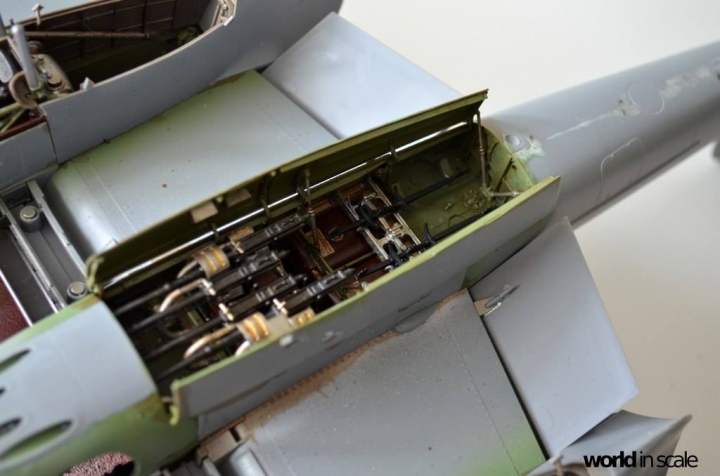
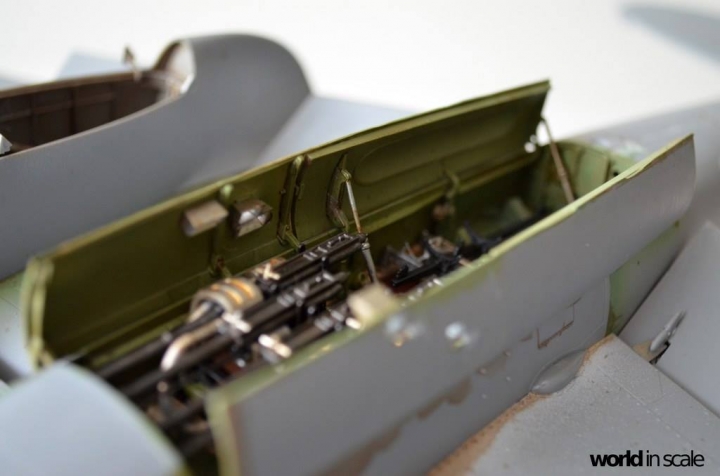
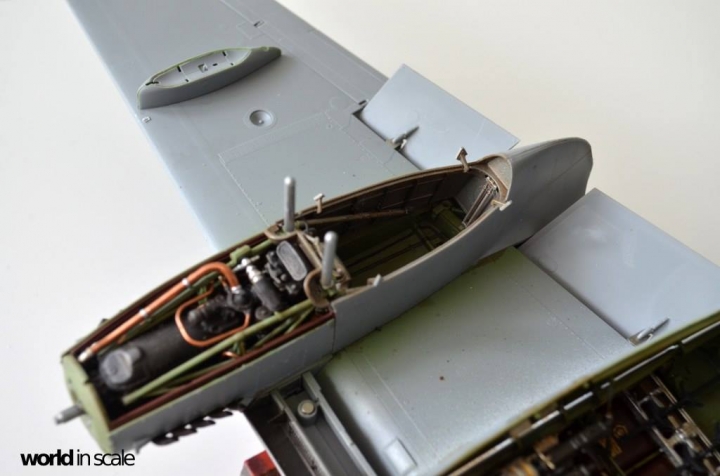
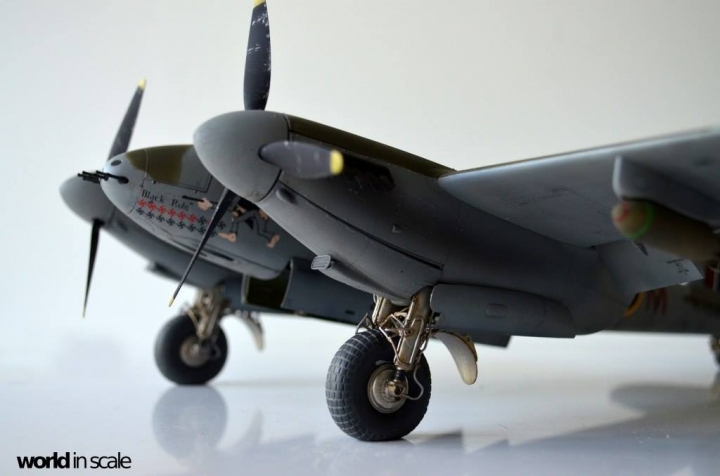
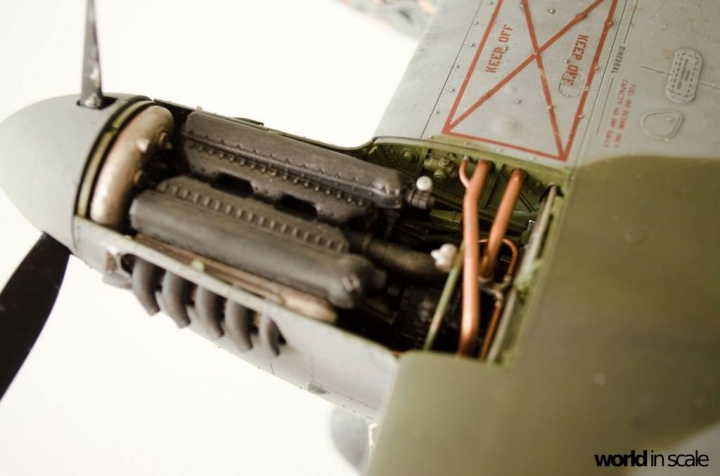
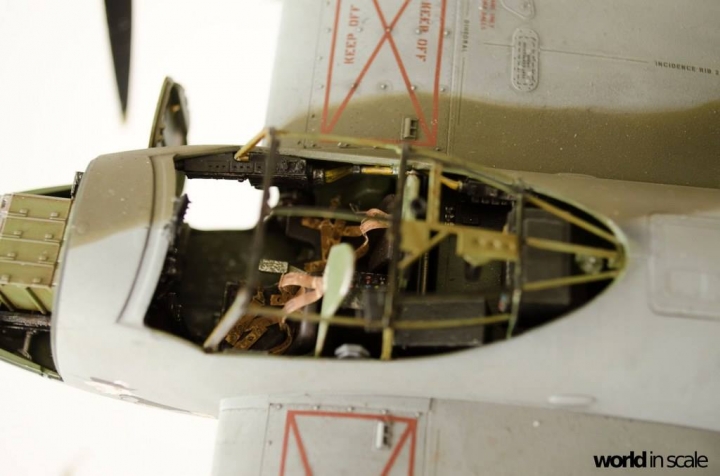
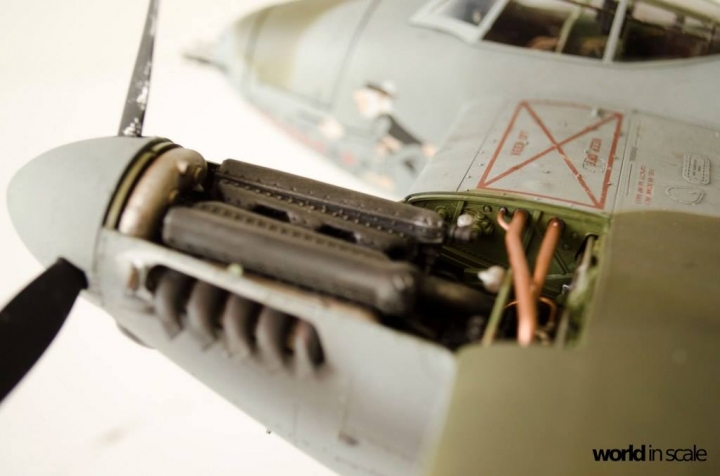
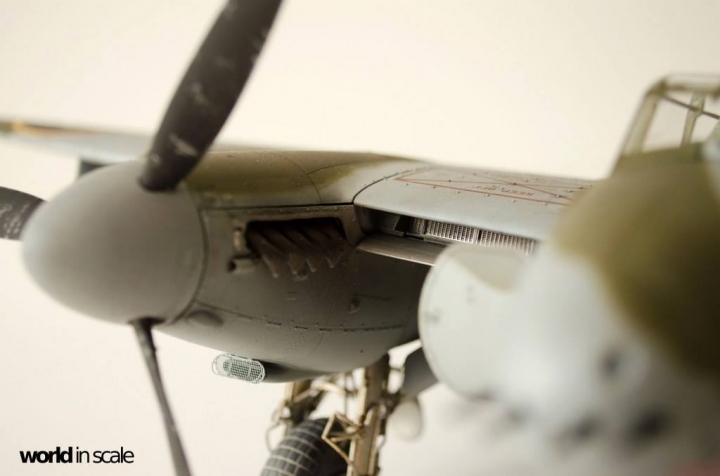
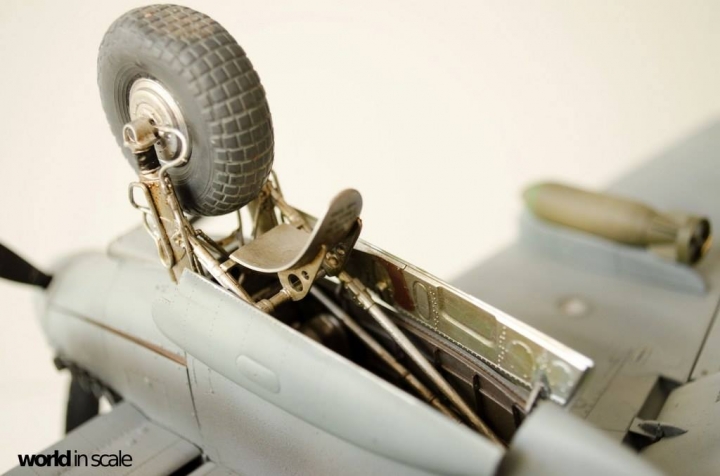
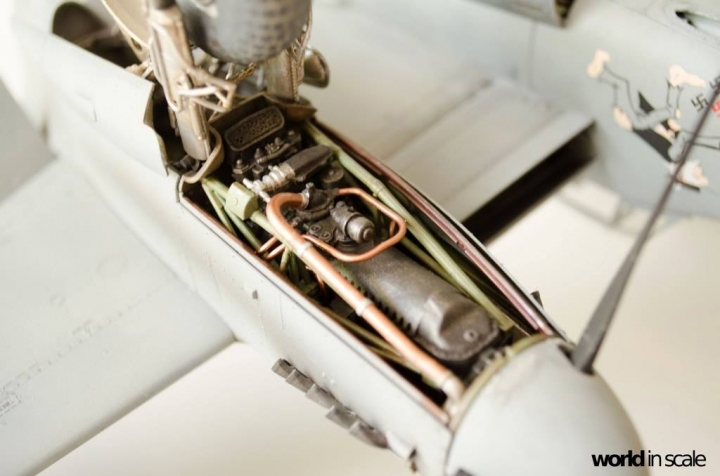
The kit consists of more then 690 plastic parts, 2 frets of photo etched parts, two sheets with decals, screws, magnetos, optional clear engine covers, big mounting instruction and info booklets.... a huge kit with so many wonderful small details... and small and smaller parts


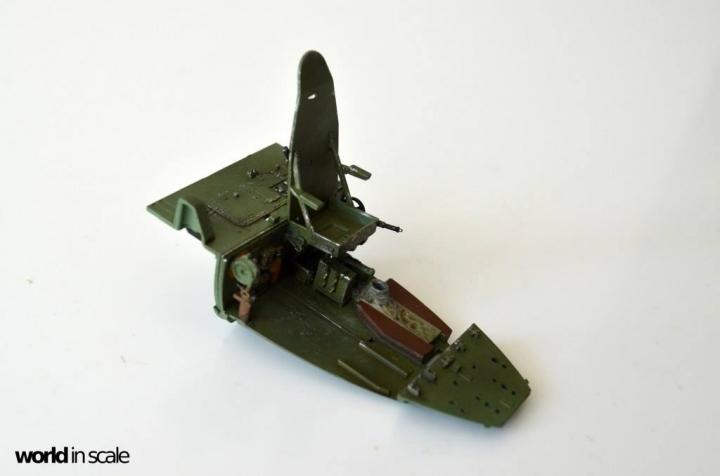
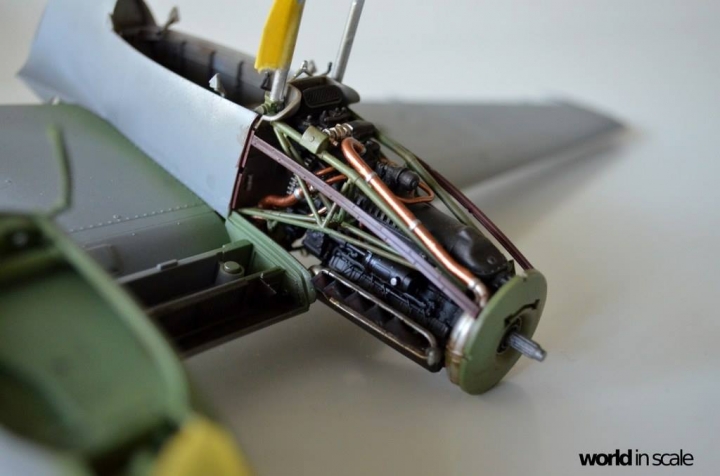
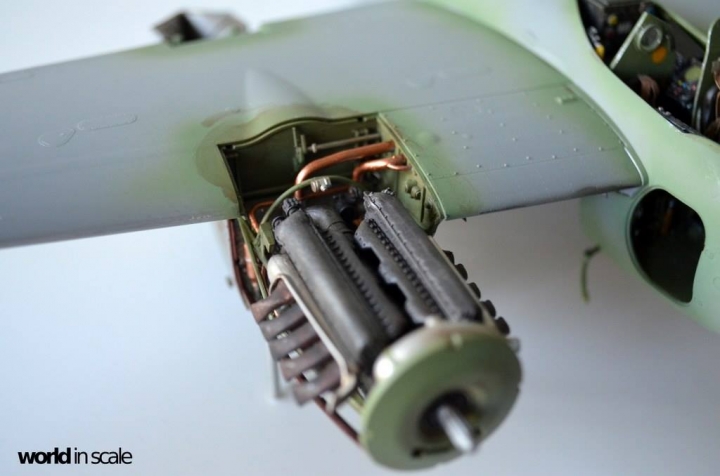
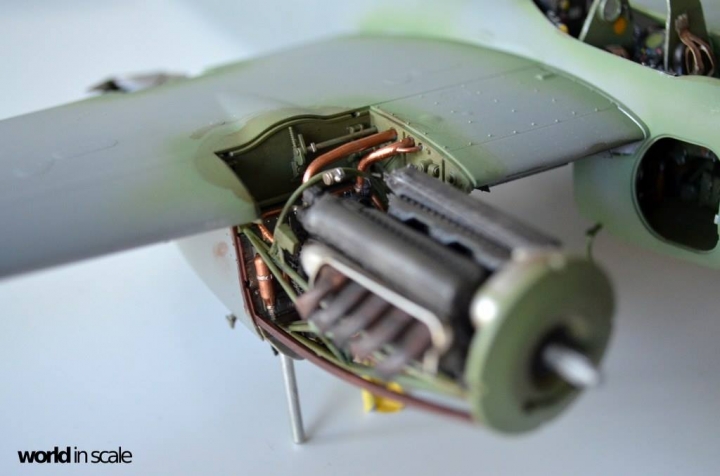
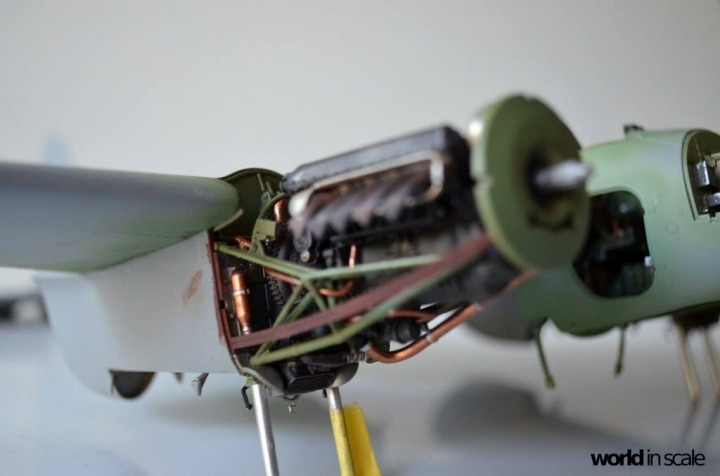
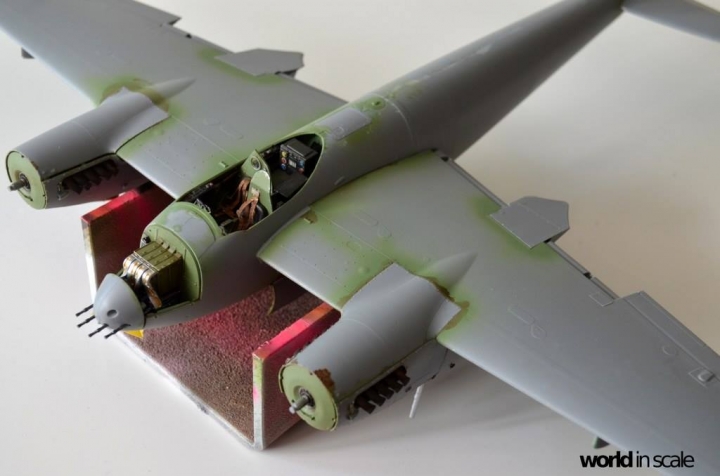
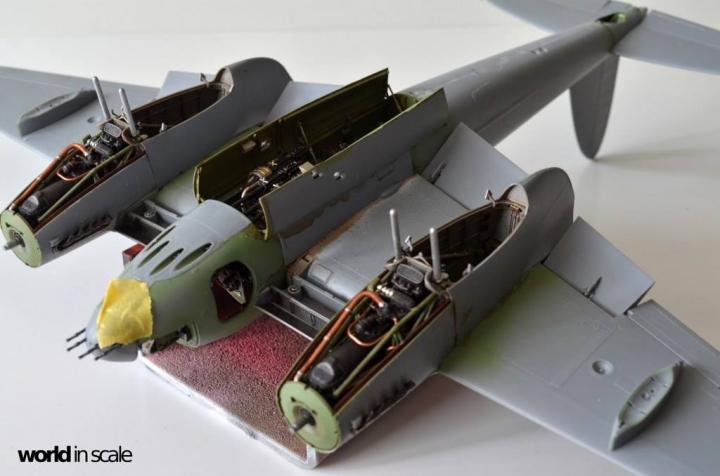
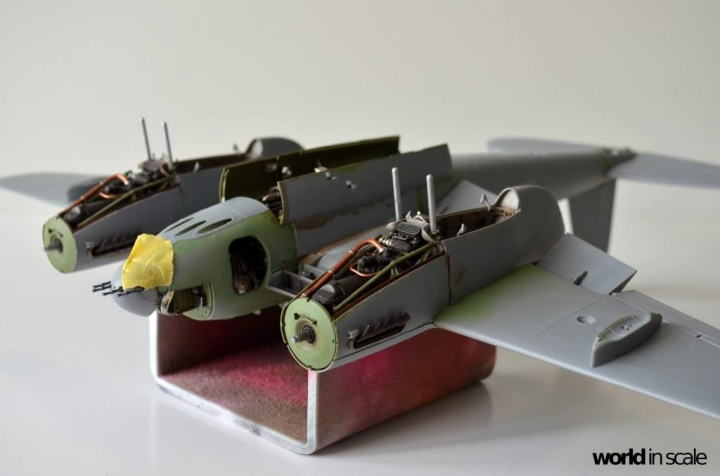
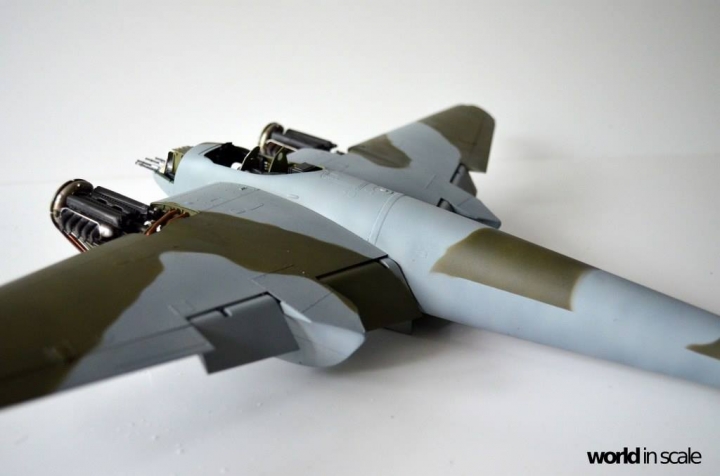
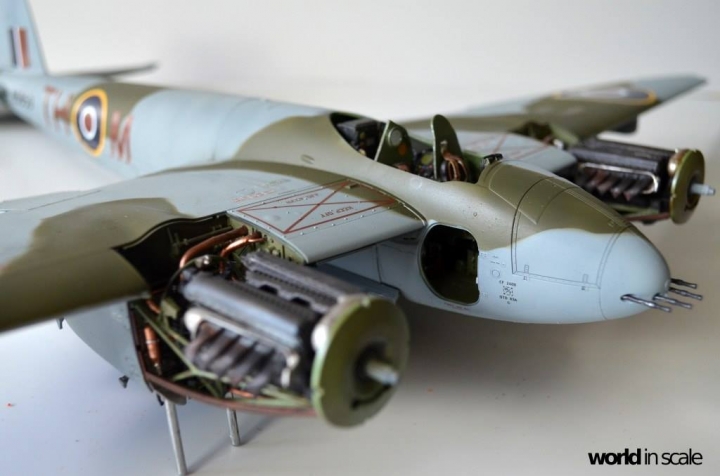
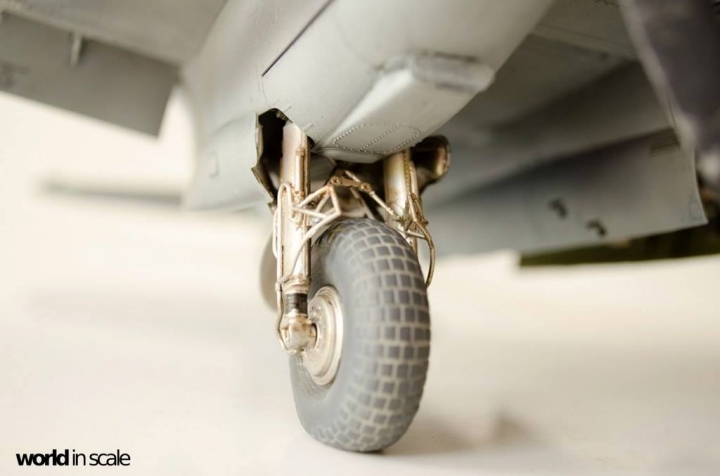
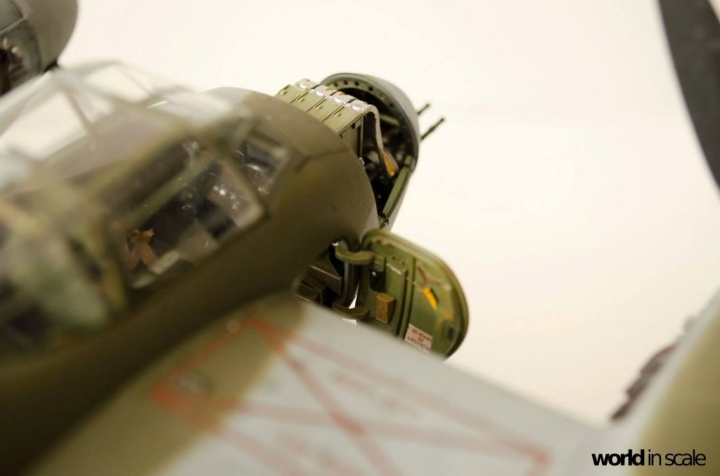
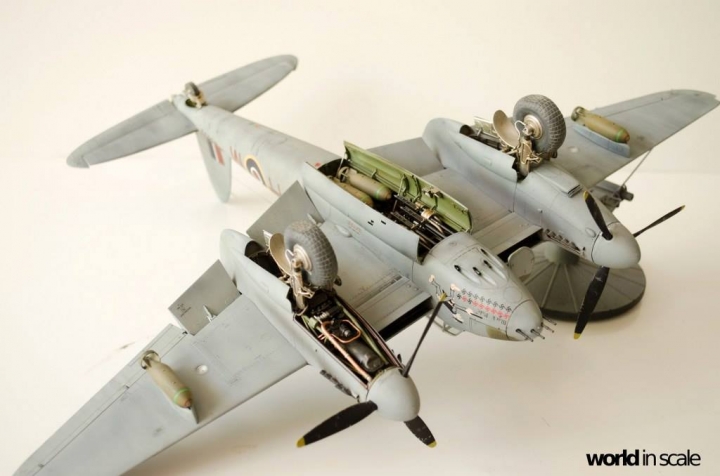
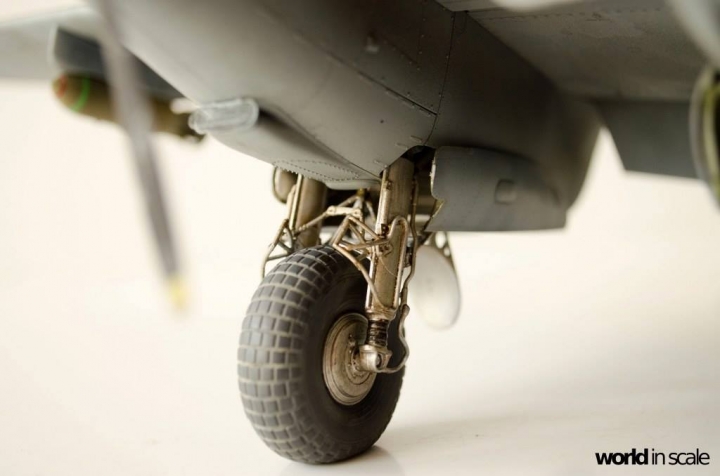
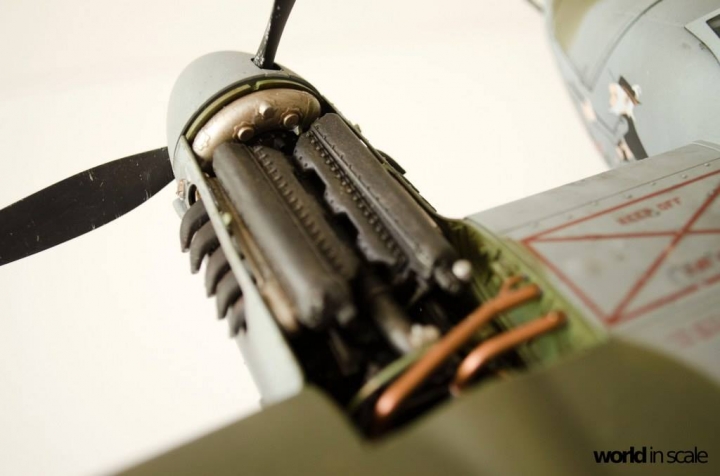
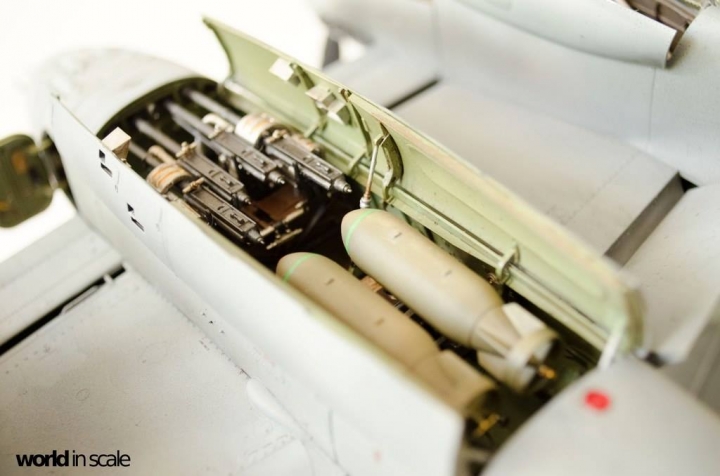
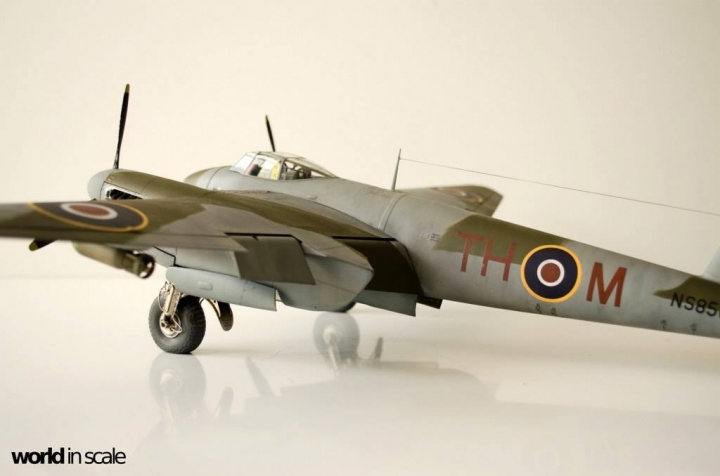
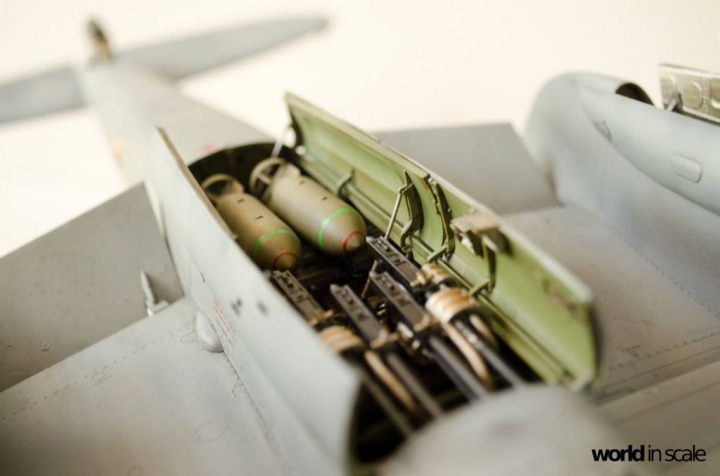
Additionally I will use the photo etched parts from Eduard for the exterieur, and some colored ones for the interior. Also the fabric seat belts and masks for the canopy, some brass barrels for the guns and the Eduard resin kits of the Brassin series for the two gun mounts as I want to show these partly in open position.

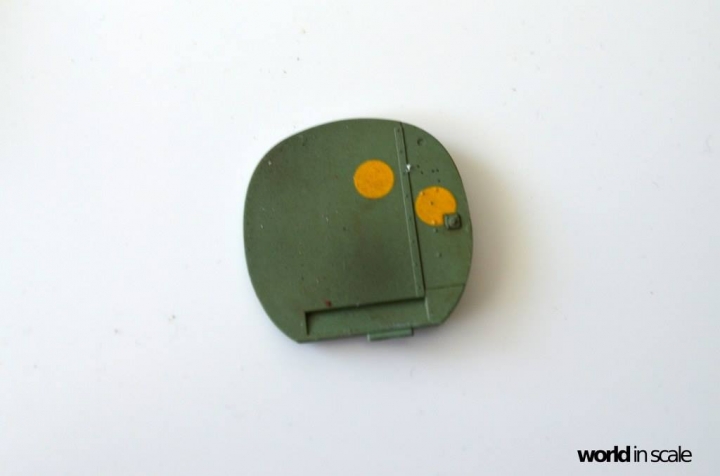
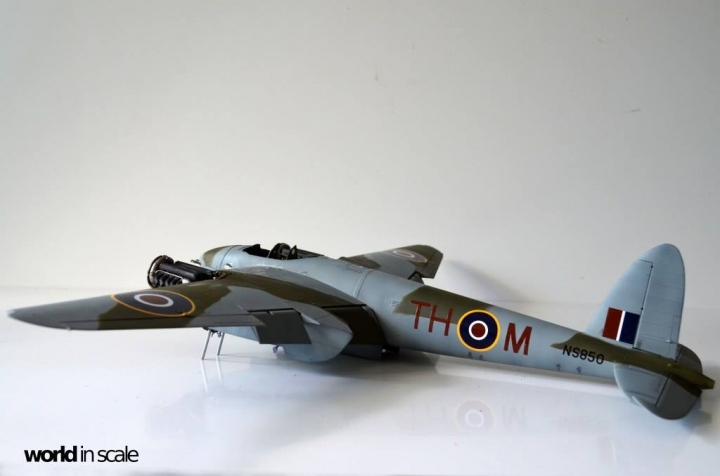
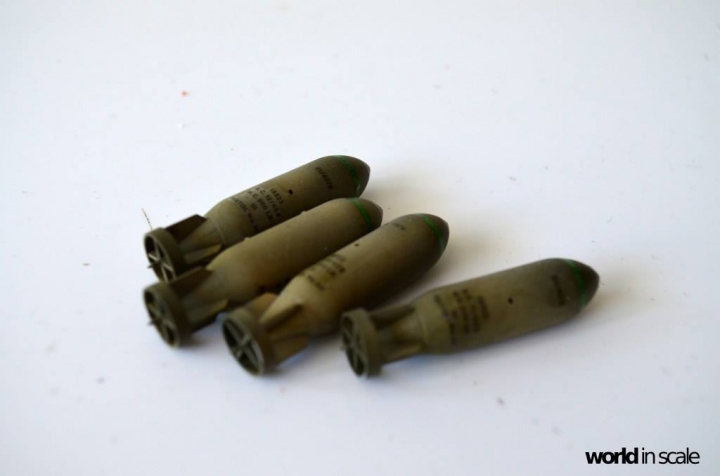
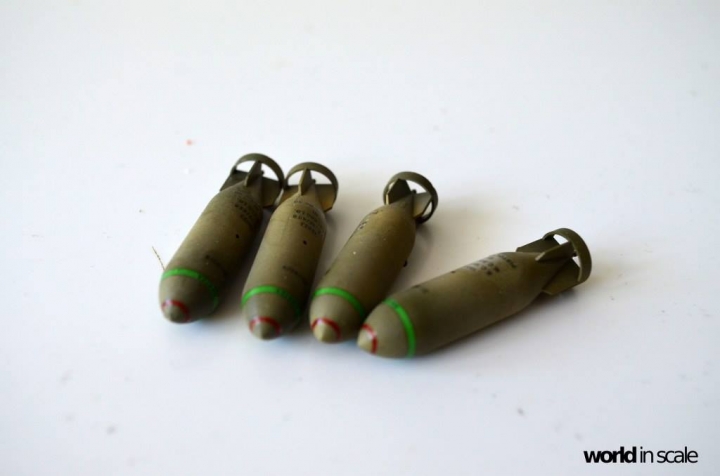
Some additional decals for the stencils and some new markings with wonderful nose art are plannes as well ....

I hope that this is an interesting new project for you!

Cheers
Michael
elmarriachi
_VISITCOMMUNITY
Baden-Württemberg, Germany
Joined: December 26, 2009
KitMaker: 813 posts
AeroScale: 98 posts
Posted: Sunday, March 05, 2017 - 08:15 PM UTC
Hello,

I have started with the cockpit of the Mosquito. Most of the kit parts are glued together. I have built several separate subassemblys for easier painting.
Most of the switches, displays, etc. I have removed already so that I could add the Eduard colored etched parts after the painting.

Next I will add some more wiring at the displays, at the bottom and at the walls.


Cheers
Micha
elmarriachi
_VISITCOMMUNITY
Baden-Württemberg, Germany
Joined: December 26, 2009
KitMaker: 813 posts
AeroScale: 98 posts
Posted: Tuesday, March 14, 2017 - 02:33 PM UTC
Hello,


The separately mounted assemblys were primered in black next. After that a glazing layer of Lifecolor's British Interior Green was sprayed on everything, keeping the black shining through as a kind of shadow.
The green received some highlights and shadows with base color mixed with dark brown, and base color mixed with beige.
After that all the small details were painted with a fine brush in its different colors...

The displays were all added next. These were wonderful colored etched parts from Eduard, also the switches, levers, etc. Also some first decals were added now.
A layer of matt clear coat on everyhing followed nedt to give the etched parts the same look as the painted ones. The matt surface received some shiny clear coat sprayed in a cloudy way on everything to give it a light shiny optic.

Dark brown oil color washing over everything followed next and gave the parts a used optic. Black washing around the details accented these a bit more.

All the displays received some dots of Micro Crystal Klear next to simulate the glass of the displays.

Next follow the seats and the seat belts made of HGW's fabric and etched parts.... lot of small parts...


The first of the two Rolls-Royce Merlin engines was built parallel. It is highly detailed and constsis of a lot of small and smalles, super detailed plastic parts. I love this engine!
Tamiya also provides some etched parts for it, two further etched parts from Eduard immitate the wiring. More additional parts is not necessary....


Cheers
Micha
elmarriachi
_VISITCOMMUNITY
Baden-Württemberg, Germany
Joined: December 26, 2009
KitMaker: 813 posts
AeroScale: 98 posts
Posted: Sunday, March 19, 2017 - 03:31 PM UTC
Hello,

the seat belts from Eduard/HGW are added. These are very funny to built. Small and smaller parts .... but the result is worth doing it, compared to etched parts.

I have added a brown wash after it. Then I have put together all components of the interior ....


Next follows the armament in front of the cockpit ...

Cheers
Micha
elmarriachi
_VISITCOMMUNITY
Baden-Württemberg, Germany
Joined: December 26, 2009
KitMaker: 813 posts
AeroScale: 98 posts
Posted: Sunday, March 26, 2017 - 04:55 PM UTC
Hello,

the finished cockpit is installed in the two halfes of the hull... the hull glued together and the seam sanded smooth.

The tail wheel area is also painted in interior green, the wheel itself follws later after the painting of the hull.

The elevator unit is installed in lowered position and glued in place too.


Next follow the two engines ...

Cheers
Micha
elmarriachi
_VISITCOMMUNITY
Baden-Württemberg, Germany
Joined: December 26, 2009
KitMaker: 813 posts
AeroScale: 98 posts
Posted: Sunday, April 09, 2017 - 03:53 PM UTC
Hello,

I started with the wings internal structure and wheel bays ... painting later ...


Cheers
Micha
ivanhoe6
_VISITCOMMUNITY
Wisconsin, United States
Joined: April 05, 2007
KitMaker: 2,023 posts
AeroScale: 81 posts
Posted: Sunday, April 09, 2017 - 04:29 PM UTC
Michael, That is quite the ambitious project you have undertaken ! Looking forward to seeing the finished project.
Thank you for sharing !
elmarriachi
_VISITCOMMUNITY
Baden-Württemberg, Germany
Joined: December 26, 2009
KitMaker: 813 posts
AeroScale: 98 posts
Posted: Monday, April 17, 2017 - 07:46 PM UTC
Hello,

the engines are finished and the etched parts added. The etched wirings received some white glue on it to get some thickness.

The finished engines were airbrush painted in black, then received some washings in dark red and beige.

Then some silver pigments were added on the complete engines ... some leaking oil follows later.


The parts for the engine mounts were painted separately, then the engine mounts were put together and weathered with oil colors, then the engines installed (glued at the front, screwed at the back).
Some further parts, wiring and small stuff will follow ...


The wings were put together, etched parts for the engine cooler added and painted in green, white and dark grey/silver mix. After that all weathered also with some oil washings.


Cheers
Micha
elmarriachi
_VISITCOMMUNITY
Baden-Württemberg, Germany
Joined: December 26, 2009
KitMaker: 813 posts
AeroScale: 98 posts
Posted: Tuesday, April 25, 2017 - 02:47 PM UTC
Hello,

The finished Rolls-Royce Merlin engines were installed into the engine mounts which were completely painted and weathered before. Some further pipes and details were added next.

The wings were finished and some instruments for the cockpit added and detailed with Eduard's etched parts. The wings were screwed and glued to the hull next. It is a perfect fittment!

After the installation of the wings the engine mounts were glued to the wings and further pipes between wing and engine added.


Next will be the gun mounts on the lower side of the fuselage ...

Cheers
Micha
c4willy
#305
_VISITCOMMUNITY
Christchurch, New Zealand
Joined: February 01, 2006
KitMaker: 1,673 posts
AeroScale: 1,517 posts
Posted: Wednesday, April 26, 2017 - 01:01 AM UTC
Micha the exhaust pipes look exceptionally life like are they Moskit or a similar replacement item or are they the kit parts? The work so far is just stunning keep up the awesome work!
GazzaS
#424
_VISITCOMMUNITY
Queensland, Australia
Joined: April 23, 2015
KitMaker: 4,648 posts
AeroScale: 1,938 posts
Posted: Wednesday, April 26, 2017 - 01:39 AM UTC
Micha,
As usual your craft looks exceptional! You must have quite a house to display all of those wonderful models you awe us with.

Gaz
elmarriachi
_VISITCOMMUNITY
Baden-Württemberg, Germany
Joined: December 26, 2009
KitMaker: 813 posts
AeroScale: 98 posts
Posted: Wednesday, April 26, 2017 - 12:01 PM UTC
Hello,
thanks a lot!
The exhausts are parts from the kit.
So far I have used only kit parts plus etched parts from Eduard (colored ones for the interior and standard etched parts for the rest). The Brassin-parts I have not used so far as the kits parts are really very, very good.

Cheers
Michael
c4willy
#305
_VISITCOMMUNITY
Christchurch, New Zealand
Joined: February 01, 2006
KitMaker: 1,673 posts
AeroScale: 1,517 posts
Posted: Wednesday, April 26, 2017 - 12:17 PM UTC
In that case Michael the exhausts are painted and weathered particularly well as they look like they're made out of metal. What process did you use?
elmarriachi
_VISITCOMMUNITY
Baden-Württemberg, Germany
Joined: December 26, 2009
KitMaker: 813 posts
AeroScale: 98 posts
Posted: Wednesday, April 26, 2017 - 02:10 PM UTC
Thank you very much

The exhausts were painted in silver first, then the rust base color from the lifecolor rust & dust set was dipped on the parts with a sponge, followed by the darker shade of rust color from the set, also with a sponge.
Finally I have used black color which was used as drybrush around the exhausts, the color rubbed in the part with an old brush. The drilled insides of the parts were painted in the same way - only black color nearly dry rubbed in the openings ...

Cheers
Michael
elmarriachi
_VISITCOMMUNITY
Baden-Württemberg, Germany
Joined: December 26, 2009
KitMaker: 813 posts
AeroScale: 98 posts
Posted: Wednesday, May 03, 2017 - 02:45 PM UTC
Hello,

the main guns under the fuselage are finished, painted, weathered and installed in the weapons bay. The first washing is added as well (that's why it is looking glossy, wet).

Next following the two bombs over the tank ...


Cheers
Micha
redcap
_VISITCOMMUNITY
England - East Midlands, United Kingdom
Joined: November 06, 2005
KitMaker: 753 posts
AeroScale: 311 posts
Posted: Thursday, May 04, 2017 - 01:39 AM UTC
What a model and what a build!

This is going to be something special when finished. Great work so far!

Gary
RussellE
#306
_VISITCOMMUNITY
Victoria, Australia
Joined: June 27, 2010
KitMaker: 3,959 posts
AeroScale: 598 posts
Posted: Thursday, May 04, 2017 - 02:56 AM UTC
not sure how this one slipped under the radar, but I'm onboard and buckled up for the ride now
elmarriachi
_VISITCOMMUNITY
Baden-Württemberg, Germany
Joined: December 26, 2009
KitMaker: 813 posts
AeroScale: 98 posts
Posted: Sunday, May 14, 2017 - 01:16 PM UTC
Hello,

I have finished the gun bay (bombs will follow later), also the engine covers were finished and added. These remain removable, mounted only with some magnets and clips.

The landing flaps installed as well, also some bomb racks under the wings.


Next step will be the masking of all open areas, so that the painting of the outside could follow next.
The final details such as covers of the landing gear bay, the landing gear itself, cockpit, doors and further small stuff follows later.

Cheers,
Micha
RussellE
#306
_VISITCOMMUNITY
Victoria, Australia
Joined: June 27, 2010
KitMaker: 3,959 posts
AeroScale: 598 posts
Posted: Sunday, May 14, 2017 - 03:30 PM UTC
continuing to amaze, Micha!
elmarriachi
_VISITCOMMUNITY
Baden-Württemberg, Germany
Joined: December 26, 2009
KitMaker: 813 posts
AeroScale: 98 posts
Posted: Sunday, May 21, 2017 - 01:34 PM UTC
Hello,

started the painting during the past few days...

First a layer of black primer on everything ...


... then a layer of Royal Airforce Grey of Lifecolor, not fully covering the black primer ...


... Then masking the camo with Blutac and Tape ... and spraying the olive green color (also Lifecolor) ...


... after a layer of clear coat the decals followed. As I want to built a Canadian version with wonderful nose art I chose some decals from the aftermarket.
These fit perfect. Then feeled 1000s of stencils followed. Some were used from the Tamiya kit, some others from the aftermarket set as well.


Now some drying time, then clear coat matt, then oil colors ...

Cheers

Micha
elmarriachi
_VISITCOMMUNITY
Baden-Württemberg, Germany
Joined: December 26, 2009
KitMaker: 813 posts
AeroScale: 98 posts
Posted: Tuesday, May 30, 2017 - 05:04 PM UTC
Hello @ all,

the Mosquito recieved its undercarriage... silver painted with black and brown oil colors. The multipiece wheels were painted in dark rubber, then dusted with grey and beige pigments.


The bombs were painted in olive green, then lightend with yellow, then decals and clear coat and oil colors ... then mounting. Some etched parts still missing on the pics.


The propellers were glued togehter, then the tops painted in a light yellow and masked before the rest received its black paint. The spinners were painted in silver, the covers in light grey as the rest of the fuselage.

Some silver scratches and damages were added with a sponge and some oil color was used for weathering.

After that all the removable parts were mounted, engines closed for the moment and the exhaust gas sprayed with the airbrush and black, grey and brown colors.


Cheers
Micha
RussellE
#306
_VISITCOMMUNITY
Victoria, Australia
Joined: June 27, 2010
KitMaker: 3,959 posts
AeroScale: 598 posts
Posted: Wednesday, May 31, 2017 - 02:37 AM UTC
This is really coming along very nicely Micha!

Top notch work!
Totalize
_VISITCOMMUNITY
Ontario, Canada
Joined: February 04, 2009
KitMaker: 743 posts
AeroScale: 151 posts
Posted: Wednesday, May 31, 2017 - 02:42 AM UTC
Very nice indeed and a fairly quick build at that. Great detail painting of the Merlins.

Kevlar06
_VISITCOMMUNITY
Washington, United States
Joined: March 15, 2009
KitMaker: 3,670 posts
AeroScale: 833 posts
Posted: Wednesday, May 31, 2017 - 07:24 AM UTC
Michael,
Excellent work-- I've been "lurking" over your build for a while now, and you've done a wonderful job-- are those the LSP decals for Canadian Mosquitos?
-- I have an LSP set for "Black Rufe" that I plan to use with my Tamiya Mosquito when I get around to building it. How did they go on? My only other question about your magnificent build is about the upper wing roundels-- I think the upper wing roundels were just the large blue ones with a red dot in the center-- not the red, white, blue with yellow surround, which were primarily used on the fuselage.
VR, Russ
elmarriachi
_VISITCOMMUNITY
Baden-Württemberg, Germany
Joined: December 26, 2009
KitMaker: 813 posts
AeroScale: 98 posts
Posted: Tuesday, June 13, 2017 - 01:31 PM UTC
Hello,

the beauty is finished ... I love the Mosquito as one of the most beautifully shaped airplanes ever.... she has a kind of elegance in her shape ...

Kit is from Tamiya in 1/32 with many, many parts, great fit, great quality, great details, great manuals, great ..... a fantastic kit of a huge model!

I have added some photo etched parts from Eduard, some new decals for the stencils and markings (Canadian Airforce with beautiful nose art) and some resin parts.

Painting was done with Lifecolor-colors mainly, plus AK Interactive. Weathering with oil colors, pigments, ...


I hope that you like it!

Cheers
Micha
 _GOTOTOP