World War II: Great Britain
Aircraft of Great Britain in WWII.
Hosted by Rowan Baylis
Spitfire Vb by Hobby Boss in 1/32 scale
Holdfast
Staff MemberPresident
IPMS-UK KITMAKER BRANCH
#056
_VISITCOMMUNITY
England - South West, United Kingdom
Joined: September 30, 2002
KitMaker: 8,581 posts
AeroScale: 4,913 posts
Posted: Tuesday, February 07, 2017 - 01:23 PM UTC

Quoted Text

Hi Mal and Robert

Oh la la. Mal, I read your very helpful info twice, and now I've got it, and I have Robert's sage advice ringing in my ears too.

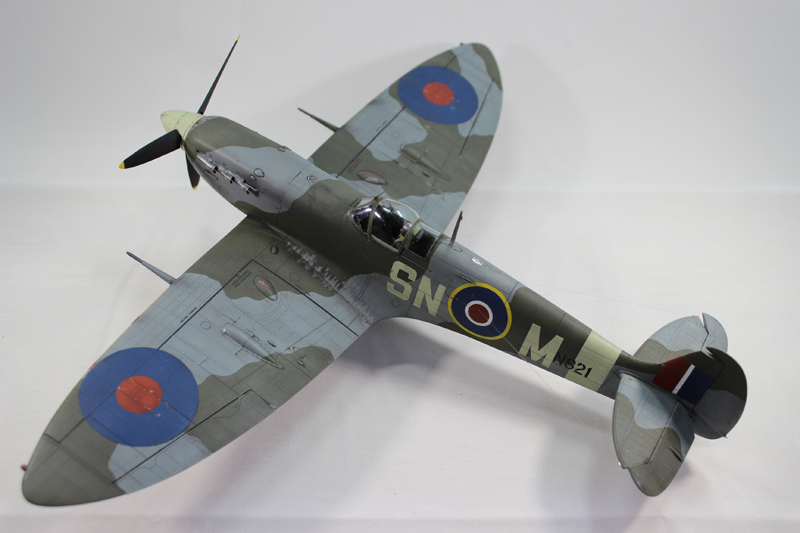
So on the basis that there's rarely a definitive answer, and the much respected Edgar Brooks gave us some info. I'm opting for the no-head-rest-no-antenna-wire option, which will need an easy scratch build on the mast, and a bit more fiddly work on the interior.

I think this photo illustrates the desired result:


Absolutely

Also note that, in that photo, there is no evedence of an armoured wind screen. An external one is obviouse so this aircraft definitely has an internal one and as it can't actually be seen (unless you get in close) I simply left off the external one and removed the fairing, that can be seen in one of your recent photos, on the upper nose adjacent to the cockpit opening
SteveAndrews
_VISITCOMMUNITY
England - South East, United Kingdom
Joined: August 16, 2010
KitMaker: 693 posts
AeroScale: 551 posts
Posted: Tuesday, February 07, 2017 - 05:30 PM UTC
Hi folks

Terri, thanks for looking in again. This is a rewarding kit and a little extra attention really brings it to life.

Bernd, yes a few additions go a long way it seems. As I've mentioned (too many times?), I let myself have a little artistic license. My additions aren't exactly in scale and neither are they strictly accurate in shape, but they all add up and I hope to create a whole that gives the impression of the real thing. Its sort of like the box art on a kit - look at it through a magnifying glass and you'll see all sorts of oddities but look with the naked eye and it seems spot on.

Mal, great call on the windscreen armour. I'm going to leave it off and adjust the fuselage a little where it would have joined.

Thanks again for joining the fun folks

Steve

SteveAndrews
_VISITCOMMUNITY
England - South East, United Kingdom
Joined: August 16, 2010
KitMaker: 693 posts
AeroScale: 551 posts
Posted: Friday, February 10, 2017 - 03:57 AM UTC
Dear Doctor

Some time ago I came to you with a problem. At first it puzzled you, but eventually you gave it a name. From that day I knew I was afflicted with ‘detailing’. Thanks to your patience and care I fought and overcame it. I was able to live normal life. For a while I could resist the urge to make tiny things in plastic and metal. But, as you know, the urge never truly goes, and… Doctor I might have lapsed a little. Even as I write this the siren voice of plasticard and copper wire whispers softly. Doctor, forgive me, but it feels so good…

As you might have gathered. I gave in to the urge

thegirl
_VISITCOMMUNITY
Alberta, Canada
Joined: January 19, 2008
KitMaker: 6,743 posts
AeroScale: 6,151 posts
Posted: Friday, February 10, 2017 - 05:13 AM UTC
Gee , hope you aren't blaming me for your relapse

I say cave and cave in hard ! Wonderful work sir


Terri
berndm
_VISITCOMMUNITY
Niedersachsen, Germany
Joined: March 26, 2014
KitMaker: 844 posts
AeroScale: 630 posts
Posted: Friday, February 10, 2017 - 01:46 PM UTC
That looks great, another worthy addition to the cockpit.
Thanks to the Spitfires hinged cockpit door it will stay visible.
Well done


Bernd
SteveAndrews
_VISITCOMMUNITY
England - South East, United Kingdom
Joined: August 16, 2010
KitMaker: 693 posts
AeroScale: 551 posts
Posted: Saturday, February 11, 2017 - 10:04 PM UTC
Hi Terri and Bernd

Terri, I lay the blame firmly on my Dad for buying me an Airfix kit when I was five, and too many years spent reading Tamiya catalogues when I was at an impressionable age. I'll follow your medical advice and succumb to temptation.

Bernd, thanks very much for your encouragement. I'm working on the sidewalls and panels and should be ready to post some more images in a few days.

Thanks both for dropping in.

Have a great day.

Steve
SteveAndrews
_VISITCOMMUNITY
England - South East, United Kingdom
Joined: August 16, 2010
KitMaker: 693 posts
AeroScale: 551 posts
Posted: Monday, February 13, 2017 - 01:21 AM UTC
So we have a cockpit. Well, almost. There’s a little work to do prior to painting, the most significant part of which is adding the full harness. It comes down from the little opening above the pilot's seat and then drapes over it. That will mean bending photo etch over fragile and painted plastic - not a risk free job, but a necessary one I think. I can’t do it now because the seat and bracket aren't joined. I could join them of course but that will make painting harder. The problems of a modern modeller! I also need to craft the rear part of the harness.


I made just a few small token enhancements to the cockpit floor to add a bit of depth when I paint it.


One little worry at this stage is the proximity of the control column to the gun sight. It sits unnaturally close. At first I thought I had assembled it badly, but after a long look at the instructions (which are a bit vague) I don't actually think I have. I did a test fit and I think there’s room to adjust the angle of the whole control column and foot pedal assembly once it is in the cockpit. They are just resting together in this pic. I’m hoping that once its all together I have some wriggle room, or is it wiggle room? There’s a big debate apparently.


Next up, fun with engines and under carriage.

Happy modelling.

Steve
Holdfast
Staff MemberPresident
IPMS-UK KITMAKER BRANCH
#056
_VISITCOMMUNITY
England - South West, United Kingdom
Joined: September 30, 2002
KitMaker: 8,581 posts
AeroScale: 4,913 posts
Posted: Monday, February 13, 2017 - 12:50 PM UTC
Steve, tell me that you are in Switzerland? I posted the masks last week to the address that you gave and as you have not let me know that they have arrived and looking now I see that your location is England! I'm just a little worried that someone else may get the benefit!

Looking good. Something that I should have mentioned earlier. Spitfires at rest have the Elevators drooped, this is because of the balance. So the control column needs to be all the way forward! The only time that the elevators would be nuetral is if the control locks were on. This was the case through all Mks up to the XIV (I believe but don't quote me on this) where they were in the up position! ( I seem to remember reading about the MkXIV some time ago but, as I say, don't quote me on it!)
SteveAndrews
_VISITCOMMUNITY
England - South East, United Kingdom
Joined: August 16, 2010
KitMaker: 693 posts
AeroScale: 551 posts
Posted: Monday, February 13, 2017 - 01:57 PM UTC
Hi Mal

You got it right. I'm in Switzerland. The postal service here is slow at delivering from overseas, so don't worry I'm sure they will arrive by the end of this week, and I'll let you know and post some photos.

Thanks very much for the advice on the control column and elevators. Duly noted for all stages of the build!

By the way, I haven't forgotten your advice about the clear parts under the wings. I'll post a shot of the instructions tonight to make sure I get the right part.

As ever thanks a million for your advice and help, and for following the build.

Have a great day.

Steve
Holdfast
Staff MemberPresident
IPMS-UK KITMAKER BRANCH
#056
_VISITCOMMUNITY
England - South West, United Kingdom
Joined: September 30, 2002
KitMaker: 8,581 posts
AeroScale: 4,913 posts
Posted: Tuesday, February 14, 2017 - 11:36 AM UTC
Phew! I was just a little worried when I spotted your banner showing you in the UK and the fact that I posted another set for a Spitfire on the same day. I've just finished a set for the "Leaping Panther" with Maple leaves in the fuselage roundels for a MkVII in 1/32 as well

More news about Spitfires later, well not Spitfires but a Spitfire is involved. I have a very special meeting today which I will post about on the Bulldogs page
SteveAndrews
_VISITCOMMUNITY
England - South East, United Kingdom
Joined: August 16, 2010
KitMaker: 693 posts
AeroScale: 551 posts
Posted: Thursday, February 16, 2017 - 02:16 AM UTC
There's a quite well known internet modelling show that usually starts with an apology. Apparently something called 'life' creeps up and surprises the show makers every month. The result is that they are always late and start by apologising profusely, every month. You'd think they might tell life to get lost, or at least recognise that its probably going to stick around for a while and take some action to avoid the worst of it. Those of us able to read watches, use calendars and generally track the passing of time, might once have been tempted to tut or mutter rude things about the show makers under our breath.

With that in mind I have to hang my head and apologise profusely. I said I'd post a picture of the wing part Mal said to leave off. I didn't. It was life's fault, and I've given it a sound talking to. Its now moping about looking for a stressed film maker to interfere with.

Here, by way of an apology is the very part, I think? Mal, is it P2?


Happy modelling guys

Holdfast
Staff MemberPresident
IPMS-UK KITMAKER BRANCH
#056
_VISITCOMMUNITY
England - South West, United Kingdom
Joined: September 30, 2002
KitMaker: 8,581 posts
AeroScale: 4,913 posts
Posted: Thursday, February 16, 2017 - 11:48 AM UTC
Yes life does get in the way!

Yes that is the part. The Spitfire never had landing lights as far as I know! I simply used the mating face of the clear part as a template and cut a blanking piece from card. I think though that the area that those landing lights are for is actually the empty shell case and link ejection port for the cannon. I would need to research that though. Hobby Boss seem to have just made this up?

Also note that in that picture the pito tube is back to front!
SteveAndrews
_VISITCOMMUNITY
England - South East, United Kingdom
Joined: August 16, 2010
KitMaker: 693 posts
AeroScale: 551 posts
Posted: Thursday, February 16, 2017 - 12:50 PM UTC
Hi Mal

Right, got it. It will be replaced. I hadn't noticed the pito tube. It makes me feel better about my own mistakes!

By the way, I'm hoping your masks will arrive today or Monday.

And this might be an example of 'life'...

https://www.youtube.com/watch?v=BKaQLYPf5hM

Happy modelling

Steve
berndm
_VISITCOMMUNITY
Niedersachsen, Germany
Joined: March 26, 2014
KitMaker: 844 posts
AeroScale: 630 posts
Posted: Friday, February 17, 2017 - 11:39 AM UTC
Your cockpit is coming together and it looks good.
It will be interesting how the often bashed Hobby Boss kit will turn out.

Bernd
Holdfast
Staff MemberPresident
IPMS-UK KITMAKER BRANCH
#056
_VISITCOMMUNITY
England - South West, United Kingdom
Joined: September 30, 2002
KitMaker: 8,581 posts
AeroScale: 4,913 posts
Posted: Friday, February 17, 2017 - 12:54 PM UTC
The masks do seem to be taking there time! But thanks for the clip that is life!

I wonder how many have fixed the pito tube the wrong way round? I think that I replaced the tube part with a length of stainless steel tube which I thinned the wall at the front end.


Quoted Text

Your cockpit is coming together and it looks good.
It will be interesting how the often bashed Hobby Boss kit will turn out.

Bernd


With Steve's permission (I'll remove it if it's in the way Steve?) here's mine:


All markings painted on
It is actually a nice kit let down by a few stupid errors.

Steve, I'm not sure if I mentioned it earlier but if you are closing up the engine compartment you will find that the side panels are a little short (It may just be one of them and the memory says the starboard one) I simply added plastic strip of the correct width (?) to just leave the slight panel gap! Another example of a slight error that was absolutely avoidable!
SteveAndrews
_VISITCOMMUNITY
England - South East, United Kingdom
Joined: August 16, 2010
KitMaker: 693 posts
AeroScale: 551 posts
Posted: Saturday, February 18, 2017 - 10:37 PM UTC
Hi Mal

No problem at all with the pic. She's a beauty.

Thanks also for the warning about the side panels. I will be closing in the engine so its good to have the warning. I hope the masks will be here tomorrow, or Tuesday latest.

Bernd, I've just been doing a little painting - see below. This may not be the best ever kit, and the level of detail is put to shame by Tamiya's Spitfire it seems, but it is a Vb and for the money, I reckon it has potential. So far it has been a fun build, and compared to the last kit I built it is a joy to assemble.

Happy modelling guys.
SteveAndrews
_VISITCOMMUNITY
England - South East, United Kingdom
Joined: August 16, 2010
KitMaker: 693 posts
AeroScale: 551 posts
Posted: Saturday, February 18, 2017 - 11:11 PM UTC
To prime or not to prime? That is the question. Well at least it seems to be a topic of debate. I used to be in the ’not to prime’ camp, but two things have changed my mind. The first is that I’m often making mutli-media models these days. The second is that I have found a primer that I trust. I used Ultimate Modelling Product’s Ultimate Primer on my last kit, and was very pleased with the results. It is wonderful. It goes on thickly, which can be a little scary, but it dries to a beautiful smooth satin finish. I tried a couple of tests on my Phantom tester to illustrate the point and check that I wasn't dreaming. Here’s what happened.

First of all I dripped neat paint on the fuselage. No brush or airbrush application, just a dollop of thick syrupy paint dropped on. I took this photo part way through drying. You can see how the Ultimate Primer undergoes a miraculous change from gloop to thin layer of colour. Even the panel lines and detail have been preserved. The thickest area did obscure detail, but that’s to be expected.


The same goes for a section of the interior. I sprayed on the primer with no regard for even layers etc. I broke the rules and just blasted on paint right at that point. You can see the wet patch has an orange peel look where I have swamped the area. But look around and you’ll it is drying back like a carefully applied and thinned coat of paint.


The only real downside is tip drying. I had some Ultimate Airbrush cleaner on hand and constantly cleaned my airbrush tip. The paint builds up and hardens quickly, so regular cleaning is essential or you’ll get clogging and splatter.

Safely reassured I went back to the Spitfire and primed all the interior parts in black. I’m going to do some simple colour modulation inside, hence the choice of black for the primer. Here’s a sample of the results. By the way the colour looks grey but without a confused camera trying to balance the contrast the finish is a satin black.


I have to say there’s nothing quite as satisfying as putting down a good layer of paint. Well, at least in modelling.

Happy modelling folks.
SteveAndrews
_VISITCOMMUNITY
England - South East, United Kingdom
Joined: August 16, 2010
KitMaker: 693 posts
AeroScale: 551 posts
Posted: Tuesday, February 28, 2017 - 01:22 AM UTC
Now for some real colour. I wanted a colour modulation effect in the cockpit. My aim is to try and enhance the points that are already prominent and create some deep shadows to exaggerate the little ones that natural light will make. With that in mind and a black base coat already laid down, I used Tamiya XF71 for the mid-tones, XF67 for the shadows and XF76 for the highlights. The silver areas I airbrushed with Valejo Metal Colour Duraluminium, again concentrating on the area closest to the light and letting a lot of the black show through.

Once that was all done I got out some nice pointy brushes and started adding details to the seat.

And here’s where that all got me:


[/URL]


Keep calm and model on.
berndm
_VISITCOMMUNITY
Niedersachsen, Germany
Joined: March 26, 2014
KitMaker: 844 posts
AeroScale: 630 posts
Posted: Tuesday, February 28, 2017 - 01:04 PM UTC
Good work now in color !

BTW nothing wrong with a Hobby Boss or Revell Spitfire. They
can t t match a Tamiya kit but personally i won t spend so much money for an aircraft kit.

Happy modelling

Bernd
SteveAndrews
_VISITCOMMUNITY
England - South East, United Kingdom
Joined: August 16, 2010
KitMaker: 693 posts
AeroScale: 551 posts
Posted: Tuesday, February 28, 2017 - 04:04 PM UTC
Hi Bernd

Thanks very much. This is always my favourite part of any build. I agree on the kit quality. One day though I will build a Tamiya 1/32 something just for the joy of the assembly and the option to expose all those details.

Keep calm and model on!

Steve
SpeedyJ
_VISITCOMMUNITY
Bangkok, Thailand / ไทย
Joined: September 17, 2013
KitMaker: 1,617 posts
AeroScale: 212 posts
Posted: Tuesday, February 28, 2017 - 04:30 PM UTC
What I really like Steve, is the artist approach in painting you show. You did that with the French 'dart' , but to me that is a rather revolution in modelling. I envy the 'Rembrandt' talent you show and I learn of course.

Greetings from Thailand.

SteveAndrews
_VISITCOMMUNITY
England - South East, United Kingdom
Joined: August 16, 2010
KitMaker: 693 posts
AeroScale: 551 posts
Posted: Wednesday, March 01, 2017 - 01:04 AM UTC
Robert, that's very kind. I must admit I feel more drawn towards art than engineering but I have a big respect for guys who do the research and get the smallest details right. I love working with colour, so it's always a pleasure to get the paint out, and I tend to spend way too much time experimenting, as well as learning from other modellers. My main inspiration comes from artists - there's a lifetime of technique to draw on just by surfing around.

And, talking of paint, something miraculous just happened...
SteveAndrews
_VISITCOMMUNITY
England - South East, United Kingdom
Joined: August 16, 2010
KitMaker: 693 posts
AeroScale: 551 posts
Posted: Wednesday, March 01, 2017 - 01:04 AM UTC
Someone once said “Life’s a b***h and then you die”. Clearly that person had never had anything to do with Mal and his Miracle Masks. After a short hiatus with the international post, the goodies shown below arrived.

Not only did Mal send me the markings he originally offered, but he also threw in a set camouflage masks, D-day strip helpers and No Walk masks. Mal, you are a gentleman. Thank you so much for the time, effort and generosity. I’m excited to try them out, and I’ll show them in use as we progress through the build.

Cheers Mal. That’s at least a pint or three that I owe you.


thegirl
_VISITCOMMUNITY
Alberta, Canada
Joined: January 19, 2008
KitMaker: 6,743 posts
AeroScale: 6,151 posts
Posted: Friday, March 03, 2017 - 06:24 AM UTC
Really like how your seat turned out , well done sir


Terri
Holdfast
Staff MemberPresident
IPMS-UK KITMAKER BRANCH
#056
_VISITCOMMUNITY
England - South West, United Kingdom
Joined: September 30, 2002
KitMaker: 8,581 posts
AeroScale: 4,913 posts
Posted: Monday, March 06, 2017 - 11:31 AM UTC
The cockpit painting is looking good I should mention though that the whole seat was the orangey red colour (apart from the padding, of course, and support arms)


Quoted Text

Someone once said “Life’s a b***h and then you die”. Clearly that person had never had anything to do with Mal and his Miracle Masks. After a short hiatus with the international post, the goodies shown below arrived.

Not only did Mal send me the markings he originally offered, but he also threw in a set camouflage masks, D-day strip helpers and No Walk masks. Mal, you are a gentleman. Thank you so much for the time, effort and generosity. I’m excited to try them out, and I’ll show them in use as we progress through the build.

Cheers Mal. That’s at least a pint or three that I owe you.


There is actually more than that but I'll let you discover what

From this mailing episode we can deduce that either Steve isn't that friendly with his postman, or that the postman doesn't understand that the shortened version of Stephen is "Steve". So if you are posting anything to Switzerland make sure that you use the proper full name as numbers are not used on apartments!

Enjoy Steve, use what you want to, don't feel that you have to use all the stuff just because I sent it