World War II: Great Britain
Aircraft of Great Britain in WWII.
Hosted by Rowan Baylis
Spitfire Vb by Hobby Boss in 1/32 scale
KelticKnot
_VISITCOMMUNITY
Scotland, United Kingdom
Joined: May 11, 2015
KitMaker: 768 posts
AeroScale: 656 posts
Posted: Monday, January 30, 2017 - 06:25 PM UTC
The seat is turning out to be a lovely little model in it's own right.
Surely that handle activates the ejector mechanism?
Joel_W
Staff MemberAssociate Editor
AUTOMODELER
_VISITCOMMUNITY
New York, United States
Joined: December 04, 2010
KitMaker: 11,666 posts
AeroScale: 7,410 posts
Posted: Tuesday, January 31, 2017 - 02:24 AM UTC
Steve,
The seat assembly is really quite complex and impressive. You did a super job in assembly it, especially since it's some what fiddly.

Joel
SteveAndrews
_VISITCOMMUNITY
England - South East, United Kingdom
Joined: August 16, 2010
KitMaker: 693 posts
AeroScale: 551 posts
Posted: Tuesday, January 31, 2017 - 03:18 AM UTC
Hi guys

Paul, for just a moment you had me. Bad man!

Joel, thanks very much. There's more fiddly stuff to come - plenty of rods and bars on the cockpit floor. I' amazed pilots didn't get caught up in it all.

More stuff to see soon.

Have a great day.

S
berndm
_VISITCOMMUNITY
Niedersachsen, Germany
Joined: March 26, 2014
KitMaker: 844 posts
AeroScale: 630 posts
Posted: Tuesday, January 31, 2017 - 01:38 PM UTC
Beautiful detail work, looks really good !

Its an interesting kit, i will follow your build.

Led Zeppelin has the right groove for modelling. On the third album they had some aircrafts on the cover but not on Physical Graffiti.
SteveAndrews
_VISITCOMMUNITY
England - South East, United Kingdom
Joined: August 16, 2010
KitMaker: 693 posts
AeroScale: 551 posts
Posted: Tuesday, January 31, 2017 - 05:17 PM UTC
Hi Bernd

Thanks very much. Its great to have you along.

Don't get me started on Led Zep. I could fill the whole blog with words of joy on just about every album. But, as you mentioned them, here's another from Paige and Plant post Led Zep in 1994. A thing of musical beauty...

https://www.youtube.com/watch?v=BeDylD8dV7U

Now I'm all melty and mellow.

Have a great day.

Steve
berndm
_VISITCOMMUNITY
Niedersachsen, Germany
Joined: March 26, 2014
KitMaker: 844 posts
AeroScale: 630 posts
Posted: Tuesday, January 31, 2017 - 06:28 PM UTC
Another fine tune from LZ, in a beautiful performance.
Happy Modelling
SpeedyJ
_VISITCOMMUNITY
Bangkok, Thailand / ไทย
Joined: September 17, 2013
KitMaker: 1,617 posts
AeroScale: 212 posts
Posted: Tuesday, January 31, 2017 - 07:36 PM UTC
Great to hear people listen to some good music whilst building excellent planes. My building sessions with Miles Davis on a cold winter Sunday are the best I can remember. Nice progress with the Spitfire. I wonder why the seat is so much different from later Mk's. Looks almost like a Chesterfield on wings.

Kind regards,

Robert Jan
SteveAndrews
_VISITCOMMUNITY
England - South East, United Kingdom
Joined: August 16, 2010
KitMaker: 693 posts
AeroScale: 551 posts
Posted: Thursday, February 02, 2017 - 01:25 AM UTC
Hi Robert

Oh yes. There's a great cozy feeling to be had from hiding from the weather with great music and a great kit. Winter isn't all bad :-)

Have fun while it lasts

S
SteveAndrews
_VISITCOMMUNITY
England - South East, United Kingdom
Joined: August 16, 2010
KitMaker: 693 posts
AeroScale: 551 posts
Posted: Thursday, February 02, 2017 - 01:27 AM UTC
How far do you go in pursuit of detail and accuracy? The answer of course is a matter of personal choice. I must admit I used to think that it was impossible to have too much detail. Then I realised that when viewed with the naked eye too man of those tiny additions I obsessed about during a build just can’t be seen. So, with the help of Mr self-discipline I’ve been trying to kick the over-detailing habit, but damn its hard. What is it about detail that is so enticing? It’s the crack-cocaine of modelling, fed by macros and close-ups in magazines and delicious after market photo-etch and resin (and yes, I’m guilty too).

The Spitfire’s cockpit offers all sorts of opportunities to indulge the habit. Hobby Boss’ offering is fine, but even a quick glance at references shows all sorts areas that could be improved. So, with an itch to scratch but a head saying ‘dont do it’ I decided to enhance a few parts only. My eye fell first on the foot pedals. They are way too thick and the strap has an unnatural curve. I simply cut off the strap and replaced it with plastic card, and sanded the edges of the rest so they became thinner. They went from…


to…


The second part to tempt me in is the control column. I decided to make the top section a bit more like the real thing with some plastic card additions. It’s not an exact replica now, but it is more interesting. I also removed the two moulded on wires. I will replace them with three copper wires. This is work in progress, but here is the journey so far.


Will all of it actually be visible in the end? I suspect not, but perhaps these additions will create the impression of greater detail. That’s what happened with my last kit - the Mirage IIIc - so I’m hoping to get the same impact from a few home made extras.

https://www.youtube.com/watch?v=KUmZp8pR1uc

Happy modelling guys.
Holdfast
Staff MemberPresident
IPMS-UK KITMAKER BRANCH
#056
_VISITCOMMUNITY
England - South West, United Kingdom
Joined: September 30, 2002
KitMaker: 8,581 posts
AeroScale: 4,913 posts
Posted: Thursday, February 02, 2017 - 11:31 AM UTC
I've built one of these and, like you say, a nice kit. It does have some issues though, some of which I can see that you have addressed, like the tail planes. There are IIRC a couple of clear parts that fit into the fuselage, near the forward cockpit (or they might be on the Revell MkII?, add them sand flat and paint over them. Again there are a pair of clear parts that fit under the wings, leave them off! They bare no resemblance to anything on a Spitfire!

I'm not sure of when your choice of subject was built but It probably had an internal armoured wind screen, the kit one depicts the external wind screen. Also the shape is a bit wrong, but I'm interested in whether you have found a replacement canopy? Incidentally for my MkV I simply left off the armoured screen part, then found a photo showing that my choice had the external screen!

Also you may find that the side cowling panels a bit short, I simply added plastic strip at the rear to extend them slightly. Again I'm not 100% sure but it may have just been one side that was effected.

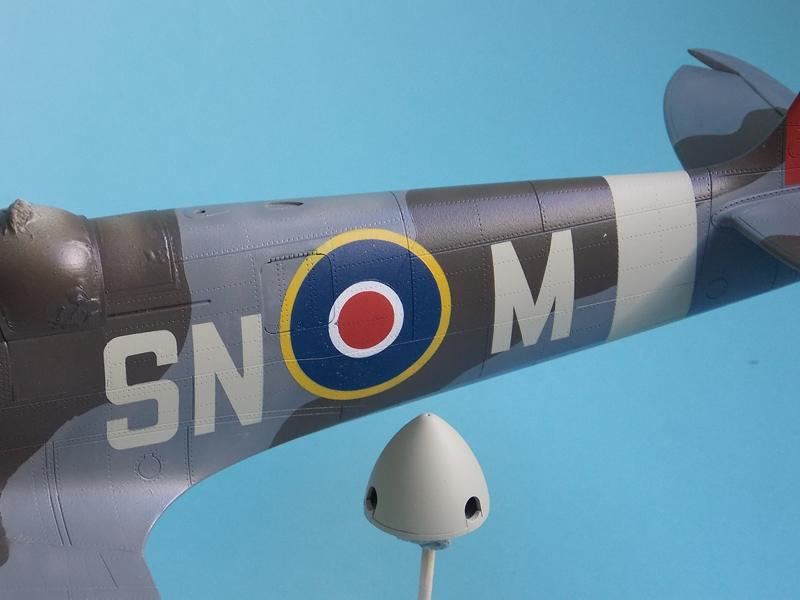
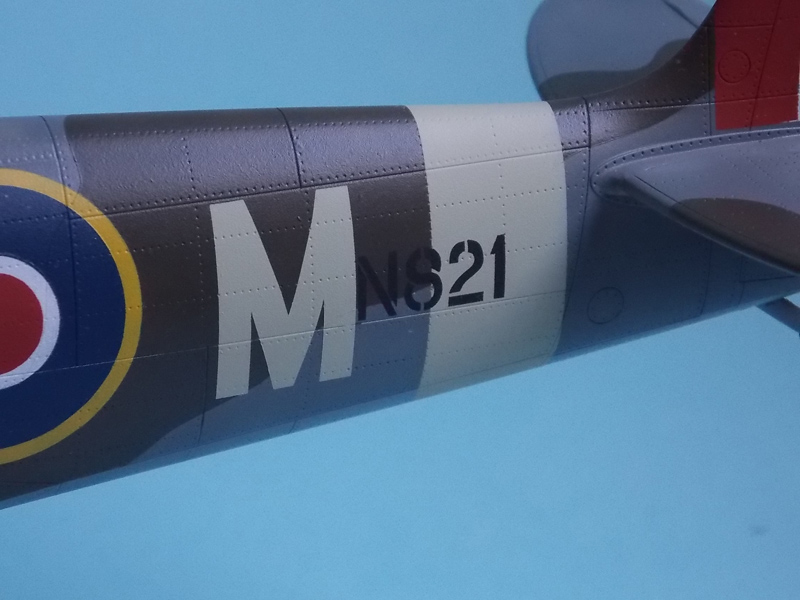
I am very pleased to see that you have gone with paint masks for the main markings But decals for the codes and serials! that cannot be allowed Contact me and I will produce them for you

You just can't have too many Spitfires
berndm
_VISITCOMMUNITY
Niedersachsen, Germany
Joined: March 26, 2014
KitMaker: 844 posts
AeroScale: 630 posts
Posted: Thursday, February 02, 2017 - 12:57 PM UTC
Good work with the cockpit details, the pedals look way better.
SteveAndrews
_VISITCOMMUNITY
England - South East, United Kingdom
Joined: August 16, 2010
KitMaker: 693 posts
AeroScale: 551 posts
Posted: Thursday, February 02, 2017 - 04:29 PM UTC
Hi Bernd and Mal

Bernd, thanks very much. Its all progress, even if it is super fiddly.

Mal, thanks a million for your advice, and especially offer on replacing the decals. I'll send you a pm on the latter subject.

I haven't moved my attention much beyond the cockpit interior yet, or checked the canopy but it sounds like I need to. Let me check some details and see if I can find a date of manufacture for the version I'm making. I'll also post a shot of the parts I think you mean on the underside.

This is great advice and the offer of masks is fabulous. Watch out for a pm.

Thanks for taking the time, and as you said, you can never have enough Spitfires.

With best wishes to you both.

Steve
Holdfast
Staff MemberPresident
IPMS-UK KITMAKER BRANCH
#056
_VISITCOMMUNITY
England - South West, United Kingdom
Joined: September 30, 2002
KitMaker: 8,581 posts
AeroScale: 4,913 posts
Posted: Friday, February 03, 2017 - 12:40 PM UTC
Hi Steve,
No problem at all, PM answered

Codes and serials are the easiest to paint and give fabulous results:


SteveAndrews
_VISITCOMMUNITY
England - South East, United Kingdom
Joined: August 16, 2010
KitMaker: 693 posts
AeroScale: 551 posts
Posted: Saturday, February 04, 2017 - 02:45 AM UTC
Hi Mal

I just replied, and wow that looks great. I'm hooked already and looking forward to dusting off the airbrush.

Happy modelling

Steve

SteveAndrews
_VISITCOMMUNITY
England - South East, United Kingdom
Joined: August 16, 2010
KitMaker: 693 posts
AeroScale: 551 posts
Posted: Saturday, February 04, 2017 - 03:25 AM UTC
Did I say this is fiddly work? Wow, it really is. A steady hand, a good pair of tweezers and constant dry fitting and checking are essential to get all these little parts lined up. The attachment points are small and the whole assembly needs care with handling even when it is done. Having said that, a little scratch building and some patience does produce pleasing result.


Keeping it this way while I make the rest of the kit will also be a challenge. I usually store sub assemblies in zip lock bags. This time I’ll also surround the parts with cut foam to take all the stress and keep them protected.

Have a great weekend.

Steve
KelticKnot
_VISITCOMMUNITY
Scotland, United Kingdom
Joined: May 11, 2015
KitMaker: 768 posts
AeroScale: 656 posts
Posted: Saturday, February 04, 2017 - 03:34 AM UTC
Lookin good Steve! All this extra detail, especially on the control column and seat will add a lot to the cockpit I'm sure.
Should be a feast for the eyes once painted .
SteveAndrews
_VISITCOMMUNITY
England - South East, United Kingdom
Joined: August 16, 2010
KitMaker: 693 posts
AeroScale: 551 posts
Posted: Sunday, February 05, 2017 - 01:33 AM UTC
Hey Paul

Yes I hope so, especially as Mal's additional masks are really going to set off the exterior.

The version I'm making was built in 1941 and survived all the way to D-Day, so I'm taking Mal's advice on the windscreen armour too and leaving it off.

Have a great evening.

Steve
Holdfast
Staff MemberPresident
IPMS-UK KITMAKER BRANCH
#056
_VISITCOMMUNITY
England - South West, United Kingdom
Joined: September 30, 2002
KitMaker: 8,581 posts
AeroScale: 4,913 posts
Posted: Sunday, February 05, 2017 - 12:49 PM UTC
One other thing that is relevant, and this is probably not a 100% reliable thing but in essence its works, Edgar Brooks has said but I couldn't say where. The head rest was removed from spitfires apparently because a Squadron leader ditched in the channel and died because his parachute harness got cought up on it and they had never been of any real use. At around the same time that they were removed the radio fit changed from the HF to VHF type.

This basically means that if the aircraft that you are modelling has a headrest fitted then it should have the antenna wire between the mast and tail. If it doesn't have the head rest then no wire. Now the kit may have a headrest (I can't remember). I have just checked a photo of mine and it does but I can't remember if it is a separate part.

Anyway if you fit the headrest and therefore want to add the Antenna wire then the antenna mast is wrong! It doesn't have the pulley that turned the antenna wire through 90deg to enter the fuselage (actually a little less than 90deg but you get the drift?). The original antenna mast was retained (the VHF antenna wire was now inside it) but the pulley and pulley mount were left off. The double bump that you see on kit masts represents the fixing point for the pulley and it should have a couple of holes through it, for the rivets.

I'm not sure of the dates for any of this but MkIXs had no headrest and the VHF sets and I think the change happened around mid 1941 (but don't quote me on that but I do need to find out). And at some time the IFF transmitter was changed so the wires for it to the tail were no longer required. Mine has them because the photo that I found shows them.

Of course you can do as you like as the source of this was Edgar who is sadly no longer with us You could say that what I have written here is my interpretation of what I remember him saying. I did have a long conversation with him about things Spitfire at Telford a few years ago and a lot of what we discussed he said when answering questions on various forums.

SpeedyJ
_VISITCOMMUNITY
Bangkok, Thailand / ไทย
Joined: September 17, 2013
KitMaker: 1,617 posts
AeroScale: 212 posts
Posted: Sunday, February 05, 2017 - 03:13 PM UTC
Nice you share the information about the head rest. did not know that. Earlier I posted a link to this thread, very useful and to the point. What I've learned and it is mentioned often that, when Spitfires went for maintenance, changes and updates were sometimes different, depending on requirements and availability of resources.

Regards,

Robert Jan
SteveAndrews
_VISITCOMMUNITY
England - South East, United Kingdom
Joined: August 16, 2010
KitMaker: 693 posts
AeroScale: 551 posts
Posted: Sunday, February 05, 2017 - 05:04 PM UTC
Hi Mal and Robert

Oh la la. Mal, I read your very helpful info twice, and now I've got it, and I have Robert's sage advice ringing in my ears too.

So on the basis that there's rarely a definitive answer, and the much respected Edgar Brooks gave us some info. I'm opting for the no-head-rest-no-antenna-wire option, which will need an easy scratch build on the mast, and a bit more fiddly work on the interior.

I think this photo illustrates the desired result:


With thanks again for all the help and advice.

Steve
Holdfast
Staff MemberPresident
IPMS-UK KITMAKER BRANCH
#056
_VISITCOMMUNITY
England - South West, United Kingdom
Joined: September 30, 2002
KitMaker: 8,581 posts
AeroScale: 4,913 posts
Posted: Monday, February 06, 2017 - 02:40 PM UTC
Be warned though that in a phone call with Edgar he didn't seem to remember telling me a about the head rest thing but it is documented in one of his replies, somewhere, and it does make perfect sense, the getting rid of the head rest, as in a crash its padding on the gun sight that you will need and you ain't going to be worried about "comfort" in a fight! It is purely coincidence that the radios changed type around the same time but, again, it can be a useful fall back if pictures don't show one or the other or you don't have pictures

SteveAndrews
_VISITCOMMUNITY
England - South East, United Kingdom
Joined: August 16, 2010
KitMaker: 693 posts
AeroScale: 551 posts
Posted: Tuesday, February 07, 2017 - 01:49 AM UTC
Hi Mal

You see, this is a great example of why I gave up rivet counting. The historical record is rarely conclusive and operational modifications weren't always consistent or documented. The photographic evidence I've found backs up the no-head-rest-no-antenna-wire view, so that's what I'm going with, and thanks to you it at least has some rationale to it.

Right, back to plastic...

Have a great day.

Steve
SteveAndrews
_VISITCOMMUNITY
England - South East, United Kingdom
Joined: August 16, 2010
KitMaker: 693 posts
AeroScale: 551 posts
Posted: Tuesday, February 07, 2017 - 02:14 AM UTC
Armed with the advice you can see earlier in this blog I set about modifying the headrest. My plan was to snip it off, sand it down and relax with a nice glass of red wine. All good, except the headrest is hollow and it snapped at the first snip. Damn. That left me removing the whole assembly while being careful not to break any of the other parts. Once it was off I scratched a replacement and glued it in place. I had to remove the photo etch panel from the old part and re-fix it to the new. Mission accomplished… phew!


At this stage I decided to remove and test fit the big assemblies - wings and fuselage. I do this partly to get a break from the fiddly work but mostly so that they provide a guide to fitting the cockpit parts well. In the case of the Spit’ I also wanted to test the clearance between cockpit floor and other parts. My references show pipes and wires beneath the rods for the control column and I wanted to see if there’s enough room to simulate some of these. There is, so that will be another simple scratch building job.


Taping the fuselage halves together and dry-fitting the instrument panel and seat bracket also gave me a good idea of what will be seen when the model is finished. The photos I took will help me to decide where to add any extra detail and where to take special care with the paint.


A final spin off benefit is that I can see how well the main parts will fit, and with a bit of tape to provide an extra hand it seems like they will fit quite well. That always gives me a little smile of pleasure.


thegirl
_VISITCOMMUNITY
Alberta, Canada
Joined: January 19, 2008
KitMaker: 6,743 posts
AeroScale: 6,151 posts
Posted: Tuesday, February 07, 2017 - 05:41 AM UTC
Like your attention to the details , nice work


Terri
berndm
_VISITCOMMUNITY
Niedersachsen, Germany
Joined: March 26, 2014
KitMaker: 844 posts
AeroScale: 630 posts
Posted: Tuesday, February 07, 2017 - 01:06 PM UTC
Looks great so far, Steve.
The "wires" on the control stick ad a lot of realism and gives the cockpit much more "live".Important in big scale.

Trumpeter and Hobby Boss have the reputation to make well designed kits but lack often in research,so it seams you can t have everything .