_GOTOBOTTOM
Cold War (1950-1974)
Discuss the aircraft modeling subjects during the Cold War period.
Hosted by Tim Hatton
KittyHawk F2H-2 Banshee build
betheyn
Staff MemberSenior Editor
AEROSCALE
#019
_VISITCOMMUNITY
England - South East, United Kingdom
Joined: October 14, 2004
KitMaker: 4,560 posts
AeroScale: 2,225 posts
Posted: Wednesday, October 12, 2016 - 11:33 PM UTC
After getting my grubby little hands on Kitty Hawks 1/48th F2H-2/P Banshee, I thought I would build the thing instead of reviewing it, as I really really want too build it. This will also give me a chance to see if any inaccuracies in the kit, which has been given a bit of a flogging over its development.
So onward and upward.

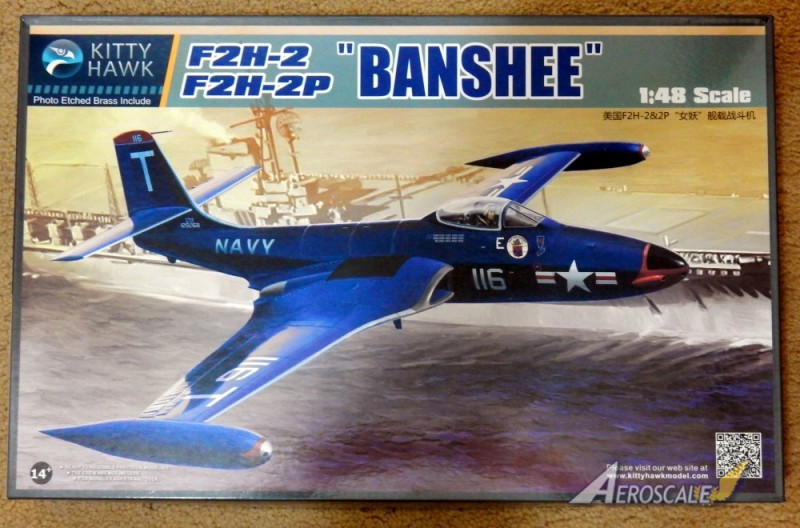
So in the box are three light grey sprues, one clear sprue and a small sheet of photo etch. 2 decal sheets, one which only holds the instrument panels decals and a unit badge, and a instruction booklet which has a full colour pull out for the four marking options.
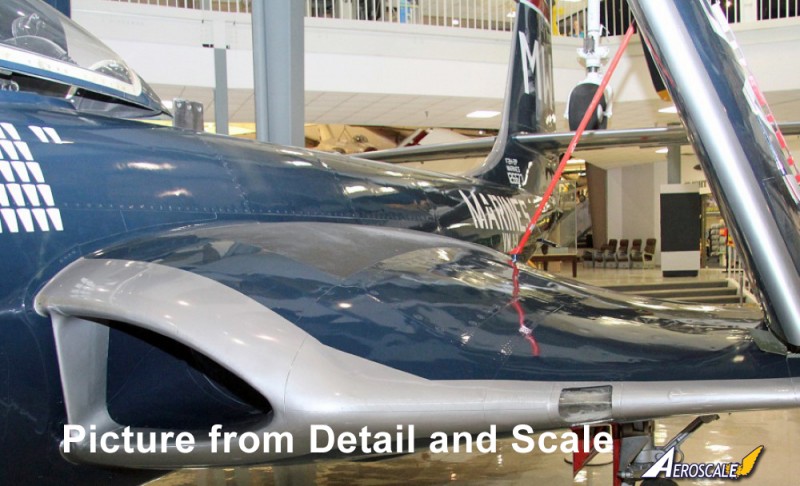
At the bottom of the box is a leaflet stating that "the research for this Kitty Hawk kit was provided by Detail and Scale". As I will be using the new publication from D&S, we shall see. Sorry didn't take any pics of the contents as I starting cutting parts off as soon as it was opened lol.
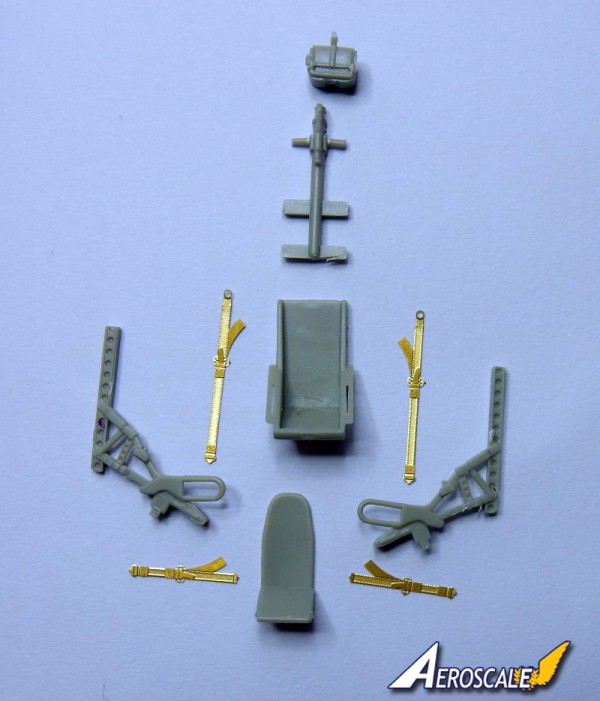
So starting off with the ejection seat. This is made up of 6 plastic parts and four photo etch parts for the harness.
The seat goes together easily and this is where you find the first error.
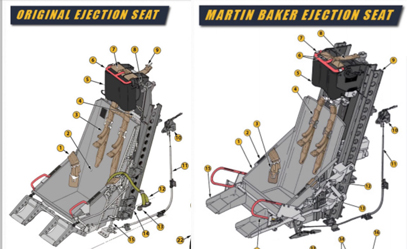
The kits seat has the bottom of the Martin Baker seat but the head rest of the original seat. There is very little gap between the headrest and the seat back, where there should be.
I have included a picture of the seats drawn by Rock Roszak.


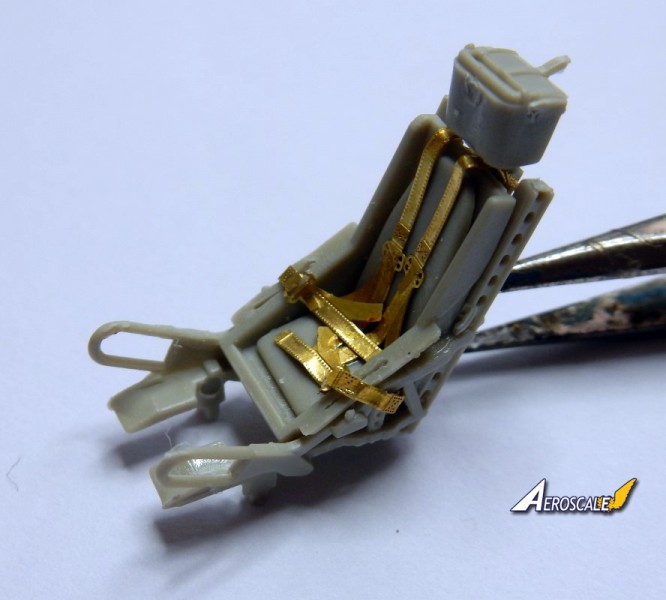
Also the instructions have the placement of the harness wrong, and are way too long.
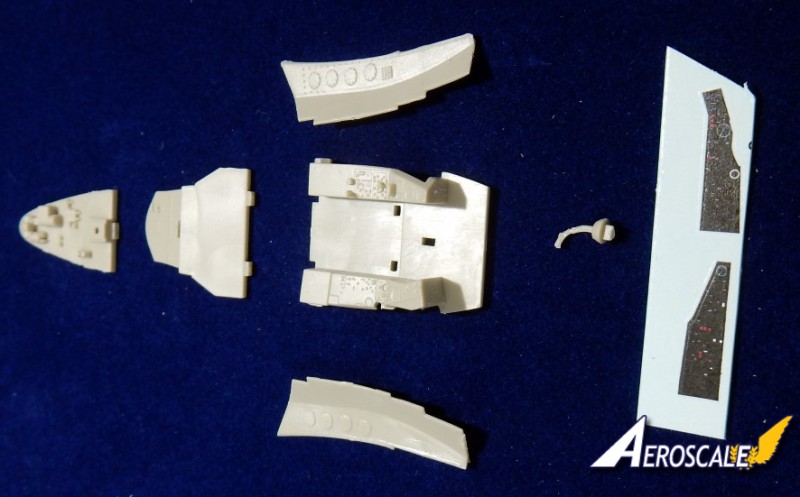
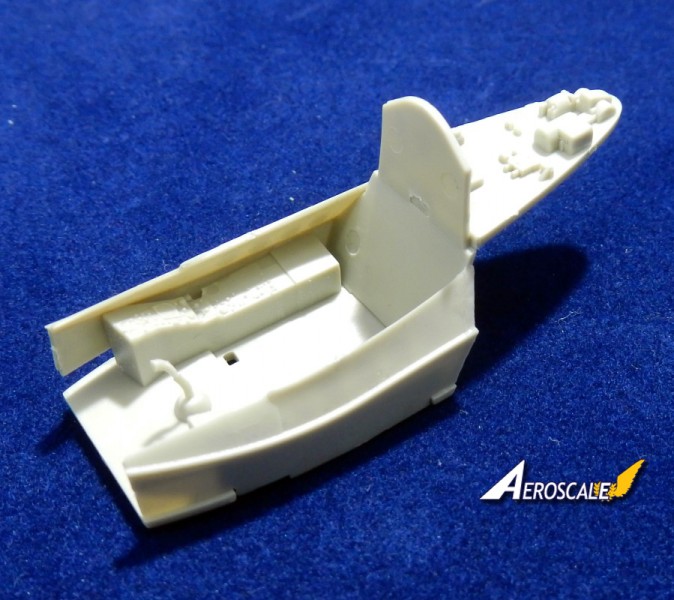
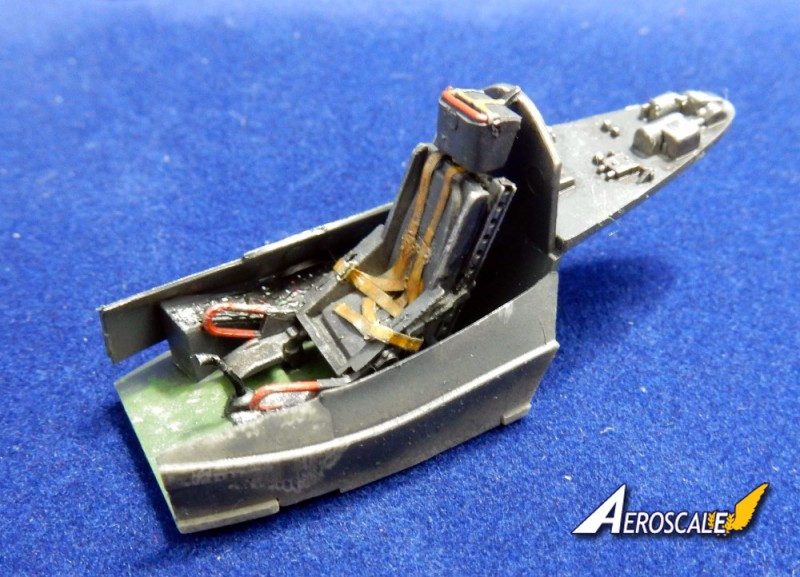
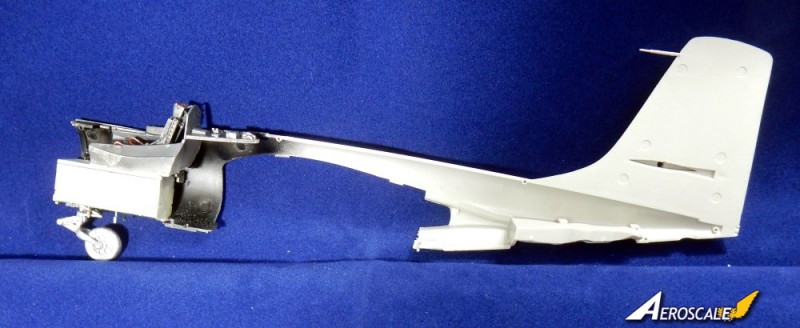
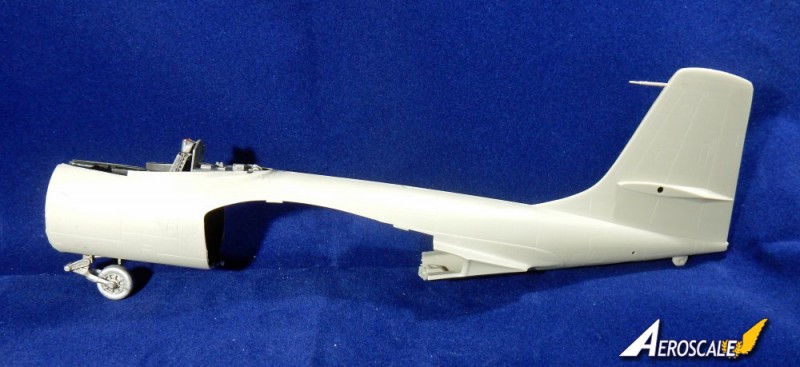
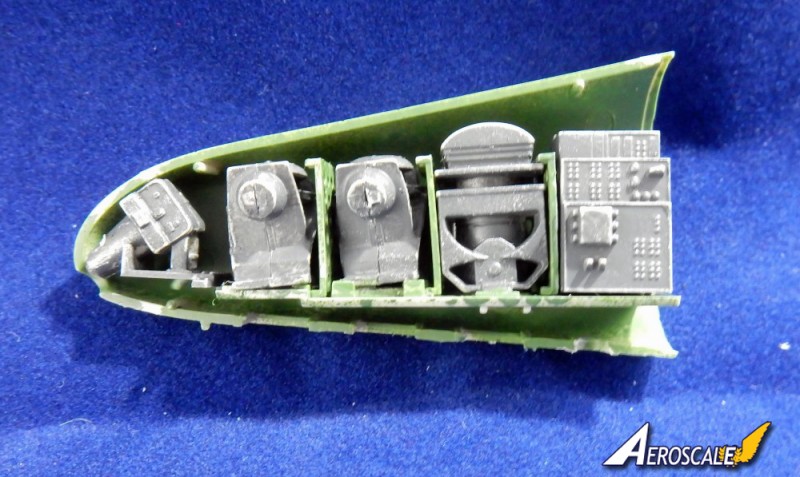
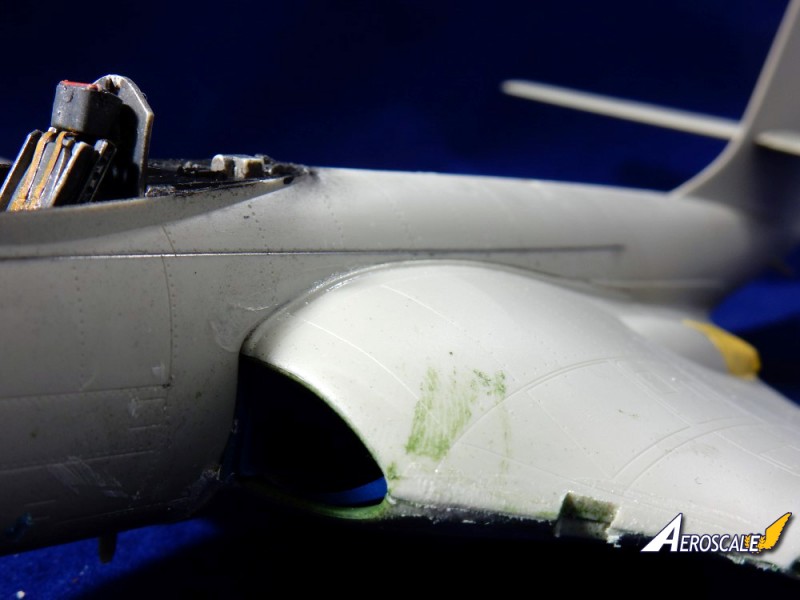
Cockpit tub next.
Andy
litespeed
Staff MemberNews Reporter
AEROSCALE
_VISITCOMMUNITY
England - North West, United Kingdom
Joined: October 15, 2009
KitMaker: 1,976 posts
AeroScale: 1,789 posts
Posted: Thursday, October 13, 2016 - 03:15 AM UTC
I'm pulling up a chair for this one Andy.
tim
betheyn
Staff MemberSenior Editor
AEROSCALE
#019
_VISITCOMMUNITY
England - South East, United Kingdom
Joined: October 14, 2004
KitMaker: 4,560 posts
AeroScale: 2,225 posts
Posted: Thursday, October 13, 2016 - 11:55 AM UTC

Quoted Text

I'm pulling up a chair for this one Andy.
tim


Make yourself comfy this could be an interesting ride Tim.
Well the cockpit is made up of 6 parts and two decals.
The detail is up too much, with the control column just a shaped bit of plastic. The decals are a bit muted, and there is no detail for the two metal tracks for the canopy.
The instructions call for the cockpit to be painted black. This is true for aircraft in the overall blue scheme, but the floor should be interior green.


Ejection seat and cockpit painted.

Nose wheel and well up next.
Andy
In_War_and_Peace
Staff MemberAssociate Editor
MODELGEEK
_VISITCOMMUNITY
England - South West, United Kingdom
Joined: September 26, 2015
KitMaker: 116 posts
AeroScale: 71 posts
Posted: Thursday, October 13, 2016 - 01:58 PM UTC
Looking good Andy will keep an eye on this one
Joel_W
Staff MemberAssociate Editor
AUTOMODELER
_VISITCOMMUNITY
New York, United States
Joined: December 04, 2010
KitMaker: 11,666 posts
AeroScale: 7,410 posts
Posted: Thursday, October 13, 2016 - 10:39 PM UTC
Andy,
I'm pulling up my chair next to Tim's to follow your build blog. I've waited for this kit for quite some time, and I'm still planning on getting two of them. A lot depends on what you find right and wrong with the kit.

While the Martin Backer seat looks fairly well detailed, especially once the PE belts and harnesses are added, the head rest really is quite a let down, and can benefit from some detailing.

Joel
Merlin
Staff MemberSenior Editor
AEROSCALE
#017
_VISITCOMMUNITY
United Kingdom
Joined: June 11, 2003
KitMaker: 17,582 posts
AeroScale: 12,795 posts
Posted: Friday, October 14, 2016 - 01:00 AM UTC
Hi Andy

Nice start. I see what you mean about the weird hybrid ejection seat - it really is half and half of the two drawings you've posted.

Is the distance between the seat and the control column correct? - it looks a long stretch for the pilot.

All the best

Rowan
betheyn
Staff MemberSenior Editor
AEROSCALE
#019
_VISITCOMMUNITY
England - South East, United Kingdom
Joined: October 14, 2004
KitMaker: 4,560 posts
AeroScale: 2,225 posts
Posted: Saturday, October 15, 2016 - 10:53 PM UTC
Not much done over the weekend as work as always gets in the way. Should have a couple of updates soon.

Quoted Text

Andy,
I'm pulling up my chair next to Tim's to follow your build blog. I've waited for this kit for quite some time, and I'm still planning on getting two of them. A lot depends on what you find right and wrong with the kit.

While the Martin Backer seat looks fairly well detailed, especially once the PE belts and harnesses are added, the head rest really is quite a let down, and can benefit from some detailing.

Joel


Thanks Joel, there are a few mistakes so far, the seat being one of them. Pavla do a resin seat that looks much better which fits the F2H Banshee and FJ-4B Fury.


Quoted Text

Hi Andy

Nice start. I see what you mean about the weird hybrid ejection seat - it really is half and half of the two drawings you've posted.

Is the distance between the seat and the control column correct? - it looks a long stretch for the pilot.

All the best

Rowan


Yep the seat fits into two pre drilled holes in the cockpit floor.

Quoted Text

Looking good Andy will keep an eye on this one


Thanks Adie.
Andy
TailspinTurtle
_VISITCOMMUNITY
United States
Joined: March 19, 2012
KitMaker: 3 posts
AeroScale: 3 posts
Posted: Sunday, October 16, 2016 - 07:40 PM UTC
Note that Rock's illustration of the seat does not show the parachute and the seat cushion that would normally be in place in an operational airplane (parachutes were left in carrier-based airplanes).

Also see: http://tailspintopics.blogspot.com/2016/09/kitty-hawk-148-f2h-22p-banshee.html
betheyn
Staff MemberSenior Editor
AEROSCALE
#019
_VISITCOMMUNITY
England - South East, United Kingdom
Joined: October 14, 2004
KitMaker: 4,560 posts
AeroScale: 2,225 posts
Posted: Tuesday, October 25, 2016 - 07:47 PM UTC

Quoted Text

Note that Rock's illustration of the seat does not show the parachute and the seat cushion that would normally be in place in an operational airplane (parachutes were left in carrier-based airplanes).

Also see: http://tailspintopics.blogspot.com/2016/09/kitty-hawk-148-f2h-22p-banshee.html


Hi Tommy,
Thanks for the info, I guessed there was a cushion missing, I didn't realise that the pilots left the parachute in the aircraft though.
I did read your blog on the problems of the kit before starting this build, so I am well acquainted with the shortfalls, but I'm still hopeful it wont be "fatally flawed" as one member who shall not be named called practically every kit ever released .
Andy
betheyn
Staff MemberSenior Editor
AEROSCALE
#019
_VISITCOMMUNITY
England - South East, United Kingdom
Joined: October 14, 2004
KitMaker: 4,560 posts
AeroScale: 2,225 posts
Posted: Tuesday, October 25, 2016 - 07:55 PM UTC
Right back onto the build after work messing my life up again, damn being to young and poor to retire lol.
Well I have built the nose undercarriage and wheel well. Both are quite well detailed, but the nose gear does need top be installed as it slots into four holes inside the well, so care will be needed too not break it when handling the model.


Cockpit and wheel well added to the fuselage half. Nose weight is required, but there isn't a lot of room to put any in.

Fuselage halves glued together, a slight seam mark is present on the top, which will need some light sanding.
The pitot tube on the tail is moulded onto the tail, so that is bound to be broken off at some point.

The two choices of nose stores up next.
Andy
Merlin
Staff MemberSenior Editor
AEROSCALE
#017
_VISITCOMMUNITY
United Kingdom
Joined: June 11, 2003
KitMaker: 17,582 posts
AeroScale: 12,795 posts
Posted: Wednesday, October 26, 2016 - 01:53 AM UTC
Hi Andy

Nice progress. I always hate having to install items like the landing gear ahead of completing the main airframe. It might be worth fitting a simple shield made of cardboard to protect it while you tackle the rest of the build.

All the best

Rowan
betheyn
Staff MemberSenior Editor
AEROSCALE
#019
_VISITCOMMUNITY
England - South East, United Kingdom
Joined: October 14, 2004
KitMaker: 4,560 posts
AeroScale: 2,225 posts
Posted: Wednesday, October 26, 2016 - 01:46 PM UTC

Quoted Text

Hi Andy

Nice progress. I always hate having to install items like the landing gear ahead of completing the main airframe. It might be worth fitting a simple shield made of cardboard to protect it while you tackle the rest of the build.

All the best

Rowan


Hi,
Yep its a bit of a pain, but there isn't a lot you can do about it as its a very tight fit too try and get the leg into the well after its built, to much force and it will break (I did have a try).
It is quite strong so as long as your careful it should survive, although it will be a pain when you get too the painting stage.
Andy
betheyn
Staff MemberSenior Editor
AEROSCALE
#019
_VISITCOMMUNITY
England - South East, United Kingdom
Joined: October 14, 2004
KitMaker: 4,560 posts
AeroScale: 2,225 posts
Posted: Wednesday, October 26, 2016 - 01:53 PM UTC
The kit offers two choices of nose, one with the four cannons, and the nose with all the cameras installed.
The detail for the nose guns is pretty good with ammo bins and the four cannons nicely rendered. The nose has separate doors, so you can show off the internals.


But, really you can't use this. Stay tuned to find out why.
The recon nose has the cameras installed but KH don't give you the option of having the two side doors open, so the detail gets hidden behind the 9 small windows.

The nose is a very tight fit onto the fuselage and will needs clamps to mate it (nose just placed onto fuselage in this pic).

Up next will be the engine/wing installation.
Andy
Joel_W
Staff MemberAssociate Editor
AUTOMODELER
_VISITCOMMUNITY
New York, United States
Joined: December 04, 2010
KitMaker: 11,666 posts
AeroScale: 7,410 posts
Posted: Wednesday, October 26, 2016 - 11:04 PM UTC
Andy,
You're making excellent progress. with the inclusion of the camera a gun associated parts, where are you planning on adding the needed weight? The only area I see is just behind the cockpit tub.
Joel
betheyn
Staff MemberSenior Editor
AEROSCALE
#019
_VISITCOMMUNITY
England - South East, United Kingdom
Joined: October 14, 2004
KitMaker: 4,560 posts
AeroScale: 2,225 posts
Posted: Friday, October 28, 2016 - 02:37 PM UTC

Quoted Text

Andy,
You're making excellent progress. with the inclusion of the camera a gun associated parts, where are you planning on adding the needed weight? The only area I see is just behind the cockpit tub.
Joel


Hi Joel,
Thanks, just a shame you cant really use the guns though.
I have added some weight behind and underneath the cockpit tub, and a little in front of the cockpit. Don't think its enough though.
Andy
betheyn
Staff MemberSenior Editor
AEROSCALE
#019
_VISITCOMMUNITY
England - South East, United Kingdom
Joined: October 14, 2004
KitMaker: 4,560 posts
AeroScale: 2,225 posts
Posted: Friday, October 28, 2016 - 02:56 PM UTC
Bit more of an update.
The engines are built and just block painted as you cant really see a lot of them once the wings are closed up. The engines have blades front and aft so it stops the see through look.

Undercarriage bays added, plus the engine mounting bits.

The inboard flaps underneath the aircraft are fitted and deployed.
The instructions show the outer flap closed (as in the flap to the right) where in fact the flaps were actually bolted together, so they both opened and closed as one. A bit of fiddling and they can be posed open.

Now a slight inaccuracy in the inner flap that covers the engine, as you can see from the kits part and the photo from the Detail and Scale Banshee book, the part is way too wide.


Wing attachment next.
Andy
Joel_W
Staff MemberAssociate Editor
AUTOMODELER
_VISITCOMMUNITY
New York, United States
Joined: December 04, 2010
KitMaker: 11,666 posts
AeroScale: 7,410 posts
Posted: Friday, October 28, 2016 - 10:56 PM UTC
Andy,
I've waited for this kit to be released for some time, and my usual concerns about how Kitty Hawk kits haven't been eased any following your build. I'm hoping that the wing assembly fits snuggly and in decent alignment with the fuselage.

Joel
betheyn
Staff MemberSenior Editor
AEROSCALE
#019
_VISITCOMMUNITY
England - South East, United Kingdom
Joined: October 14, 2004
KitMaker: 4,560 posts
AeroScale: 2,225 posts
Posted: Saturday, October 29, 2016 - 04:15 PM UTC
Well the wing fits, very well on the top as KH have an ingenious way of fitting the wing to the fuselage. The fuselage has four tabs which slot into the upper wing, so a little of the wing sits inside of the fuselage, thus eliminating a gap.

No such luck on the underside though as there is quite a prominent gap.

Now there has been talk of the rather prominent wing root for the engine nacelles being to over pronounced.
Looking at the panel line on the kit and comparing it too one of the Banshees on display at the National Navy Aviation Museum you can see that KH have got this slightly wrong as the panel line on the real aircraft is nowhere near the canopy, but on the KH kit it is right underneath it. You can also see quite clearly the wing root is too bulged, and not as streamlined.


Next up the reason you cant really build the gun toting variant of the Banshee.
Andy
Joel_W
Staff MemberAssociate Editor
AUTOMODELER
_VISITCOMMUNITY
New York, United States
Joined: December 04, 2010
KitMaker: 11,666 posts
AeroScale: 7,410 posts
Posted: Saturday, October 29, 2016 - 09:09 PM UTC
Andy,
Your efforts are certainly up to the task of turning this poor offering into a decent replica.

The top side of the inner wing to the fuselage does indeed create a seamless joint, but as you said the intakes are completely miss shaped, and the joining fairing is way out of scale, Absurdly so. Then there is that horrendous lower wing/fuselage joint. fixable with sheet, but in my book for a so called new state of the art kit, it's just unacceptable.

Perhaps Kitty Hawk should scake back on the number of new releases in both 1/48 and 1/32 scales, and apply those allotted funds to higher Quality Standards, as so many of their releases have major issues.

Since the release of their 1/32 scale OS2U Kingfisher, I've yet to buy one due to the many issues that need to be addressed. Their 1/48 scale F9F-8/P Cougar was yet another major disappointment.

Joel
betheyn
Staff MemberSenior Editor
AEROSCALE
#019
_VISITCOMMUNITY
England - South East, United Kingdom
Joined: October 14, 2004
KitMaker: 4,560 posts
AeroScale: 2,225 posts
Posted: Sunday, October 30, 2016 - 12:59 PM UTC

Quoted Text

Andy,
Your efforts are certainly up to the task of turning this poor offering into a decent replica.

The top side of the inner wing to the fuselage does indeed create a seamless joint, but as you said the intakes are completely miss shaped, and the joining fairing is way out of scale, Absurdly so. Then there is that horrendous lower wing/fuselage joint. fixable with sheet, but in my book for a so called new state of the art kit, it's just unacceptable.

Perhaps Kitty Hawk should scake back on the number of new releases in both 1/48 and 1/32 scales, and apply those allotted funds to higher Quality Standards, as so many of their releases have major issues.

Since the release of their 1/32 scale OS2U Kingfisher, I've yet to buy one due to the many issues that need to be addressed. Their 1/48 scale F9F-8/P Cougar was yet another major disappointment.

Joel


Hi Joel,
Thanks, I'm trying with this kit, to be honest most of the parts fit quite well but that underside wing joint did really throw me, I actually went back and looked at the instructions too see if I missed a part.
Looking at some pics the engine nacelle/wing root looks more like the FH-1 Phantom (really wish someone would produce a new tool in 1/48th)as the hump is quite pronounced on the Phantom.
I have their Cougar sitting in the stash waiting for me too some up the courage to build it, after the horror stories I read concerning the build.
Andy
betheyn
Staff MemberSenior Editor
AEROSCALE
#019
_VISITCOMMUNITY
England - South East, United Kingdom
Joined: October 14, 2004
KitMaker: 4,560 posts
AeroScale: 2,225 posts
Posted: Sunday, October 30, 2016 - 01:06 PM UTC
Ok now we will see why you can't really build the gun variant out of the box.
This is the instrument panel for the kit, which is for the P variant, as it doesn't have the gun sight above it but the viewfinder.
No gun sight is supplied, but the panel is quite true too life concerning the dials and switches.

F2H-2P variant panel.

F2H-2 variant.

Andy
Joel_W
Staff MemberAssociate Editor
AUTOMODELER
_VISITCOMMUNITY
New York, United States
Joined: December 04, 2010
KitMaker: 11,666 posts
AeroScale: 7,410 posts
Posted: Sunday, October 30, 2016 - 11:32 PM UTC
Andy,
Unfortunately, it doesn't surprise me that the gun site is missing.
Joel
betheyn
Staff MemberSenior Editor
AEROSCALE
#019
_VISITCOMMUNITY
England - South East, United Kingdom
Joined: October 14, 2004
KitMaker: 4,560 posts
AeroScale: 2,225 posts
Posted: Wednesday, November 02, 2016 - 04:56 PM UTC
Well onwards and upwards.
The outer wing sections are on, well one of them as I intend to build one wing folded.
As you can see the top fits quite well but the underside of the wing has a pretty large gap that will need filling, no doubt this is due to the kit having the wing being able to fold.


The wing tip tanks are made up of two parts each and slot straight onto the wing tip. The fit is very good, and at the correct angle. The tanks were fitted off center, so more of the tank is underneath then above the wings centerline.
If modelling the photo recon version, the pylon holes will need filling as no external stores were carried (even though the instructions don't mention that).
More soon as I am nearing the end of the build, and should start painting soon.
Andy
TailspinTurtle
_VISITCOMMUNITY
United States
Joined: March 19, 2012
KitMaker: 3 posts
AeroScale: 3 posts
Posted: Wednesday, November 02, 2016 - 08:09 PM UTC
Well, rats. I just noticed another Kitty Hawk error that is in the gun bay. They misinterpreted a photo and in effect added a third ammo can as a "block" on the aft bulkhead of the bay. See today's update here: http://tailspintopics.blogspot.com/2016/09/kitty-hawk-148-f2h-22p-banshee.html

This post also includes illustrations of the gun sight needed for the fighter version.
Joel_W
Staff MemberAssociate Editor
AUTOMODELER
_VISITCOMMUNITY
New York, United States
Joined: December 04, 2010
KitMaker: 11,666 posts
AeroScale: 7,410 posts
Posted: Wednesday, November 02, 2016 - 11:22 PM UTC
Andy,
The fit of the outer wings once again adds another major issue to this already very disappointing release by Kitty Hawk. As you said, it's clearly the intention to have the wings in a folded position, then why offer the choice half heartedly?

Did you opt to fill those seems with some homemade plastic goop? You've once again managed to over come another glaring issue. One question, are you planning on trying to fill in the gap inside the wheel wells?

Joel
 _GOTOTOP