

Paul,
The frame is simple incredible. 80 pieces, and everything fits. Don't sell yourself short as getting it together one piece at a time, including all the glue spots that need to be one at a time, takes patience and a fair amount of skill. Well done.
Joel
Pre-Flight Check
Constructive critique of your finished or in-progress photos.
Constructive critique of your finished or in-progress photos.
Hosted by Jim Starkweather
Zoukei Mura SWS 1:48 Horton 229
Joel_W

Joined: December 04, 2010
KitMaker: 11,666 posts
AeroScale: 7,410 posts
Posted: Friday, December 30, 2016 - 08:18 PM UTC


spaarndammer

Joined: January 28, 2007
KitMaker: 1,945 posts
AeroScale: 388 posts
Posted: Friday, December 30, 2016 - 11:25 PM UTC
Incredible indeed. The story is as complex as the frame is. But the work is well done.
Looking forward to see more!

Jelger
Looking forward to see more!
Jelger

PeeJay74

#363
Joined: January 08, 2014
KitMaker: 425 posts
AeroScale: 401 posts

Posted: Thursday, January 12, 2017 - 06:25 PM UTC
Grr, I just spent 2 hours writing a detailed update and adding pics but somehow deleted it before I could post.
Must have fat-fingered the touchpad. Damn laptops!
Must have fat-fingered the touchpad. Damn laptops!
PeeJay74
#363
Joined: January 08, 2014
KitMaker: 425 posts
AeroScale: 401 posts
Posted: Thursday, January 12, 2017 - 06:45 PM UTC
@Everyone - thanks for following along. I hope you are enjoying it.
Ok, since I have to do this all over again I am going to break it up into smaller posts just in case I manage to ruin it again.
First off, my continued problems with the cockpit. I broke out the Airscale gauges and tried them out. They went on beautifully and snugged right down into the details, but unfortunately are too large to use on the panel. This isn't a fault of the decals in my opinion but an issue with Zoukei Mura's approach to the kit. I get the impression the kit's instrument panel is truly scaled down to 1/48th, making the gauges smaller than what most of us are used to in kits where manufacturers keep the gauges a bit oversized to offer us better detail. I don't take issue with either approach, but it is worth noting.
I tried to solve this by punching out the centers of the Airscale gauges an then applying them, but this didn't work out. Most of the gauges on the part are as narrow as my smallest punch, and trying to center the decal for this proved impossible for my abilities/eyesight. I ruined 3 out of every four I tried and gave up after wrecking about 12 decals. Not to mention I would still have needed to paint the gauge rings in the appropriate colors the Luftwaffe used.
Next I decided to just give in and use the kit decal for the gauge cluster. The details are not as fine as Airscale's but I was getting frustrated and wanted to move past this. Enter the decal from @#$#. It went on fine but proved very thick. Like, makes Tamiya-seem-like-Cartograf thick. Nothing I did would get it to snuggle down into the details on the part face. Repeated applications of Micro Set, Sol, and eventually a practical bath in Walther's Solva-Set did nothing to get the decal to melt down into the detailed instrument face.
I gave up and decided to purchase the Zoukei Mura Horten 229 Extra Parts set for the cockpit. This little gem right here:
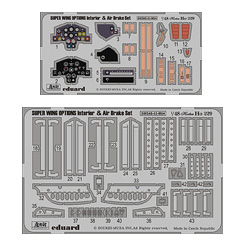
Image from Zoukei Mura's product website.
This is a fancy way of marketing a custom made PE set by Eduard under ZM's label. With the associated price mark up of course. $25 later it is in the mail, but honestly I know I would never be satisfied with the kit if I left the cockpit looking substandard. I have been enjoying this kit too much to cave now. Even with the added PE, I still only have about $80 invested in it and feel I am definitely getting my money's worth. Heck, I already broke down and bought their J7W1 Shinden based on my experience with this one.
Anyway, I'll come back to the cockpit after the mailman delivers the goods.
Ok, since I have to do this all over again I am going to break it up into smaller posts just in case I manage to ruin it again.
First off, my continued problems with the cockpit. I broke out the Airscale gauges and tried them out. They went on beautifully and snugged right down into the details, but unfortunately are too large to use on the panel. This isn't a fault of the decals in my opinion but an issue with Zoukei Mura's approach to the kit. I get the impression the kit's instrument panel is truly scaled down to 1/48th, making the gauges smaller than what most of us are used to in kits where manufacturers keep the gauges a bit oversized to offer us better detail. I don't take issue with either approach, but it is worth noting.
I tried to solve this by punching out the centers of the Airscale gauges an then applying them, but this didn't work out. Most of the gauges on the part are as narrow as my smallest punch, and trying to center the decal for this proved impossible for my abilities/eyesight. I ruined 3 out of every four I tried and gave up after wrecking about 12 decals. Not to mention I would still have needed to paint the gauge rings in the appropriate colors the Luftwaffe used.
Next I decided to just give in and use the kit decal for the gauge cluster. The details are not as fine as Airscale's but I was getting frustrated and wanted to move past this. Enter the decal from @#$#. It went on fine but proved very thick. Like, makes Tamiya-seem-like-Cartograf thick. Nothing I did would get it to snuggle down into the details on the part face. Repeated applications of Micro Set, Sol, and eventually a practical bath in Walther's Solva-Set did nothing to get the decal to melt down into the detailed instrument face.
I gave up and decided to purchase the Zoukei Mura Horten 229 Extra Parts set for the cockpit. This little gem right here:
Image from Zoukei Mura's product website.
This is a fancy way of marketing a custom made PE set by Eduard under ZM's label. With the associated price mark up of course. $25 later it is in the mail, but honestly I know I would never be satisfied with the kit if I left the cockpit looking substandard. I have been enjoying this kit too much to cave now. Even with the added PE, I still only have about $80 invested in it and feel I am definitely getting my money's worth. Heck, I already broke down and bought their J7W1 Shinden based on my experience with this one.
Anyway, I'll come back to the cockpit after the mailman delivers the goods.
PeeJay74
#363
Joined: January 08, 2014
KitMaker: 425 posts
AeroScale: 401 posts
Posted: Thursday, January 12, 2017 - 07:02 PM UTC
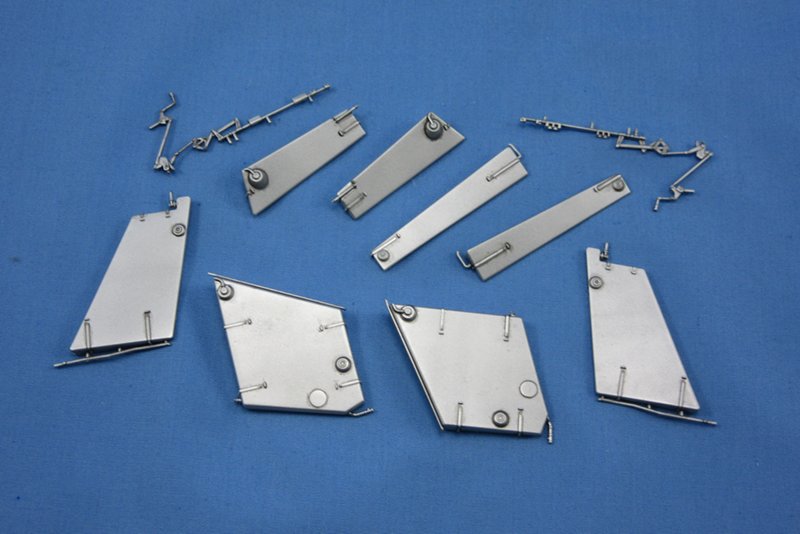
Since I have delays with the cockpit I moved on to the gear and wings.
The gear assemblies were not too difficult to deal with. I drilled out the lightening holes on the oleo scissors. The legs were airbrushed with Gunze Aqueous RLM 02 and then treated to clear coats and a wash. The molded brake lines were done in Vallejo NATO Black and the struts with Model Master Chrome Silver. For the main fork I did the strut with Bare Metal Foil Chrome for the improved look over paint. I added some light chipping to the main fork using a sponge with Vallejo Aluminum.
The wheels were airbrushed with Tamiya NATO Black and the hubs in Tamiya Gloss Black. I faded the wheels with progressively lighter greys to give the smooth tread a wear pattern. Continental logos were dry-brushed with Model Master USN WWII Light Grey; I find white too stark for this sort of thing. Once all of this was sealed I lined the sides of the main wheel with Tamiya tape to protect the paint and then slid it into the fork. It snaps into place this way without the need for glue, you just need to remove the tape after its spinning on its axle. The rear wheels will be glued in place.
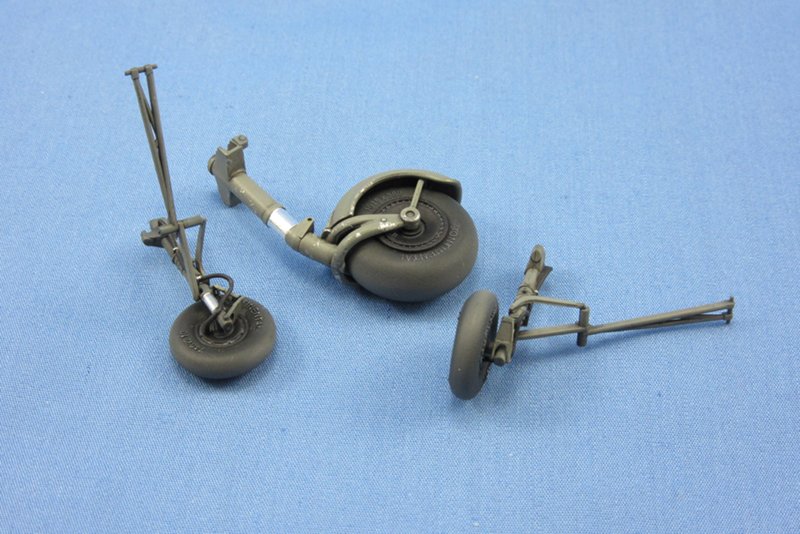
The gear assemblies detailed and ready to go.
With the gear done I decided to once again check the fit on everything I have managed to accomplish. The legs secure into very solid locating sockets. There isn't any need to worry about flimsy connections or setting angles correctly as the glue cures.
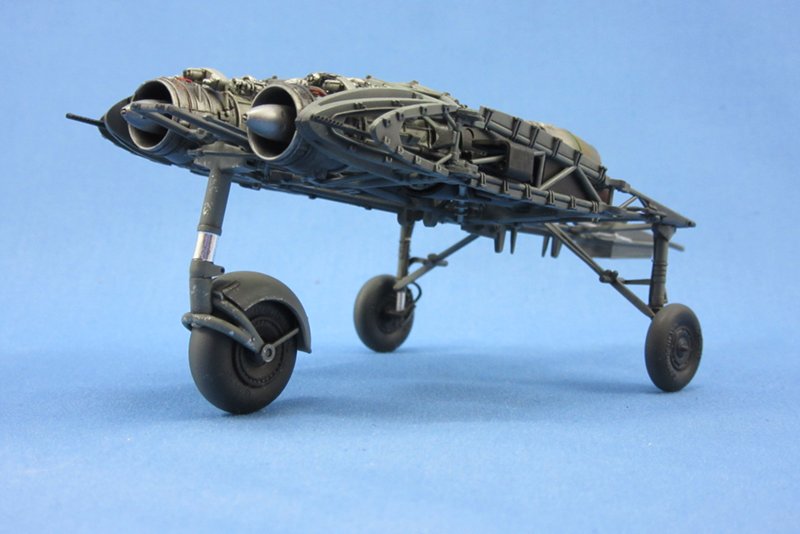
Horten 229 fuselage assembly resting on her gear. I haven't added the retracting arms to the front fork yet but the gear is still a solid base.
Now on to the wings...
The gear assemblies were not too difficult to deal with. I drilled out the lightening holes on the oleo scissors. The legs were airbrushed with Gunze Aqueous RLM 02 and then treated to clear coats and a wash. The molded brake lines were done in Vallejo NATO Black and the struts with Model Master Chrome Silver. For the main fork I did the strut with Bare Metal Foil Chrome for the improved look over paint. I added some light chipping to the main fork using a sponge with Vallejo Aluminum.
The wheels were airbrushed with Tamiya NATO Black and the hubs in Tamiya Gloss Black. I faded the wheels with progressively lighter greys to give the smooth tread a wear pattern. Continental logos were dry-brushed with Model Master USN WWII Light Grey; I find white too stark for this sort of thing. Once all of this was sealed I lined the sides of the main wheel with Tamiya tape to protect the paint and then slid it into the fork. It snaps into place this way without the need for glue, you just need to remove the tape after its spinning on its axle. The rear wheels will be glued in place.
The gear assemblies detailed and ready to go.
With the gear done I decided to once again check the fit on everything I have managed to accomplish. The legs secure into very solid locating sockets. There isn't any need to worry about flimsy connections or setting angles correctly as the glue cures.
Horten 229 fuselage assembly resting on her gear. I haven't added the retracting arms to the front fork yet but the gear is still a solid base.
Now on to the wings...
PeeJay74
#363
Joined: January 08, 2014
KitMaker: 425 posts
AeroScale: 401 posts
Posted: Thursday, January 12, 2017 - 07:35 PM UTC
Here's where I need to add a disclaimer:
Nothing I am about to do is necessary to finish this kit. If you plan to paint the Horten you could skip adding nearly all of the internal wing structures and totally avoid painting it. I have decided though that I really want the full experience of building this kit, I am just enjoying it that much. Plus I have an ulterior motive...
I asked my lovely wife for a digital picture frame for my birthday. I was looking at my builds and realized I thought it would be a great addition to my display cabinet if I could include a slide show showing each kit through the stages of being built. Given how much of the detail in this kit will be hidden beneath the skin I really want to have a way to show off the work.
I decided to take the time to detail the full skeleton of the kit before I add the external skin. For the wings this meant I would need to assemble all of the fuel tanks and paint everything well enough to be presentable in a photo display. I decided I would focus on making sure the top angles were good and not worry so much about the under-surfaces on the internal structures. This way I could take some nice shots of the Horten skeleton and then focus on hiding all of my work.
Each fuel tank is comprised of two pieces and features excellent molded piping. The bottom fit leaves a bit to be desired if you were trying to leave these permanently exposed. You'd need to spend some time filling seams before they would be contest-ready.
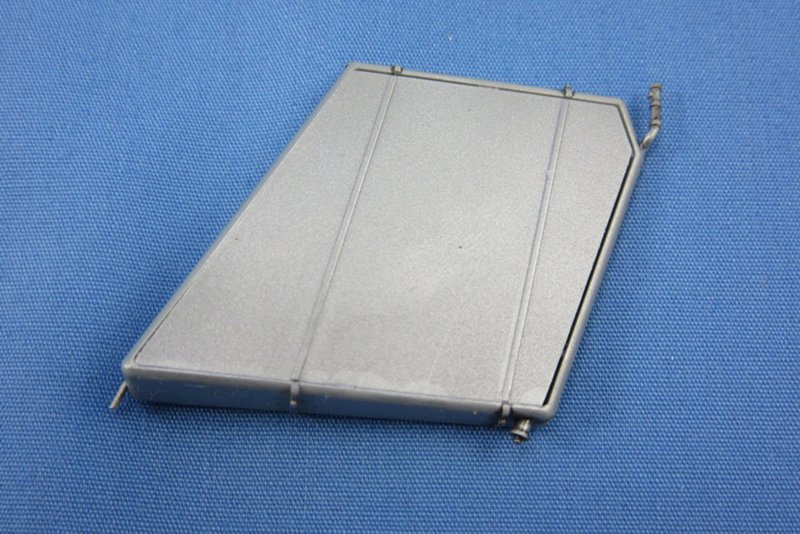
View of the bottom of a fuel cell. The gaps are representative of any of the eight cells. I will be ignoring them completely.
I airbrushed all of the assembled cells with Tamiya AS-12 Bare Metal Silver and then a wash of Tamiya Black Panel Line Accent. I really like the silver and black combo when trying to make details pop on NMF. Brown tends to make it look dirty rather than detailed to me.
All eight cells ready to be added to the wing. I kept the painting simple but effective.
I set the cells aside in my warmer to cure overnight and moved on to the wing frames. The wings are molded in two parts, the frame and the wing root. Assembly here was very simple, but there was a lot of clean up on the framing. I broke out the molding sanders again and removed all traces of sprue gates after I had them assembled. There are some small pipe sections to add inside the frames which for some reason weren't molded on already, but these were also easy to add. Once I had this done it was time to paint. Everything got a coat of Mr. Surfacer 1500 Black. I decided to check the fit before I added more paint in case I needed to rework anything.
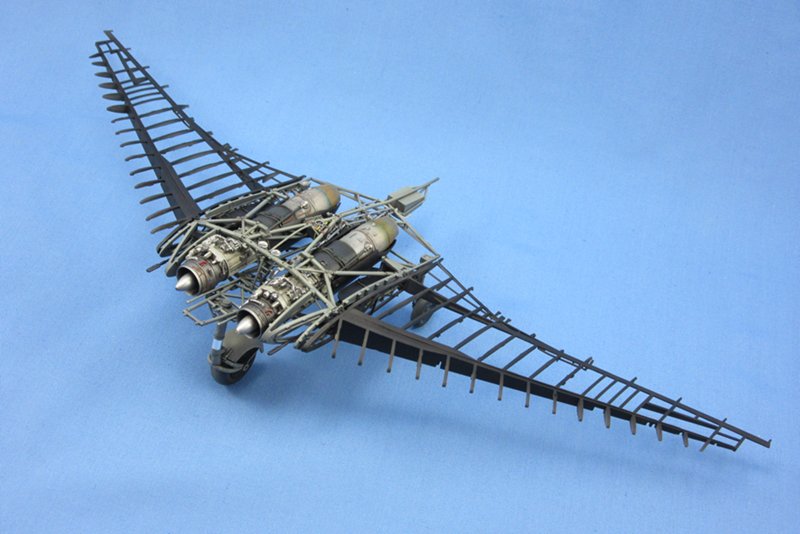
I needn't have worried about the fit. The wing frames and the landing gear are all just press fit here, no glue has been added yet. Fit and structure are that solid in this kit. Bravo Zoukei Mura!
I broke everything down and took out the Gunze Aqueous RLM 02 again. I repeated my process from the fuselage on the wings, lighter mists on the bottom and heavier on top to lend shadows. Once this cures I'll do clears and add a wash of Tamiya Brown Panel Line Accent to the wing frames so they match the fuselage. Then I just need to add the fuel cells and it should be time to photograph the skeleton.
I am going to spend some time on this stage to make sure I get a decent record of the kit's skeleton. Honestly, Zoukei Mura's approach to kit design revolves around that concept so I want to get all I can out of it. I really like the idea of a photo show, it's almost as good as building the kit twice with both options chosen.
Nothing I am about to do is necessary to finish this kit. If you plan to paint the Horten you could skip adding nearly all of the internal wing structures and totally avoid painting it. I have decided though that I really want the full experience of building this kit, I am just enjoying it that much. Plus I have an ulterior motive...
I asked my lovely wife for a digital picture frame for my birthday. I was looking at my builds and realized I thought it would be a great addition to my display cabinet if I could include a slide show showing each kit through the stages of being built. Given how much of the detail in this kit will be hidden beneath the skin I really want to have a way to show off the work.
I decided to take the time to detail the full skeleton of the kit before I add the external skin. For the wings this meant I would need to assemble all of the fuel tanks and paint everything well enough to be presentable in a photo display. I decided I would focus on making sure the top angles were good and not worry so much about the under-surfaces on the internal structures. This way I could take some nice shots of the Horten skeleton and then focus on hiding all of my work.
Each fuel tank is comprised of two pieces and features excellent molded piping. The bottom fit leaves a bit to be desired if you were trying to leave these permanently exposed. You'd need to spend some time filling seams before they would be contest-ready.
View of the bottom of a fuel cell. The gaps are representative of any of the eight cells. I will be ignoring them completely.
I airbrushed all of the assembled cells with Tamiya AS-12 Bare Metal Silver and then a wash of Tamiya Black Panel Line Accent. I really like the silver and black combo when trying to make details pop on NMF. Brown tends to make it look dirty rather than detailed to me.
All eight cells ready to be added to the wing. I kept the painting simple but effective.
I set the cells aside in my warmer to cure overnight and moved on to the wing frames. The wings are molded in two parts, the frame and the wing root. Assembly here was very simple, but there was a lot of clean up on the framing. I broke out the molding sanders again and removed all traces of sprue gates after I had them assembled. There are some small pipe sections to add inside the frames which for some reason weren't molded on already, but these were also easy to add. Once I had this done it was time to paint. Everything got a coat of Mr. Surfacer 1500 Black. I decided to check the fit before I added more paint in case I needed to rework anything.
I needn't have worried about the fit. The wing frames and the landing gear are all just press fit here, no glue has been added yet. Fit and structure are that solid in this kit. Bravo Zoukei Mura!
I broke everything down and took out the Gunze Aqueous RLM 02 again. I repeated my process from the fuselage on the wings, lighter mists on the bottom and heavier on top to lend shadows. Once this cures I'll do clears and add a wash of Tamiya Brown Panel Line Accent to the wing frames so they match the fuselage. Then I just need to add the fuel cells and it should be time to photograph the skeleton.
I am going to spend some time on this stage to make sure I get a decent record of the kit's skeleton. Honestly, Zoukei Mura's approach to kit design revolves around that concept so I want to get all I can out of it. I really like the idea of a photo show, it's almost as good as building the kit twice with both options chosen.

goodn8

Joined: October 12, 2008
KitMaker: 709 posts
AeroScale: 651 posts
Posted: Thursday, January 12, 2017 - 09:48 PM UTC
Awesome work, Paul!!!
This kit is absolutely astonishing. Thanks for sharing your work and for spending so much time in updating the posts. Reporting again after wasted time is a real challenge. Maybe you should leave and display the Ho open and get another one (cheaper/different manufacturer) built closed to show the shape. It's looking so fantastic with the frame and engines only. Maybe the most impressive and pioneering aircraft ever - Made In Germany!
Thomas

Joel_W
Joined: December 04, 2010
KitMaker: 11,666 posts
AeroScale: 7,410 posts
Posted: Friday, January 13, 2017 - 08:34 PM UTC
Paul,
Another excellent update for sure.
The landing gear looks fantastic. ZM did a great job in molding it, and you did an equally good job in painting and weathering it.
I really like your idea of the digital slide show. A great compromise to let one add all the internal details even though none will be seen in the display option you're building.
Your tanks and MM work with the Tamiya black wash really looks good, and is quite effective.
As always, looking forward to your next update.
Joel

rdt1953
Joined: February 06, 2015
KitMaker: 1,098 posts
AeroScale: 900 posts
Posted: Friday, January 13, 2017 - 09:32 PM UTC
Paul -
Beautiful job - I've been watching all along. I hope you'll post your efforts on the Shinden when it makes it to your bench . May have to add it to my stash.
Cheers - Richard
Beautiful job - I've been watching all along. I hope you'll post your efforts on the Shinden when it makes it to your bench . May have to add it to my stash.
Cheers - Richard
Joel_W
Joined: December 04, 2010
KitMaker: 11,666 posts
AeroScale: 7,410 posts
Posted: Thursday, January 26, 2017 - 09:48 PM UTC
Quoted Text
Grr, I just spent 2 hours writing a detailed update and adding pics but somehow deleted it before I could post.
Must have fat-fingered the touchpad. Damn laptops!
Paul,
I've done that more times then I care to admit. Now I write out my updates including the links for any pictures in Notepad, then copy and paste. I do have to add the front and back brackets to every picture link manually, but I've conquered the dreaded accidental deletion issue.
Joel
PeeJay74
#363
Joined: January 08, 2014
KitMaker: 425 posts
AeroScale: 401 posts
Posted: Sunday, March 12, 2017 - 12:09 AM UTC
Just wanted to make a fast update. I haven't dropped this project from my bench but it has become a bit of a hostage to Hobby Link Japan.
I decided on finishing it in the exposed wood version without any camouflage or markings. Zoukei Mura offer a set of two masks for exactly this scheme. My wife ordered me a set and one of the two has been on back order since Christmas. I am hoping it comes before too much longer.
I have nearly all of the internal work completed and will pick up once I get the masks. Well, after I practice using them a lot on a paint dummy.
 |

WEB HOSTING BY


Copyright ©2021 AeroScale and Kitmaker Network, a subsidiary of Silver Star Enterprises
All Rights Reserved. Please read our Conditions of Use and Privacy Policy.
All Rights Reserved. Please read our Conditions of Use and Privacy Policy.