

WOW!!!!
Unreal Paul - amazing detail.
Regards,
Kobus
Hosted by Rowan Baylis
Building Tamiya's 1/48 Lancaster

Kilo_Uniform

Joined: July 03, 2015
KitMaker: 280 posts
AeroScale: 141 posts
Posted: Thursday, April 07, 2016 - 08:26 PM UTC

KelticKnot

Joined: May 11, 2015
KitMaker: 768 posts
AeroScale: 656 posts
Posted: Sunday, April 10, 2016 - 09:03 PM UTC
Thanks once again Kobus. 
Sadly there is an impending house move on the horizon this year so trying to make good progress before any interruptions to the scheduled viewing
Thanks for watching !
Sadly there is an impending house move on the horizon this year so trying to make good progress before any interruptions to the scheduled viewing
Thanks for watching !

KelticKnot
Joined: May 11, 2015
KitMaker: 768 posts
AeroScale: 656 posts
Posted: Wednesday, April 13, 2016 - 04:46 PM UTC
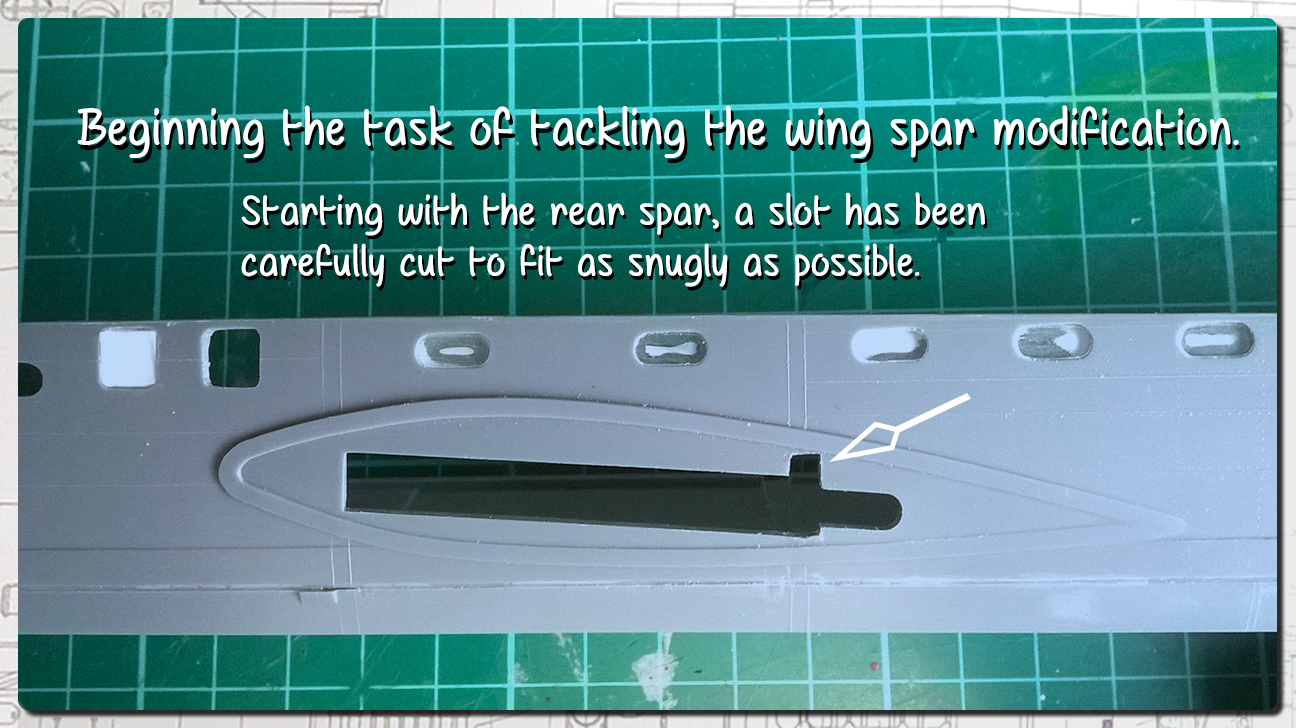
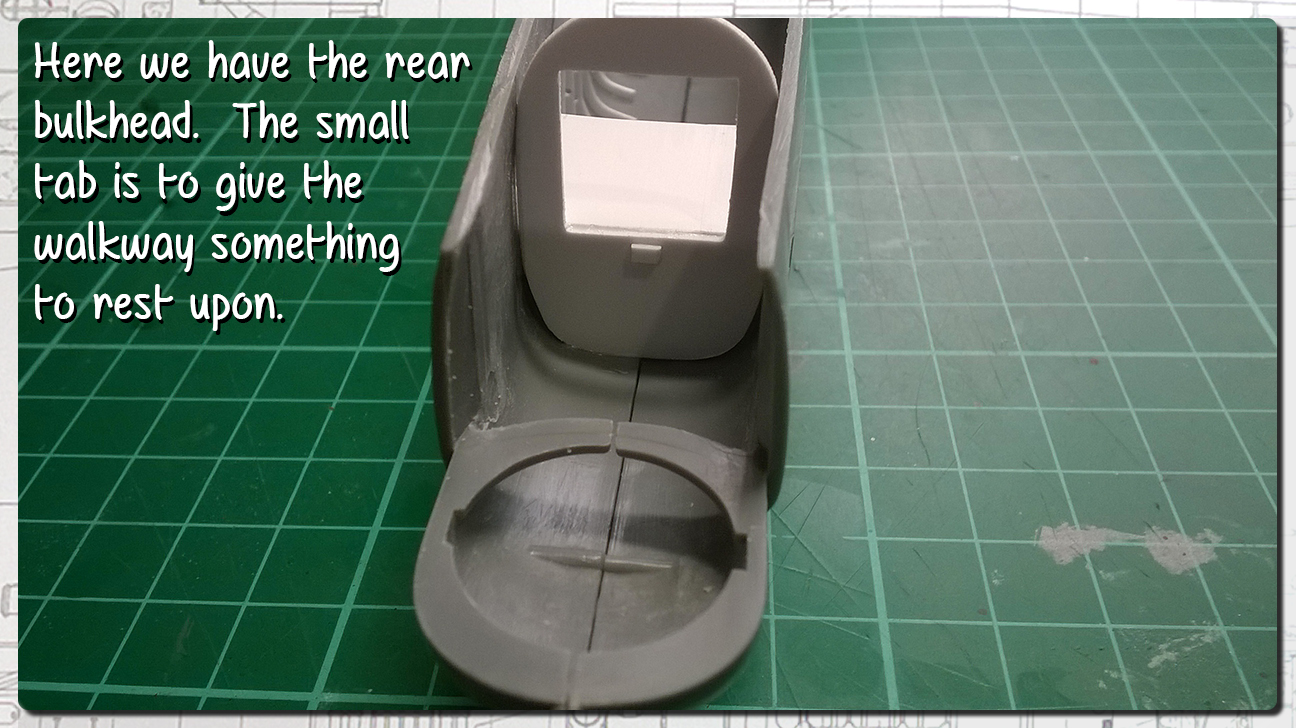
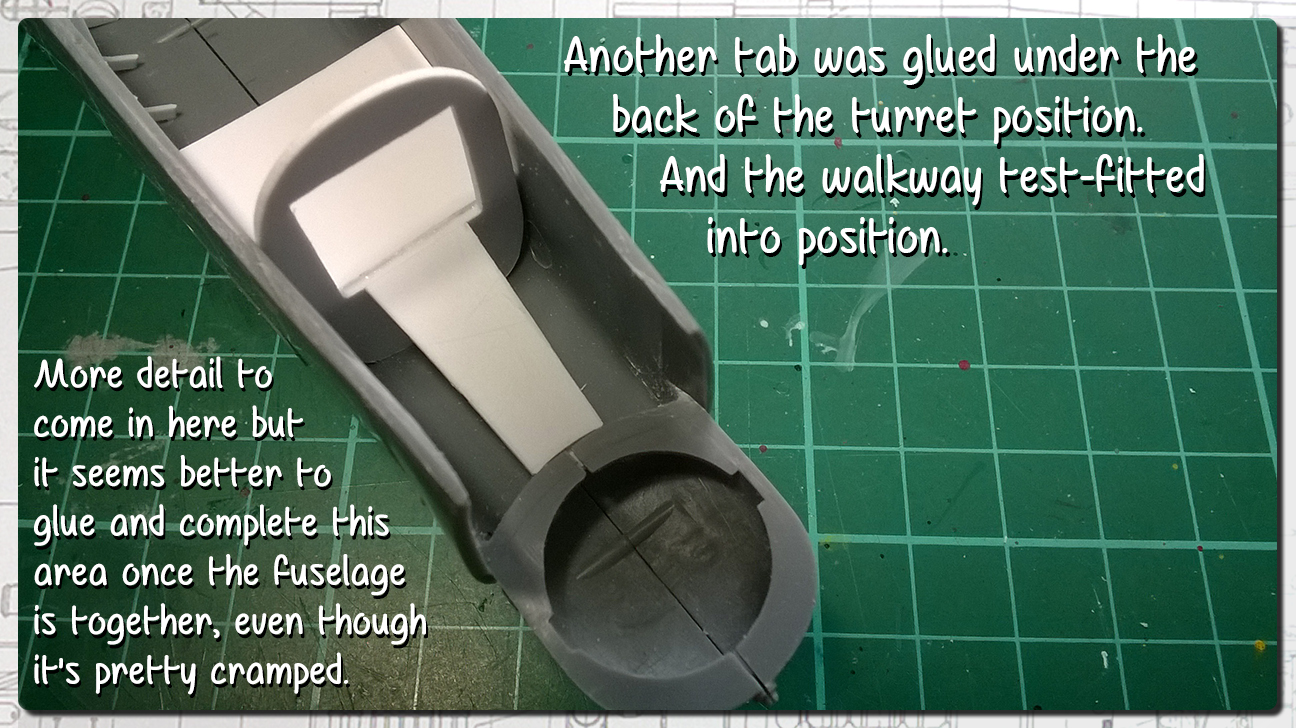
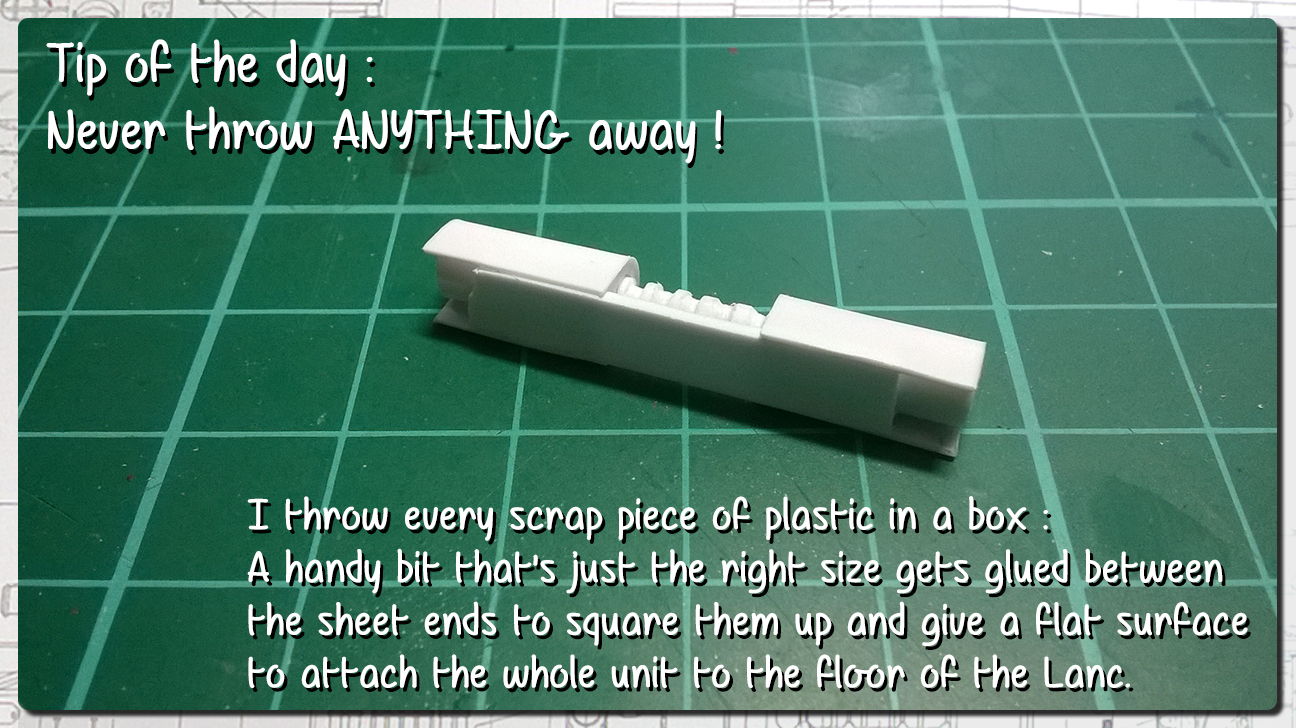
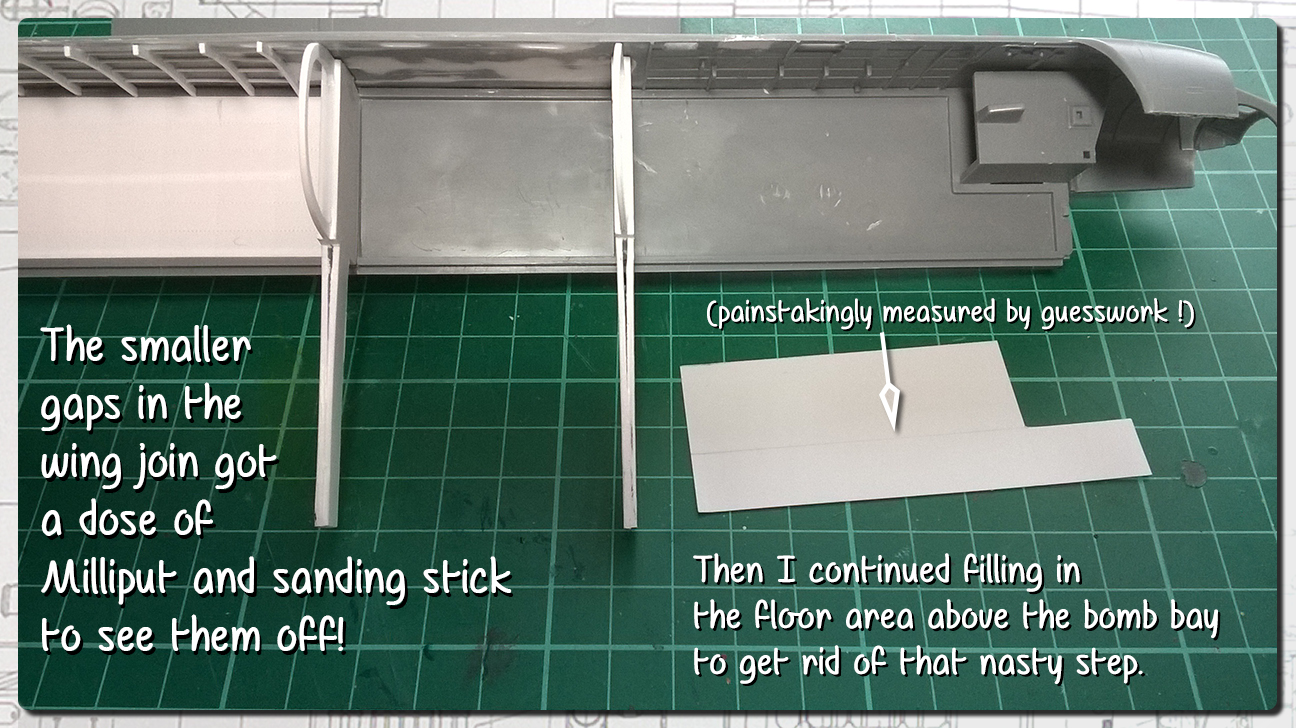
A couple more bits as I procrastinate on continuing with the rest of the formers.... 
chukw1

Joined: November 28, 2007
KitMaker: 817 posts
AeroScale: 729 posts
Posted: Wednesday, April 13, 2016 - 11:44 PM UTC
I'll be a monkey's uncle if this isn't one of the nicest build threads I've seen in a while! I had the pleasure of seeing the BOB Memorial Flight several years ago- it gave me new appreciation for the Lanc. Soldier on, Paul- and cheers!

KelticKnot
Joined: May 11, 2015
KitMaker: 768 posts
AeroScale: 656 posts
Posted: Thursday, April 14, 2016 - 03:24 PM UTC
Why thank you Chuck although I couldn't possibly comment on your genetic make-up. 
The updates are coming thick and fast this week, hopefully I'll get another small one out later today.
The updates are coming thick and fast this week, hopefully I'll get another small one out later today.
KelticKnot
Joined: May 11, 2015
KitMaker: 768 posts
AeroScale: 656 posts
Posted: Thursday, April 14, 2016 - 08:57 PM UTC
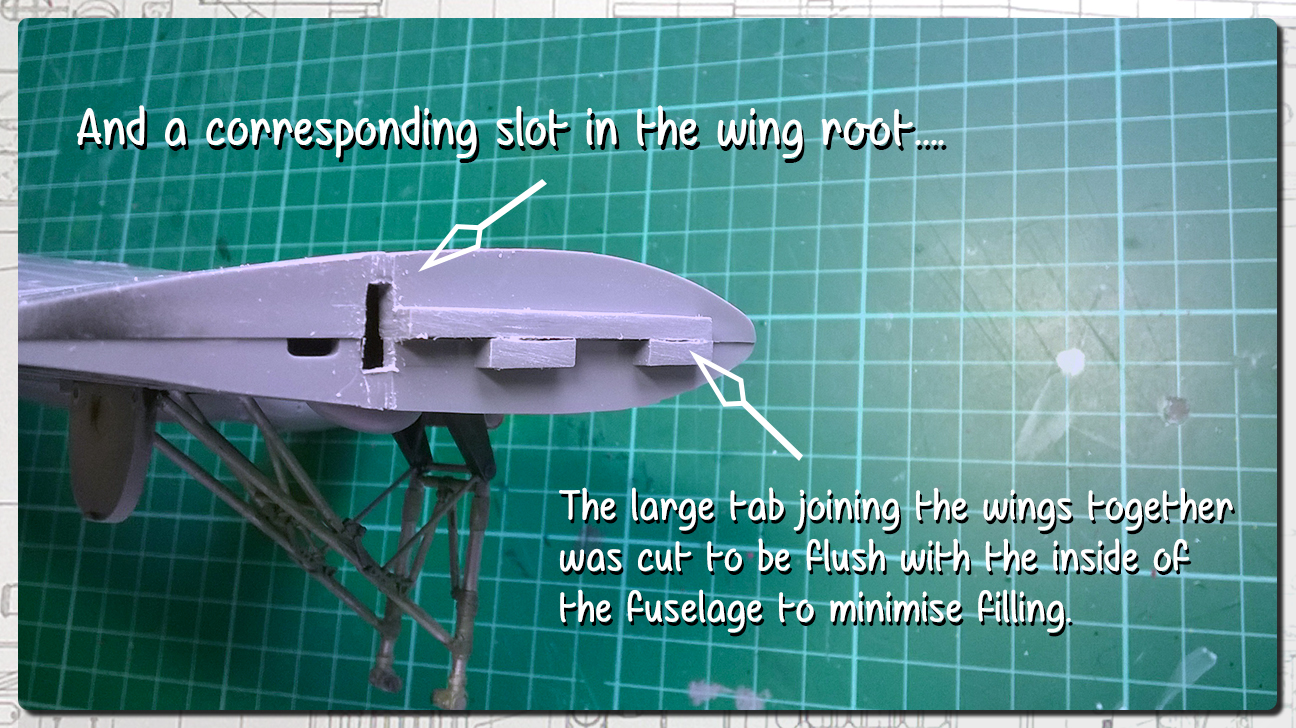
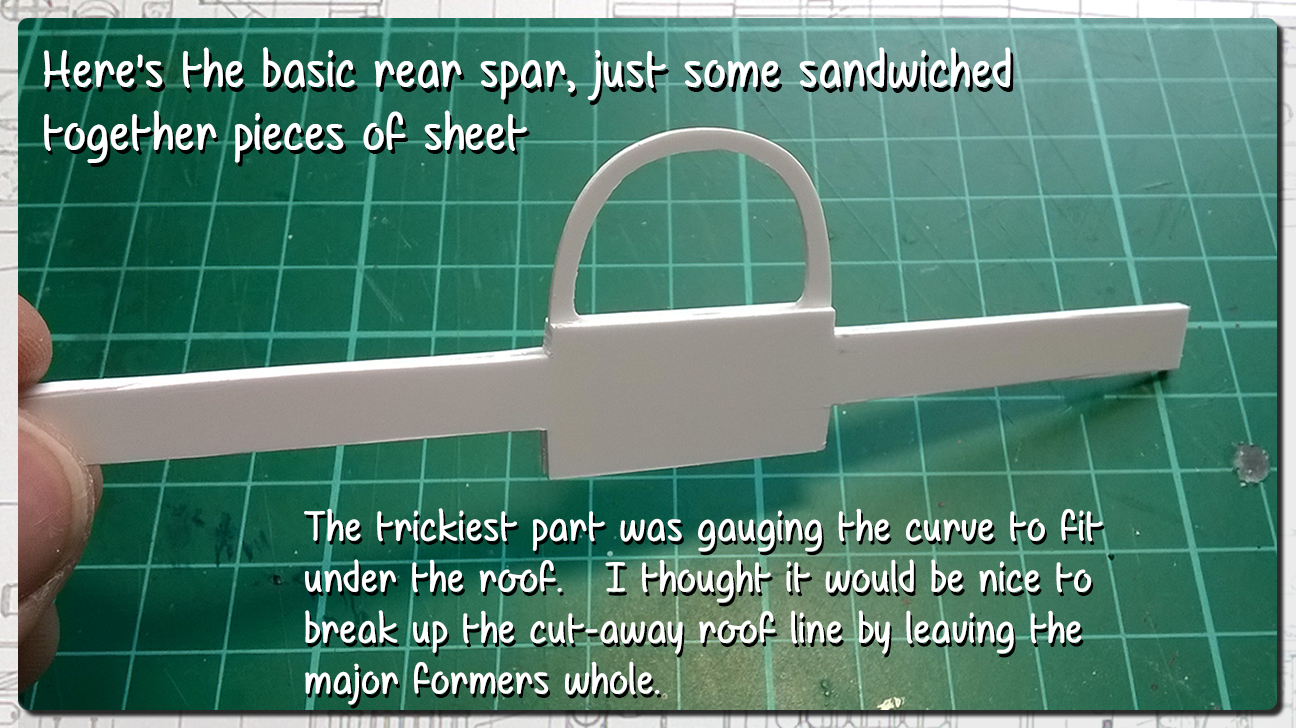
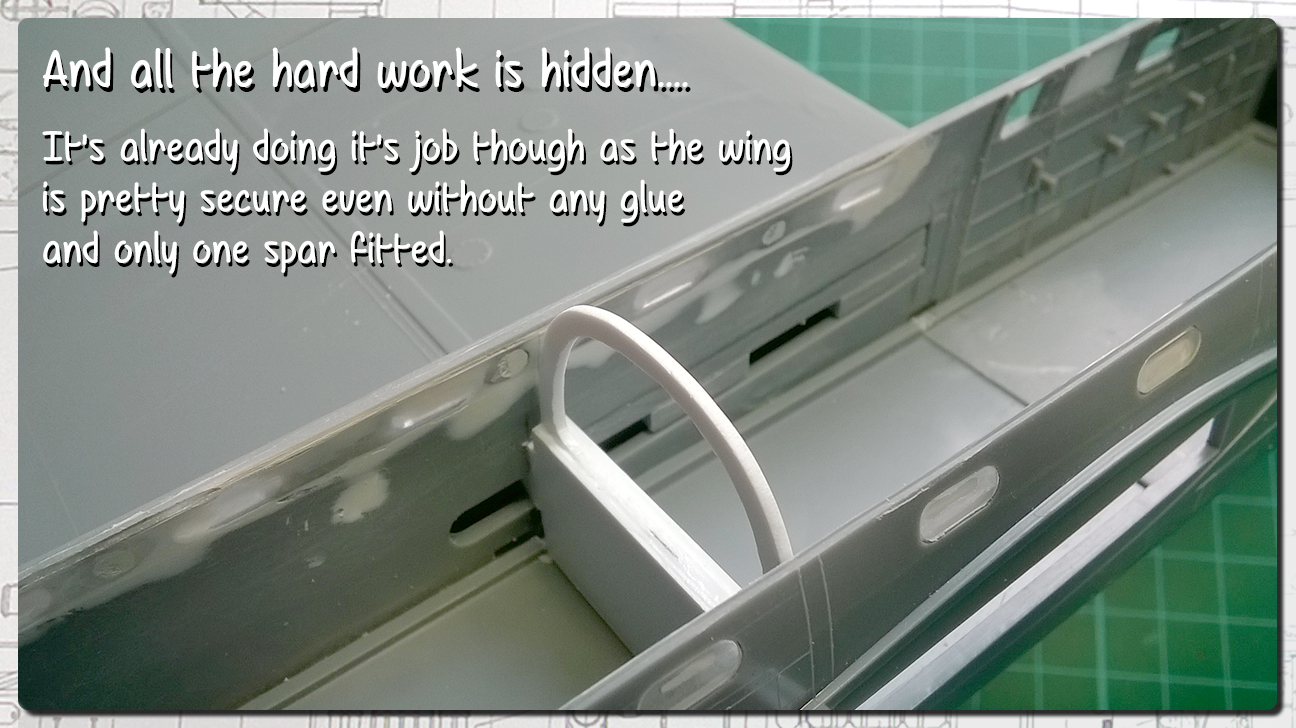
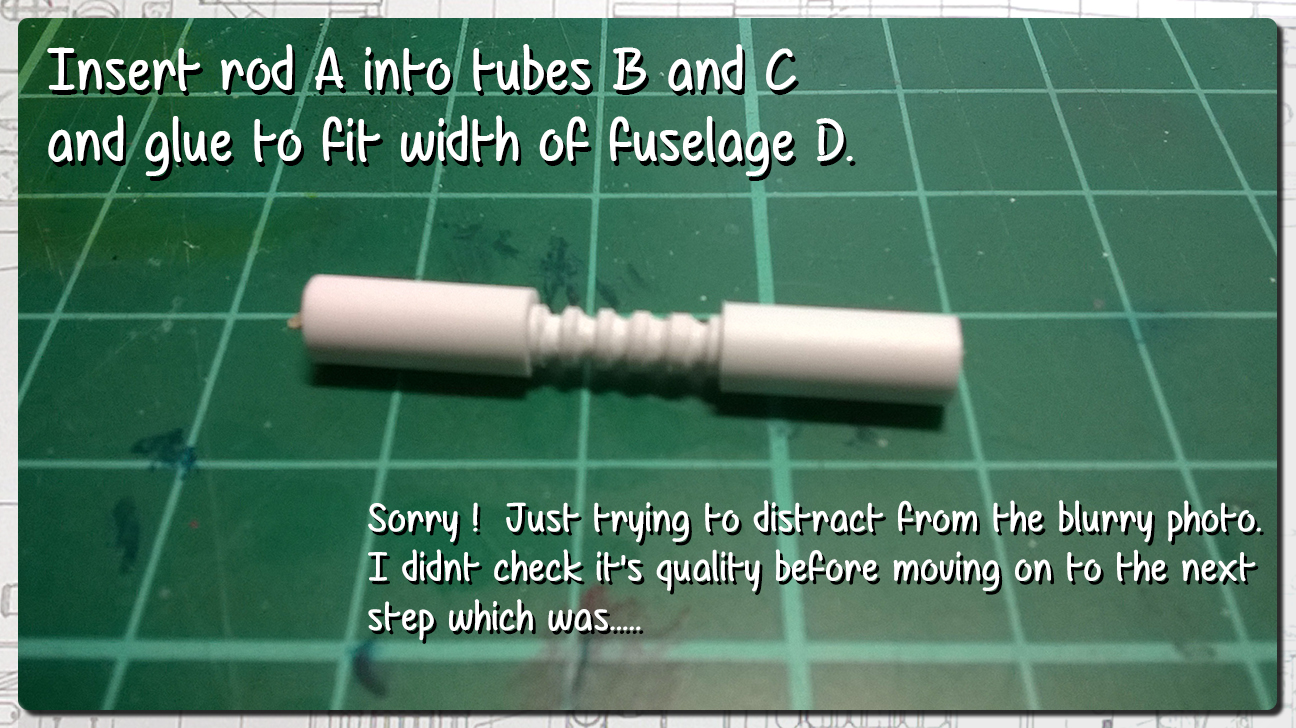
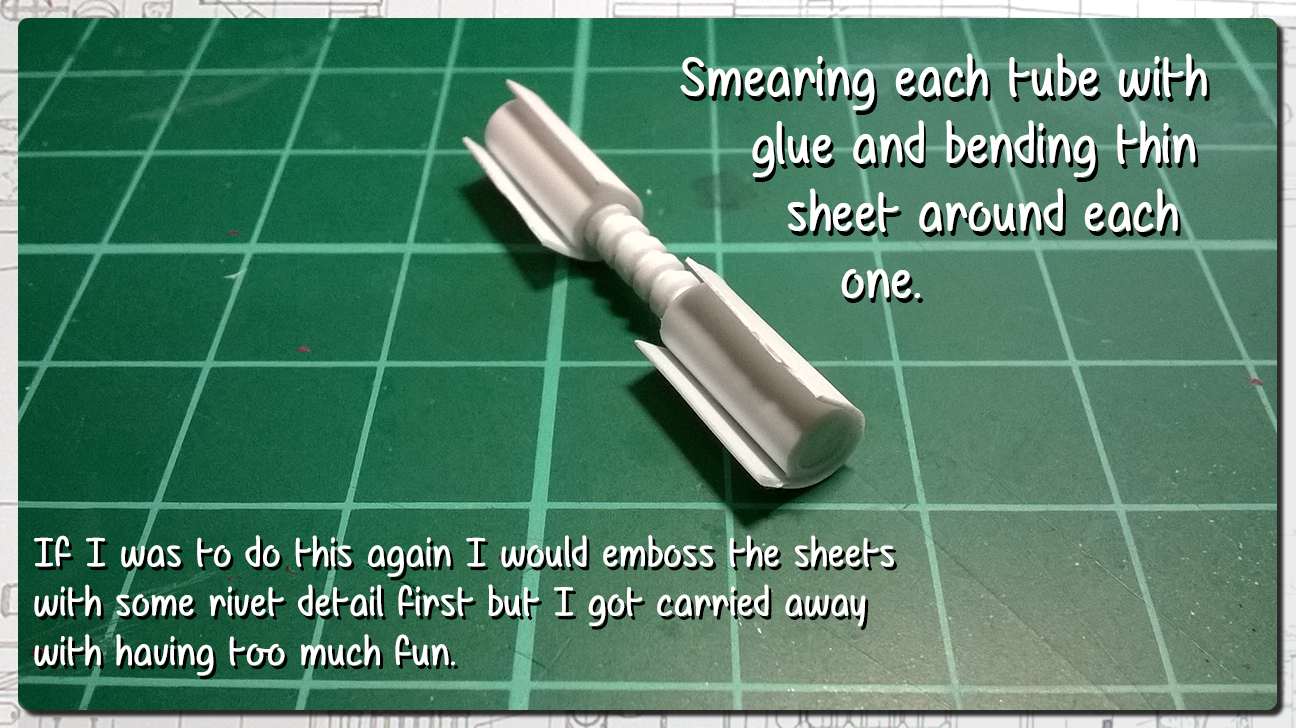
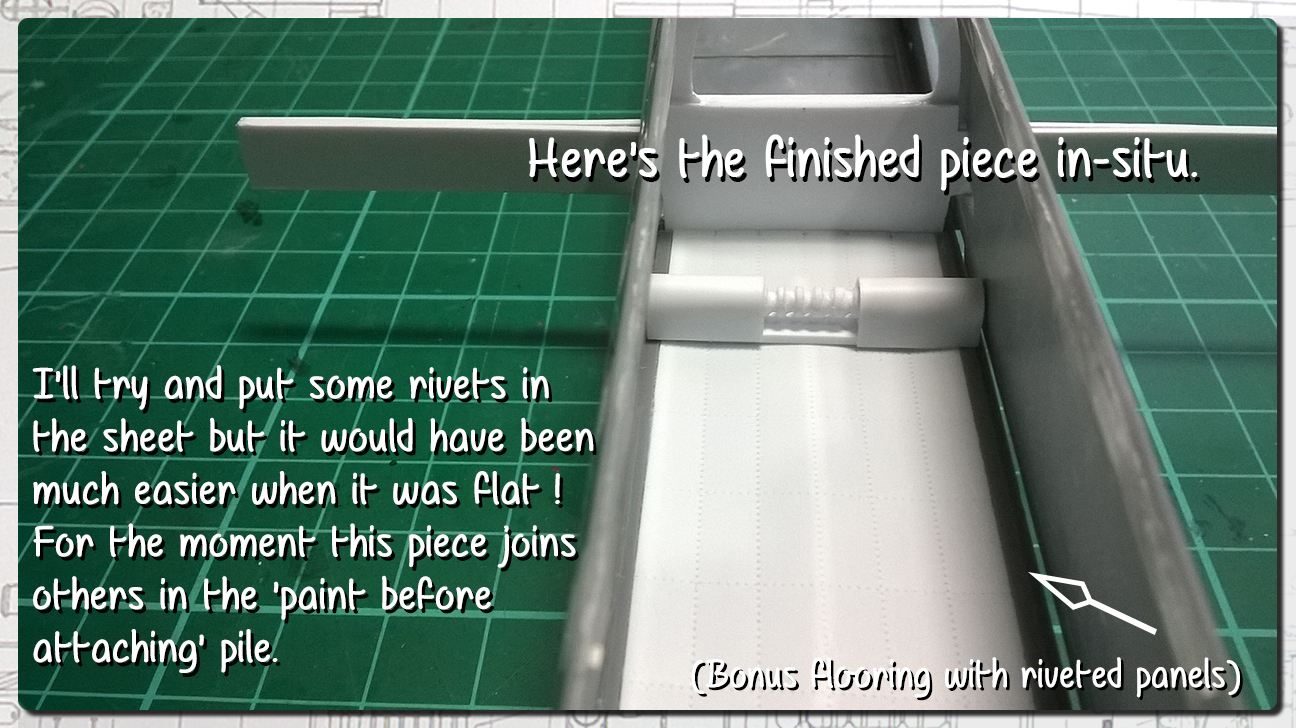
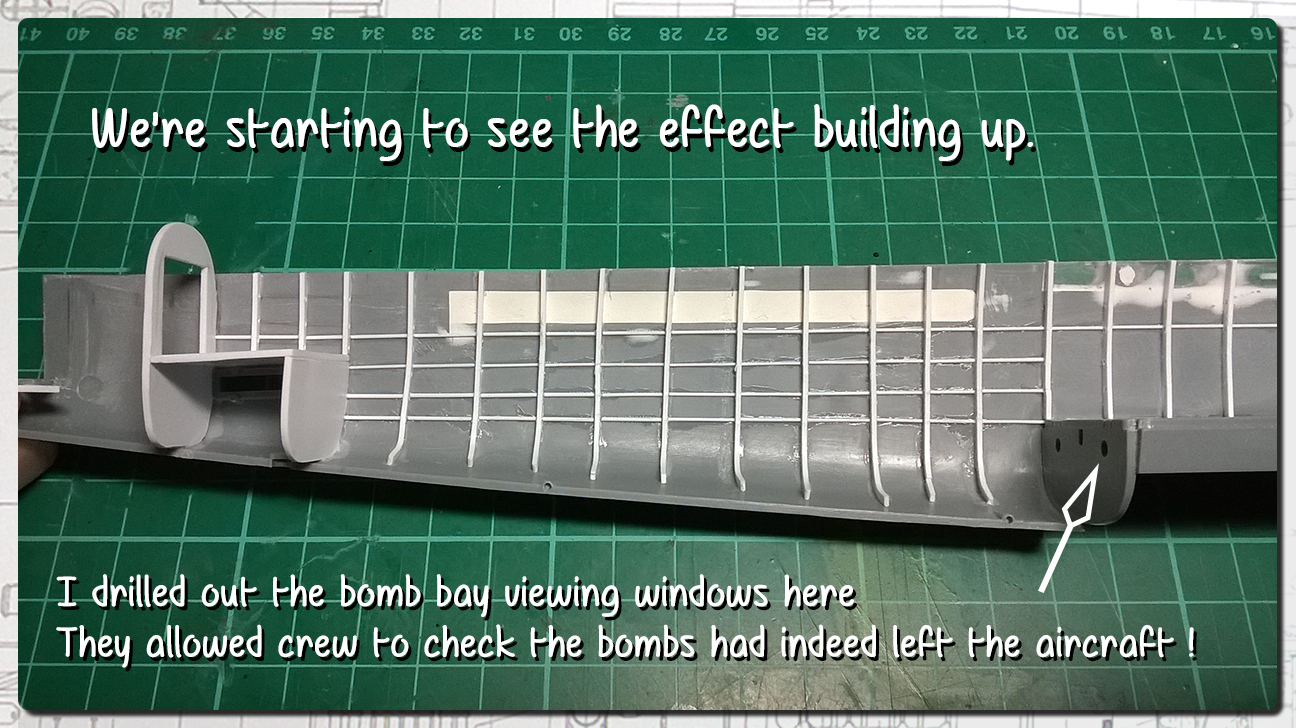
Yep, here's another bit ticked off the list. I'm thinking the grooved centre section is probably threaded but let's not get too picky !


goodn8

Joined: October 12, 2008
KitMaker: 709 posts
AeroScale: 651 posts
Posted: Thursday, April 14, 2016 - 10:56 PM UTC
Paul, your build and log is sooooo cool and nice !
You have a real good eye for engineering.
Thanks for the time you spend to share it with the community
Thomas
You have a real good eye for engineering.
Thanks for the time you spend to share it with the community
Thomas


GazzaS

#424

Joined: April 23, 2015
KitMaker: 4,648 posts
AeroScale: 1,938 posts

Posted: Friday, April 15, 2016 - 02:42 AM UTC
Paul,
Some fantastic scratch building you're doing! I'm impressed by your turning your Dremel into a makeshift lathe! I can already see some useful applications...like the springs on landing gear that always have either injector pin marks or those annoying thin strips of flash. It'll be easier to make new springs in some applications perhaps.
Gaz
KelticKnot
Joined: May 11, 2015
KitMaker: 768 posts
AeroScale: 656 posts
Posted: Friday, April 15, 2016 - 03:56 AM UTC
Quoted Text
You have a real good eye for engineering.
I think the way my brain is wired allows me to visualise things before and during building them. A bit of art school training in the past probably helps me see the underlying shapes of things. I think that's maybe the key : look for the cubes and cylinders and planes underneath the detail.
Quoted Text
Thanks for the time you spend to share it with the community
Thomas
Thanks Thomas, I hope it's as entertaining for others as it is for me !
KelticKnot
Joined: May 11, 2015
KitMaker: 768 posts
AeroScale: 656 posts
Posted: Friday, April 15, 2016 - 04:16 AM UTC
Quoted Text
Paul,
Some fantastic scratch building you're doing! I'm impressed by your turning your Dremel into a makeshift lathe! I can already see some useful applications...like the springs on landing gear that always have either injector pin marks or those annoying thin strips of flash. It'll be easier to make new springs in some applications perhaps.
Gaz
Thanks Gaz, I'm glad you like the dremelathe©
I'll be selling them for a modest markup of about 35% on Fleabay.


Szmann

Joined: September 02, 2014
KitMaker: 1,977 posts
AeroScale: 295 posts
Posted: Friday, April 15, 2016 - 06:35 PM UTC
Terrific scratch-building abilities, Paul. Thanks for sharing!
Cheers!
Gabriel
Cheers!
Gabriel

Joel_W
Joined: December 04, 2010
KitMaker: 11,666 posts
AeroScale: 7,410 posts
Posted: Friday, April 15, 2016 - 08:01 PM UTC
Paul,
Your engineering of the wing spar assembly is just outstanding. I'm also quite intrigued for yet another use for my dremel that 99% of the time is unused, even though I've had it for 40 years.
Joel
Your engineering of the wing spar assembly is just outstanding. I'm also quite intrigued for yet another use for my dremel that 99% of the time is unused, even though I've had it for 40 years.
Joel
KelticKnot
Joined: May 11, 2015
KitMaker: 768 posts
AeroScale: 656 posts
Posted: Sunday, April 24, 2016 - 01:21 AM UTC
Thank you all, you're encouraging me to keep pushing myself.
It's been a week since I last touched anything and my fingers were getting itchy!
It's been a week since I last touched anything and my fingers were getting itchy!
GazzaS
#424
Joined: April 23, 2015
KitMaker: 4,648 posts
AeroScale: 1,938 posts
Posted: Sunday, April 24, 2016 - 02:34 AM UTC
That's pretty amazing detailing, Paul. I admire your ability to get them neat and parallel.
Can't wait to see more!
Gaz
Can't wait to see more!
Gaz
KelticKnot
Joined: May 11, 2015
KitMaker: 768 posts
AeroScale: 656 posts
Posted: Monday, April 25, 2016 - 02:19 PM UTC
Thanks Gary, having a straight edge to work against is the thing. Trying to eyeball several parallel lines would be too difficult.
I'm planning on getting the opposite side done in the same way then finally dust off the airbrush. I'll need to get paint down before layering on the other main things like the ammunition feed belts which run down the fuselage.
Trouble is I need to afix the wings to each half and fill the interior join before i can add the formers in that area. Not ideal but the only option i think!
I'm trailblazing new territory with this kit... It wasnt meant to be put togethet this way.
Joel_W
Joined: December 04, 2010
KitMaker: 11,666 posts
AeroScale: 7,410 posts
Posted: Monday, April 25, 2016 - 08:55 PM UTC
Paul,
As I already said a few times, your scratch building skills are amazing. The very best of the best seem to be able to mentally visualize the process needed to create a part, then go ahead and fabricate it. Unfortunately in my case, I don't really have that skill set.
All those formers are in perfect parallel orientation to each other. Same for the few stringers you've added to date. And that's the real secret. So many times I've seen some excellent work just fall short because of that issue. And I'm the 1st to admit that it's been one of the main issues I still struggle with.
Joel
KelticKnot
Joined: May 11, 2015
KitMaker: 768 posts
AeroScale: 656 posts
Posted: Thursday, April 28, 2016 - 06:11 PM UTC
Quoted Text
All those formers are in perfect parallel orientation to each other. Same for the few stringers you've added to date.
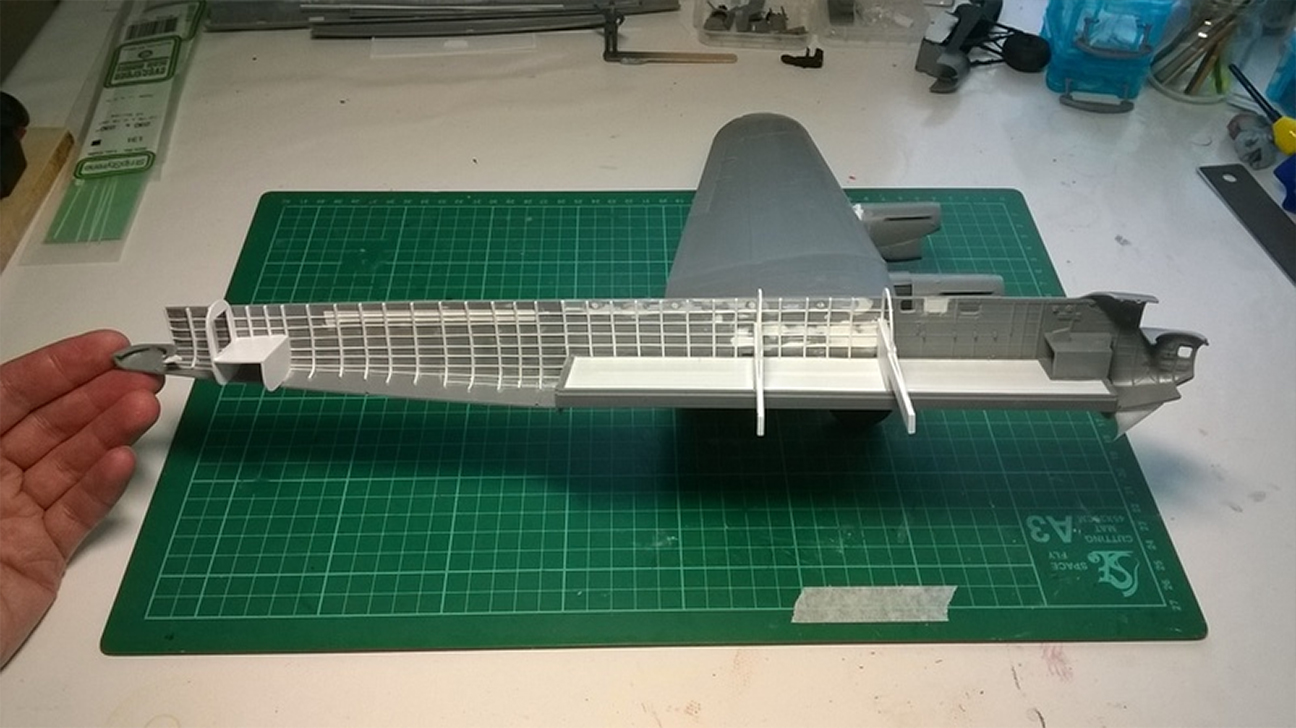
I can look again at the picture above and see lots of not-parallel areas but we do tend to over-analyse our own work don't we?
I've been away on holiday for a couple of days so nothing to report although I did get a lot more of the stringers fitted on that one side before I went. Not looking forward to having to try and repeat the task and get the lines in the same places !
KelticKnot
Joined: May 11, 2015
KitMaker: 768 posts
AeroScale: 656 posts
Posted: Tuesday, May 03, 2016 - 08:37 PM UTC
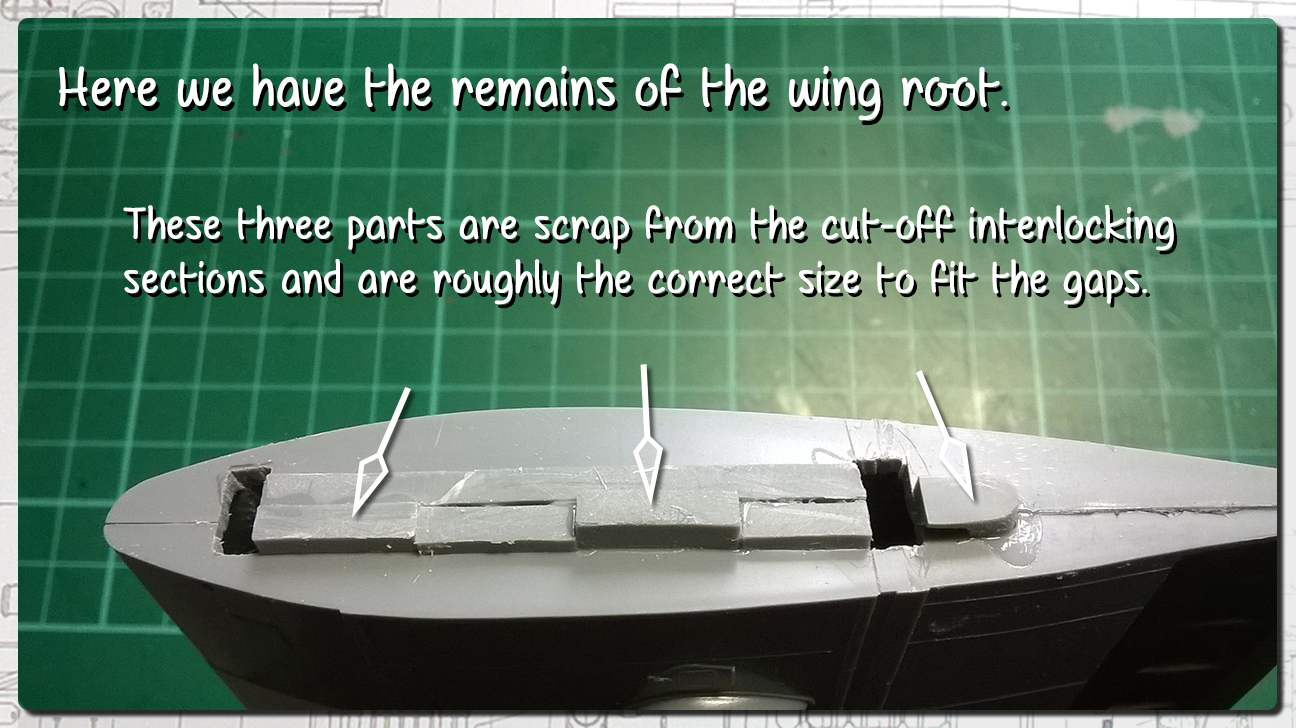
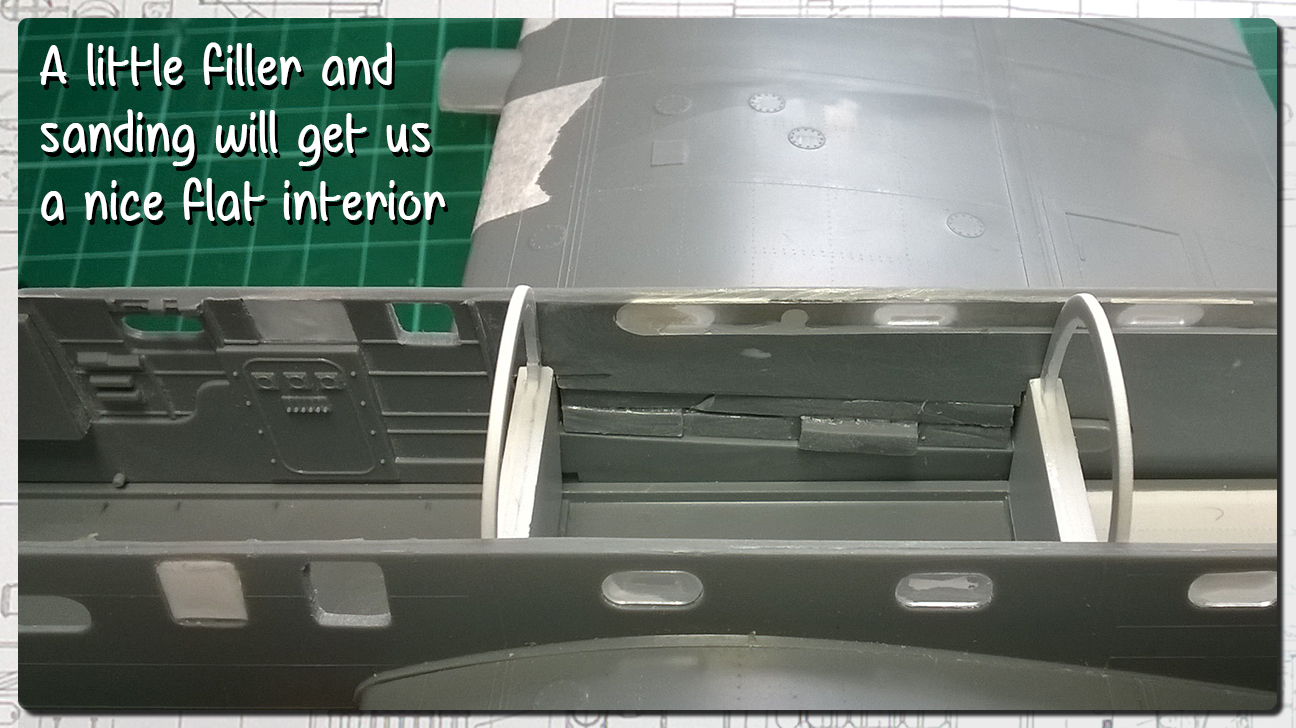
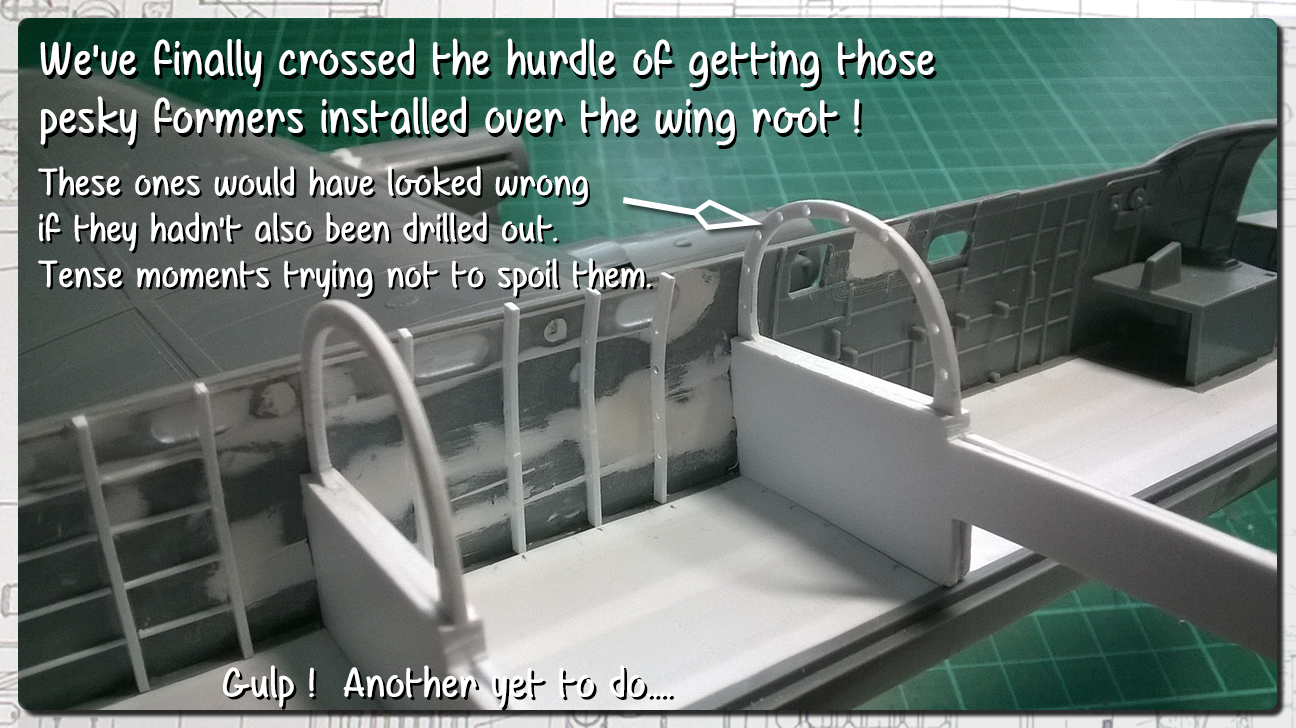
Work continues - a step backwards to fix the wing issues before we can move ahead again with getting the last of the formers in place over the wing join.
Also a satisfying moment when parts fit together well.... not something that happens too often in this hobby!
Also a satisfying moment when parts fit together well.... not something that happens too often in this hobby!
KelticKnot
Joined: May 11, 2015
KitMaker: 768 posts
AeroScale: 656 posts
Posted: Thursday, May 05, 2016 - 09:16 PM UTC
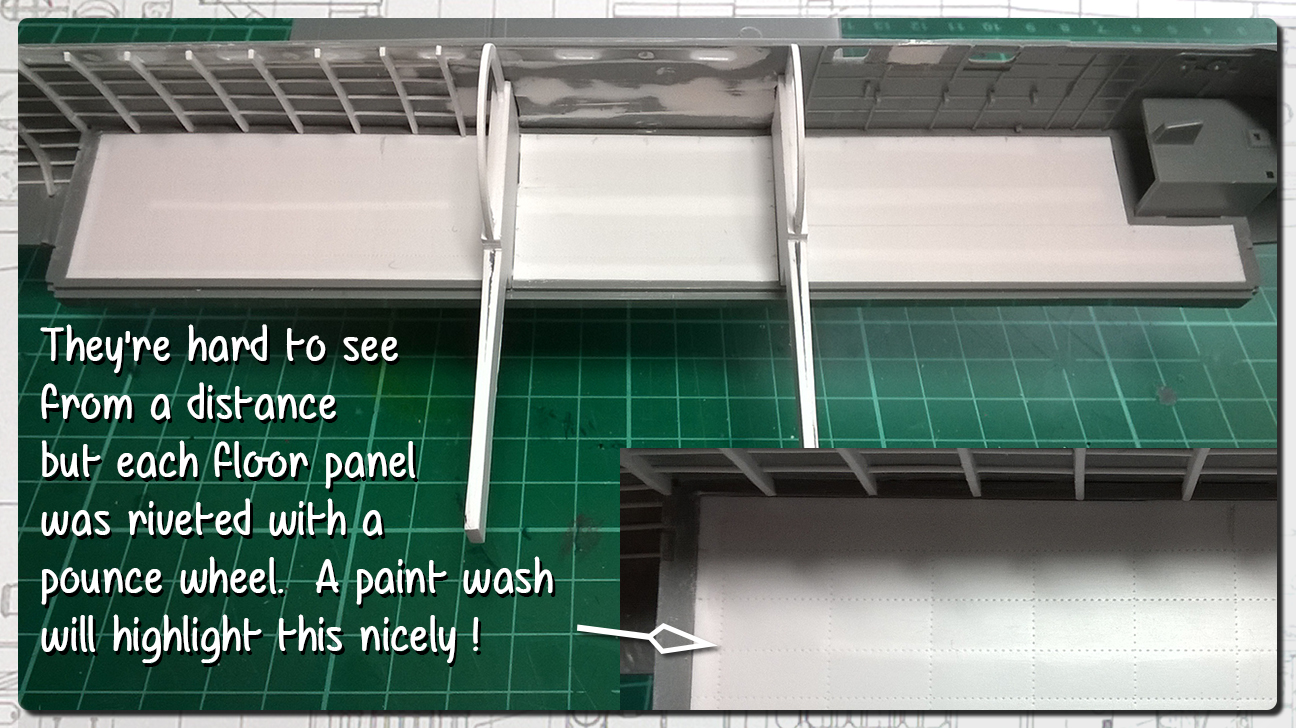
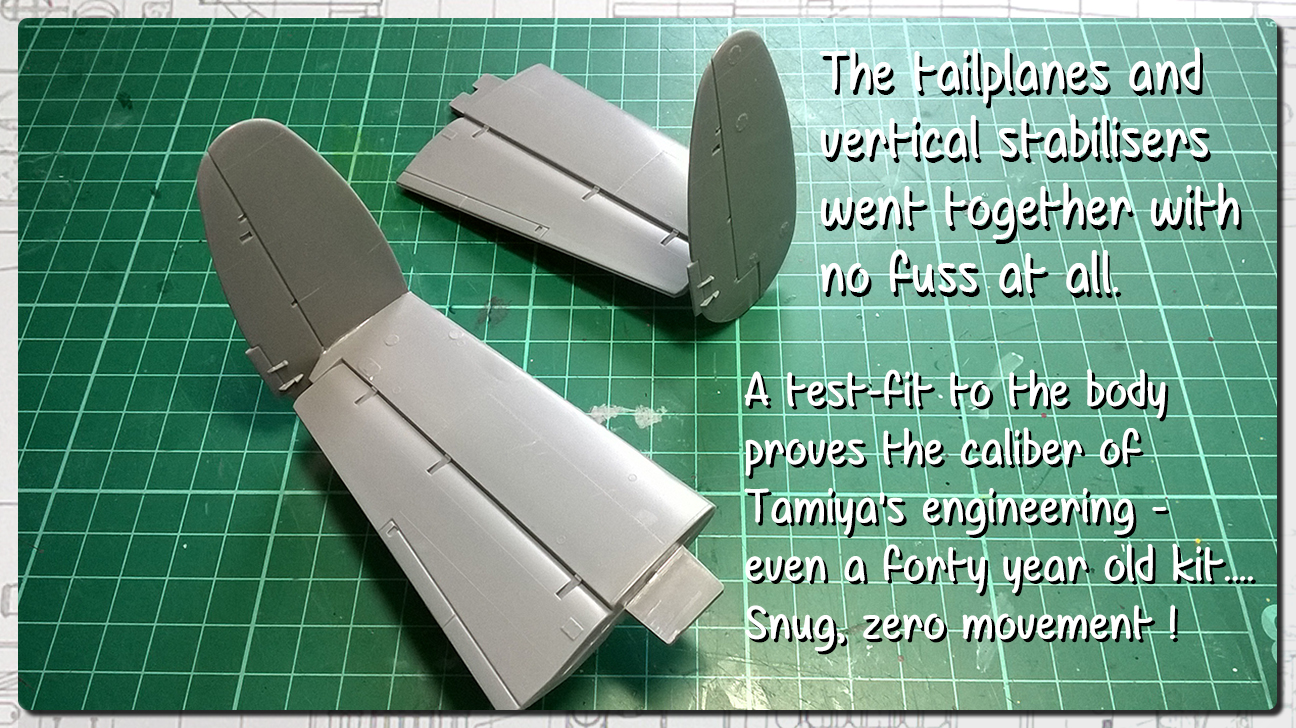
Slowly but surely getting through a lot of this structural work before we get back to trying to scratch build some more interesting bits.
KelticKnot
Joined: May 11, 2015
KitMaker: 768 posts
AeroScale: 656 posts
Posted: Thursday, May 05, 2016 - 09:38 PM UTC
Out of a mad curiosity I started wondering what the parts count for this model was........
Original kit parts - approx 220
Additional parts so far - approx 320
I've already more than doubled the part count !
Original kit parts - approx 220
Additional parts so far - approx 320
I've already more than doubled the part count !
GazzaS
#424
Joined: April 23, 2015
KitMaker: 4,648 posts
AeroScale: 1,938 posts
Posted: Friday, May 06, 2016 - 03:18 AM UTC
Hi Paul,
Nice work on those spars and formers. Drilling styrene at any time makes me nervous. I'm always afraid the bit will drift.
Gaz
Nice work on those spars and formers. Drilling styrene at any time makes me nervous. I'm always afraid the bit will drift.
Gaz

Redhand

#522
Joined: January 20, 2013
KitMaker: 1,460 posts
AeroScale: 1,443 posts
Posted: Friday, May 06, 2016 - 05:33 PM UTC
More wonderful work here Paul. What a beauty this is going to be!

KelticKnot
Joined: May 11, 2015
KitMaker: 768 posts
AeroScale: 656 posts
Posted: Friday, May 06, 2016 - 06:49 PM UTC
Quoted Text
Hi Paul, Nice work on those spars and formers. Drilling styrene at any time makes me nervous. I'm always afraid the bit will drift.
Gaz
Yes, me too. I could probably do with a slightly thinner bit. I'm using the thinnest one I currently have and there's not a lot of leeway for mistakes. Thankfully I've only ruined two or three formers but it's always on the last hole when you are getting over-confident!
*edit* oh, as a side note: I always poke a small pilot hole with a pin thats held on the other end of the pin-vise. Just have to keep it in mind that its there and not stab myself with it
Quoted Text
More wonderful work here Paul. What a beauty this is going to be!
Thanks Brian, I hope my paintwork does the interior justice after spending so much time on it. I think I'll try to slightly over-emphasise the shading to make all the detail really stand out. It would be a shame for all the detail to just blend into one mass of 'interior green'.
KelticKnot
Joined: May 11, 2015
KitMaker: 768 posts
AeroScale: 656 posts
Posted: Friday, May 06, 2016 - 08:28 PM UTC
Some more interesting bits and pieces of research coming to light this week....
I've re-read the Tirpitz related chapters of Tony Iveson's book and there was some extra, valuable info regarding the modifications made to the Lancs which carried Tallboy bombs.
Not only that but the modifications to extend the range of the bomber to an absolute maximum to reach the Tirpitz to deliver the Tallboys.
To paraphrase:
F-Fox had a major service, being re-fitted with the more powerful Merlin T-24s, with paddle blade props. Mid-upper turret and front guns removed. The flare chute and armour plating (which i assume was the pilots headrest plate) were also removed for weight. In addition, extra fuel capacity in the shape of a 250 gallon tank was installed in the fuselage.
This raises some fascinating points. (well, possibly to aircraft historians and myself anyway!)
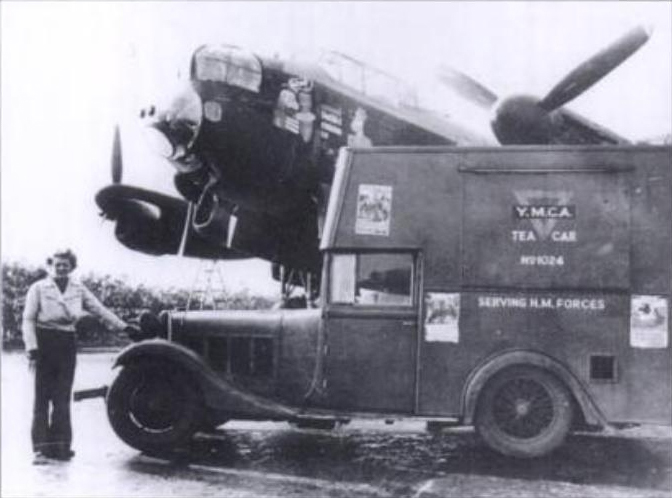
Firstly I can now say with reasonable certainty that the single photo of ME554 that I discovered earlier can definitely be linked to the period of time Tony flew her as the paddle blades are plain to see. Not only that but there seems to be good evidence that the photo captures the aircraft in her specific incarnation that I am modelling, prepped for the second or third Tirpitz raid. I hadn't noticed before but there are no guns in the front turret !
I'd like to think it's safe to assume that the guns would have been replaced after those extreme distance raids.
Here's the image to refresh the memory....
The information regarding the fuel tank was not new to me but it got me wondering. I had read somewhere that they may have been Mosquito tanks. I delved into the 617 operations book which is available online and did some digging. (I feel like someone researching their family tree) Helped by the timeline in Iveson's book I found this gem :
"15.10.44
Extensive flying programme carried out. Pilots played against Navigators in a football match.
(The training being carried out during this period was to complete the conversion of the Squadron aircraft to fly the maximum possible range. Modification involved removal of the mid-upper turrets and many other internal fittings and the addition of ex-Vickers Wellington bomber aircraft overload fuel tanks....."
Another source "Last of the Lancasters" claims that in addition to these Vickers tanks, Mosquito long range tanks were also fitted. I'm leaning towards the Vickers tanks being replacements to the Lanc's own wing tanks and the Mosquito tank was internally fitted in the fuselage. If this is so, how to possibly portray this in the model??? There would be next to zero chance of a description of such a modification, ie. where and how it was fitted in the fuselage, and less chance than that of any photographic reference ! This is a special mod in an already specially modded aircraft in an elite squadron. Of course, no-one is likely to challenge my interpretation of this detail.
Sorry for the long post ! I have some more interesting findings to share but I'll save them for another time.
Paul
I've re-read the Tirpitz related chapters of Tony Iveson's book and there was some extra, valuable info regarding the modifications made to the Lancs which carried Tallboy bombs.
Not only that but the modifications to extend the range of the bomber to an absolute maximum to reach the Tirpitz to deliver the Tallboys.
To paraphrase:
F-Fox had a major service, being re-fitted with the more powerful Merlin T-24s, with paddle blade props. Mid-upper turret and front guns removed. The flare chute and armour plating (which i assume was the pilots headrest plate) were also removed for weight. In addition, extra fuel capacity in the shape of a 250 gallon tank was installed in the fuselage.
This raises some fascinating points. (well, possibly to aircraft historians and myself anyway!)
Firstly I can now say with reasonable certainty that the single photo of ME554 that I discovered earlier can definitely be linked to the period of time Tony flew her as the paddle blades are plain to see. Not only that but there seems to be good evidence that the photo captures the aircraft in her specific incarnation that I am modelling, prepped for the second or third Tirpitz raid. I hadn't noticed before but there are no guns in the front turret !
I'd like to think it's safe to assume that the guns would have been replaced after those extreme distance raids.
Here's the image to refresh the memory....
The information regarding the fuel tank was not new to me but it got me wondering. I had read somewhere that they may have been Mosquito tanks. I delved into the 617 operations book which is available online and did some digging. (I feel like someone researching their family tree) Helped by the timeline in Iveson's book I found this gem :
"15.10.44
Extensive flying programme carried out. Pilots played against Navigators in a football match.
(The training being carried out during this period was to complete the conversion of the Squadron aircraft to fly the maximum possible range. Modification involved removal of the mid-upper turrets and many other internal fittings and the addition of ex-Vickers Wellington bomber aircraft overload fuel tanks....."
Another source "Last of the Lancasters" claims that in addition to these Vickers tanks, Mosquito long range tanks were also fitted. I'm leaning towards the Vickers tanks being replacements to the Lanc's own wing tanks and the Mosquito tank was internally fitted in the fuselage. If this is so, how to possibly portray this in the model??? There would be next to zero chance of a description of such a modification, ie. where and how it was fitted in the fuselage, and less chance than that of any photographic reference ! This is a special mod in an already specially modded aircraft in an elite squadron. Of course, no-one is likely to challenge my interpretation of this detail.
Sorry for the long post ! I have some more interesting findings to share but I'll save them for another time.
Paul
KelticKnot
Joined: May 11, 2015
KitMaker: 768 posts
AeroScale: 656 posts
Posted: Sunday, May 08, 2016 - 07:38 PM UTC
A quick informal post but worth noting a landmark moment:
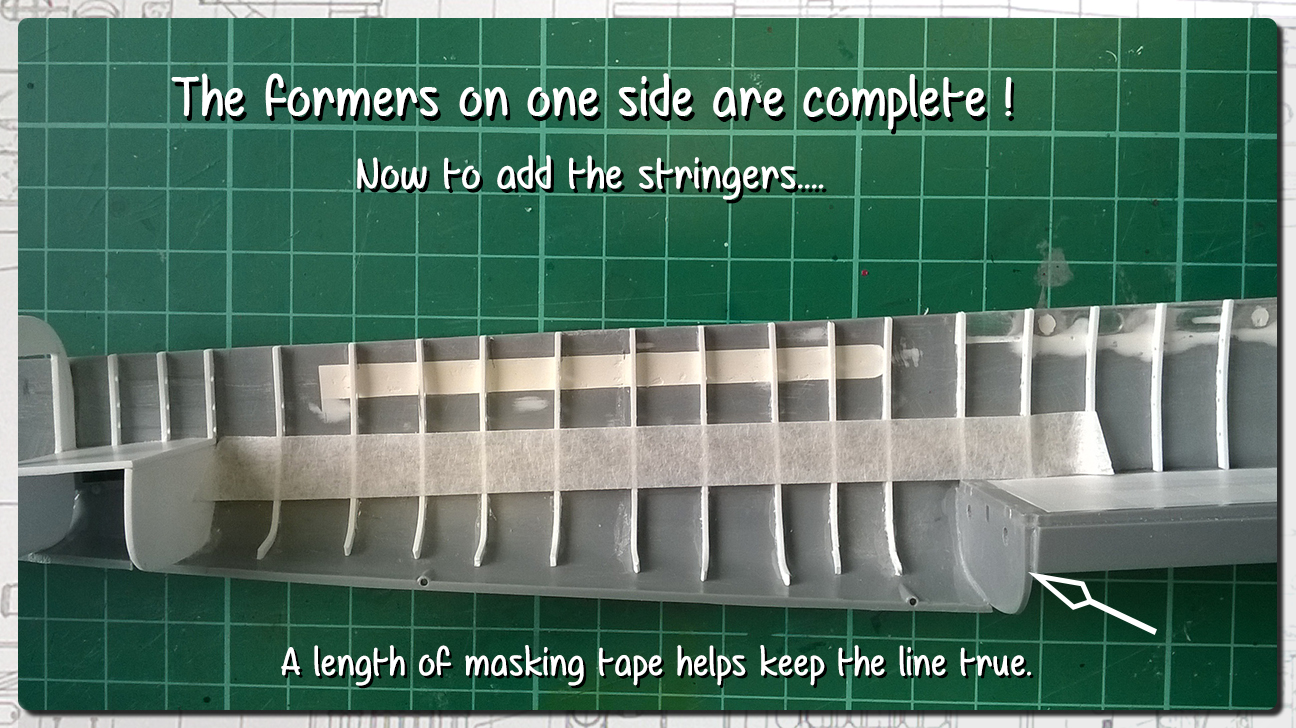
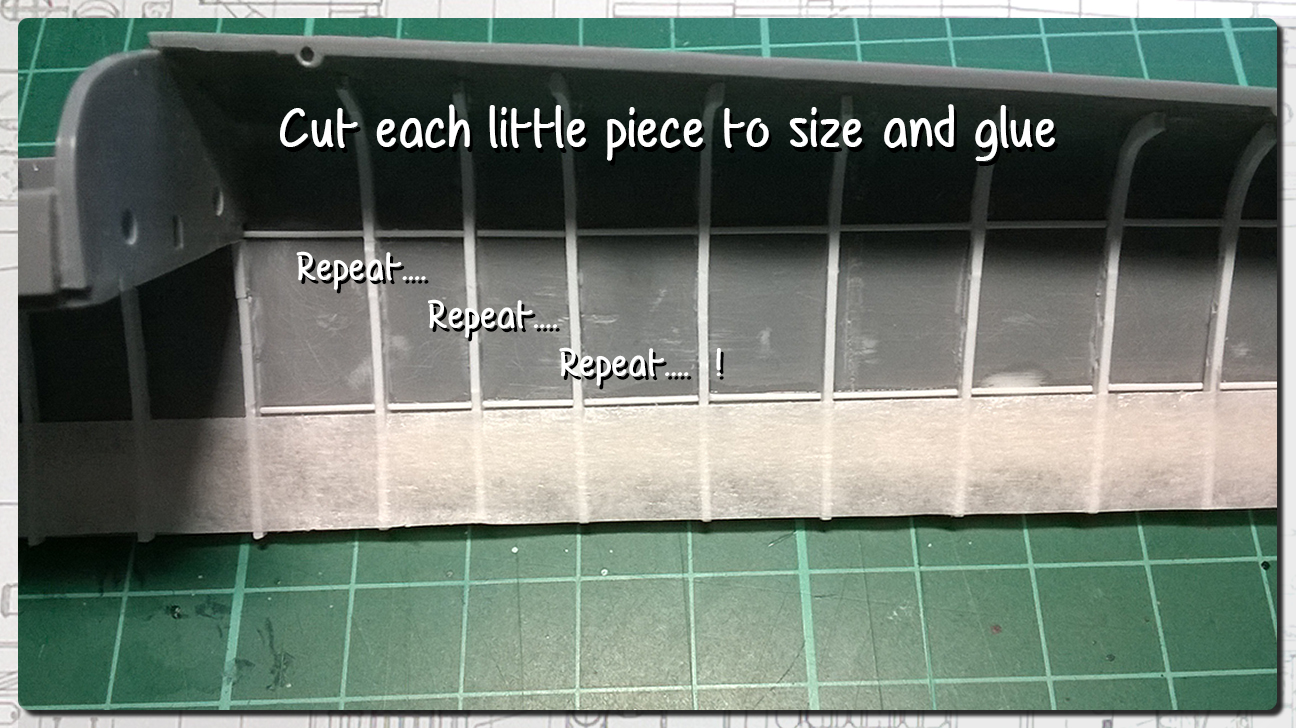
Formers and stringers for one half of the fuselage complete!
189 individually cut and glued pieces of Evergreen strip and rod. Phew !
Formers and stringers for one half of the fuselage complete!
189 individually cut and glued pieces of Evergreen strip and rod. Phew !
 |

WEB HOSTING BY


Copyright ©2021 AeroScale and Kitmaker Network, a subsidiary of Silver Star Enterprises
All Rights Reserved. Please read our Conditions of Use and Privacy Policy.
All Rights Reserved. Please read our Conditions of Use and Privacy Policy.