Building Tamiya's 1/48 Lancaster

#522
New Jersey, United States
Joined: January 20, 2013
KitMaker: 1,460 posts
AeroScale: 1,443 posts
Posted: Saturday, March 12, 2016 - 08:38 PM UTC
Quoted Text
Paul,
The level of detail can vary greatly, and time needed and spent can become a major issue. Just checkout Brian's B-17F build. He's detailing on a master level, and he's into year 3 and still not done with the interior.
Joel
Indeed.


Though my day job is more than partly to blame.

On my Workbench: 1/48 B-17F Luscious Lady (with H.G. Barnes and Karl Hauffe - Research) and with Contributions from the late Arthur T. Babiarz, Jr.
Two Special Hobby AF-2 Guardians, one AF-2W, and one AS-2S
Scotland, United Kingdom
Joined: May 11, 2015
KitMaker: 768 posts
AeroScale: 656 posts
Posted: Friday, March 18, 2016 - 12:43 AM UTC
Pax & Pallets: Revell 1/48 Dakota
Terrible Teens : Revell 1/48 F15E Strike Eagle
Airfix IV : Airfix 1.72 Vulcan
Joel_W
 Associate Editor
New York, United States
Joined: December 04, 2010
KitMaker: 11,666 posts
AeroScale: 7,410 posts
Posted: Friday, March 18, 2016 - 02:33 AM UTC
Paul,
Your scratch building skills continues to amaze me. I'll be following along quite closely.
Joel
On my Workbench:
Monogram 1/24 scale 427 Shelby Cobra
Just Completed:
Beemax 1/24 scale BMW M3 E30 1992 Evolution II
Scotland, United Kingdom
Joined: May 11, 2015
KitMaker: 768 posts
AeroScale: 656 posts
Posted: Friday, March 18, 2016 - 02:45 AM UTC
Joel, really you're too kind.
I have to admit that this build is a lot of throwing caution to the wind and attempting things I would never have had the guts to do if I hadn't been inspired by other's work since I joined up here, including your own.

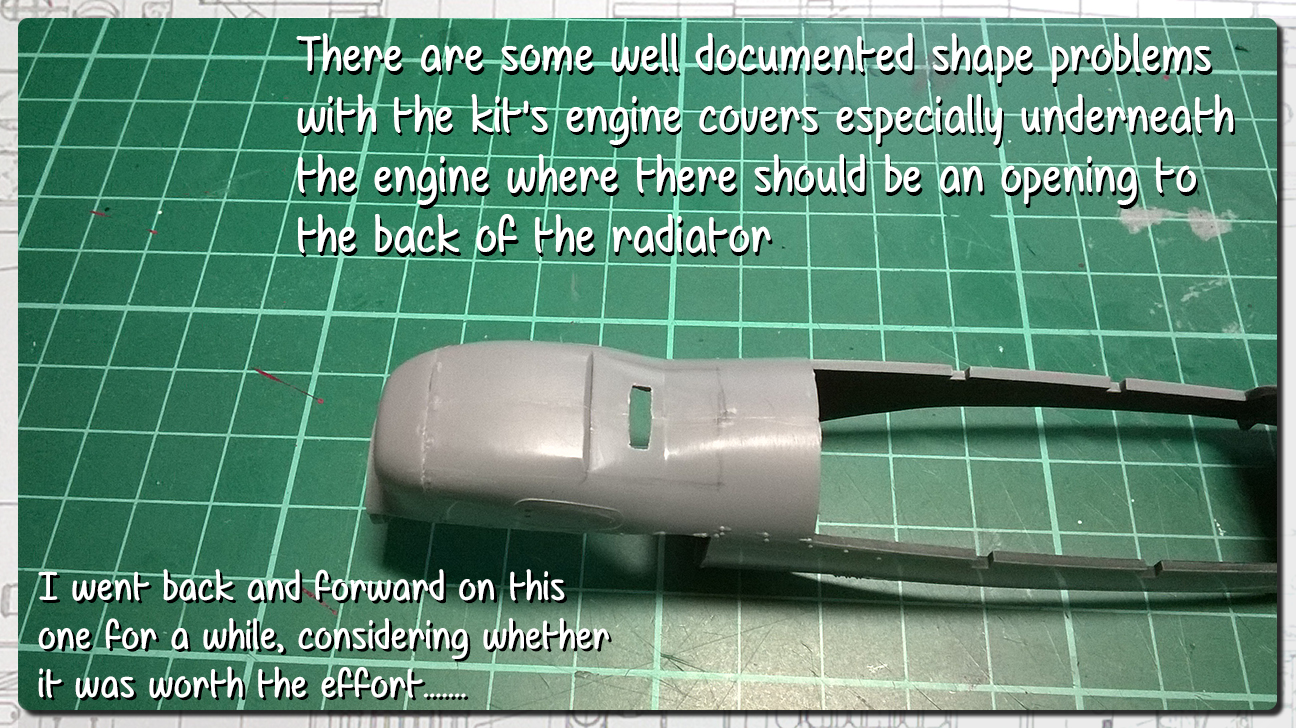
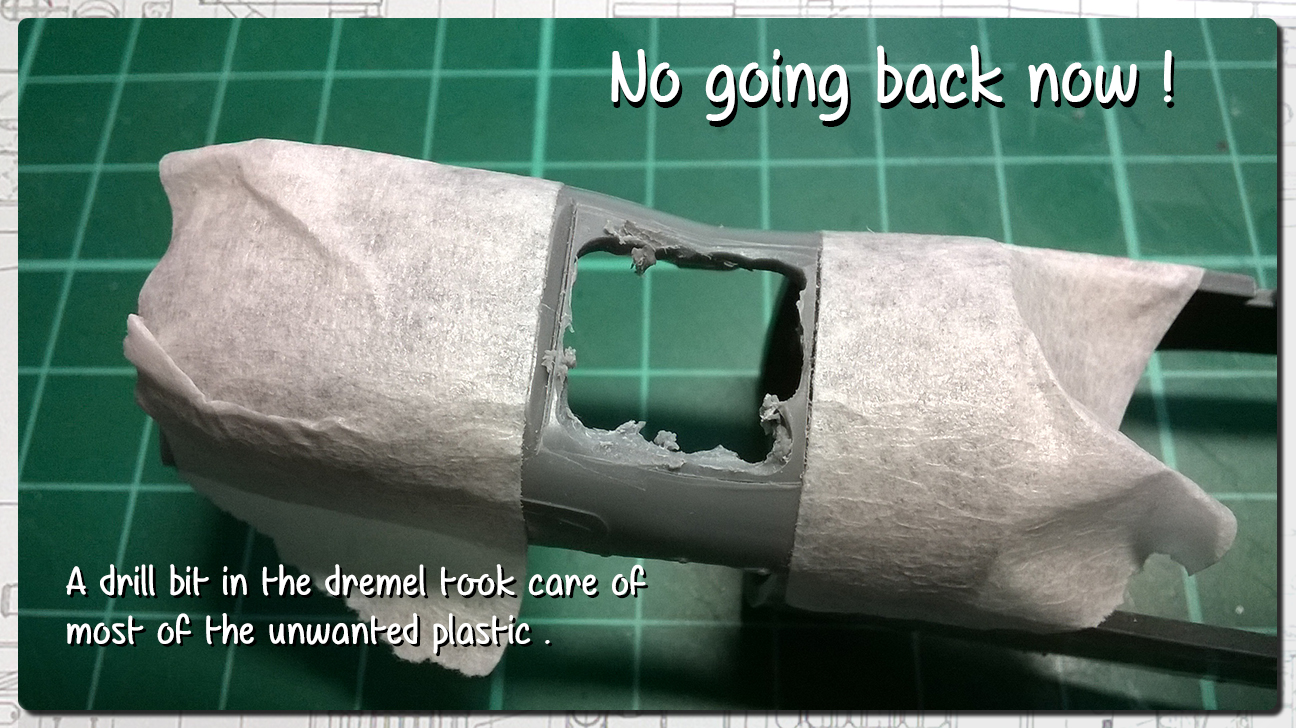
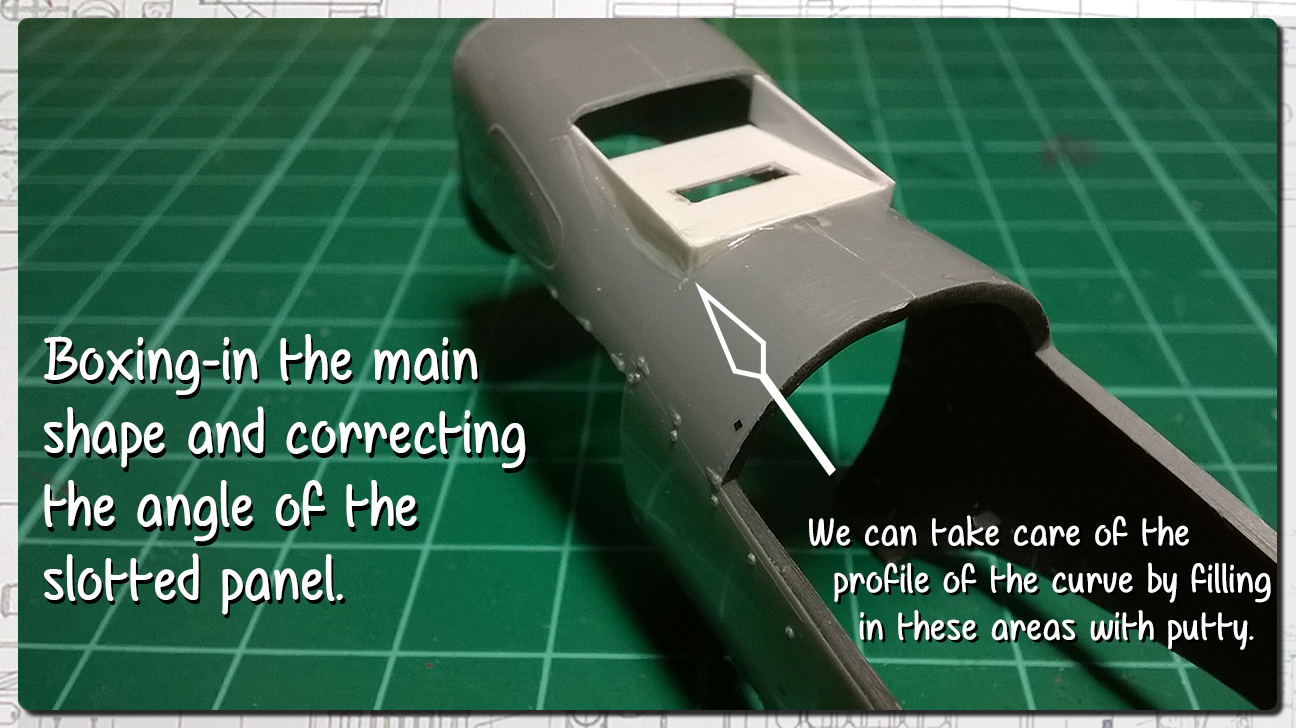
I nearly didn't go for the engine cover modification... Admittedly, I'm still nervous about building up the sides of those walls i've built to correct the shape and getting a nice curve.

Pax & Pallets: Revell 1/48 Dakota
Terrible Teens : Revell 1/48 F15E Strike Eagle
Airfix IV : Airfix 1.72 Vulcan
#424
Queensland, Australia
Joined: April 23, 2015
KitMaker: 4,648 posts
AeroScale: 1,938 posts
Posted: Friday, March 18, 2016 - 02:54 AM UTC
Paul,
Not being well versed in the Rolls and It's coverings, I'd never had known. But you will feel better about your modifications....no matter how many times you have to reshape them.
It's only by daring to make such changes that make us better modellers.
Keep on inspiring!
Gaz
"Artillery adds dignity, to what would otherwise be an ugly brawl."
Frederick The Great
Scotland, United Kingdom
Joined: May 11, 2015
KitMaker: 768 posts
AeroScale: 656 posts
Posted: Friday, March 18, 2016 - 03:47 AM UTC
Quoted Text
Not being well versed in the Rolls and It's coverings, I'd never had known. But you will feel better about your modifications....no matter how many times you have to reshape them.
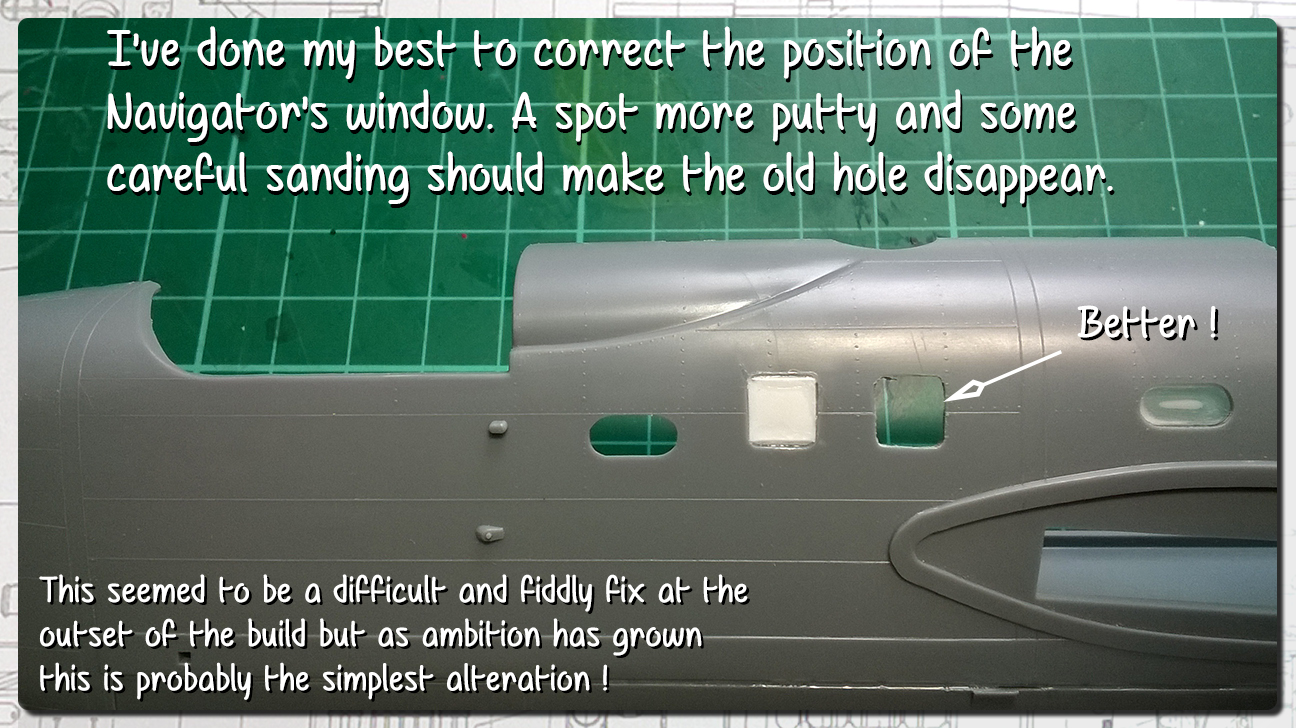
Thanks Gary, I'd have quite happily left them well alone only it's one of the biggest complaints about the kit next to the navigator's window being in the wrong place. (something else i feel needs to be tackled!). I'd have felt i wasn't doing the model justice if i didn't go that extra mile.
Pax & Pallets: Revell 1/48 Dakota
Terrible Teens : Revell 1/48 F15E Strike Eagle
Airfix IV : Airfix 1.72 Vulcan
Bayern, Germany
Joined: January 17, 2006
KitMaker: 673 posts
AeroScale: 492 posts
Posted: Saturday, March 19, 2016 - 01:20 PM UTC
Your overall work and you scratch building skills continue to impress Paul. Absolutely first class work.
Berlin, Germany
Joined: October 12, 2008
KitMaker: 709 posts
AeroScale: 651 posts
Posted: Saturday, March 19, 2016 - 02:22 PM UTC
Great Paul!
From the Lockheed campaign and your Blackbird up to now your modelling and presenting skills are steadily enhanced. Fantastic, move on
Thomas

Sometimes you need to distance yourself to see things clearly - Lao Tzu -
... in scale and in real life -T.
Scotland, United Kingdom
Joined: May 11, 2015
KitMaker: 768 posts
AeroScale: 656 posts
Posted: Saturday, March 19, 2016 - 04:57 PM UTC
Thank you both.
That Blackbird seems so long ago! It was only completed around eight months ago???
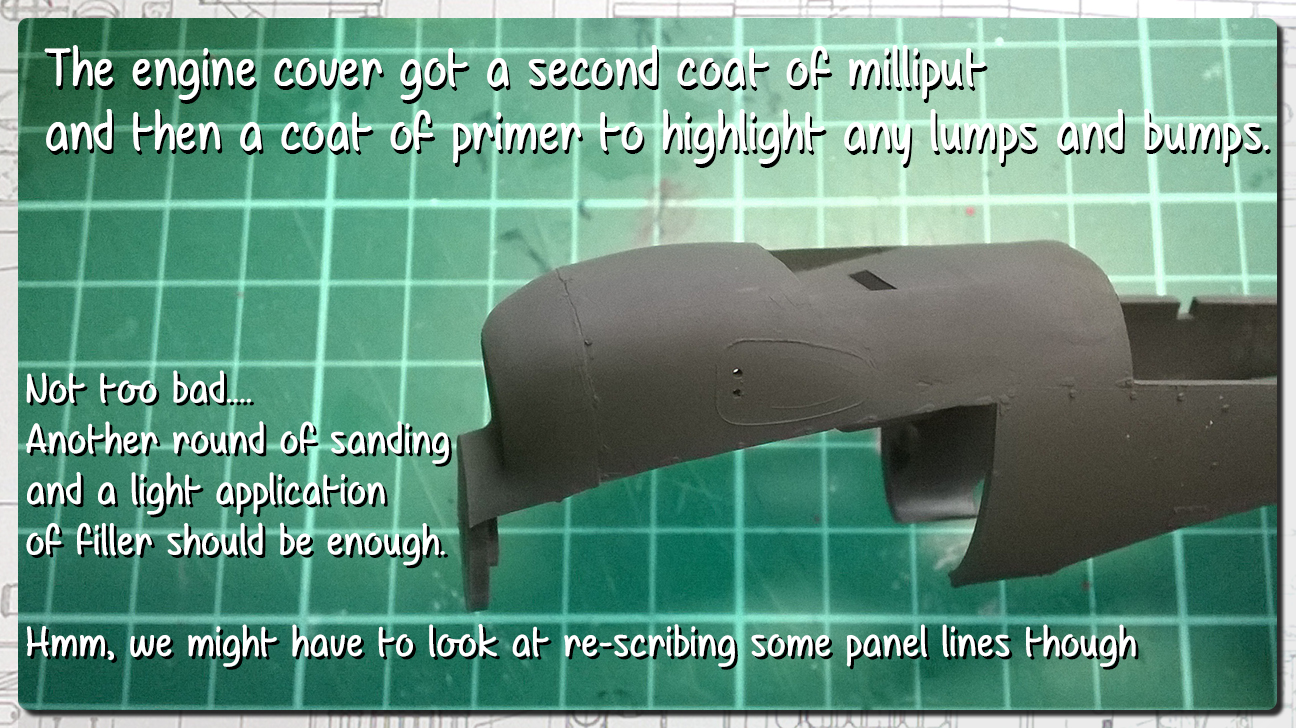
Today I got the other three engine covers altered. Just need to do the filler work to build up the sides a bit. It seems to take a long time looking at reference , thinking about how you will approach a problem and then getting the first engine done. The other three probably took an hour to do once i'd got over the initial hurdle.
Anyone care to venture what this part i've modified is called? I've been hesitating to call it an exhaust. It's more like a passive heat vent to allow air to pass through the radiator and straight out again.... ????
Pax & Pallets: Revell 1/48 Dakota
Terrible Teens : Revell 1/48 F15E Strike Eagle
Airfix IV : Airfix 1.72 Vulcan
England - East Anglia, United Kingdom
Joined: June 09, 2009
KitMaker: 670 posts
AeroScale: 175 posts
Posted: Saturday, March 19, 2016 - 06:11 PM UTC
Hi Mate, Following this build with interest as I won one of E-bay a few months ago. I didn't realise that this kit had so many glaring inaccuracies !
You have also hexed me as I`m an inveterate tinkerer so I`ll have a little tinker when I get round to starting it using your posts as a guide.
Anything Will Fit If You Use A Big Enough Hammer !!
If you produce it in Injection Moulded Plastic SOMEONE is bound to buy it !
If you want it 100% accurate - SCRATCHBUILD IT !!
Scotland, United Kingdom
Joined: May 11, 2015
KitMaker: 768 posts
AeroScale: 656 posts
Posted: Saturday, March 19, 2016 - 08:55 PM UTC
Hi Danny, glad to have you on board!
I wouldn't say the issues with the kit are glaring as such but once you learn of them it's hard not to feel the need to fix them. The navigator's window for example : You would never realise it's too far forward unless it's pointed out to you and then you look for confirmation in reference photos.
Feel free to share any interesting stuff you might find on Lancasters. I've been doing a bit of background digging on this particular aircraft and will share some history when I don't have a lot of progress to show.
Pax & Pallets: Revell 1/48 Dakota
Terrible Teens : Revell 1/48 F15E Strike Eagle
Airfix IV : Airfix 1.72 Vulcan
Scotland, United Kingdom
Joined: May 11, 2015
KitMaker: 768 posts
AeroScale: 656 posts
Posted: Tuesday, March 22, 2016 - 10:35 PM UTC
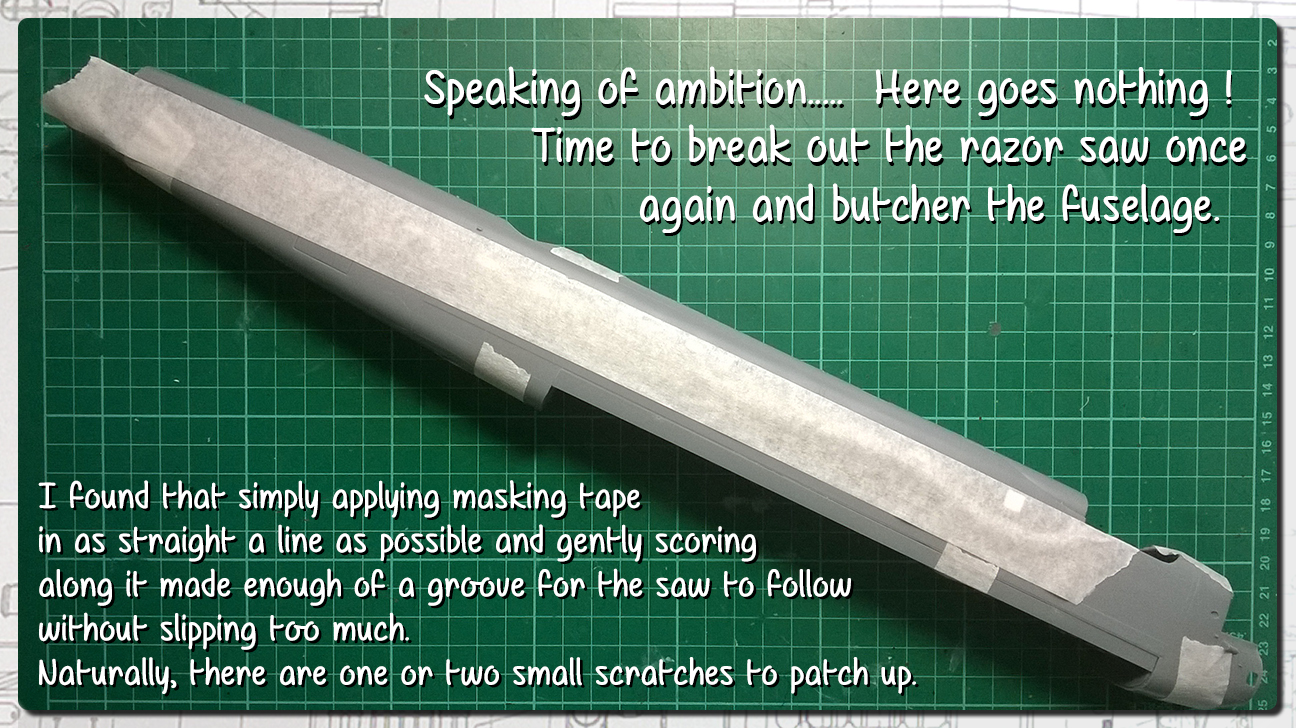
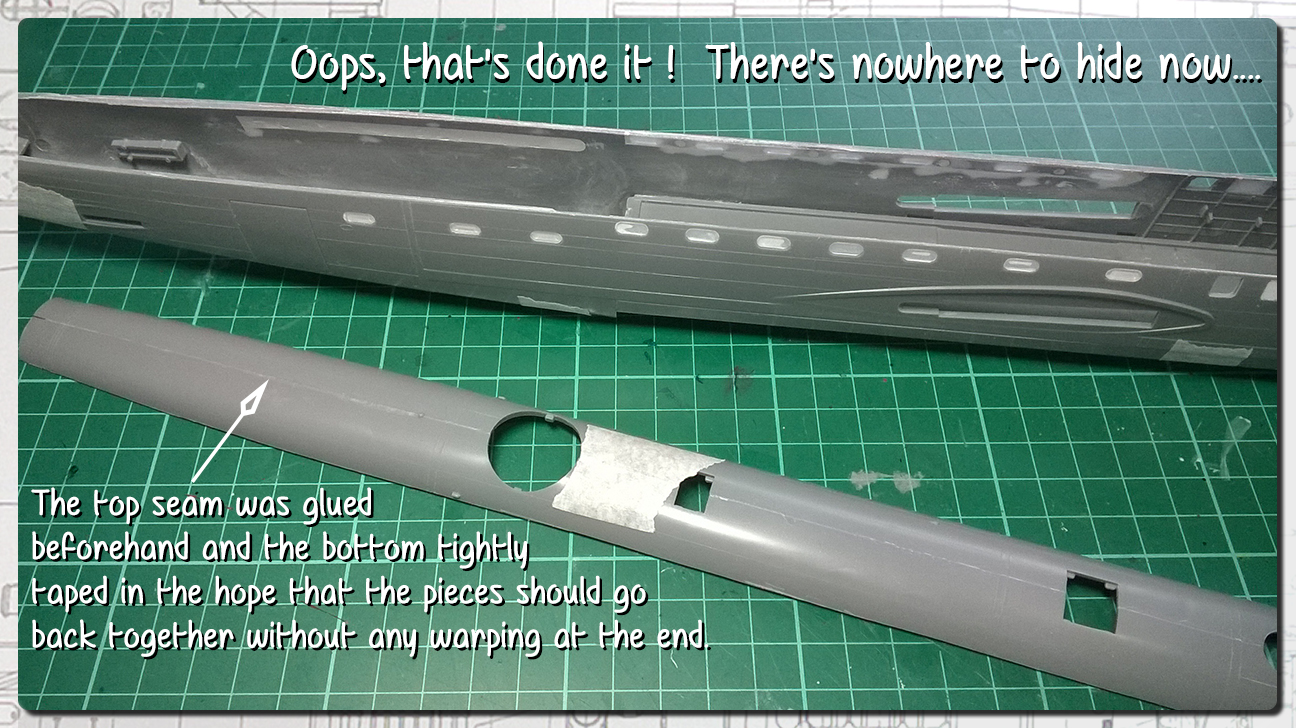
Work continues.... (Work? who am I kidding? This is great fun!)
Pax & Pallets: Revell 1/48 Dakota
Terrible Teens : Revell 1/48 F15E Strike Eagle
Airfix IV : Airfix 1.72 Vulcan
Netherlands Antilles
Joined: September 02, 2014
KitMaker: 1,977 posts
AeroScale: 295 posts
Posted: Tuesday, March 22, 2016 - 10:54 PM UTC
Hi, Paul.
Great scratch building skills. Thanks for saring your techs.
Cheers!
Gabriel
Gabriel
Many of my builds can be seen on YT in video format. Please check 'Panzergrau Models' Channel.
Scotland, United Kingdom
Joined: May 11, 2015
KitMaker: 768 posts
AeroScale: 656 posts
Posted: Thursday, March 31, 2016 - 05:25 PM UTC
Pax & Pallets: Revell 1/48 Dakota
Terrible Teens : Revell 1/48 F15E Strike Eagle
Airfix IV : Airfix 1.72 Vulcan
#522
New Jersey, United States
Joined: January 20, 2013
KitMaker: 1,460 posts
AeroScale: 1,443 posts
Posted: Thursday, March 31, 2016 - 10:27 PM UTC
Wow, just wow. Fascinating build. I am really impressed!!
On my Workbench: 1/48 B-17F Luscious Lady (with H.G. Barnes and Karl Hauffe - Research) and with Contributions from the late Arthur T. Babiarz, Jr.
Two Special Hobby AF-2 Guardians, one AF-2W, and one AS-2S
#424
Queensland, Australia
Joined: April 23, 2015
KitMaker: 4,648 posts
AeroScale: 1,938 posts
Posted: Friday, April 01, 2016 - 01:55 AM UTC
"Artillery adds dignity, to what would otherwise be an ugly brawl."
Frederick The Great
Scotland, United Kingdom
Joined: May 11, 2015
KitMaker: 768 posts
AeroScale: 656 posts
Posted: Friday, April 01, 2016 - 02:27 PM UTC
Cheers guys! It's going to get really interesting from here on I suspect.

Pax & Pallets: Revell 1/48 Dakota
Terrible Teens : Revell 1/48 F15E Strike Eagle
Airfix IV : Airfix 1.72 Vulcan
Joel_W
Associate Editor New York, United States
Joined: December 04, 2010
KitMaker: 11,666 posts
AeroScale: 7,410 posts
Posted: Friday, April 01, 2016 - 08:15 PM UTC
Paul,
I'll 3rd that.
Your scratch building skills are just 1st rate. You make the work involved look easy enough for any novice modeler to do it, yet we know that's not the case. It's the key that you're just that good.
Joel
On my Workbench:
Monogram 1/24 scale 427 Shelby Cobra
Just Completed:
Beemax 1/24 scale BMW M3 E30 1992 Evolution II
Scotland, United Kingdom
Joined: May 11, 2015
KitMaker: 768 posts
AeroScale: 656 posts
Posted: Tuesday, April 05, 2016 - 07:47 PM UTC
Pax & Pallets: Revell 1/48 Dakota
Terrible Teens : Revell 1/48 F15E Strike Eagle
Airfix IV : Airfix 1.72 Vulcan
#522
New Jersey, United States
Joined: January 20, 2013
KitMaker: 1,460 posts
AeroScale: 1,443 posts
Posted: Wednesday, April 06, 2016 - 09:03 AM UTC
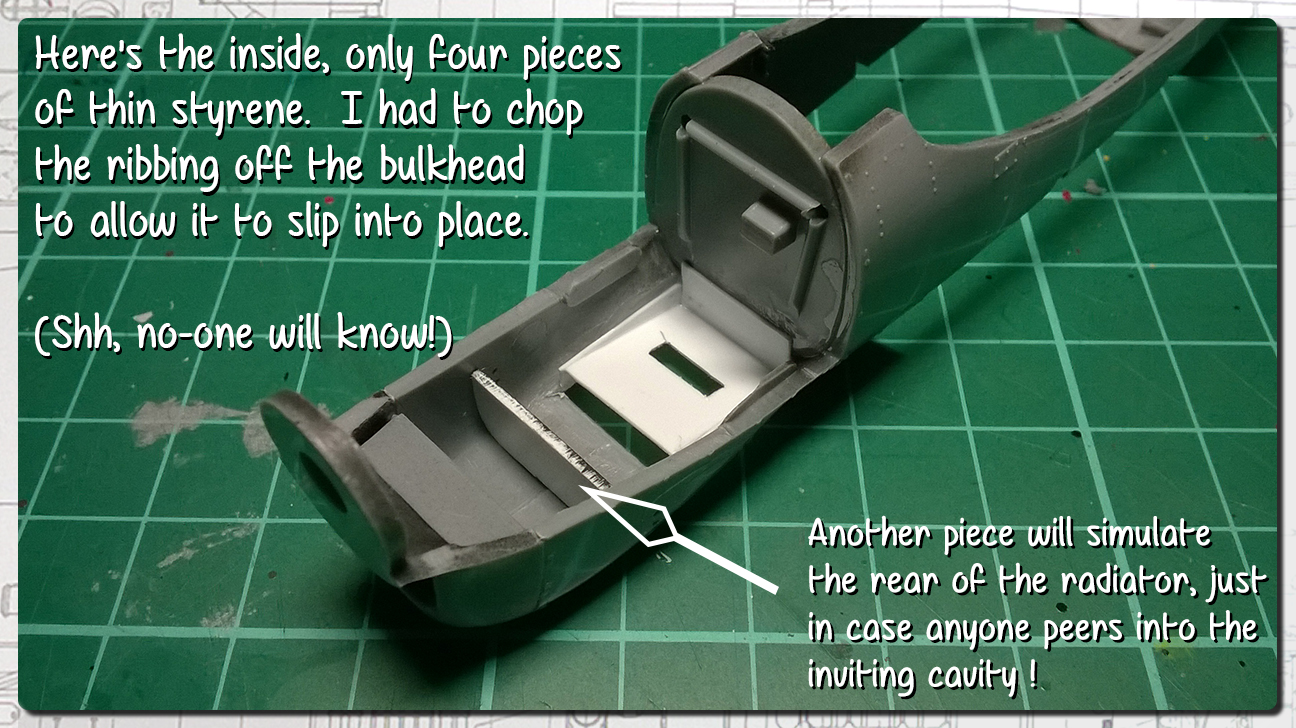
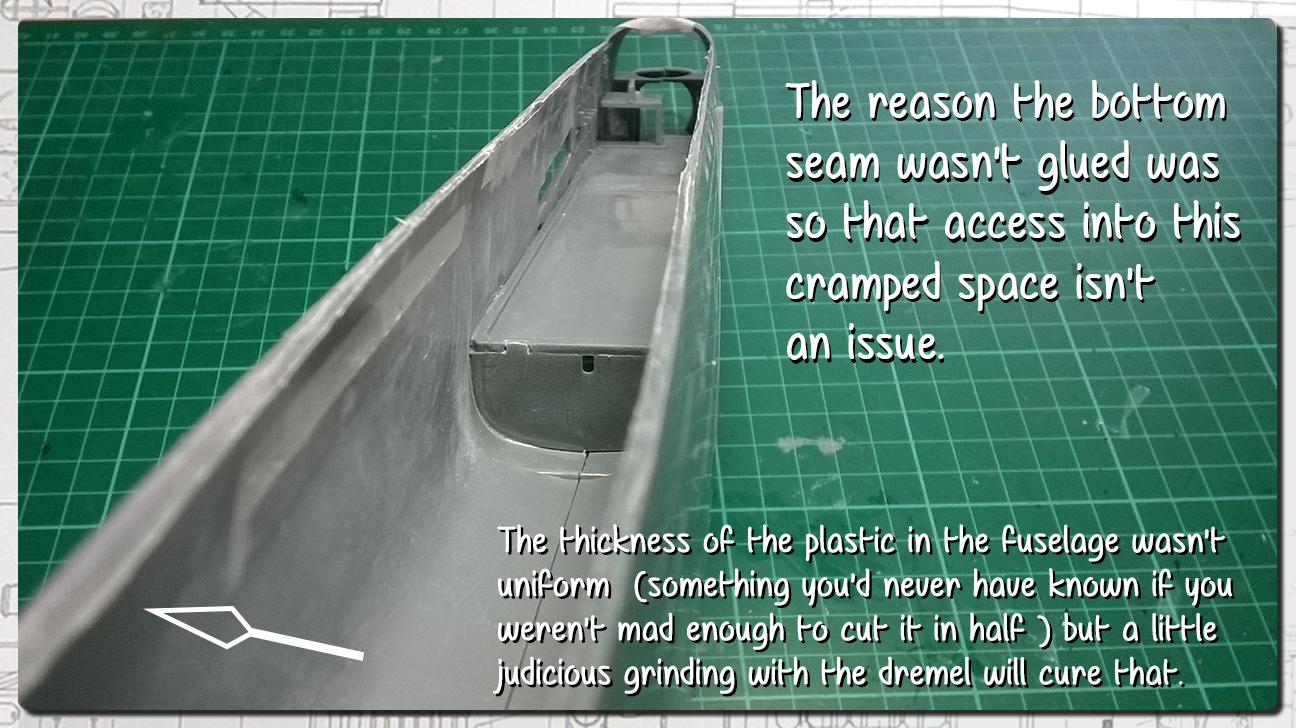
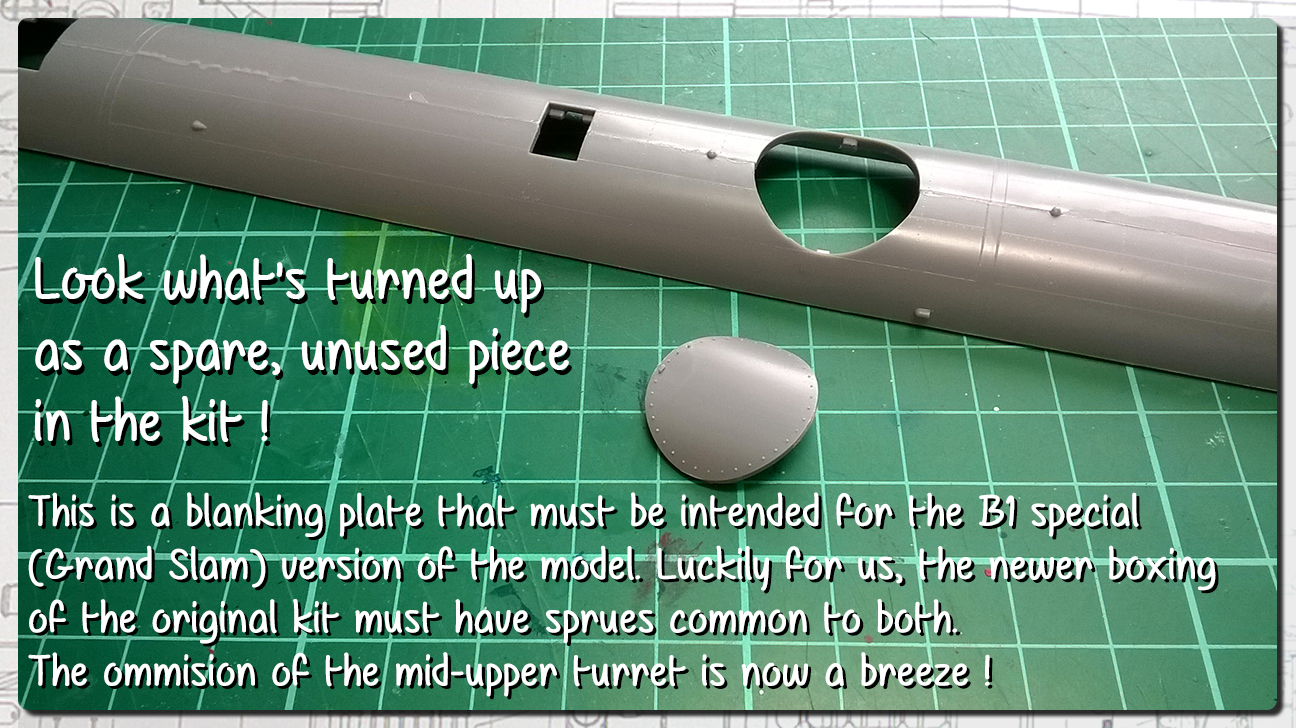
You continue to impress mightily. Love the part about discovering the top turret blank-off piece. What luck!!
On my Workbench: 1/48 B-17F Luscious Lady (with H.G. Barnes and Karl Hauffe - Research) and with Contributions from the late Arthur T. Babiarz, Jr.
Two Special Hobby AF-2 Guardians, one AF-2W, and one AS-2S
Scotland, United Kingdom
Joined: May 11, 2015
KitMaker: 768 posts
AeroScale: 656 posts
Posted: Wednesday, April 06, 2016 - 01:49 PM UTC
Thanks Brian, indeed what a find! I was looking at the piece next to it on the sprue and suddenly realisation of what it might be struck. It will certainly save a bit of time and effort.
Pax & Pallets: Revell 1/48 Dakota
Terrible Teens : Revell 1/48 F15E Strike Eagle
Airfix IV : Airfix 1.72 Vulcan
Gauteng, South Africa
Joined: July 03, 2015
KitMaker: 280 posts
AeroScale: 141 posts
Posted: Wednesday, April 06, 2016 - 05:25 PM UTC
Hi Paul
Amazing skills!! Will be following along to learn as much as I can.
Looking forward to the next installment.
Regards,
Kobus
Scotland, United Kingdom
Joined: May 11, 2015
KitMaker: 768 posts
AeroScale: 656 posts
Posted: Wednesday, April 06, 2016 - 06:38 PM UTC
Thanks Kobus, it's good to have you along. The next installment will be very soon as I'm "in the zone" and full of enthusiasm!
I'm trying to describe almost everything I'm doing as I'm learning as I go too. We all have different approaches and techniques so it's great to be able to share ideas.
Pax & Pallets: Revell 1/48 Dakota
Terrible Teens : Revell 1/48 F15E Strike Eagle
Airfix IV : Airfix 1.72 Vulcan
Scotland, United Kingdom
Joined: May 11, 2015
KitMaker: 768 posts
AeroScale: 656 posts
Posted: Thursday, April 07, 2016 - 01:06 PM UTC
Pax & Pallets: Revell 1/48 Dakota
Terrible Teens : Revell 1/48 F15E Strike Eagle
Airfix IV : Airfix 1.72 Vulcan
#424
Queensland, Australia
Joined: April 23, 2015
KitMaker: 4,648 posts
AeroScale: 1,938 posts
Posted: Thursday, April 07, 2016 - 02:08 PM UTC
"Artillery adds dignity, to what would otherwise be an ugly brawl."
Frederick The Great