

General Aircraft
This forum is for general aircraft modelling discussions.
This forum is for general aircraft modelling discussions.
Hosted by Jim Starkweather
Hucks type starter truck build

rdt1953

Joined: February 06, 2015
KitMaker: 1,098 posts
AeroScale: 900 posts
Posted: Saturday, January 23, 2016 - 12:07 AM UTC
Hi everyone - I am embarkining on a 1/48 Hucks type starter truck using Hasegawa's Isuzu fuel truck as a starting point.I am starting to gather info for this so my question is- Is this an appropriate topic for Aeroscale or should I post on Armorama? Thanks -Richard
Grauwolf

#084

Joined: September 14, 2005
KitMaker: 2,485 posts
AeroScale: 95 posts

Posted: Saturday, January 23, 2016 - 12:40 AM UTC
Hi Richard,
I think it is quite appropriate to post the build here as this
vehicle pertains to aircraft.
Would also be nice to see it in a diorama with an aircraft and
some service personnel.
May I suggest that you look at the RPM Ford model T as a basis
for this conversions.
The wheels and front hood and frame seem to be more appropriate
for the Hucks conversion than the Isuzu, there will be alot less work.
Look at this illustration:
http://www.ipmsusa3.org/gallery/d/290626-1/Ford_Model_T_Ambulance_M1917_RPM_48002_48th.jpg
Just my suggestion
Cheers,
Joe
rdt1953
Joined: February 06, 2015
KitMaker: 1,098 posts
AeroScale: 900 posts
Posted: Saturday, January 23, 2016 - 01:36 AM UTC
Joe - thanks for the reply-some one ( in Canada , I believe , ) has built a real Ford T based starter truck and you can see a video of it on You Tube starting an aircraft. As this is for my WW II Japanese aircraft I am going to stick with the Isuzu. I have managed to source several photos via the Internet of Japanese starter trucks - some Isuzu,some Toyota - but there are various details here and there missing or unclear so I am hoping the modeling community can clear these up. Am I the only one who finds it odd that Tamigawa has not kitted one of these yet ? Richard
Grauwolf
#084
Joined: September 14, 2005
KitMaker: 2,485 posts
AeroScale: 95 posts
Posted: Saturday, January 23, 2016 - 02:29 AM UTC
Hi Richard,
Ok....I see...it's a starter truck for Japanese aircraft...
misunderstood the original post...though you wanted to do the
the 20s - 30's Hucks truck.
This what you meant:
http://i20.photobucket.com/albums/b212/Capitanstratos/StarterTruck-ToyotaGB.jpg
Looks to be pretty straight forward conversion.
Here is a link to a build of the Hasegawa 1:72 version...
you can use it a guide.
http://www.collectiondx.com/toy_review/starter_truck_toyota_gb
Cheers,
Joe
rdt1953
Joined: February 06, 2015
KitMaker: 1,098 posts
AeroScale: 900 posts
Posted: Saturday, January 23, 2016 - 03:06 AM UTC
Joe - Now we're on the same page so to speak - ha-ha! Thanks for the response and links. With my daughter's help I will post links to the pictures I have so far- I am new at this blog business . I am in the process of drawing up details by pro portioning the components in photos to wheelbase of vehicle as a means of scale. Do you think General Aircraft is the appropriate forum for this blog or should I shift to WW II ? Also, I should clarify my comment about my surprise at the lack of this vehicle being kitted by the big boys by stating 1/48 scale. I am aware of the Hasegawa 1/72 Toyota. I should think that a 1/48 scale offering would be a big seller. Thanks again - Richard
Grauwolf
#084
Joined: September 14, 2005
KitMaker: 2,485 posts
AeroScale: 95 posts
Posted: Saturday, January 23, 2016 - 04:26 AM UTC
Hi Richard,
General aircraft for the blog is fine for me.
And I can't agree more about a 1:48 scale version after all
1:48 aircraft and accessories are a big parts of the game.
Maybe the aftermarket guys should at least offer a conversion.
And of course, there is always scratch building, as you are
doing.
Looking forward to some photos of your build.
Cheers,
Joe
rdt1953
Joined: February 06, 2015
KitMaker: 1,098 posts
AeroScale: 900 posts
Posted: Sunday, January 24, 2016 - 06:44 PM UTC
Hi everyone - My IJA ground crew are getting tired of hand propping the Nate & Oscar so I am starting a kit mod of Hasegawa's 1/48 Isuzu fuel truck to represent a Hucks type starter truck. I am in need of clear photos showing the details at the top of quadrapod mast/chain case area . There is a triangulated truss/boom arrangement mounted here to raise/lower the driveshaft of the starter mechanism. Any leads or links to photos of this area would be appreciated. I have many pics of the Hasegawa 1/72 Toyota Hucks kit so more of these won't be needed. Thanks in advance for any help. Richard

Jessie_C

Joined: September 03, 2009
KitMaker: 6,965 posts
AeroScale: 6,247 posts

Posted: Sunday, January 24, 2016 - 09:29 PM UTC
Quoted Text
Joe - thanks for the reply-some one ( in Canada , I believe , ) has built a real Ford T based starter truck and you can see a video of it on You Tube starting an aircraft.
That would be this one.
This Video is the Shuttleworth Collection's Hucks starting a Hawker Hind:
Here's the Vintage Wings starter in action:
The "Someone" is Chris Hadfield's dad.
rdt1953
Joined: February 06, 2015
KitMaker: 1,098 posts
AeroScale: 900 posts
Posted: Thursday, February 04, 2016 - 02:33 AM UTC
Jessica - That would be the one ! Apparently you know the people involved with creating this early Ford T based starter truck. I'm envious - if only it was a WW 2 era Japanese type. Thanks for posting this . I'll be starting build log just as soon as learn how to upload / post photos. Richard
rdt1953
Joined: February 06, 2015
KitMaker: 1,098 posts
AeroScale: 900 posts
Posted: Saturday, February 06, 2016 - 04:58 AM UTC
Hi to all - I am trying to get this build log started but due largely to my inexperience I am having difficulty posting pictures. I have managed to get the pictures uploaded to " My Photos " but how do I get them to this forum ? When I click on the "upload photos " immediately below the ready to reply bar I get a message " The category you chose can't contain photos ". Any help would be appreciated - Thanks - Richard
Jessie_C
Joined: September 03, 2009
KitMaker: 6,965 posts
AeroScale: 6,247 posts
Posted: Saturday, February 06, 2016 - 07:24 AM UTC
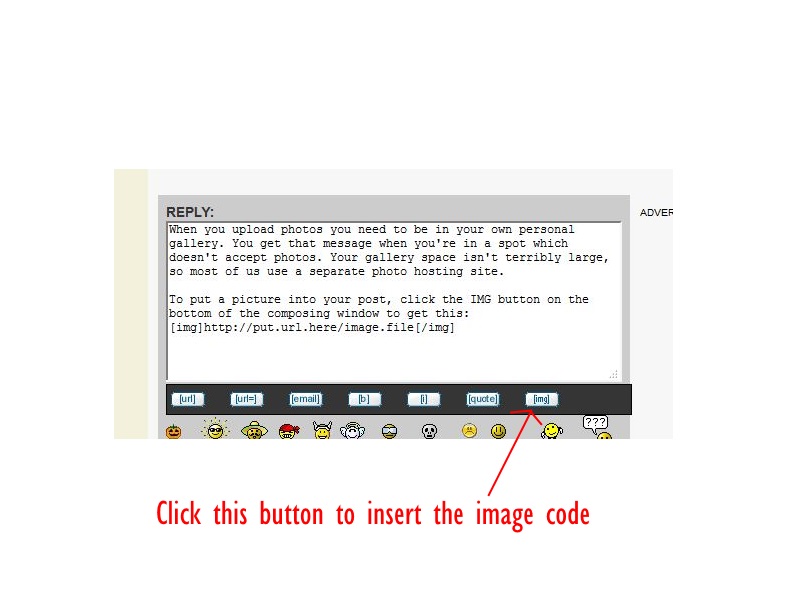
When you upload photos you need to be in your own personal gallery. You get that message when you're in a spot which doesn't accept photos. Your gallery space isn't terribly large, so most of us use a separate photo hosting site such as Photobucket or Flickr.
To put a picture into your post, click the IMG button on the bottom of the composing window. Paste your photo's URL in between the square bracket IMG taqs. When you're finished, your picture will appear like this one.
To put a picture into your post, click the IMG button on the bottom of the composing window. Paste your photo's URL in between the square bracket IMG taqs. When you're finished, your picture will appear like this one.
rdt1953
Joined: February 06, 2015
KitMaker: 1,098 posts
AeroScale: 900 posts
Posted: Saturday, February 06, 2016 - 07:05 PM UTC
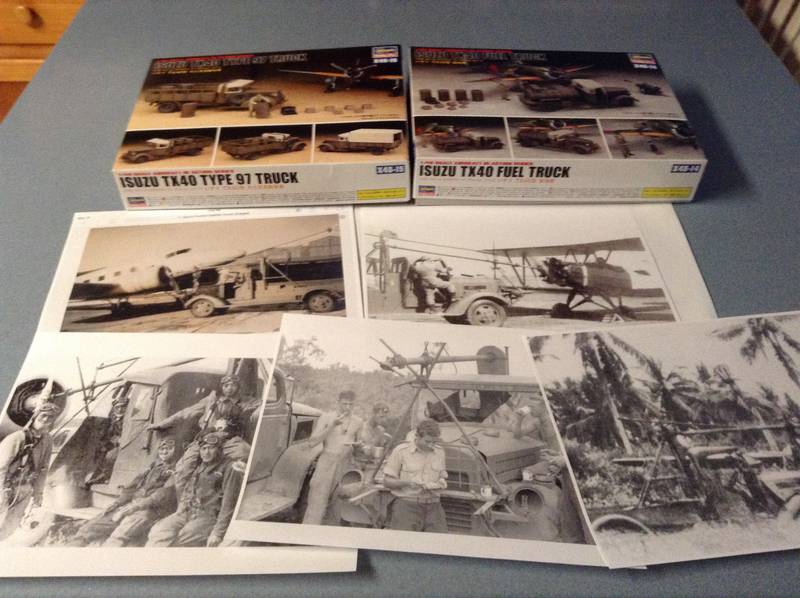
Hi to all - As this is my first attempt at a build log I am posting this photo as a trial.As can be seen I am combing parts from both Hasegawa Isuzu truck kits along with some scratch building as well.I have gathered what images I could find on the net and printed a few to work from. If I am succesful more will follow shortly. Thanks to Jessica for helping this caveman with computer skills - Richard [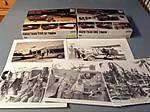 ]
]
] Jessie_C
Joined: September 03, 2009
KitMaker: 6,965 posts
AeroScale: 6,247 posts
Posted: Saturday, February 06, 2016 - 07:36 PM UTC
Another trick which makes your pictures show up larger is to edit out the "/thumbs" portion of the URL. You also don't need to click the "URL=" button either. The code you used there goes like (Imagine that there are square brackets around the tags)
When all you really need is
img http://gallery3.kitmaker.net/data/500/image933.jpg /img
Which gives you this:
Quoted Text
url=http://gallery3.kitmaker.net/showphoto.php/photo/438594 img http://gallery3.kitmaker.net/data/500/thumbs/image933.jpg/img /url
When all you really need is
img http://gallery3.kitmaker.net/data/500/image933.jpg /img
Which gives you this:
rdt1953
Joined: February 06, 2015
KitMaker: 1,098 posts
AeroScale: 900 posts
Posted: Sunday, February 07, 2016 - 12:02 AM UTC
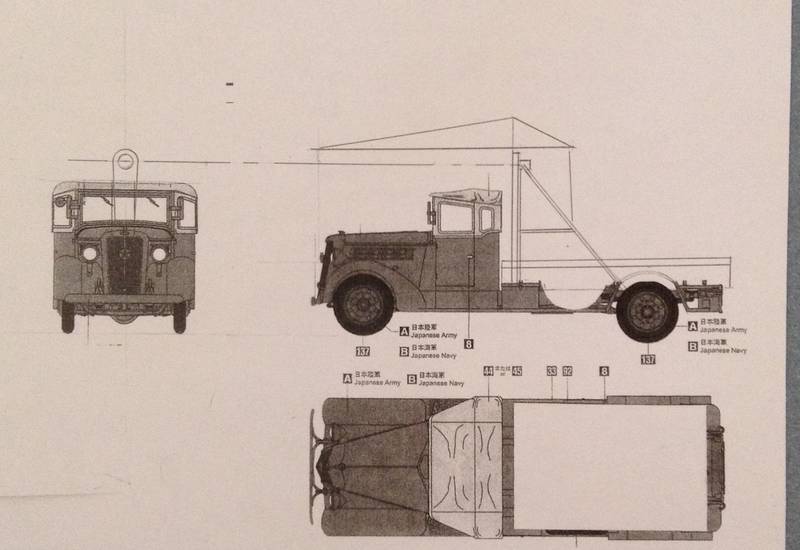
First off more thanks to Jessica are in order for her assistance in this photo posting stuff. After studying the available images I marked up a copy of the kit 3 view drawings to try to pin down the proportions of the major components. Most images seem to be of Toyota trucks but I used the diameter of the wheel rims as the unit of measure on the assumption that they would be the same on the Isuzu. At this point I should state that a great deal of the detail on this build will be conjecture as reference seems to be pretty scarce or at least beyond my ability and/or willingness to find it. At any rate , using the rim diameter I established ratios to the height of the mast , height of chain case, length of booms etc. Fortunately one image - although very grainy - was a nearly perpendicular side view that allowed this. Next up will be a breakdown of mods. -Richard [ ]
]
] rdt1953
Joined: February 06, 2015
KitMaker: 1,098 posts
AeroScale: 900 posts
Posted: Sunday, February 07, 2016 - 12:05 AM UTC
Ha - looks like I need to try the photo thing again ]
] Jessie_C
Joined: September 03, 2009
KitMaker: 6,965 posts
AeroScale: 6,247 posts
Posted: Sunday, February 07, 2016 - 10:12 AM UTC
Quoted Text
Ha - looks like I need to try the photo thing again {url=http://gallery3.kitmaker.net/showphoto.php/photo/438633}{img}http://gallery3.kitmaker.net/data/image935.jpg{/img}{/url}}
Something's still giving you the URL= tags there, which is too much for the posting software to cope. All you need for a picture is the {img} {/img} tags surrounding the image's URL.
rdt1953
Joined: February 06, 2015
KitMaker: 1,098 posts
AeroScale: 900 posts
Posted: Sunday, February 07, 2016 - 04:24 PM UTC
Thanks again - I apparently did not edit the url code completely
rdt1953
Joined: February 06, 2015
KitMaker: 1,098 posts
AeroScale: 900 posts
Posted: Wednesday, February 10, 2016 - 04:38 AM UTC
This is a test to see if I have this photo posting thing figured out yet. Thanks everyone for their patience
Jessie_C
Joined: September 03, 2009
KitMaker: 6,965 posts
AeroScale: 6,247 posts
Posted: Wednesday, February 10, 2016 - 05:24 AM UTC
Quoted Text
This is a test to see if I have this photo posting thing figured out yet. Thanks everyone for their patience
I'm really not certain why that's not displaying for me; the code looks perfectly correct. Did you perhaps set your gallery to 'private' or something?
rdt1953
Joined: February 06, 2015
KitMaker: 1,098 posts
AeroScale: 900 posts
Posted: Wednesday, February 10, 2016 - 06:30 AM UTC
Jessica- I'm clueless - the image looks fine on my i pad and desk top but I had my brother in law check and he has nothing just like you. I have not changed any of my settings to my knowledge nor could I find settings control on gallery page- ??? Hopefully my modeling skills exceed my computer skills
Jessie_C
Joined: September 03, 2009
KitMaker: 6,965 posts
AeroScale: 6,247 posts
Posted: Wednesday, February 10, 2016 - 07:21 AM UTC
I'm going to try an experiment.

Okay, that didn't work for me either. Perhaps there's something going wonky in the forum software. I'm going to alert Staff_jim and see what he says about it.
Okay, that didn't work for me either. Perhaps there's something going wonky in the forum software. I'm going to alert Staff_jim and see what he says about it.

staff_Jim
Joined: December 15, 2001
KitMaker: 12,571 posts
AeroScale: 510 posts

Posted: Wednesday, February 10, 2016 - 11:16 PM UTC
Nope... he was just missing a slash.
http:/
vs.
http://
Cheers,
Jim
http:/
vs.
http://
Cheers,
Jim
rdt1953
Joined: February 06, 2015
KitMaker: 1,098 posts
AeroScale: 900 posts
Posted: Thursday, February 11, 2016 - 05:27 PM UTC
Thanks - my bad - let's try this yet again
rdt1953
Joined: February 06, 2015
KitMaker: 1,098 posts
AeroScale: 900 posts
Posted: Friday, February 12, 2016 - 07:51 AM UTC
Looking at the various images I was able to obtain I came up with a number of things on the Hasegawa Isuzu trucks that will need modification. These kits both feature dual wheels on the rear axle but all of the photos show single rear wheels on starter trucks. Unfortunately I could not find any photos showing a clear rear view to determine if they used a wider axle for single wheel arrangement or if they simply left the outboard wheels off. I found images of civilian Toyota ( was it Toyoda back then ? ) trucks of this vintage that seem to support both. If the Hasegawa 1/72 Toyota starter truck is accurate then the single rear wheels have the same track as the front and thus require a wider axle. I elected to widen the rear axle because I felt it looked right. I drilled into each end of the axle with a pinvise thru to the differential then cut off the ends outboard of the shackles just behind the boss for the brake drums. I took brass tubing the same diameter as the axles and cut two spacers to make up the difference. All was assembled with brass rod and CA/ baking soda. 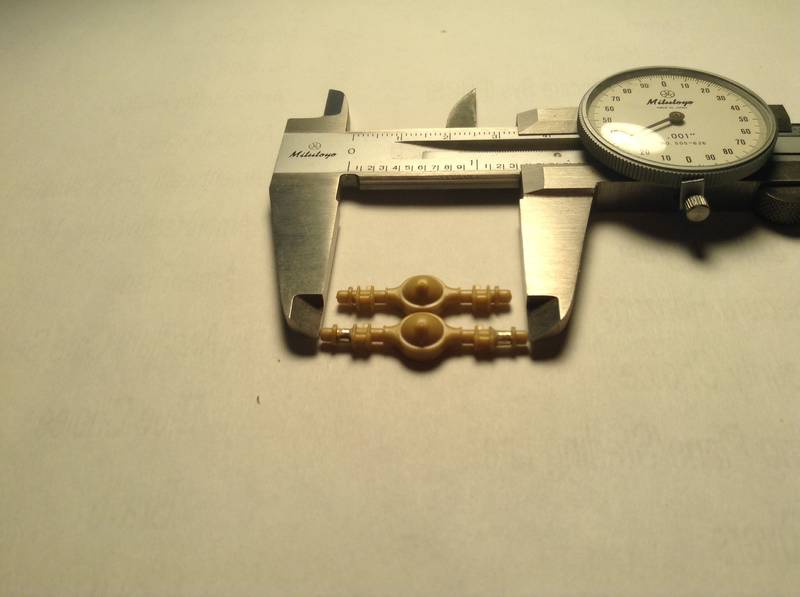
rdt1953
Joined: February 06, 2015
KitMaker: 1,098 posts
AeroScale: 900 posts
Posted: Friday, February 12, 2016 - 08:55 AM UTC
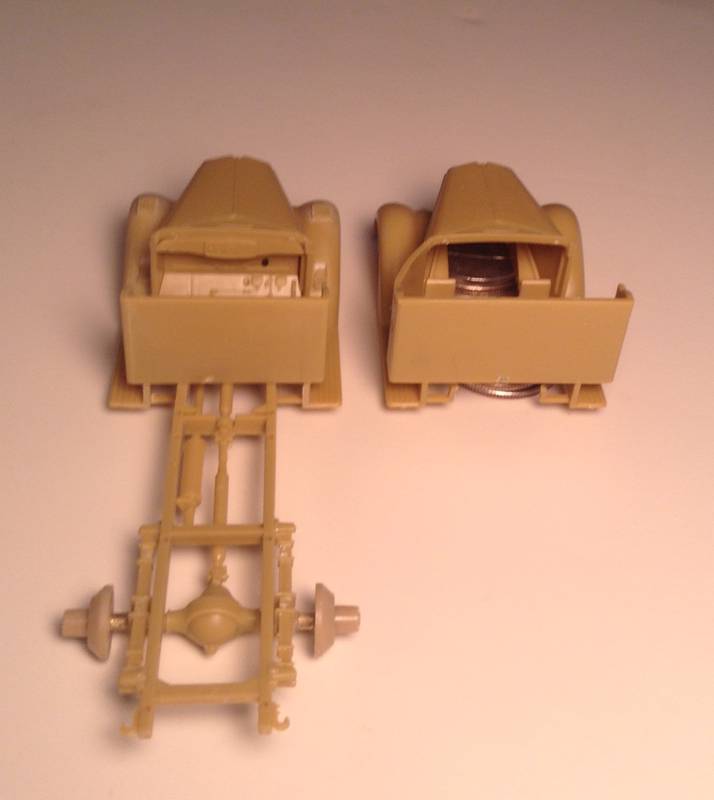
The next modification concerns the cab. Photos indicate these starter tucks had narrower simple cab arrangements with no doors. The kits come with one door off and one molded closed- I cut away the hood and closed door and sectioned the cab back and seating area to produce a width just wider than the splash aprons on the running boards. I also produced rectangular openings in the back of the fenders for the recesssed steps. The fuel truck came with a treadplate platform behind the tank so I cut the step pads for the fenders from this. I include an unmodified cab for comparison. All comments welcome and thanks for looking. 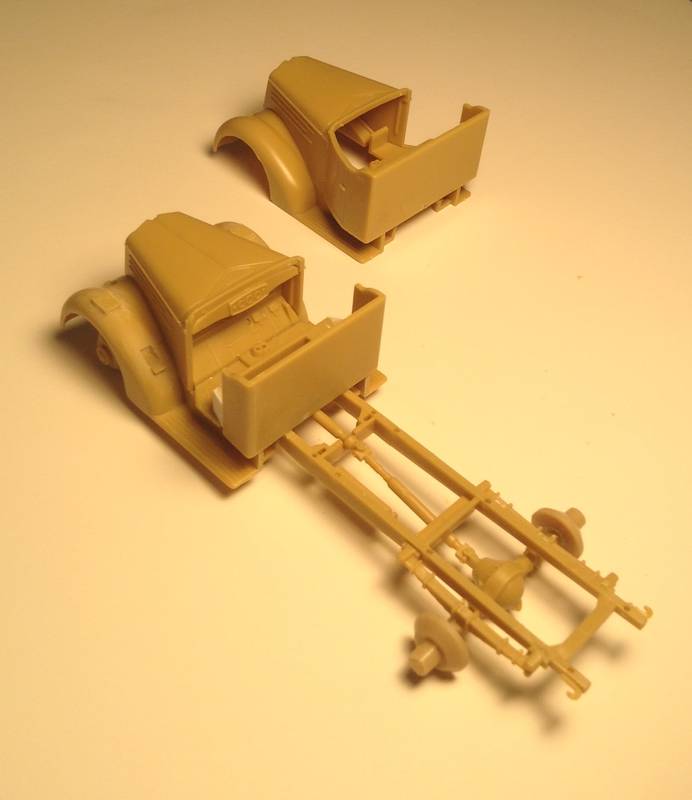
 |

WEB HOSTING BY


Copyright ©2021 AeroScale and Kitmaker Network, a subsidiary of Silver Star Enterprises
All Rights Reserved. Please read our Conditions of Use and Privacy Policy.
All Rights Reserved. Please read our Conditions of Use and Privacy Policy.